Though most of the PC gamers use traditional tools, a keyboard and mouse to play games. But some games are better with a controller. You could spend some dollars on a PC controller, but why waste money when you already have an Xbox 360 controller. Yes, you can connect and use an Xbox controller on any computer. Where installing a wired device is simple, just hook up the wire and drivers starts installing automatically. But connecting a Wireless Xbox 360 controller requires a little more. Here is how to connect a Wireless Xbox controller to a Windows or Mac computer.

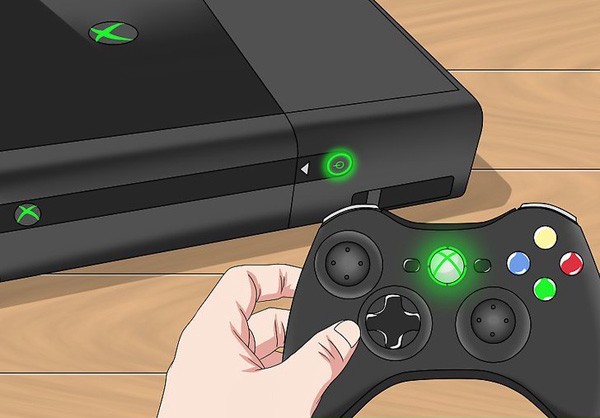
How to Setup a wireless Xbox controller on Xbox 360
1. Ensure that your Xbox console is connected to a power source.
2. Now, press the ?Power? button and turn it on. The power button is on the console?s front on the right side.
3. Take your wireless controller.
4. Press & hold down the ?Guide? (Xbox logo) button.
5. Release the button when it starts flashing.
6. On your console, press the ?Connection? (next to >>> icon) button. You?ll see the light start circling on the power button.
7. Now, within 20 seconds press the ?Connection? button of your controller.
8. Wait for the devices to get connected.
When the controller?s Guide (logo) button light turns constant, and power button light on controller stop circling, it means they are connected.
How to Setup a wireless Xbox controller on Windows
To use Wireless Xbox controller on a PC, an original Microsoft Xbox 360 Wireless Receiver is required. You can get this from Amazon or tech stores. Most of the third party receivers won?t work, so while purchasing be sure to buy an officially licensed Microsoft receiver.
? Install wireless receiver on your PC: Plug in the receiver?s cable into the USB port of your computer and for the drivers to install automatically.
? Installing the drivers manually: if the receiver?s drivers don?t install automatically, use the disc comes with the receiver and install them manually.
? Power off your Xbox 360: if there is an Xbox 360 in your home, make sure it is turned off otherwise, the controller will connect to it. Disconnect the console from the power source to before proceeding.
Now, follow the steps:
1. Press & hold down the ?Guide? (Xbox logo) button.
2. Release the button when it starts flashing.
3. Now, press the ?Connection? button on the receiver. It is at the center of the receiver and pressing it will turn on the receiver?s light.
4. Press the ?Connection? button of your controller.
5. Wait for the devices to get connected.
Now, you?re ready to control games with your Wireless Xbox 360 controller.
How to Setup a wireless Xbox controller on Mac
To use Wireless Xbox controller on a Mac, an original Microsoft Xbox 360 Wireless Receiver is required. You can get this from Amazon or tech stores. Most of the third party receivers won?t work, so while purchasing be sure to buy an officially licensed Microsoft receiver.
? Download and install the Xbox 360 drivers in your Mac from ?github.com/360Controller/360Controller/releases/tag/v0.16.5?.
? Install receiver to your Mac, and make sure to power off your console is turned off.
Now, follow the steps:
1. Press & hold down the ?Guide? (Xbox logo) button.
2. Release the button when it starts flashing.
3. Now, press the ?Connection? button on the receiver. It is at the center of the receiver and pressing it will turn on the receiver?s light.
4. Press the ?Connection? button of your controller.
Wait for the devices to get connected. When the controller?s Guide (logo) button light turns constant, the controller is connected to your console.
5. Go to ?System Preferences? in your Mac.
6. Click ?Xbox 360 Controllers?.
7. If the controller is listed here, this means it is connected successfully.
Setup controller in the game and enjoy gaming.
John Watson is a creative person who has been writing blogs and articles about security. He writes about the latest updates regarding mcafee.com/activate and how it can improve the work experience of users. His articles have been published in many popular e-magazines, blogs and websites.
Source:


