In our Wi-Fi world, these instructions were ridiculously hard to find, probably because a couple steps might be scary.
I spent half a day tracking these steps down, hitting dead-ends and roadblocks everywhere. I was so frustrated, I even considered purchasing a travel router. (Yes, those exists! In fact, I still probably should get one given how much time I spend at Starbucks.)
I know I promised everyone we?d get that Arch Linux ARM configuration up and running, and I promise you, that is definitely going to happen this week. But first, I have two other things I want to say.
- How to connect your Raspberry Pi to your computer via Ethernet (this story)
- How to check changes in Arch Linux ARM tarballs (the next story, titled ?An Aside About Finding Differences in Tarballs?.) In that story, I went all out. In fact, I?m not finished writing it from yesterday because I found it prudent to post this story.
So I have a lot of work to do right now?SO MUCH!!!
Right now, these instructions should work if you have a Raspberry Pi 3B+ using Raspbian. My hope is that these instructions will also be applicable for Arch Linux ARM.
The need for these instructions was the result of me needing to leave the house to get away from my two cat, who have pretty much taken over my bed where I usually sit with my laptop pounding the keys all day writing articles like this one an looking for jobs. (If only I was getting paid for doing this. Especially when I am so in the zone right now.)
 Where have I seen this image before?
At any rate, let?s pretend you are a writer of a blog about technology. (Hi.) You?re comfortably sitting at home, in your room focused on work when you hear the wrapping at your door of a cat, dog, or small child. They want to hang out with daddy. They will do this even in the middle of the night just so they can wake you up, bother the hell out of you until five minutes later you toss them back out. They don?t need a potty break or anything. They just want to be in your room and mess with your stuff.
So I?m starting to hang out at coffee shops and open work spaces just to get away from people and animals that don?t think that I have anything important to do and have no clue as to the effort I am putting in to impress somebody with my skills.
Yes, I love my cats, but daddy needs a day job that pays. In order to make that possible, I need to be offsite.
Now that I am offsite, a new problem, I still need to get Arch Linux ARM set up (again), this time with a better image that won?t fall apart.
Starbucks seems like a good place to hide for the day, until you realize you can connect your PC but not your Pi. Even if you could, would you really want to on their network? It?s such a hassle just to boot up a Raspberry Pi with Raspbian?s crappy GUI especially when there are better GUIs out there. Of which, I can?t wait to get i3-gaps installed later this week so I can get back to business especially after the micro SD card crapped out.
Enough back story. Let?s get down to business.
But first, do you have your Ethernet stuff set up? Step 1 is all about that. And because it got so long, I needed to compose an aside about Ethernet.
The first step is going to require that you use a straight Ethernet cable.
Wait, what is this ?straight? Ethernet cable, you speak of?
There are two kinds of Ethernet cables: straight and crossover. Crossover cables are generally used to connect networking devices. Most short cables, called ?patch cables?, are crossover cables. Crossover cables are generally used in the server room to connect routers and switches, those big boxes with the blinking lights that make Internet happen.
If you plug a crossover cable into to ports that require a straight connection, the Ethernet connection will shut down because of something called ?collision detection?. Think of all the data packets as being sent down the interstate, when there?s a wrong way driver. Traffic has to stop.
The plus side with having crossover patch cables is that having one is handy, and you can use an adapter to make a crossover cable a straight cable when you need one, which is why I use them with adapters in case i need one or the other.
But wait, I have a laptop made in the 2010s! Where did this ?Ethernet port? go?
Because everyone wants to be a Mac, and in an effort to push more people to use Wi-Fi, the Ethernet port was haplessly sacrificed by manufacturer to make room for everything?except enough USB ports for all the things you need. Even my Dell XPS 13 only has like two USB 3.0 ports on it, everything else is SD Card Reader, USB-C, Audio plug, Power Plug. You would think there?d be a couple extra USB ports right? Not as long as the folks in Cupertino keep making dumb ?innovations? like moving a power plug a quarter-inch back, which people will fork out thousands of dollars for a computer that if somebody else made, you wouldn?t need to sacrifice your first born to get.
To accommodate for all these dumb Apple-isms, PC users should look for a computer where performance outweighs prettiness. You wouldn?t trade in a Tesla for a Volkswagen Beetle because VW Beetle?s were chic. (I didn?t do that 20 years ago, why would I do that today?!) Never mind how VW cheated on the Diesel emissions tests, and got busted. In fact, part of the reason I wanted a Dell XPS was because the keyboard wasn?t some goofy-ass thing where there was no Insert Button (Vim users should know how important that is), and the power button was where the Delete button should be. I will put up with a lot of other crap, but of there is one thing you don?t do is mess with the keyboard layout! (To which, guess what Apple did with the Macbook a couple of years ago? Put that dashboard touch screen where the F-Keys were.)
So there is a reason there for resistance. Why it?s why I still use adapters even with all this tech stuff. Bluetooth crashes the computer when trying to listen to music? Get an adapter, and the appropriate cables. (While your at it, spoil yourself and get some good headphones!) The stuff on the market is geared toward having people unwittingly sell their data online everytime grandma posts something on Facebook. You need to find the stuff that doesn?t do that.
If you want to write code, you have to spend less time on Social Media and more time breaking stuff or leaving your comfort zone.
So here?s a quick shopping list to get your Raspberry Pi connected to your laptop.
- Two 1 foot Ethernet cables. (These are called ?patch cables?. Always buy them in pairs in case one breaks.)
- A Crossover Adapter. (I don?t know why it is red in this photo. The one I got was black. I?m sure you can find it in that color.)
- Realtek USB/Ethernet adapter. (CableMatters sells this, but it shows up as ?Realtek USB GbE Family Controller? in ipconfig. Plus there are some extra USB ports if you need to plug in your mouse.)
OK, with that said, we can FINALLY get to our instructions. Because Medium has trouble embedding images in lists, I?ll need to post my screenshots after this numbered list.
- Connect your Raspberry Pi using the PC Ethernet Port using a straight Ethernet Cable. It should be pretty obvious. Connect the USB-Ethernet Adapter to the Crossover Adapter and then connect the Ethernet port on the adapter to the one on the Pi. Make sure you hear that ?click? to make sure things are connected.
- Open Windows Settings. Since we?re using Windows 10, click the Windows menu, and select the gear icon for Settings.
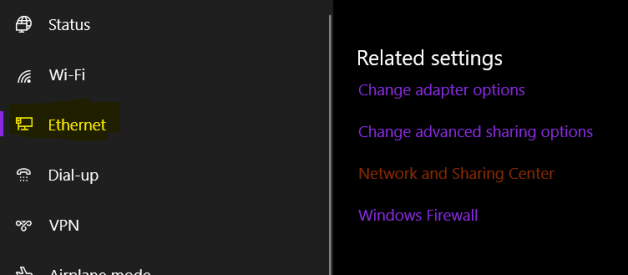
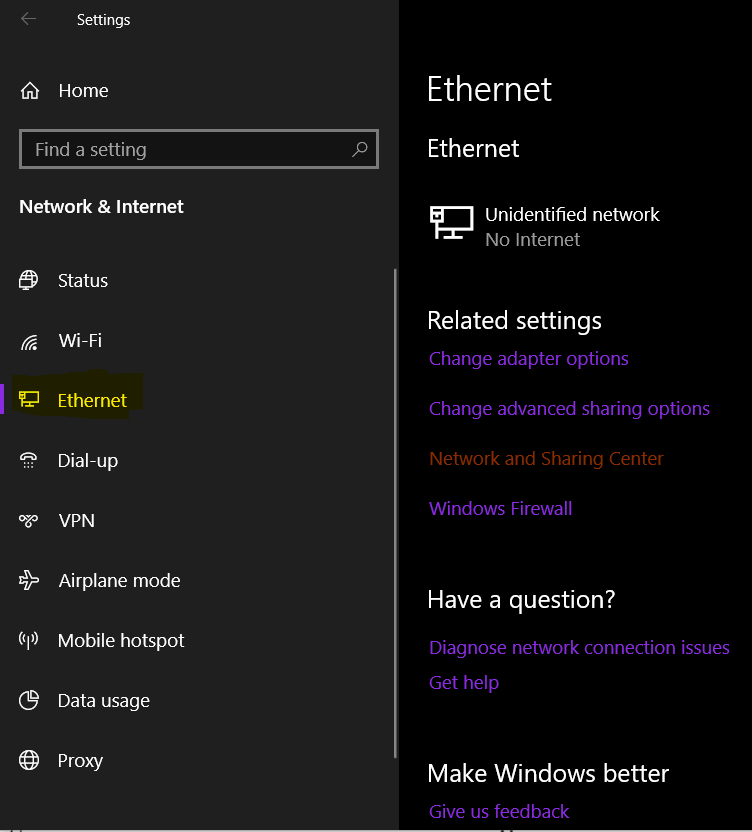
- Open Network and Sharing Center. To get there, in Settings click on ?Network & Internet?. If you have your Ethernet plugged in, you should see a ?Ethernet? tab on the left side. Click on that. Then on the right side, there should be a section called ?Related Settings? with link that says ?Network and Sharing Center?. Click that.
- Modify your Wi-Fi sharing settings. (Seriously.) ?Wait, why am I messing with Wi-Fi settings? I don?t want to touch that, I might break something!? That?s what I though, but contrary to what it seems, you need to modify your Wi-Fi sharing settings in order for Internet Connection Sharing (ICS) to actually work. I ran into all sorts of stuff online where people complained about how they changed their Ethernet settings, but nothing happened. That?s because we need to change our Wi-Fi sharing settings so that it shares it?s Internet access with Ethernet. A scary as that sounds, that?s how it?s done. On the ?Network and Sharing Center? where you see the Connections field for ?Wi-Fi? click the blue text. (It might have what network your are connected to appended to that.) This should open then ?Wi-Fi Status? window.
- Open Wi-Fi Properties. In the ?Wi-Fi Status? window, click the ?Properties? button. This should open the ?Wi-Fi Properties? window.
- Modify the ICS settings. (Note: Just to reiterate what I said in step 4, if you did anything described in this step to your Ethernet settings, undo it.) Microsoft in their big scary Wizard-of-Oz way of explaining how ICS works, especially when there are so many security threats to worry about, couldn?t have made everything on the ?Sharing? tab (which you should click on for this step) more frightening if there were icons for horror movie characters on it. So again, against conventional wisdom, we?re going to need to click a few things that are way more scary that they should be. In the ?Wi-Fi Properties? window, click the ?Sharing? tab. Check the box for ?Allow other network users to connect through this computer?s Internet connection?. In the drop down menu below it, select the Ethernet connection. You?re Ethernet connection may be called something else, such is the case where mine is called ?Ethernet 2?. You?ll also want to check the box for ?Allow others network users to control or disable the shared Internet connection?. Click ?OK? to close the ?Wi-Fi Properties? window. On the ?Wi-Fi Status? Window, click ?Close?.
- Check your Ethernet connection properties. In the ?Network and Sharing Center? window, click on the Connections field with ?Ethernet? as the value this time. (Again, it might be called something else, but it should be below the ?Wi-Fi? connections we were meddling with earlier.) This should open a window titled ?Ethernet Status? (or something similar). Click the ?Properties? button. This should open ?Ethernet Properties? (or something similar).
- Check your IPv4 Settings. Cisco geeks might feel comfortable with this step knowing what it does. In the ?Ethernet Properties? window, find the ?Internet Protocol Version 4 (TCP/IPv4)? in the ?This connection uses the following items? section. Make sure that it is checked, if not you may need to restart your computer to enable it. (Hopefully you won?t need to do that.) Double click on it or select it and click the ?Properties? button to show the ?Internet Protocol Version 4 (TCP/IPv4) Properties? window. If we hadn?t done any of the previous steps, the ?Obtain an IP address automatically? radio button would have been checked, as would the ?Obtain DNS server address automatically? option. However, now we see that ?Use the following IP address? is selected, and the ?IP address?, ?Subnet Mask?, and ?Default Gateway? fields have all been enabled, while in the DNS settings, ?Obtain DNS server address automatically? is disabled and ?Use the Following DNS server addresses? is selected. The ?IP Address? field should be filled with 192.168.137.1 and the ?Subnet Mask? field set to 255.255.255.0. ?Default gateway? should be blank. Meanwhile, the DNS address fields can also remain blank unless you want to change that to 1.1.1.1 (Cloudflare?s public DNS server) and 8.8.8.8 (Google?s public DNS server). We can click ?OK? and also click ?OK? on the ?Ethernet Properties? window and click ?Close? on the ?Ethernet Status? window. Alternatively, we could have check this information by opening the Command Prompt (cmd) and type ipconfig /all. We can also ping our connection using ping 192.168.137.1 or ping the Pi via its hostname like ping raspberrypi.local assuming your Pi?s hostname (found using sudo hostname) is raspberrypi. (You should change that. I?ll show you how later this week when we finish our Arch Linux ARM setup.)
- SSH into your Pi. Typically this is done using PuTTY. However, I?m a fan of using Chocolatey to install open source software on Windows. So install Chocolatey, then in Powershell, use Chocolatey to install Putty. I actually planned on writing how to use SSH in an article later this week. So when that is done, I?ll post a link to that later. Long story short, you should be able to SSH into your Pi (ssh [email protected]) and then do things like ping Google (ping google.com). It?s more complicated than than but I want to wrap this up.
 Step 3
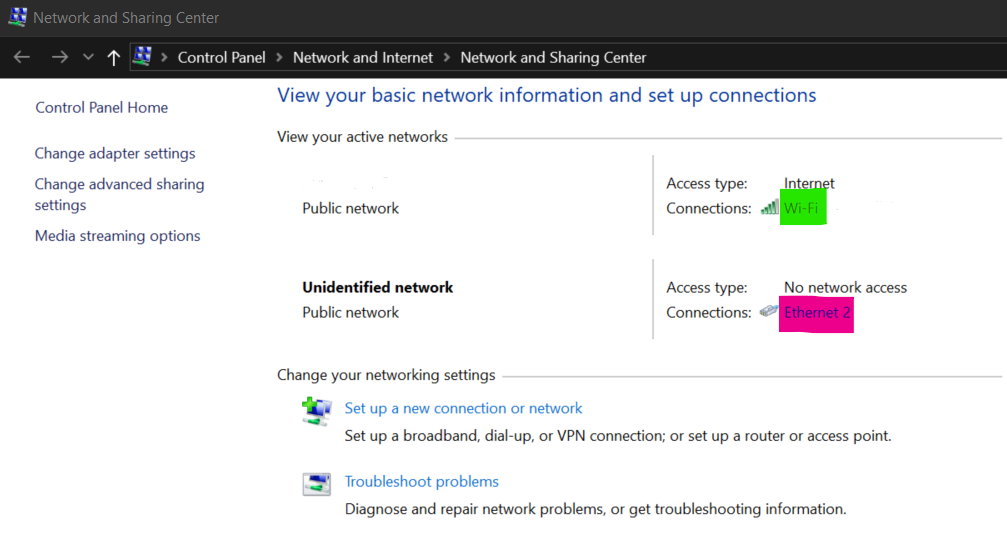 Step 4 (Green) and Part of Step 7 (Pink)
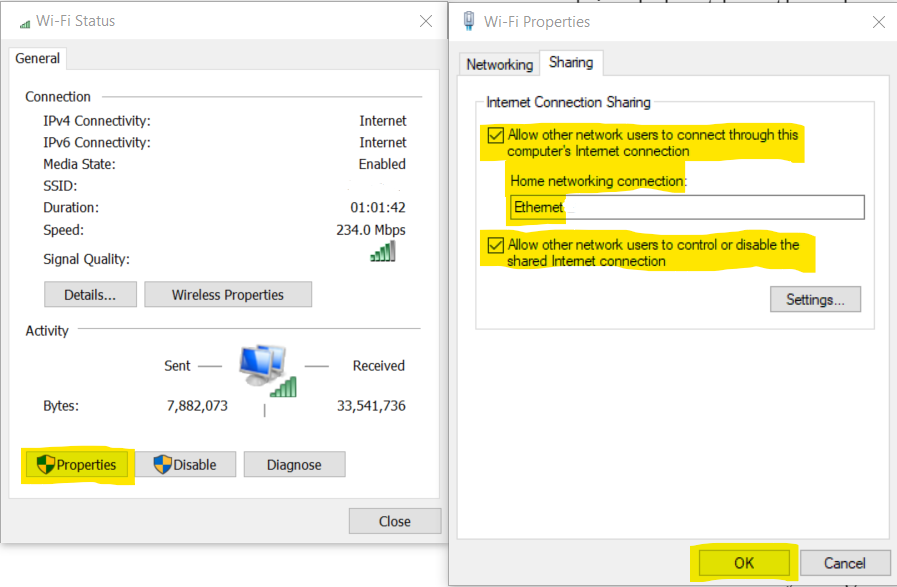 Step 5 (left) and Step 6 (right)
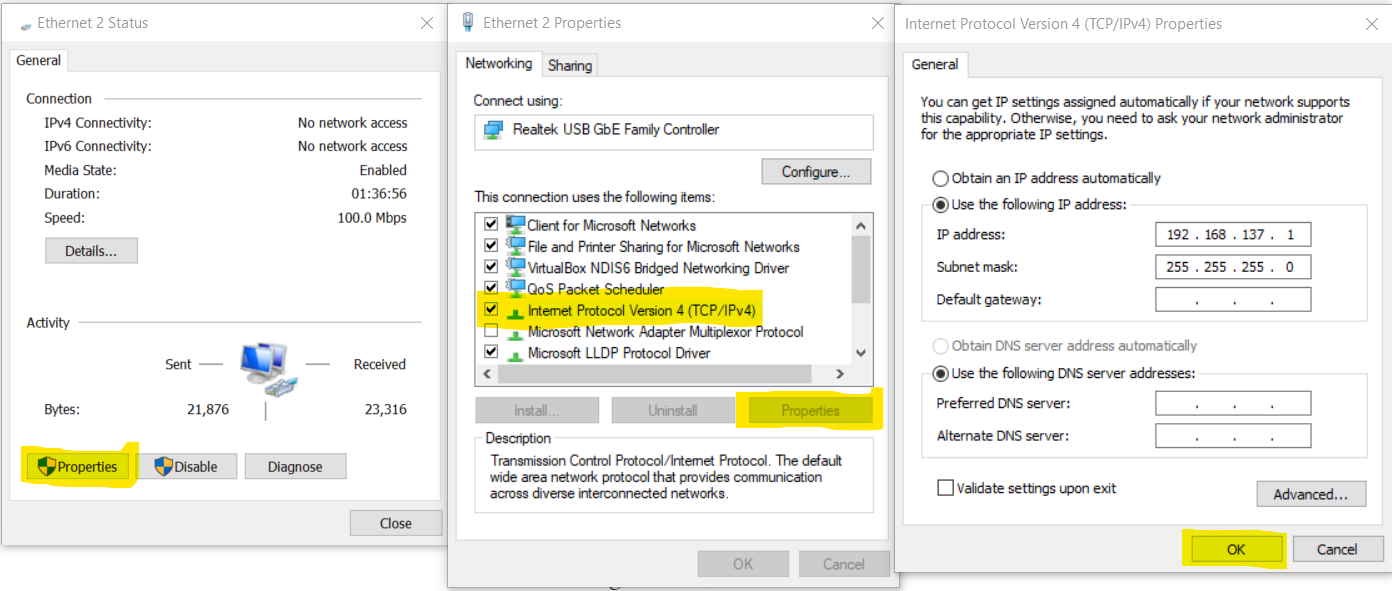 The rest of Step 7 (left and center) and Step 8 (right)
So that?s how you connect your PI, to your Computer, to the Internet. I want to thank Kyle Abad for posting this video which everybody should watch if my article is too long to read.
I don?t know what?s really going on with the Raspberry Pi organization lately, but there has been a de-emphasis on their documentation, which should be one of the links that you should see immediately in the header.
Stay tuned for more content!

)
)