 Interior 360 view of a gaming PC Maximilian Schnherr [CC BY-SA 4.0 (https://creativecommons.org/licenses/by-sa/4.0)]
Twitch, with limited exceptions, is all about audience interaction. Streamers should be paying attention and responsive to their chat. Lowering your latency to the viewer (or Latency to Broadcaster as Twitch calls it) is by far one of the best tools to help boost that interaction. Since Twitch implemented low latency streaming I feel less like I?m talking at a streamer or a viewer, and more like I?m having a real-time conversation with them. And since I tuned OBS specifically to lower the latency to the viewer even further a few viewers and friends told me that talking to me on stream is spooky, like I know what they?re typing before they press Send because I respond so quickly. In this post I?ll lay out how exactly I accomplished all of this.
Quick note before you read the rest of this: I can only really recommend this if you have a fairly to very capable PC and a very stable and reliable internet connection and connection to Twitch. Also, all of these OBS screenshots were taken from 23.1.0.
And, of course, your mileage may vary.
What is ?Latency to Broadcaster? anyway?
Latency to Broadcaster is the Twitch player?s measurement of how long it takes in seconds for content to get from a streamer?s computer to the viewer?s player on the streamer?s page.
 Screen Clip of Twitch Player Settings
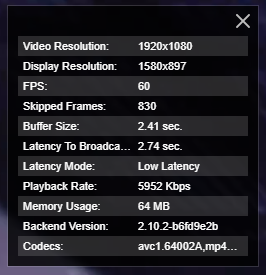
It?s visible to you on the web player if you click the Settings gear icon in the bottom right corner of the stream, go to Advanced, and click the toggle next to Video Stats. One of the settings there is called Latency to Broadcaster. In this image my latency to this broadcaster is 2.74 seconds. It?s pretty good, but I think we can do better.
Enable Low Latency Mode on Twitch
There?s another setting visible on the above image, Latency Mode. The latency mode is possible the most important thing to enable. This setting is found on your Dashboard under Settings > Channel (https://www.twitch.tv/dashboard/settings) at the bottom of the ?Stream Key & Preferences? heading:
 Twitch latency mode options
Without this, average latency to broadcaster can range from 5 to 7 seconds; with this enabled average latency to broadcaster is usually 1 to 4 seconds (or less if you?re REALLY lucky). Unfortunately Twitch haven?t explained how this setting works so I can?t break it down for you.
Once you?ve done this the rest of the tuning to do is within OBS itself.
Test Your Ingest Servers
Richard Stanaway is one of the developers of OBS and has also released a tool I?ve found very helpful called Twitch Bandwidth Test. It?s available for download at his website: https://r1ch.net/projects/twitchtest
According to his site:
?TwitchTest is a free, open source program that allows you to easily measure your upload speed to each Twitch server. Picking a server with sufficient bandwidth, low RTT and a high quality rating will ensure the best results when streaming to Twitch.?
A note from Richard I would like to point out as well:
TwitchTest will work on all modern versions of Windows. The Visual Studio 2015 Runtime (vc_redist.x86.exe) is required (you?ll get a missing VCRUNTIME140.DLL error otherwise). The program will prompt to launch as an administrator since connection quality statistics can only be measured under admin mode.
To use the tool, get your stream key from your Settings page (https://www.twitch.tv/dashboard/settings) and paste it into the ?Stream Key? field of the application. A TCP Window Size of 64k is default for OBS and is acceptable for the test (see https://tools.ietf.org/html/rfc793#section-1.5 for more info on what that is). A Test Duration of 10 seconds is generally OK for this purpose. Note the Test Duration tests each server for the selected length of time; the Test Duration is not how long it will take the entire testing process to finish. From Twitch?s perspective, you?re doing a 10 second bandwidth test against all of these servers.
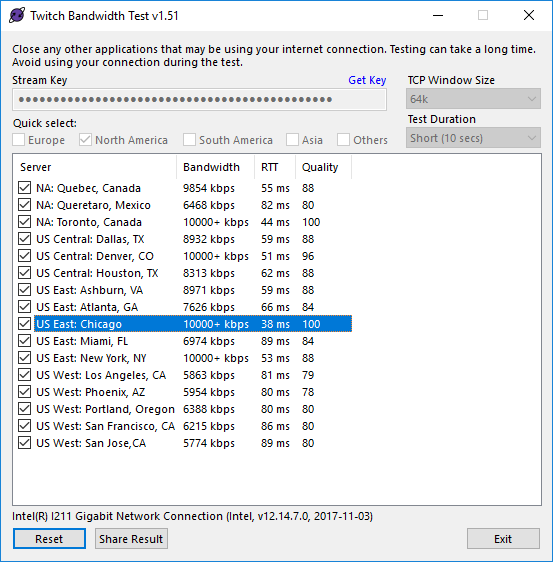
Here?s a photo of my test results. I?m in the US, so I chose all the servers in North America and let my test run for 10 seconds per server. I chose my server according to the highest Quality score and the lowest RTT (US East: Chicago), and manually set that server in OBS as OBS isn?t always the best at choosing servers for you. I recommend you choose whichever server has the highest quality and lowest RTT for yourself, and then set it in OBS manually.
If you?re not comfortable giving your stream key to the TwitchTest tool for some reason, you can also visit https://stream.twitch.tv/ingests/. Twitch itself determines what the best ingest server for you probably is. Results on this page often line up perfectly with results given in the TwitchTest tool, although the TwitchTest tool is more thorough.
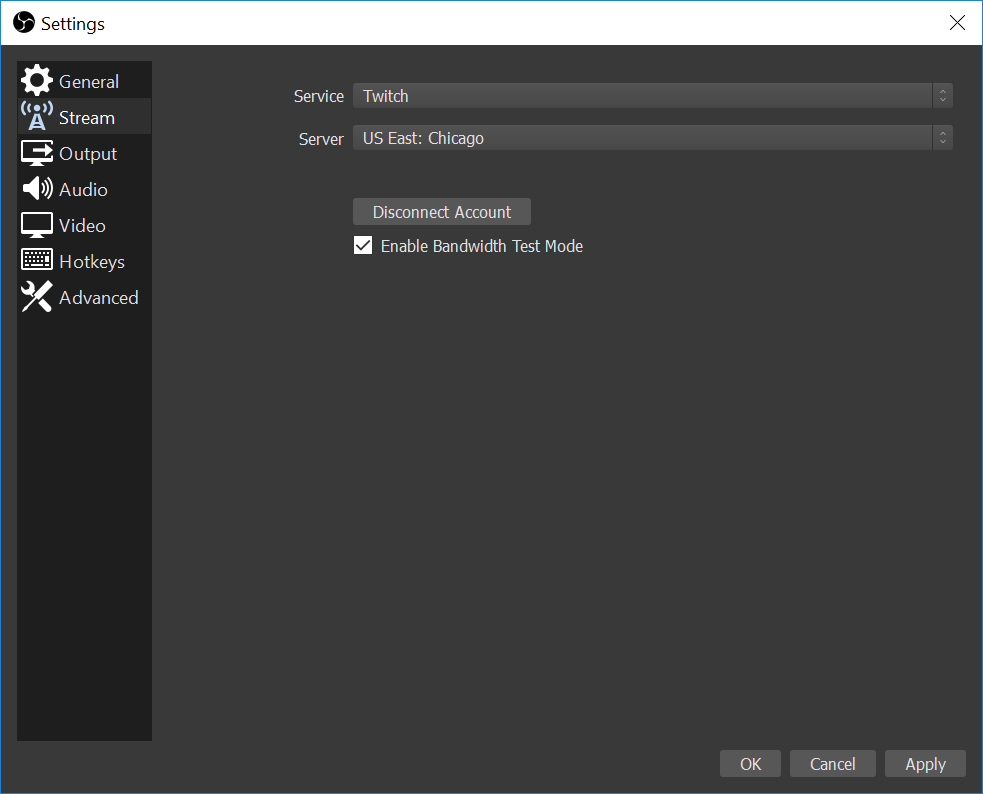
You manually set which ingest server you?d like to use in OBS in File > Settings > Stream.
What is RTT?
RTT is short for Round Trip Time. Round Trip Time is the amount of time, typically in milliseconds, it takes a packet of information (like a frame) to go from point A through a network or series of connected networks (like the Internet) to point B and back. In this case, point A is your computer and point B is a Twitch ingest server. The lower your RTT to Twitch is, the lower your response time to chat will be and the healthier your stream will be.
Enable New Networking Code And Low Latency Mode
In the advanced settings in OBS there are two check boxes, one to enable new networking code and one to enable low latency mode. I highly recommend checking both of those boxes for a variety of reasons. Here?s where they?re located under File > Settings > Advanced > Scroll Down > Network:
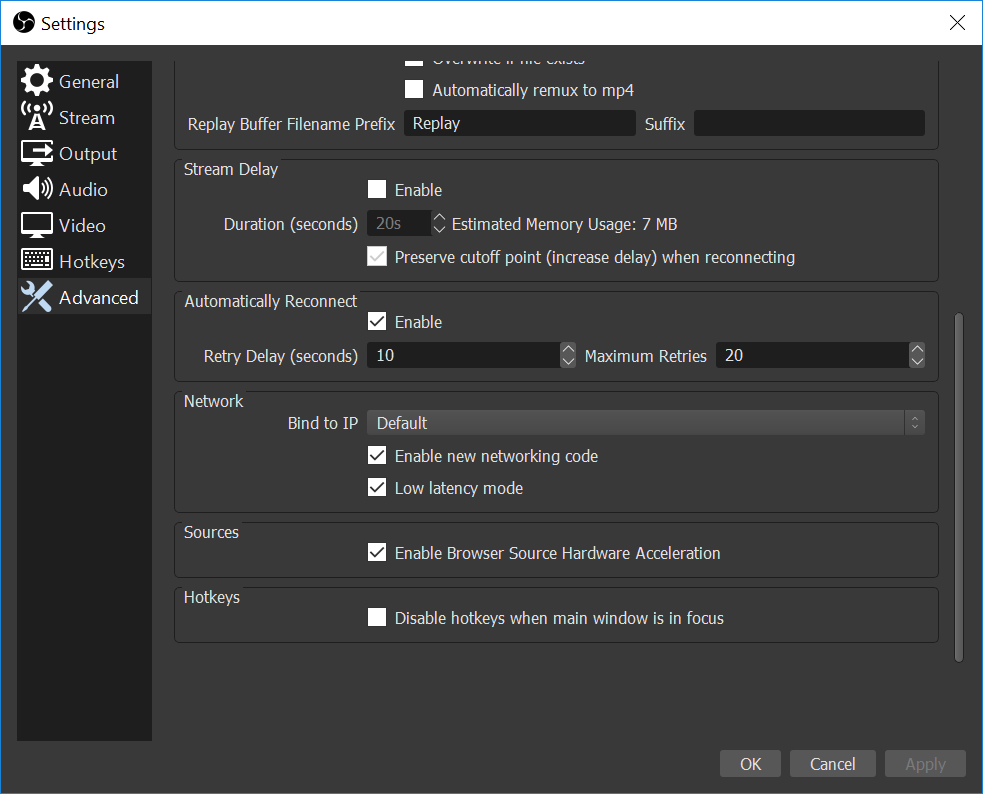
As for why I so highly recommend this option, it:
- Breaks larger video packets into smaller packets and sends them with a bit of delay in between packets. Doing this helps lower your ping time to a game server when you?re streaming and attempts to avoid packet buffering problems at any device in between you and Twitch.
- Makes OBS prioritize sending encoded frames faster. It does reduce quality (although I haven?t noticed this myself) and can get viewers down to 1 to 3 seconds of latency, usually 1.5 seconds +/- 1 second.
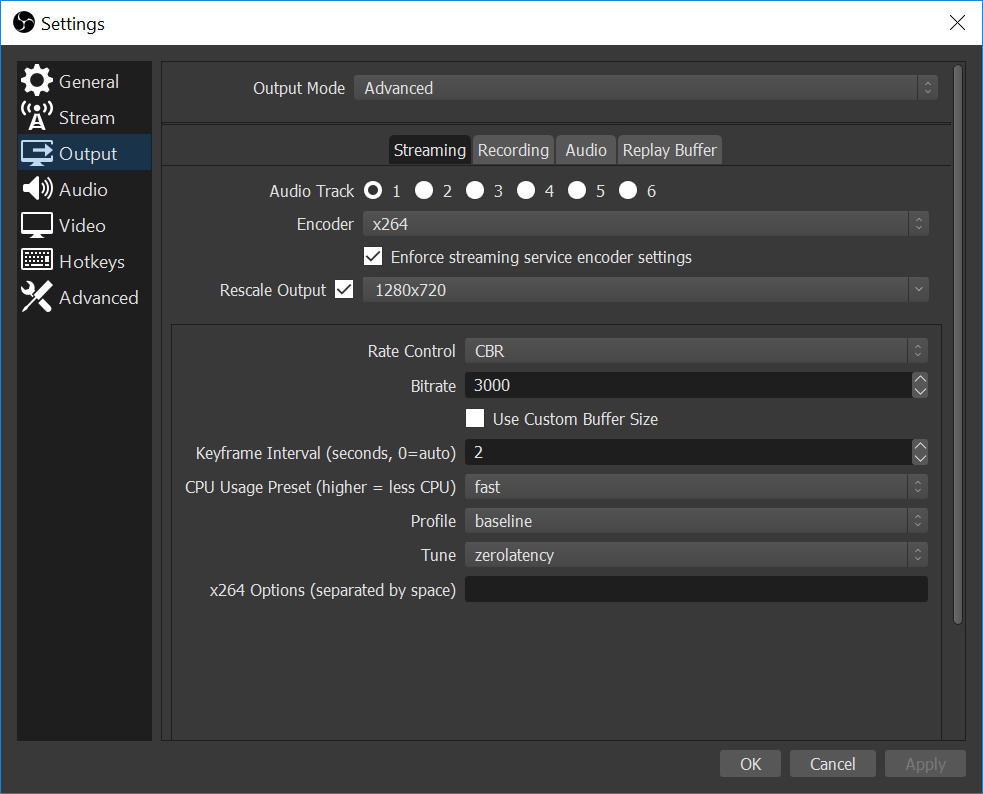
Encoder Settings
I can only really talk about x264 (software CPU encoder) and a little bit about NVENC (NVIDIA graphics card hardware encoder) because I mostly use x264 and have only experimented a little bit with NVENC. I also have little problem with x264 at my settings because I have an AMD Ryzen 7 2700x. These are the settings I use on stream:
My output is rescaled down to 1280×720 from 3840×2160 with the best quality downscale filter available in OBS, and I stream at 30fps:
Let?s step through my output settings.
Rate Control
There are two options for rate control ? CBR and VBR. CBR stands for Constant Bitrate, and VBR stands for Variable Bitrate. Like the names suggest, CBR outputs a constant bitrate and VBR outputs a non-constant bitrate. In my case, CBR outputs 3000Kbps where VBR would output up to 3000Kbps.
CBR decodes faster than VBR, and VBR is the best balance between data usage and quality. VBR can lower the output bitrate when there?s little/no movement on screen, but when there is movement on screen the bitrate goes up and the data usage goes up and you might see lost frames to Twitch or your viewers might see buffering.
Officially, Twitch requires CBR (https://help.twitch.tv/s/article/broadcast-requirements?language=en_US).
Bitrate
Bitrate is how much data is included in each of your frames expressed in Kbps. I use a bitrate of 3000Kbps, meaning my stream uses about 3Mbps of upload from my PC and download to viewer devices. Right now I recommend streaming 3000Kbps at a resolution of 720p and framerate of 30fps to keep your content accessible to viewers.
Keyframe Interval
A keyframe is a frame that contains a complete image of the stream. Every frame between keyframes describes what in the frame changed since the last frame. Twitch requires that you set your keyframe interval to 2 seconds (https://help.twitch.tv/s/article/broadcast-requirements?language=en_US).
Setting your keyframe interval to 1 second requires a lot of processing at the client to completely redraw everything on the screen every second, and from the little bit of testing I?ve done setting the keyframe interval to higher than 2 seconds can cause increased playback errors for viewers and lost quality.
I?ve also seen Twitch and other video services switch resolutions for transcoded content at keyframe intervals, which makes sense if you think about it. Keyframes describe the whole picture, so it?s easiest to change resolutions when you have a fresh copy of the whole picture than it is to change resolution with an iframe (intra-only frame, the frames between keyframes).
CPU Usage Preset
Presets range from ultrafast (lowest quality) to placebo (highest quality). Fast or medium is often recommended. I chose medium as the medium preset is a great balance between encoding speed and quality.
Profile
x264 offers three ?profile? options ? baseline, main, and high. Baseline is the most basic type of encoding, less intensive for clients to decode, and has the highest device compatibility. This is my chosen profile because I designed my stream around trying to be accessible to as many devices as I possibly can, although it is not recommended.
The high profile offers the best quality and file size, but takes more resources for clients to decode.
The main profile is a ?middle ground? between the two ? I generally recommend this.
Tune
My chosen tune is ?zerolatency.? Effectively, as soon as a frame is encoded it gets sent off to Twitch. In the interest of low latency streaming, this tune is very important to me.
Other tunes let the CPU preset lookahead value stay (30 frames for fast, 40 frames for medium). A lookahead keeps a certain number of frames in a buffer on your system to help it draw iframes in between keyframes. I chose the zerolatency tune because it doesn?t keep any frames buffered.
If you think about it, at 30 frames per second, if I?m holding 30 frames to help me draw frames I?m adding 1 second of latency to my stream. If I?m holding on to 40 frames to help me draw frames I?m adding 1 and 1/3 seconds latency to my stream. In this case I opted for speed over quality because I don?t think my quality has visibly suffered (it hasn?t to me) and it clearly helps my interaction with chat.
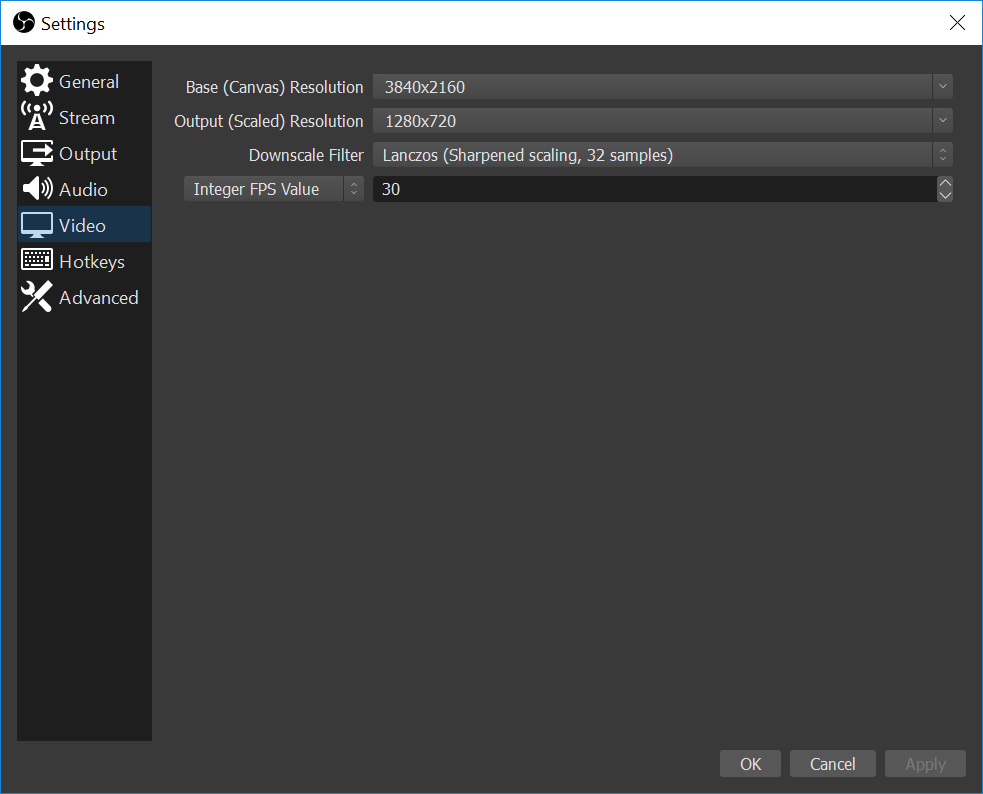
Video Settings
Let?s have a look at my video settings again:
My base (canvas) resolution is 3840×2160. That is the size of the black box in OBS where you place all of your elements (game capture, overlay, etc). I mainly play games for streams at this resolution so it works out well.
My output resolution is 720p, this is the resolution that users actually see on my Twitch stream instead of a 4k stream.
There are several options for a downscale filter ? bilinear, bicubic, and lanczos with bilinear being the ?worst? and lanczos being the ?best.? I use the lanczos filter because after testing I?ve found this does indeed offer the best visual quality to the stream and compensates for quality that would be lost due to using the baseline profile, explained above.
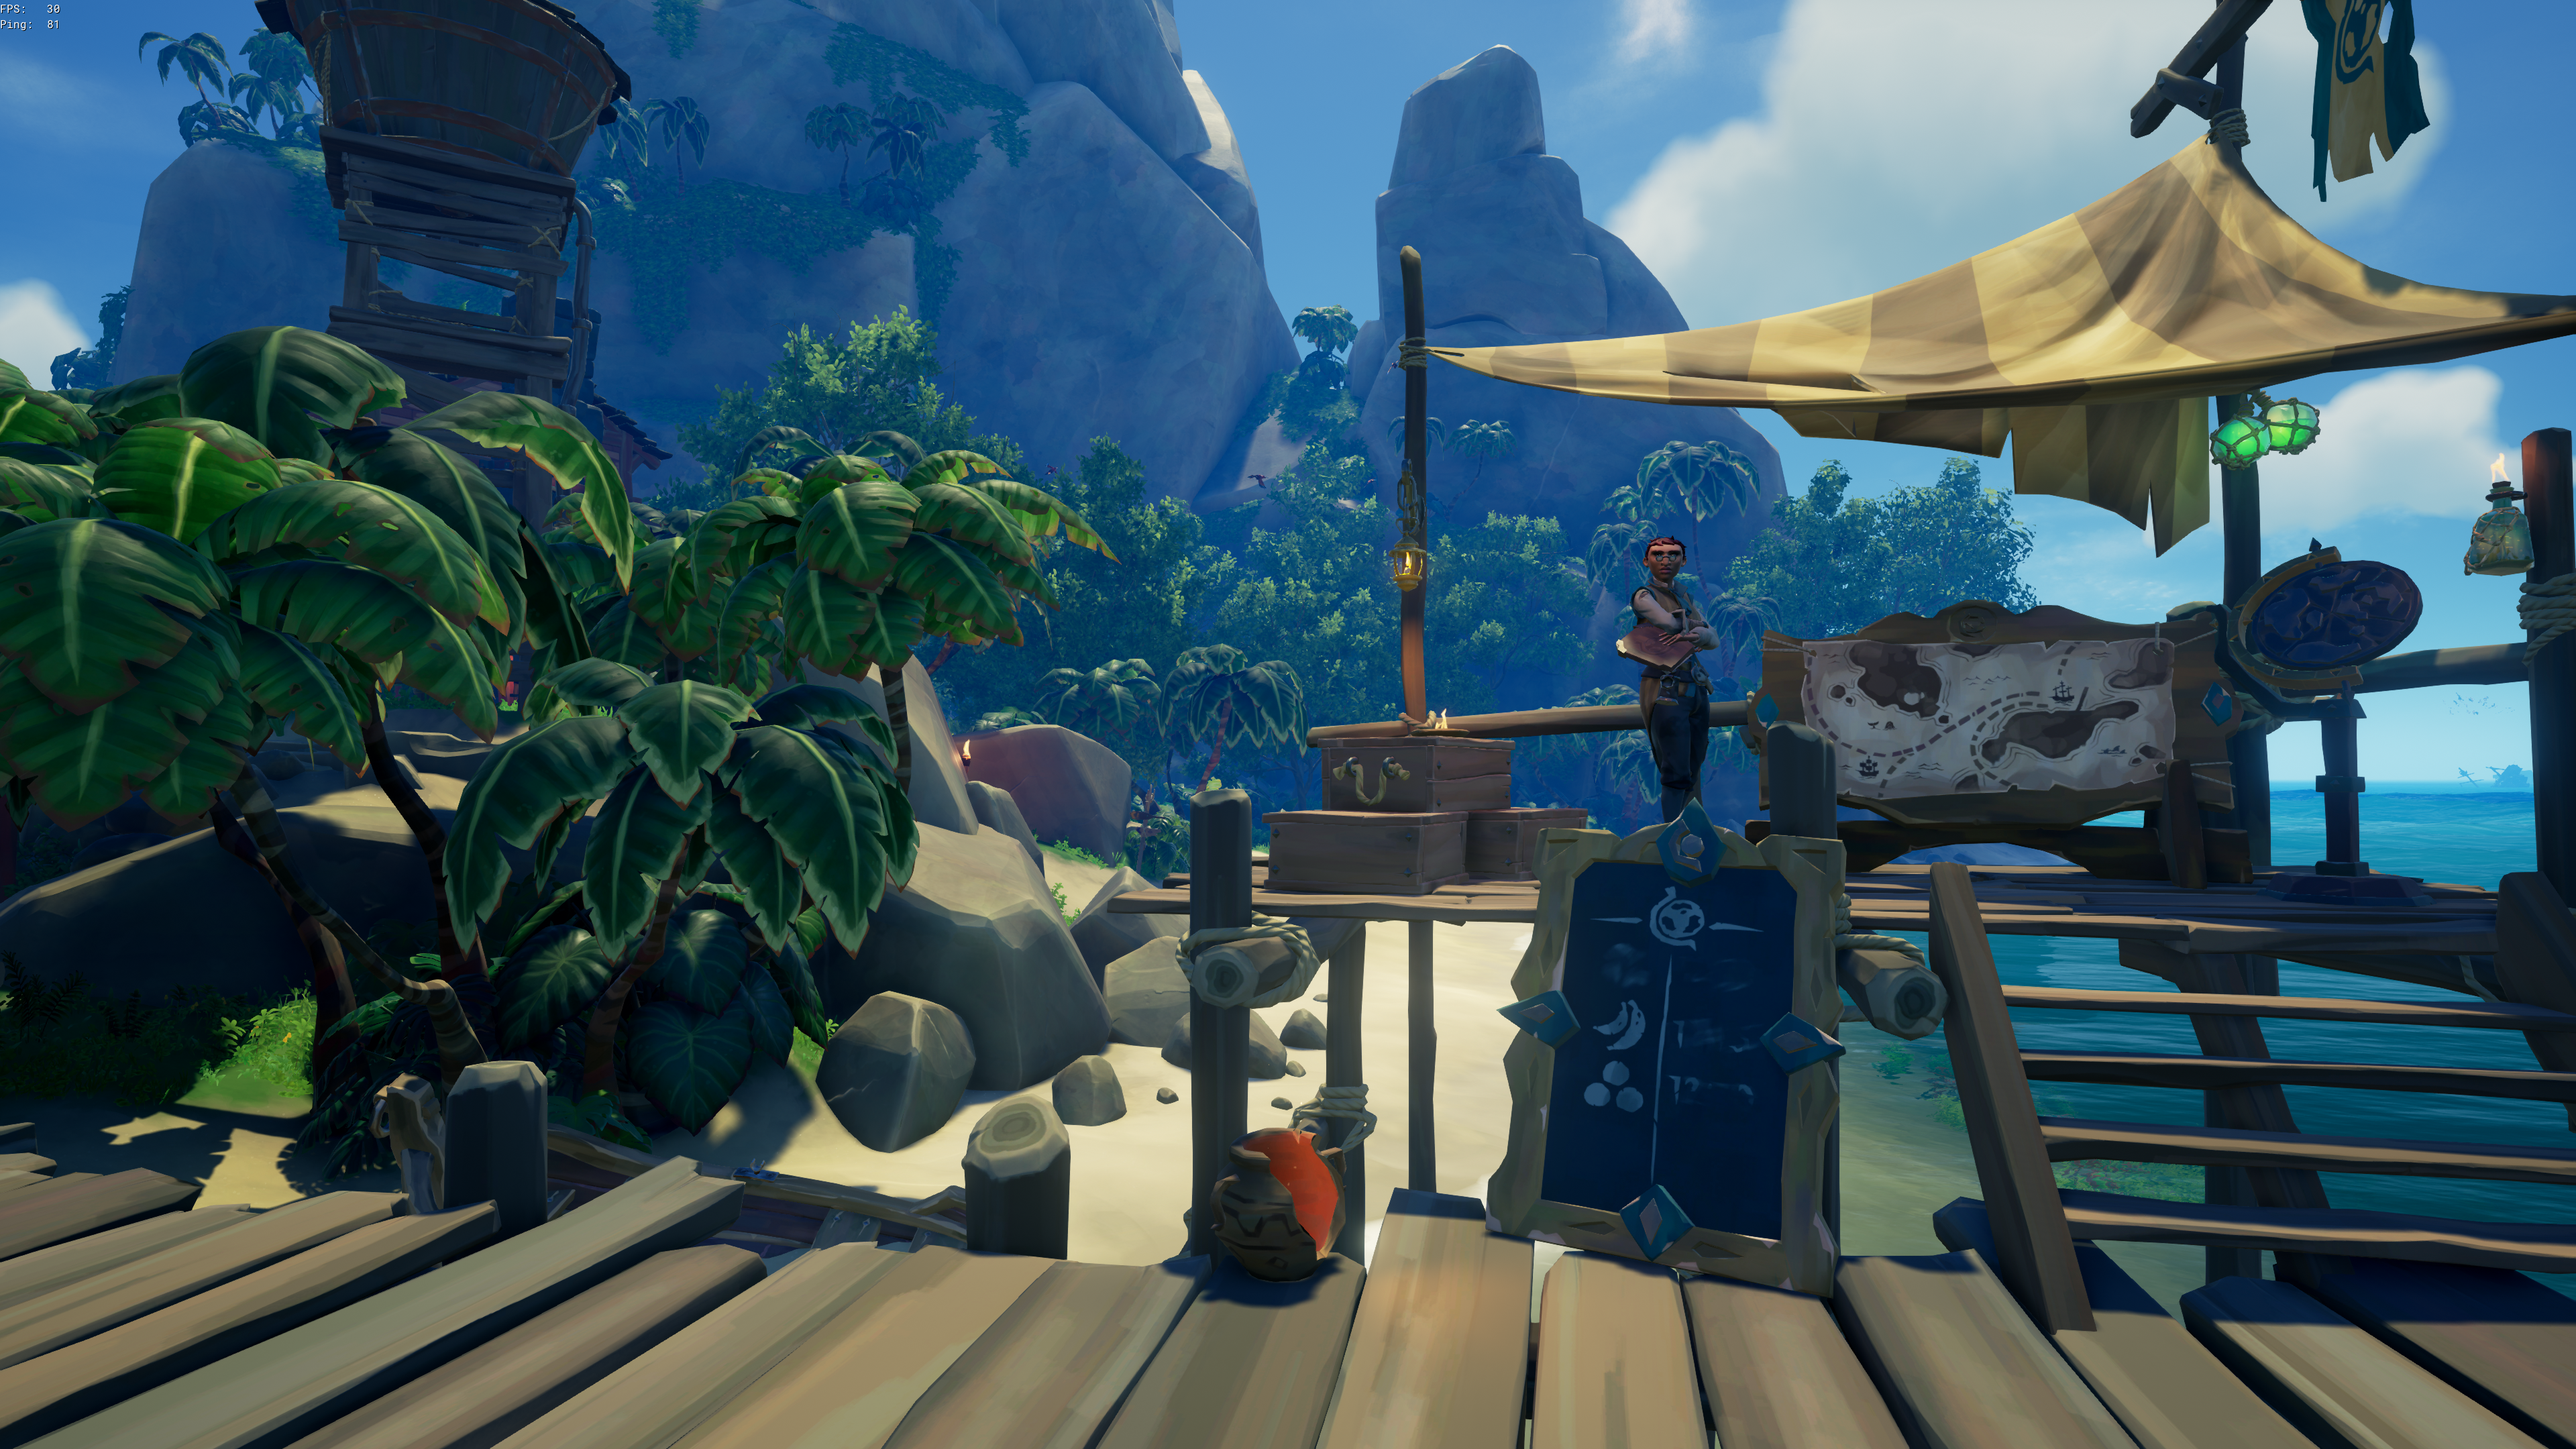
Closing Thoughts
As I said at the start, your mileage may vary, but I didn?t say why. Your streams may suffer in quality if you?re not able to play the game in a resolution higher than 720p and downscale that game to 720p with the lanczos filter.
During and after streams I cannot recommend using the Twitch Inspector utility enough. Twitch has a guide on how to use it built right in, and a very informative guide to troubleshooting your stream at https://help.twitch.tv/s/article/guide-to-broadcast-health-and-using-twitch-inspector?language=en_US.
So you can see the difference in quality yourself, here is a screenshot from one of my streams. I sized the player down to 1280×720 as that is the resolution I stream in:

And here is a similar screenshot from the game itself in 4k:
Anyway, I hope you found this helpful. At time of writing I?m also thinking about posts for green screens, Snap Camera, my chat bots, interacting with chat while in VR, how I turned my Elgato Stream Deck into a mini audio mixer, and how to do videos and GIFs on stream with invisible backgrounds. If you have any other suggestions, please let me know either here or on Twitter @AstrocatFreitag.
If you enjoyed this please check out my Twitch channel and Twitter where I play a ton of Sea of Thieves and talk a lot about tech and a little about law (NOT A LAWYER).
