
New versions of Python come out on the regular ? at least once a month or so. Manually installing new versions is a pain and often forgotten. With the manual plan, before you know it, you?re on Python 2.7.16 (currently the Mac default) and the rest of the world has moved on. Here we?re going to use Homebrew to automate updates.
 Photo credit: Oziel Gmez
NOTE: In this opinionated story, I suggest that the ?right? way of doing Python 3 on macOS is to have the latest version and to stay current with frequent updating. This is a good one-size-fits-all solution. However, if you require nuanced versioning or multiple versions of Python, check out my article on pyenv: Multiple version Python development on Mac. If you?re setting up your Mac from scratch, my article Zero to Hero: Set Up Your Mac for Software Development will guide you through the whole process.
Step 1. Get Homebrew
We?ll need to see where you?re starting from in order to get setup correctly.
Do you have Homebrew installed?
Since we?re using Homebrew, or brew, to keep Python up-to-date, it needs to be installed. Open a terminal and find out whether it is installed by checking the version:
$ brew –versionHomebrew 2.2.14Homebrew/homebrew-core (git revision 118be0; last commit 2020-04-30)Homebrew/homebrew-cask (git revision 656ce; last commit 2020-04-30)
If you don?t see something like that and instead Bash says -bash: brew: command not found, then you need to install Homebrew.
Installing Homebrew
First, we?ll install a bit of Apple?s Xcode, which Homebrew requires, and then Homebrew. This will probably ask for your password and may take awhile depending on whether you already have any Xcode components installed already.
$ xcode-select –install
When Xcode finishes, this command will install Homebrew:
$ ruby -e “$(curl -fsSL https://raw.githubusercontent.com/Homebrew/install/master/install)”
If all went well, you should now be able to check the Homebrew version:
$ brew –versionHomebrew 2.2.14Homebrew/homebrew-core (git revision 118be0; last commit 2020-04-30)Homebrew/homebrew-cask (git revision 656ce; last commit 2020-04-30)
Step 2. Handle Non-Homebrew Python
This is an optional step. If you have a need for several legacy versions of Python, skip this step.
Do you already have non-Homebrew Python installed?
If you downloaded Python directly from python.org and used the installer, you?ll have non-Homebrew Python on your system. The Python itself is exactly the same. It?s how it?s installed and updated that differs.
If you want a squeaky-clean system, you can remove extraneous Python installs. But, be careful! On a Mac, the operating system needs the version of Python kept at /usr/bin/python. You cannot do much to this version ? and don?t try or you?ll mess up your Mac.
However, Python located in, or symbolically linked from, /usr/local/bin is not part of the macOS and can be deleted.
Try this command to see where you?re at:
$ ls -l /usr/local/bin/python*lrwxr-xr-x 1 root wheel 68 Jul 5 10:05 /usr/local/bin/python -> ../../../Library/Frameworks/Python.framework/Versions/3.4/bin/python
This tells us that we have Python 3.4 installed and it was not installed using Homebrew because the location is ../../../Library/Frameworks/Python.framework. If Python had been installed by Homebrew, it?s location would start with ../Cellar/python. So, let?s get rid of it.
Get Rid of the Old Pythons
Careful!! Some applications include a version of Python and, as mentioned above, macOS relies on Python. Make sure to not delete these Pythons!
On my system, I had installed Python various times from DMG installers on python.org. When I switched to Homebrew Python, I wanted to get rid of all the extra Python installs. This is how I did it.
Remove all the symbolic links in /usr/local/bin that point to Python related files:
$ sudo rm /usr/local/bin/python*$ sudo rm /usr/local/bin/pip*
Remove versions of Python in the Python framework:
$ sudo rm -Rf /Library/Frameworks/Python.framework/Versions/*
Step 3. Set Up the Environment
Any previous Python installs may have cluttered up your PATH environment variable. Let?s clean that up.
With Homebrew, you don?t need a complicated path pointing to the Python framework. For basic Python usage, this is all that you?ll need in your ~/.bash_profile file:
export PATH=/usr/local/bin:/usr/local/sbin:${PATH}
Extra Python tools (e.g., Pylint, iSort) are sometimes installed in another special path. It?s a good idea to include that path as well:
export PATH=/usr/local/bin:/usr/local/sbin:${PATH}export PATH=${PATH}:/Users/<your username>/Library/Python/3.7/bin
For most Python features that should be all you need in your PATH.
Step 4. Install Python
With all the prep out of the way, actually installing Python becomes very easy:
$ brew install python3
Step 5. Upgrade Python
Now, whenever you use Brew to update your whole system, Python will also be updated!
$ brew upgrade
If you just want to make sure that Python is up-to-date, you can do that as well.
$ brew upgrade python3
Homebrew responds with an error if you?re already up-to-date:
Error: python3 3.7.2_1 already installed
Step 6. Install common Python packages
Depending on how many Python packages you use, installing and updating them all can be a pain. Homebrew can help with some packages.
At a minimum, you should have Pipenv installed:
$ brew install pipenv
For other packages, when should you use Homebrew vs. Pip vs. Pipenv within a virtualenv? Follow this handy guide:
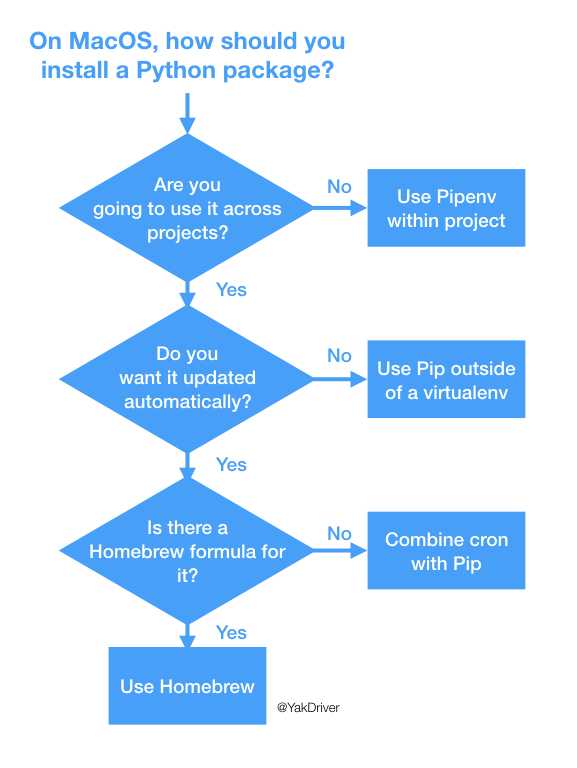
Install Using Pipenv Within a Project
If you?re not planning to use a particular Python package across projects, you?re probably best off installing it with Pipenv in the project?s virtualenv.
For example, if you?re only planning on using Pyppyn within one project (e.g., project_dir/), from within the virtualenv you use while developing the project, you can install the package using either Pip or Pipenv. I recommend Pipenv.
Using Pipenv, create a new virtualenv based on Python 3 ? macOS will default to Python 2:
$ cd project_dir/$ pipenv –three
Start (i.e., ?activate?) the virtualenv and install the package in it:
$ pipenv shell$ pipenv install pyppyn
This package, Pyppyn, will only be available within the virtualenv associated with project_dir/.
Install Using Pip Outside of a virtualenv
If you want a package to be available across your system but don?t want it updating automatically, or there?s no Homebrew formula, you can install it with Pip.
For example, if you use Pylint to lint your code, across projects, but there?s no Homebrew formula for it, install it with Pip outside of any virtualenv.
Start a new terminal to make sure you?re not in a virtualenv and install:
$ pip3 install pylint
This package, Pylint, will be available across your system, including new virtualenvs created based on Python 3.
However, you?ll be responsible for keeping it up-to-date with Pip:
$ pip3 install pylint –upgrade
Install by Combining Cron and Pip
If you want to keep a system-wide package up-to-date automatically but there is no Homebrew formula for it, you can easily use crontab.
For example, if you want to use Pylint across your Python projects and you want it to be kept up-to-date automatically, use the crontab to run the upgrade command we saw above on a regular schedule.
The following command will edit ? or create ? your user?s crontab:
$ crontab -e
The command will open the system?s default editor which is Vim, if you haven?t changed it.
If you did not already have a crontab, you?ll see a blank file. If you already have a crontab, you?ll see your previous entries.
Cron does not have access to your Bash profile, so we?ll make sure the system can find commands by setting the PATH.
#!/bin/sh PATH=/usr/local/bin:/usr/local/sbin:/usr/bin:/bin:/usr/sbin:/sbin
Subsequent lines are crontab entries. Each entry specifies a command and a schedule for the command. To update Pylint, for example, and Homebrew, each day at 3:40 and 3:35 pm, respectively, you could add these two entries:
40 15 * * * pip3 install pylint –upgrade35 15 * * * brew upgrade
Every time these commands run, the system will, thoughtfully, send you an email with the commands? stdout. Add MAILTO=”” to your crontab before your entries to suppress these emails. See this helpful post for more details on using crontab.
Install Using Homebrew
If you want to use a package across projects, you want it updated automatically, and there?s a Homebrew formula for it, use Homebrew!
For example, if you use Flake8 to enforce style on your code, across projects, you want Flake8 updated automatically, and since there?s a Homebrew formula for it, you can use Homebrew.
$ brew install flake8
This package, Flake8, is now available across your system.
Some of the Python packages and tools currently available via Homebrew include the following:
- autopep8
- black
- fades
- flake8
- lorem
- numpy
- pipenv
- pycodestyle
- pyenv
- pypy3
- pyvim
- tox
![]()
Follow us on Twitter ? and Facebook ? and Instagram ? and join our Facebook and Linkedin Groups ?.
To join our community Slack team chat ?? read our weekly Faun topics ??, and connect with the community ? click here?


