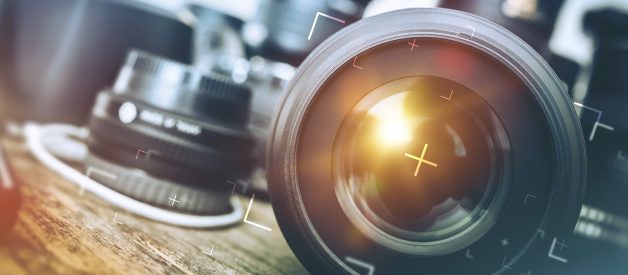
The glass in front of your imaging sensor is the single most important part of your camera. Are you ready to geek out? OK, let?s go?
What is the most important part of your SLR or mirrorless camera?
If you just replied ?the camera body?, you?re onto something, but you?d be wrong.
The answer is ?the lens? ? and in this post, I?ll teach you everything you need to know about lenses!
Camera bodies as more or less disposable.
Introduction, part I: What about camera bodies?
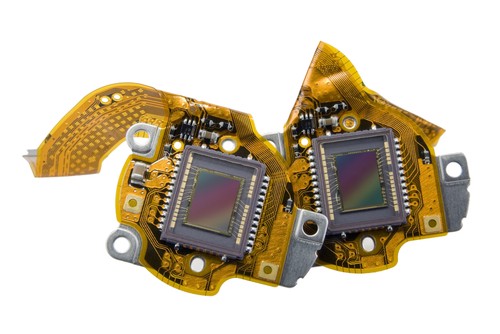 Imaging chips are fun.
Okay, so not everybody agrees that lenses are important, but hear me out?
Of course, it?s important to have a bucket-load of megapixels, comfortable controls, a good light meter, a solid ISO range, reliable noise reduction and a precise shutter ? and all of that is part of your camera body. However, I?ve grown to appreciate camera bodies as more or less disposable.
That?s not to say that the cost of a camera body is pocket change, but I?ve been through a hell of a lot of camera bodies over the past 15 years. If we cut off the dreary pre-digital era, my SLR history started with the Canon EOS D30 I saved up for for several months. After that, I had a D60, a 300D, a 350D, a 450D, a 400D and a 550D. In between all of that, I?ve also had several xxD and xD series cameras, but because I spend most of my time writing books aimed at beginners and intermediate photographers, I like to keep a finger on the pulse by (mostly) sticking to entry-level cameras. For the past four years, I?ve been shooting with a Sony A7 ? the longest I?ve ever hung on to a camera body. Given that you can pick one up for under $800 these days, it?s an absolute bargain.
Each individual little step up the camera body ladder is an evolution rather than a revolution. Canon, Nikon, and all the other camera manufacturers keep making tiny little tweaks that make camera bodies that tiny little bit better for every iteration. I defy anybody to tell much of a difference between photos taken by two subsequent camera bodies, for example, but pick up a 2010 body and compare it to a current camera body, and you?ll be amazed how different the camera bodies are. Better sensors, better ergonomics, better controls, better photo quality, better battery life, and still around the same price point. It?s awesome.
Introduction, Part II: Wasn?t this meant to be about lenses?
Lenses get better with age. Or rather: Every time I upgrade my camera body, the image quality I get from my lenses increases just that tiny little bit.
 Glass. Beautiful, glorious glass.
The point I?m trying to make here is that I?ve owned a dozen different camera bodies over the past 15 years or so, but there?s one thing that stays constant: My lenses. I don?t buy lenses very often, but when I do, I buy top-quality stuff.
The oldest lens I currently use is nearly 15 years old, and it?s a 70?200mm f/2.8. It?s ludicrously sharp, delivers fantastic autofocus performance, and is one of my all-time favorite lenses. If it was stolen from me today, I?d head to the nearest camera shop tomorrow to buy the exact same lens again. Or, y?know, the current version of it.
The best thing about all of this is that that 70?200 lens has done something that?s nearly unheard of in the world of technology: It has gotten better with age. Or rather: Every time I upgrade my camera body, the image quality I get from my lenses increases just that tiny little bit. The sensors and on-board processing on SLR cameras is only getting better, meaning that I can get more resolving power, better colors, and less noise from my lenses.
Part 1: How to balance your camera body and lens expenditure
So: The first lesson here is this: When you buy lenses, buy the best ones you can possibly afford. If you?re looking to spend $700 on a camera body, it isn?t such a bad idea to budget another $700 on lenses, too. Or, put differently: Don?t spend a lot of money on a camera body and then skimp on lenses: You?ll end up disappointed with the sharpness you?re getting, and there?s nothing as disheartening as not getting the results you?re hoping for.
What I?m getting at here, is this: If you are considering a mid-range camera body and a mid-range lens, I would seriously consider instead buying an entry-level camera body and a high-level lens. When the time comes to upgrade your camera body, you?ll be reaping the benefits.
The second thing to take away from this is not to be disheartened by this advice. If you have $700 in your bank account and are looking to buy a new camera body, don?t take this to mean that you should only spend half on a camera body and half on a lens. By all means, buy your first camera body with a kit lens: You can still get some great photos, and as we?ll look at just a little bit later in this article, you can buy some absolutely astonishingly sharp lenses for pocket-change (in photography terms, anyway).
Right, with that out of the way, let?s start talking about what you need to be looking at when it comes to camera lenses?
Part 2: What does a camera lens do?
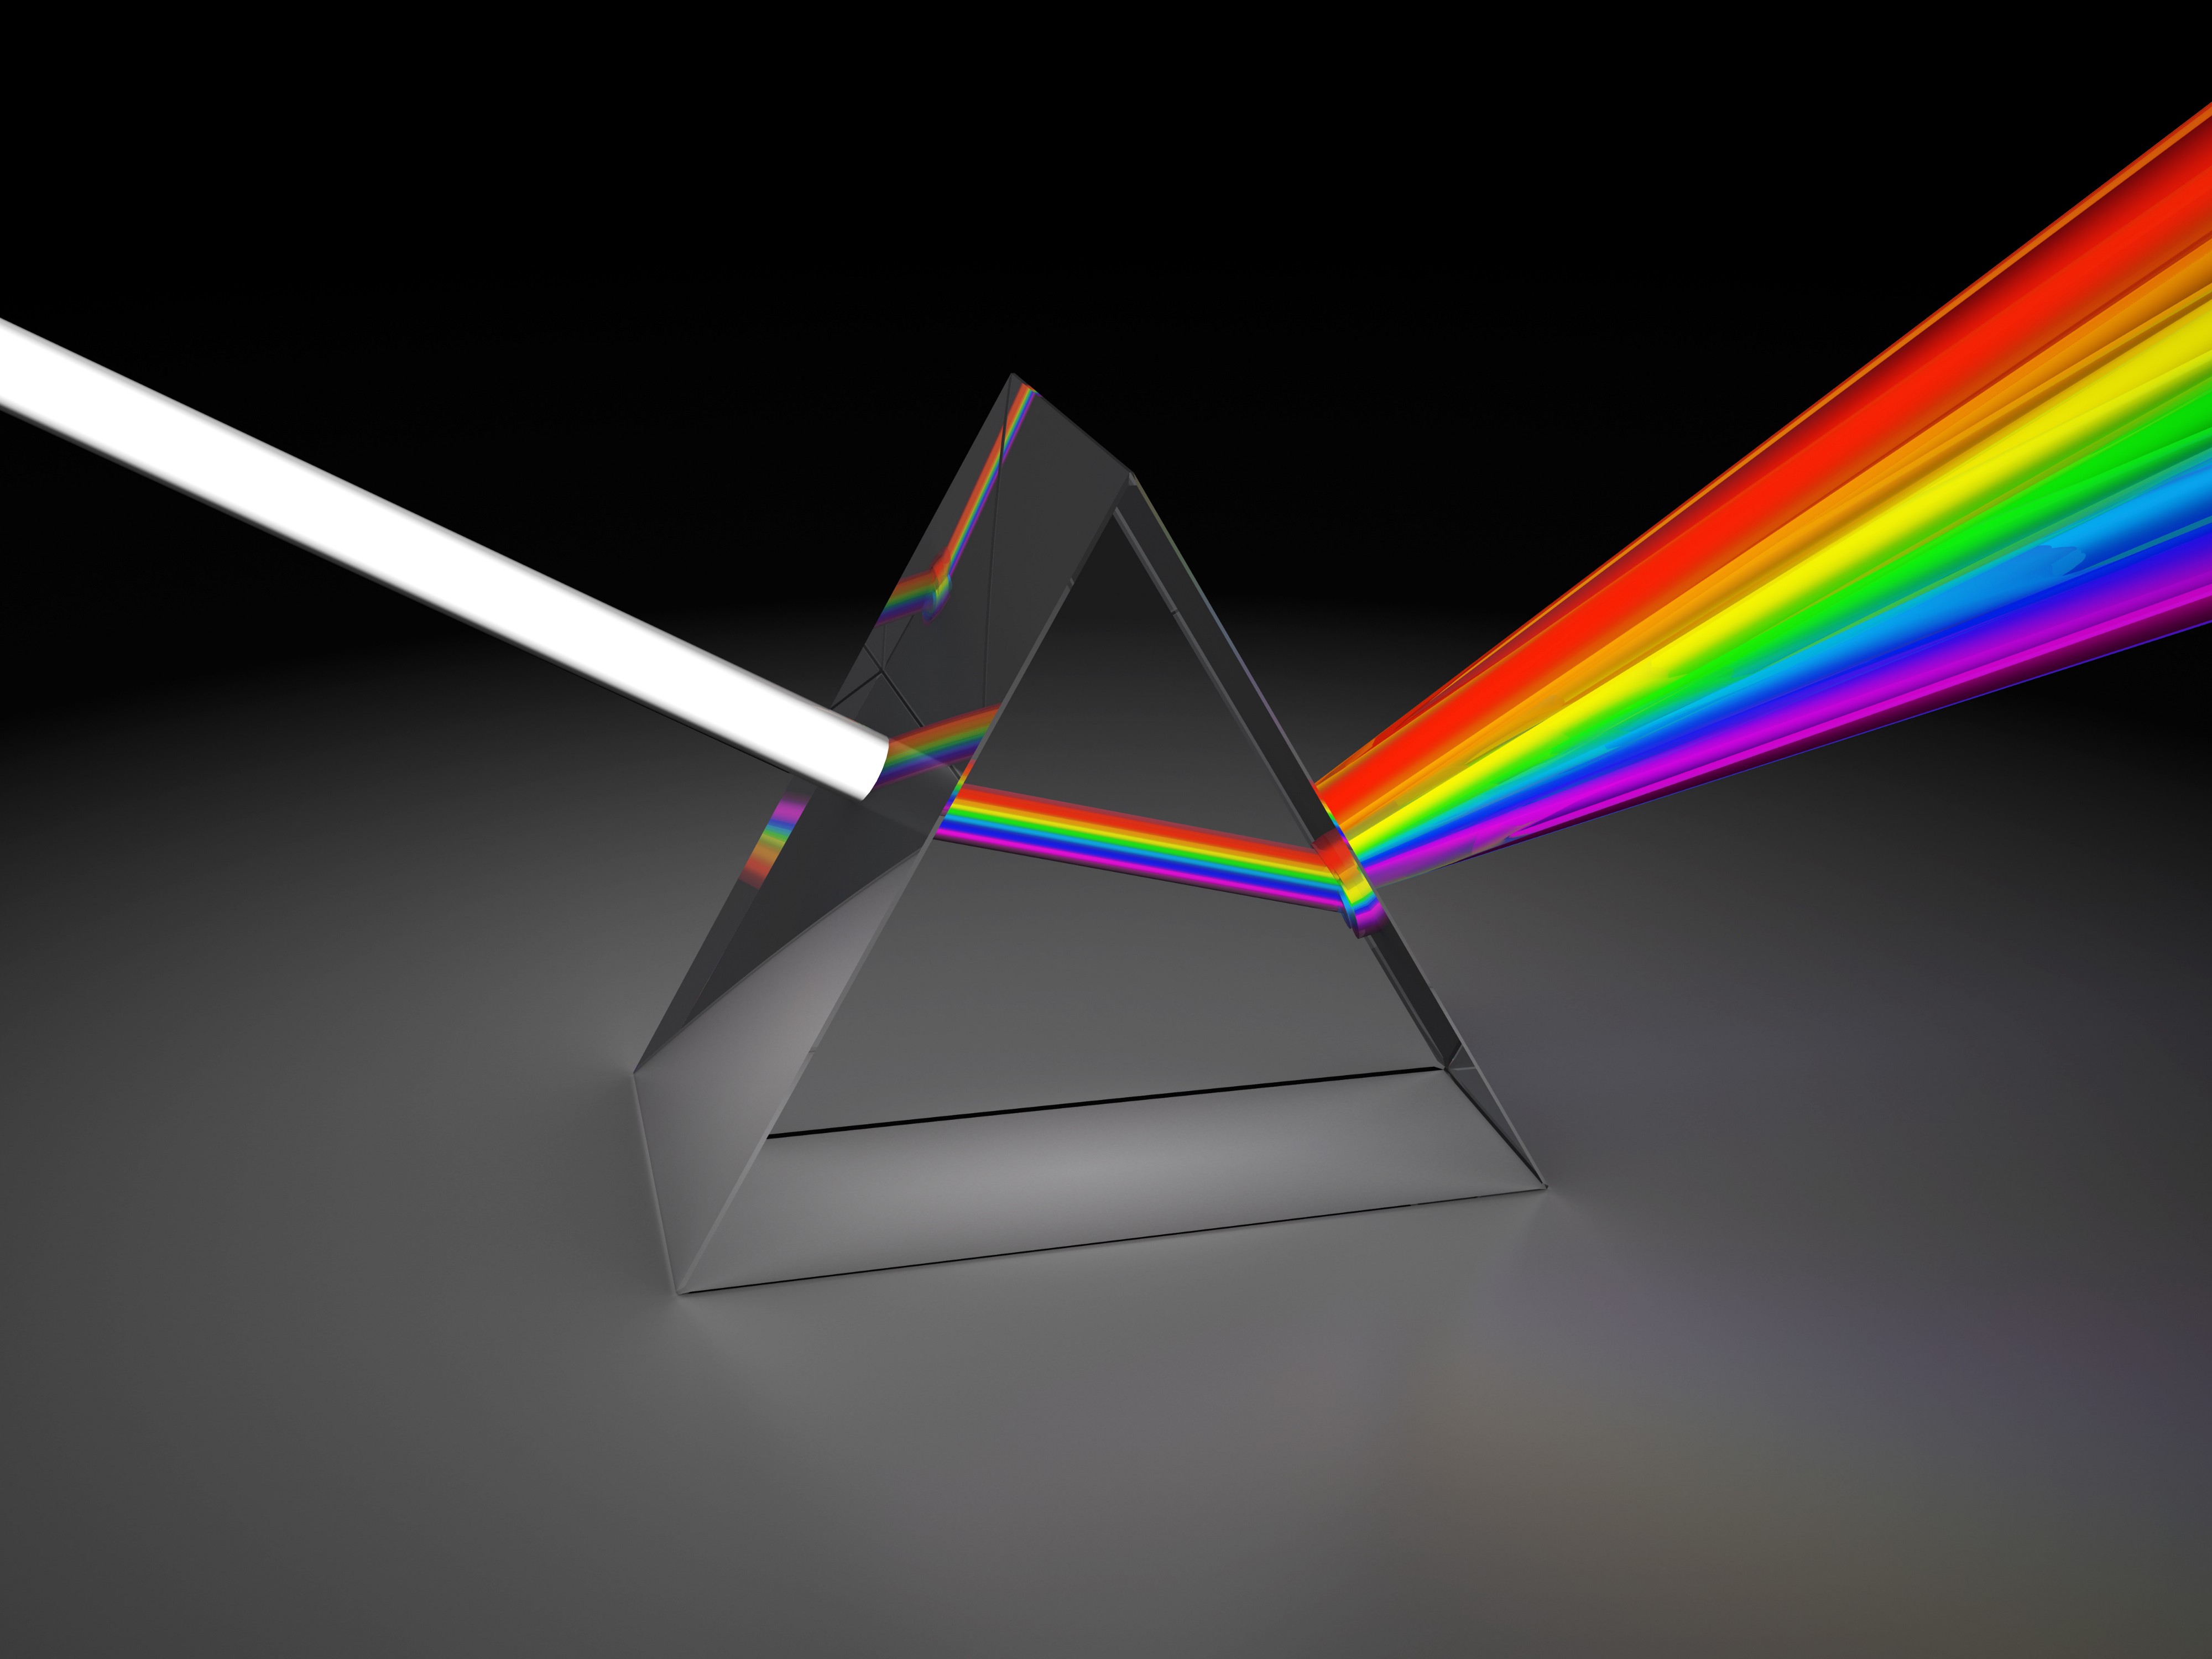 A camera lens does just one thing: It bends light.
Let?s start at the beginning: A camera lens is a device that contains one or more lens elements. At its most basic, these ?elements? are pieces of shaped glass that ?bend? light in various ways. Each element has a slightly different function, but they play nicely together in order to form a sharp image on the imaging chip.
A camera lens really only has one job, which is to focus light beams onto your imaging chip. As simple as that sounds, there?s a hell of a lot of science that goes into lens design. The main challenge is that you don?t just want the lens to be sharp in one place: You want your photo to be perfectly sharp across the entire width of the photograph, all the way out into the corners.
If that didn?t quite sound complicated enough, there?s the issue of zoom lenses: With a zoom lens, all of the above stays true, but the lens has to focus light beams into very exact places on the imaging sensor, whilst also offering the photographer a variation of focal lengths. The full complexity of this is well beyond the scope of this article, but rest assured that the engineers designing camera lenses are bloody clever people.
Part 3: The parts of a camera lens.
Before we get bogged down too deeply in all sorts of concepts and terminology, let?s take a look at what the different parts of a lens are called:
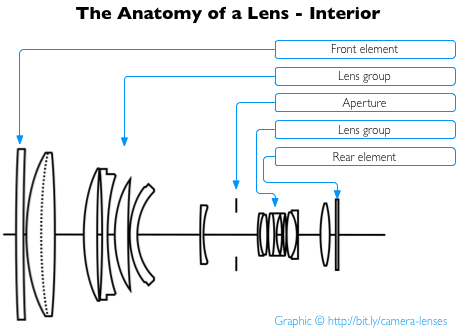
The insides of a lens are generally nothing to worry about. You know how VCR?s used to have ?no user serviceable parts inside? stickers on them? Well, that is certainly true for most ? if not all ? camera lenses as well.
The only thing you need to know about, really, is that there are a whole load of different pieces of glass inside.
Some of them will be affixed to the inside of the lens barrel, others might be moveable. The main reasons why pieces of glass inside your lens would move is in order for your lens to be able to focus, to zoom, or to assist in the optical image stabilisation process. All of these things are covered later on in this article, so keep on readin?!

The outside of the lens has a lot of different controls and attachments. Lenses can look quite different from manufacturer to manufacturer, but this graphic has the majority of things marked. The only other major control you might find on camera lenses is a ?MF/AF? switch ? this switches the lens between automatic and manual focus.
Part 4: Focal length explained
One of the things you hear about a lot when people are talking about lenses is the focal length of a lens.
What is ?Focal Length??
If you?ve ever wondered what this distance was, you might have looked it up on Wikipedia or similar, and you?ll have been met with the extremely unhelpful ?When a photographic lens is set to infinity, its rear nodal point is separated from the sensor or film, at the focal plane, by the lens?s focal length. Objects far away from the camera then produce sharp images on the sensor or film, which is also at the image plane.?
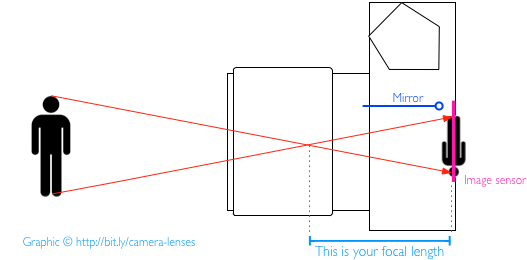
Did you follow that? Yeah, me neither, and I do this stuff for a living. Let?s simplify this hugely? When the light travels through your camera, it is flipped upside-down:
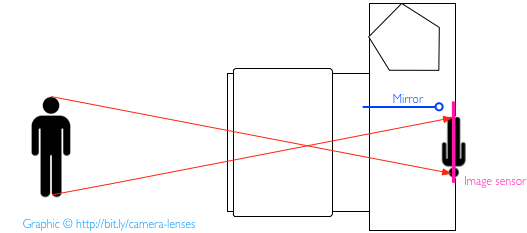
Incidentally: The sensor isn?t glued to the very back of the camera. Instead, it?s somewhere inside the camera body. If you ever need to know exactly where it is, there?s a trick:
Here?s why is there a London Underground logo on top of your camera.
It?s a circle with a line through it, and you find it on many SLR and mirrorless bodies. But what is it? It?s actually?
medium.com
As an aside, this flipping-upside-down is why a SLR camera needs to have a Pentaprism (the bulge at the top of your camera) ? this flips the image rightside-up again:
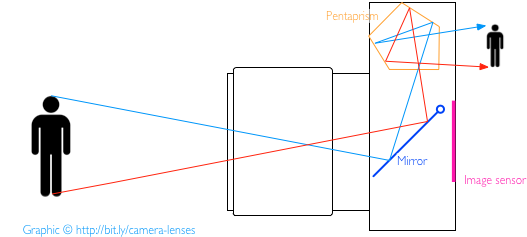
Anyway, I digress. As you can see from the drawing, when two lines intersect, they have to cross at some point. In optics, this crossing point is known as a ?nodal point?. The distance from this point to your imaging sensor is your ?focal length?:
Why is focal length important?
The Focal length of a lens describes how wide its field of view is, and this, in turn, is directly proportional to how ?wide? a lens is. We?ll talk more about ?wide? and ?telefocus? in just a moment, but let?s take a look at focal lengths first.
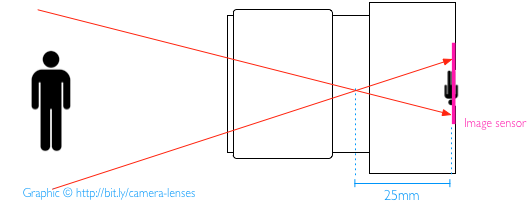
Imagine if the the place the rays cross is close to the imaging sensor. This would make an object appear small in the photograph:
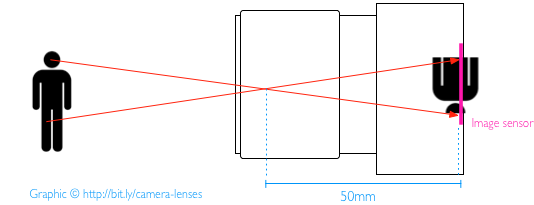
Now, imagine that the place the rays cross is further away from the imaging sensor. This would make the object appear much bigger:
As you can see, a low focal length creates a wide angle of view ? which is why lenses with low focal lengths are known as ?wide angle? lenses. The opposite is also true: A long focal length creates a narrow angle of view; these lenses are known as ?telephoto? lenses.
Part 5: Zoom and Prime lenses
We?ve talked about focal lengths, and I?ve hinted at the fact that some lenses can have more than one focal length:
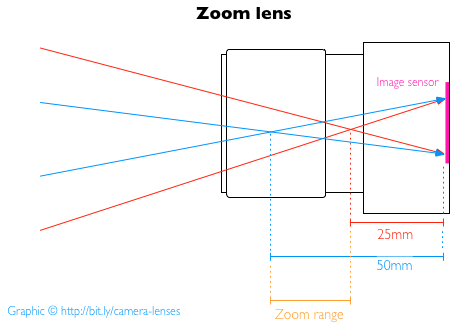
The very first lenses all had only a single focal length, but then, the clever engineers started thinking: Wouldn?t it be nifty if a single lens could have several focal lengths? In other words: Wouldn?t it be fantastic if you could take photos of big things that are close to you (such as buildings and landscapes), or perhaps small things that are far away (birds, or people running on a football field) all with the same lens?
The science boffins came up with a way of changing the configuration of photographic lenses so it became possible to move the nodal point (as you?ll remember, that?s the point where the image flips upside down inside the lens) closer or further away from the imaging sensor. By doing that, they created a variable focal length lens ? or a ?zoom? lens, as we like to call it today.
When zoom lenses were invented, they needed another word for a non-zoom lens ? so they became known as ?prime? lenses.
Part 6: Aperture and the maximum aperture of a lens
In addition to the focal length, the other key figure people talk about when it comes to lenses is ?aperture?. Aperture is a word that means ?opening?, and describes the size of the hole in a lens, which the light passes through on its way to the camera?s sensor.
Apertures are described as a fraction of the focal length of a lens, and this is where the expression ?f stop? comes from as well. Apertures are measured in F-stops, because they are fractions of the focal length. I have written about f-stops and the f-stop scale in a separate article, so if you want to delve into more detail, go peek at my Why is the F-stop scale so Weird article.
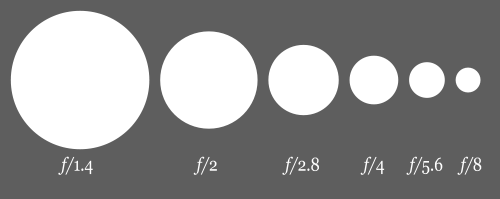
The key thing to understand is the point about fractions. So: If you are taking photos with a lens that has a focal length of 50mm, and you are taking photos with an aperture of f/2.0 lens, that means that the diameter of the hole in your camera is 25mm across. How did we figure that? Well, 50/2 = 25mm. Similarly, if you are shooting at f/4.0, the size of the hole in your lens is 50/4 = 12.5mm
Did you notice how when the f-number got bigger, that the aperture became smaller? Good, because that bit is important. When it comes to f-stops, we are talking about fractions, so f/2 is bigger than f/4, which, in turn, is bigger than f/8.
How does this affect lenses?
As you might imagine, a larger aperture (so a smaller f-stop number) means that more light is passing through the lens on its way to the sensor. More light is good if you are taking photos in low-light situations.
When it comes to choosing lenses, the most important figure is the maximum aperture. This is the biggest-size aperture your lens can use when you are taking a photo, and it is an expression of how ?bright? your lens is. As a general rule, brighter is better.
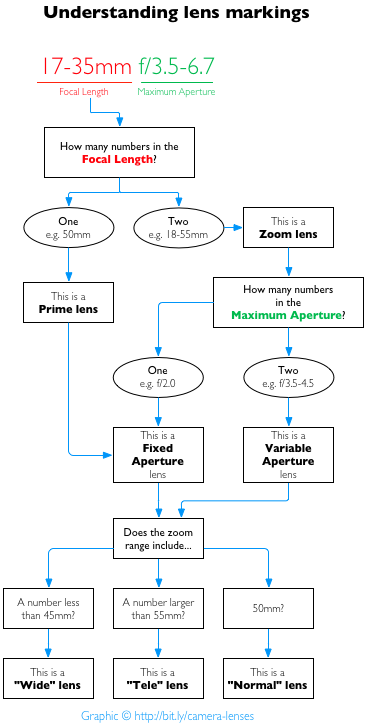
Part 7: What do the markings on a lens mean?
 So many weird markings
Now that we?re starting to get a grasp of the basics are of the numbers you?ll find on a lens, let?s take a closer look at what all those lens markings on the side of a lens mean.
The first number of a lens spec is usually the lens? focal length. This is measured in millimeters. If there is one number, you?re holding a lens that only has a single focal length, also known as a Prime lens. If there are two numbers with a dash in between, you?ve got a zoom lens. Zoom lenses are discussed in further detail later on in this article.
The second number of a lens spec is usually the maximum aperture. If you have one number, this is a fixed maximum aperture lens (or a prime lens ? there?s no such thing as a variable aperture prime lens). If there are two numbers, you have a variable aperture lens. Here?s a handy flow-chart to help you read lens specifications:
Other things you might find on a lens include:
?-0.5m ? You?ll some times find a marking like the infinity symbol, then a dash, then a distance indication. This is the operating range of the lens; it?ll indicate what the closest focusing distance of the lens is, usually both in meters and in feet.
IS / OIS / VR ? this stands for Image Stabilised, Optical Image Stabilisation, or Vibration Reduction. This means that your lens has a ?floating? lens element built in, along with some motors and a stack of electronics. The lens senses how it is moving, and it attempts to move the ?floating? lens element to counteract any vibrations.
? You?ll often find the symbol on a lens, followed by a number of millimeters. This will be the diameter of the front of the lens; it?s useful to know in case you want to buy screw-in filters for your lenses. The screw-in filters will need to be the same diameter as your lens, so this marking saves you getting the measuring tape out.
Asph / ASP ? This stands for Aspherical, and is a designation some lens manufacturers like to put on lenses that have non-circular lenses built in. They can be used to reduce aberrations and such. There?s a great little article on Wikipedia about aspherical lenses, but for everyday photography, you don?t need to worry about this.
Macro / CRC (Close Range Correction) ? this marking means that the lenses are especially designed to be sharper at shorter focus ranges, great for photographing flowers, bugs, and other little things. Note that not all macro lenses are created equal, and some are much, much better than others. If you?re looking for a lens especially for macro photography, you could do a lot worse than checking this out 🙂
USM / HSM / SWM ? An Ultrasonic motor, High Speed Motor and Silent Wave Motor are designations of electric motors powered by ultrasonic vibration. Lenses with these types of autofocus motors tend to be much quieter and significantly faster than their non-USM counterparts. Check out the Wikipedia article for full geek cred.
DX (Nikon) / EF-S (Canon) ? these are lenses that are created for less-than-full-frame camera bodies, typically the APS-C-size sensors found in digital cameras. They tend to be smaller and lighter than their full-size counterparts, but cannot be used on full-frame sensors, because the rear element of the lens sticks too deeply into the camera body ? the mirror would be obstructed by the lens if it were mounted on a full-frame camera body.
Other markings ? Many lens manufacturers will have additional markings on their lenses. Canon, for example, likes to mark its professional series lenses with a red ?L?, Sigma marks their exotic glass with EX, etc. Lens manufacturers love to make up expensive-sounding abbreviations, but they don?t always mean anything in particular to the photographer.
Part 8: Variable aperture
We?ve talked about aperture before, but in the lens markings in Part 7, a new concept came up: Variable aperture.
Variable aperture lenses are zoom lenses that have a different maximum aperture depending on how far you zoom in on your subjects. Before you scream ?why?, think about what aperture means: it?s the size of the hole the light passes through, expressed as a fraction of focal length. So, a f/2.0 aperture on a focal length of 100mm is a 50mm hole.
The definition of aperture can cause some challenges when it comes to zoom lenses. Let?s do the math on a lens that has a focal range of 28?135mm, for example, like the Canon E 28?135mm f/3.5?5.6, for example: At 28mm, you can use a f/3.5 aperture. 28mm divided by 3.5 is 8mm. If we zoom all the way in, we have gone from a 28mm focal length to a 135mm focal length, and the images you are taking are magnified by 4.8x. Impressive stuff. At 135mm, your maximum aperture is f/5.6, so that aperture has a diameter of 24mm or so.
So why can?t the lens be f/3.5 all the way? Well, at 135mm, f/3.5 would be a 38mm aperture ? but because the lens is relatively slim, there simply isn?t enough space inside the camera body to accommodate such a huge aperture size.
So, is variable aperture a bad thing?
A lot of ?serious? photographers shun variable aperture lenses, but there is no real reason to do so: They are a compromise, but then, so is all lens design. The simple fact remains that non-variable-aperture (or fixed maximum aperture) lenses offer some great advantages: They are much lighter and smaller than their non-VA variants, and significantly cheaper as well.
It is important to understand the difference between variable aperture and non-variable-aperture lenses, especially if you plan to do a lot of your photography at the ?far? end of your zoom range, but if you?re aware of the trade-offs, don?t be put off by ?em.
On the topic of variable aperture lenses: Outdoor Photographer has a great feature article on how to get the most out of ?em ? well worth a read if you want to get in-depth.
Part 9: Focusing a lens
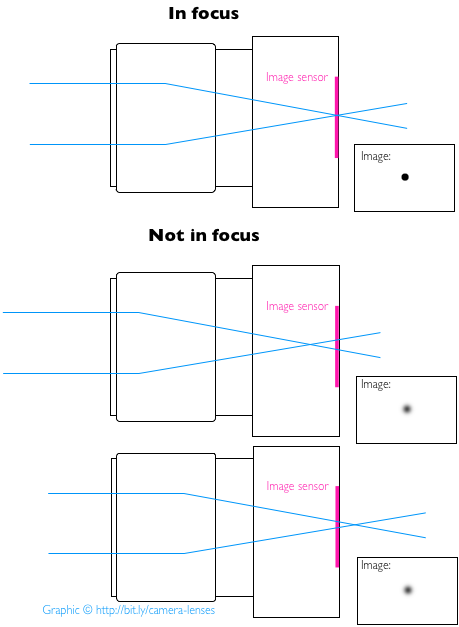
All lenses have a way of ?focusing? them. The technical definition of ?focus? is ?the point where light rays originating from a point on the object converge?.
In normal-people-English, imagine that a particular portion of your image needs to be in focus. Imagine, for example, that you are taking a photograph of this dot: ? . In order to be sharply in focus, the light rays from that dot need to hit as few pixels on your digital sensor as possible.
What is ?in focus??
You might be surprised to hear that ?in focus? is a contentious subject, where things can get very confusing very quickly, but for the purpose of this article, let?s say that something is either in focus or not in focus. If you are taking a photograph where you have sharp edges (say, of a sheet of text), and the edges are all sharp, it can be said to be in focus.
Focusing on something is done inside your lens by moving one or more lens elements closer to, or further away from, the imaging sensor. This changes how the lens ?bends? the light. This, in turn, moves the place the light rays converge forward or backwards from the imaging sensor. Ideally, you want the point of convergence to be exactly on your imaging chip ? when that happens, your photo is in perfect focus.
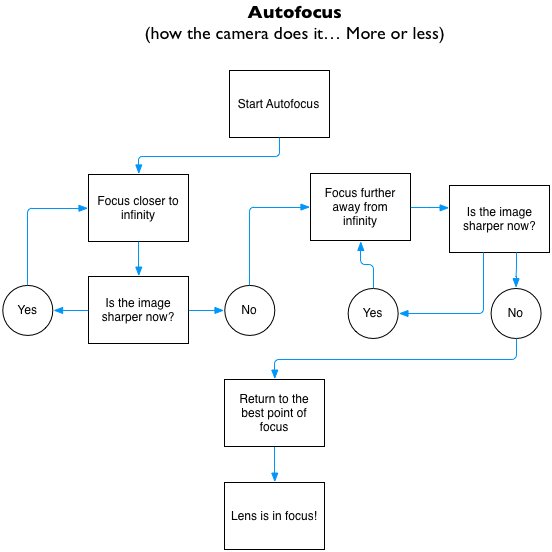
Autofocus
There are two ways you can focus your lens to get your images to be sharp; automatically, or manually. When you are taking photos using auto-focus, your camera body sends a signal to the lens, which makes the lens change its focus. The logic works a little something like this:
Manual Focus
You can leave focusing to the camera ? it is generally quite good at it. However, there are situations where you might want to use manual focus instead. For example, if you are in a situation where you know that your subject is not going to get any closer or further away, there?s no point in letting the camera focus time and time again. There are other situations, too, where the auto-focus can get confused: Scenes with very low contrast (in pitch dark, fog, or a snowstorm, for example), if you?re shooting through glass, or similar.
A lot of things in photography have gotten better, but one thing has gotten a lot worse: Old manual-focus cameras used to come with a focusing screen ? it?s a device that helps you manually focus. In the world where all cameras have automatic focus, it?s all gone. The side-effect of that is that it?s a lot harder to focus your camera manually than it used to be. If your camera has live view, you can use that to zoom in and use the same approach as your autofocus does (see the flowchart above) to focus. You can learn more about focusing screens on the internet, but be aware that it?s mostly a historical curiosity at this point.
Autofocus with manual adjustment
Finally, a lot of lenses have the feature that you can use the auto-focus on your camera to get a good starting point, and then manually adjust the auto-focus afterward. Be aware that some lenses aren?t built to do manual adjustments when the lens is set to auto-focus ? check the manual that came with your lens to find out.
You can also test whether your lens supports manual adjustments when set to autofocus by trying it out: Set your lens to manual focus, and turn it back and forth, to get a feel for how much resistance there is. Now, set it to automatic focus, and gently turn the focusing ring. If you feel significantly more resistance or (god forbid) a crunching sound, stop immediately; your lens doesn?t like this!
Internal / external Focusing
Lenses can come with two different types of focusing: Internal and external. The difference is simple: try focusing your lens, and look at the front lens element. If it turns or extends, your lens has an external focusing design. If you can?t see any changes from the front of the lens, it?s an internal focusing design.
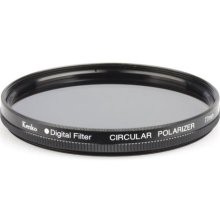
If you use filters on your lens, you should be aware that some filters (notably polariser filters) are different depending on their orientation. If your lens turns when focusing, the only difference is that you have to focus before you adjust your filters to achieve the effect you want.
Most lenses use internal focusing these days, but apart from the gotcha when it comes to Polariser filters, there?s no reason to avoid external focusing lenses.
Distance indicators
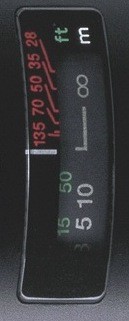 The white numbers are distance indicators in meters. Green is distance indicators in feet. And the red numbers are helping you ascertain depth of field, usually most helpful for finding the hyperfocal distance of a lens.
A lot of lenses have distance indicators built in. They are handy if you need to focus on infinity, or if you need a reminder which way to turn to go towards ?close? or ?infinity?, but I?ve never come across distance indicators that are precise enough that you can use them for focusing, really.
The only thing distance indicators are really good for is to remind you what the minimum focusing distance (i.e. how close you can get) is ? although this is normally marked on the lens as well. The second thing it can be good for is if you want to use?
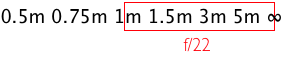
Depth of field indicators
Cameras that have distance indicators usually also have Depth of Field indicators. These are usually marked as ?22?, ?11? and ?8?, or slightly different numbers, based on the design and properties of the lens.
These markings basically indicate how much of the photo will be in acceptable focus at a particular aperture. When you are taking photos at f/22 (a relatively small aperture), and you focus your lens on infinity, you might find that everything from about 3 meters and onwards is pretty much in focus:

This is great, but what about the huge amount of things beyond infinity that would be in focus? Infinity is infinity, so in effect you are ?wasting? a lot of your depth of field. This is where the depth of field indicators come in: You can use this knowledge to take photos where most of your photo is in focus. By setting your camera to manual focus, selecting f/22, and using the depth of field indicators on your lens, you can take photos where everything from 1 meter and onwards is in focus:
Hyperfocal distances falls in the ?advanced? category, but now at least you know what those scales are, and what they can be used for! DOFmaster has a great article about how to calculate and use hyperfocal distances in your photography, if you want to learn more.
Part 10: Lens mounts
Your lens has to connect to your lens somehow ? and it does so via a lens mount. There are two main types of mount: Screw fitting, and bayonet fittings. The former is used so rarely these days that it can basically be ignored: All camera manufacturers have decided to use bayonet fittings instead. The benefits are obvious: It?s much faster to change lenses, the lenses are more secure on the camera body, and using bayonet fittings makes it possible to have electrical connections between the camera body and the lens ? a necessity for electronic control of aperture and automatic focus.
Current-generation Canon lenses use EF or EF-S bayonet fittings. EF lenses can be used on EF-S cameras, but not vice versa. That is because EF-S lenses are designed for smaller sensors ? this has advantages (if a lens doesn?t have to illuminate a full-size sensor, there?s no point in using the extra glass required; so lenses can be smaller and lighter), but it also has disadvantages: if you trade up to a full-frame camera body later, you can only take your EF lenses across, not your EF-S ones.
Nikon?s current generation of lenses are F-mount lenses; their lenses designed for smaller sensors are known as DX lenses. They also have the 1-series lens mount, for their EVIL cameras.
Each camera manufacturer has their own lens mount (the notable exception is the Four-Thirds mount, which is backed, but not used exclusively, by several manufacturers), and they are generally not inter-exchangeable.
It is possible to buy adapters to use one manufacturer?s lenses on another manufacturer?s camera bodies. This is especially true for EVIL cameras, where the small sensor sizes makes it easier to adapt to just about any lens mount ? Novoflex markets 11 different adapters for the Micro Four Thirds camera mount, for example.
Third party lens manufacturers
Although Nikon lenses generally can?t be used on Canon camera bodies and vice versa, that doesn?t mean you?re stuck buying only Canon/Nikon lenses; there are quite a few third party lens manufacturers that create lenses of varying qualities. Sigma, Tamron, Tokina and Carl Zeiss all create lenses for a multitude of cameras.
Third-party lenses aren?t necessarily ?worse? than lenses made by the manufacturer of your camera ? a high-end Sigma zoom can often be better than a similarly priced Canon or Nikon equivalent. However, if you compare the best third-party lenses with the best ?brand? lenses, the big-brand lenses tend to come out a little bit better in test.
If you?re on a budget, however, it?s well worth considering a third-party manufacturer. My Sigma 70?200 f/2.8 lens is not quite as sharp as the Canon 70?200 f/2.8 equivalent, but it is two thirds of the price cheaper? If you?re on a budget
Part 11: Image stabilisation
A lot of lenses come with image stabilisation built-in. This clever technology utilises the latest gyroscopic sensors, and motors that move a lens element to counteract any minor vibration (such as slightly shaky hands). If you?ve never experienced image stabilisation, do yourself a favour and head to a photography shop. Borrow a relatively long lens (200mm works well), and turn off the image stabilisier. Look through the viewfinder, and try to hold the lens as still as you can. Now, turn the stabiliser on, and do the same. (you may have to half-press the shutter to activate the stabiliser). It?s pure magic!
It is said that an image stabiliser can help you shoot two stops ?slower? ? so whereas you might have to use a 1/200 second shutter speed to counteract your shaky paws, you could shoot with a 1/50 second shutter speed instead, because the stabiliser is soaking up some of the shake.
Some camera bodies have image stabilisation built in, which can be awesome; it turns all your lenses into image stabilised lenses.
Things to be aware of with image stabilisation
Image stabilisation is pure magic, but be aware that not all vibrations can be removed with IS. There is a limit to how far the ?floating? lens can be moved, so big vibrations can?t always be effectively removed. In addition, in situations where you want to move the lens (say, for panning shots), your image stabiliser might try to filter out the movement. This will invariably result in blurry shots, so you may have to turn your IS feature off when you?re going out on a limb creatively.
Finally, depending on the implementation, IS can be quite power-hungry, so if you?re worried you may run down your batteries, consider flicking the switch off to save your power.
Part 12: Sensor sizes and crop factors
Imaging sensors in digital SLR cameras come in a range of different sizes, from the enormous 3045mm sensors used in the Leica S2 SLR camera, via the so-called ?full frame? sensors used in cameras like the Nikon D3S and Canon 1DX, via the APS-C sized sensors used in most SLR cameras, to the minuscule sensors used in Nikon?s new 1-series EVIL cameras.
There are tons of implications of sensor types and sizes, but that falls a little outside this ?lens? article.
Crop factor
The main way sensor size has an effect on your lenses is that if you?re taking photos with a camera that has a smaller-than-36x24mm sensor, you are effectively cropping your images. This is called a ?crop factor?, and becomes relevant when you?re explaining to someone what the focal length of your photo is.

If you are taking a photo with a 100mm lens on your full-frame sensor, you get a particular field of view. If you attach the same 100mm lens to a camera that has a smaller sensor, you?ll find that the field of view of the lens decreases. Note that the focal length stays the same ? but the apparent focal length is different because of the different sensor size.
When you?re shopping for lenses, it?s useful to know what the equivalent focal length is, because it can help you select the correct lens. If you know that your favourite wildlife photographer is taking photos with a 400mm lens, for example, you might wish to buy a lens that gives a similar field of view. If you are taking photos with an Olympus E-P3, however (which uses a Micro Four-Thirds sensor with a 2x crop factor), you only need to buy a 200mm lens. The 2x crop factor will take care of the rest, and you?ll end up with a lens that is the equivalence of a 400mm lens.
To find out what the lens equivalence is, find out what the crop factor is, and multiply it with the lens lengths. So, if you purchased a 70?200mm zoom lens, and attached it to a camera with a 1.4x crop factor, your lens would be an equivalent to a 98?280mm lens.
Finally, to learn more about crop factors on SLRs, check out this lovely video that explains it in great depth.
Part 13: Filters
Most lenses have a filter thread in the front bezel, enabling you to screw in a filter. These filters can do all sorts of things, including adding color tints to a scene, helping you darken a scene, add creative effects, and many other things as well.
Filter threads
Different lenses have different filter threads; the size of this threading is normally marked on the front of the lens, or on the lens barrel itself. Look for something like =67mm or similar ? that?ll be your filter thread size! If you can?t figure it out, bring your lens to a photography store, and they?ll have a load of filters you can try to find out what the right size is for your lens.
Square filters
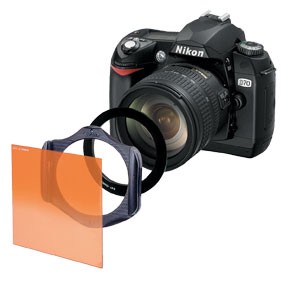
Finally, there?s a type of filter known as ?drop-in? filters, typically made by Lee, Cokin and Hitech. These are square filters instead of round. The benefit is that instead of buying a new filter for each lens size you have, you can put a filter holder on your lenses, and use all your filters on all your lenses.
Drop-in filters tend to be more expensive, but they tend to be higher quality and ? as mentioned ? are more versatile.
Using a filter for protection
A lot of photographers opt to add a ?skylight? or ?uv? filter to the front of their lenses to protect the lenses from damage ? say, for example, that your camera was splashed with paint or a corrosive chemical, or perhaps you bump it into something. The logic is that it?s much easier and significantly cheaper to replace a filter than the front element of a lens.
Using a filter like this comes at some minor image quality degradation. It is a cost/benefit analysis: Either you?ll use your filter, and accept a minor decrease in image quality, in order to achieve peace of mind. Alternatively, you might decide that it?s not worth taking the image quality drop in order to protect your lens. Personally, I use an UV filter on lenses that I carry around with me a lot, because I do knock them into things some times ? but I?ll take the UV filter off when I?m taking photos like cityscapes, or scenes where I?m taking photos into the light. Experiment to find out what works best for you!
Rear filters
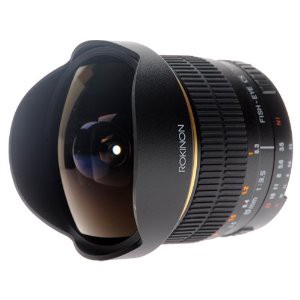
There are a few lenses that do not accept filters at the front of the lens; this is true especially for specialty lenses like fish-eye lenses: Since the front of these lenses are rounded, there is no space for a traditional filter.
Some of these lenses have a slot at the rear of the lens where you can add a filter. Obviously, these filters don?t help you protect the front of the lens, but they can be used for creative effects.
Part 14: Lens hoods
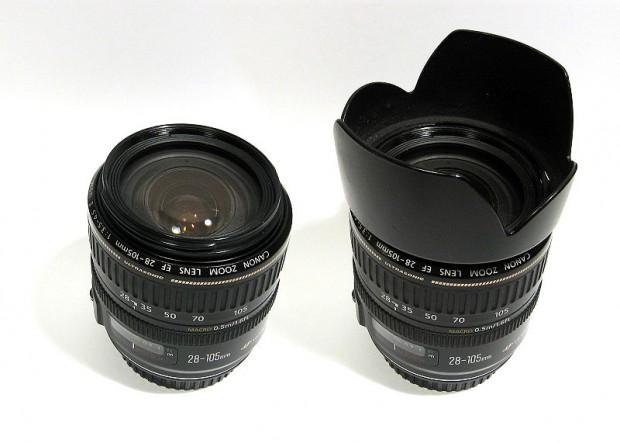
Beams of light hitting the front of a lens can cause ?flare?, ghosting, or other curious effects. If you?re taking photos straight into a light source, you?re out of luck, but if you?re merely trying to block out stray light hitting the front lens element, a lens hood might be your best friend.
A lot of camera lenses come with hoods, some have them as optional extras, or you might be able to make your own using templates that are freely available online.
Part 15: Tele-converters and Macro Rings
We mentioned in Part 10 that it is possible to use an adapter to use the lenses from one manufacturer on the camera body of another. That?s done by using an adapter that goes between the camera body and the lens. Tele-converters and macro rings work in much the same way, to modify the behaviour of a lens.
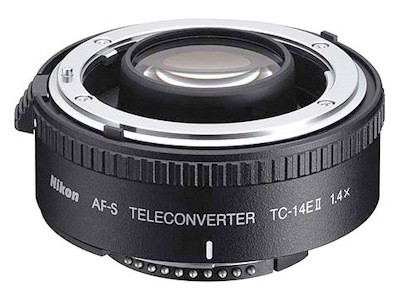
Tele-converters (TCs) are spacers that go between a camera body and a lens. They have an optical element in them, which re-focus the light that goes through the TC. The effect of the teleconverter is that they increase the focal length of a lens. Tele-converters come in different magnifications, but 1.4x and 2.0x are the most common.
TCs are a great way to increase the range of your lenses, but unfortunately, you also lose some light. For most teleconverters, the amount of light you lose is the same as their magnification ratio, so, if you attach a 100mm f/2.0 lens to a 2x TC, you get a 200mm f/2.8 equivalent lens.
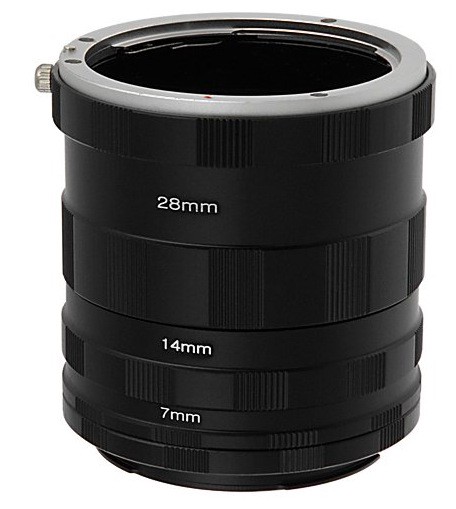
Macro extension rings are merely spacers, they don?t have any optics in them, which means that they are a lot cheaper than TCs, usually. You can stack macro rings, so if you have a 14mm and a 20mm ring, you can combine them and have a 34mm spacer.
Macro rings work by reducing the focusing range of your lens. It means you can no longer focus at infinity, but it also means that you can bring your subjects much closer to your camera; perfect for taking photos of small things.
Macro extenders are quite easy to make yourself, if you fancy having a go before you put any money down.
Part 16: Distortions
Not all lenses are created perfectly, and all lenses have smaller or greater amounts of distortions. Prime lenses tend to have less distortion, because the lens designers don?t have to accommodate a range of focal lenghts, but technology is improving all the time, and modern zoom lenses are plagued much less by distortions than older lens designs.
There are two types of distortions worth being aware of; Barrel distortion is so-called because it makes edges that should be straight look barrel-sized. Pincushion distortion is the opposite: It makes edges bow inwards. Finally, there?s a combination of both distortions, often known as a ?complex? distortion, or a ?moustache? distortion (because the top edge goes down then up, then down again, like a moustache).
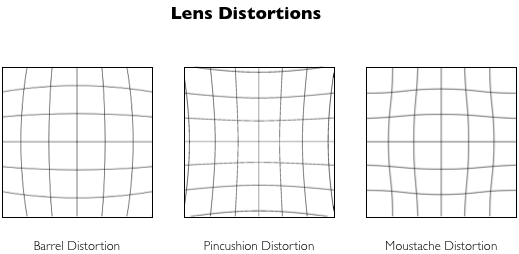
There?s not a lot you can do about distortions when it comes to using your lens, although it is possible to correct for lens distortions using photo correction software. In general, I wouldn?t worry too much about them ? the main reason I?ve included them here is so you know what they are if you read about them in reviews.
Part 17: Aberrations
In addition to distortions, it?s worth being aware of lens aberrations. When light passes through a lens, all light isn?t ?bent? in exactly the same way.
Some colors are affected slightly more than others, and light might be the victim of minor flaws in the glass, diffractions from the aperture assembly, refractions from the various glass elements, etc. Some of these aberrations can be reduced in software, but others are less easy to squash.
I?ll be honest with you: I know a lot about lenses, but aberrations make my brain hurt. If you feel like sharing in my pain, try to plough your way through this Wikipedia article, or, y?know, try one of these? Or do what every sane photographer would do at this point, and ignore it, in the hope that the problem goes away. It works for me?
Part 18: Sharpness
I?ve written a fair bit about how to ensure your photos are as sharp as possible. . A lot of this depends on how good your lens is, but if you?re going for optimum sharpness, there?s something to be said for using your lens correctly, too!
The most important thing to be aware of when it comes to lenses, is that sharpness is measured in a whole host of different ways.
Center vs edges: The rule of thumb is that lenses tend to be sharpest in the middle, and become less sharp towards the edges. Since the corners of your image are furthest away from the center, that?s where they tend to be least sharp.
Zoom range: Sharpness of a lens will vary through its zoom range. The gotcha here is that it isn?t always completely predictable where your lens will be the sharpest. Some lenses are sharper at both extremes of their zoom range, indicating that the designers have focused on making the lens as good as it can be when it?s fully zoomed in and out. Other lenses tend to be more sharp around the middle of the zoom range.
A very few other lenses have bizarre peaks and troughs of sharpness throughout their zoom range. The only way to find out is to learn about MTF curves and read the scientific charts for your lens. Or you could just decide the same thing that most photographers seem to agree on: Leave the scientists to do their science bits, and concentrate on taking good photos, without worrying too much about a couple of percent reduced sharpness here or there.
Aperture range ? One thing that?s definitely worth knowing is that all lenses have a curve of sharpness that changes with its aperture range. When you are shooting wide-open (i.e. with a very large aperture), your lens will be less sharp. Go down a couple of stops (i.e. use a slightly smaller aperture), and your lens will be quite drastically sharper. As you step through the smaller and smaller apertures, your lens will gradually be less sharp again, due to diffractions etc.
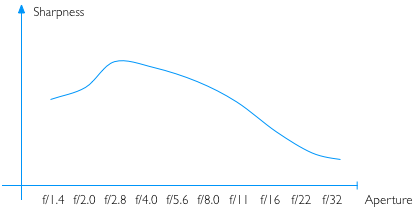
Finally, it?s worth pointing out that whilst all this talk of ?sharp? and ?less sharp? sounds very dramatic, the differences are often quite subtle ? and remember that image quality is not all about sharpness either: Even if you are taking a photo with a zoom lens zoomed to its least sharp bit of its zoom range, at its widest aperture, and you crop the image to a section that includes the extreme edges of your photo, you can still end up with perfectly lovely photographs. Don?t let differences in sharpness that in many circumstances can only be measured in a laboratory get between you and taking great photos?
Part 19: Specialty lenses
In addition to zooms and prime lenses that make up the bread and butter of most of our photography existence, there are a load of different specialty lenses out there; exotic pieces of kit that are used by people who want to do unusual or special things with their photographic equipment. I don?t really want to go into this in detail, but I do want to leave you with a few of them, so you know they exist.
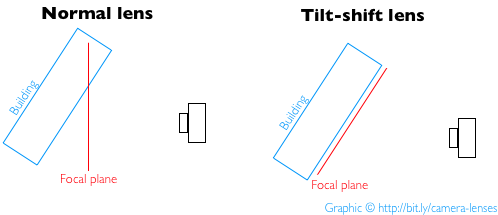
Tilt shift lenses are designed to be able to create a diagonal focal plane. When you are taking photos of a building with a normal lens, for example, you have a problem: If the building is at an angle from you (or if you are standing on the ground, photographing a tall building), it becomes hard to get the whole thing in focus, because your focal plane is perpendicular with your imaging sensor. Because the building is not, you need to use a small aperture to photograph the building, which has its own challenges.
By using a tilt-shift lens, you can adjust the focal plane to match your subject, which is perfect for creating perfect depth of field:
Of course, you can use tilt-shift lenses to achieve the opposite as well: By changing the shift to go against the usual, you can create a ?miniature? effect, where real-life scenes appear as miniatures.
Fish eye lenses are used to create an unusual perspective in photography; instead of trying to minimise barrel distortion, fish-eye lenses embrace the effect. You?ll often see this effect used in skateboarding videos, for example.
Macro lenses are used to take photos up close; insects, flowers, medical imagery, and scientific photographers use macro extensively.
Want to learn more about photography? I run a 100% free photography newsletter that takes you through all the basics. You can find it here.

