Do you want to sound like a pro on Twitch? Give an ear to the right settings.
Apart from the game you play, one of the things your viewers are going to notice as soon as they land on your channel is the sound quality. First impressions matter.
If you haven?t thought much about the impact of your microphone, its position, your recording space and all the OBS filters you can tweak to improve your audio, it?s about time you did.
Here?s an awesome Twitch analyzer you can use to check the quality and stability of your stream or to use the settings of someone else as a reference point. It can work for some streamers but it?s best if you try and figure out the right set up for your own situation.
The audio quality depends on a few things:
Your mic
You don?t have to go spend hundreds of dollars to achieve great sound quality. You?ll frequently get recommendations for a condenser mic like the Blue Yeti or the AT2020. Consider them if you want to step up your audio game. They?re way more sensitive to loud noises and can have a larger range. However, you can decide on a dynamic or broadcast mic because they?re easier to work with and you?ll worry less about background noise. Frankly, there are also some pretty good headset options.
Your microphone can make you sound awesome but remember that there?s more to audio quality than just plugging a 100+ dollar mic in.
Your mic?s position
If you?re using a condenser mic, it?s better to place it closer to you, approximately 1?6 inches away from your mouth. In any case, getting a mic stand, a pop filter, and a shock mount is a must.
If you?re using a headset, never place your mic directly in front of your mouth because most people don?t want to hear you breathing. If it comes with an adjustable arm, the best place, depending on its length, would be right around or under your chin off to one side.
Your recording space
Even the most expensive premium quality microphone won?t make you sound like a god if the room you?re using produces a lot of noise.
That would depend on the walls, the floor and all the other surfaces in it. In case of background noise, you have 3 options: pick a very insensitive mic, soundproof your room or, ideally, do both for maximum results.
Do what you can to reduce the background noise by placing your mic as further away as possible from the noise sources. You can also improve a lot by covering any large flat surfaces with acoustic foam panels or even with blankets. If you?re using a headset mic or have a fan in the background, getting a wind screen is another possible solution.
Your settings
No one can give you the perfect settings because they depend on a wide range of factors.
- Volume
The most important thing you should pay attention to is the volume of your mic. A lot of streamers make the mistake of putting their volume level a bit too high. This is a common issue among the ones who are using onboard mics.
Before you jump into adding filters to adjust your sound, check your audio level in Windows by right clicking on the sound icon and selecting Recording Devices. Then click on the Properties of your mic and tick Listen to this device. After that, go to the Levels tab and test your microphone by speaking. Adjust the level until there?s no feedback.
Your microphone audio should be louder than your computer audio.
The next step to make your sound even clearer is to play around with OBS.
- OBS Audio Settings
Take a look at the Mixer settings in your OBS.
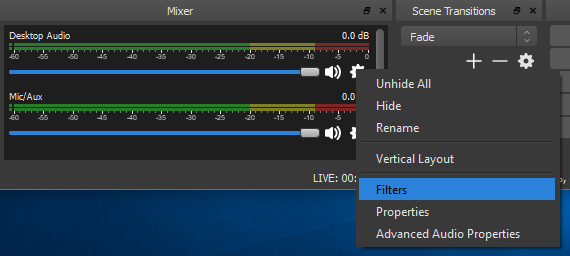
The Mic/Aux settings adjust the volume of your microphone. If your mic is set up, you should see an illuminating green light as you speak. You want to keep this at the yellow level. If it?s red, you?re too high and if it?s green, it?s too low. Adjust the volume using the slider below the bar.
For your desktop audio, set it a little below the yellow level so it doesn?t go too high when you?re trying to speak over the game you?re playing.
Only mess with the webcam audio if you?re using it for your stream?s audio.
OBS Filters
Use OBS filters to improve your audio. You can access them from the cog wheel on the right of your Mixer Settings as seen in the picture above.
The amount of adjusting you?ll need to do for each filter will depend on your voice, microphone and the room, so keep in mind that the best settings are the ones you finetune yourself.
You can add any filter you want simply by choosing what it from the + button on the Filters window. Here are the ones you need the most as a streamer:
- Noise Suppression
Noise Suppression reduces the amount of background noise. It won?t work if there?s a party going on in your room but it does the trick for noises coming from your air-conditioning or the street outside. Once you add it, the default noise suppression settings will be activated. You can play around with the level of suppression until you reach a satisfactory result.
- Noise Gate
This filter will help keep your microphone completely silent when you?re not speaking. You can also use it to reduce noise coming from your keyboard which is probably too close to your mic. Take a look at the filter settings:
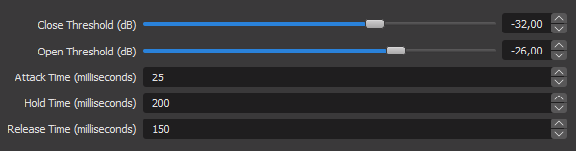
The Close Threshold is the decibel level at which your microphone will be muted and the Open Threshold is the opposite. Test to finetune these levels by taking turns to speak and be silent. You?ll want your microphone to be illuminated in green only when you?re speaking. Your Close Threshold should be above the noise volume and the Open Threshold should be slightly below your mic level. When you?re testing it out, try to speak at the same level you do when you?re streaming.
Attack Time is the time period needed for noise to be active to trigger the mic.
Hold Time is the amount of time the mic will remain active after you stop speaking.
Release Time is the time it takes for the filter to turn off your mic.
In general, the default milliseconds should work for you but feel free to adjust them as necessary.
- Compressor
The Compressor is a must-have filter for any streamer. It turns the loud noises down automatically so your audio won?t get clipped or distorted when you shout in excitement. You?d want to place the compressor near the beginning of your filter chain.
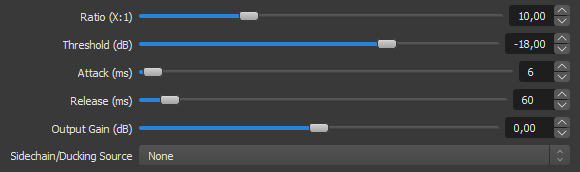
The Ratio is the amount of compression that will be applied to a sound above the threshold.
The Threshold is the point at which the compressor will kick in.
The Attack indicates how quickly the compressor will turn in after it detects a high volume.
The Release shows how quickly the compressor will return the volume back to normal.
Pick a Sidechain/Ducking Source if you want to use the input from one audio source to reduce the volume of the output source. For example, if you place the compressor on your desktop audio, the Sidechain can use the input from the device you selected (for example, your mic) to reduce the volume of the desktop sound.
- Gain
Before you add that filter, check your mic?s volume level through the Windows sounds. If the sound is still not high enough, use the Gain filter to increase the volume.
A few more audio filters were recently introduced with version 23 of OBS. One of the most useful new filters for a streamer is the Limiter.
- Limiter

This filter limits your audio to the level you choose. It simply stops the audio above a certain dB value. You can set it to -1 dB because peaking above 0 dB can cause clipping and distortion. Anything above the set threshold will be flatlined.
According to the official OBS filters guide, this should be the last filter you add to your chain.
Remember to always test your audio after you play around with its settings.
Do a stream or a video to make sure that everything is in order.
These are the easiest settings you can apply to improve the sound quality of your channel. Audio fine-tuning is a whole science in itself.
Start learning.
Who are we?

Stream Edge is a new project dedicated to helping streamers grow through personal analysis. We?ve talked to hundreds of streamers with the purpose of finding solutions to their most common problems. For more information, check out our main channels:
- Website
- Discord