I bought a new place last year, the first time I?ve been a home owner (well, condo, but close enough), so I moved my belongings from a small studio apartment into a much larger place. Since I carried light and didn?t have any furniture besides a rolling computer chair and a computer table (I didn?t even have a dining table or bed frame), I needed to furnish the place. Looking at couches and shopping around both online and in brick and mortar stores, I saw prices ranging from $600 to $2,000+, and the designs I liked usually cost upward to $1,000 or more. Then an idea popped in my head: let?s make a sofa!
As I looked online to see how hard it would be to make one, I realized there?s not that many resources documenting the process and explaining why certain things were needed, why a dimensions was made this way, or why there?s springs on the bottom of a couch. You would think in this age of DIY and Instructables that there would be a few that shows plans and blueprints, but I could only find one from Australia. So, in my effort in making a couch and diving deep into the world of furniture making, I?ll document my research and maybe someone else will find this info useful for making a couch. The only thing I?m lacking is the blueprints in this article, which I will have to draw out (instead of the sketches I made for myself).
Sofa Background
A couple of notes before we jump into the how?s and why?s of sofas. There?s a reason why many good sofas cost $1,000 and more. It requires having two skills below:
- Woodworking ? Using power tools, traditional tools, and joinery
- Sewing ? Making cushions, upholstery tools
If you can?t sew, you can buy custom cushions from shops at an additional cost. If you can?t use wood cutting tools or can?t make wood joints, then this might not be the project for you. If you still want to make a sofa but have neither of those skills, there?s palate bed couches that people have made. Probably the easiest and simplest way to make a makeshift sofa, but not as elegant.
Traditional VS Modern
There are two ways of making a couch: the traditional way and the modern way. Traditional couches are those vintage sofas you see with flowery designs and made from innately carved wood, or maybe it?s just plain wood. In these designs, the cushions are built straight into the fabric and springs are tied down to the bottom. If the cushion or fabric broke in any way, it?s likely that the whole couch would need to be redone to repair it. Upholstering also requires skill in order to make these properly.
The new modern designs split the springs from the cushions so you have replaceable cushions and different types of springs in the bottom. The modern designs generally involve more clean-cut lines and the recognizable ?sofa? that people have in homes. When I say ?sofa,? what comes to your mind is most likely the modern sofa and not the traditional.
For the sake of simplicity, I chose a modern design. Also, I don?t have the upholstery skill to make a traditional sofa, not to mention the hours of work and specialized tools needed to do it.
Springs VS Webbing
Under the sofa cushions is another system of support to make that sitting experience more comfortable. There?s two methods of support: springs and webbing. Webbing is the cheapest method and involves weaving 2?3″ semi-elastic bands across a frame. This is the cheapest option and most places generally say to avoid this when buying a sofa. The upside is this doesn?t squeak compared to springs when they start wearing out or become misaligned.
Springs have two methods to it. The first is the S-Springs or sinuous/serpentine spring. These are the cheaper version of a normal coiled spring and are instead these wavy heavy gauge steel that line the underside of the sofa. You?ve probably seen them if you?ve flipped a sofa over. I think these are the most commonly used springs for the majority of the sofas I see.
The second method is the high end Eight-Way Tied Springs. This involves coiled springs set evenly at the base of a sofa and tied together with high quality twine. As it is tied to each other and the sofa, it crosses in eight different directions, giving it the name and allowing the springs to share the weight no matter where you sit. This type of spring method is the reason why your couch may cost $2,000, but it?s the sturdiest support.
Again, for simplicity, I chose to use webbing for my sofa. Webbing itself is not bad if the couch has casual use, but in cases where there?s kids jumping on the couch (or maybe you feel like jumping on it), springs are much better.
Sidenote
You may be wondering ?why don?t you just use a solid piece of wood and put a large cushion on top of it?? The reason is a solid piece of support puts all the stress on the cushion, so it will wear out faster. The springs and webbing are meant to offset the stress so the cushions don?t bottom out as fast, plus it gives it more room to bounce (compare jumping on a sofa with springs and a large piece of foam on solid wood). If you want to be really cheap in making a sofa and don?t plan on keeping it for long, then you could do that, but you?ll need to offset with larger cushions so it doesn?t feel like you?re sitting on a wooden bench and make sure there?s breather holes in the wood.
Staple Gun vs Tapestry Tacks
A minor thing, but there?s two ways to attach the fabric and webbing/springs to the sofa: either using traditional tapestry tacks, which are small blue tacks, or using an electric/air compressor staple gun. Tapestry tacks are the old styled way using a tapestry hammer specially made for attaching webbing and fabric. The new modern way is staple everything, which is the way I went. You could use a hand staple gun, but it?s going to wear our your hands and arms for something this big.
Standard Dimensions
So what about the size of a sofa? A three person sofa is generally 85″ long, 35″ deep, and 35″ high, but that?s a rough guideline. The max length is generally recommended at 85″ since any longer and you?ll have trouble carrying the sofa up stairs (pivot!), though normal couches still have this issue. The depth of a couch is pretty consistent around 30″-35″. The height of a couch is generally 30″-36″ and is determined mostly by design and how well it matches the height of other furniture.
Now that you have a general idea on the block size of a sofa, let?s get down to some details you probably didn?t consider. What is the seat height? This also varies based on design, but the most common is 18″ from the floor to the top of the seat cushion. It varies from 13″ to 20″ and is up to a personal preference and the height of a person. The higher the seat height, the more your feet will dangle if you?re too short.
What is the seat depth? This is the length from the front of the seat cushion until the back cushion. The standard is about 20?21″ for the most part. What about the seat height for the back? The standard is 15″, but again, it can vary based on design and a person?s height.
There?s also the issue of seat incline. If you want to be technical about it, most places suggest a 90?100 degree angle at the front to be comfortable for the legs to hang. The back incline is 5 degrees for more upright sofa and 15 degrees for a more casual back. If you don?t care about any of this, just make everything right angles and use cushions for everything. That?s what I decided to do.
Fabric
Not much to say here other than user preference. I wanted something soft and not leather, so I went with microfiber. You can shop around stores for the different fabrics and see which one you like better. As usual, better material is more expensive per yard. Also note that upholstery is thicker than normal fabric if you?re used to sewing. You?ll need to make sure you have the proper needle to go through the fabric and, if you?re using a sewing machine, that the stress doesn?t destroy your needle and motor. Luckily, microfiber is both cheap and relatively thin, so a regular sewing machine and a simple needle works.
Design
Finally! After all that research, it?s time to draw out the frame and figure out what we really want. This is more of an optional step if you?re not a designer or don?t know what you want. In my case, I wanted to make my sofa with a contemporary style, be modular enough that I could transport it easily, not have curves (because I don?t have tools for that, nor do I feel like carving/sanding it out), and have a USB port. Why a USB port? So you can set your phone on a small table nearby and charge it.
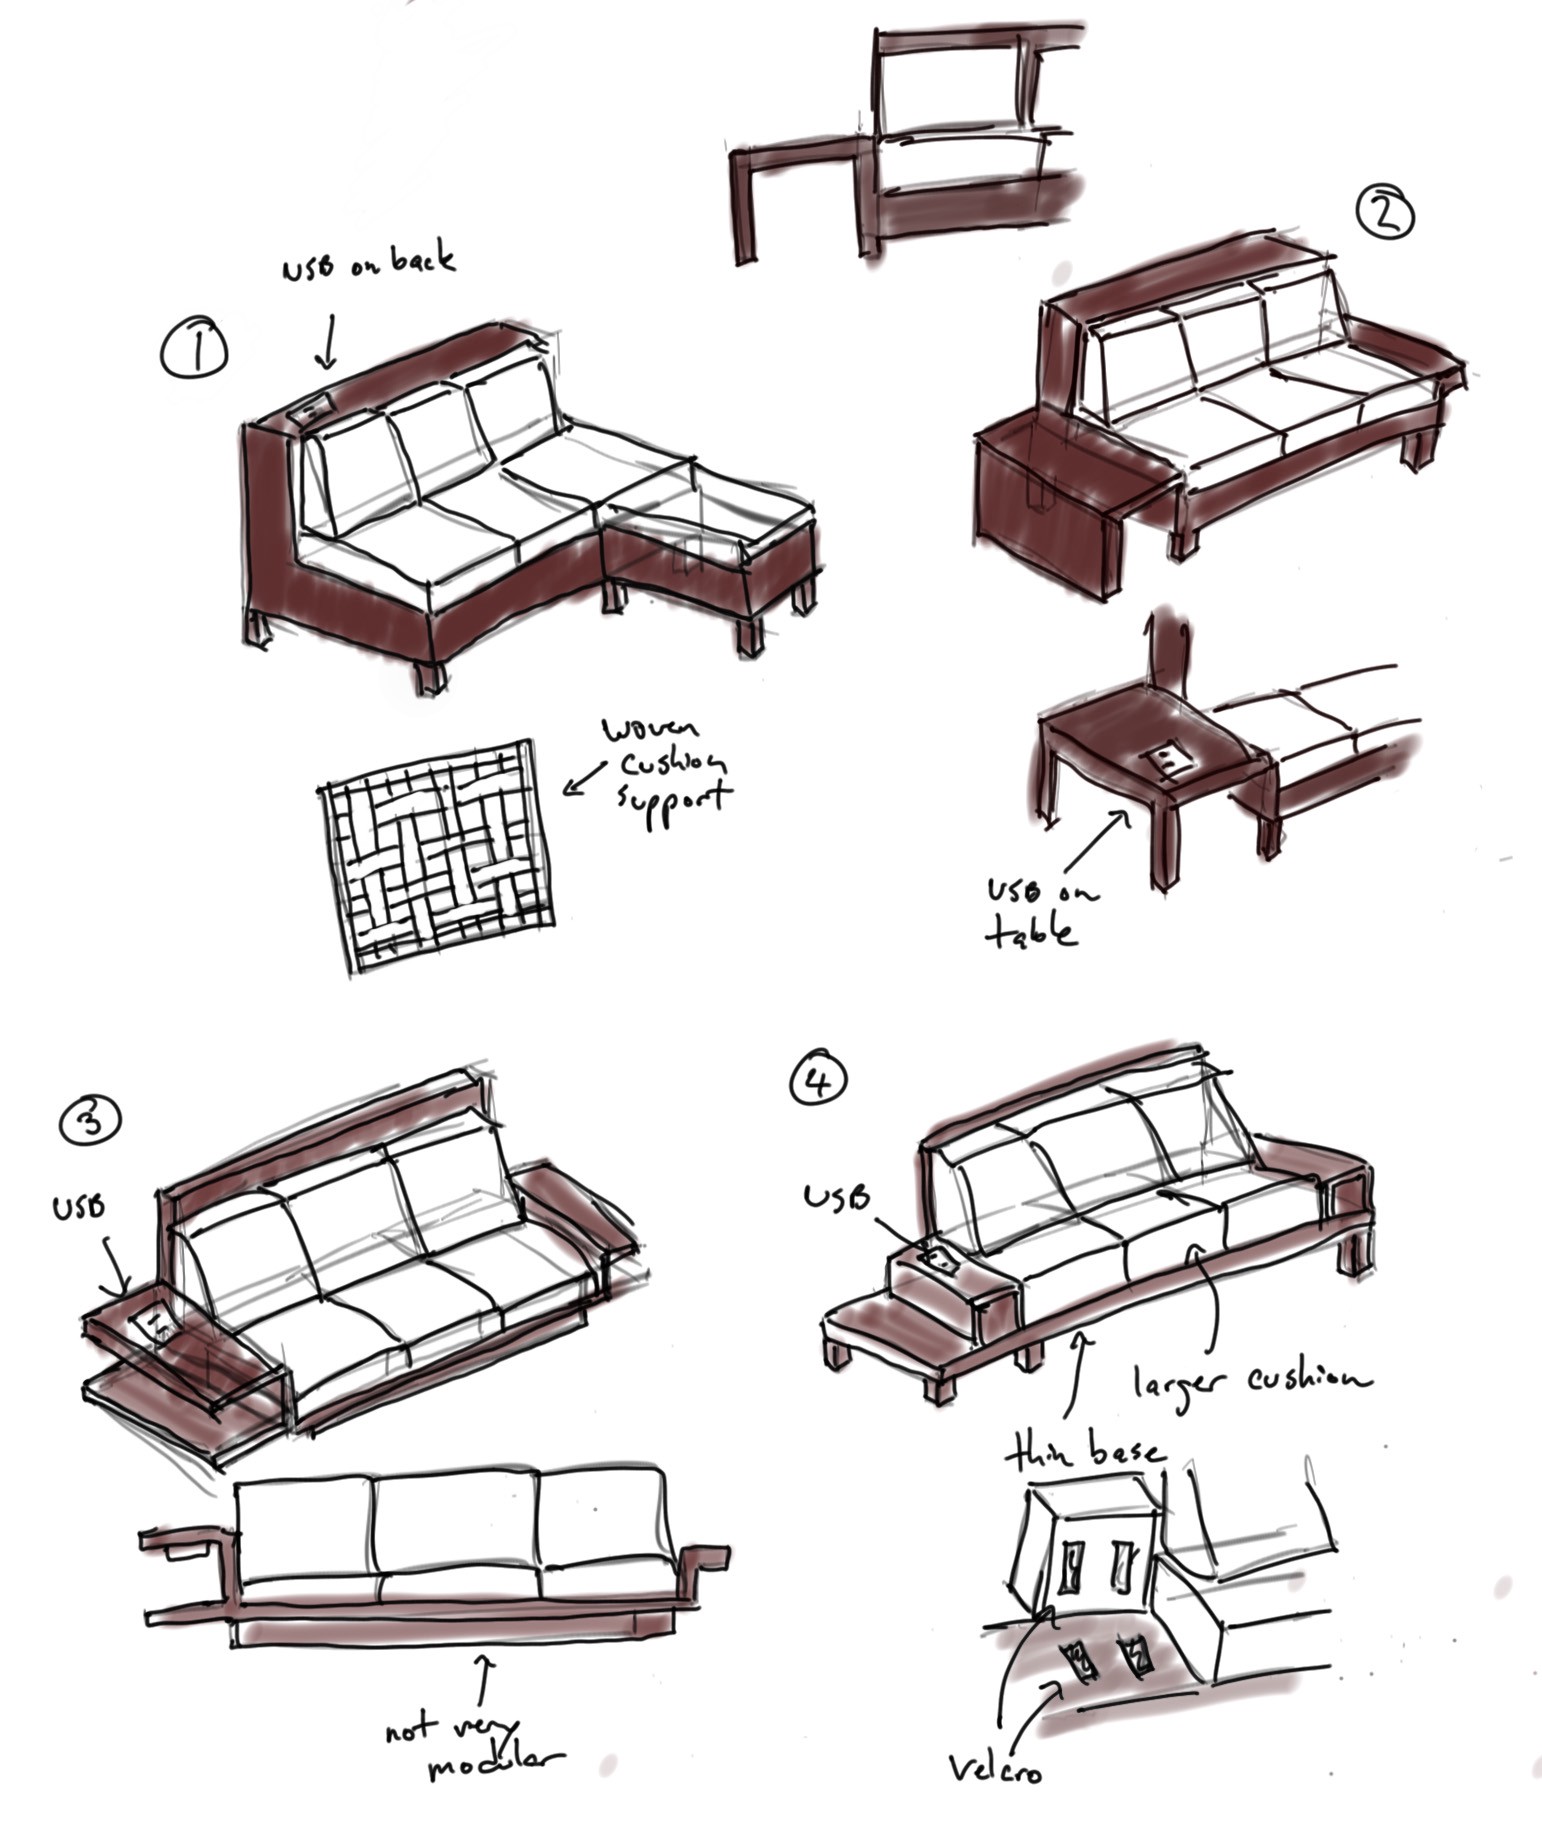
I did a lot of Google searches for different sofa designs for inspiration as I didn?t know the exact look I wanted. I drew several sketches based on a few that I liked and settle upon #2.
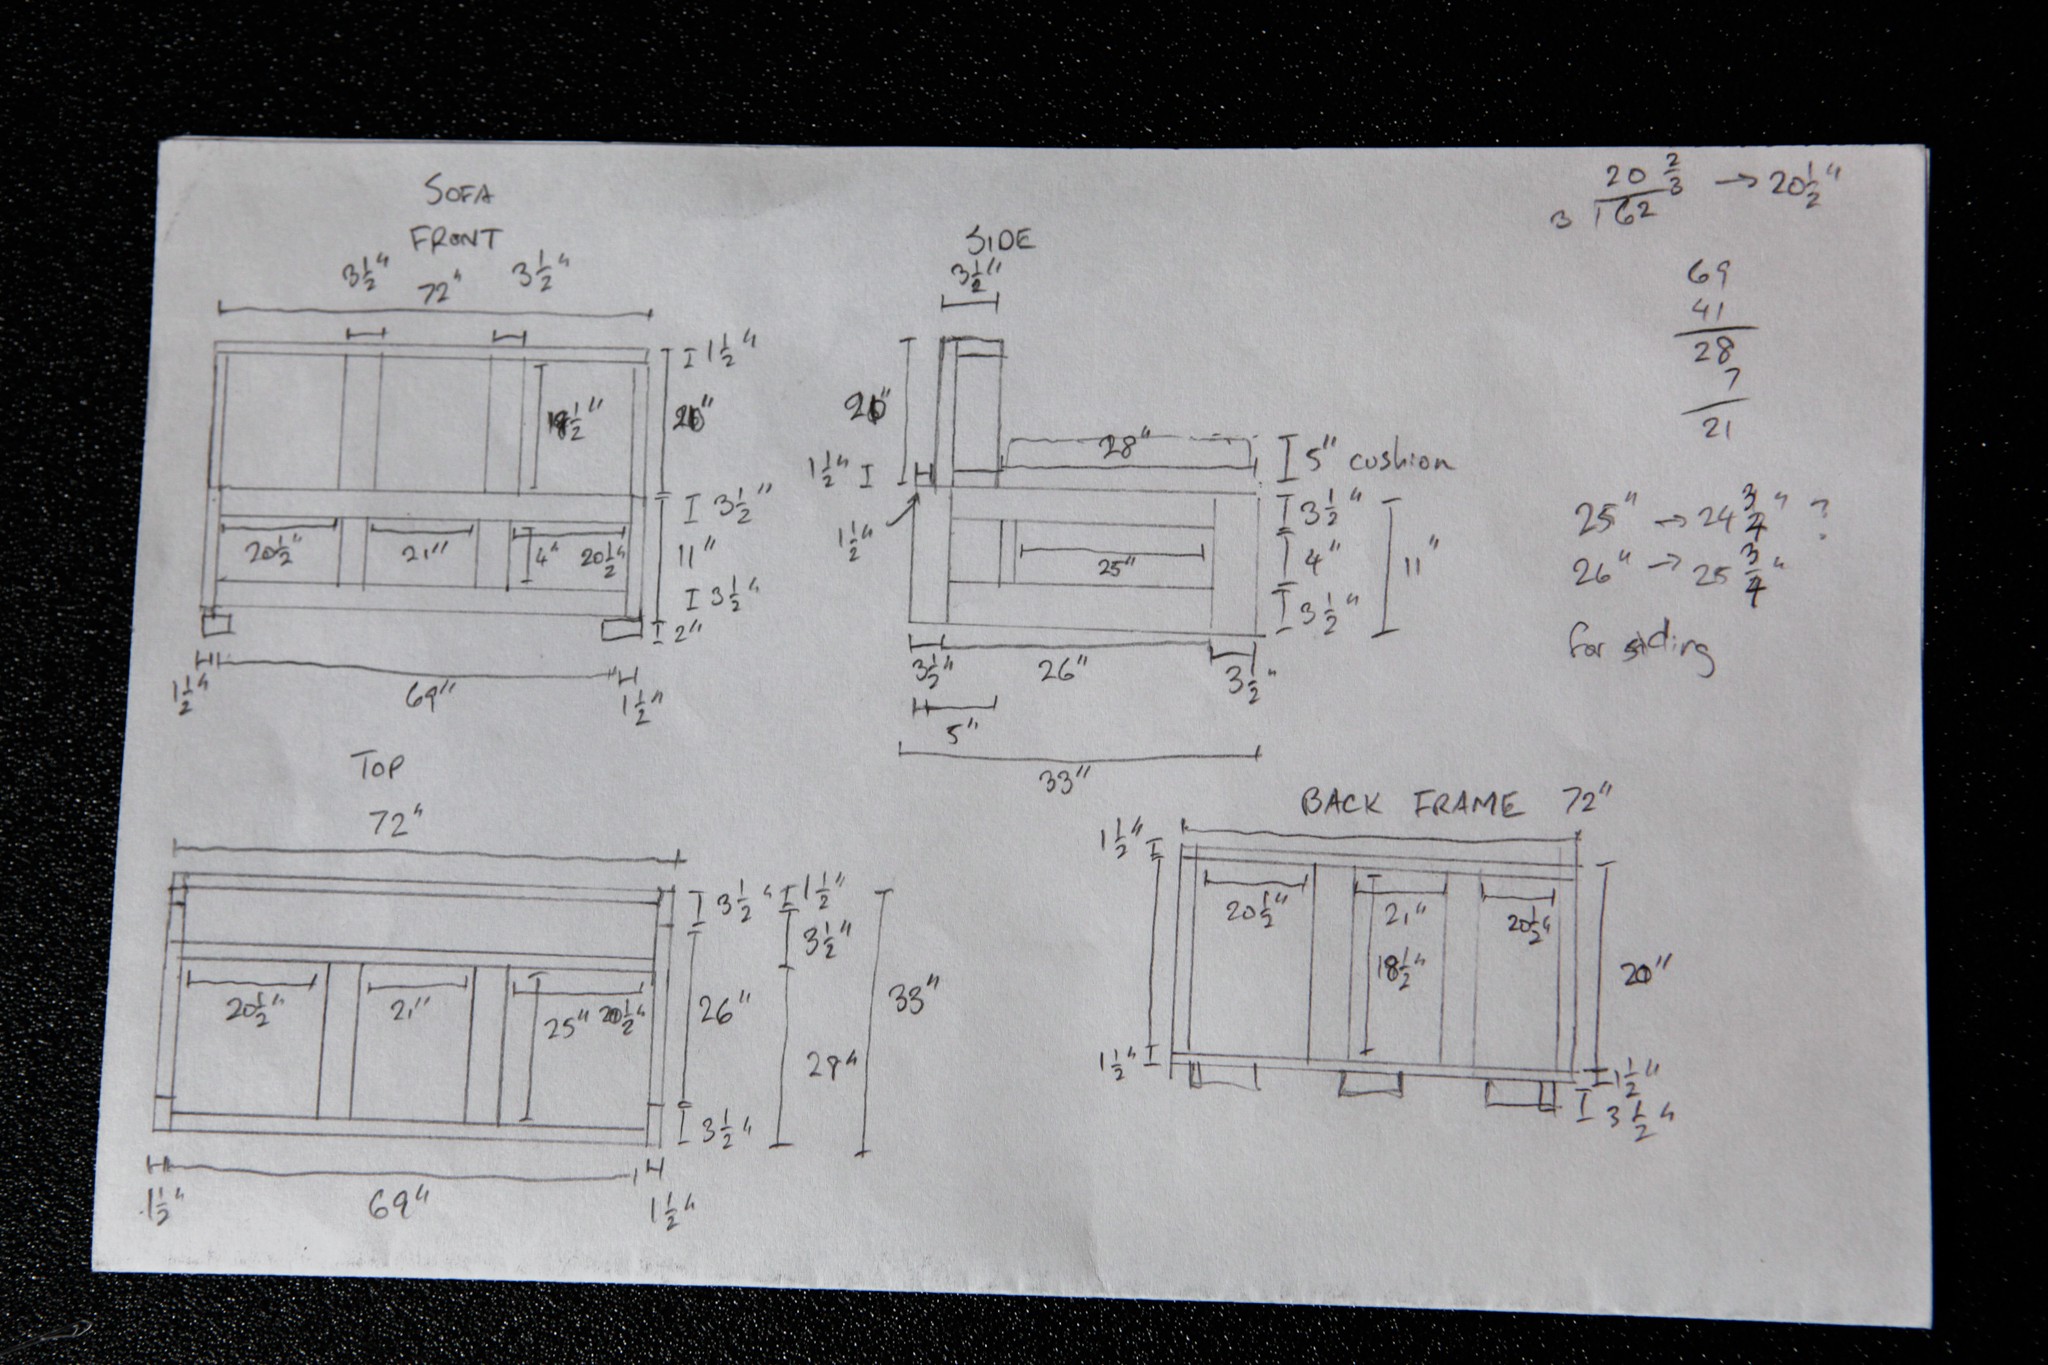
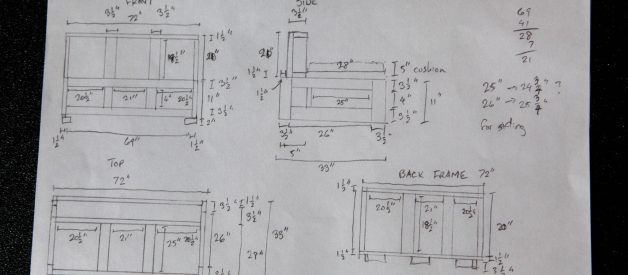
Now that I had a design, I needed to work out the measurements. When drawing the measurements, you need to take account the width of the wood. It?s too easy to make measurements based on numbers without actually measuring it. For example, regular 2×4’s imply 2 inches by 4 inches, but the actual measurement is 1.5 inches and 3.5 inches. If you attempted to make something assuming 2×4, the actual size won?t match, so double check those numbers. If you?re making wooden joints (like mortise and tenon), make sure you account for that as well before making cuts.
Tools and Material
Here?s the list of tools and material I bought for this project:
Tools
- 12 amp 7 1/4″ Circular Saw with 24 teeth 7 1/4″ blade
- Hearing protection
- Electric Staple Gun
- Hacksaw
- Chisel Set
- Rubber Mallet
- Hacksaw blades
- Sawhorses
- Heavy duty steel triangle ruler
- Webbing Stretcher
- Pocket Hole Jig System with Face Clamp
- 1/2-Inch H Style Pipe Clamps
- Staining Brushes
Material
- USB Coupler (F/F) A/B + USB Cable
- Foam seat cushions (2.4/ ILD 40) and back cushions (2.8/ ILD 34)
- Elasbelt 2 inch 164 foot roll (one for the seat, one for the back)
- Mount Anna Microfiber Shell fabric
- Upholstery Zippers + Zipper Slides
- 2″x4″x96″ wooden studs
- 2″x6″x96″ wooden studs
- Steel 40 36″ pipes 1/2″
- T50 5/16″ Staples
- Wood stain and seal
- Pocket Screws
If we map out the cost in a pie graph, you can see where most of the sofa cost is:

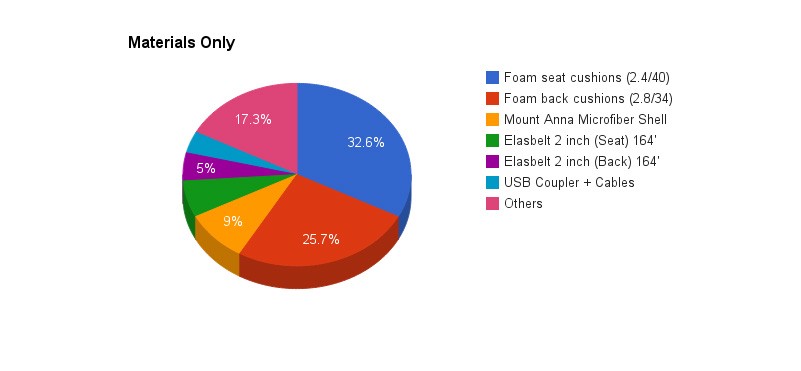 Foam cushions accounted for more than half the material costs.
The materials are the majority of the cost, and within the materials, the sofa cushions are the most expensive by far. If you already have most of the tools, it?ll be 33% cheaper since I had to buy everything (except for the drill and tape measure which I owned already).
Construction
Wooden Frame
Now that we have the design, the measurements, the tools, and the materials all collected, it?s time to make the sofa! To begin, I cut the boards to size based on my measurements from my design. I double checked and redrew my designs to make sure it would all fit. When cutting, I followed an old advice of ?measure twice, cut once.? I measured the distance, marked it, drew the line across, and measured it again to make sure it was correct. After cutting, I measured the final piece to verify I cut it to length. It?s a lot of measuring, but it?s better than cutting everything at once and nothing fits.
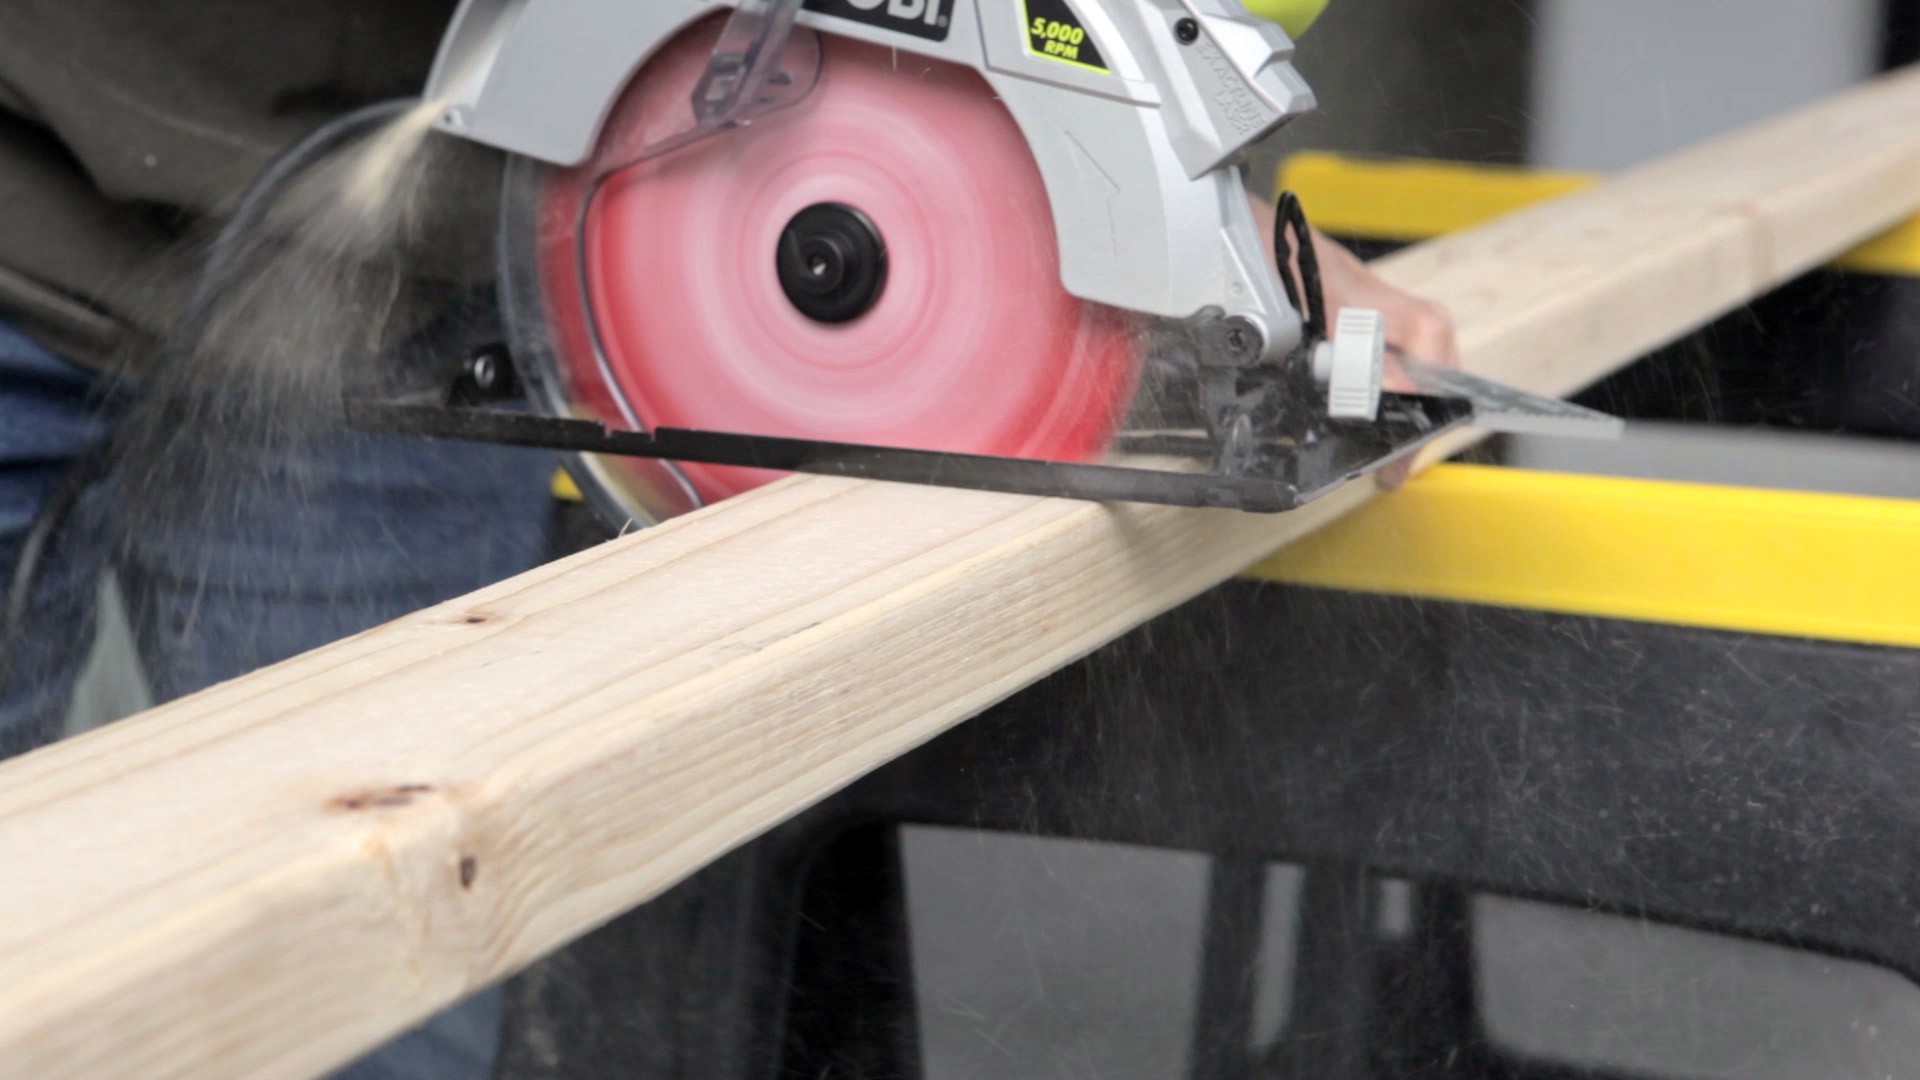 Sawing 2×4 studs to size.
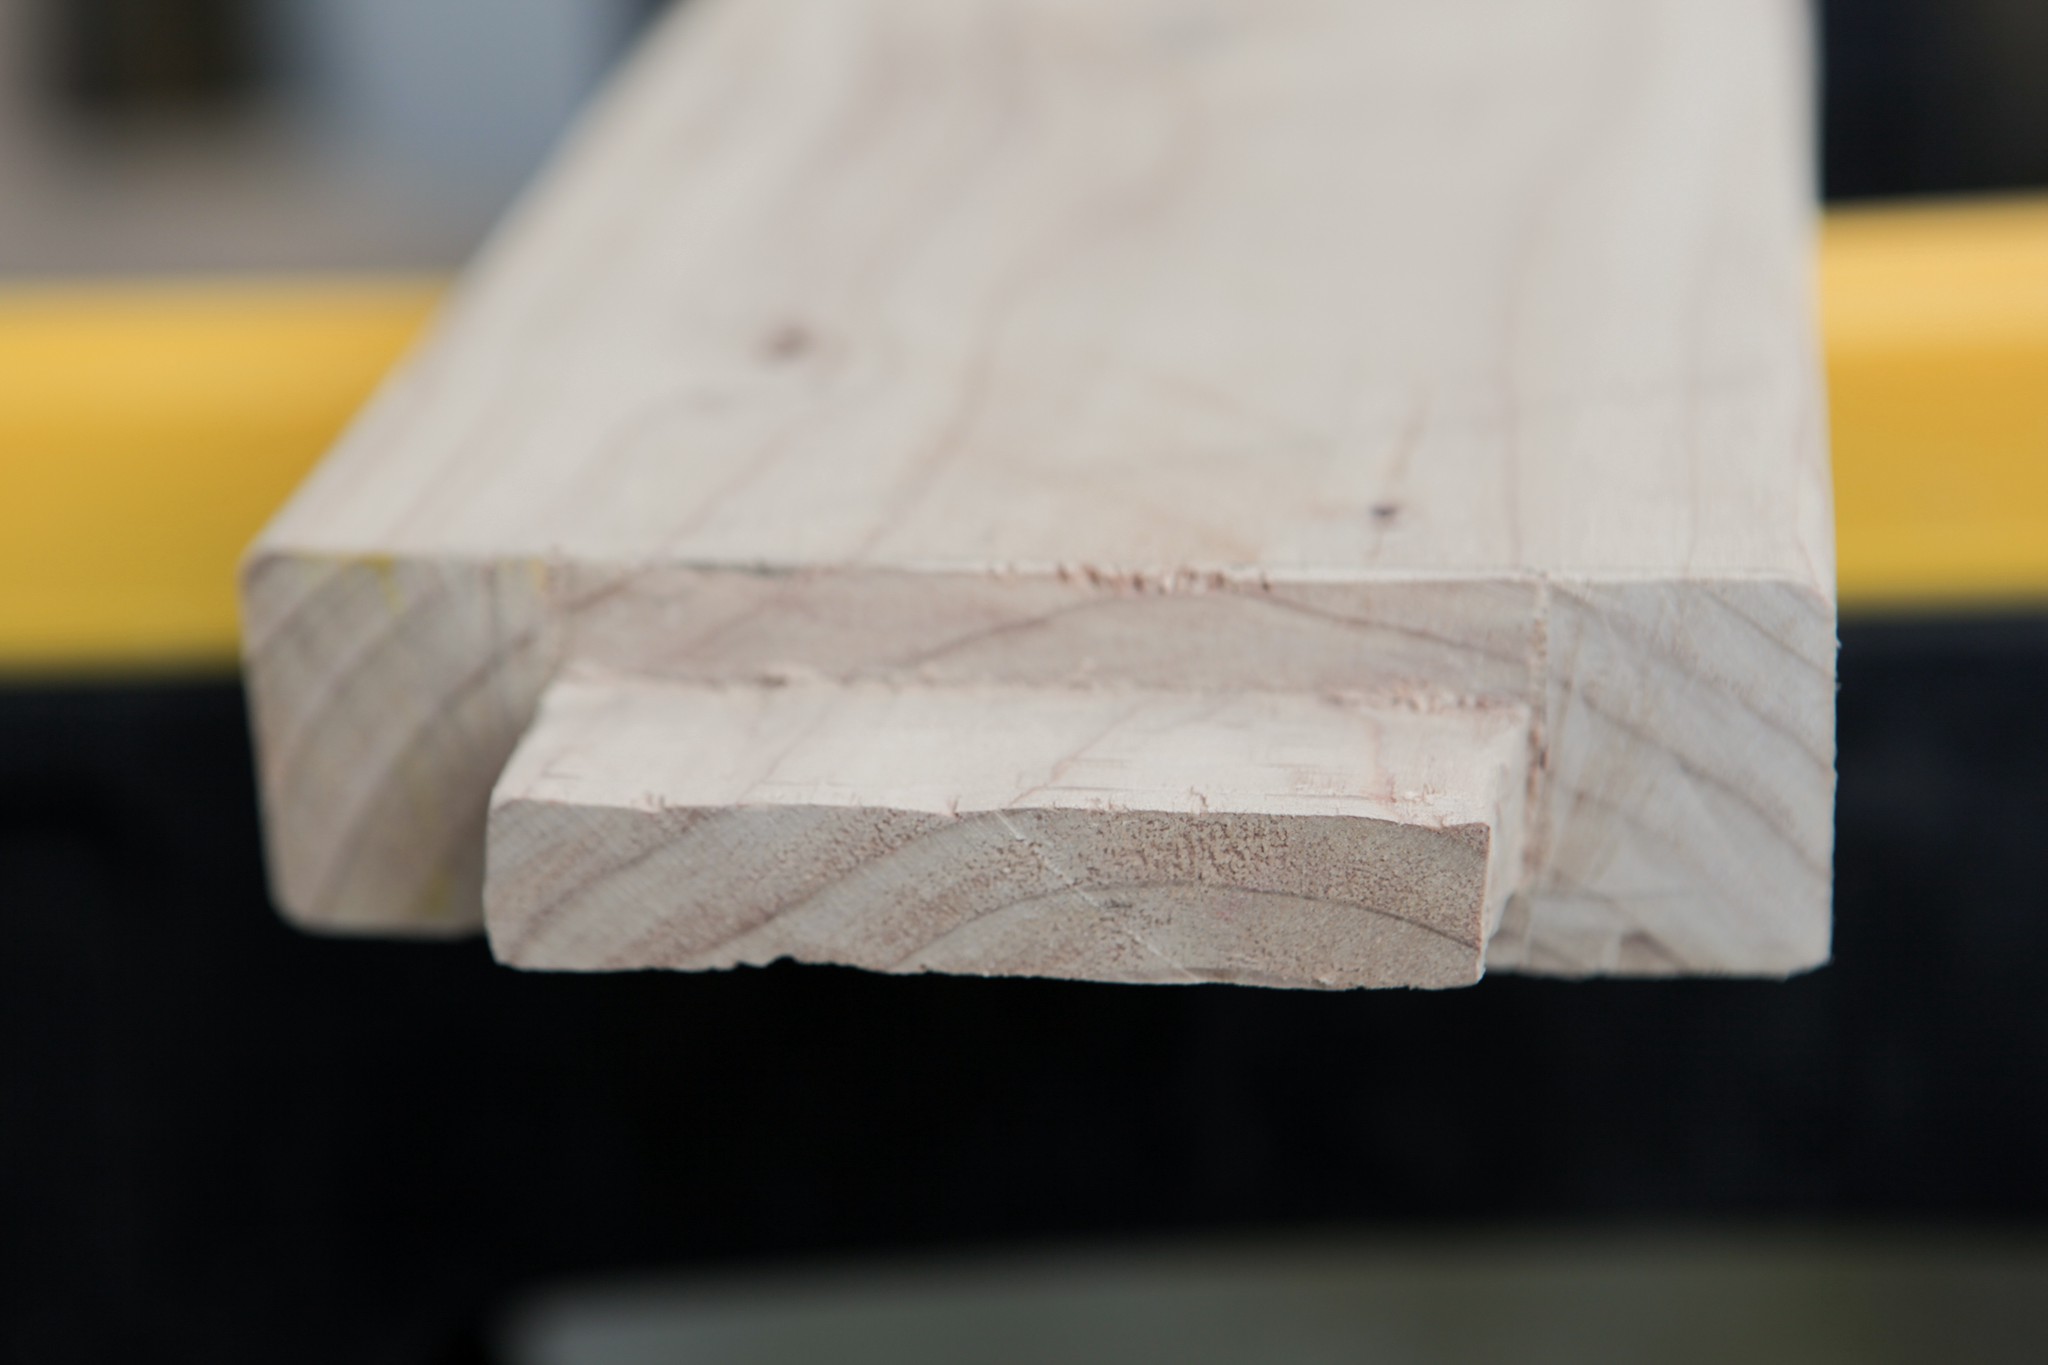 The front tenon joint ready for assembly.
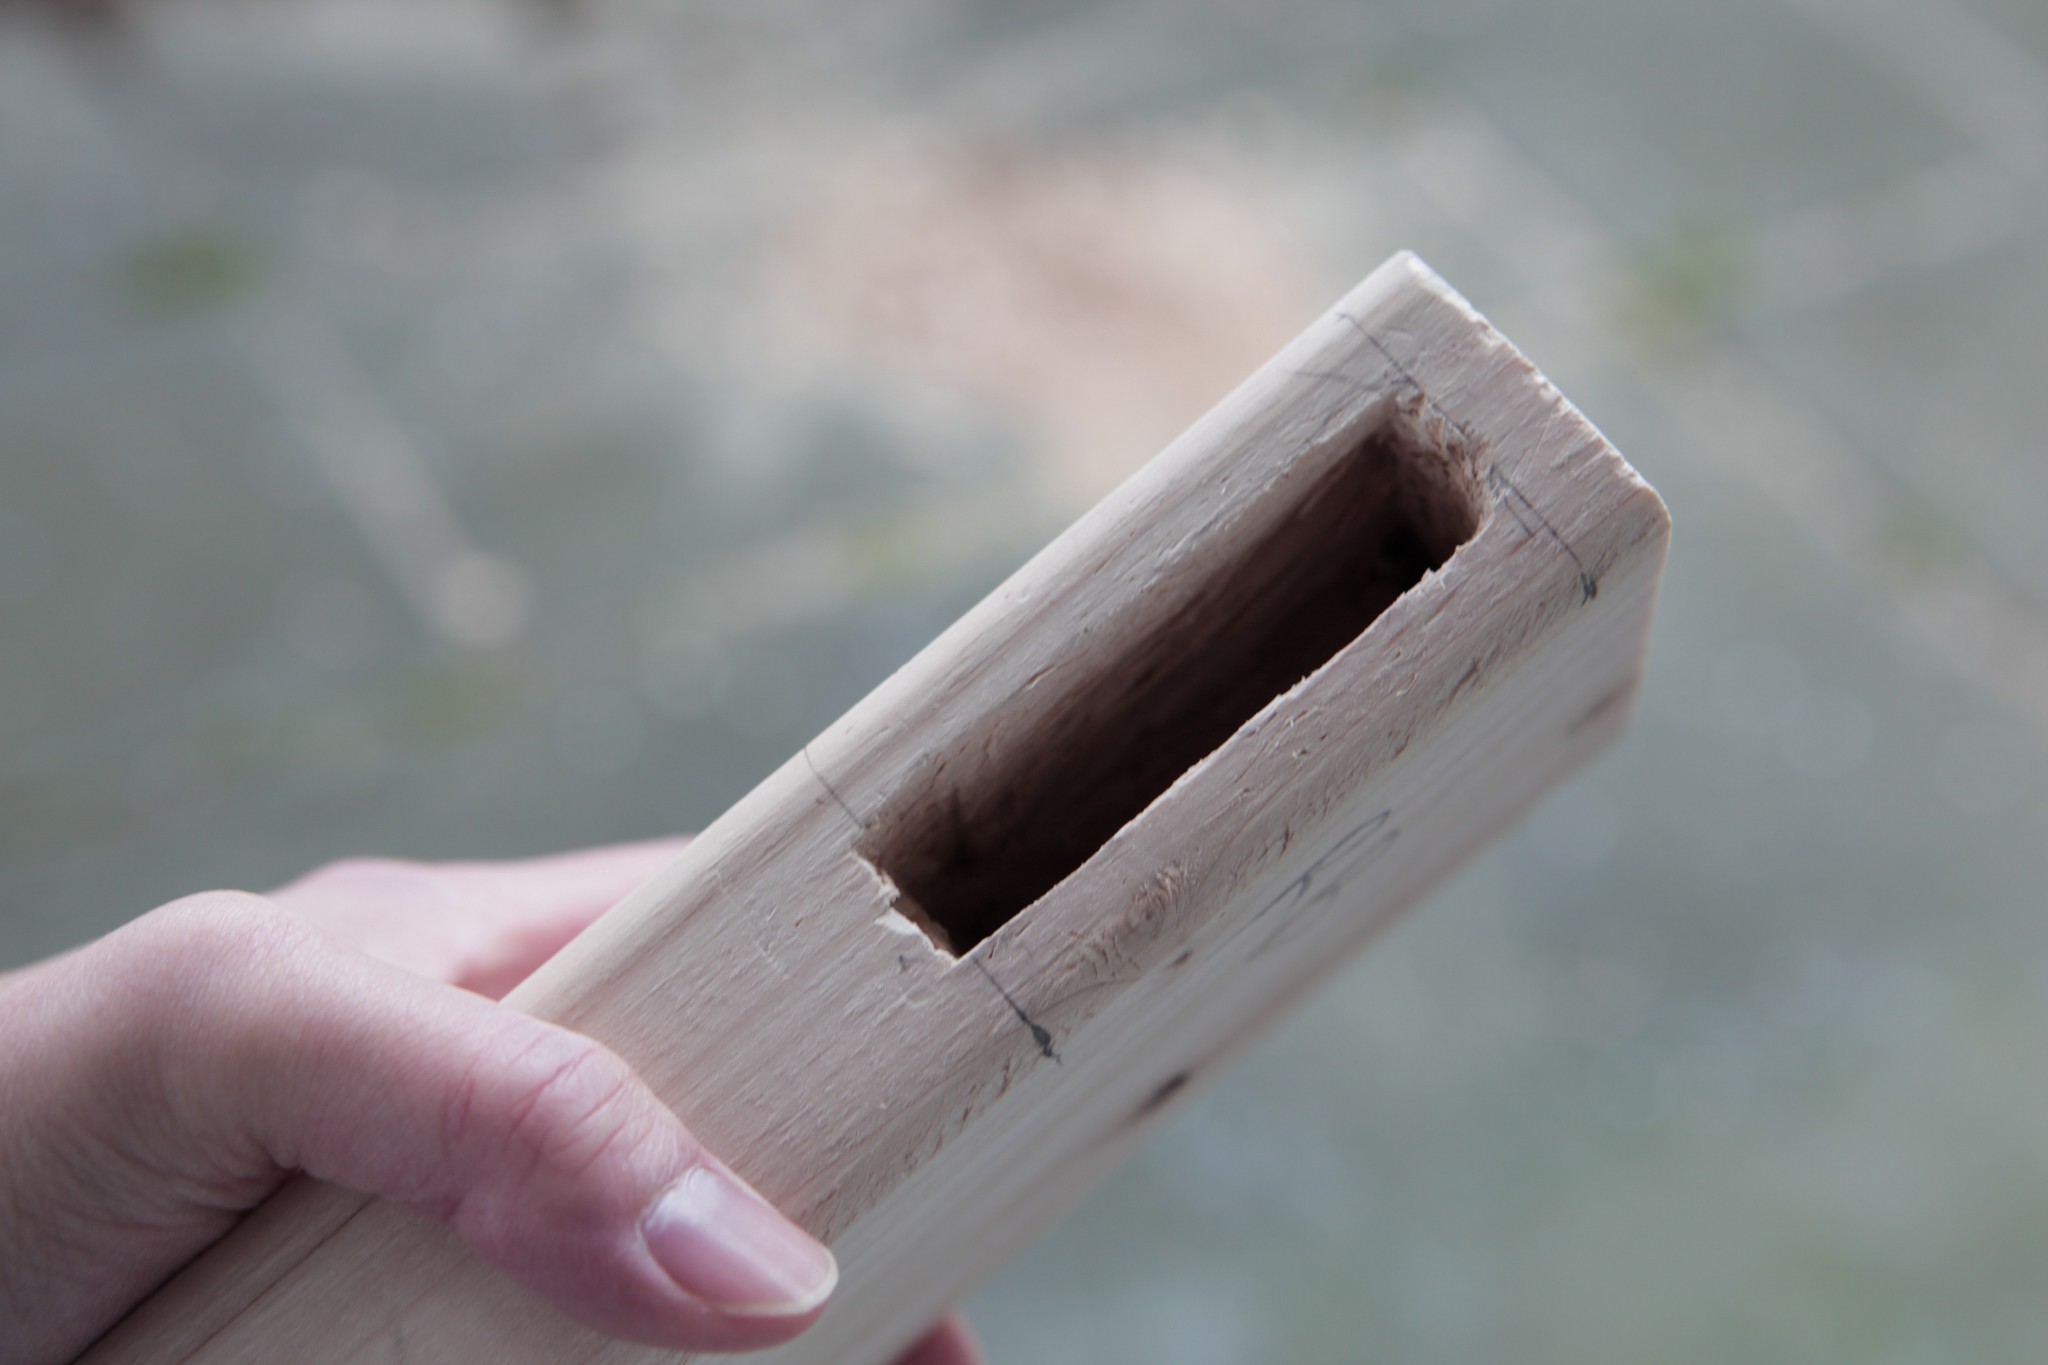 It took a lot of drilling and chiseling to get the mortise ready.
For the base, I made the top part from traditional mortise and tenon joints. The reason why I went this way is it makes sense for furniture to have mechanical joints as it?s a very strong joint in all directions. This took much longer than just using screws, but it felt much more satisfying to see everything fit. Of course, I probably over-engineered this section, but better to have an extremely sturdy base than something that could fall apart.
 Back frame clamped and glued (along with pocket screws).
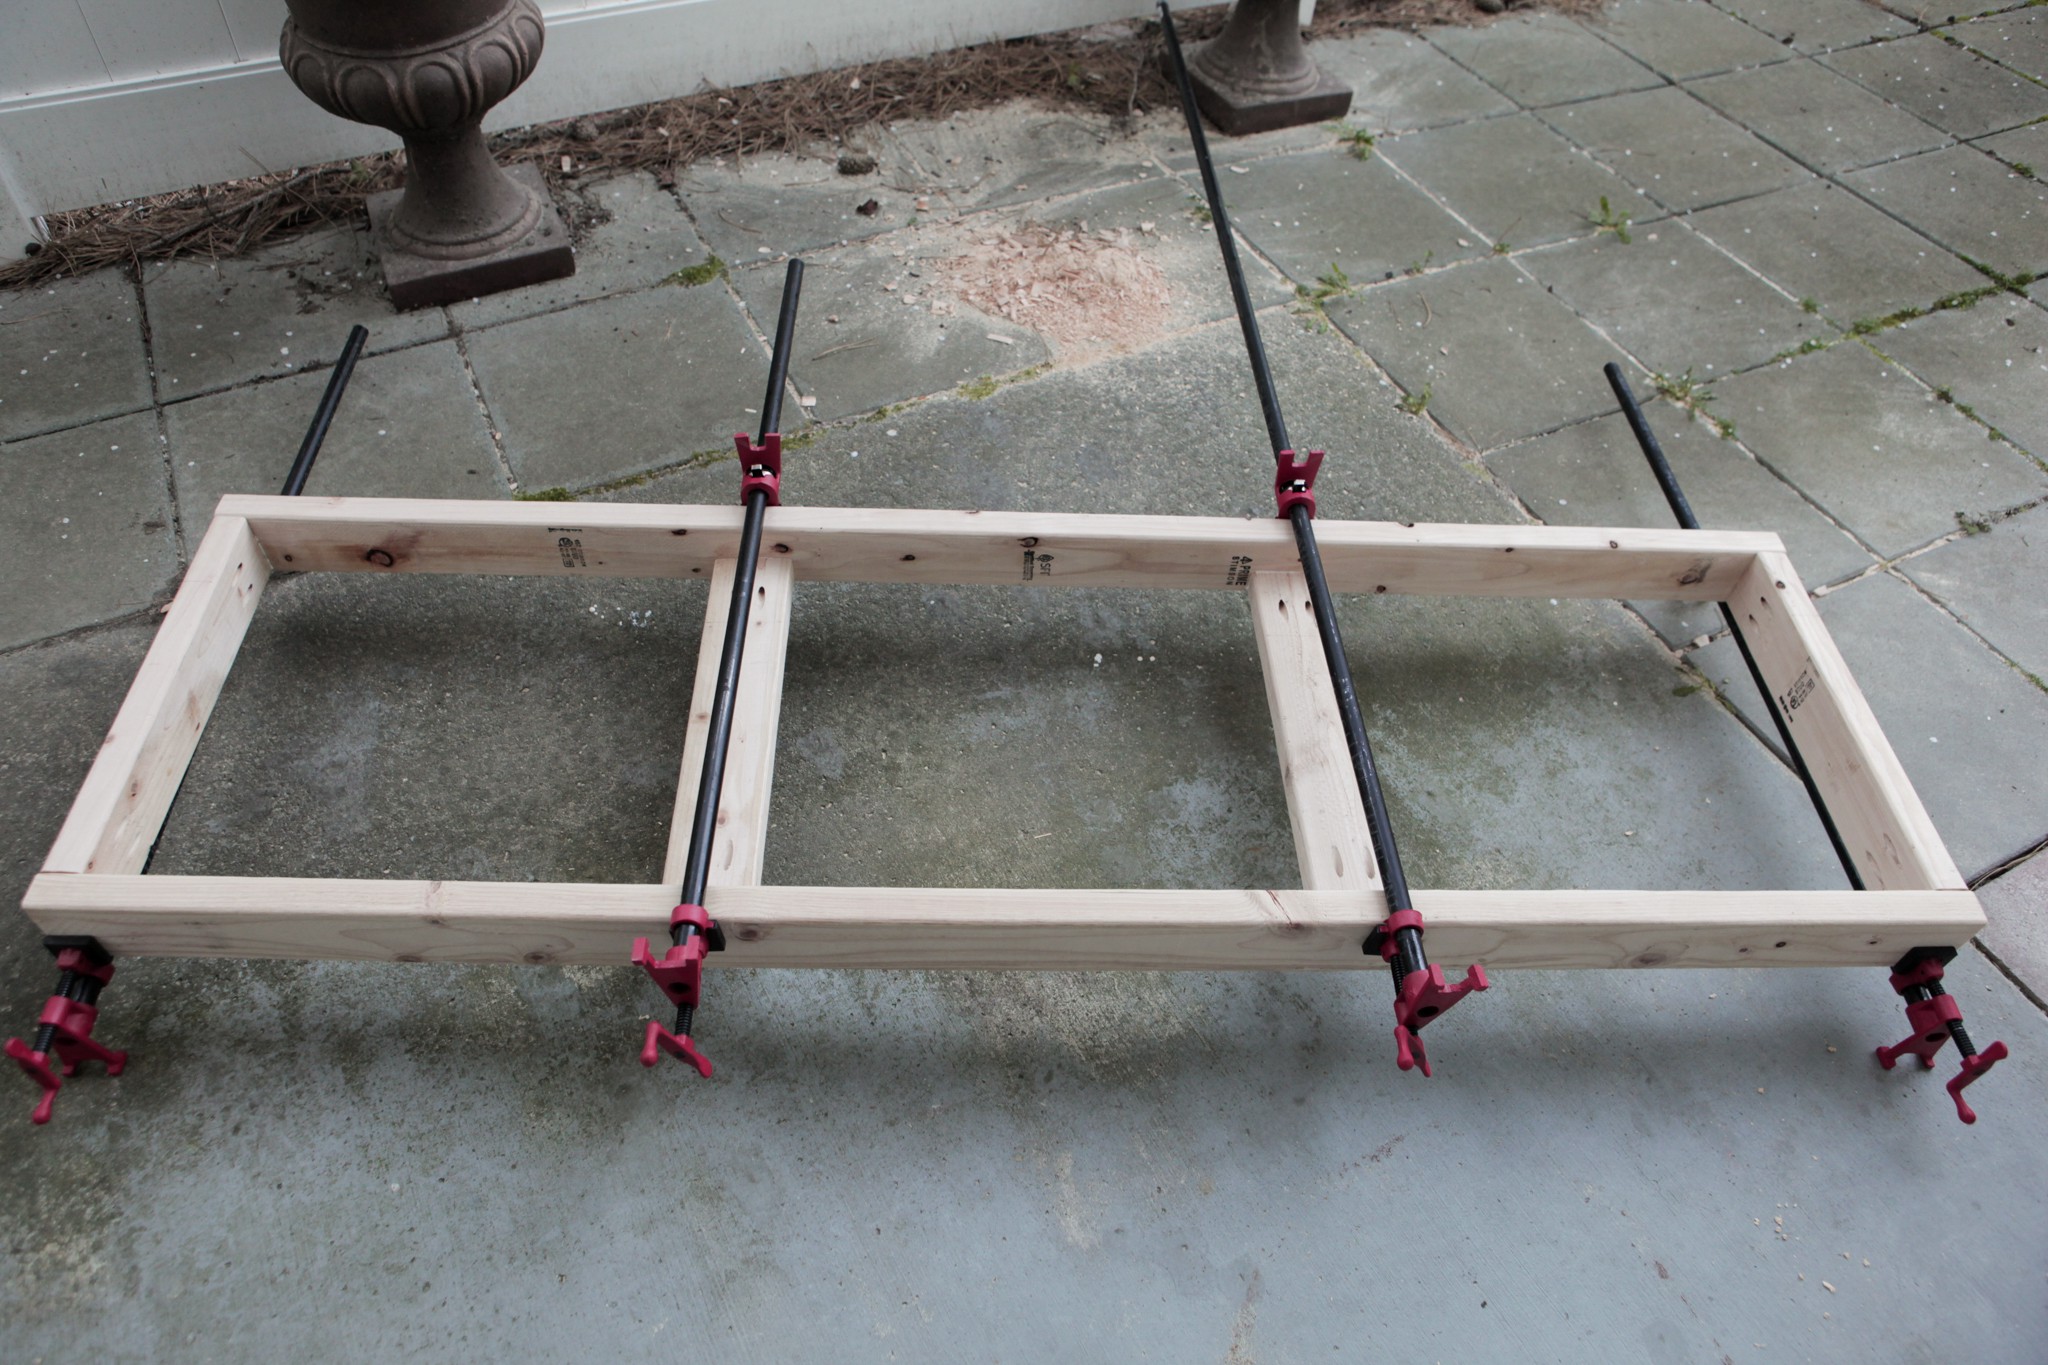
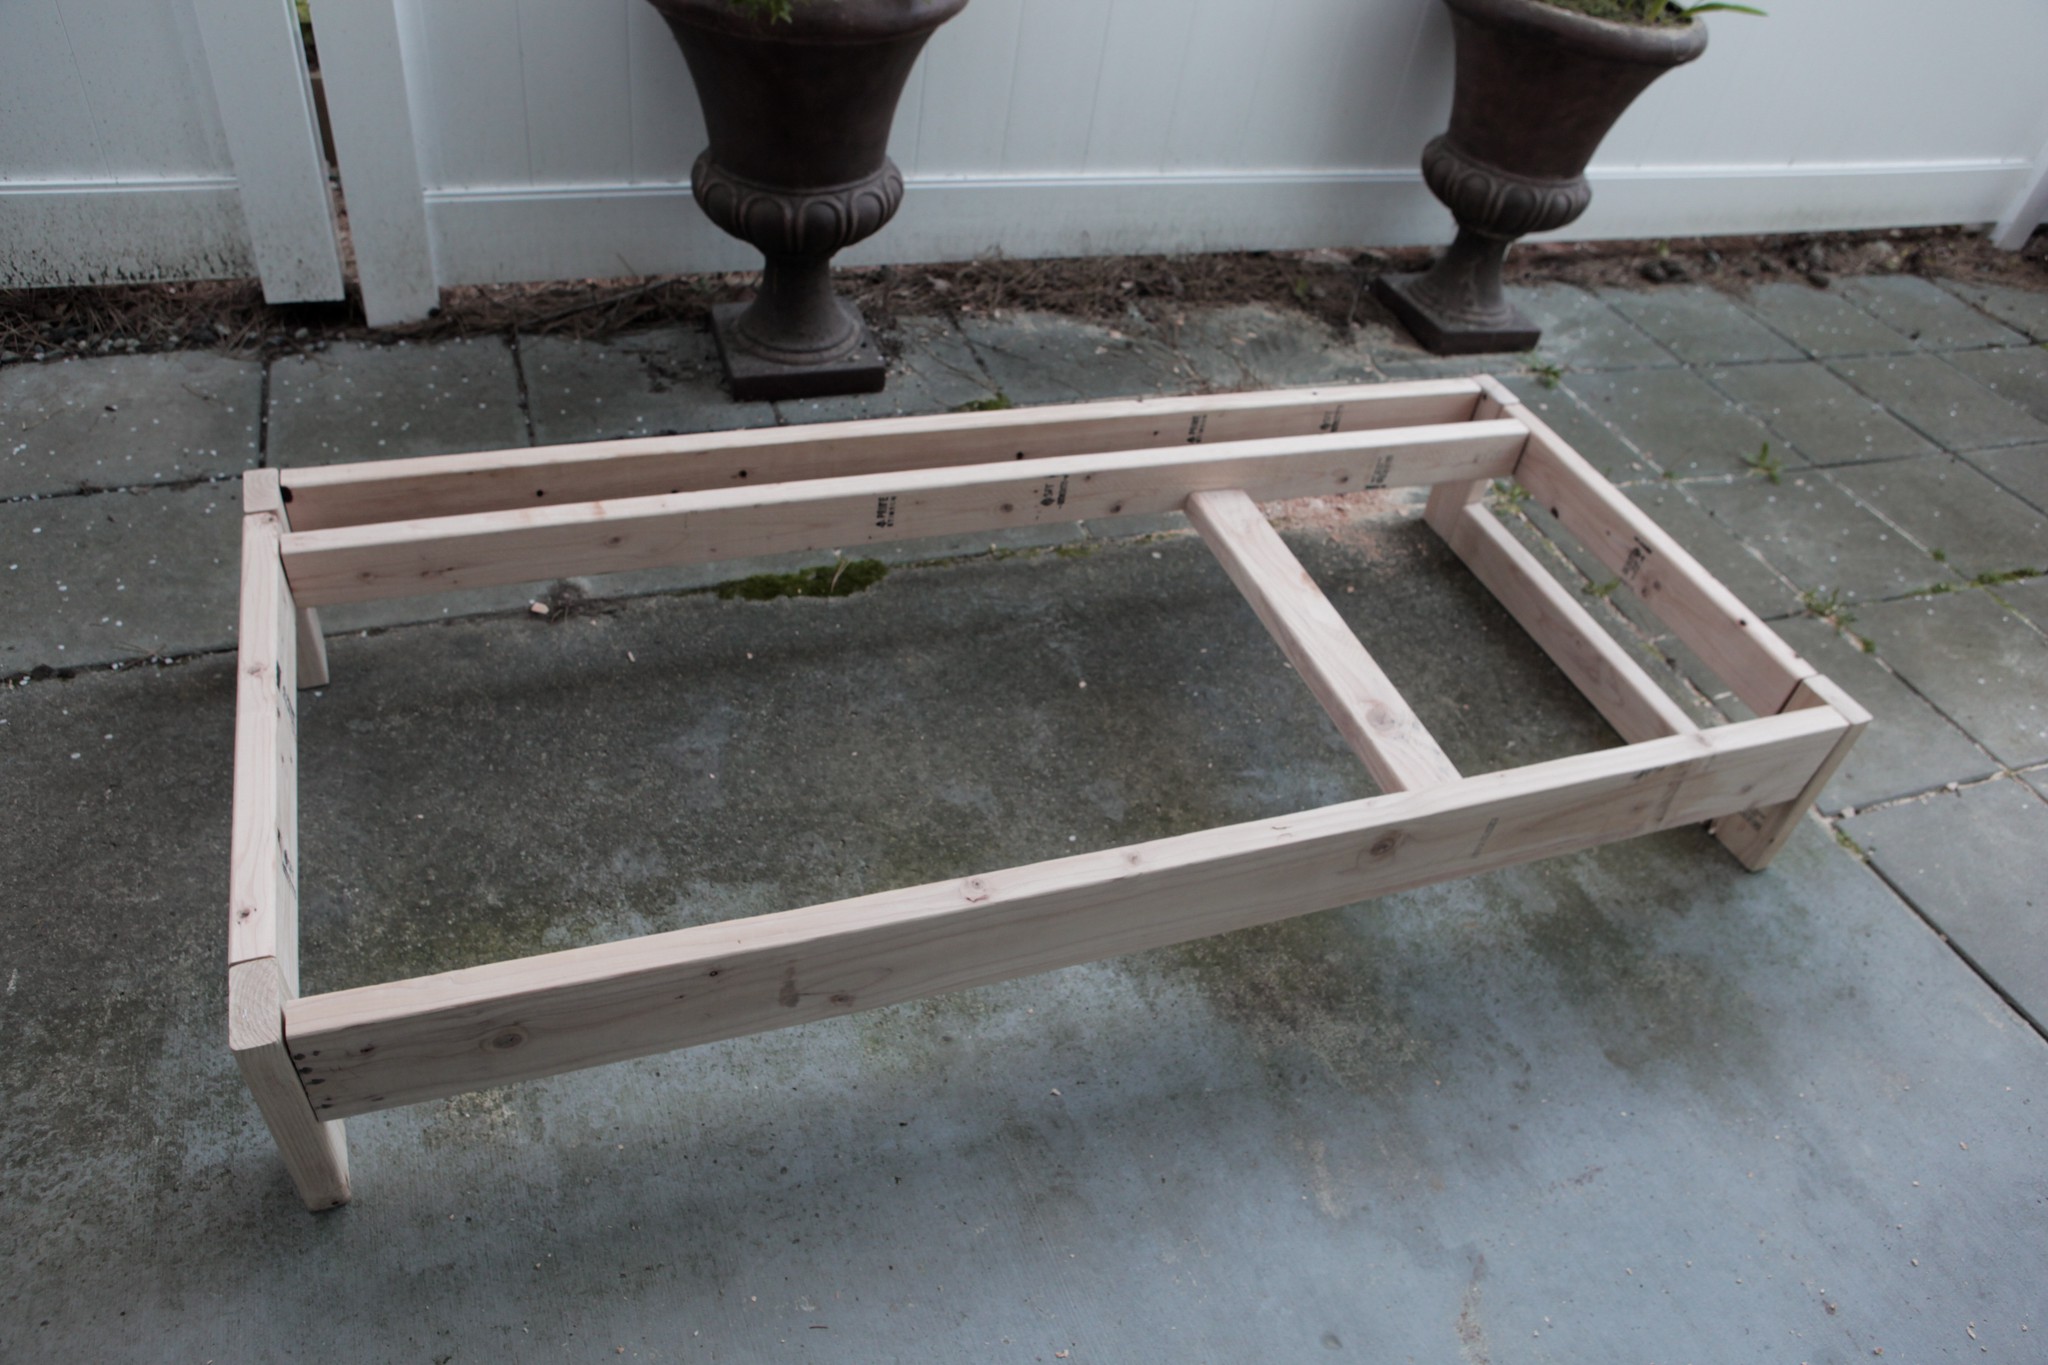 Base dry fitting to make sure everything fits and is within measurement.
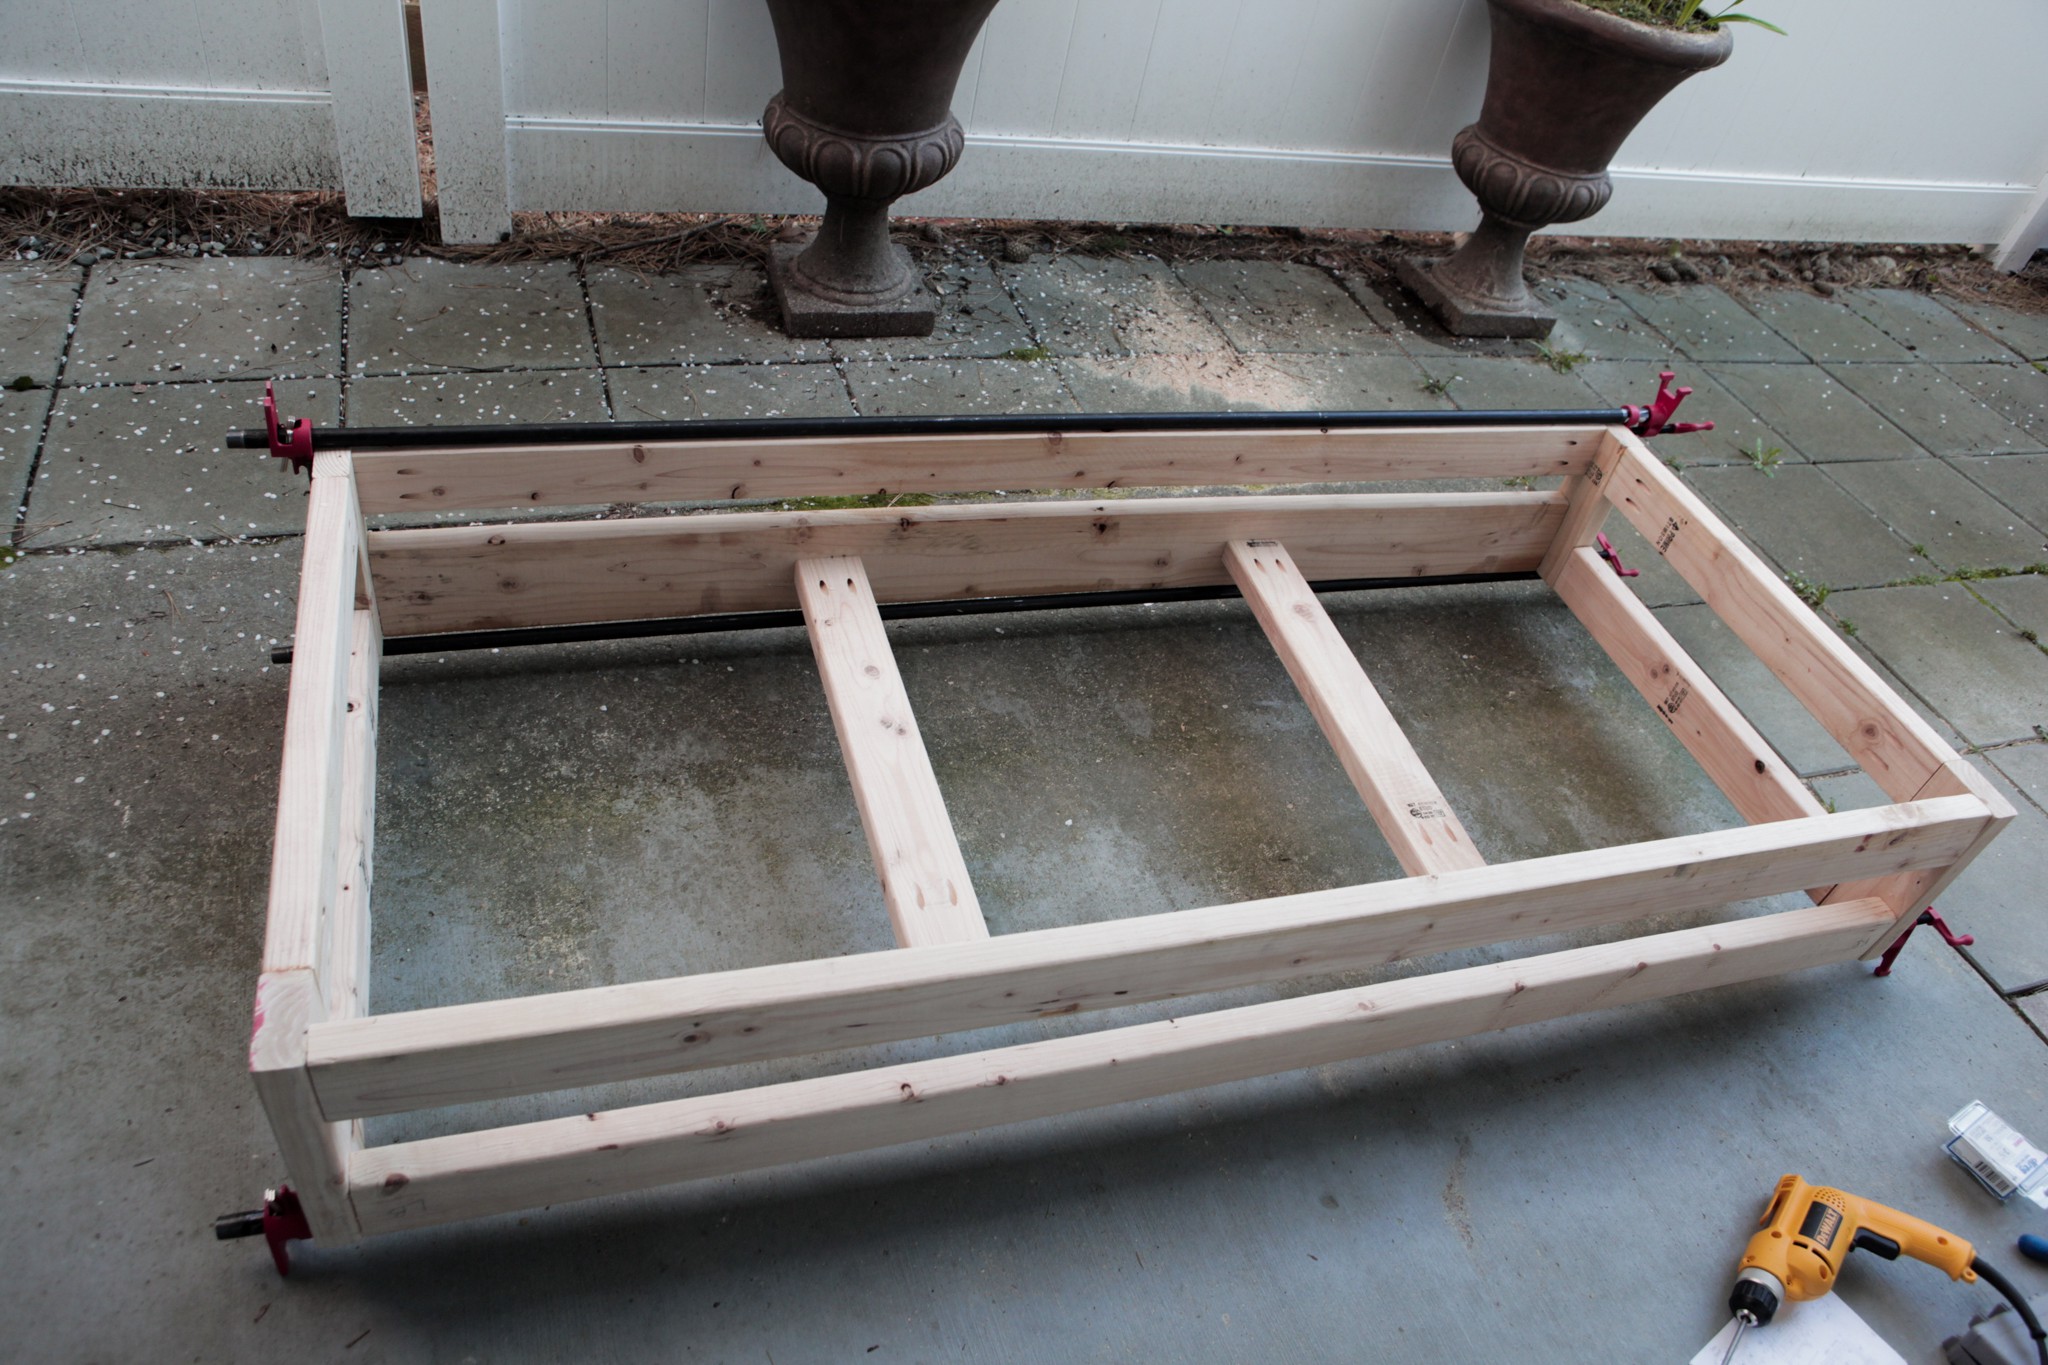 Fully assembled base with all joints glued and clamped. The middle section is held with pocket screws and acts as support for the webbing.
For the rest of the sofa, I used pocket screws in order to hide the screws from the side. Supposedly, pocket screws are just as strong as mortise and tenon joints, though I have my doubts about that. Still, they?re pretty strong and works well for the rest of the sofa.
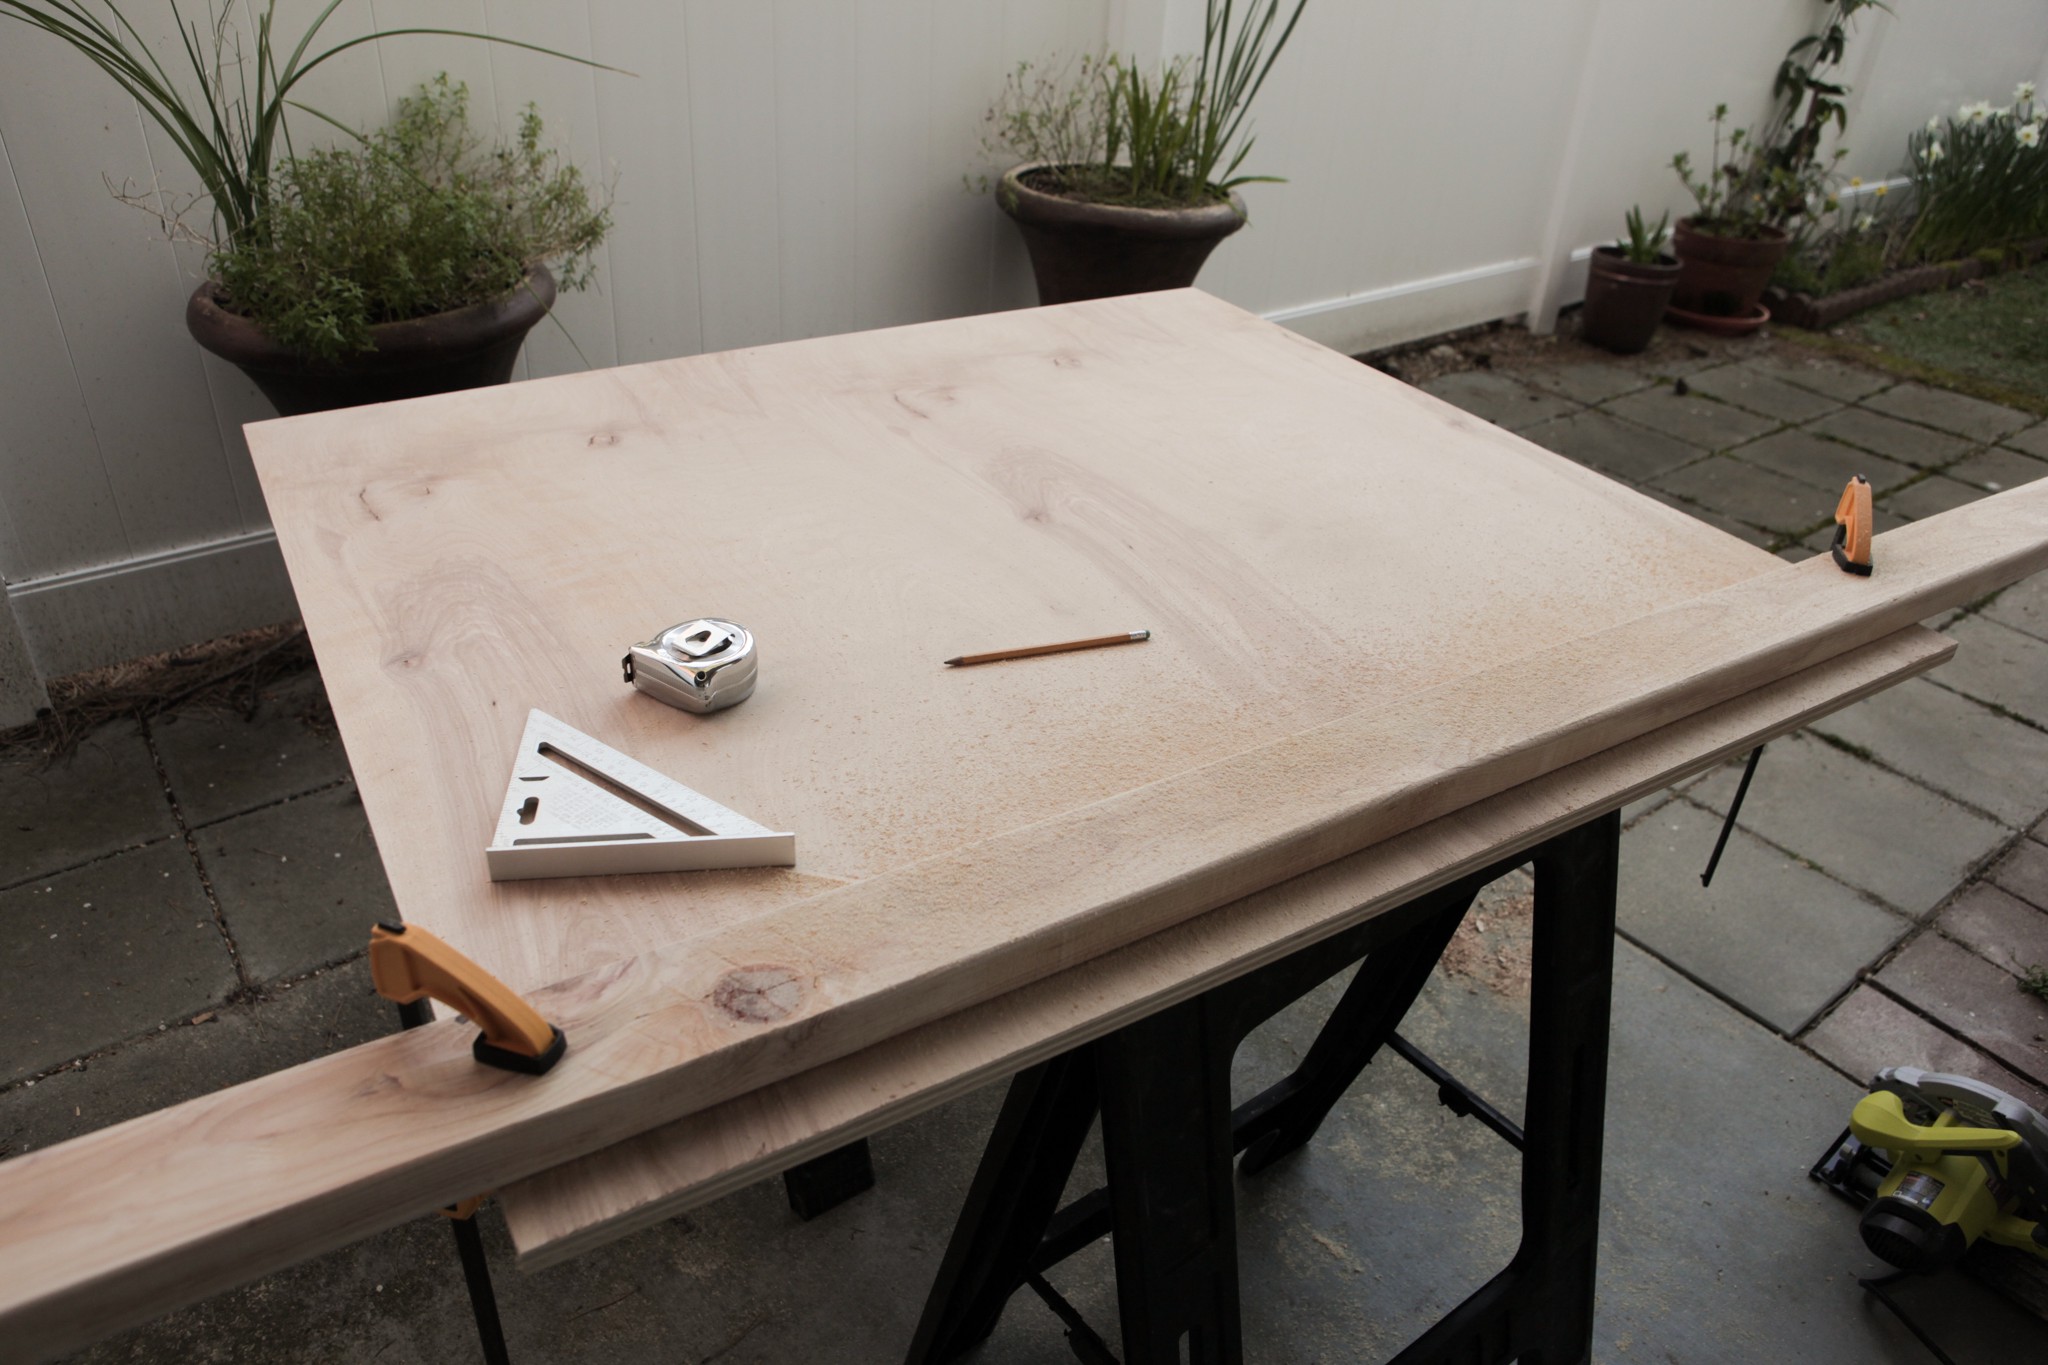 My workstation for cutting plywood for the arm rests.
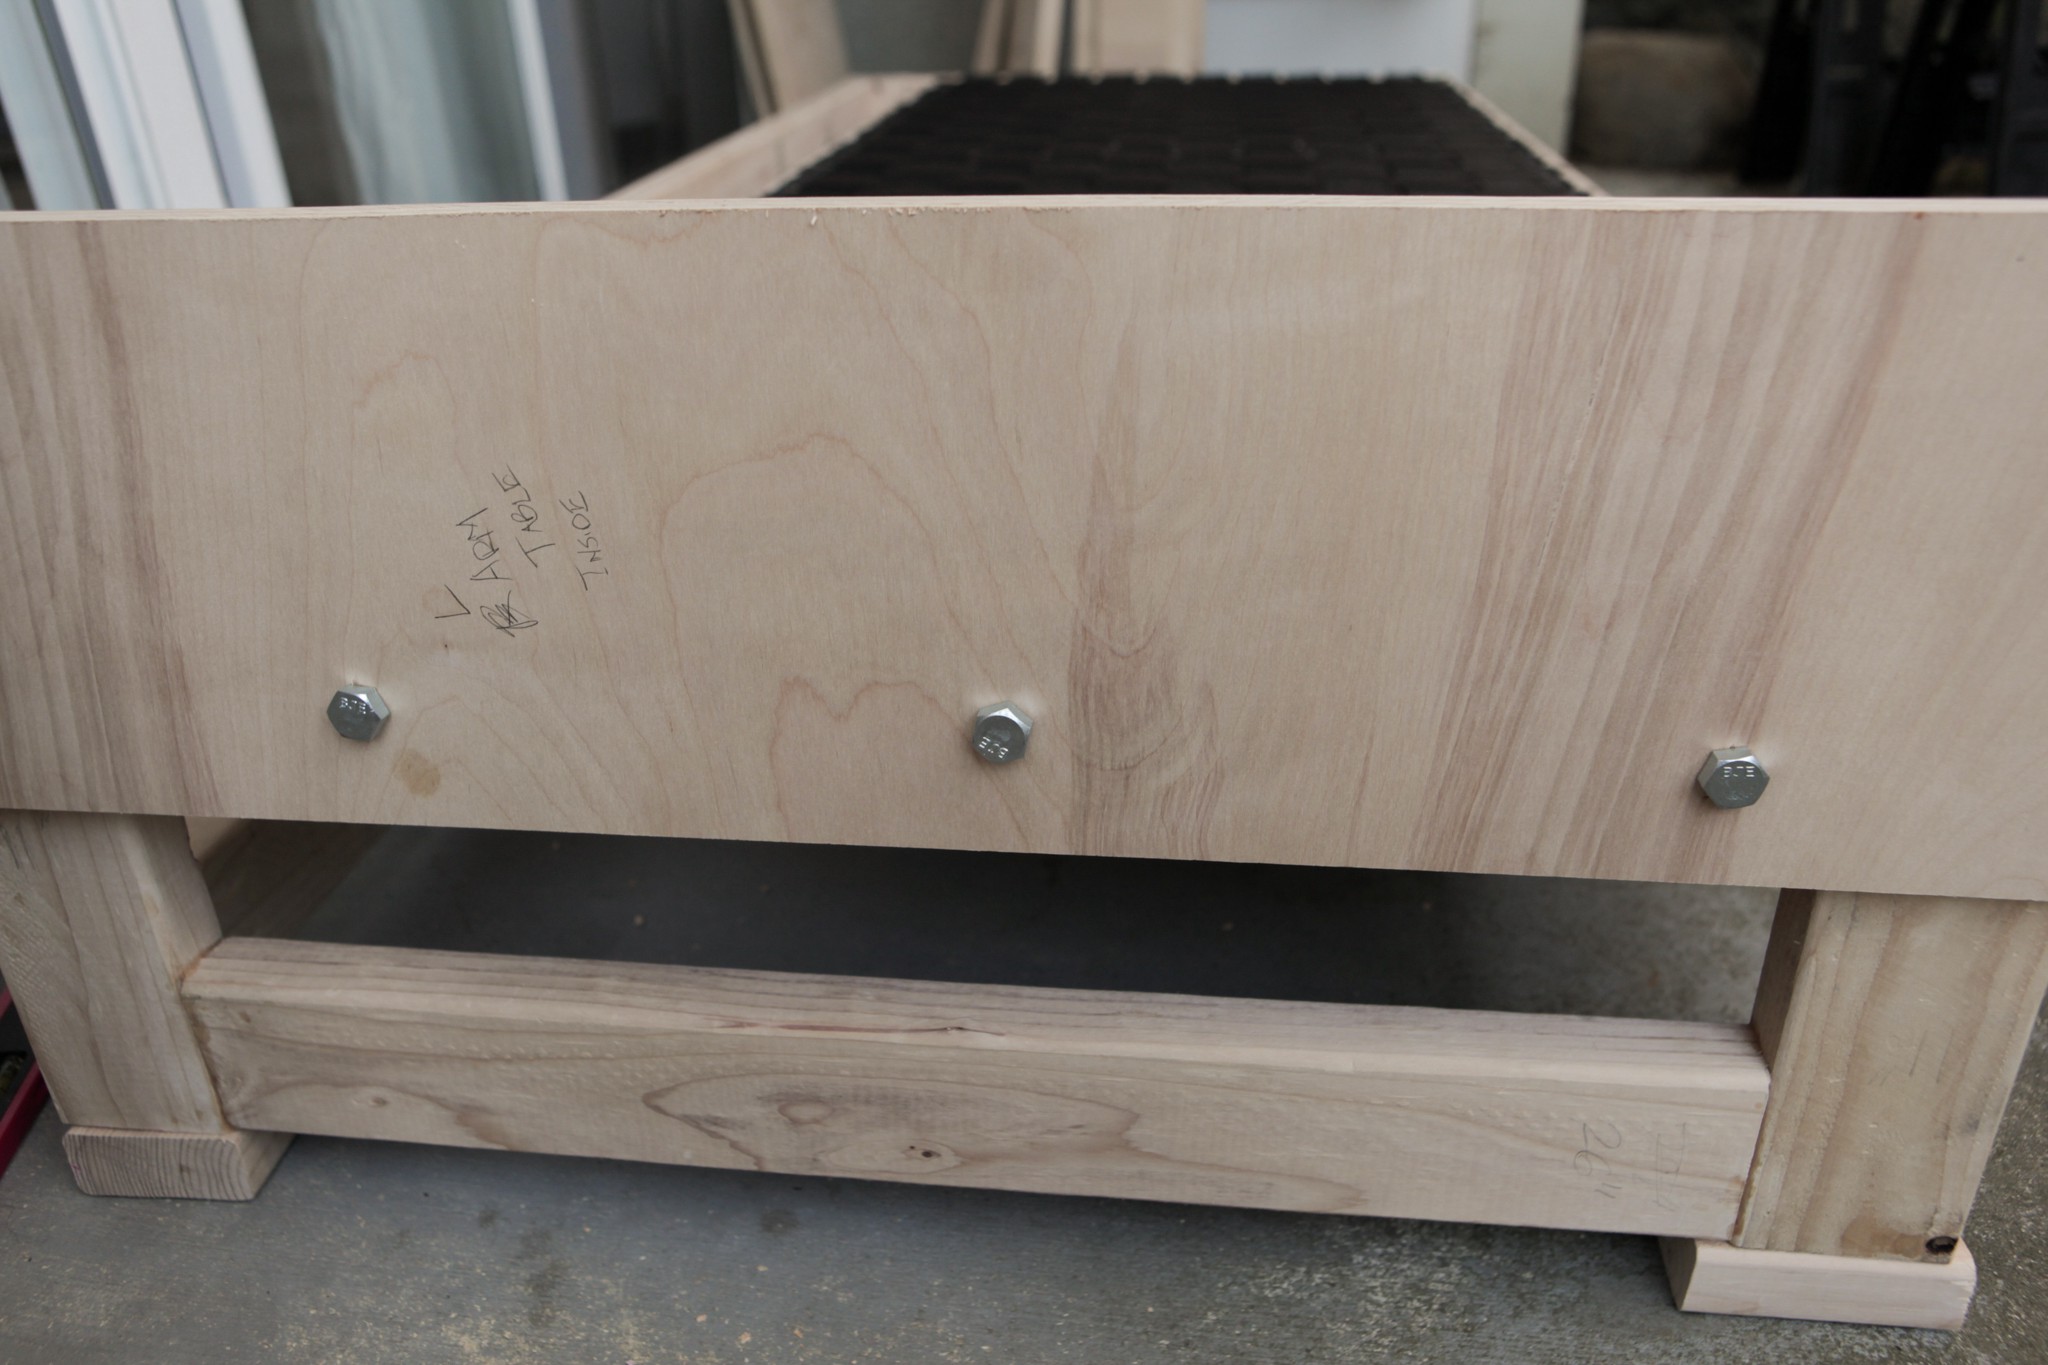 Fitted side for the arm. Three metal bolts hold it to the side and can be easily removed in case I want to change the arm or need to move it.
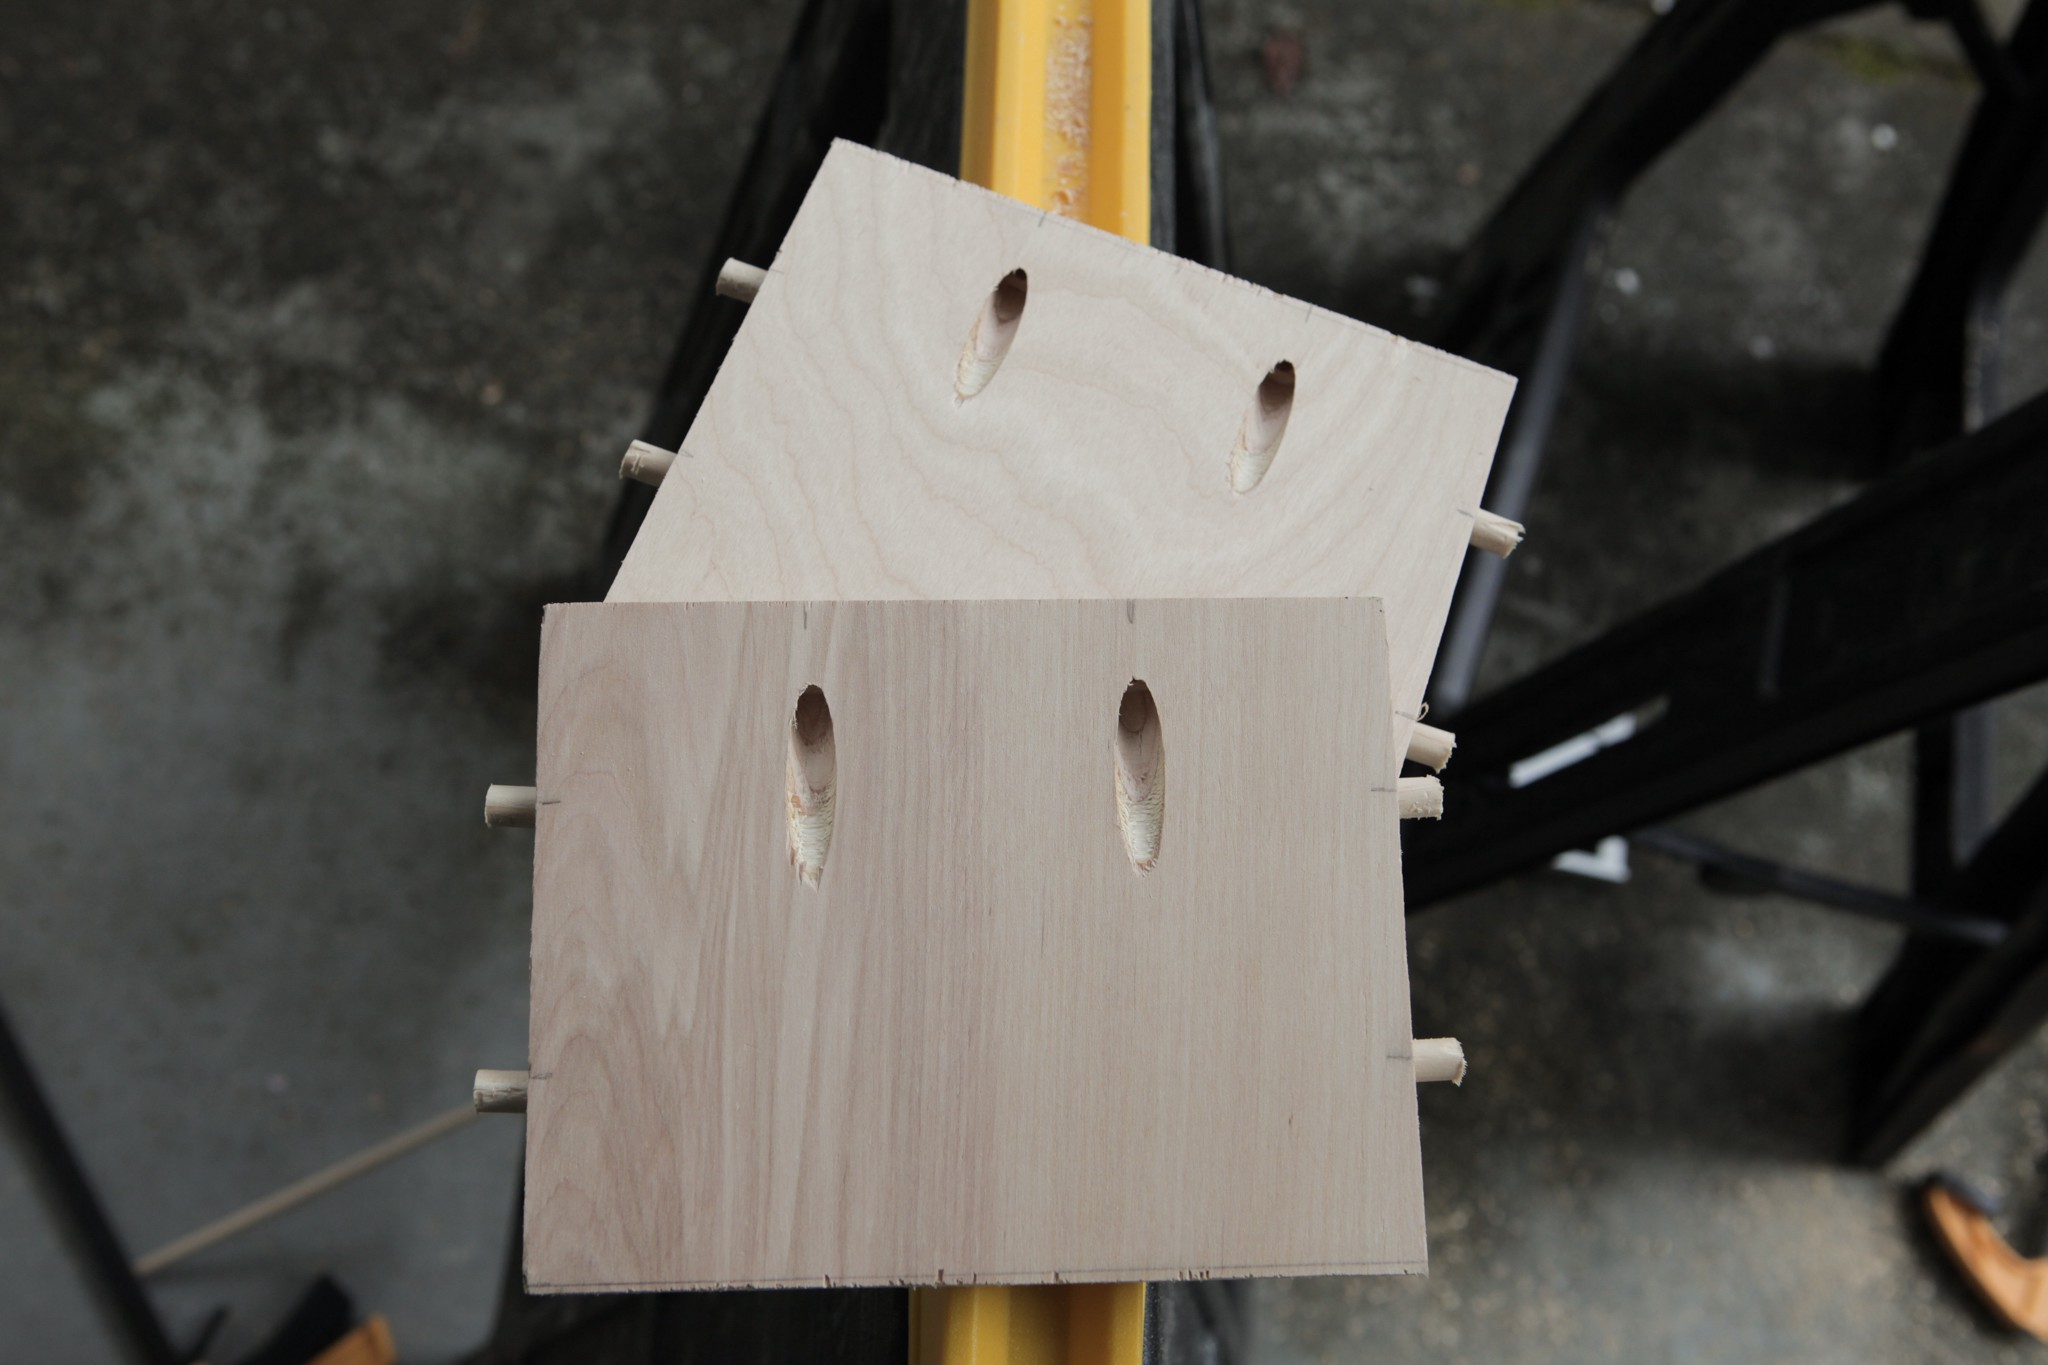 To support the arm rests, I made a small center piece that would bridge the two sides. It uses a mix of pocket screws and dowel rods.
Tapestry
After getting the frame done, it?s time to make the cushions to go on top, but first, we need to get the webbing on the sofa.
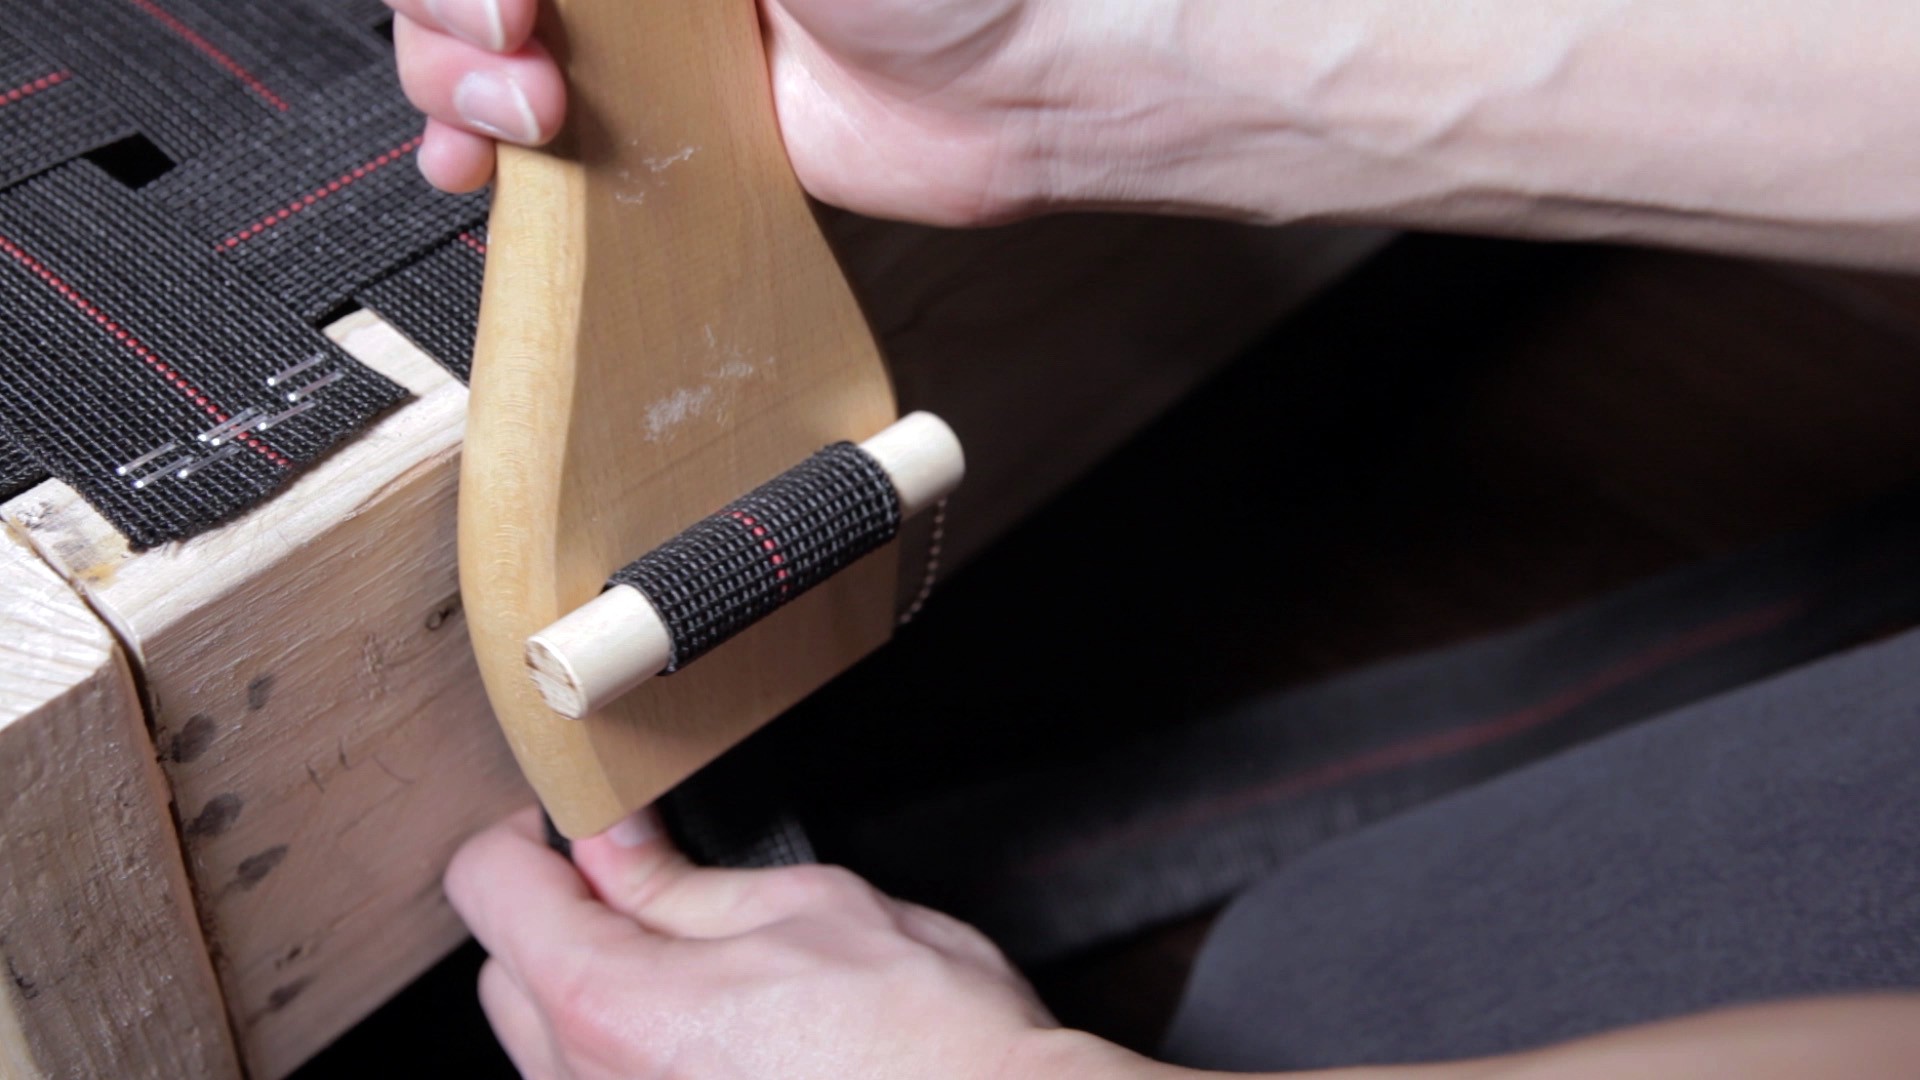 Using a webbing stretcher on the webbing.
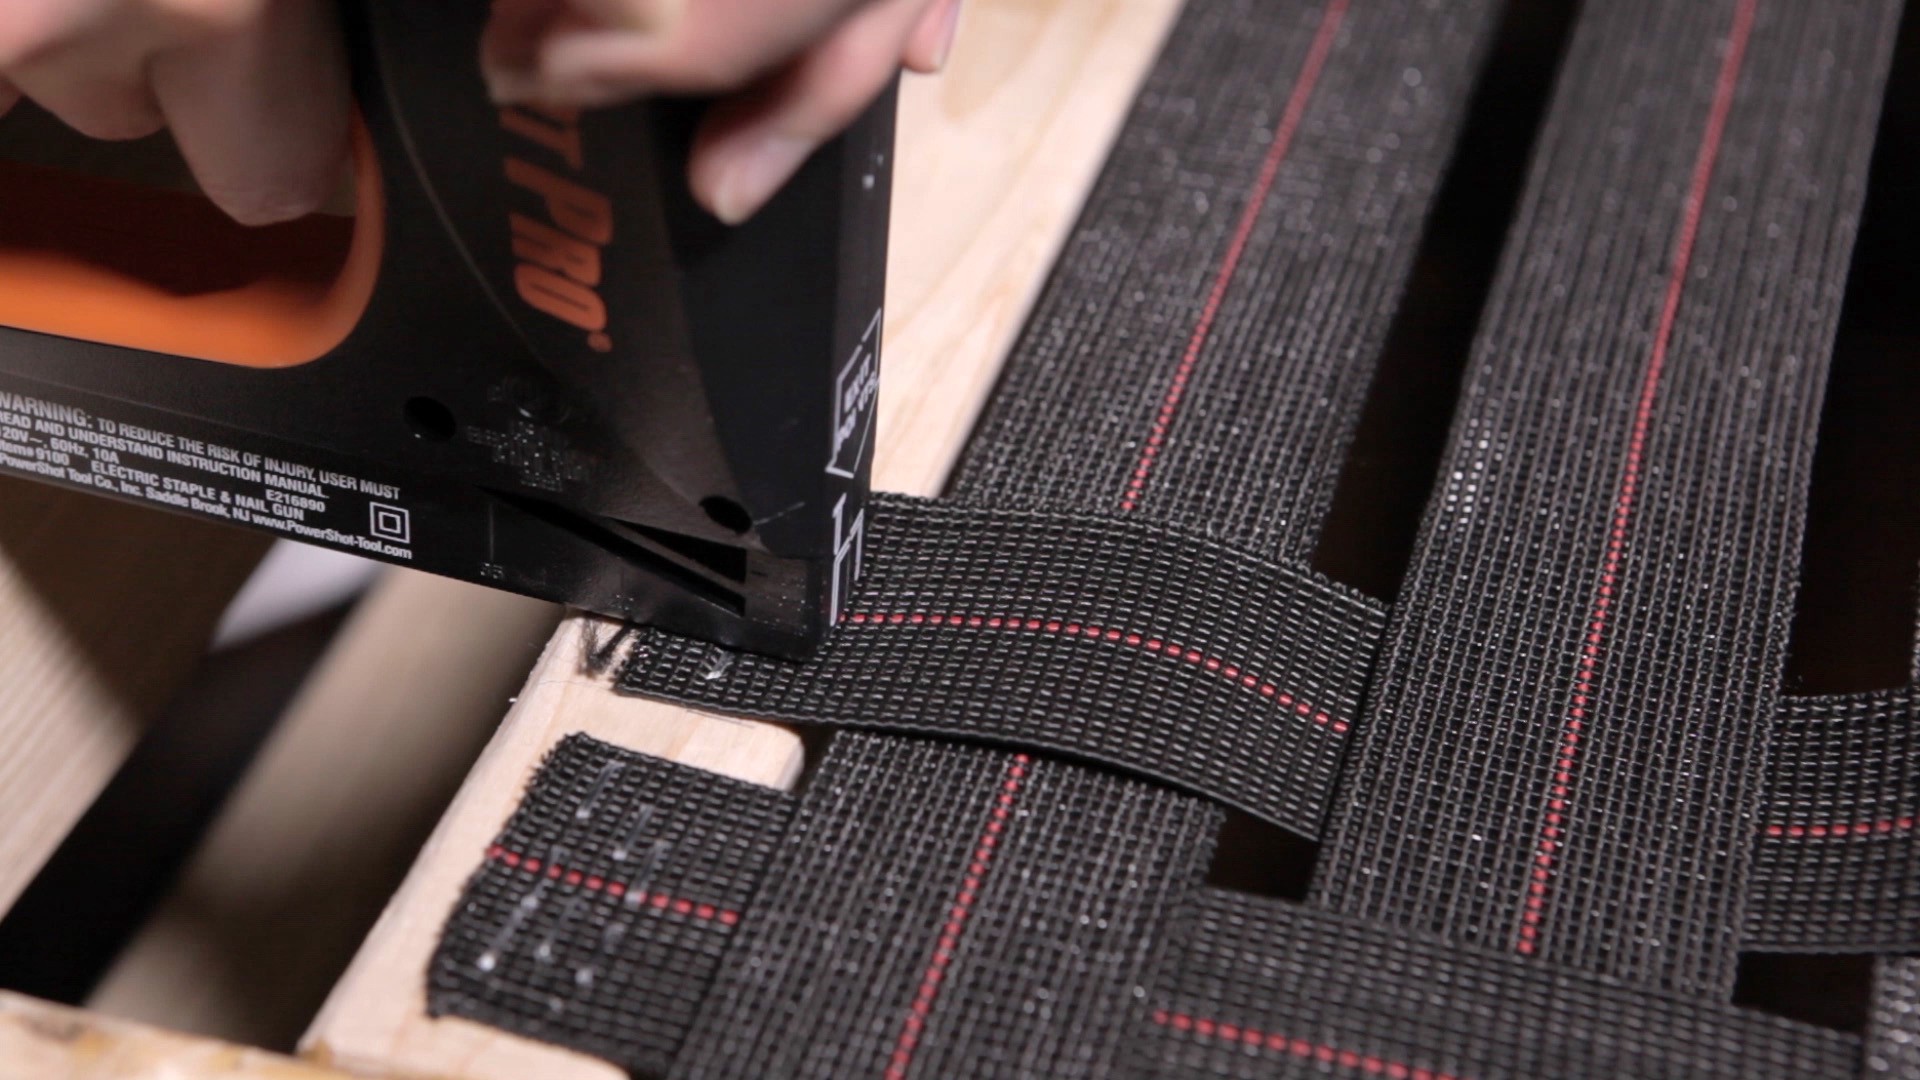 Stapling the ends of the webbing to the frame.
The webbing involved stapling one end and then using the webbing stretcher tool to stretch the webbing. I used a traditional webbing stretcher and not the ones with metal nails since I didn?t want to make more holes than necessary. You can?t stretch it by hand due to the strength of the webbing. It makes a nice drumming sound when it?s correctly stretched. I may have over-stapled the base with 9?10 staples each, but I?m pretty sure they won?t be coming out. I used less on the back since there shouldn?t be as much stress (and I don?t want to use that many staples). I weaved each strap through the others for more support.
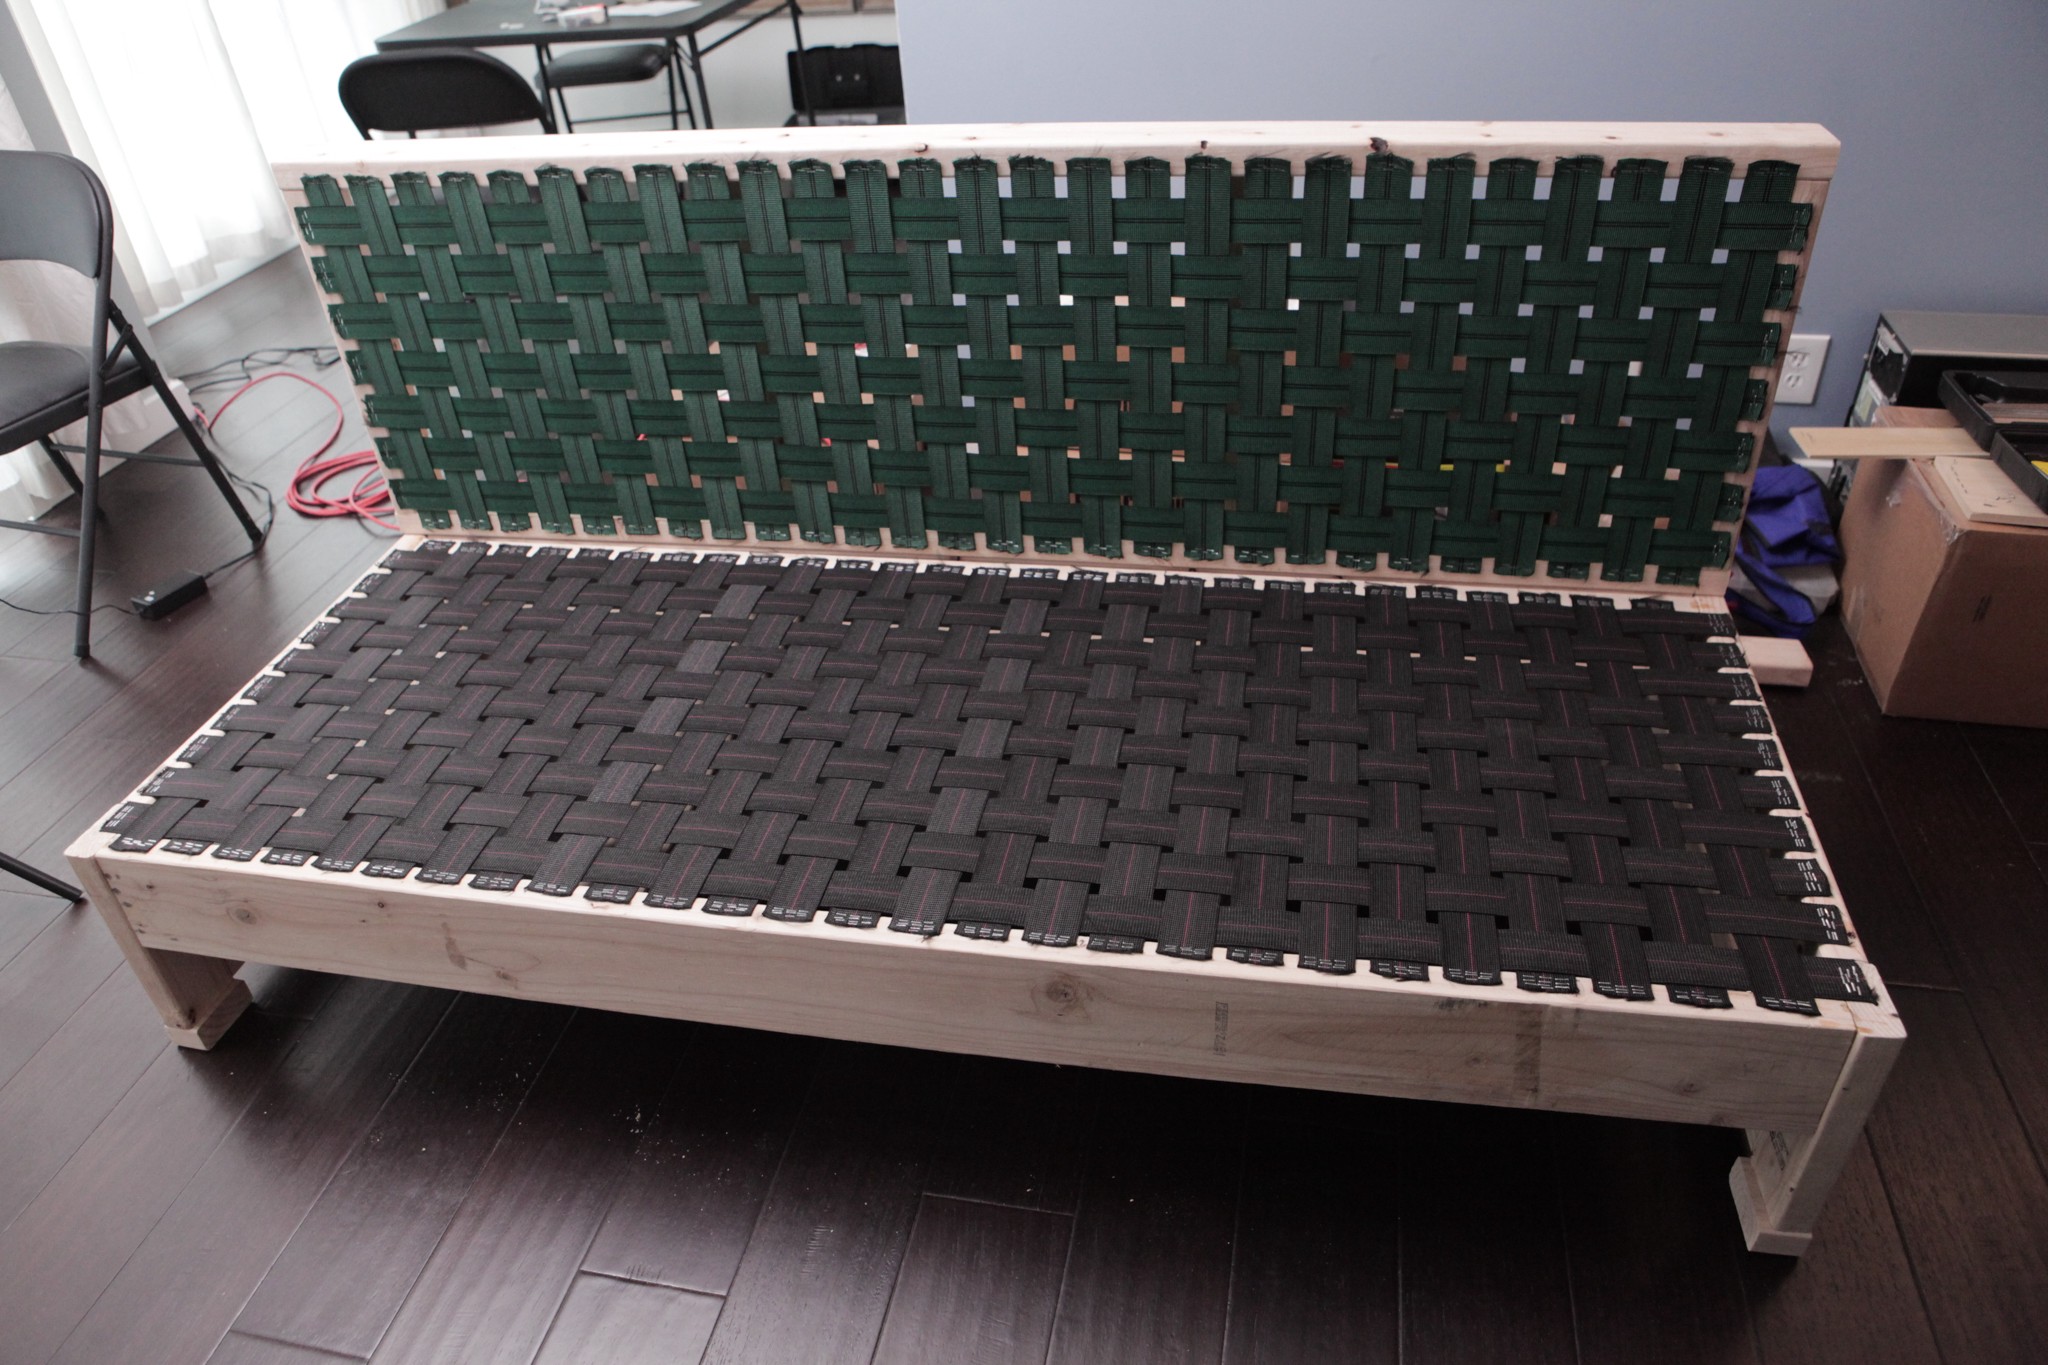 Finished webbing on the wooden frames.
Now that the webbing is in place, it?s time to start making the cushions that go on top. I ordered 6 foam cushions, 3 for the seats and 3 for the back, and let them decompress for a day since they come vacuum sealed and compressed. While it?s decompressing, I started on the covers using the microfiber cloth. The dimensions for the seat cover is 24″ W x 28″ L x 6″ H (the cut fabric is 1/2″ extra to account for the 1/4″ sewing margin). The back covers were 24″ W x 16″ H x 5″ D with a slight angle to 6″ at the bottom. The seat cushion foam is measured 25″ x 29″ x 6.5″ in order to fill out the cover. However, I made a mistake here and didn?t account for the extra width, so when all three are put side by side, it hangs off the sofa edge by 2″. Not a big deal, but it also means I can?t put the arm rest on the other side. So note to self (and others): Get bigger cushions to fill out the seat covers, but also make sure to compensate the size so it fits the desired length.
Also as another side note, making the covers too small by 1/2″ will make the foam start bowing inside the cover, so make sure you get those measurements correct.
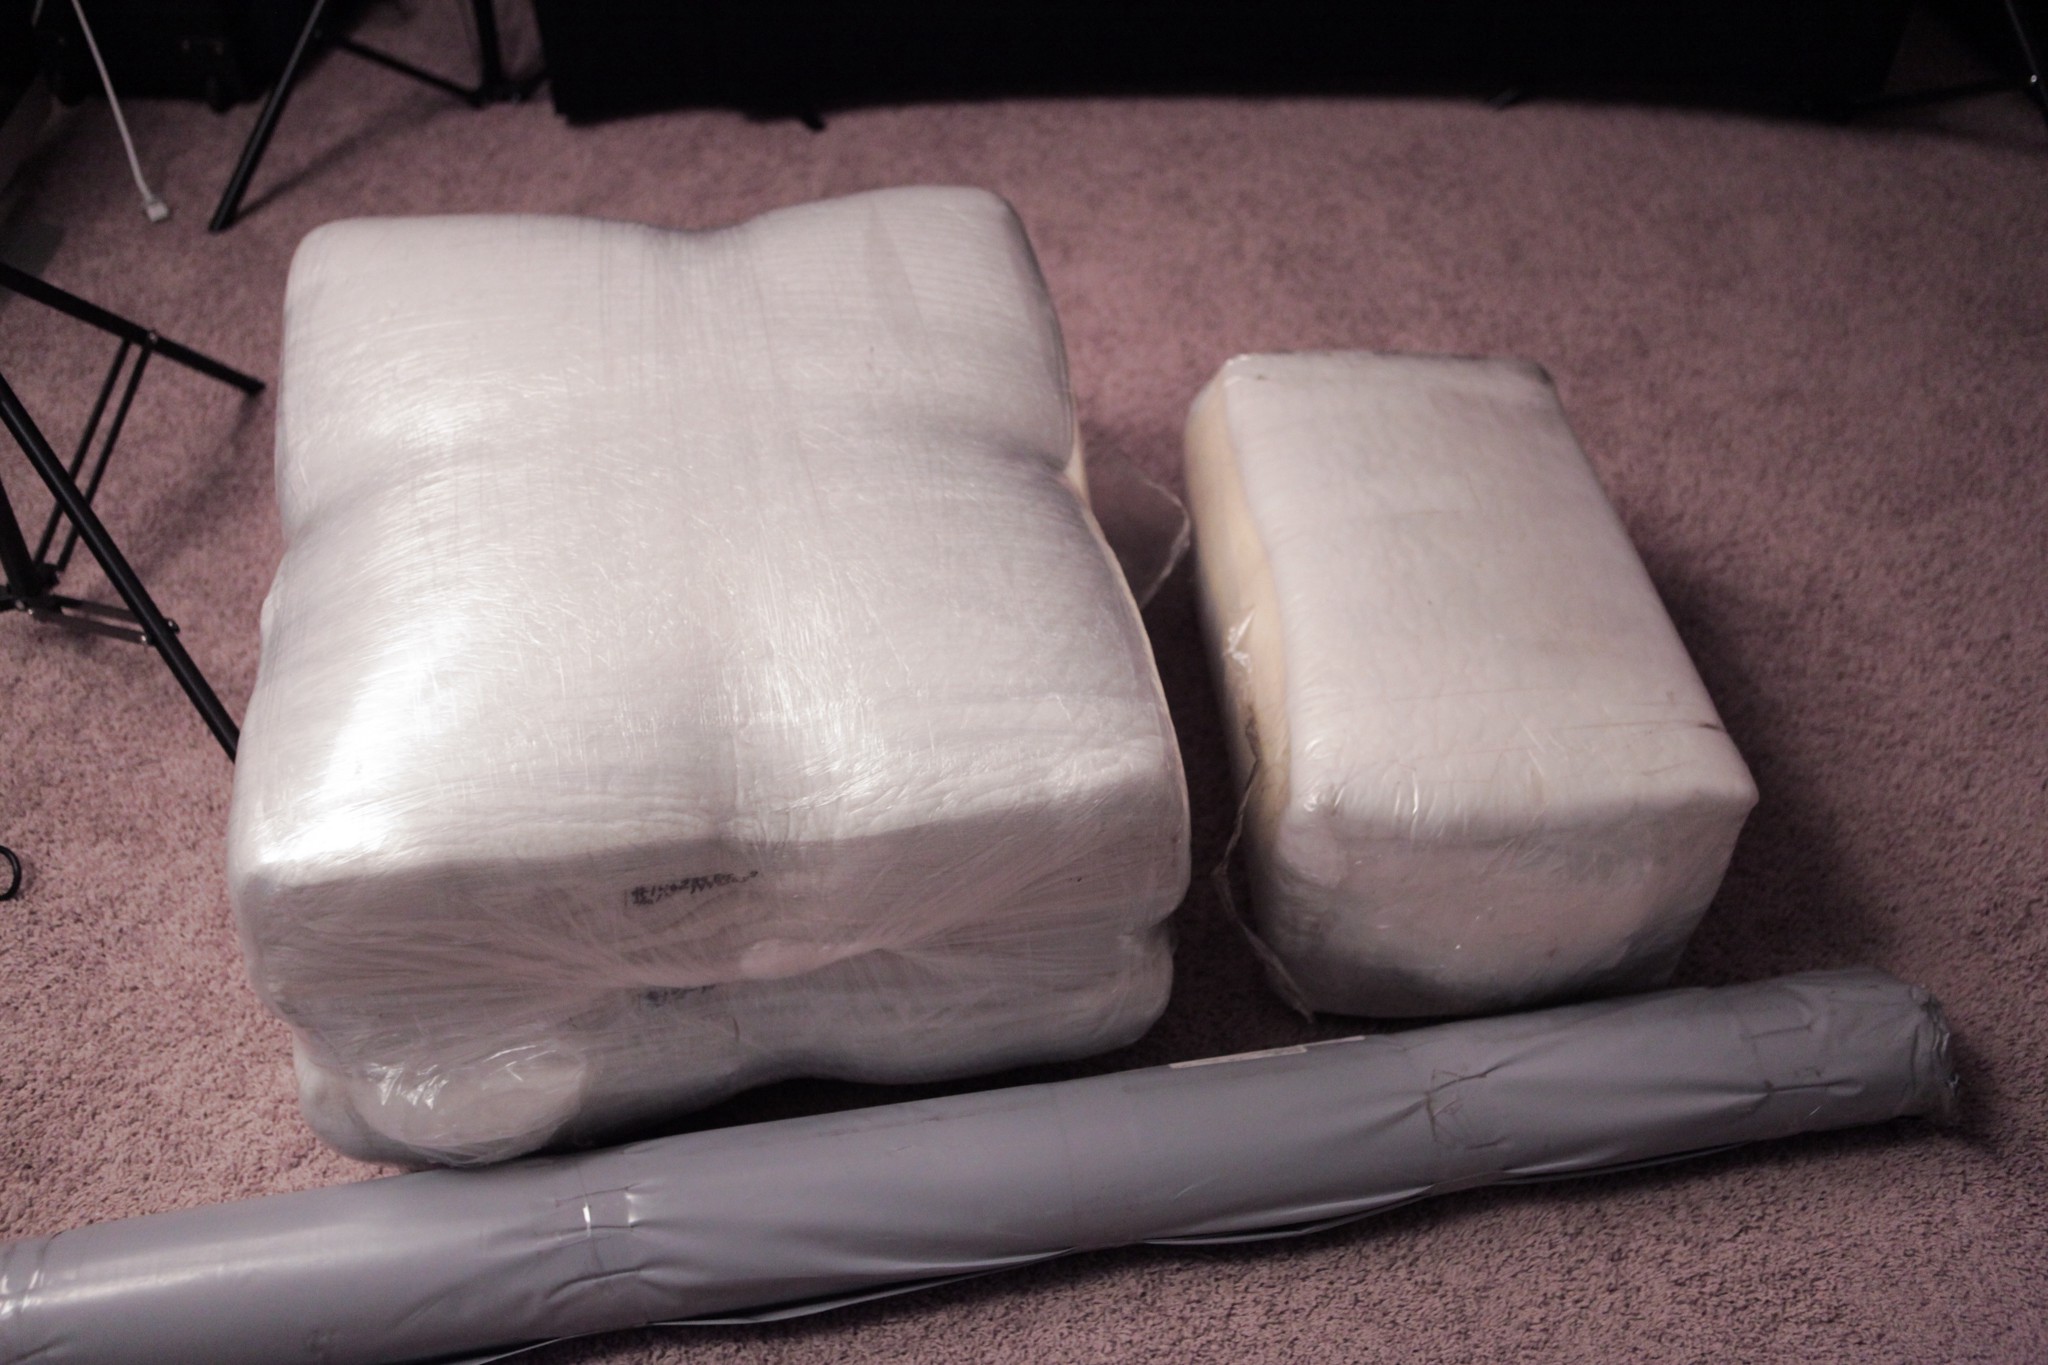 Foam and fabric straight from the post office.
To actually get the foam to fit into the cover, you need to put it in a sealed plastic bag, stick a vacuum to it, and start compressing it. The foam I bought for the cushions were a bit firm, so trying to jam them into the cushions without compressing this would be near impossible. With it compressed, I quickly tossed it into the cover before it re-expanded, then slowly took the plastic bag out to use for the others.
For the covers, I measured out each side + 1/2″ for sewing and cut each piece out of the giant 10 yard microfiber roll. Luckily, I had just enough to make all the cushions with very little left over.
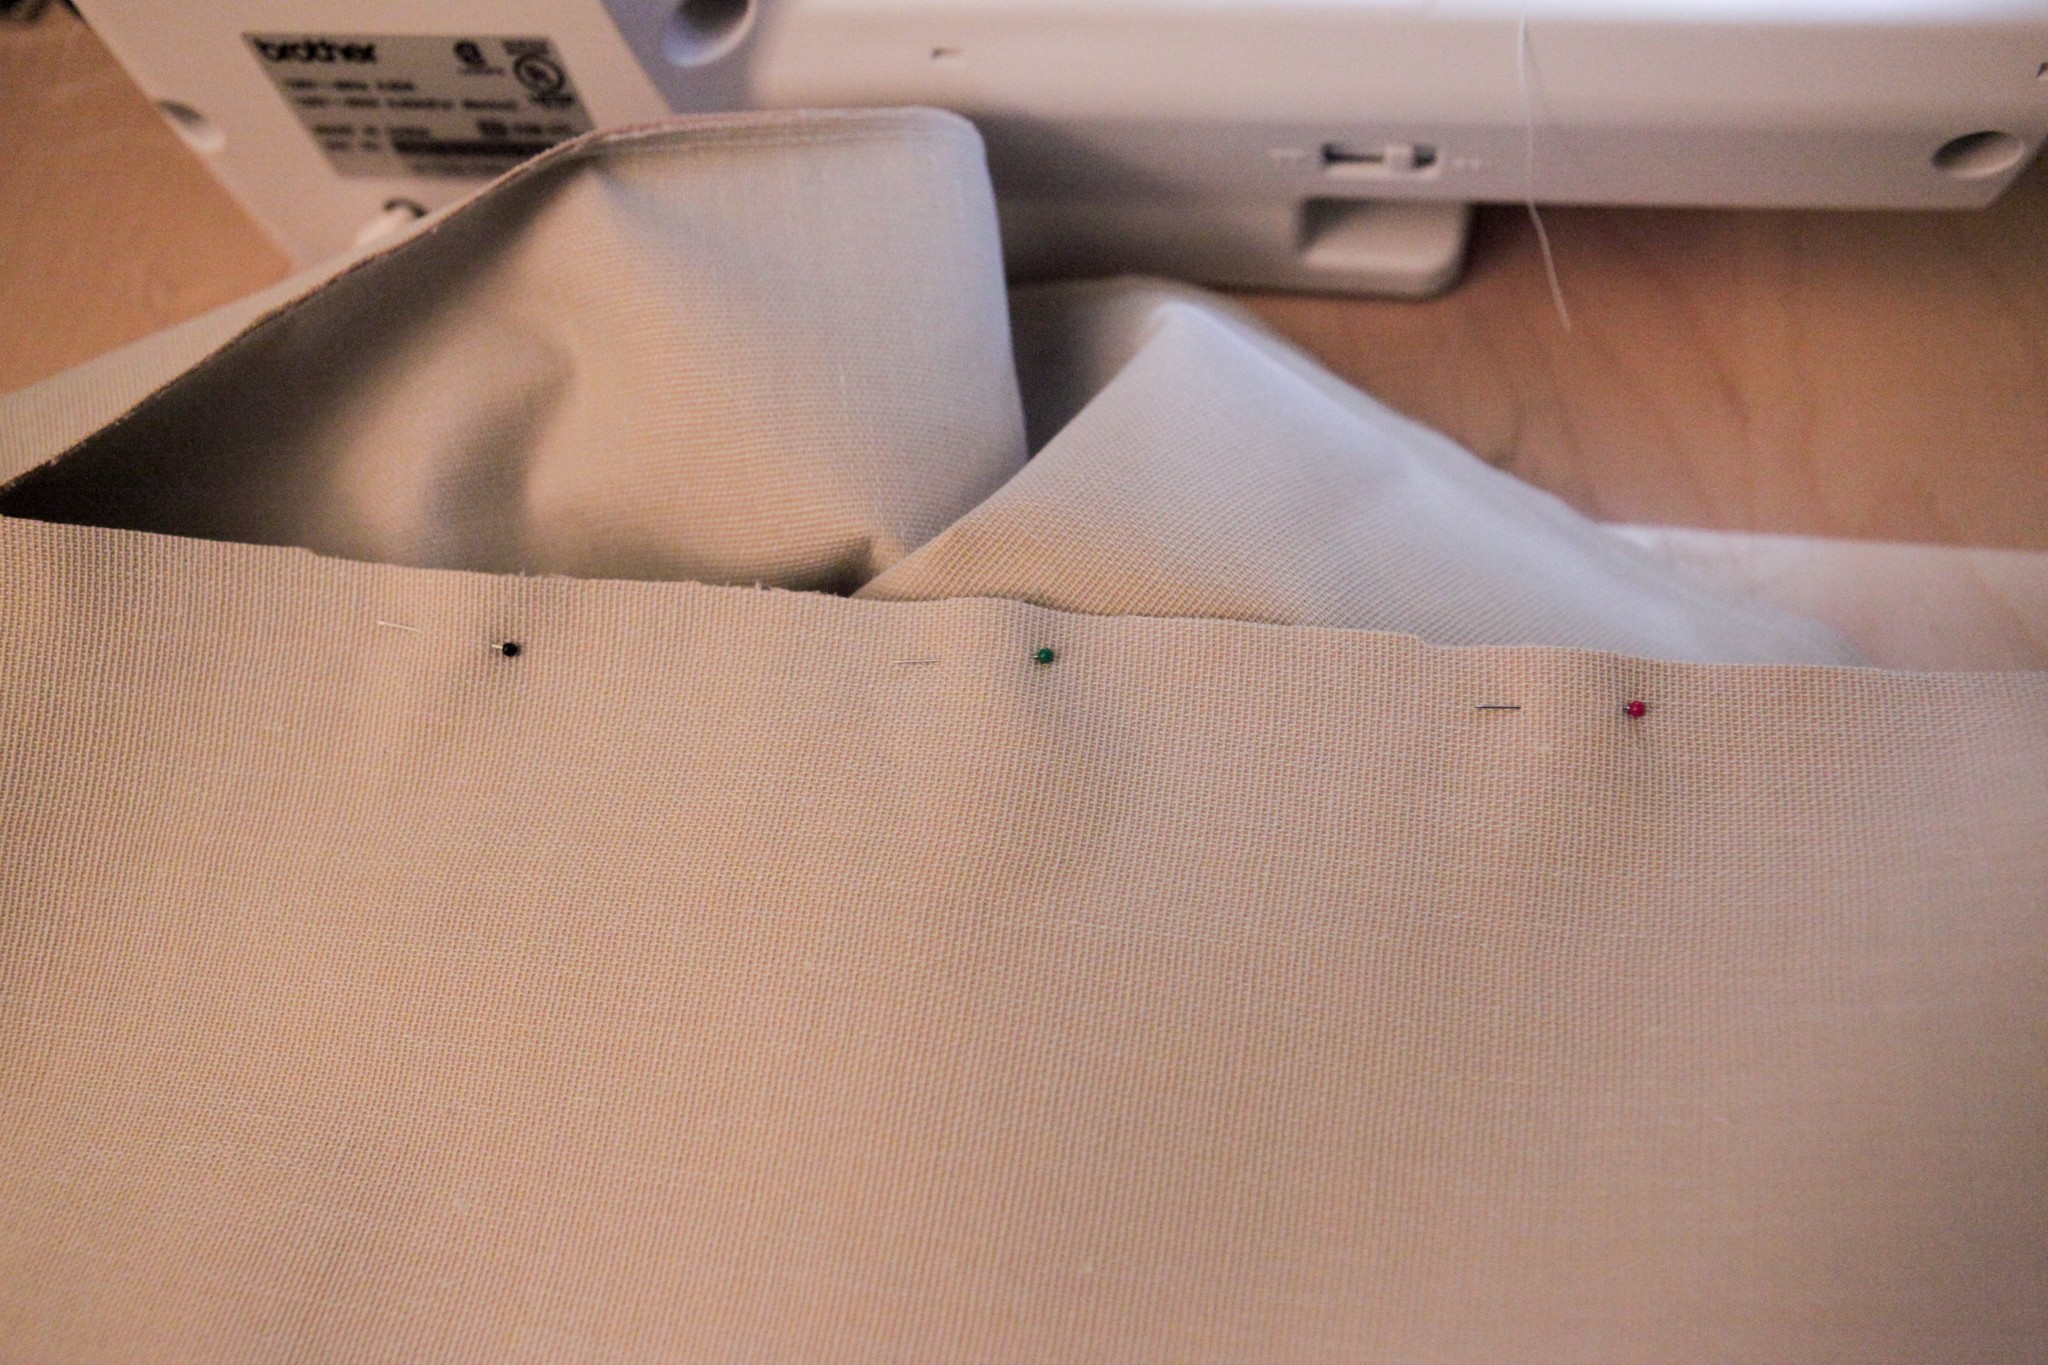 Pinning the fabric to make sure they?re straight.
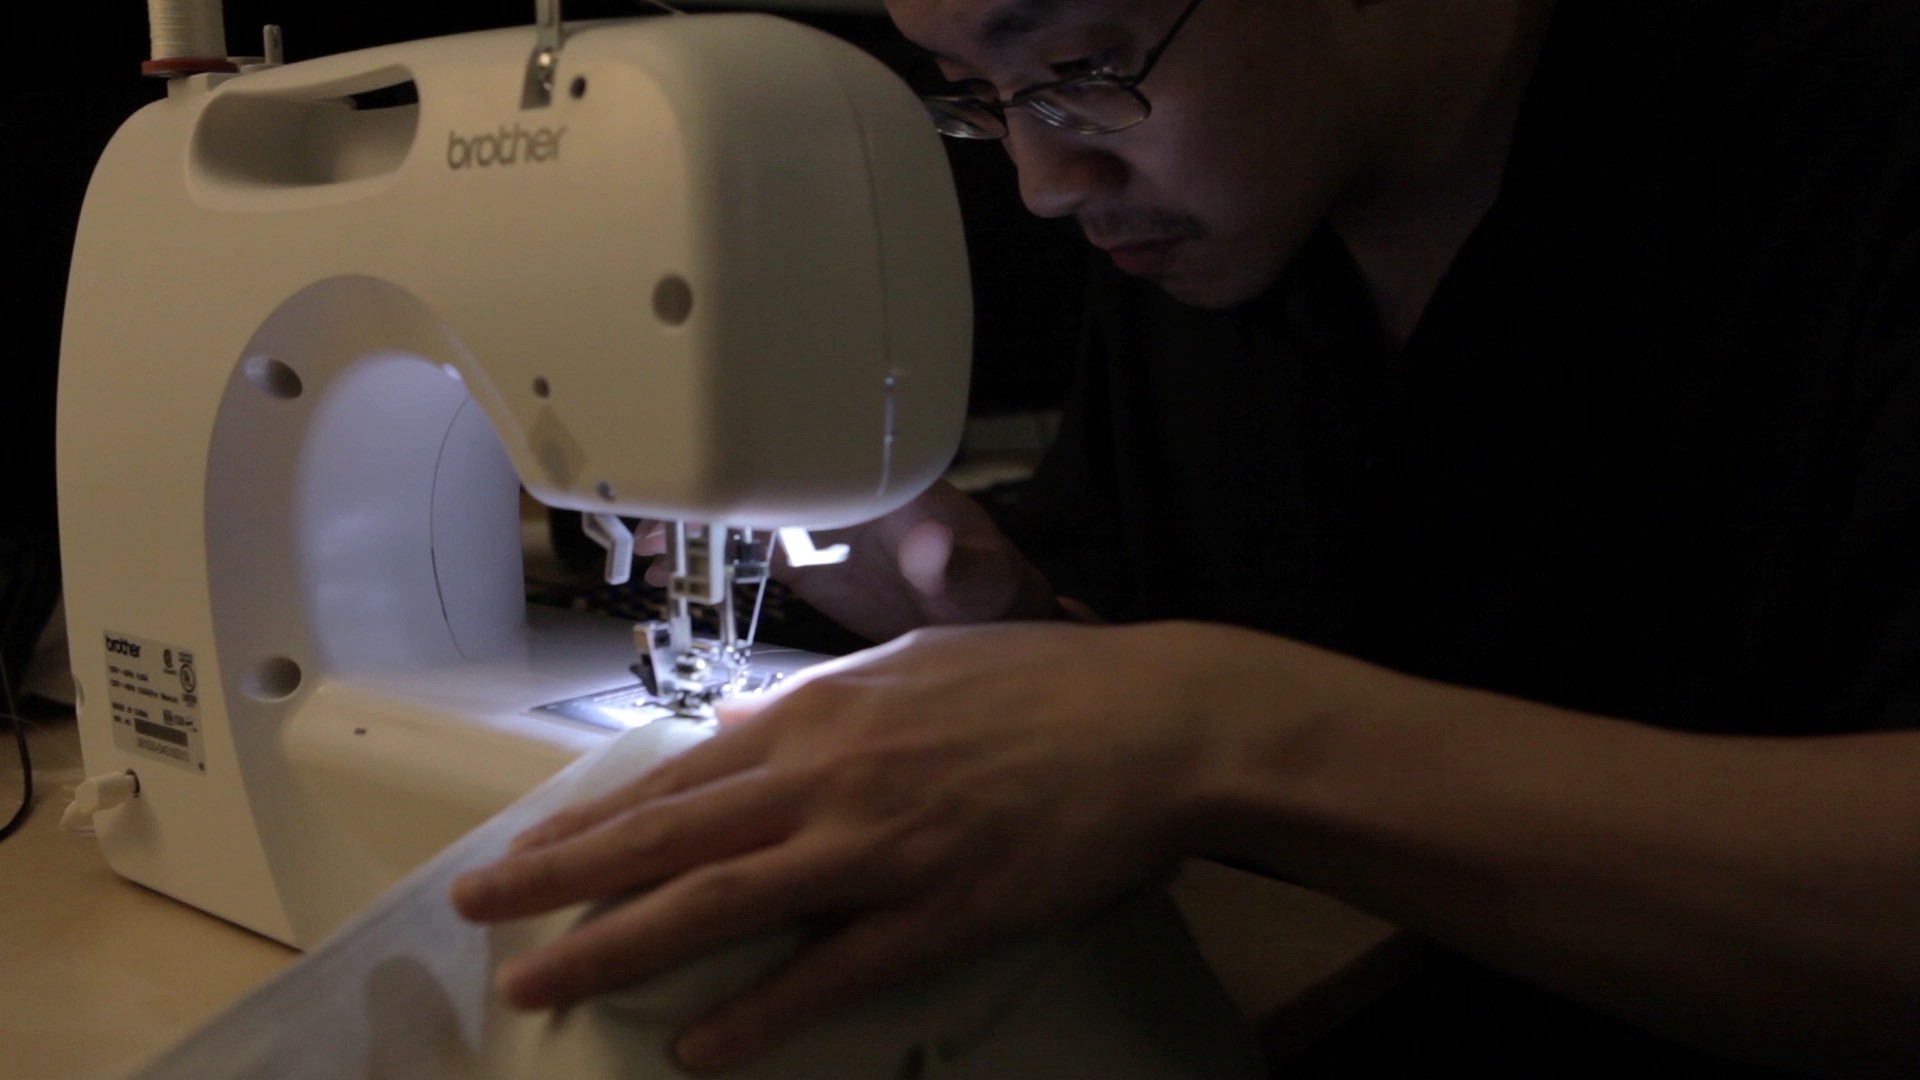 A lot of sewing.
Finishing
The final part is staining the wood and sealing it, giving it that nice clean look. I applied one coat of the stain as the one I?m using doesn?t require more and a seal after the stain dried. Unfortunately, there?s no photos here since I didn?t want to stain my camera trying to take pictures. It?s basically like painting with regular paint, only you need to wipe it down after letting it soak. Just follow the instructions on the cans.
I also made three 16″ accent pillows to go on the couch, starting from light blue to dark blue to match the walls. After spending so much time sewing the cushions, these felt so easy to make.
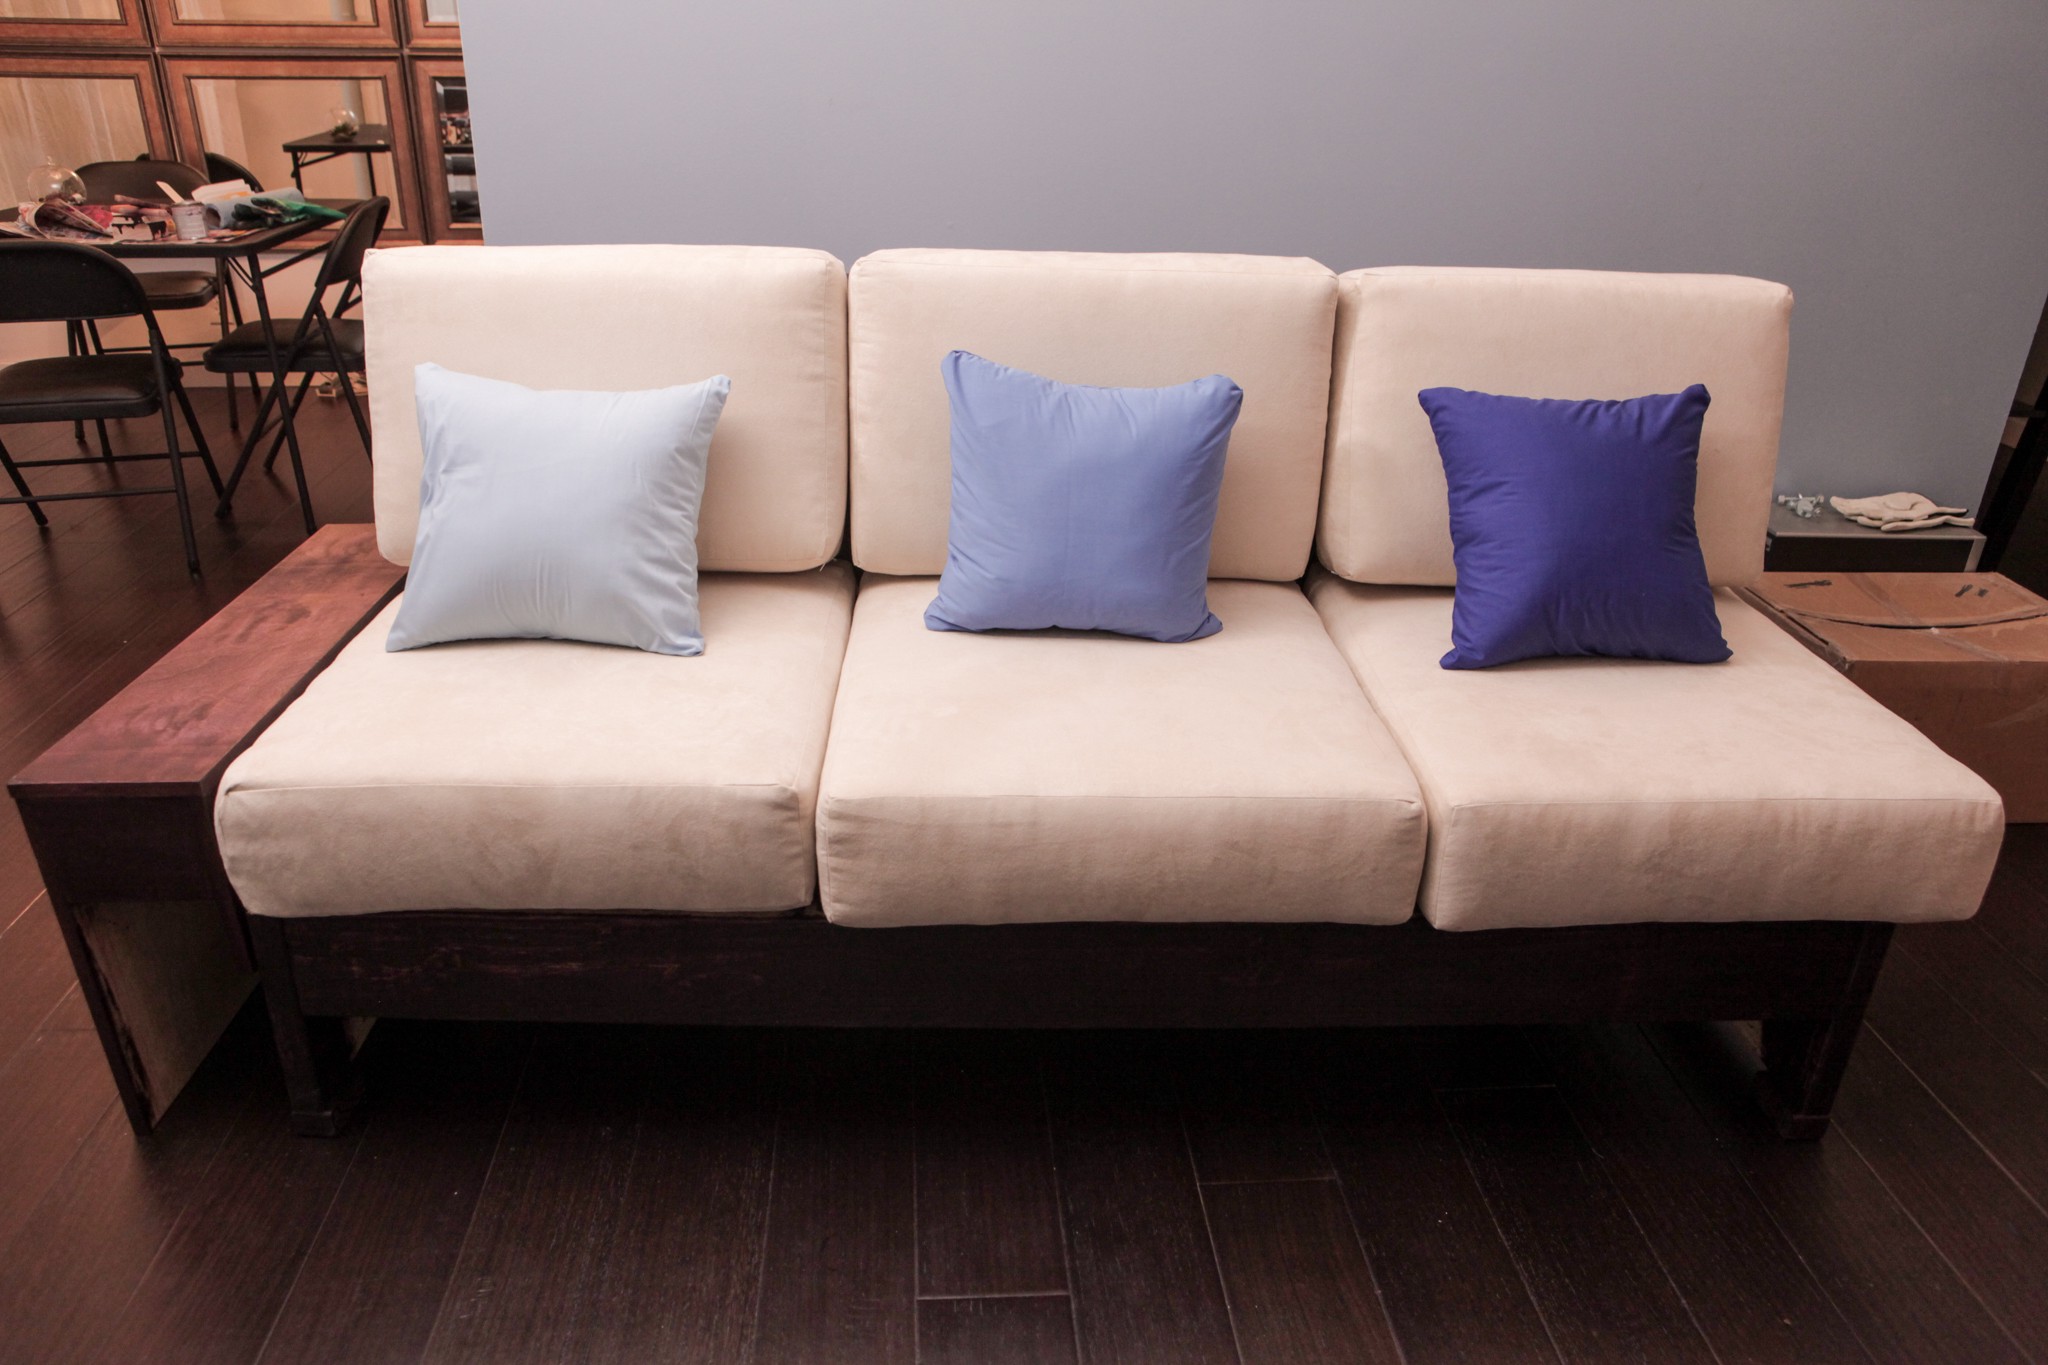 The completed couch with accent pillows and stained wood.
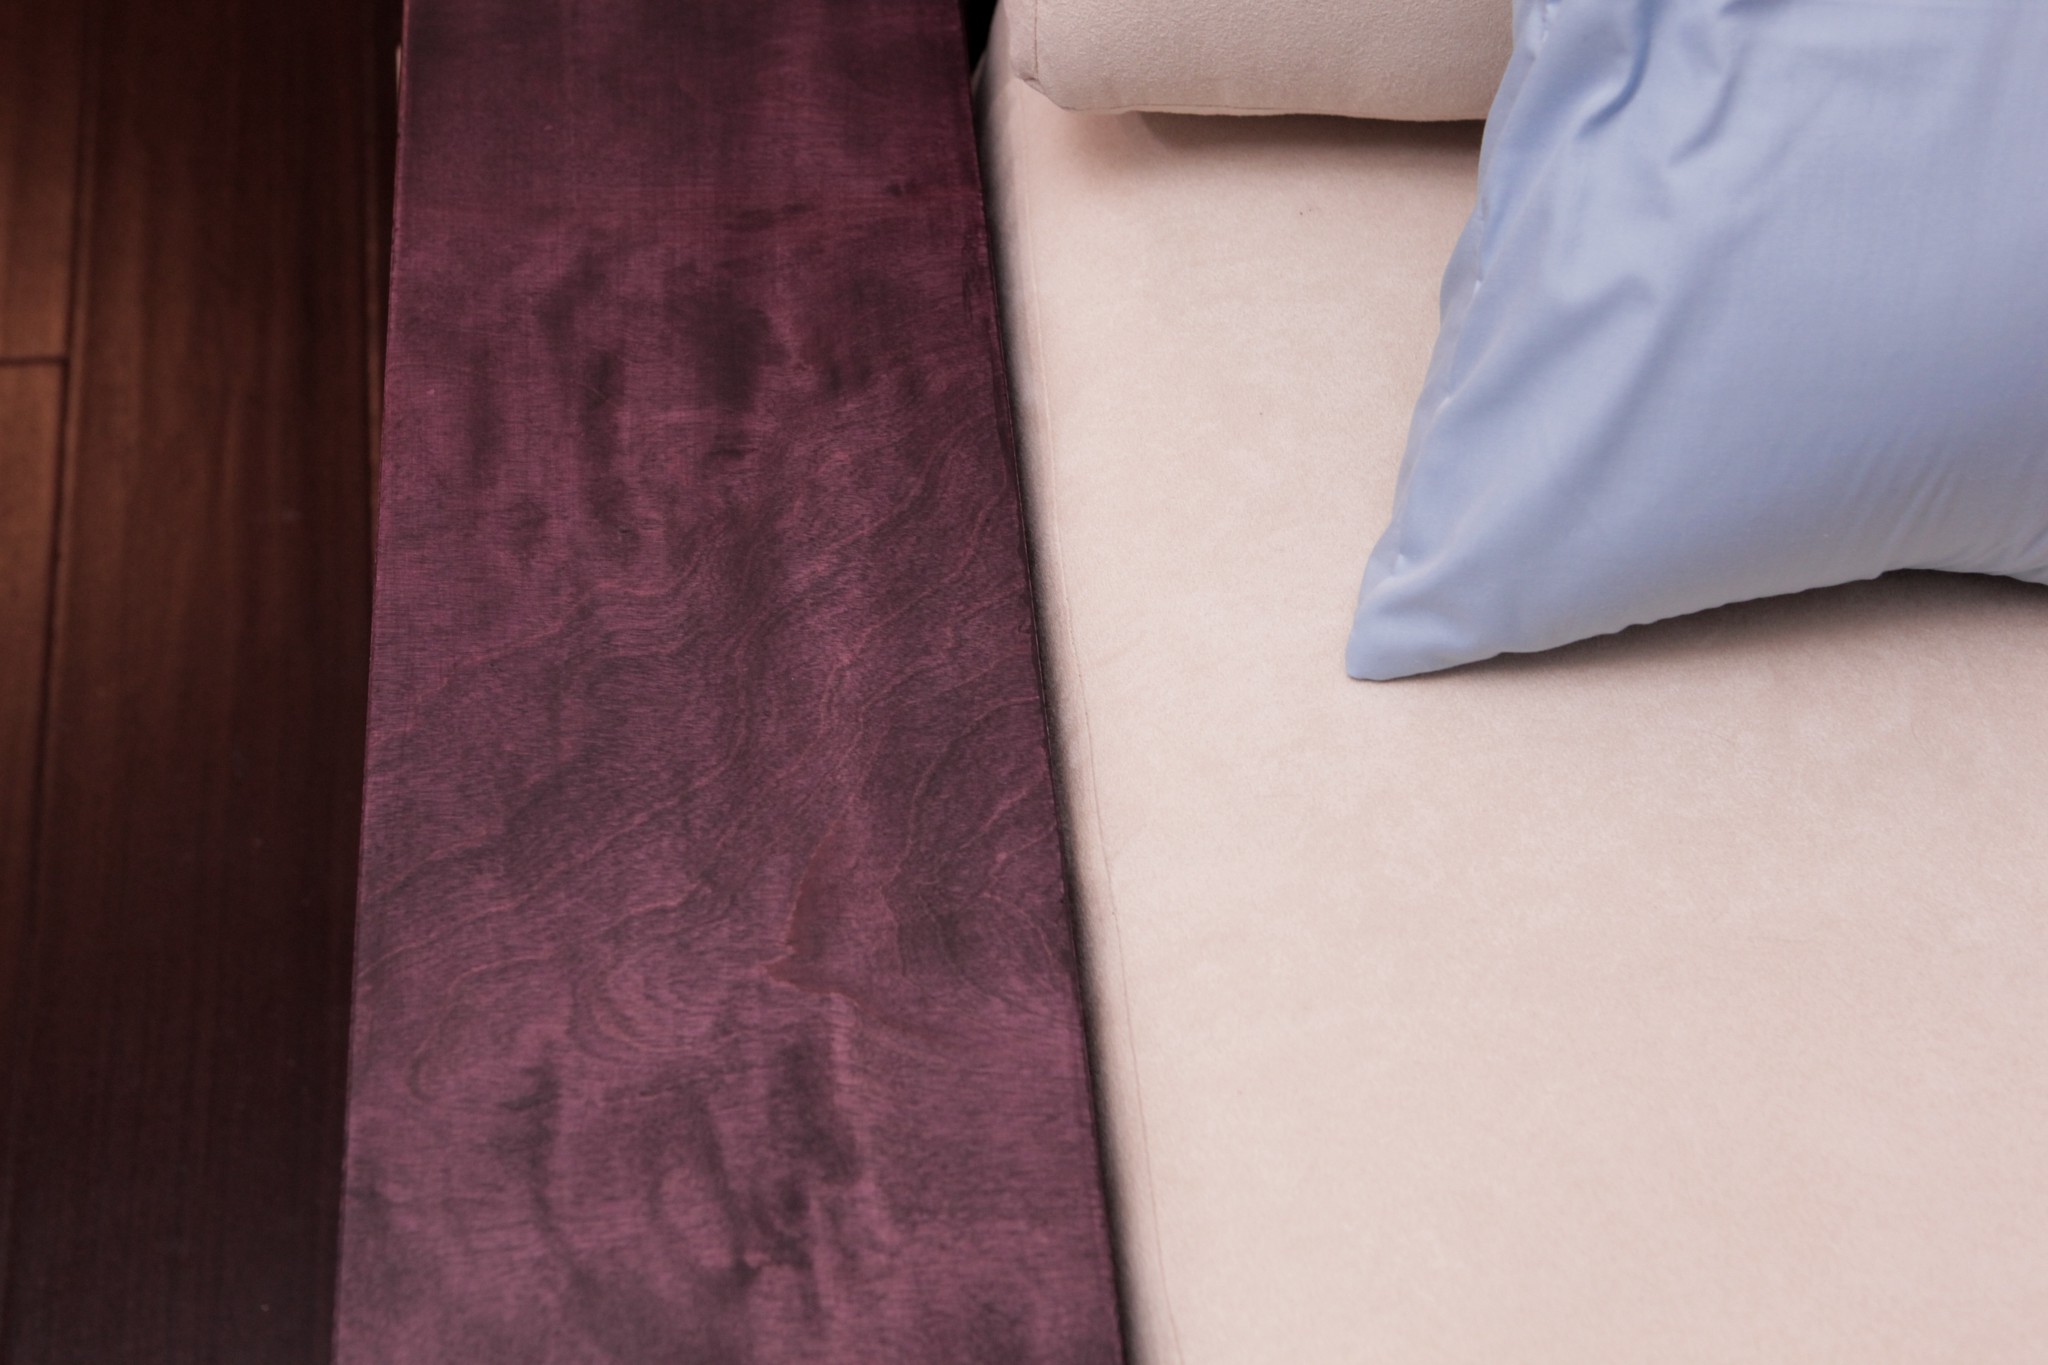 The plywood stained nicely.
So there you go, an overview on how to make a sofa. After spending two months working on it on the weekends, I can see why good couches cost around $2,000. A lot of work goes into these, and a lot of specialized tools are needed to construct everything. If you have the time and are willing to make a few mistakes making a sofa for the first time, you can give this a shot. It definitely takes more time than you expect, and buying everything from scratch costs as much as a regular sofa. If you plan on making more beyond a sofa or have the tools already, then this might be something fun to try.
Where will I go from here? Maybe I?ll make a coffee table to go with my new sofa. I have the tools now, so I feel like I can furnish everything. I could also write a more detailed plan for this sofa since I have everything logged, but for now, this is a good general overview on it.
