While most people purchase the Oculus Quest because they do not have a ?VR Ready? PC to begin with, there are many Quest owners that actually have a computer powerful enough to run AAA titles like Half-Life: Alyx or The Walking Dead: Saints and Sinners. Oculus has offered a wired solution called Link that lets you play PCVR games on their headset ? but there is another WIRELESS solution for those with the right network and setup. It?s called Virtual Desktop. Last Updated: 2020?07?28
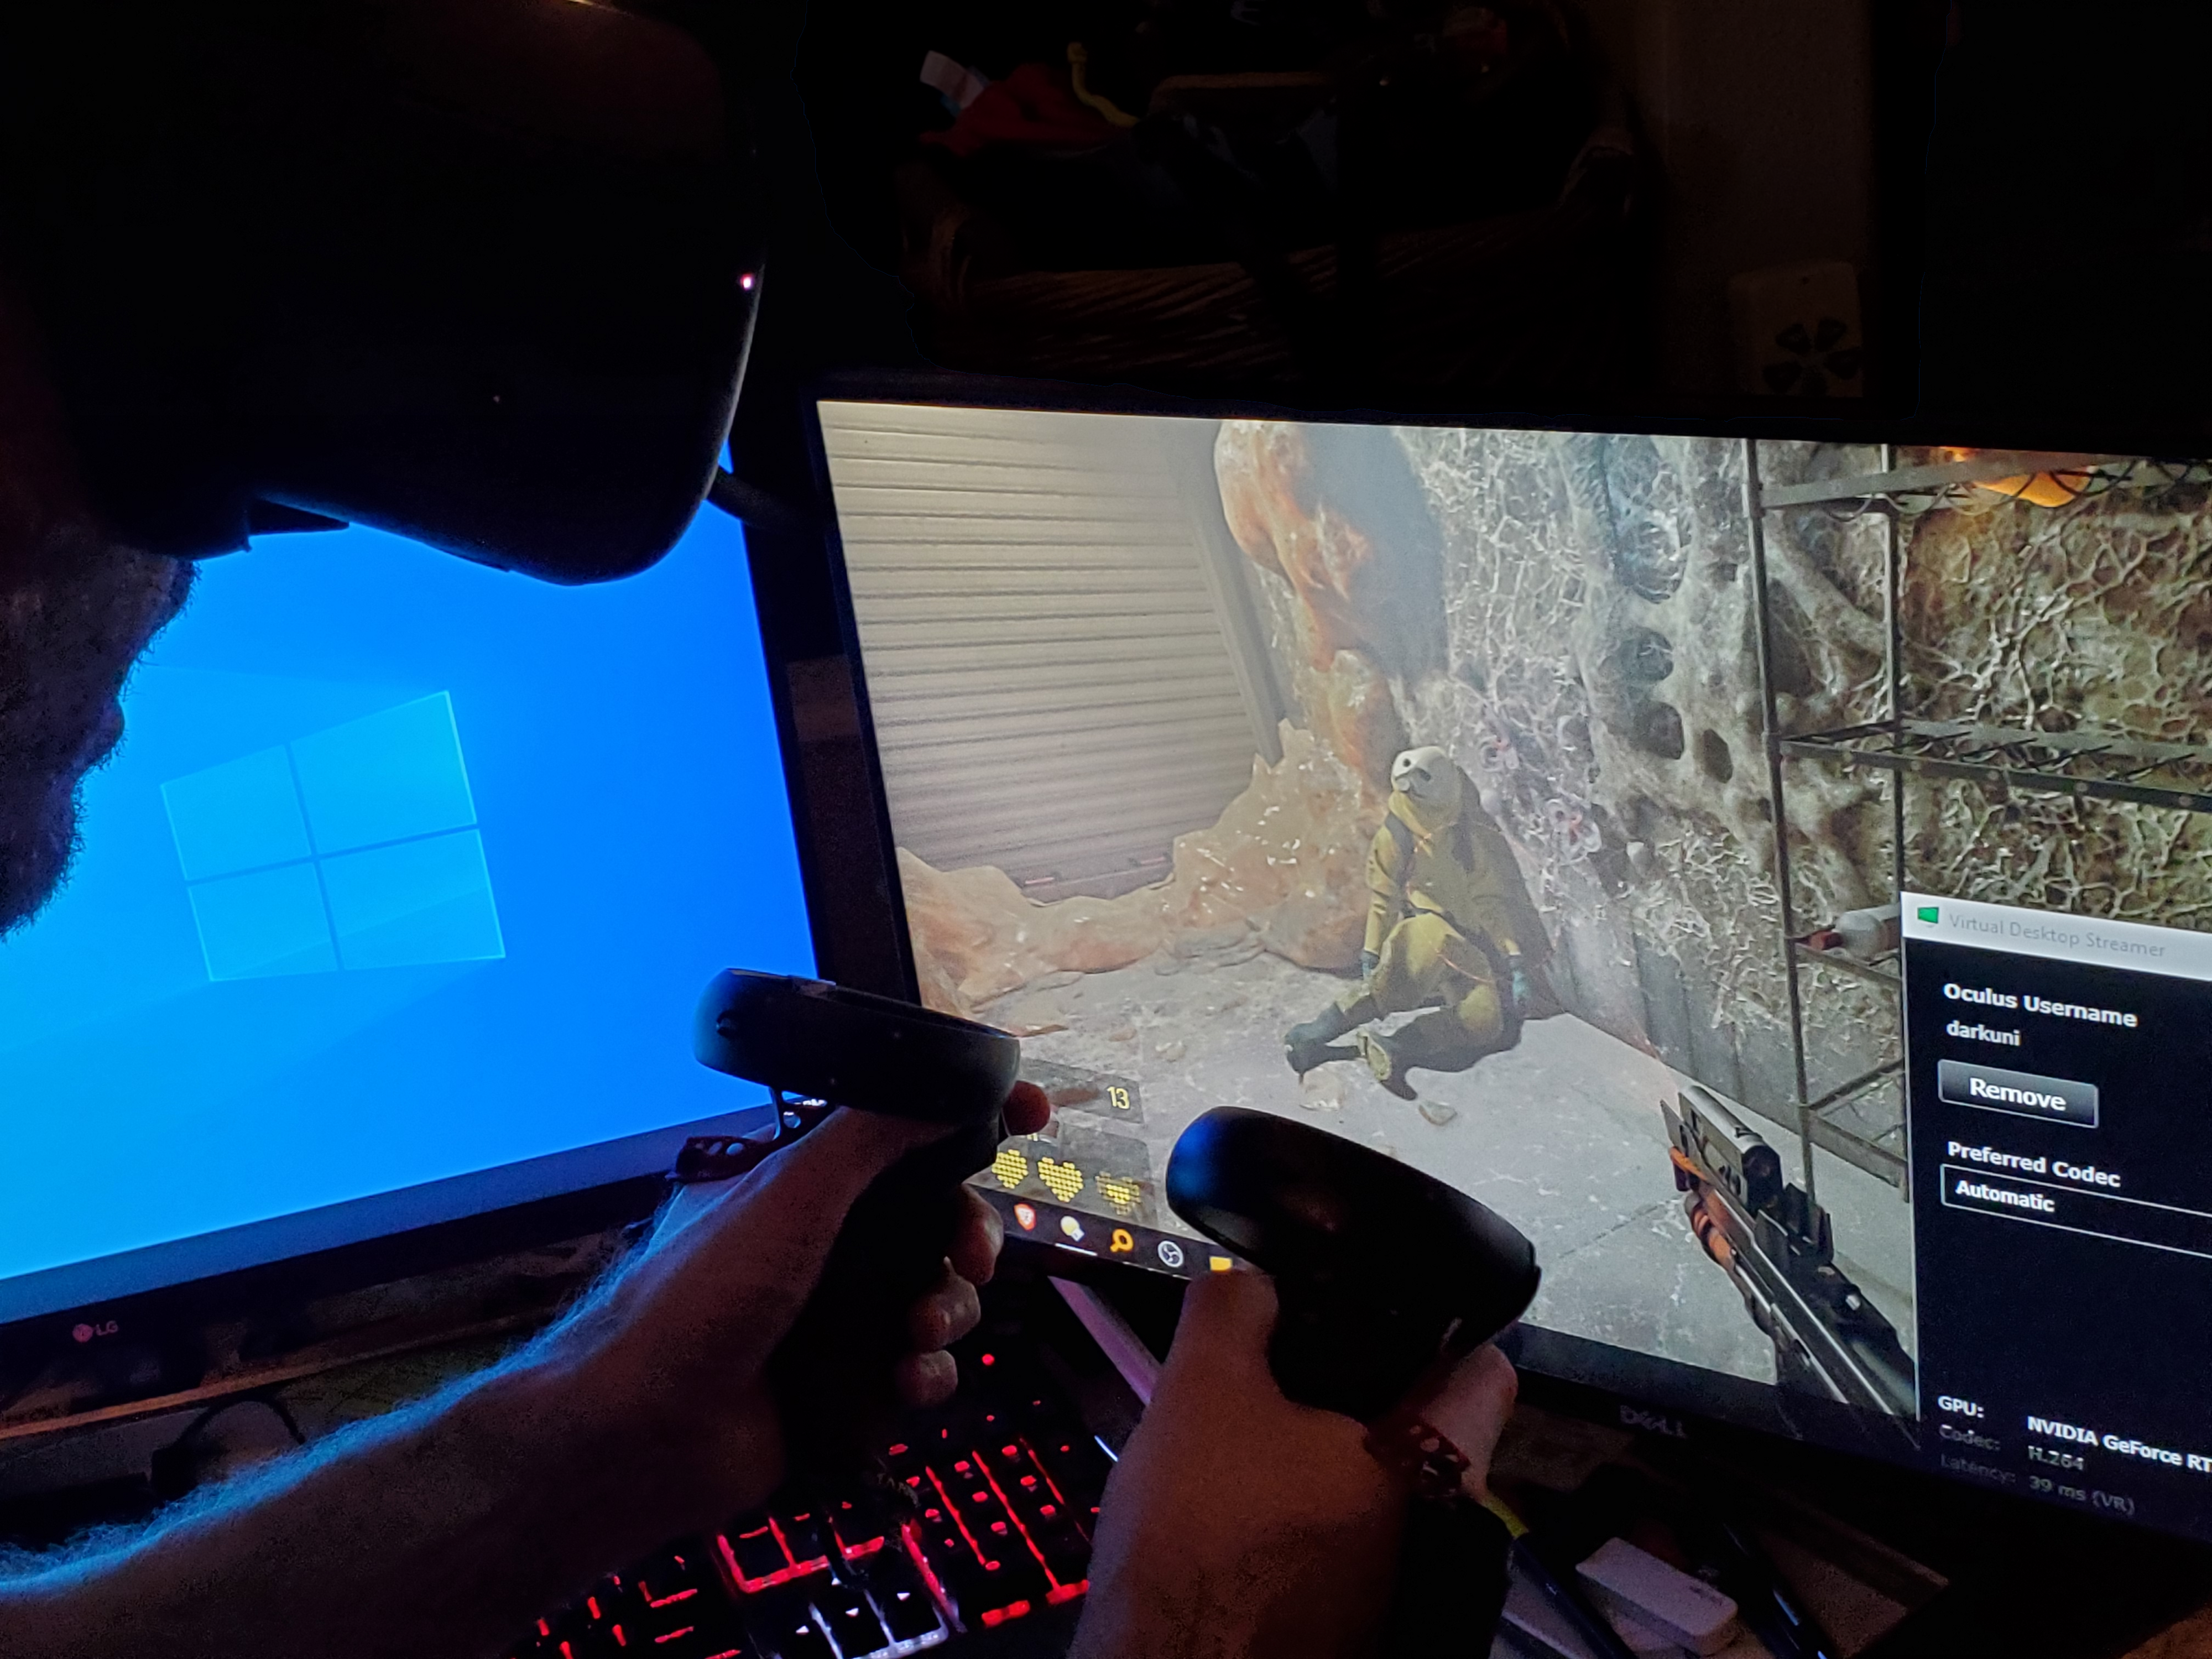 Half-Life: Alyx via Virtual Desktop on Oculus Quest
While not a requirement to use this article, it would probably be a good idea to read this article if you?re fairly new to the Quest platform.
Quest Newbie: Sideload, Link, Streaming, Crossbuy ? WHAT?
If you?re only using the Oculus Quest as it is out of the box, you may not be familiar with these terms. But there are?
medium.com
Now that we understand the variations of play, let?s start by seeing if Virtual Desktop is even an option for you.
Requirement 1: The Right PC
First things first. Virtual Desktop does not absolve you of having a top-notch VR-Ready PC.
Oculus themselves have a site set up to discuss what this means as it pertains to their Rift S VR line. Since your Oculus will sort of be a Rift S, this is a good place to start.
Oculus Ready PCs | Oculus
MSRP shown; retail prices may vary The Oculus Ready Program evaluates a wide range of high-performance laptops and?
www.oculus.com
Your VR Ready PC should meet or exceed the specifications of the PC featured there.
This article may also help you decide if your PC is ready.
How to Build a Cheap, VR-Ready Gaming PC | Digital Trends
It’s been a couple years since the VR renaissance kicked off in earnest, and things are looking up for VR. The HTC Vive?
www.digitaltrends.com
But, one thing you need to take away from this section ?
Your PC needs to be ?above minimum spec? for best results.
Rift S and other wired headsets use ?HDMI mirroring? to show the game in the headset. Virtual Desktop (just VD from now on) is essentially using your PC as a ?game streaming service? like GeforceNOW or Stadia. As such, your PC needs the power to run the game AND stream it to the Quest.
Requirement 2: The Right Network
Unlike a PC, whose overall ?power? is an aggregation of a few pieces of hardware (CPU, GPU and memory) ? your network has dozens of potential issues that can degrade or even halt your ability to use VD.
If you look at the VD listing on Oculus? Quest store ? there are no requirements listed; only a single recommendation.
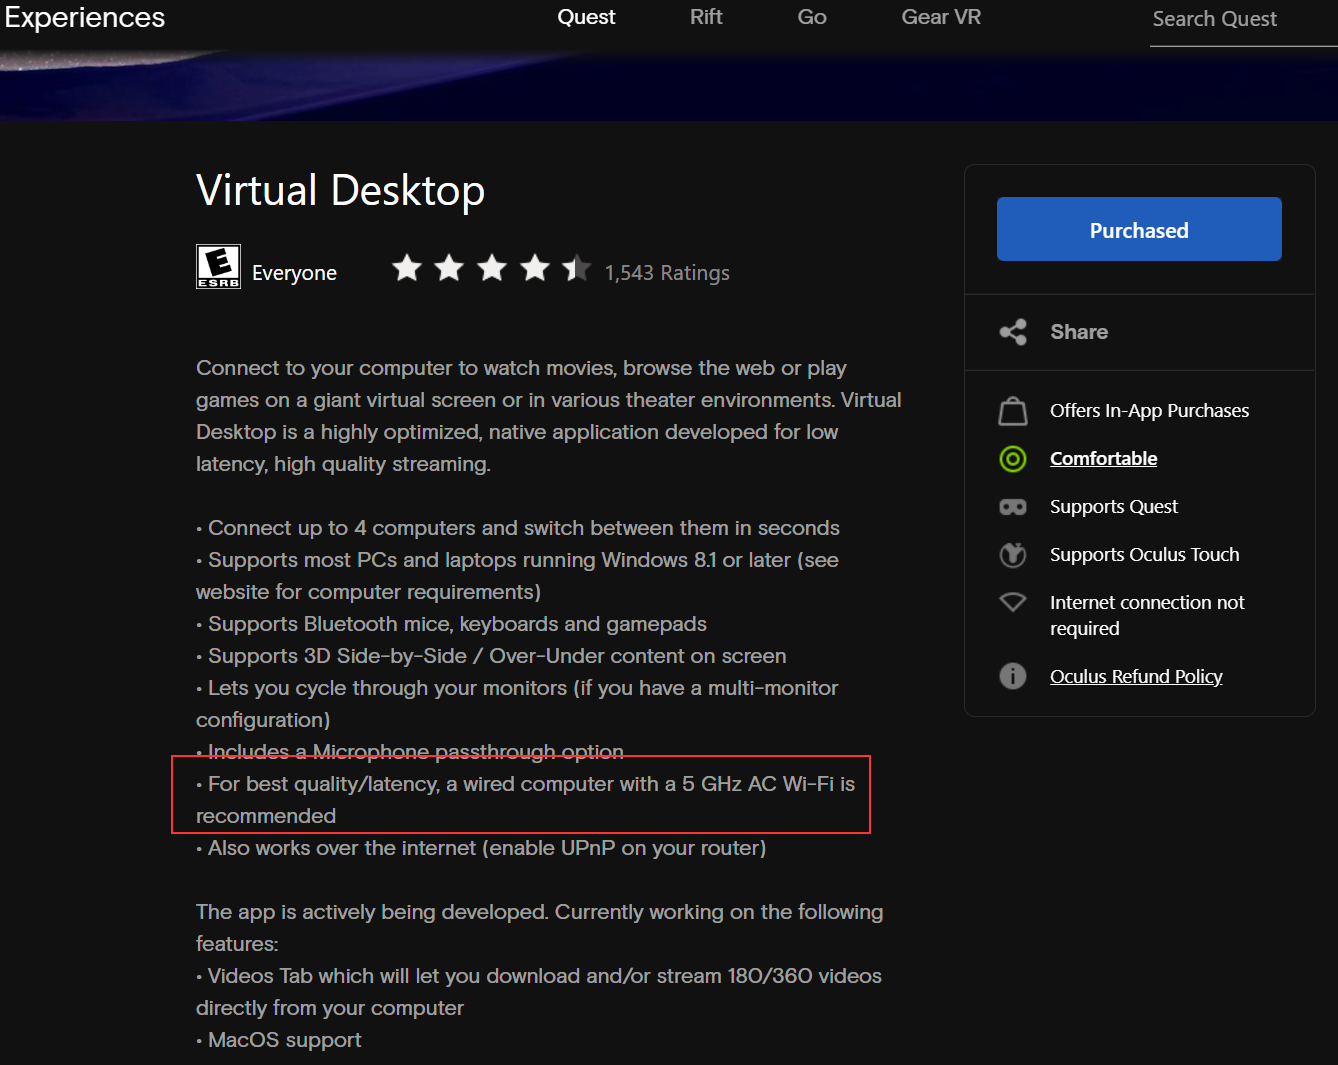 For best results ? Wired PC + 5ghz AC Wi-Fi is recommend
These are the requirements for streaming the PC desktop to your Quest ? but certainly not all encompassing for PC VR gaming.
From a much more realistic standpoint, I will give you my recommendations for a successful implementation with solid performance ? based on my own experiences. Don?t worry if these don?t make total sense now ? we?ll be covering them more later.
- 5Ghz AC Wi-Fi Router
- Wired, gigabit Ethernet on the PC
- All gigabit Ethernet compatible hardware (cables, hubs/switches); no power line adapters
- < 30 feet line of sight to your Quest play area
- No obstacles such as walls or large barriers
- A ?quiet? channel to operate your 5ghz band on
That?s quite the list, right? What makes this worse, is that some of these requirements are going to be beyond your control and are subject to changing conditions constantly.
Which leads to the last requirement ?
Requirement 3: A Little Elbow Grease and Effort
As with everything worth having, an optimum VD setup is rarely handed to you in a neat little package. To conform with the recommendations above, you may have to exert a little effort, spend a little money and possibly put in a little time.
For my experience, I ended up having to do the following:
- Replace a length of poor cable (few bucks)
- Replace a dying hub ($30)
- Make some configuration changes on my router (Free)
But enough of this foreplay. Let?s get to the good stuff.
Step 1: The Software
To use Virtual Desktop you?re going to need some software set up and installed.
SideQuest
In order to sideload VD properly, you will need SideQuest set up and installed. This is a well-documented procedure, so I do not feel the need to explain it. If you already have a SideQuest installed, you can move on. Otherwise, go to the site below and get that going first.
SideQuest – Make it your own
SideQuest is a tool to help simplify getting content onto Quest and Go and other VR headsets.
sidequestvr.com
Virtual Desktop: Buy The App
While we?re not actually going to use the Oculus Quest store version of VD, you still must own it. The version you need to buy is linked below. Hopefully you didn?t buy the Rift or Steam edition already. If so, refund it.
Virtual Desktop on Oculus Quest
Connect to your computer to watch movies, browse the web or play games on a giant virtual screen or in various theater?
www.oculus.com
You only to need to purchase this app ? you do not need to install it.
Virtual Desktop (The Sideloaded Version)
The official Quest version of VD will not allow you to play SteamVR games. That simply won?t do, so we will need to sideload a version that will allow us to do so. This is 100% approved by the developer, so we?re not skirting any rules here.
Connect your Quest to your PC and run SideQuest. In the search box, search for Virtual Desktop. Click on Virtual Desktop.
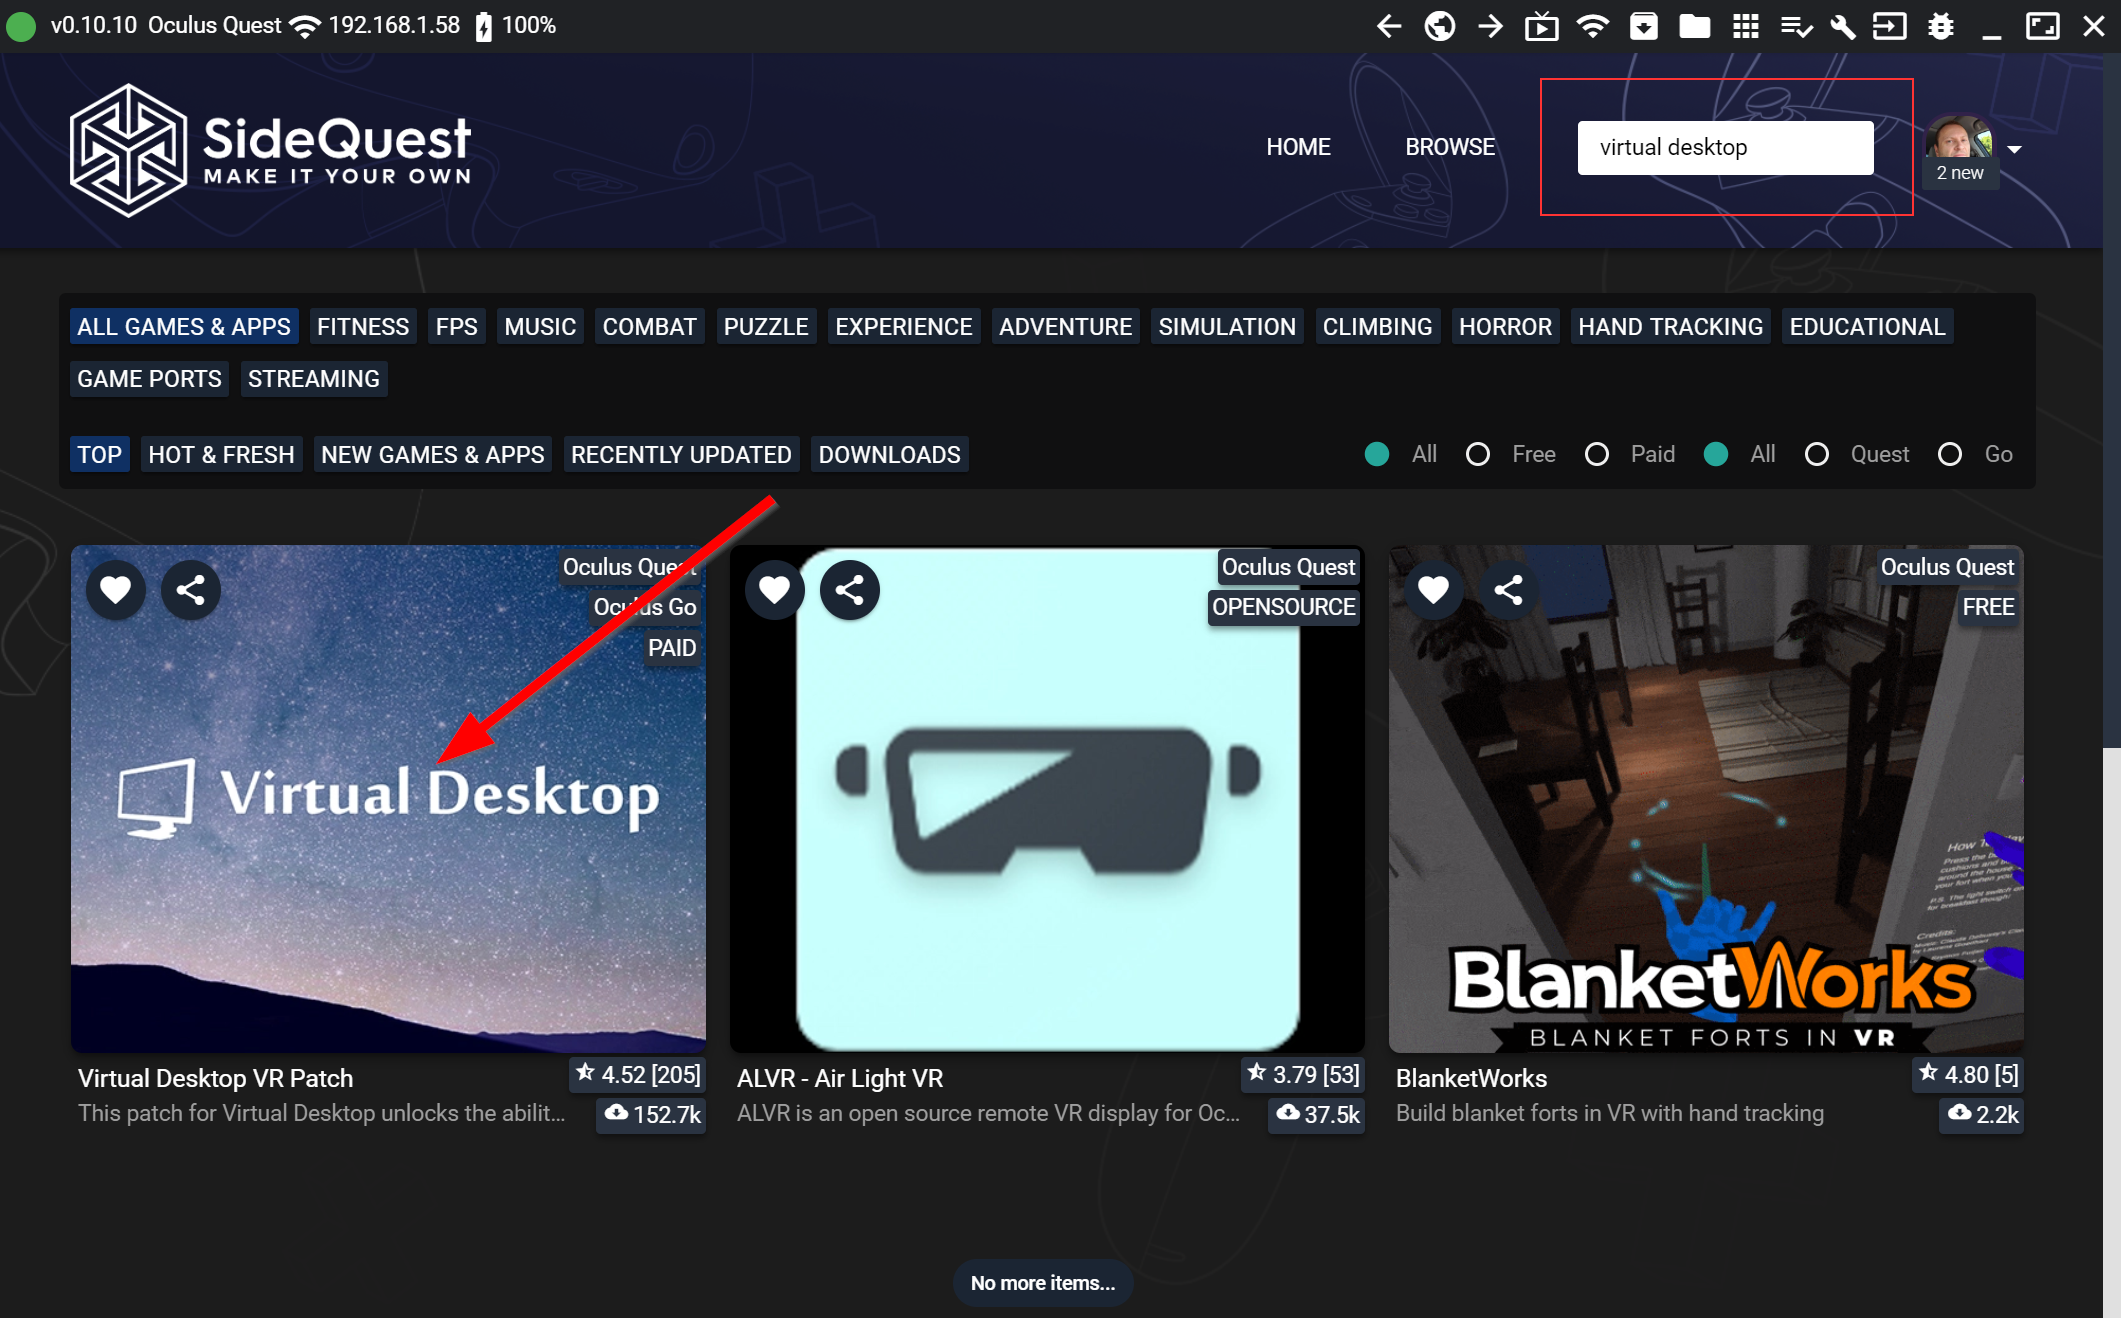 SideQuest ? Your store away from the store.
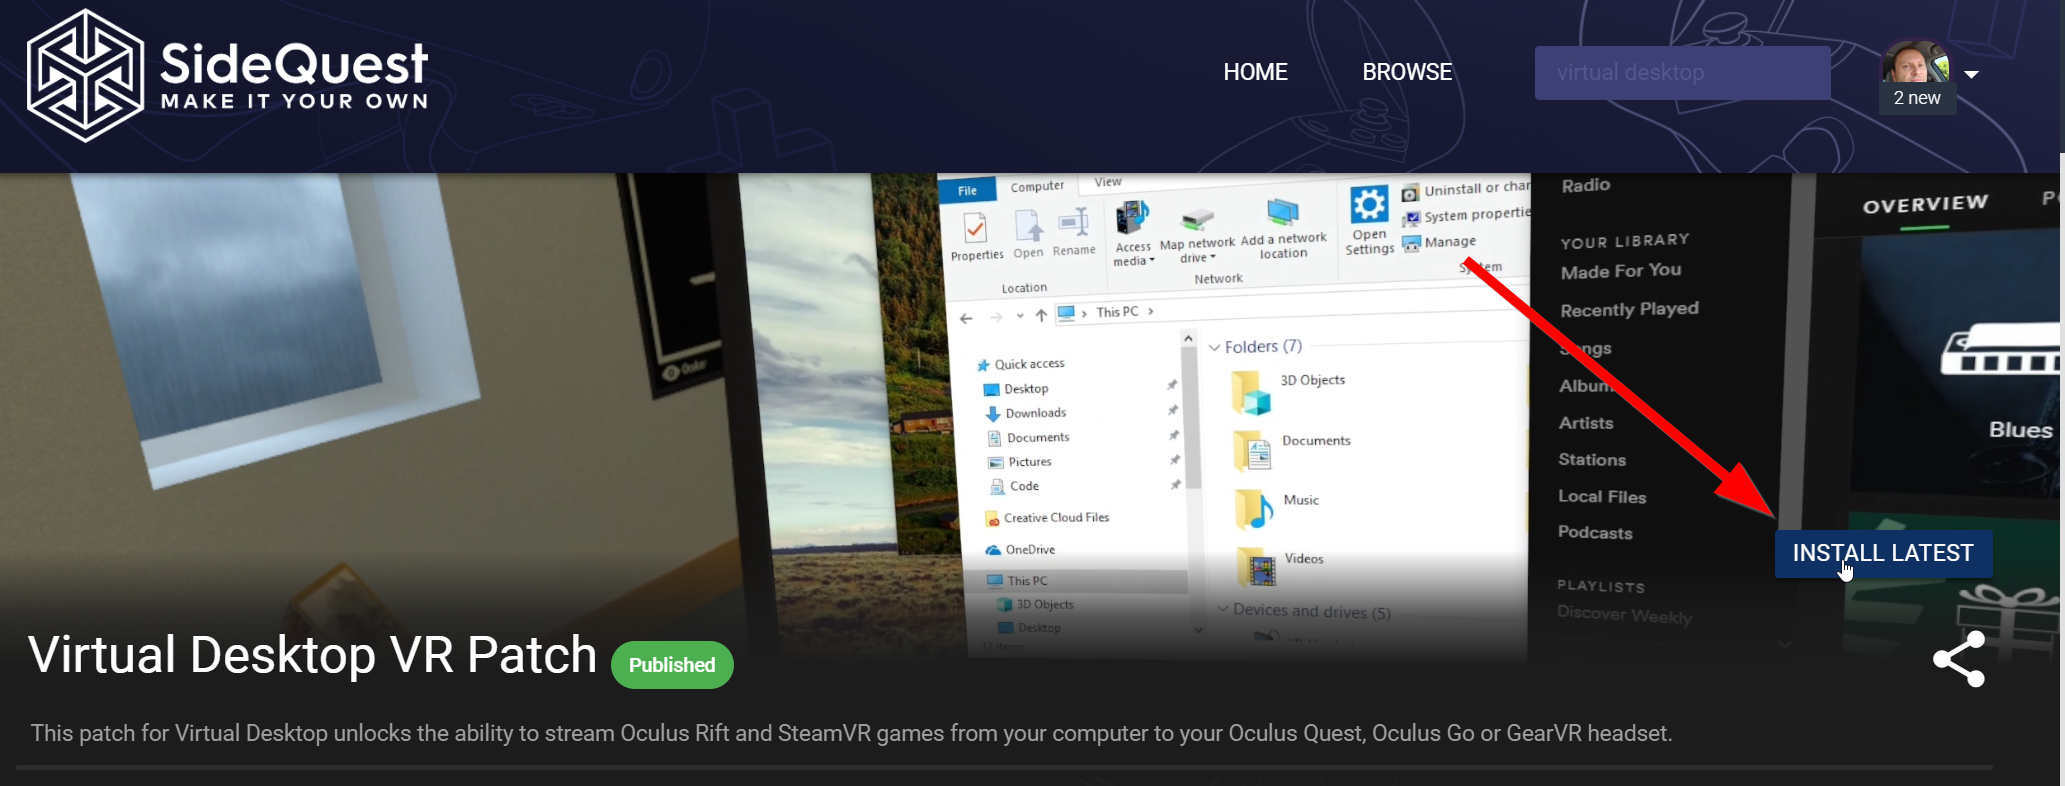
Click on Install Latest.
You can check on the progress of the install by clicking the Running Tasks.
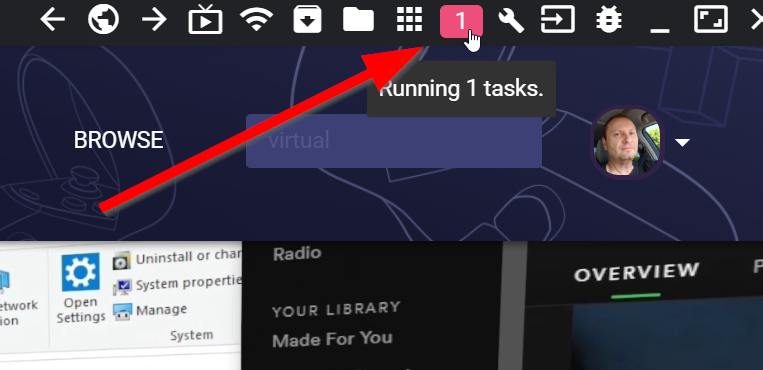
Once you see Virtual Desktop has finished being installed, you can close SideQuest. We?re done with that.
The Windows Server Application
Now that we have the Quest side all worked out, it is time to get your PC outfitted with the application we need.
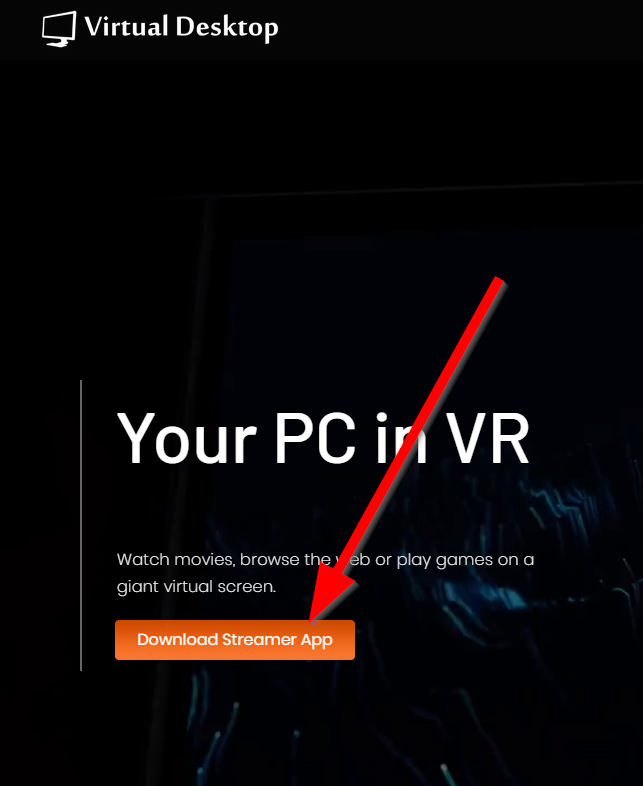
Go to the official website and get the Streamer app.
Home | Virtual Desktop
Your PC in VR Watch movies, browse the web or play games on a giant virtual screen.
www.vrdesktop.net
Download the app and install it.
Run Virtual Desktop on your PC.
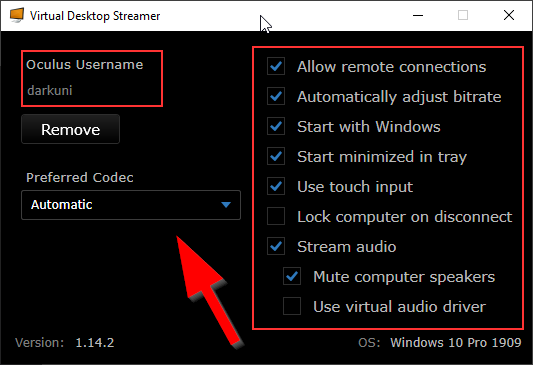
Fill in your Oculus user name (the same name you use on Quest).
Note: This is not your email address.
If you aren?t sure what your Quest username is, open the app on your phone, select Settings, then tap your name at the top.
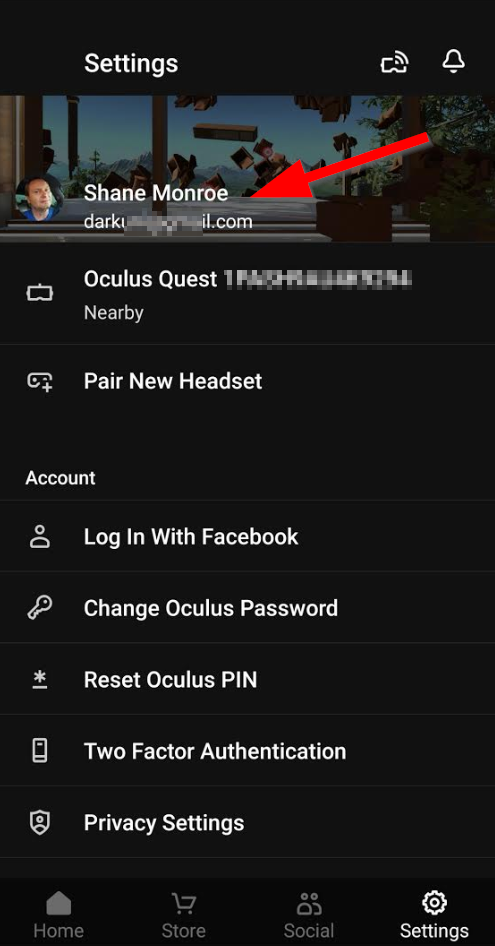 Find your username here.
For the other options on the Windows Virtual Desktop screen use the defaults I have provided ? for now. We may change these later.
Leave VD running on your PC. It?s time to bring this all together.
Step 2: The Quest Settings
Most of the most important settings you?ll mess with for VD are in the Quest app itself.
Put your Quest on and open Virtual Desktop.
The first thing we?re hoping to see is a VD window with your PC listed there and it should try to connect for you.
Note: On your first run, you may have to manually connect. You can set auto connect in Settings later.
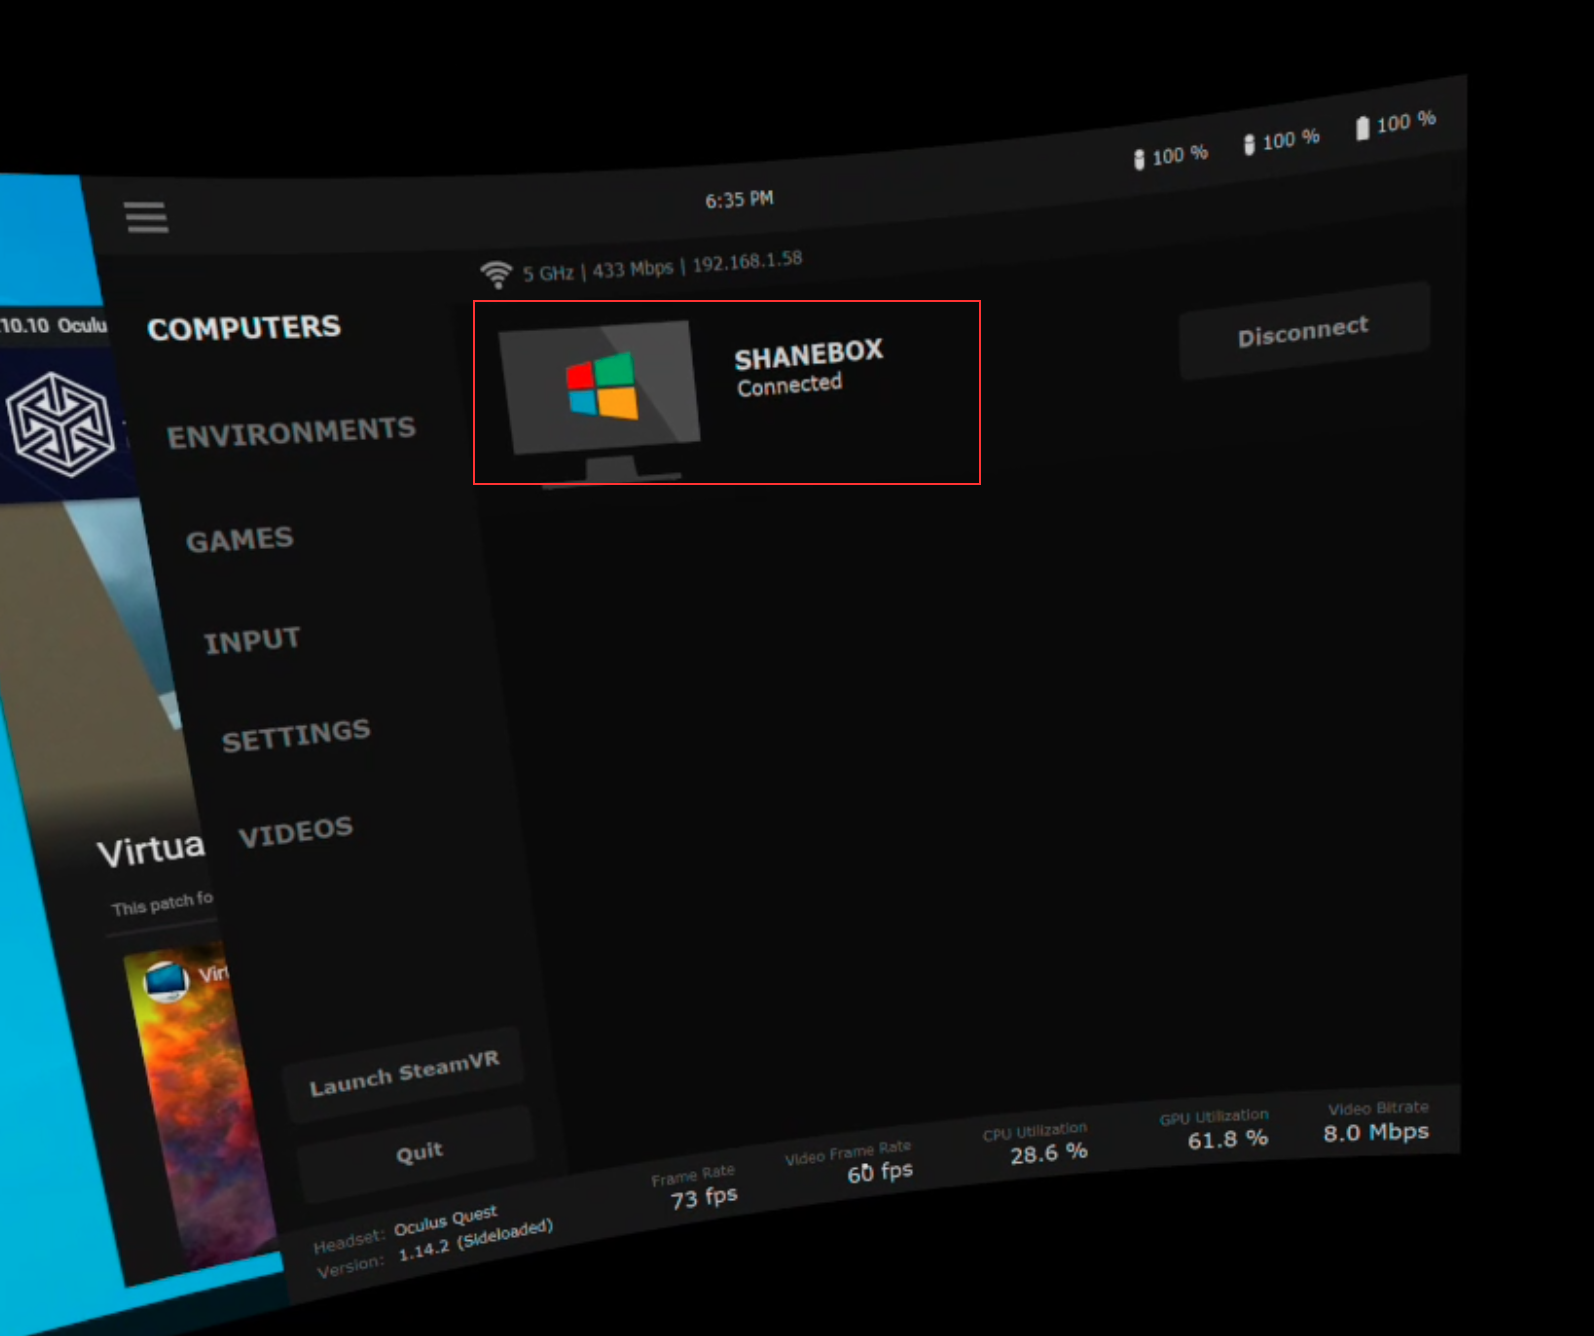
If nothing is listed here, we already have issues. Skip down to Troubleshooting below.
Assuming your PC was detected correctly and connected we need to note a few things on the screen.
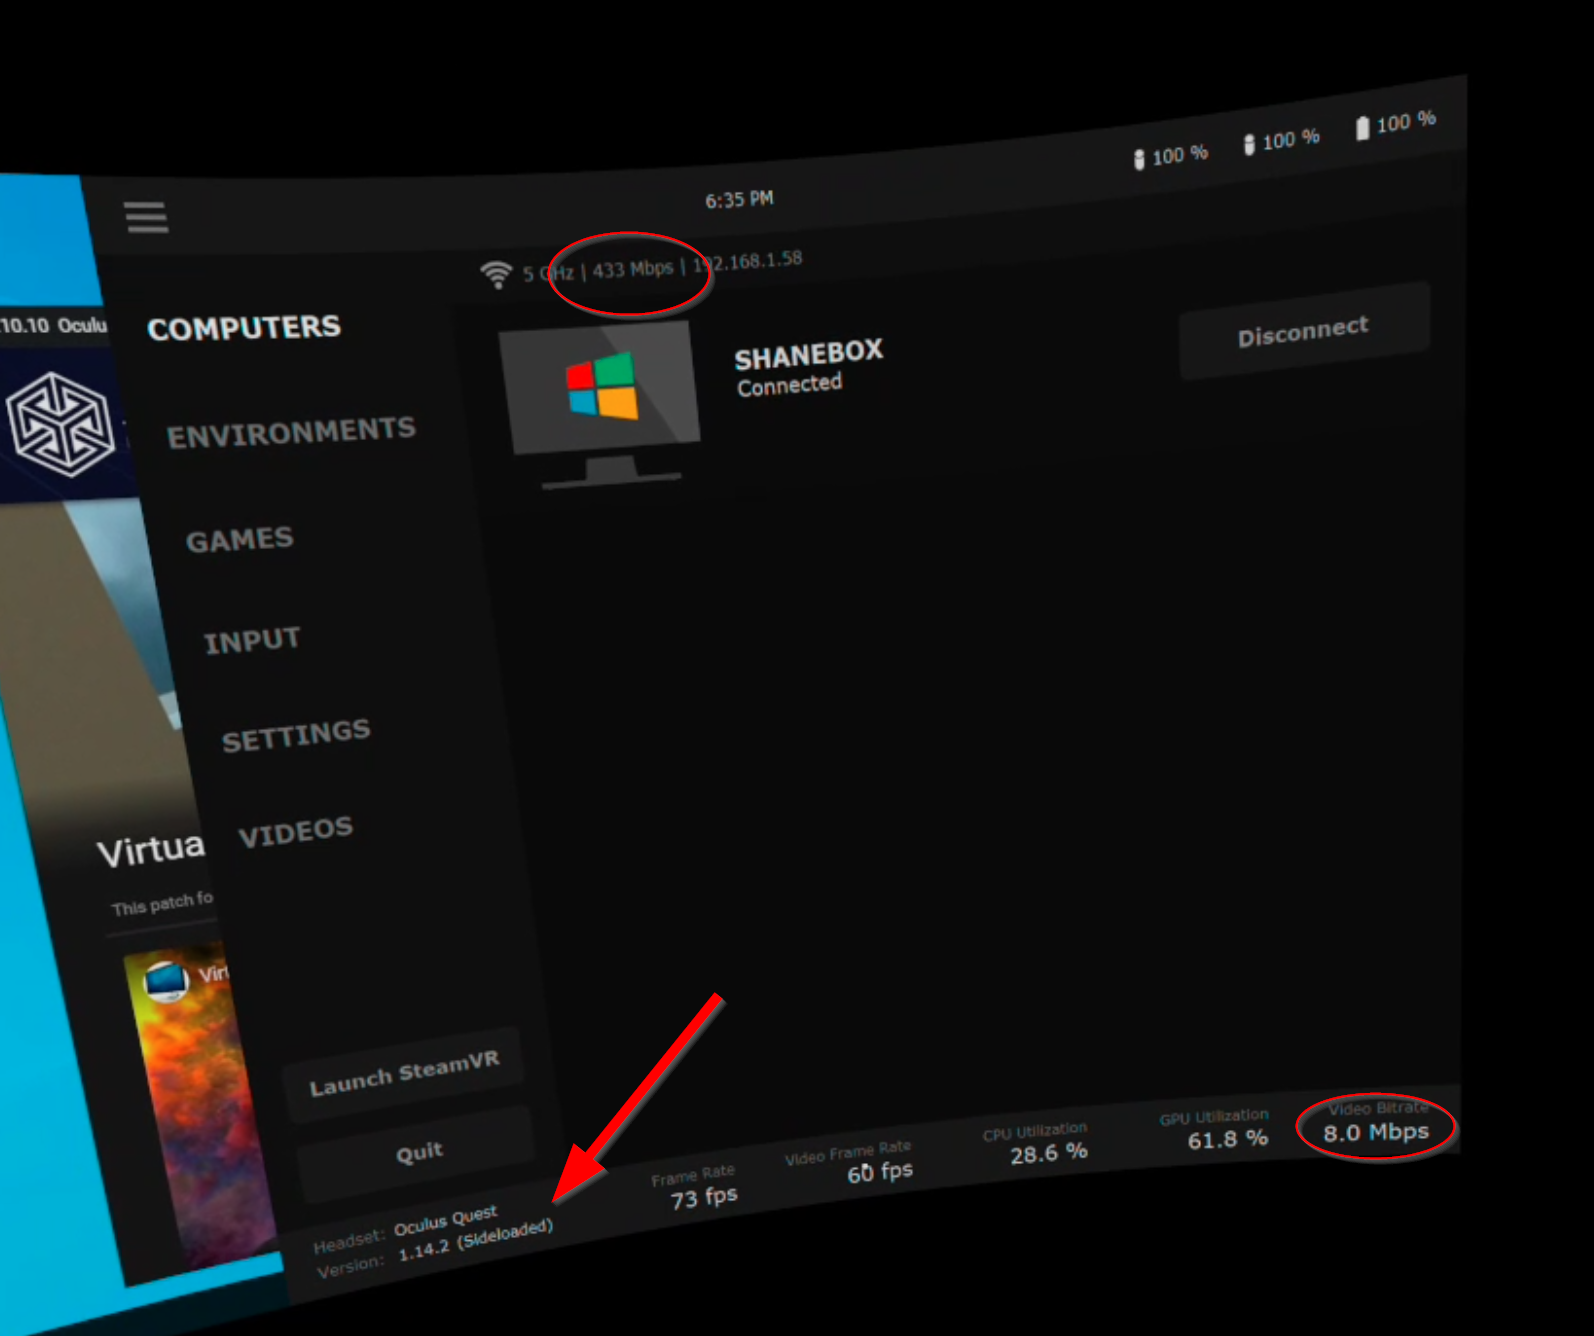
At the top of the screen, you?ll see your wifi details. Hopefully it says 5GHz.
What we are HOPING to see is 866Mbps. As you can see by my screenshot, I do not have that speed ? I have half of that. This is actually because I?m connected to a wifi access point ? not my actual router.
This is not ideal. We want this to be as fast as possible. This value pretty much means either something is wrong, or you may not have a suitable network.
There may also be other messages up there warning you about other things unsuitable about your network ? such as not having your PC wired to your network or your hardwired network is not fast enough.
On the bottom right, we see a Video Bitrate of 8.0Mbps. This is a good number. If you see 4.0 or less? VD may not end up being a solution for you.
Finally, look on the bottom left and you?ll see the current version of the VD and if it is sideloaded or not. If you?re not seeing (Sideloaded) down there, then you didn?t get it from SideQuest and you need to go back in this tutorial and get the right version installed.
If you have any of the above issues, it is a warning that you might have some work to do if you want the best experience in VD.
Let?s assume things are okay for now and we?ll move on. We?ll address these issues later (as best as we can).
We now need to open up the SETTINGS tab.

We?re going to set a baseline using the settings I have above.
Most of these are going to come down to your personal preferences ? or to compensate for deficiencies in your network environment.
For the time being, let?s see how we do with my default settings. Set those now.
Now that we have the settings dialed in, let?s talk about launching the games.
Step 3: Launching Games
There is a button that says Launch SteamVR on the screen. We?re not going to be using that. Instead, you should always click the GAMES tab.
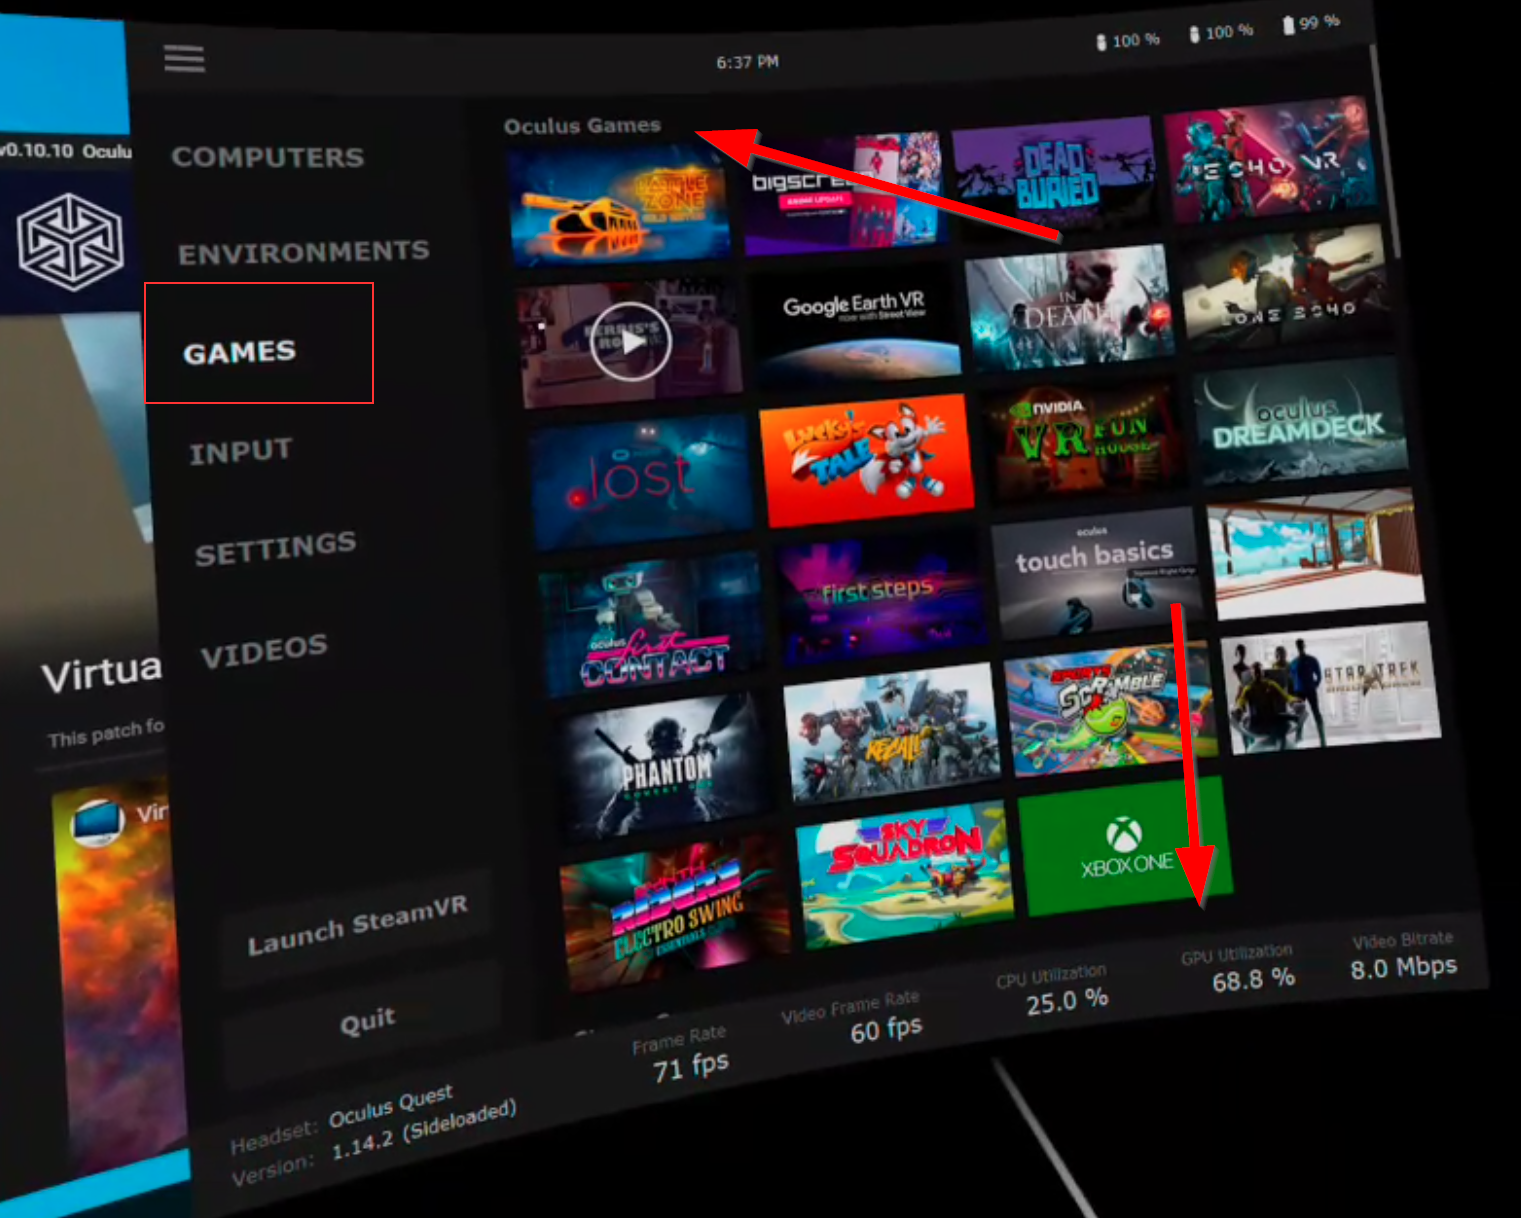
Upon clicking the tab, it might take awhile for your games to show up. This is normal.
When the screen refreshes, your Oculus Rift games (if you have any) will appear on top. Note: You have to have the Oculus PC software installed and games installed within it. Hopefully you have this already because you tried Link at some point.
Your Steam games are on the bottom of the list. Scroll down to see them.
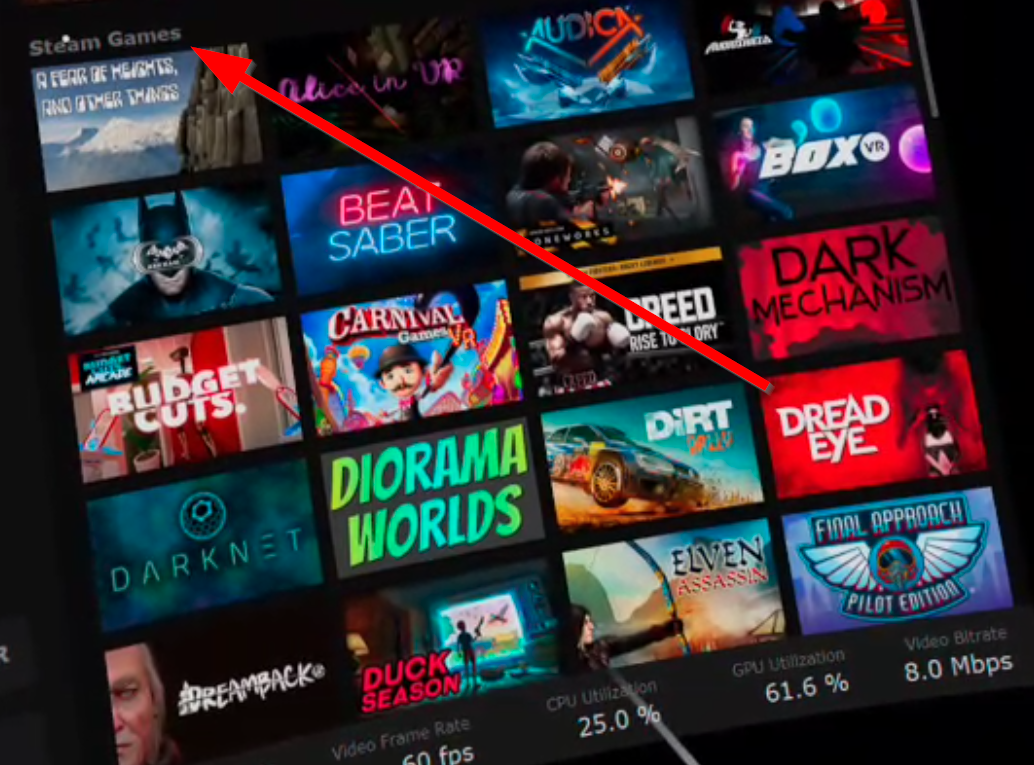
Click the game to launch it.
You should always use the Games tab to launch your games.
This is because VD can perform a little magic on those games ? fixing controls or compatibility issues that would not have been done had you tried to simply launch from SteamVR?s Home environment.
Pirated games nor other digital locker games will not show up here. While I do not endorse piracy (or other digital lockers for that matters) we?ll show you how to launch other locker games anyway.
Find the VD icon in your system tray, right click it and select INJECT GAME.
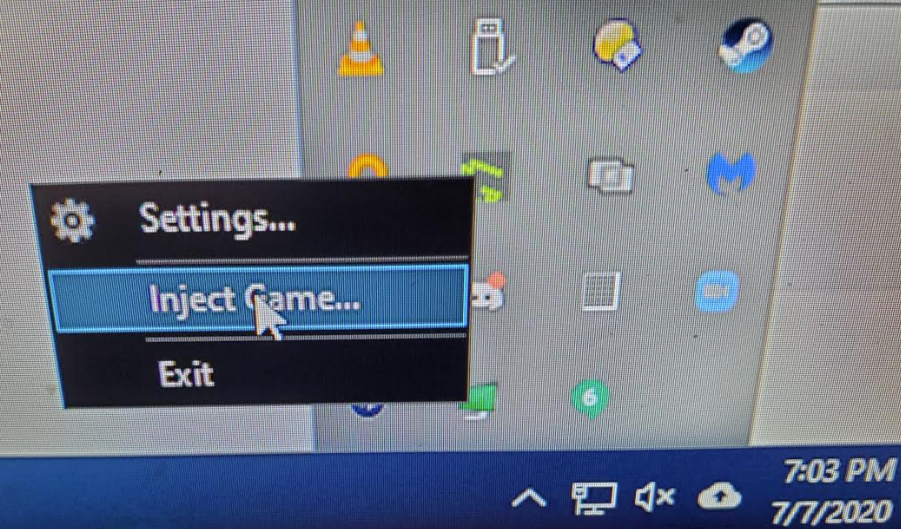
Note: You must be connected to your PC with VD in order to run this ? otherwise it will be grayed out.
You will then select the EXE of the game from the other digital locker you want to run.
Note: Currently there is no way to ?add? injectable games into the UI. You?ll have to inject it each and every time you want to run it.
Play your game for awhile ? you?ve earned it!
You can bring up the VD menu at anytime by tapping the menu button on the left controller. You can exit both the game and/or VD itself from here.
Step 4: Grade Your Performance
Alright, so you tried your first wireless PC VR game! Now let?s do the report card.
Grade: A
You friggin? loved it. Everything was silky smooth, the game played exactly as you hoped. There was no input lag, there was no stuttering during head movements. Input felt smooth and natural. Graphic quality was better than you thought and you had no issues in game.
We?re done here. Congrats and have fun with your new wireless PCVR headset. You are a ?VD One Percenter?.
Grade: B
Impressive. MOST impressive. Alright, there were a couple of head stutters as you looked around ? we had some obvious dropped frames or a bit of visual quality loss that you expected would be better. Input was 99% great, but you might have noticed a bit of lag in some high action games (Beat Saber never goes above a Grade B IMHO ? that is as good as it gets). You would TOTALLY play this regularly and it might have even exceeded your expectations; despite being a little rough around the edges.
Grade: C
Well, some stuff runs pretty good, but you?re not happy with Half-Life: Alyx and The Walking Dead leaves some to be desired. Hey, there are tons to play here, but the stuttering of the head gets annoying, input could be a lot better and graphic quality is meh. I mean, it is better than nothing.
Grade: D
Most stuff is totally unplayable; especially anything super duper cool looking. Yeah some indie stuff runs okay and Google Earth VR still wows you ? despite some lag and input stuttering. Most games run like crap, head stutters constantly. Input lag is almost intolerable. This isn?t usable in this state.
Grade: F
This was a colossal waste of your time. Nothing plays well. Everything is a mess. You only have a half an hour left to refund VD to the Quest store ? and the truth is? You probably should at this point. An F at this point means that you?re going to need a lot of help ? probably in the form of hardware purchase, relocation of hardware or more.
How did you score? If you scored a D or F? I would keep your hopes in check; there are a lot of issues here. Maybe I can help you ? but if you?re worried about getting that $20 back for VD, you may consider refunding at this point.
If you have a B or C ? chin up. We can probably help; and hopefully with some very simple tricks.
Troubleshooting / Improving Performance
Rules of troubleshooting is that you try one thing; check to see if the issue is resolved, then move on to the next one. Try each of these in turn and see if they help.
Let?s start with some things that are easy and free.
Get Closer / Remove the Walls
5Ghz wifi is far more susceptible to interference and other conditions. Your first fix should always be to get within line of sight of your router with no walls. If this works, well ? you have some decisions to make. At least you know distance is the enemy and nothing else.
You?re looking for that magic 866Mbps 5GHz speed with the Video Bitrate of 8.0. If you can?t get that ? no matter how close you are, you may need a new router or at least some configuration changes.
Wire the PC Directly To the Router
People vehemently resist this, but a PC being used for streaming and/or gaming should always be wired the best possible way; directly to your router over gigabit Ethernet. This makes the connection faster, more stable, less susceptible to interference and lowers latency and lag.
Even if your house isn?t wired right, you NEED to try this. Once you know this is the weakest link, you can intelligently decide how to handle it.
Even if you just ?rent? a 50 foot ethernet cable from Amazon for $20 ? long enough to try it and see just how much of a difference this makes. I assure you ? it will make a difference.
If your PC is ?wired? but you are not directly connected to the router ? that is, you have hubs, powerline adapters ? ANYTHING between the PC and the router? Use the ?long cable? method above to see if you get performance increases. These devices are ?road bumps? in your network traffic. I had to replace a hub ? it was ?fine? for browsing, watching streaming movies ? but it was dropping packets like crazy and my VD experience suffered horribly.
This also tests your ?cable? structure. I also had an older CAT cable in my network leg from the router to PC which was causing a degradation of signal.
If you find this ?long cable? test makes all the difference in the world, you may bring someone in to drop Ethernet through the house to make sure your PC stays wired all the time.
Connect the Quest Directly To The Router
If you have ?wi-fi extenders? or ?mesh networks? in your home, these are similar ?road bumps? between your Quest and the PC. We often buy cheap extenders so we can get internet to some dark corner of the house; which is fine for getting email, but simply HORRID for streaming gaming.
The little ?mesh nodes? that some people are now using? They promise a full home coverage wi-fi experience. But we know that these mesh networks can be a nightmare for streaming gaming and for Quest use in general (search the r/OculusQuest sub-Reddit). Again, great for getting access to Amazon in the guest bedroom ? less great sometimes for Quest VD experiences.
?Renting? a ?dedicated WiFi access point? ($42 at Amazon) that meets the specifications for a solid Quest experience and wiring it directly to the router can make a huge difference. This bypasses several router issues, mesh network issues or others. Pair this testing with Get Closer / Remove the Walls above.
Maybe Keep That Access Point ?Rental?
Once you know that the problem exists and can be circumvented, you may elect to keep that access point and use it exclusively for your Quest. This ensures that you aren?t competing for wi-fi resources with other devices on the 5GHz band; your wife streaming Hamilton in 4k in the bedroom on 5Ghz won?t interfere with killing face-huggers in Alyx.
Changes To Your Wifi / Router: Channel
Your wi-fi operates on a certain channel. These channels can be shared by others nearby. If you live in a house? Your spectrum analysis may look like this:
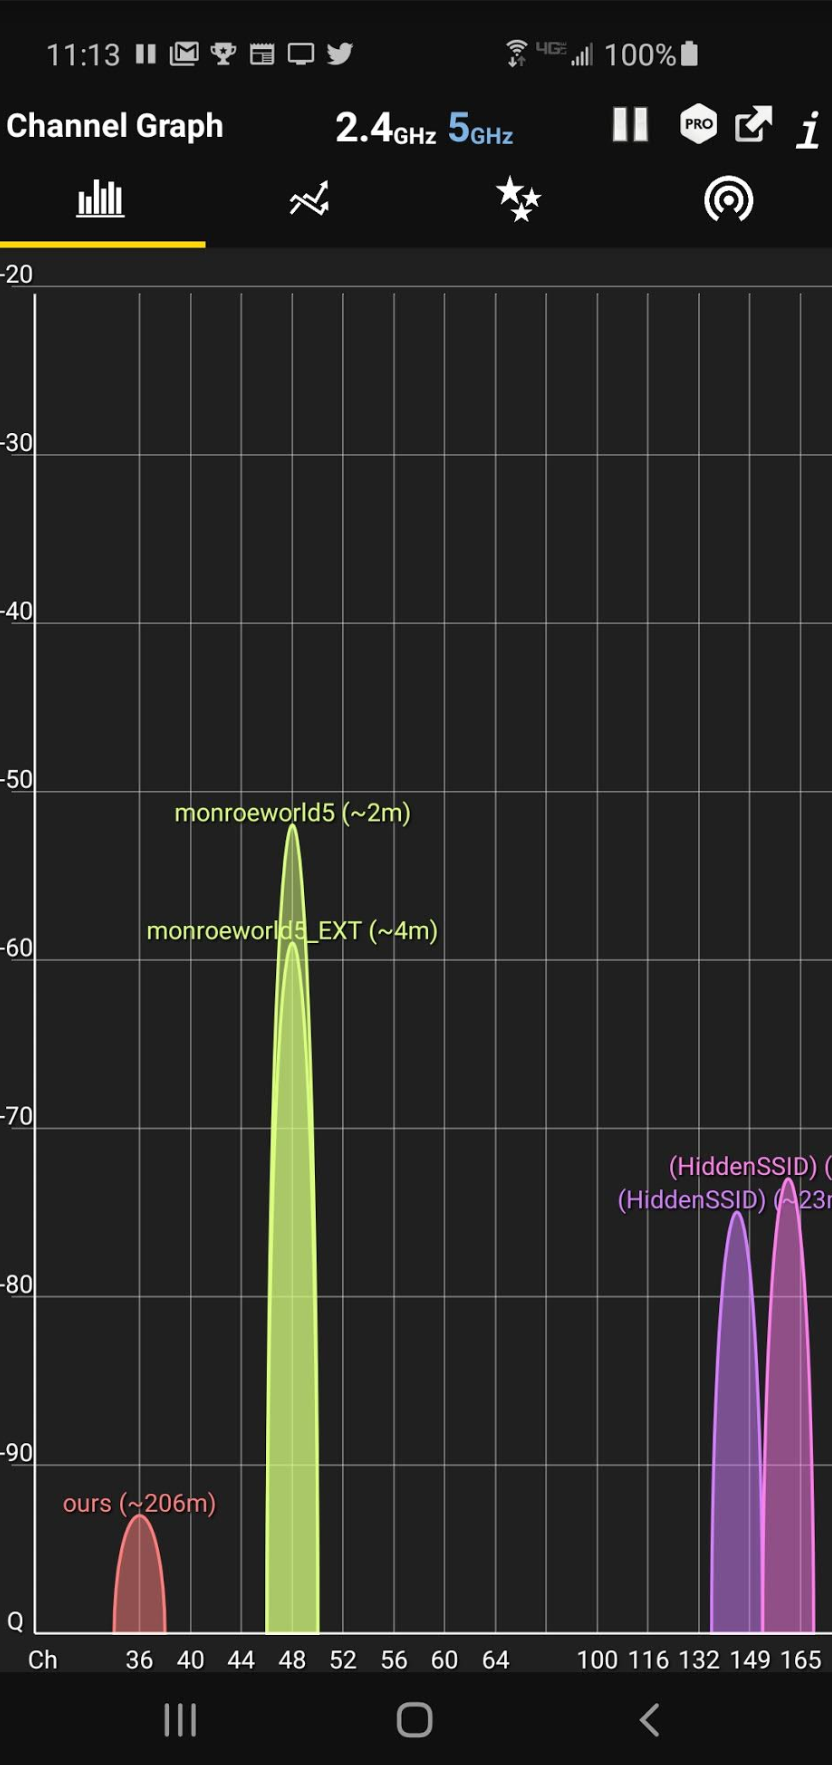
I?m running two different 5Ghz points (my router, and an extended) on Channel 48.
Using a WiFi Analyzer on your phone can easily show you how many other 5Ghz points are around you. If you live in an apartment complex? You might look like this:
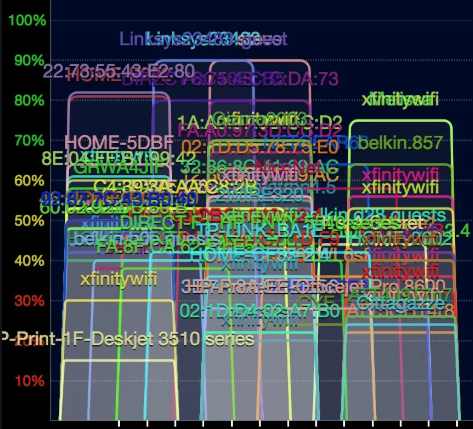 Crap.
Crap.
In some cases, you can change your 5Ghz channel to one that is not overloaded with other people around you. This would be done on your router, and every router is different ? Google will be your friend here.
Unfortunately, unless you want to move? There isn?t always a lot you can do about this.
Changes To Your Wifi / Router: Isolation For Quest
We talked early about setting up a dedicated, wired access point exclusively for use with your Quest. As mentioned, there are a lot of advantages to this; not sharing with other devices is a biggie.
If you have a ?high traffic? home, you may see if your router will allow you to set up additional 5GHz access; possibly in lieu of one of your 2.4Ghz options.
Changes To Your VD Settings
There are a few settings you can change/toggle in VD itself, but don?t expect miracles; these settings can?t cure a ?poor network?.
On the PC streamer settings, try messing with these settings.
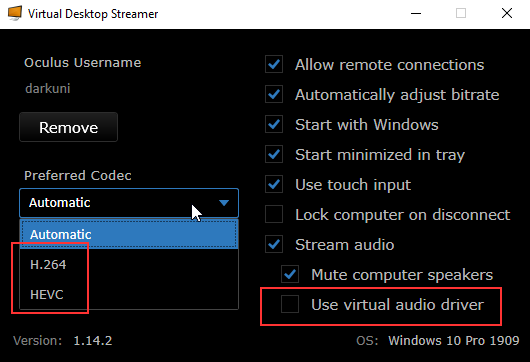 The Codec could help!
On the Quest VD app, there are three places you can ?play? to possibly improve performance, latency and image quality.
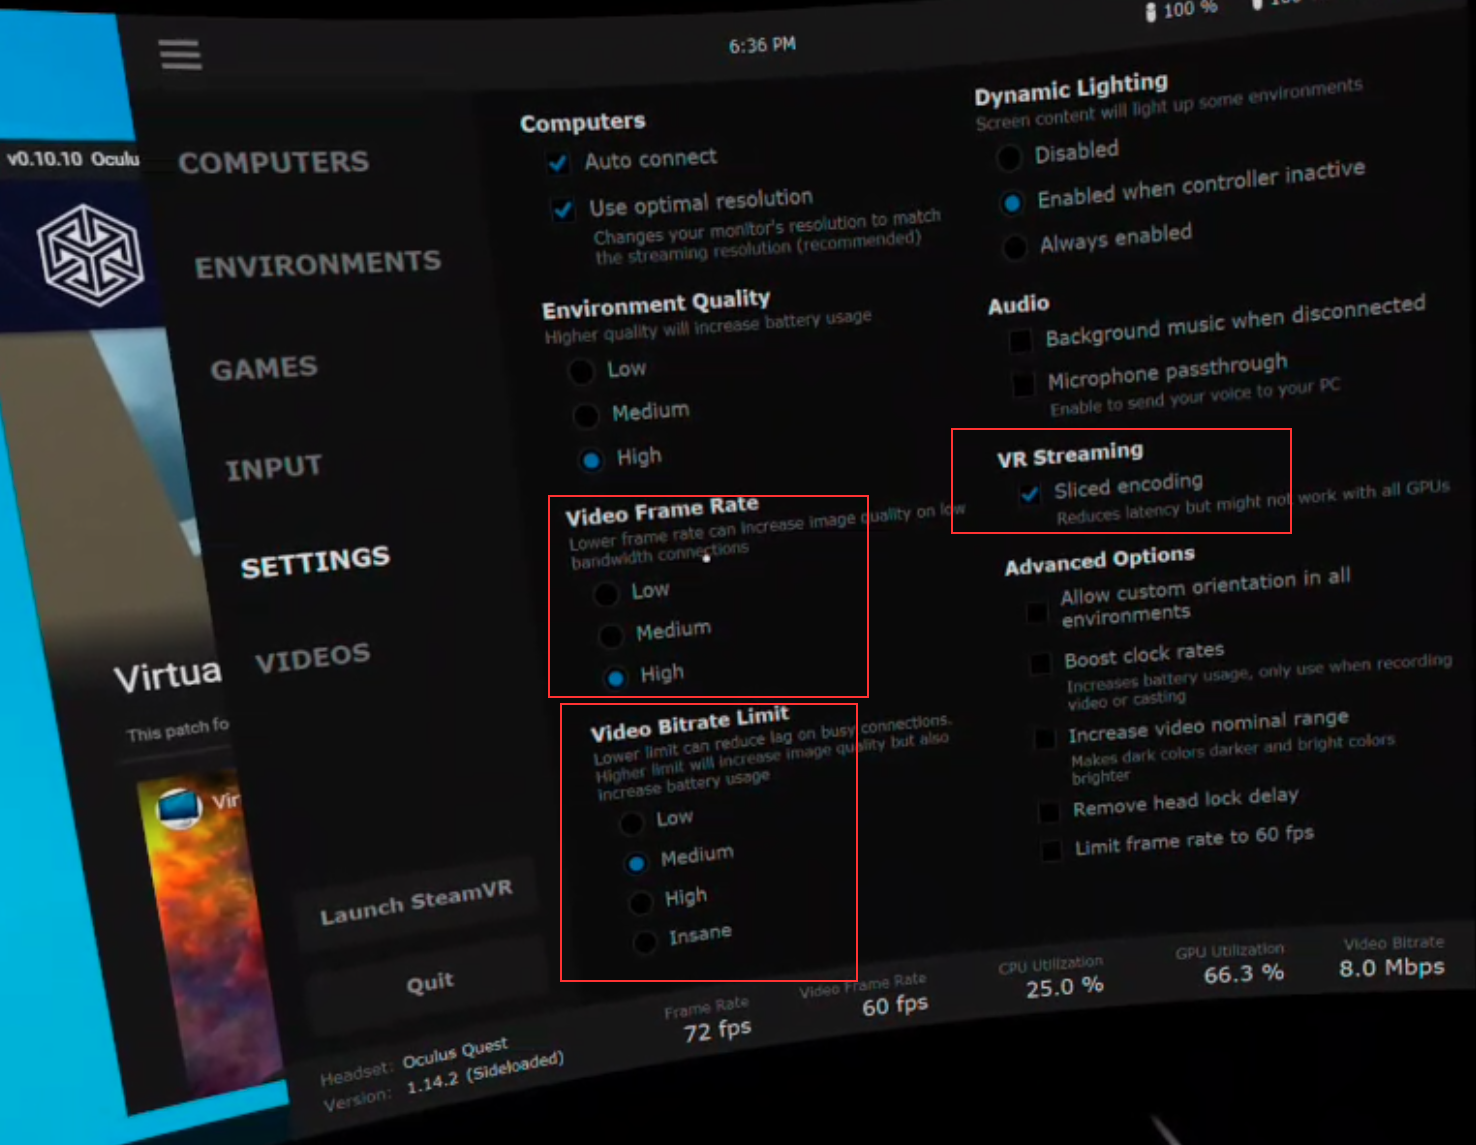
For Quality issues, mess with Video Bitrate Limit. You could also play in the Video Frame Rate area.
If you?re having latency (this is not just input, but also when turning your head, etc) then toggle the Sliced Encoding setting.
For game visuals, you may also need to mess around with SteamVR settings (out of scope for this tutorial) as well as the game?s built in settings.
Won?t run? Weird Control Issues? Disable Secure Boot!
Part of what makes VD so magical is that it can actually work with supported games to fix incorrectly identified controllers, bad controller mapping and compatibility issues on the fly (that?s why you should always run games from the VD Games tab).
However, in order to perform this magic, sometimes it needs to inject special code directly into the game?s memory space ? something that is rather forbidden on modern PCs (and it kinda makes sense)!
The games (at the time of writing) are:
- Dirt Rally
- In Death
- Espire 1
- Redout
- Redout Demo
- Moss
- Star Trek: Bridge Crew
- Time Transit VR
- Radial-G
- Nvidia VR Funhouse
- Torn
- Far beyond: a space odyssey
- Batman: Arkham VR
- Primitive
- Virtual Battlegrounds
- The Room VR
- Transpose
- Premium Bowling
- Smashbox Arena
- Wrench
To get around this, you?ll need to disable Secure Boot on your Windows PC.
You can learn how to do this at this page:
How To Enable/Disable Secure Boot In Windows 8, 8.1, And 10?
Short Bytes: Windows 8 and later versions of Windows come with UEFI Firmware settings which allow a user to disable any?
fossbytes.com
Issues with NVENC? Other streaming related issues?
Anything that affects NVIDIA?s NVEnc services can interfere with streaming VD, OBS or other hardware streaming functions.
To understand all about this ? and counter it ? check out my other article here. This directly discusses Oculus Link, but the core issues are the same.
Quest Techie: Fixing NVENC Issues Causing Link To Fail
You?re were all excited about Oculus Link ? but when it released to beta in November 2019, it wouldn?t work for you. Or?
medium.com
Other issues? Try the official website or Discord!
Home | Virtual Desktop
Make sure your computer is connected to the same router and is on the same network as your headset (the headset might?
www.vrdesktop.net
Join the Virtual Desktop Discord Server!
Check out the Virtual Desktop community on Discord – hang out with 13,699 other members and enjoy free voice and text?
discord.gg
Of course, if you would like to talk about things with me, my Discord server is available as well.
Join the Monroeworld Discord Server!
Check out the Monroeworld community on Discord – hang out with 251 other members and enjoy free voice and text chat.
discord.gg
Final Words
Virtual Desktop is one amazing piece of kit. It brings so many more games to the table and breaks us free of ?The Wire?.
If you?re wondering if all this work and effort is really worth it? The answer is ?yes?. You?ll never want to use Link again.
What?s more? The developer never sleeps; regular, big feature updates are always coming and there is a huge thriving community (along with the developer) to support you.
Whether it worked right out of the box, or you have to replace your aged router, dying hubs or a crappy Ethernet cable ? the effort will pay off in the end.
Note: Links to products may be affiliate links and the author may benefit from purchasing products from those links.
