
Connect to a public WiFi network every day? Don?t let hackers get in your way.
Many people who work on the go have to connect to public WiFi networks every day, but did you know that even amateur hackers can see everything you do online with simple tools like Packet Sniffers, available anywhere? Luckily, we can easily mitigate these threats by setting up a VPN server at your own home or workplace.
Good question! What a VPN does basically, is act as a secure tunnel to the network the server is on. This will make your computer think it?s actually on your home network, even when you may be miles away! All network traffic is encrypted and sent to and from the VPN server, stopping would-be hackers in their tracks. During this process we?ll be setting up our own personal VPN. This tutorial is fairly long, but don?t worry if you don?t understand all of it, we?ve laid out all the commands you?ll need, so feel free to just copy/paste them all. The entire process should only take about 30?45 minutes.
What do I need?
Glad to hear you want to make your connections more secure. Here?s what you?ll need:
- A Raspberry Pi 2. These cost about $35 from Amazon.
- A case for your Pi. While not strictly required, these will protect your device from dangers such as short circuiting, which could permanently damage your device. You could get one like this or even just fold one out of cardboard.
- An SD card, 8 GB or bigger. These can be picked up cheap from retailers like Amazon these days. You could even get an SD card with Noobs preinstalled, so you don?t have to follow the next requirement:
- Noobs or Raspbian installed on the SD card. This is a simple process, all it does is installs the operating system (Linux) on your Pi, allowing programs like OpenVPN to run.
- A Cat5e Ethernet cable. Simply to connect your Raspberry Pi to the internet, you plug this into your router.
- An HDMI cord, keyboard, and monitor. This is only for the initial setup, it won?t need to be plugged in full-time, so feel free to borrow them from another device for a bit.
- UDP port 1194 forwarded to your Pi?s IP address in your router settings. This process is different for every router, try Googling ?[Your router model] port forwarding?
Connecting to your Raspberry Pi with SSH
We?re going to assume you already have Raspbian (or Noobs) installed and running on your Pi. If you don?t, follow this tutorial.
Firstly, we?ll have to setup a static IP address on your Raspberry Pi. ReadWrite has a simple tutorial on this, so go to this link and follow #3, the other ones aren?t necessary.
Alright great, now we can connect to your Raspberry Pi via SSH. After this step that keyboard and monitor won?t be necessary anymore, so you can put that back. On another computer, follow these steps to SSH into your Raspberry Pi.
On Linux and Mac
Open Terminal and enter the following command:
Replace the IP address (after the @) with the static IP address you just set earlier. You?ll need to enter a password, unless you already changed it, it?s raspberry. Don?t worry, we?ll change that later (otherwise using the default password would render this security tutorial rather pointless). You should be connected, so skip to the next section, no need to read about Windows computers.
On Windows
Windows makes SSH a bit trickier, because it isn?t built in by default. Not to worry though, we can use a number of applications to give us the same functionality. My personal favorite is Bitvise, so we?ll be using that, but if you want to go with another client go ahead, the screenshots may vary slightly.
First, download ?Bitvise SSH Client? from their official website, here. Run the installer and open the application, usual stuff. Fill out the application window like this:
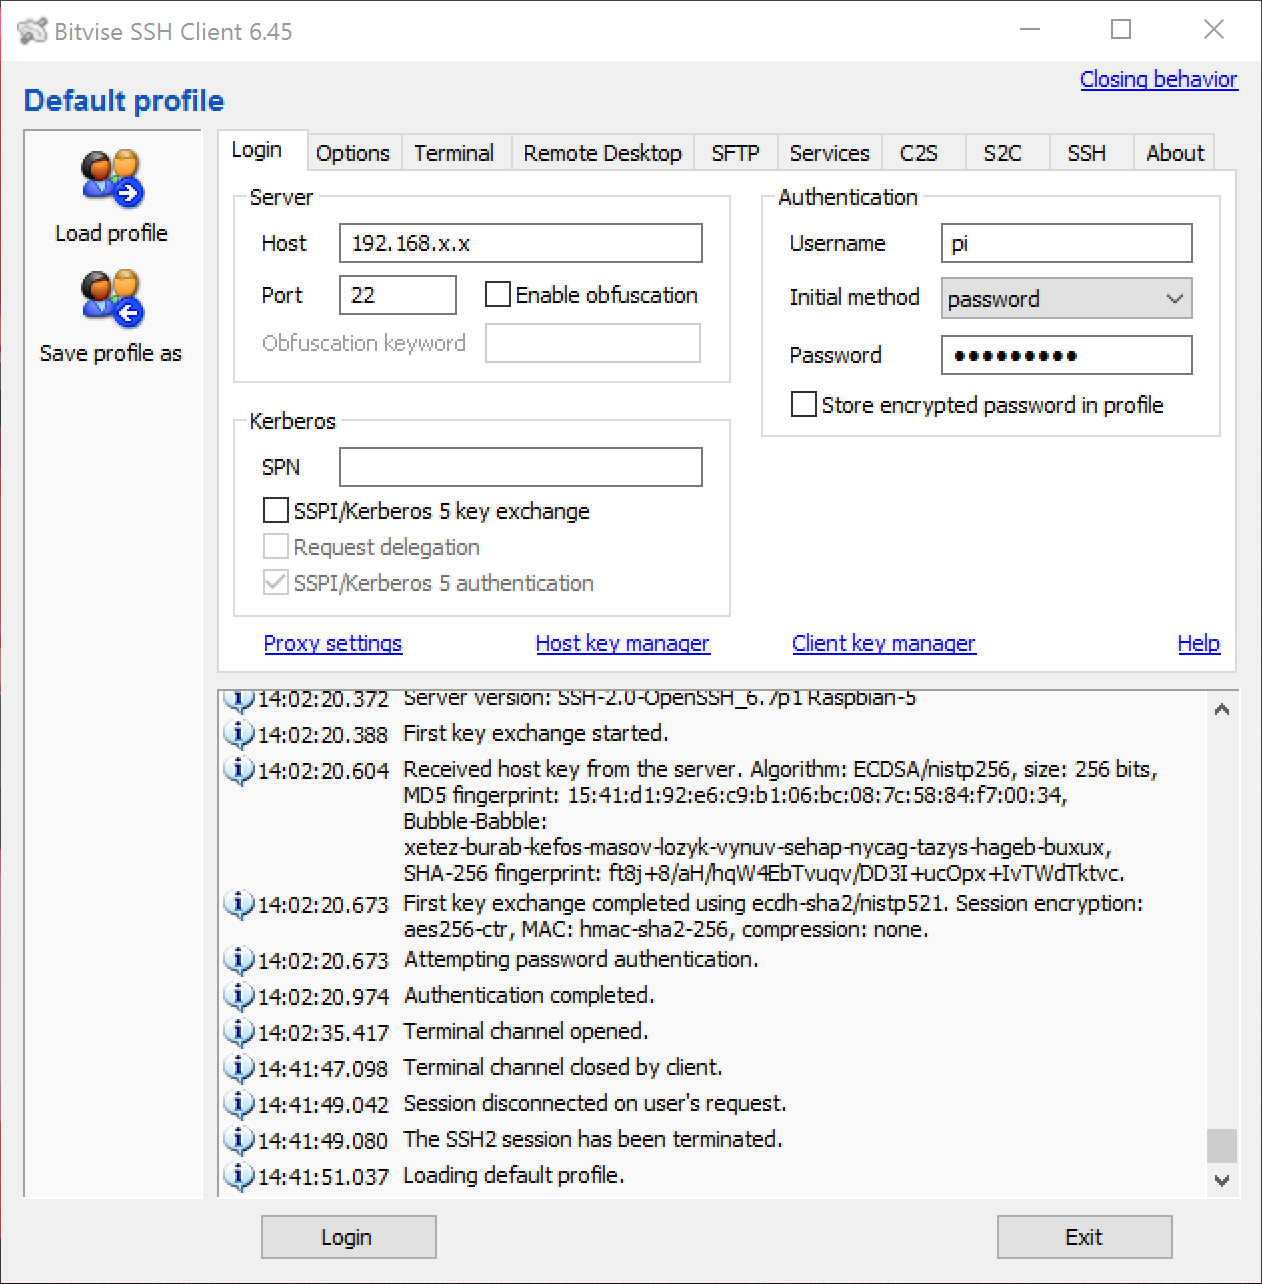
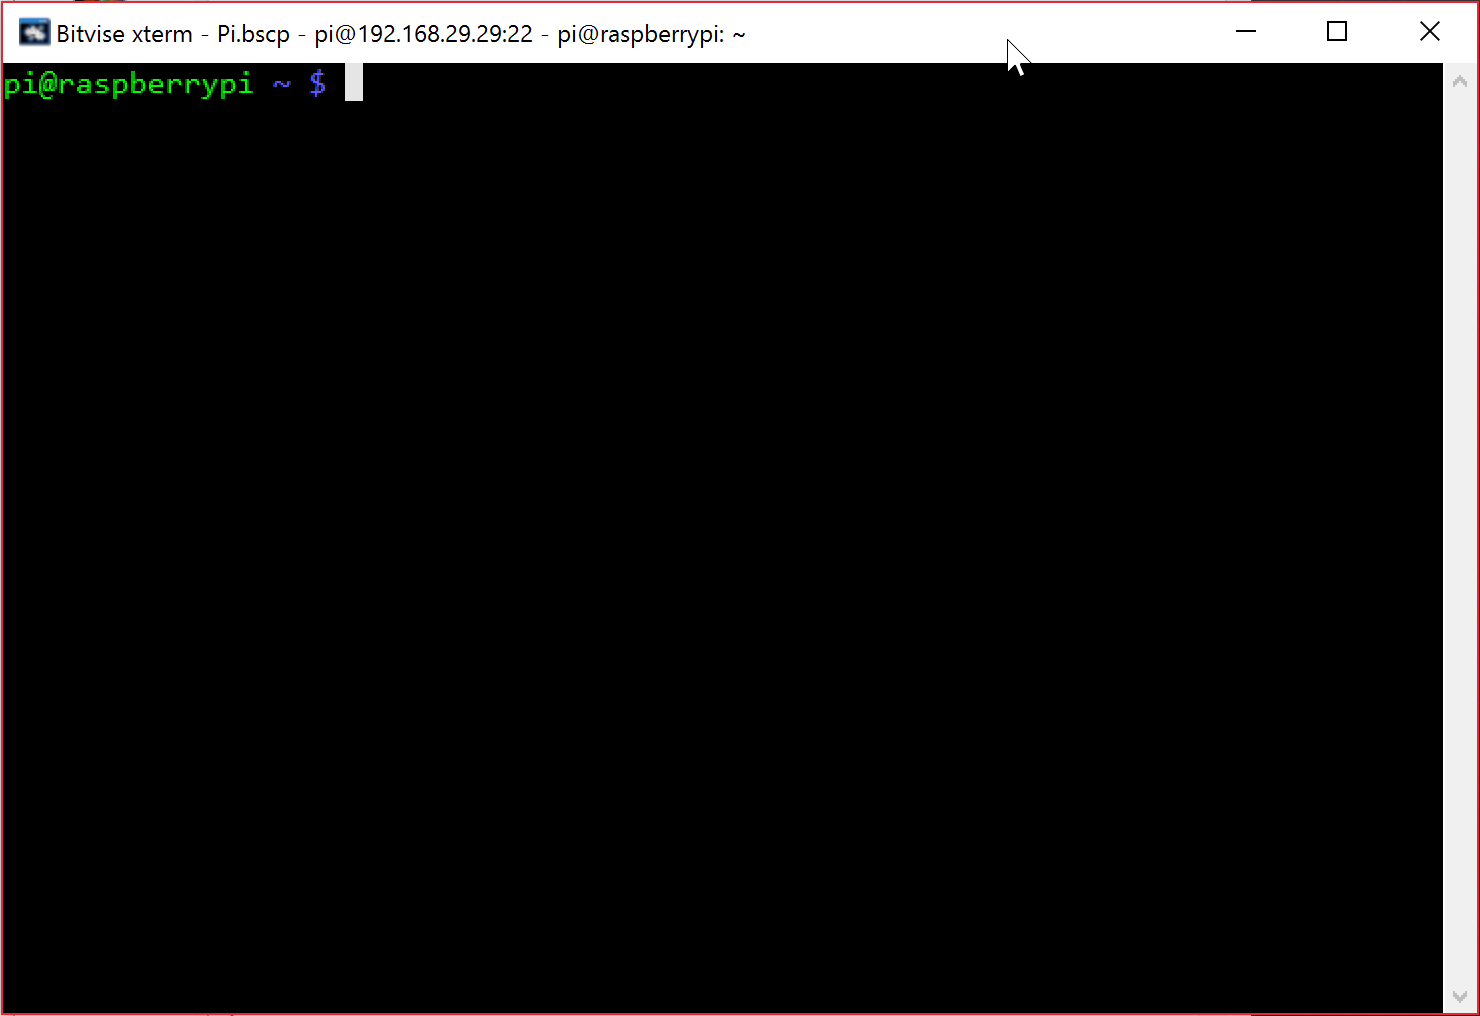
Replacing Host with the static IP address you filled out earlier, and Password with the default password: raspberry (unless you?ve already changed it). Don?t worry about the password, we?ll change it later. After entering this information, click Login at the bottom. A window looking like this should pop-up, this is how you know it worked!
Getting your Pi ready
Now that you?re in an SSH window, we can begin. Anything you enter in this window will be run on your Raspberry Pi, not your personal computer. In this SSH window, enter the following 2 commands:
sudo apt-get update
This command will update all the software repos on your Pi. Give it a few seconds (depending on your internet connection) and then enter:
sudo-apt-get upgrade
This command actually updates the software itself. Out of the box my Pi had a lot of software to update, so just press Y (for Yes) when it asks and it?ll do that for you. This downloads all the software, so it may take some time to get everything, depending on your internet connection.
Now we?re going to change the password for the pi user. This prevents people from just logging in with the default. In your SSH window enter:
passwd
First it?ll ask you for the current password. Again, this is raspberry. Then it will ask twice for a new password, just enter it and press Enter when done. You may or may not be kicked out of SSH at this point, but if you are just reconnect with your new password. Now that the Pi is finally all setup, we can get to the good part:
Installing OpenVPN
In your SSH window, enter the following command:
sudo apt-get install openvpn -y
This will begin the install, so just be patient while it downloads everything.
Now we can generate encryption keys for OpenVPN. This is what makes the connection itself safe to use, so don?t skip this step. First, we?re going to switch to a root user, so it allows us to edit the keys. This is simple, just enter this in your SSH window:
sudo -s
You?ll know this works if it switches from [email protected] to [email protected] in the window.
Next we need to download easy-rsa, which is a program that generates keys. This can be done simply using this command:
git clone https://github.com/OpenVPN/easy-rsa.git
Run these 2 commands to get version 2.2.2 of Easy-RSA:
cd easy-rsa git checkout 2.2.2
You?ll know it worked if it says this at the bottom of the window:
HEAD is now at 19c3186… creating 2.x branch for tracking changes
Now all we need to do is run this command, which will copy easy-rsa to the OpenVPN directory:
cp -r easy-rsa/2.0/ /etc/openvpn/easy-rsa
Setting up your Certificates
Alright, now change directories to the newly created easy-rsa directory. This can be done by running:
cd /etc/openvpn/easy-rsa
Now we need to edit the vars file. This file is the configuration for easy-rsa. We can edit this by running the following command:
nano vars
We are using nano because it comes preinstalled with Raspbian and is simple to use, while providing a lot of functionality.
Now we are going to change the EASY-RSA variable in this file, using your arrow keys navigate down to that (around line 15 on my window) and change
export EASY_RSA=”`pwd`”export EASY_RSA=”/etc/openvpn/easy-rsa”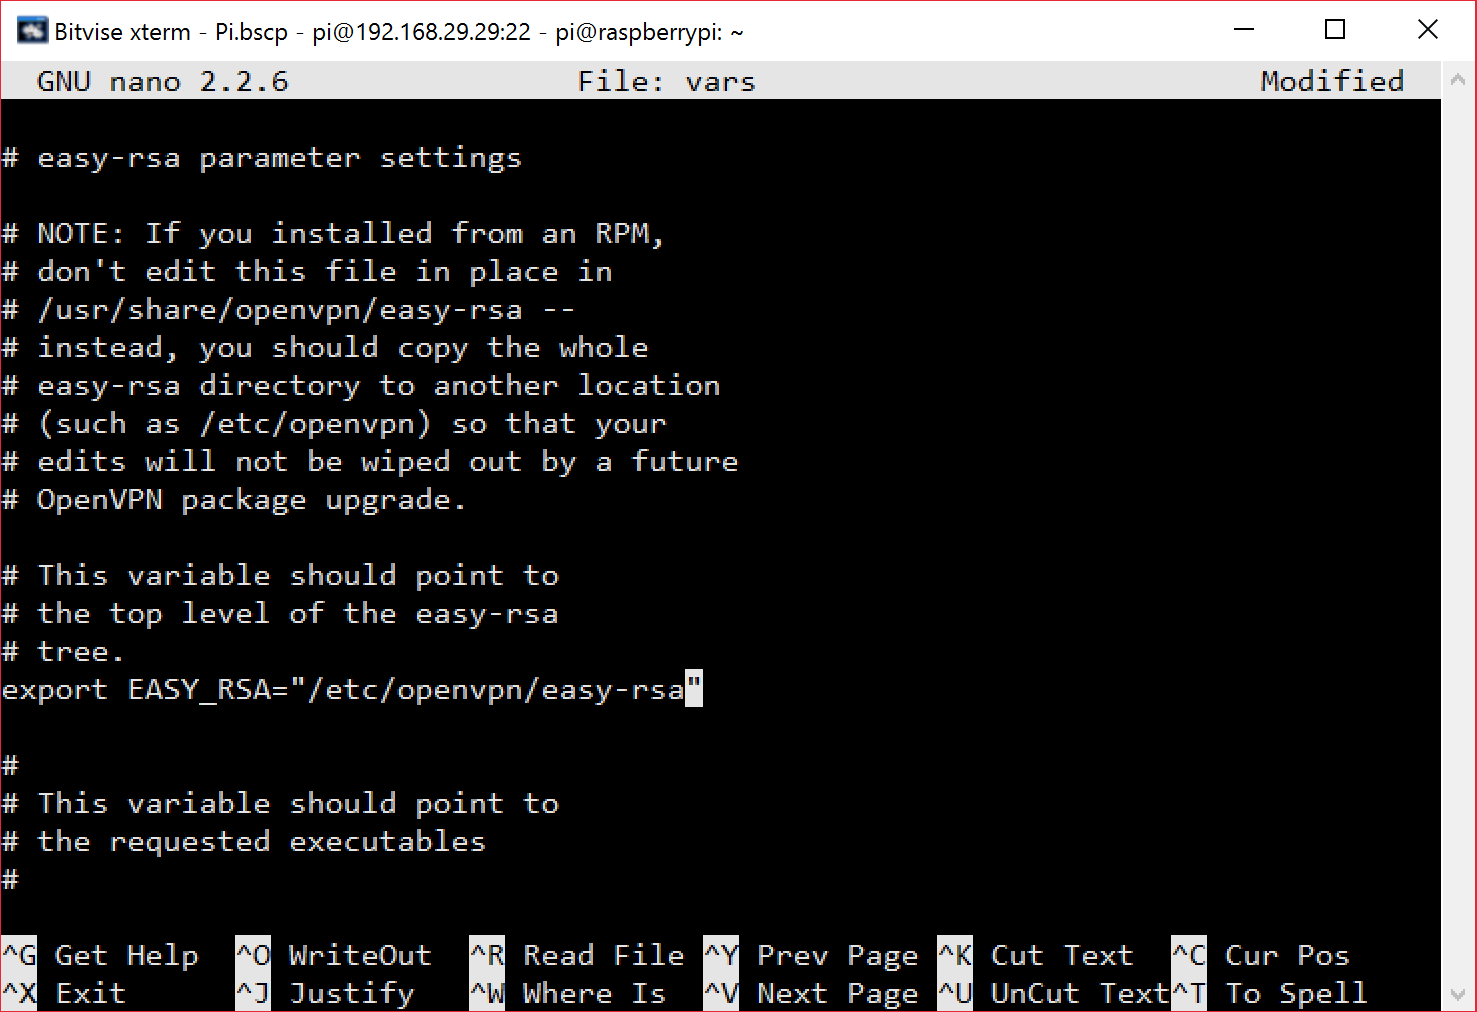
Now scroll down (using the arrow keys again) to a section that says:
# Increase this to 2048 if you # are paranoid. This will slow # down TLS negotiation performance # as well as the one-time DH parms # generation process. export KEY_SIZE=1024
And change
export KEY_SIZE=1024export KEY_SIZE=2048
This will increase security, and I?m a pretty paranoid person, so this is a must for me. And this has no real-world noticeable downsides. You can change other settings in this file too if you know what you?re doing, otherwise press Ctrl+O to save on your keyboard, press Enter, then press Ctrl+X to exit the document.
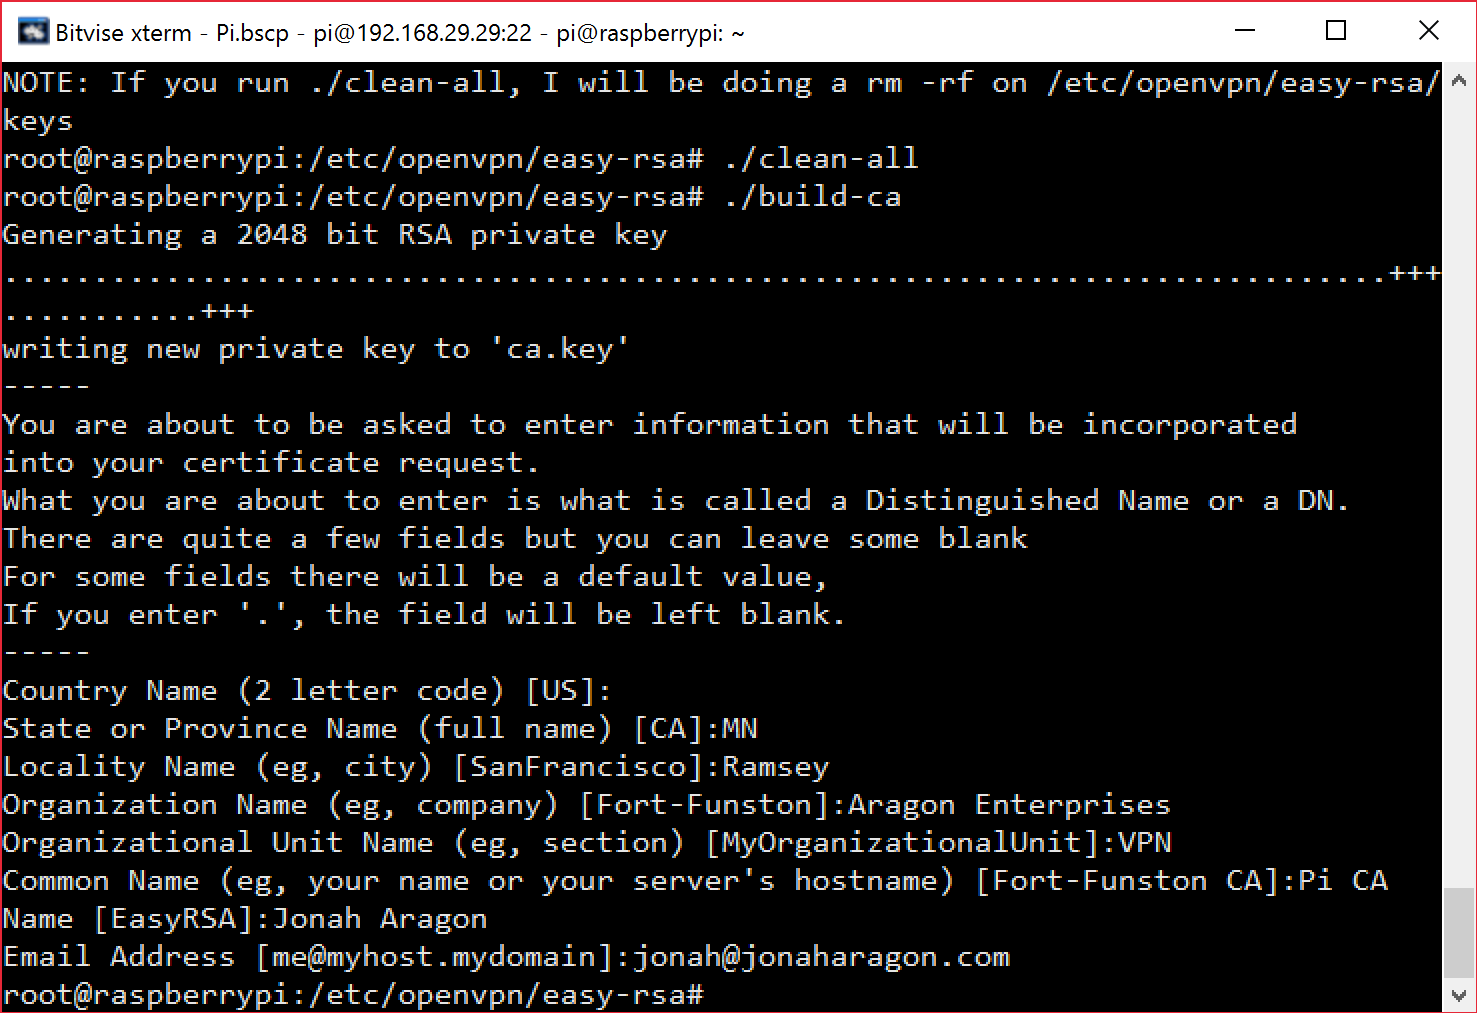
Now we?re going to actually build our encryption certificates. Enter these commands one by one to start the process:
source ./vars
This sets the configuration to the vars file we just edited.
./clean-all./build-ca
After this last command, it?ll ask you to enter some information. Fill it out with with your information, or just keep hitting enter for the defaults.
Now we?ll create a certificate for and name the server. I named mine Pi but it really doesn?t matter:
./build-key-server Pi
Again, this will allow you to enter some information. Most of this is optional, but make sure you set the following settings manually:
Common Name must be set to your server name you entered above (for example Pi), it should do this by default but verify it to be safe.
A challenge password must be left blank! Don?t enter anything here.
Sign the certificate?, enter y to sign it.
1 out of 1 certificate requests certified, commit?, again press y of course.
We just made a certificate! This certificate expires in 10 years so I suppose if you?ve been using your Pi VPN for 10 years you?ll have to repeat this process again.
Creating Client Certificates
Now we will create certificates for all our clients (laptops, desktops, phones, whatever else you?ll be using to connect to this server away from home). It is possible to be lazy and only make one, but if you did that only one would be able to connect at a time. Enter this command:
./build-key-pass User1
You can replace User1 with anything you wanted, but it?s simpler to just use a naming scheme like User1, User2, etc?
Now (you guessed it!) more prompts, some are optional but you will need to pay attention to the following:
Enter PEM pass phrase: Enter a password (you will remember). This will be used every time you connect to your server.
A challenge password: Must be left blank!
Sign the certificate?: Enter y to sign it for 10 years.
Now we?re going to change the keys to an encryption scheme called des3. This is mandatory for certain modern clients for OpenVPN:
cd keysopenssl rsa -in User1.key -des3 -out User1.3des.key
It will ask you for some information:
Enter pass phrase for Yoga.key: Enter the same PEM pass phrase here.
Enter PEM pass phrase: Enter the same pass phrase again.
Now change directories back to /etc/openvpn/easy-rsa/:
cd ..
Now we will generate the Diffie-Hellman keys for your server. This will allow your clients and the server to exchange keys. Enter the command:
./build-dh
Give it some time, it?ll take a while because we?re using 2048 bit encryption. In my case it took me about 15 minutes, so sit back and take a break, you?ve earned it.
Finally, we can implement DDoS protection. OpenVPN has this built in so all you?ll need to do is run this command and you?ll be set:
openvpn –genkey –secret keys/ta.key
Configuring OpenVPN
Alright, most of the process is done, finally we can finish the OpenVPN configuration and then you can get connected!
Run this command to open up the configuration file:
nano /etc/openvpn/server.conf
You may have noticed this file is completely blank. Fill it in with this information:
There are comments in the above Gist telling you what you need to change, so make those changes and press Ctrl+O, Enter, and Ctrl+X when you finish, to leave the document.
Now let?s edit our Pi?s network configuration, to allow network forwarding. Enter the following command to edit the file.
nano /etc/sysctl.conf
Scroll down and you?ll see a section labeled:
# Uncomment the next line to enable packet forwarding for IPv4 #net.ipv4.ip_forward=1
It shouldn?t be too far down the file. Simply remove the # in front of net.ipv4.ip_forward=1 and you?ll be good to go.
# Uncomment the next line to enable packet forwarding for IPv4 net.ipv4.ip_forward=1
Press Ctrl+O, Enter, and Ctrl+X when you finish, then apply those changes using:
sysctl -p
Now we?ve made a functioning server, but we can?t use it yet because Raspbian has a built-in firewall, which blocks all incoming connections. We?re not going to completely disable it, as it protects us from outside hackers, but we?ll add some rules that allow OpenVPN users through. Let?s make a simple file to do this for us:
nano /etc/firewall-openvpn-rules.sh
This is blank of course, enter the following information:
Be sure to change 192.168.X.X to your Pi?s IP address.
Exit nano and enter the following commands to change the file?s permissions:
chmod 700 /etc/firewall-openvpn-rules.sh chown root /etc/firewall-openvpn-rules.sh
Now that we have this file, we need to enter it in the network configuration so the rules stick, run:
nano /etc/network/interfaces
Find the line that is either iface eth0 inet dhcp or iface eth0 inet manual and enter this line below it:
pre-up /etc/firewall-openvpn-rules.sh
Keep those spaces at the front so it?s indented, it should end up looking like this:
iface eth0 inet manual pre-up /etc/firewall-openvpn-rules.sh
Finally, we are done. Run this command to finish the install and reboot your Pi:
sudo reboot
Conclusion
You now have an OpenVPN server you can connect to from anywhere in the world. Continue to Part Two on my blog, which includes final steps and how to connect.
Originally published at sys.jonaharagon.com on May 12, 2016.

