
To learn more about this topic, I highly recommend this Pluralsight tutorial for a more detailed overview.
npm is gaining more and more steam as a replacement for other build tools such as Gulp, Grunt, Bower, and others. While the previously mentioned are great tools, node provides a great way to implement build processes with only npm and your package.json file. Here, we will go into an introduction to this process as well as a few key things to know about if you are looking to learn about using NPM as a build tool.
Using npm as a build tool is all about working in the package.json file and creating custom scripts in the scripts object of file, so that is where we will spend most of our time.
Why use NPM vs the others mentioned above?
- NPM is already part of your process when using node.
- Any command that you are already running at the command prompt can be moved into your package.json file and used there.
- NPM ecosystem is huge, and very active.
- Having your build process in your package.json file is much less overhead. You only have to keep this file updated as opposed to multiple configuration files for your build process.
1. Getting Started
- Create a new clean directory, then open your terminal into that directory.
- Run the following command:
npm init
3. Skip all questions by pressing enter for every one.
A few notes about important parts of npm init questions / package.json file:
A. name: defines the name of application (must be unique if publishing to NPMjs.org as an npm package)
B. main: defines entry point to application
4. In your terminal, run the following command:
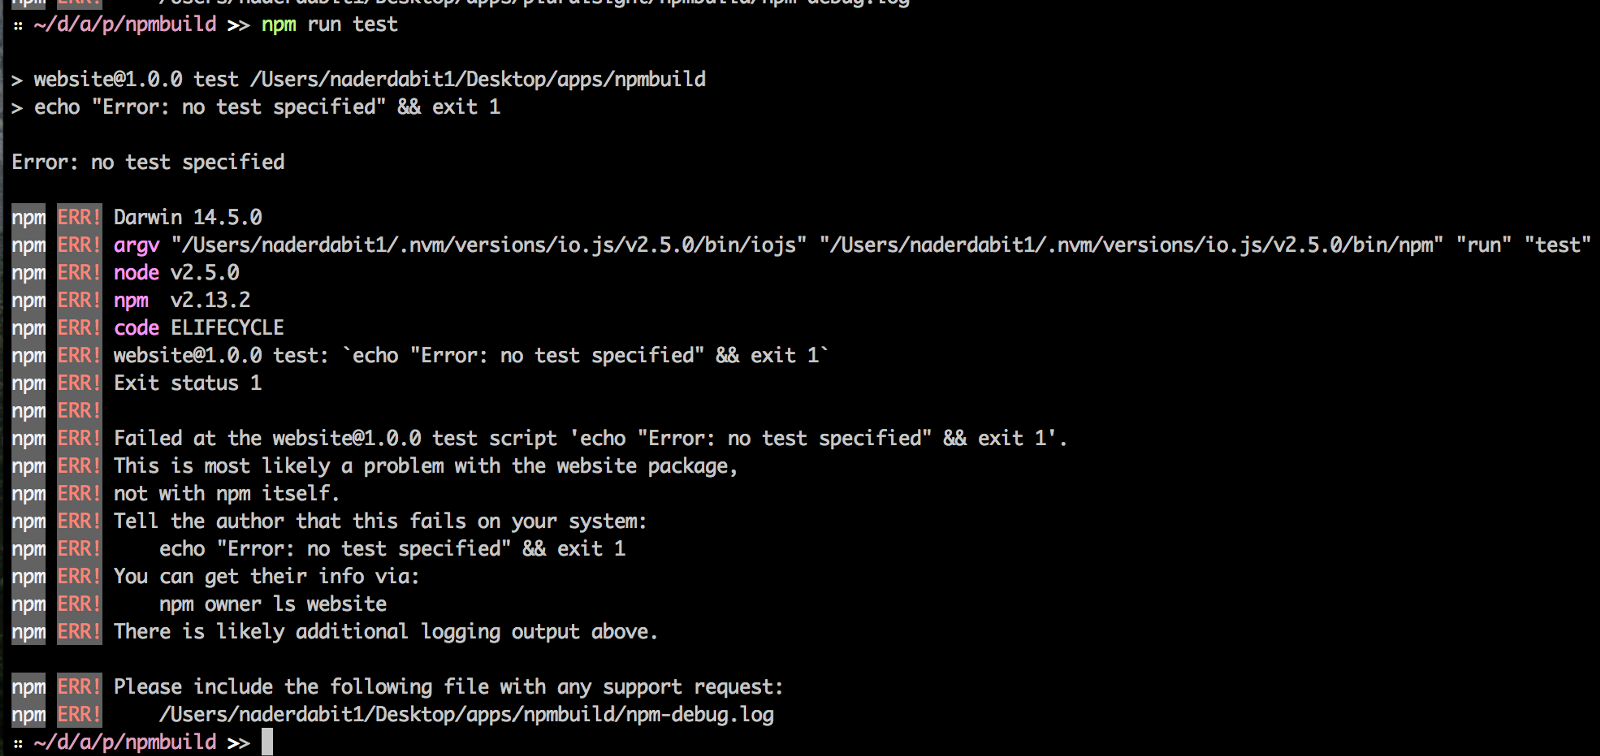
npm run test
What does ?npm run? do? It is a shortcut for ?npm run-script?. These two commands run scripts that are in your package.json file inside the ?scripts? object. In this case, we have a default ?test? script, which echoes back to us that there has not been any test specified. What about the ?&& exit code 1?? This is means we are specifying an exit status (the following was quoted directly from linuxcommand.org:
Exit status
A properly written Unix application will tell the operating system if it was successful or not. It does this by means of an exit status. The exit status is a numeric value in the range of 0 to 255. A ?0? indicates success; any other value indicates failure. Exit status provides two important features. First, it can be used to detect and handle errors and second, it can be used to perform true/false tests.
Runing the above script should give you the following error message:
Now delete the ?&& exit code 1? part of the command, run again, and you should get the following output:

More about the test script:
?npm run test? is one of a few well-known npm scripts that can be executed in a shorthand way (others being the ?start?, ?stop?, and ?restart?). Other ways of running ?npm run test? are the following:
npm testnpm tstnpm t
2. Other shorthand scripts
npm start
npm start ? runs the package.json ?start? script, if one was provided. If no start script is specified, then it will run ?node server.js?. If there is no file called ?server.js?, then it will throw an error ?npm ERR! missing script: start?
npm stop
npm stop ? runs the package.json ?stop? script, if one was provided. If none is provided, it will throw an error ?npm ERR! missing script: stop?
npm restart
npm restart ? runs the package.json ?restart? script, if one is provided. If none is provided, it will run ?npm stop? then ?npm start?.
3. Our first custom script
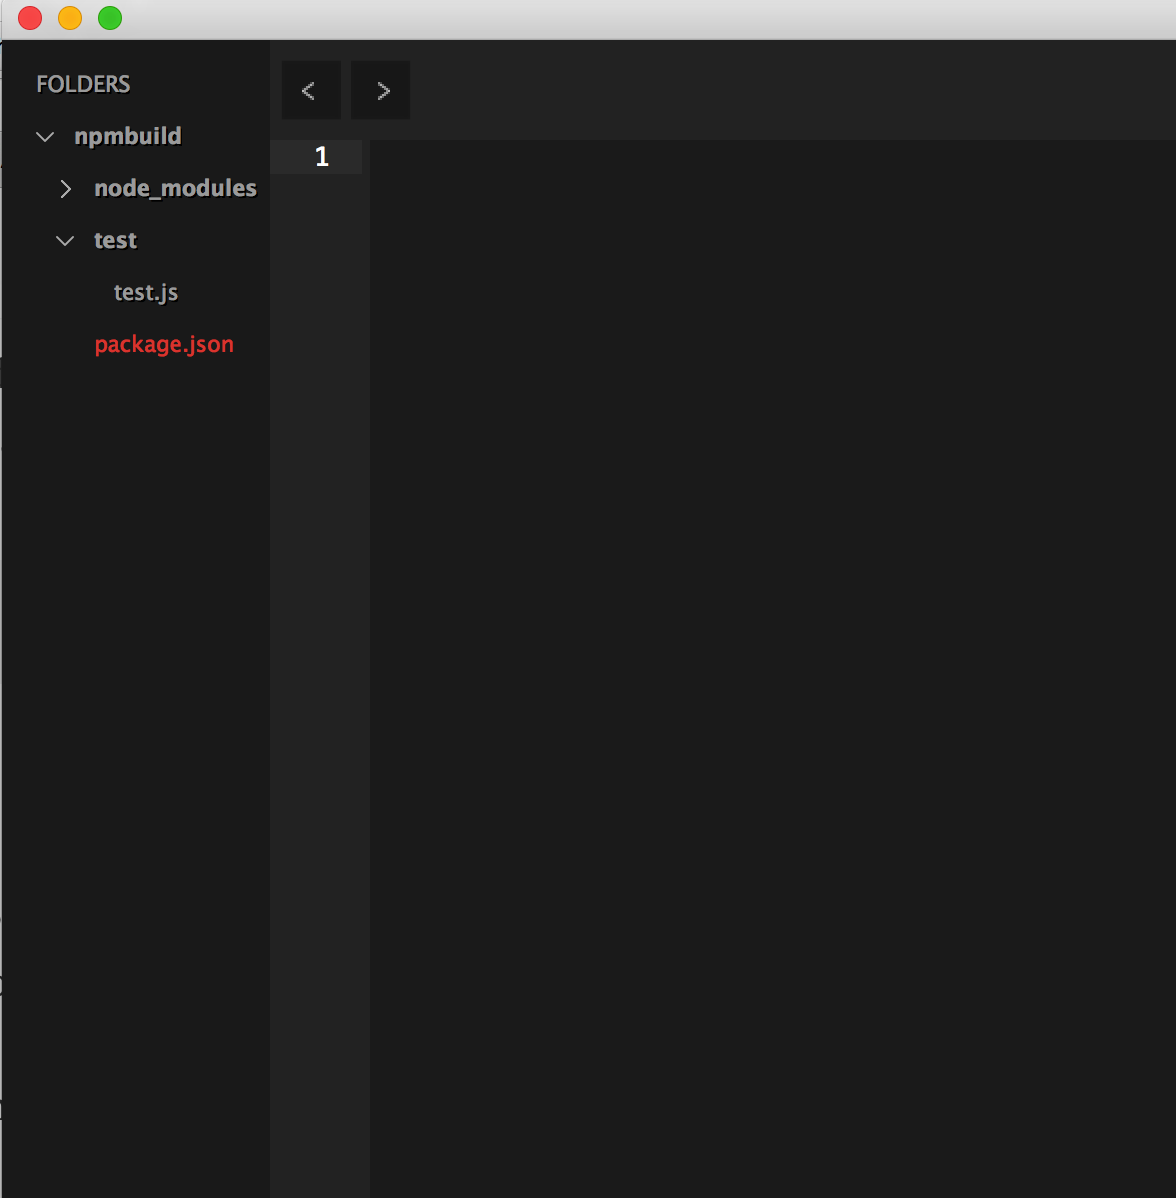
Before we get started with our first custom script, install both mocha and should via the command line:
npm install mocha should ?-save-dev
mocha ? for testing
should ? for assertions in mocha ( i.e. this should do that, etc.. Click here to learn more about should.)
save-dev ? saving only as development dependencies
After these are installed, create a test folder and a file called ?test.js?. Our file structure should now look like this:
In test.js, copy or type the following code:
var should = require(‘should’);describe(‘my first test’, function() { it(‘is running’, function() { true.should.equal(true); });});
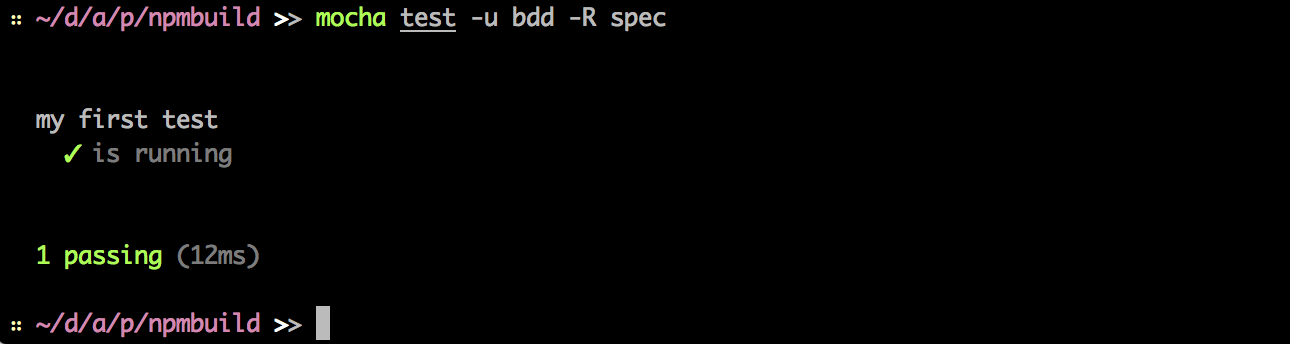
Then, in your terminal, execute the following command:
mocha test -u bdd -R spec
You should get the following output:
First, let?s break down the mocha command to understand what?s going on. Then, we will write a script to make this much more efficient.
mocha ? mocha test command
test ? specifies name of the directory
-u ? specify user-interface (bdd|tdd|exports). In our case, we are using bdd (Behavior-Driven Development)
bdd ? again, specifies behavior-driven-development
-R ? specified a mocha reporter (Mocha reporters adjust to the terminal window, and always disable ANSI-escape coloring when the stdio streams are not associated with a TTY.)
spec ? This is the default reporter. The ?spec? reporter outputs a hierarchical view nested just as the test cases are.
Now that we know what our script is doing, let?s go into our package.json file and replace the old test script with our new one.
“test”: “mocha test -u bdd -R spec”
Then, in the terminal, run:
npm t
Viola, you have created your first custom script.
4. More scripting
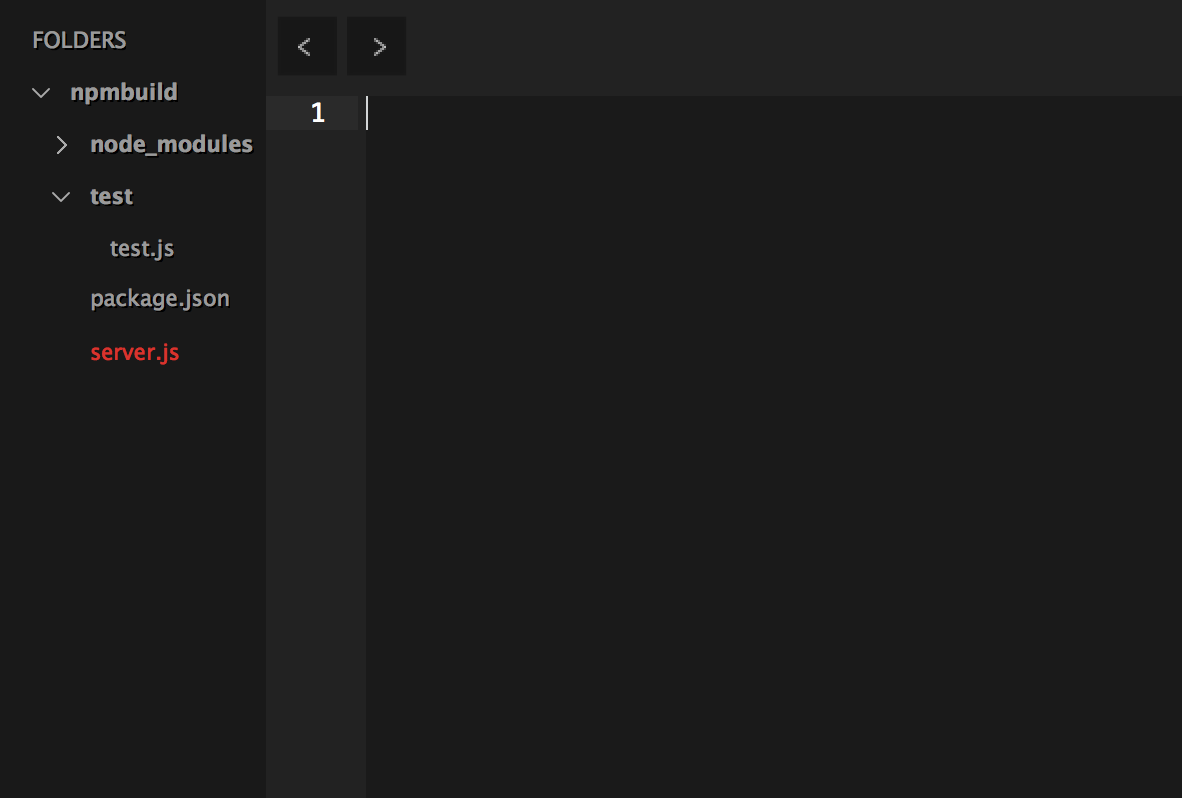
To get into more actual use cases, we will build an extremely basic express application. To get started, install express and save it to your package.json with the following command:
npm install express –save
Then, create a file called server.js. In server.js, type the following code:
var express = require(‘express’);var app = express() app.get(‘/’, function (req, res) { res.send(‘Hello World’)});var port = process.argv[2] || 3000;app.listen(port);console.log(‘app listening on port ‘ + port);
Now, our file structure should now look like this:
Now, run:
npm start
This will automatically look for a ?start? command in our package.json, then because we do not have one it will execute server.js. It will also allow us to specify a particular port (process.argv[2]) in the third argument of npm start:
npm start 4000
Now if we navigate to localhost:4000 in our browser, we will get the ?hello world? printed to our screen (if we had simply run ?npm start?, it would have opened on port 3000):

We will probably want to add on to our start script, as well as be more explicit in starting our app, so let?s go into our package.json and add a custom ?start? script as well as a custom development start script. In scripts, add the following(outlined in bold, don?t forget the comma!):
“test”: “mocha test -u bdd -R spec”,”start”: “node server.js”,”start:dev”: “node server.js 4000”
Now running ?npm run start:dev? will still give us the same result as above. Running ?npm start? will give us our app running on port 3000.
5. Pre & Post scripts
Pre and post scripts do exactly what they sound like they do: they run before and after the main executed script. To set one up, simply prepend the word ?pre? or ?post? to the script you are running.
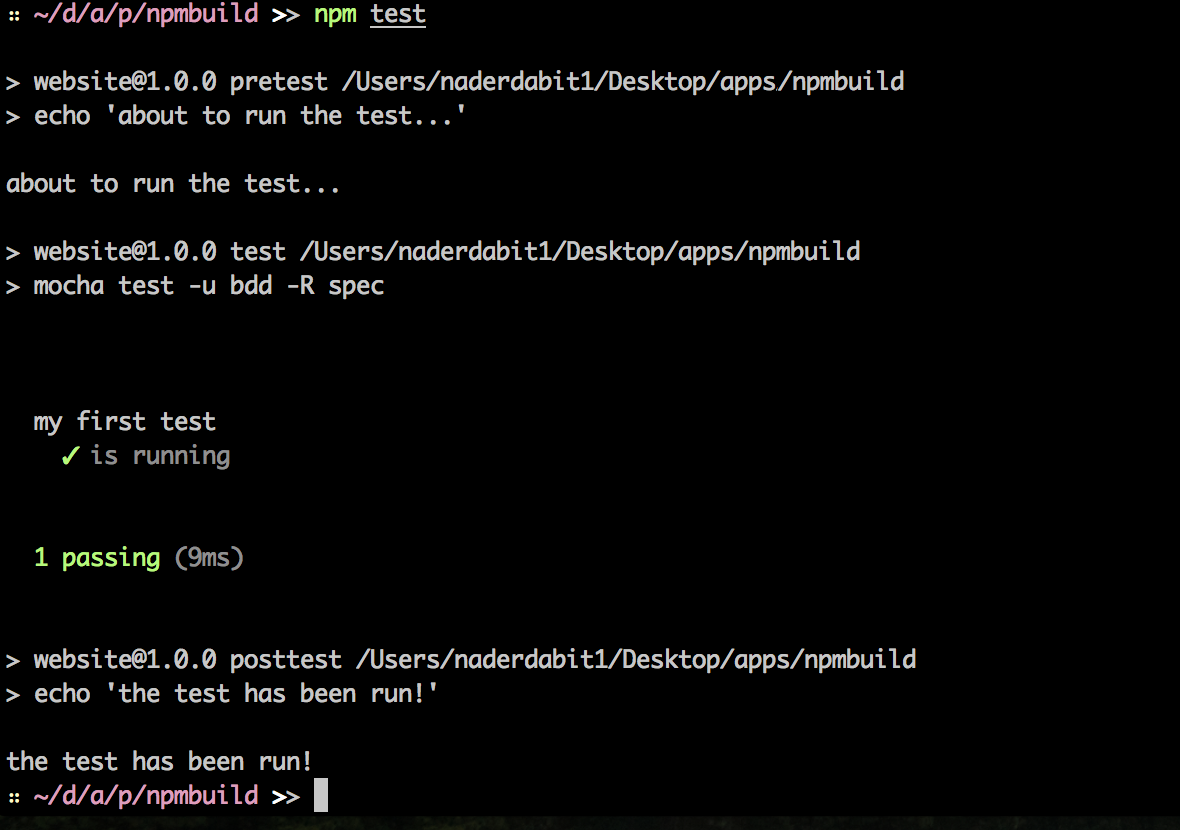
“test”: “mocha test -u bdd -R spec”,”pretest”: “echo ‘about to run the test…'”,”posttest”: “echo ‘the test has been run!'”,”start”: “node server.js”,”start:dev”: “node server.js 4000”
Now, running:
npm t
Will run, in this order, ?pretest? then ?test? then ?posttest?, and will give you the following output:
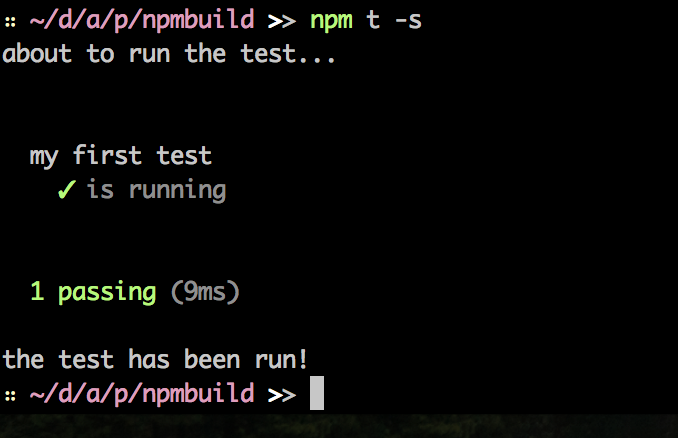
You can also run
npm t -s
-s silences npms output from the subtasks, which makes the log output a little tidier. -s is a shortcut for:
?-loglevel=silent
Doing so will give you the following output:
Of course, we can also run the ?pretest? or ?posttest? scripts alone:
npm run pretest -s
6. JSHint
First, install JSHint:
npm install jshint –save-dev
Second, create a file in the root of the project called .jshintrc
Our file structure should now look like this:

Inside .jshintrc, type the following code:
{ “esnext”:”true”, “noyield”:”true”}
esnext ? This option tells JSHint that your code uses ECMAScript 6 specific syntax.
noyield ? This option suppresses warnings about generator functions with no yield statement in them.
Now, let?s add a lint script to our package.json:
“test”: “mocha test -u bdd -R spec”,”pretest”: “echo ‘about to run the test…'”,”posttest”: “echo ‘the test has been run!'”,”start”: “node server.js”,”start:dev”: “node server.js 4000″,”lint”: “jshint *.js **/*.js”
Now, running:
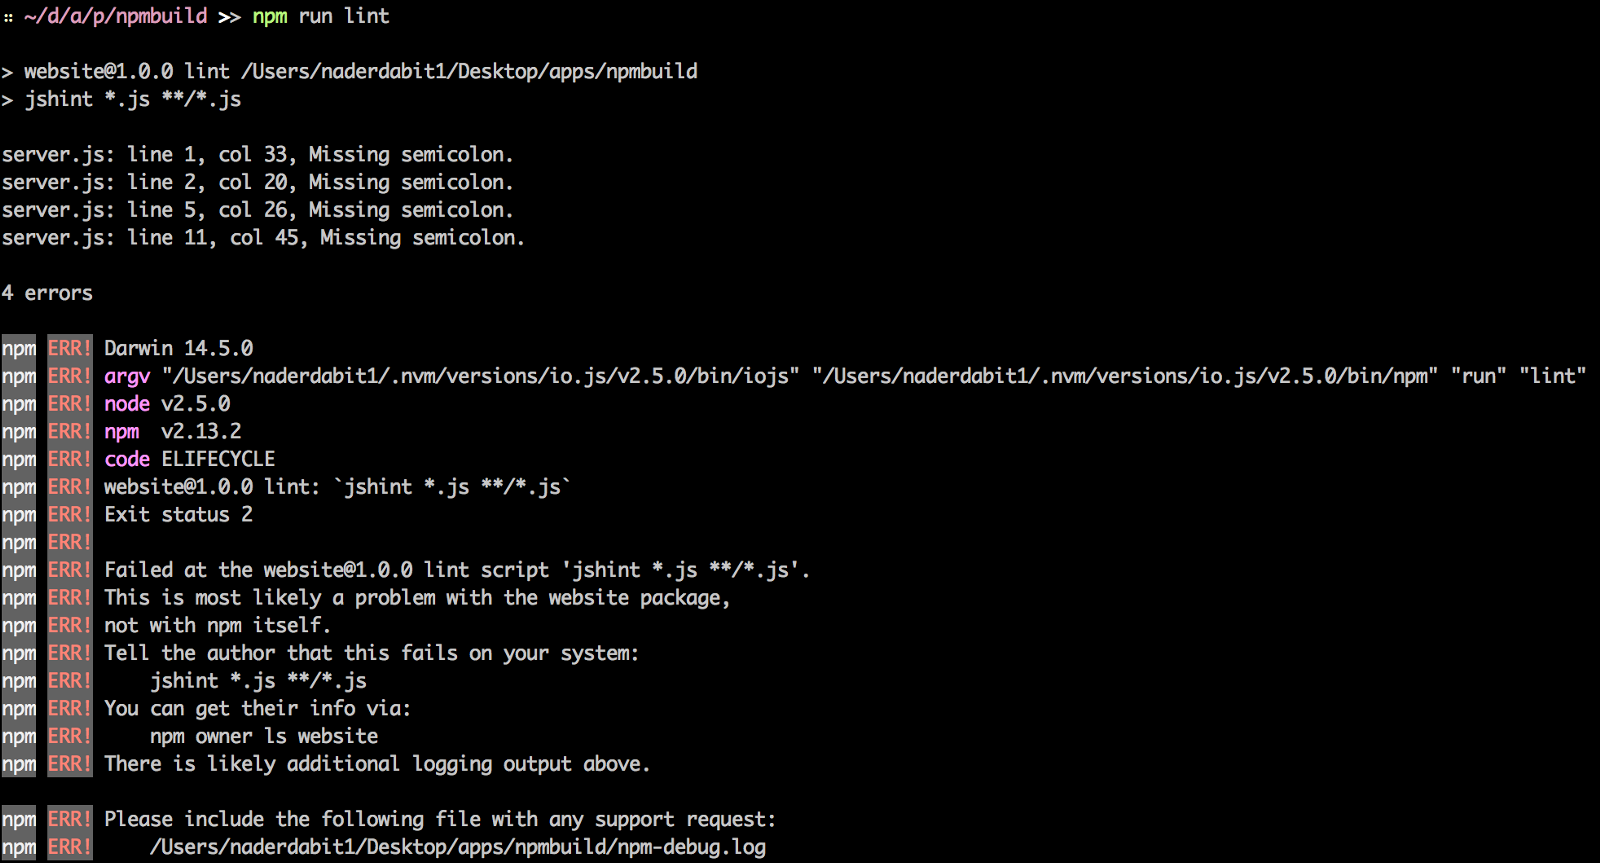
npm run lint
Should give you the following output (if you have followed along, leaving out the semicolons from server.js):
Let?s fix that by adding the semicolons in server.js on lines 1, 2, 5, and 11. Now, running npm run lint we should get the following output:

This linting may be a good candidate for our pretest script, let?s replace the current pretest script with the new one:
“test”: “mocha test -u bdd -R spec”,”pretest”: “npm run lint”,”posttest”: “echo ‘the test has been run!'”,”start”: “node server.js”,”start:dev”: “node server.js 4000″,”lint”: “jshint *.js **/*.js”
Notice, we are running ?npm run? from within the package.json. This is perfectly fine, and very powerful.
Now if we run:
npm t
We should get the following output:
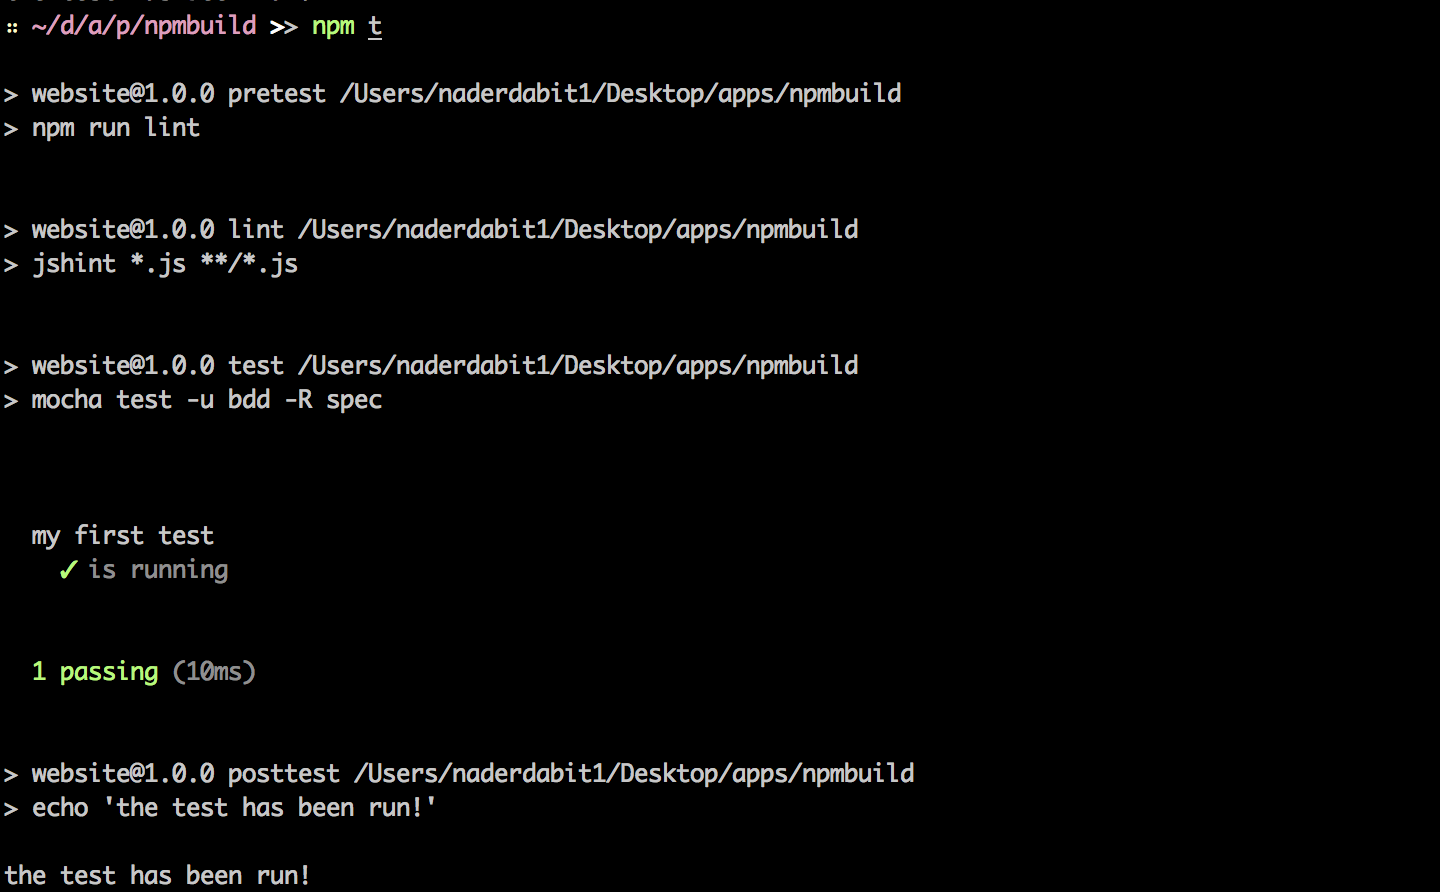
Both mocha and jshint were run!
7. Compiling typescript with npm scripts
First, install the typescript compiler:
npm install typescript –save-dev
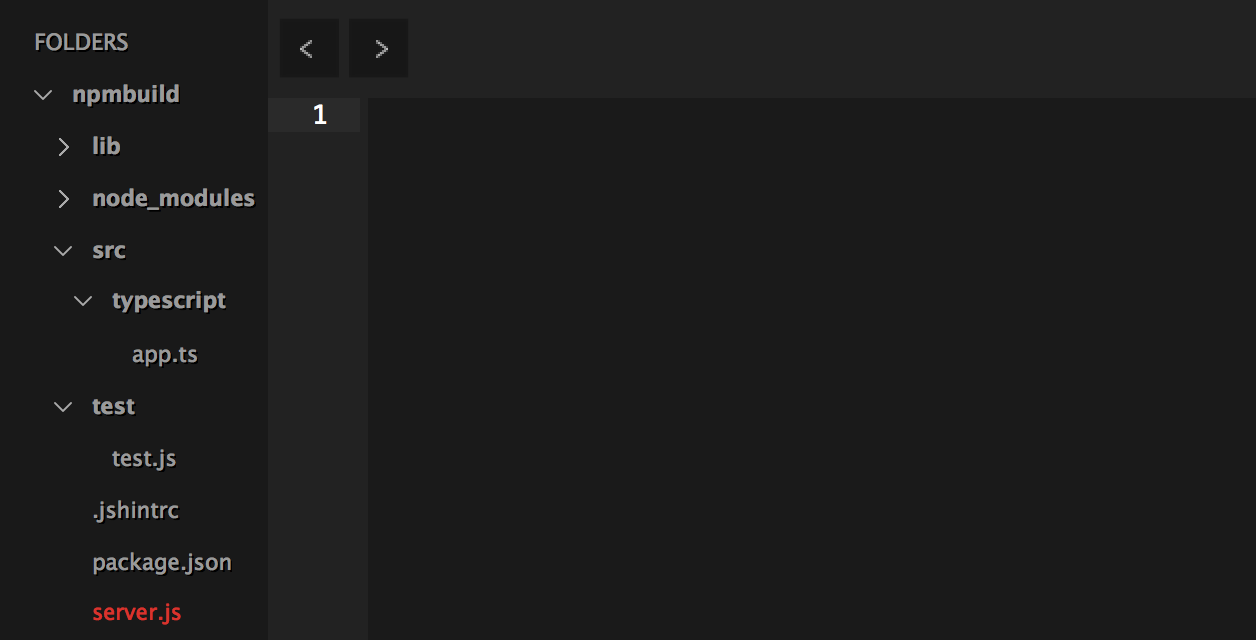
Second, create a src/typescript folder in the root of our directory, and create a file named ?app.ts?. Also create a lib folder in the root of our directory. Our file structure should now look like this:
In app.ts, type the following code:
class Messenger { message(name: string) { return “Hello from the Messenger class, ” + name; }}export = Messenger;
In our package.json file, add the ?compile:ts? script:
“test”: “mocha test -u bdd -R spec”,”pretest”: “npm run lint”,”posttest”: “echo ‘the test has been run!'”,”start”: “node server.js”,”start:dev”: “node server.js 4000″,”lint”: “jshint *.js **/*.js”,”compile:ts”: “tsc –outDir ./lib –module commonjs ./src/typescript/app.ts”
tsc ? typescript command
-outDir ? output directory for our compiled file should be the next argument
./lib ? output directory for our compiled file
-module commonjs ? to compile, we must specify a module target on the command line. For node.js, we use ? module commonjs.
./src/typescript/app.ts ? Where to find the code that needs to be compiled.
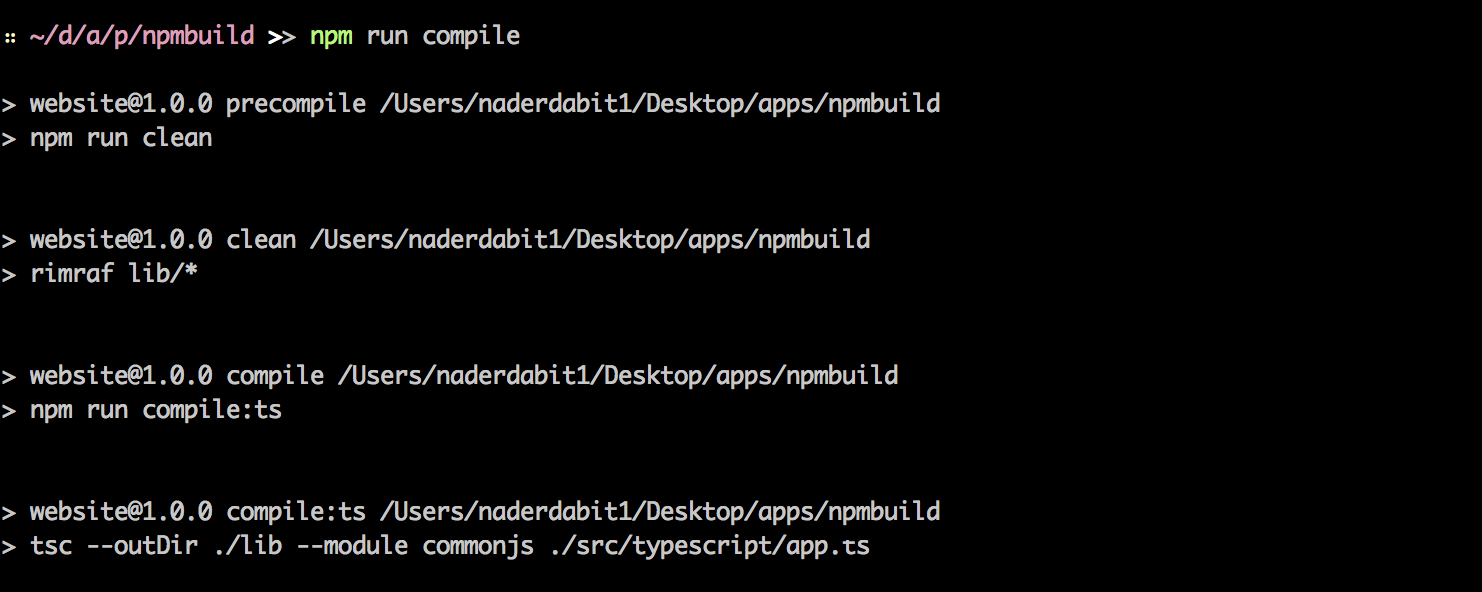
Now, if we run:
npm run compile:ts
Our code is compiled, and placed into the lib directory, in a file called ?app.js?
8. Cleaning our directory before compiling new code
First, install rimraf (A deep deletion module for node (like rm -rf)):
npm install rimraf –save-dev
Next, go into your package.json file and edit it to look like the following:
“test”: “mocha test -u bdd -R spec”,”pretest”: “npm run lint”,”posttest”: “echo ‘the test has been run!'”,”start”: “node server.js”,”start:dev”: “node server.js 4000″,”lint”: “jshint *.js **/*.js”,”precompile”: “npm run clean”,”clean”: “rimraf lib/*”,”compile”: “npm run compile:ts”, “compile:ts”: “tsc –outDir ./lib –module commonjs ./src/typescript/app.ts”
Now, when we run ?npm run compile?, we get the following output:
First, ?compile? calls ?precompile?, which calls ?npm run clean?, then the typescript file is deleted, and recompiled.
PROTIP:
Run ls node_modules/.bin to see all executable scripts available to you in your project:

9. Compiling LESS to CSS using npm
First, install less as a dev dependency:
npm install less –save-dev
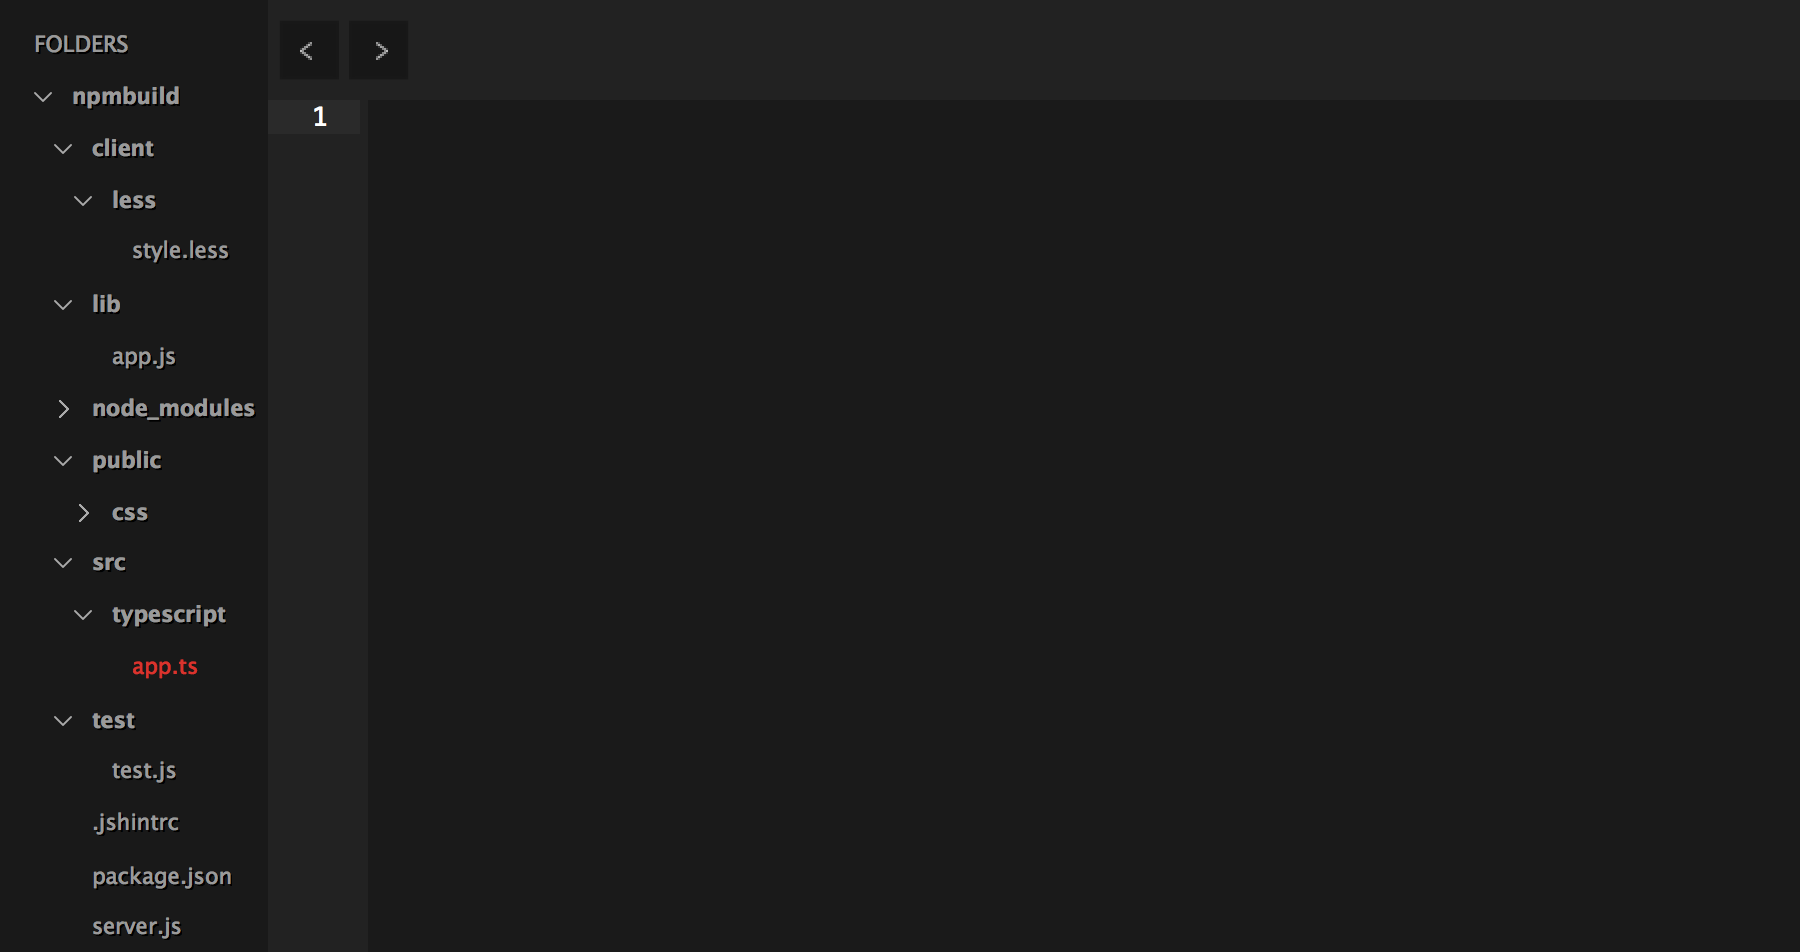
Next, create a client and client/less folder with a style.less file. Also, create a public/css folder. Our file structure should now look like this:
Now, let?s add the less compile script named ?build:less? into our package.json file:
…”compile:ts”: “tsc –outDir ./lib –module commonjs ./src/typescript/app.ts”,”build:less”: “lessc client/less/style.less public/css/style.css”
In the terminal, run:
npm run build:less
Now, if we look in public/css, we should see a file called style.css with our compiled css!
10. Bundling with Browserify using npm
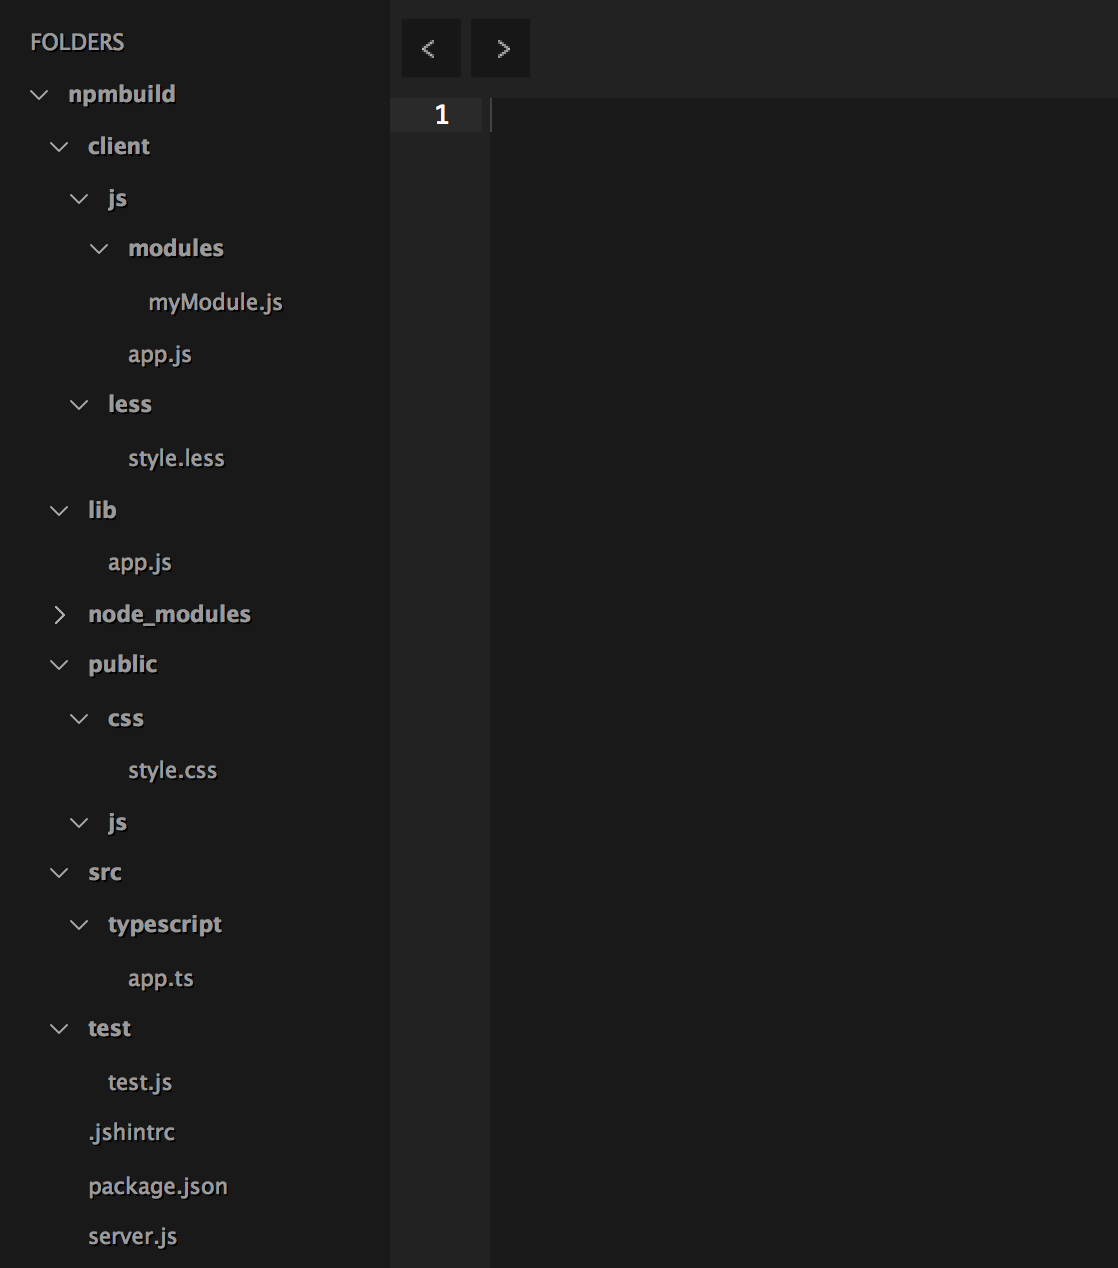
First, create the following files and folders:
client/js & client/app.js
client/js/modules & client/js/modules/myModule.js
public/js
Our file structure should now look like this:
In app.js, type the following code:
var module = require(‘./modules/myModule’);console.log(module.getGreeting(‘Nader’));
In myModule.js, type the following code:
module.exports = { getGreeting: function(name) { return “Hello, ” + name }}
In our package.json file, create a script name ?build:browserify? to bundle our app.js using browserify:
…”build:less”: “lessc client/less/style.less public/css/style.css”,”build:browserify”: “browserify ./client/js/app.js -o ./public/js/bundle.js”
browserify ? browserify command
./client/js/app.js ? file to be compiled
-o ./public/js/bundle.js ?tells browserify specific output of file to be compiled
In the terminal, run:
npm run build:browserify
The output should now be in our public/js folder in a file called bundle.js!
11. Minifying your code
First, install uglifyjs by entering the following into your terminal:
npm install uglifyjs –save-dev
Next, rename ?build:browserify? script to ?build:bundle?. Then, edit the ?build:bundle? script to contain the following:
browserify ./client/js/app.js | uglifyjs -mc > ./public/js/bundle.js
| tells our script to take the output of the command on the left and pass it as the first argument to the command on the right.
uglify ? runs uglifyjs
-mc ? tells uglifyjs to ?mangle? and ?compress? the file.
> ?redirection command redirects complete output of the result of uglify into the file called ./public/js/bundle.js.
Run the following command:
npm run build:bundle
The minified and uglified output of the file should be ready to go in ./public/js/bundle.js.
12. Combining multiple build steps into one command
Now we want to clean our existing directory, then compile our less and our javascript. To do this, let?s create a few new build scripts:
…”build:bundle”: “browserify ./client/js/app.js | uglifyjs -mc > ./public/js/bundle.js”,”build:clean”: “rimraf public/css/*, public/js/*”,”prebuild”: “npm run build:clean”,”build”: “npm run build:less && npm run build:bundle”
Next, run the following in your terminal:
npm run build
First, ?prebuild? will run the clean script, then ?build? will run the ?build:less? and ?build:bundle? scripts! This is one way to execute multiple commands in order.
13. File Watching with watchify
First, install watchify:
npm install watchify –save-dev
Next, below the ?build? script add the following ?watch:bundle? script:
“build”: “npm run build:less && npm run build:bundle”,”watch:bundle”: “watchify ./client/js/app.js -o ./public/js/bundle.js -v”
watchify ? similar to browserify, but will instead watch files passed to it, and when there is a change, it will rerun the compiler.
-v tells the terminal to output verbose logging
Running:
npm run watch:bundle
should give you the following output:

My Name is Nader Dabit @dabit3. I am a developer at @schoolstatusapp. If you enjoyed this article, please recommend and share it! Thanks for your time.

