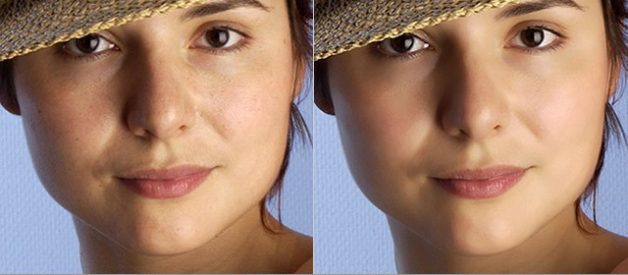
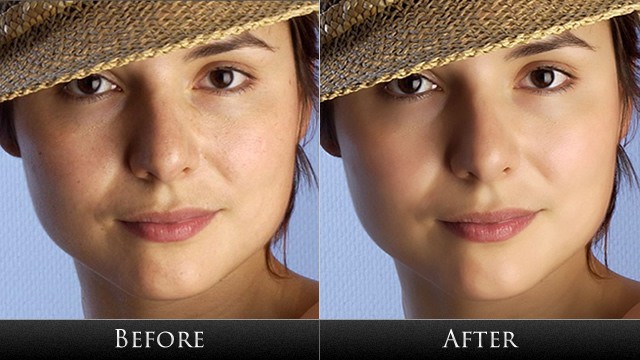
Digital airbrushing is a useful technique applied to portrait photos using image editing programs in Photoshop. Airbrush skin will help you hide skin blemishes and imperfections. And if you are a photographer, you will familiar with using this technique to make your shots look glamorous and professional. There are many ways to achieve this look using airbrushing in Photoshop that allow you to create beautiful artwork. Next, retouch Skin is one of the useful tools that used in digital photos with the special features. It help your photos become more prominent and more stunning before the reader?s eyes. Retouch Skin is used primarily for Food and Non-food. Packaging should, in fact, always be airbrushed because it is never perfect including damaged, printing errors, etc, and never evenly colored due to lighting. So, what is retouch skin and why or how to retouch skin effetely in Photoshop.
First, we can know what is airbrushing?. Airbrushing is a painting technique using a tool which sprays a liquid medium onto a surface. They have been used to create artwork, illustrations, murals, paintings on vehicles, temporary tattoos, apply makeup, fake tans and even nail art. Airbrush skin like a pro. In this Photoshop retouching tutorial, you will learn how to retouch skin like the professionals.
Retouch skin is the act of using an airbrush tool to mix air and paint to create a fine mist that can be applied to nearly any surface. A compressor or can of air is needed to create enough force to push the air through the airbrush and thus mixing with the paint. Besides, retouch skin can be used for applying a background or base coat, painting fine detail, and achieving smooth gradations in colors. We often use airbrushing to even out colored surfaces. After the background has been removed, surfaces are selected from the object and cleaned or evened out per colored surface.
If you use retouch skin tools to edit photos, airbrushing refers to any retouching done to a photo that changes the reality of the photo. With retouch skin tool, you can remove excessive images, the dirty, the acne erased, or body shapes altered. So, would you like to learn to create amazing artworks independently at home and edit your photosby using airbrushing tool?. Recently, here we will guide you some basic tips to retouch and airbrush skin photos.
The first step to learning to retouch skin is to structure your skills of airbrushing in your mind in a systematic and measurable way. Next, the second step is to learn to break down photos or drawings into these measurable structures, so that you need to master step to step of process.
Step 1:
You need to open Photoshop and go to File-> Open to select a photo in your collection you want to modify. Make sure the photo is high-resolution, good quality so you can see the finer details of the photos
Step 2:
Now, to enhance the feel and look of the objects we are going to need to open two duplicate layers to compare and feel them correctly. Using Layers in Photoshop, we can edit a layer, remove it and have the original image. It allows us to modify certain parts of an image without making permanent changes or don?t loss the original photos. Photoshop is a perfect tool to make any customization necessary to a photo or an image and transform them become special.
So, the first things that you need to go to your layer panel and select duplicate layer. The layer panel can be found on the bottom right of your screen. You can see it by pressing F7 and it will appear in the bottom right hand corner. To create a duplicate you can either, right click on the layer containing your image and select duplicate layer, or clicking CTRL+J. With two steps below, you should now have three layers in your layer panel including the original and the duplicates.
Step 3:
After creating the layers, we want to start working with the filters. Highlight the low layer by clicking on it. Go to the top of your screen and select Filter->Blur Menu and choose the surface blur option. This step helps blur the pixels in the image that make it look smoother without affecting the edges. You can choose between 2 options from: radius and threshold. Using the radius allow you indicates the size and strength of the blur and threshold lets you define the area you want to blur.
Step 4:
It?s time to get airbrushing or airbrush skin in Photoshop. With the Surface Blur box open, adjust the Threshold and the Radius until the image is blurry. After moving the sliders around until you have a good blur going on. Now, lower the Threshold slider until you have definition back in the image. You should notice the quality of photos become smoother.
Step 5:
If we see our photos what are still bumps or pores visible in the image, we should use Linear Light tools to eliminate them. Linear Light tools is one of the useful tools to edit photos and called the different name as: the blending methods. In your layer panel where it says normal, click on it and choose the Linear Light option.
Step 6:
We need to create a layer mask. To do this, look on the bottom of your layer panel and find the grey box with a white circle in it. Click this button. Now you will see a white layer added to the high layer.
Step 7:
It?s time to choose the image you want to edit by going to Image>Apply Image at the top of your screen. Select layer 0 from the drop down list where it says merged. Click OK to complete.
Step 8:
You should see a black and white version of your image next to the thumbnail for the high layer in your layers panel. Now click on the colored thumbnail so we can do some fine tuning. You should zoom in a lot on the areas that need work by pushing CTRL+. To adjust the radius and help your photos become more natural, you can click on Filter->Other->High Pass, you will see a dialog box will pop up and give you the option to adjust the radius. Click OK when you?ve done.
Step 9:
Go to Image->Adjustments->Brightness/Contrast to increase the contrast and adjust the brightness to make the bumps on the objects in photos less visible on the dark areas and more visible on the bright areas.
Step 10
We?re done smoothing the skin but you?ll notice that the whole picture is blurry now. In order to isolate the skin from the background we need to combine the low and high layers into a group and then painting the layer mask over the skin. So first, highlight both the low and high layers by holding down CTRL and clicking on each of them. Now push CTRL+G to create a group. You should now see a little folder icon with Group 1 written next to it. If you click on this you will see both the layers in the group. Now we need to get rid of the layer mask by going to Layer->Layer Mask>Hide All. You should see a black thumbnail next to the group layer.
Step 11
Going ahead and create a new layer above the low layer by clicking on the icon at the bottom of your layers panel. You want to fill this layer with color you want, so you can see where you are painting. Go to Edit->Fill and select color from the drop down menu. Select colors and click OK to complete.
Step 12
It?s time to paint! Click on the black thumbnail on the group layer. You need to get your brush tool so hit B to activate it. Now go to your picture and paint over the areas you want to airbrush. It will look color when you choose this old step, but this is just so you can see where you are painting. Adjust the brush size as necessary on the top left hand side of your screen
Once you are done coloring in the desired areas, go back to your layers panel and delete the red layer mask. You have an airbrushed face or airbrush skin. Here are some basic tips about using the airbrushing tool in Photoshop that help you learn how to retouch and airbrush skin in Photoshop. We hope that you will feel it interesting. If you have some images product, you need to support and help, don?t hesitant, contact us. We will help you solve all difficulties.
