!!! Security Warning !!!
Part of this tutorial involves switching your chromebook to developer mode. When the chromebook is in developer mode, ChromeOS built in security features are disabled. This makes it less secure than if developer mode is switched off.
GalliumOS is a beautiful Linux distro that is based on the extremely popular Ubuntu but is is designed to be lightweight, fast and more importantly to integrate seamlessly with your Chromebook hardware. Installing Gallium can be a little tricky if you?ve never done this kind of thing before but I?m going to take you by the hand and show you step by step how to install Gallium on a USB flash drive. This will allow you to keep ChromeOS on your Chromebook, but with the added superpower ability to boot into Gallium when desired.
What you will need?
- A flash drive for your Gallium installation. It doesn?t matter which one but I prefer Sandisk?s Ultra Fit. It?s small enough that it can be left in the chromebook permanently and it can be picked up for about ?20/$20. I recommend a minimum size of 64GB.
- Another flash drive for the Gallium image. This one can be as small as 2GB.
- Access to another operating system; Windows, MAC, Ubuntu or another Linux Distro. This is just for the initial Gallium image download and burning it onto to the flash drive. This tutorial is written using examples from Windows 7, although these steps are pretty similar in other operating systems.
- Most importantly, a chromebook.
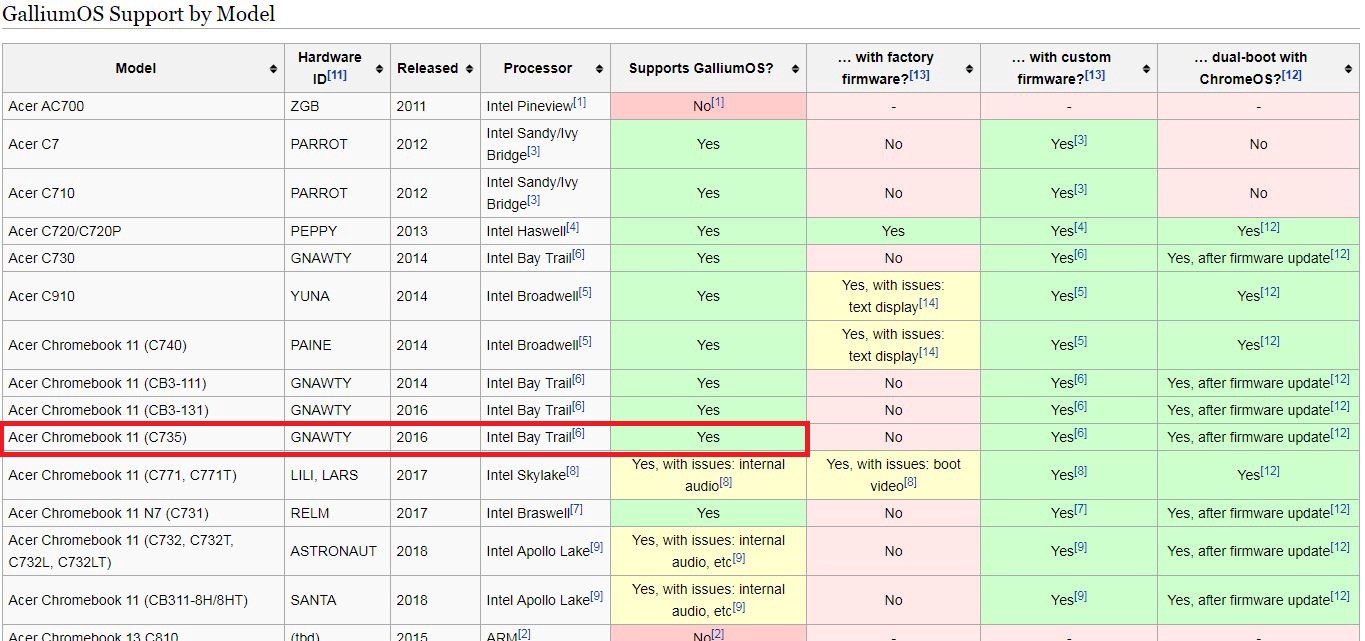
Step 1 ? Check your Hardware Compatibility
Click on this link and find your chromebook in the first column. Then read across to the fifth column to see if your chromebook is compatible. If it is you can continue to step 2.
Step 2? Enable Developer Mode
This part comes with a small caveat. When you enable developer mode, you will reset your chromebook to factory settings. This means that anything you have saved on the hard drive will be lost. You should back it up on your google drive if you want to keep it. All your chrome settings will be safe as these are saved to your google account.
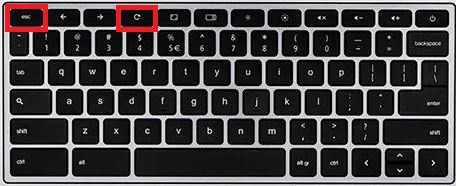
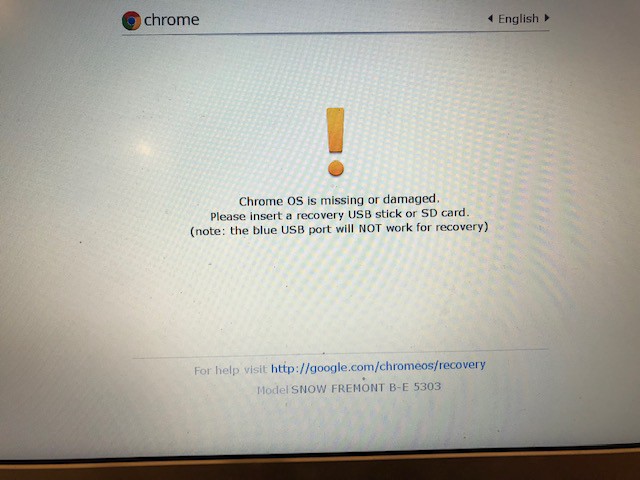
To enable developer mode you need to turn off your chromebook, then while holding Escape and Refresh press the on button. You will see a big scary screen like the one below. Don?t panic.
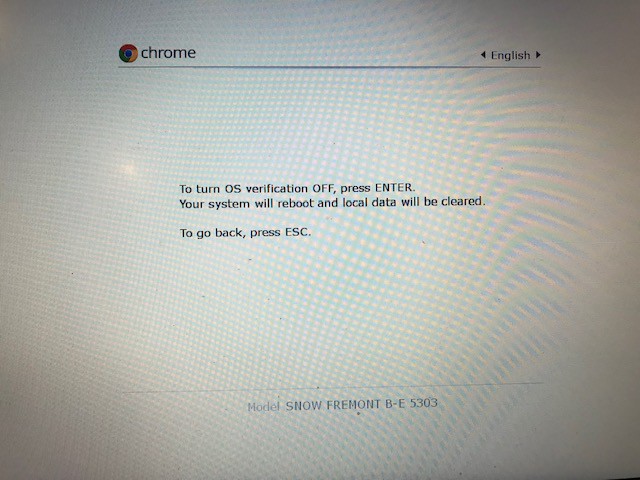
Press Control + D and you will then see another screen similar to below.
Now press Enter and wait. Your Chromebook will transition to developer mode. It will take a few minutes but you will eventually be back to a screen that looks like this?
This is your new welcome screen. Press Control + D again and your chromebook will boot into chromeOS. It will be like switching it on for the first time again so you will need to enter your account details and set up your wifi.
Step 3 ? Add Mr. Chromebox Firmware
The Mr. Chromebox script will add some bios firmware that will allow us to boot Gallium. Go to Mr Chromebox?s firmware page and copy the script (shown below) exactly as is. Don?t try and copy it by typing it out. Highlight it and press Control + C to copy.
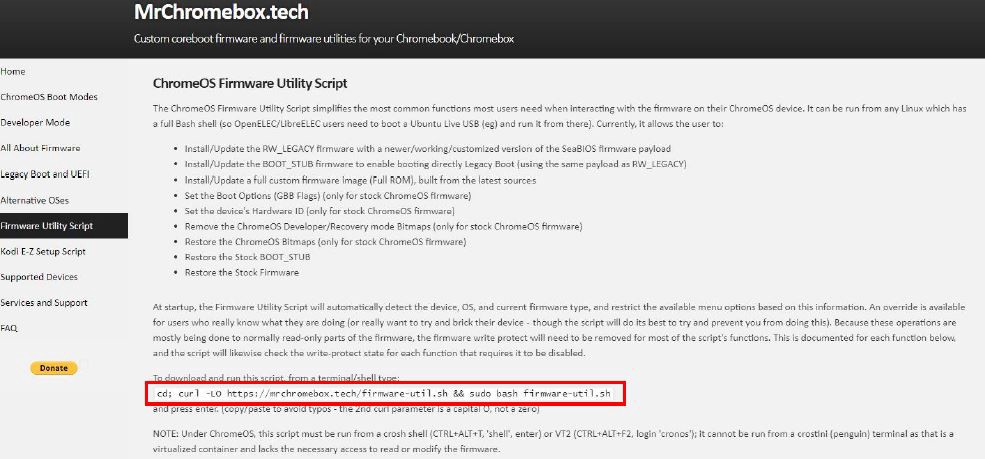
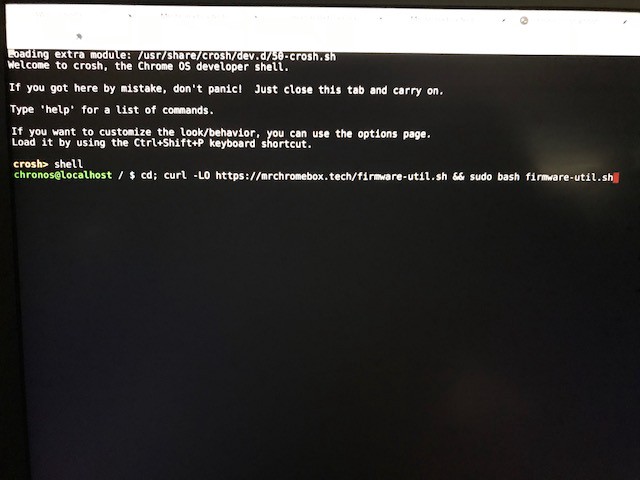
Now with Chrome open press Control + Alt + T on your chromebook to bring up a terminal window. Type in shell and press Enter. Now paste in the copied script and press enter again.
The script will then execute and you will see the following menu. Take note of your CPU Type here, you will need it later. You can see in the screenshot below mine is ?Intel Braswell?.
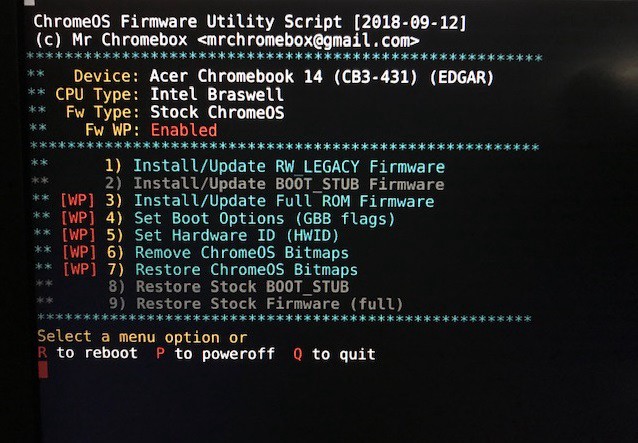
Here you want option 1. This is important if you want to keep ChromeOS on your Chromebook. Do not select any other option. You will be asked if you want to always boot from internal storage. This is up to you, but it just sets a boot order for your chromebook. Pressing Y will mean it will boot from your USB first, N means it will boot from the internal drive first. Either way you can run the script again and change later if you so desire.
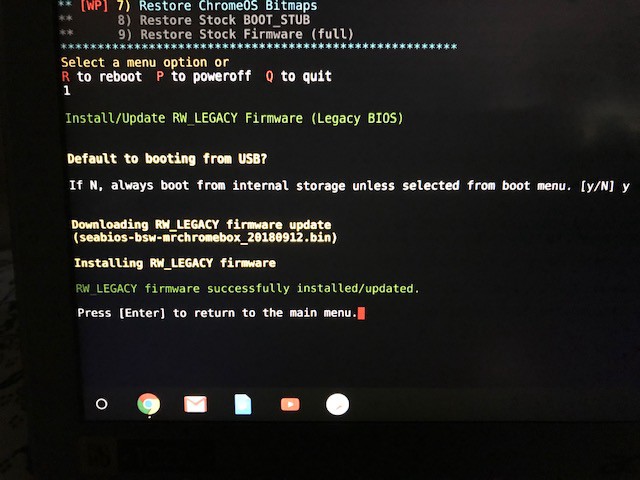
Congratulations, you have now installed the necessary firmware.
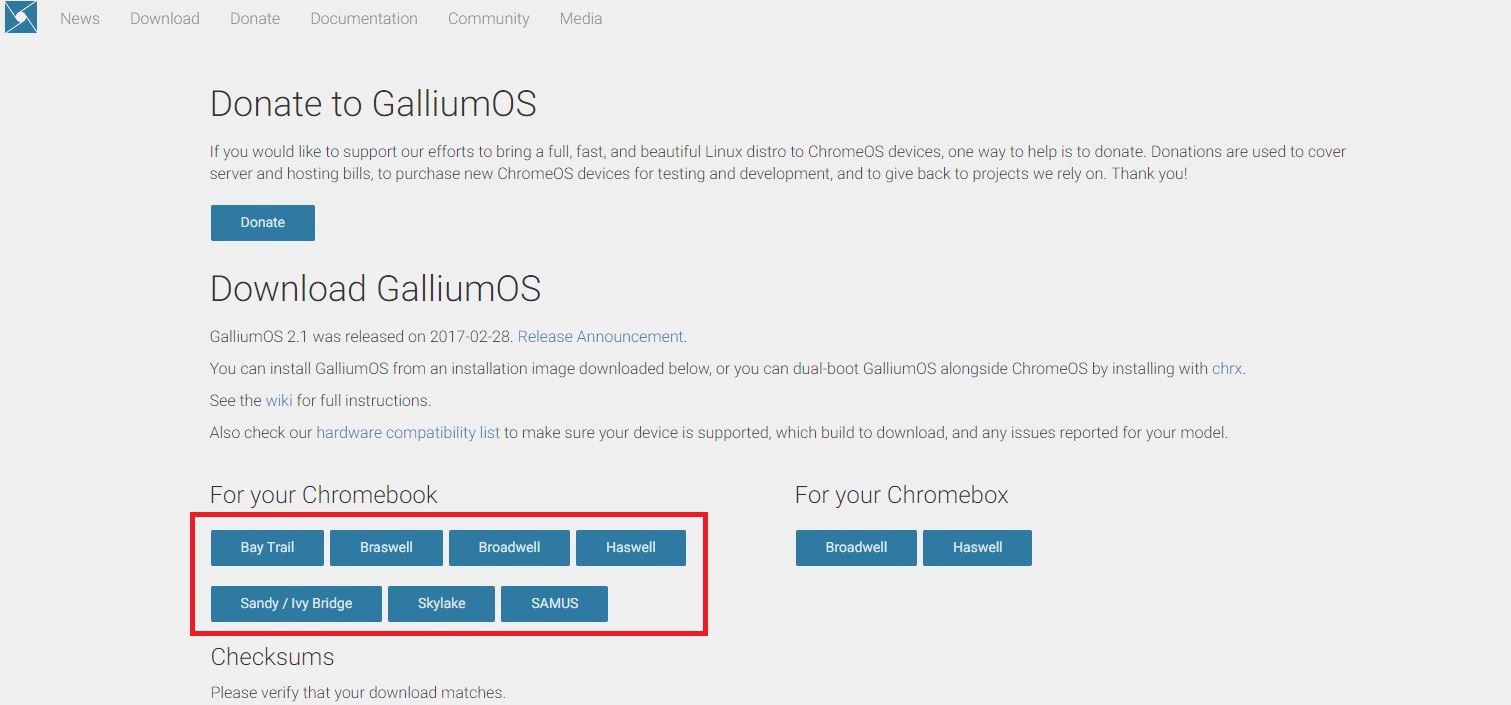
Step 4? Download the Gallium Image
Go to the Gallium Download page and click the button that matches the CPU type that you identified in the previous step.
Step 5 ? Download Etcher
Etcher is the tool that we will use to create a live USB. This live USB is what we will use to install the Gallium Operating System onto our second flash drive. Etcher is available for Windows, Mac and Linux, although all screenshots in this tutorial are shown on the Windows version.
Go to Etcher?s homepage and download it.
Step 6 ? Create a Live USB
Insert one of your USB flash drives into your machine. We are creating the live USB here, which will be used to create the final Gallium installation so if one of your flash drives has more memory than the other, use the smaller one.
Go ahead and open Etcher. You?ll find it in your downloads folder. You?ll be greeted with the following screen
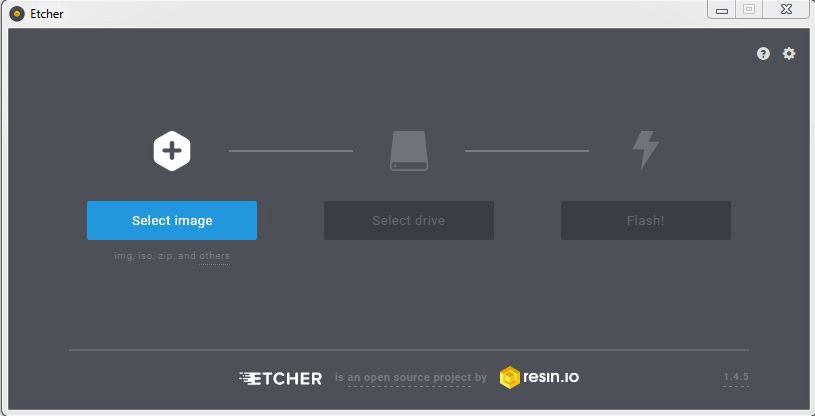
From here click on Select Image and select the image file you downloaded in step 4. This will also be in your downloads folder. Now click on Select Drive and you will see a screen similar to this
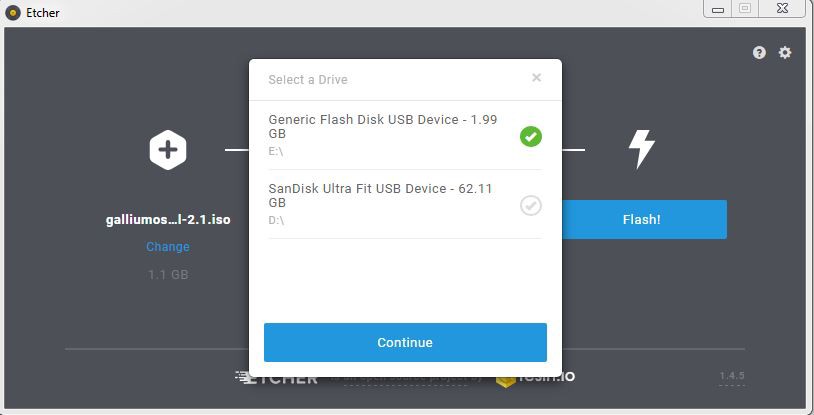
Select the drive you want to write the image to (your flash drive) and click continue
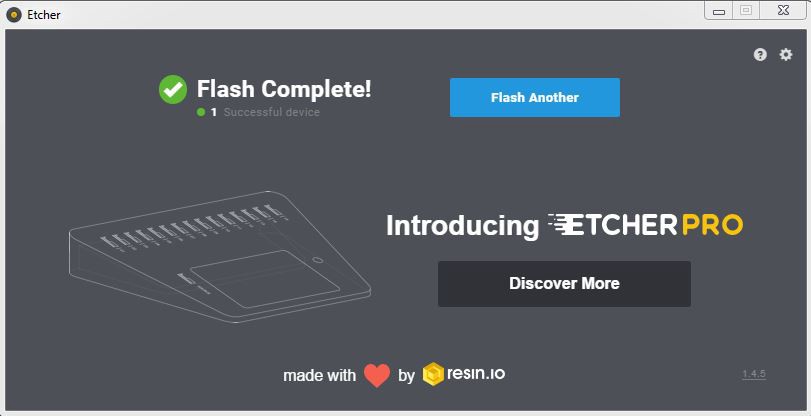
When the write process has completed you will see a page like this?
Step 7? Beginning the Gallium Installation
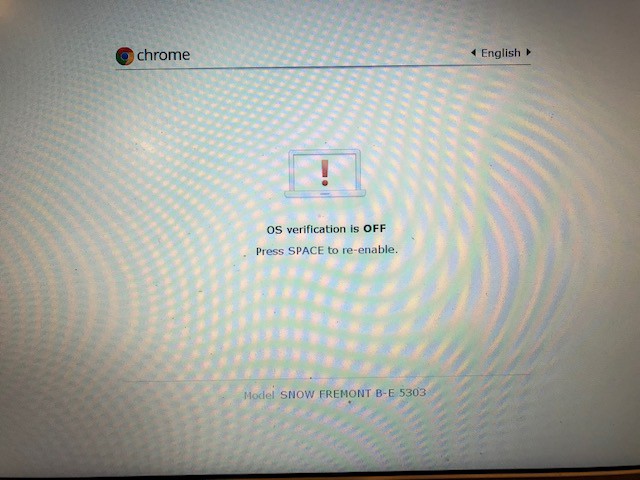
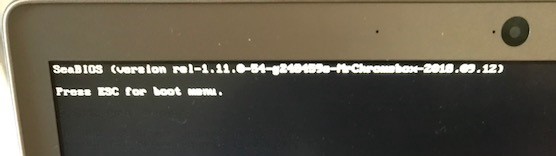
Shut down your chromebook and insert both USB flash drives. Now switch it on again. When you see the white screen with the red exclamation mark press Control + L and then press Esc when prompted.
You will now see a boot menu appear with the two USB drives listed alongside your hard drive.
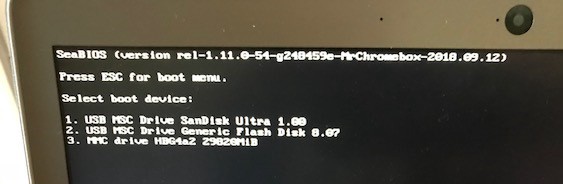
Choose the number that corresponds to the drive that you burned the Gallium image onto. In my case above, it?s number 2. Number 1 is a 128GB flash drive that I will install a persistent copy of Gallium onto and number 3 is my chromebook?s hard drive.
You should see the following screen. Press enter to load Gallium.

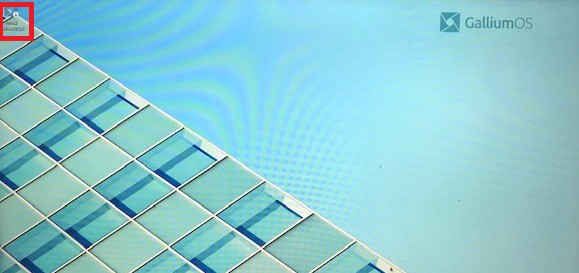
The Gallium desktop will load. At this stage you are free to have a play around with Gallium if you wish. Just be aware that any changes you make will be lost every time you restart. We will use the install icon located on the top left of the desktop to create a persistent installation on our second USB so all changes made will persist when we restart the OS. Double click the icon when you?re ready.
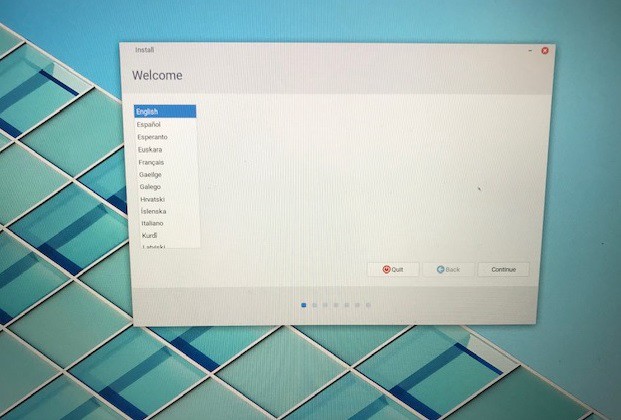
From here you will see a screen asking you to select your language. Go ahead and select a language and click next
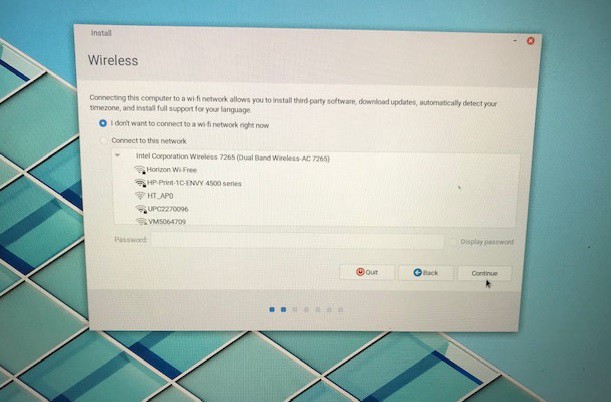
Next you will see a screen prompting you for your WiFi password. You can enter a password or skip it. Entering a password will allow Gallium to download any updates that are available. Click continue when you?re ready.
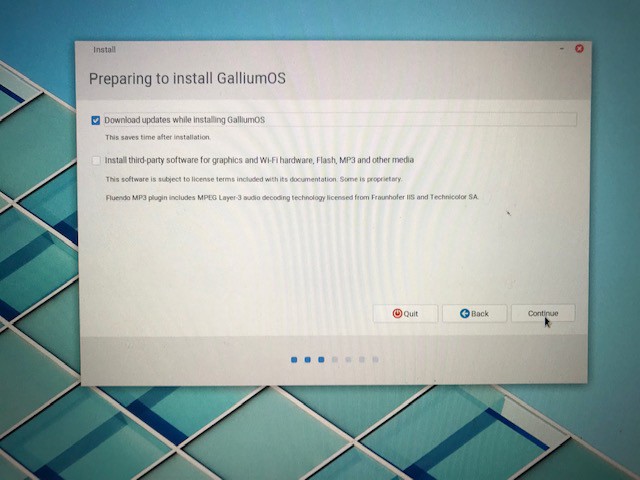
The next screen will allow you to select whether or not to install updates. It will only let you check the box if you entered your WiFi password on the previous page.
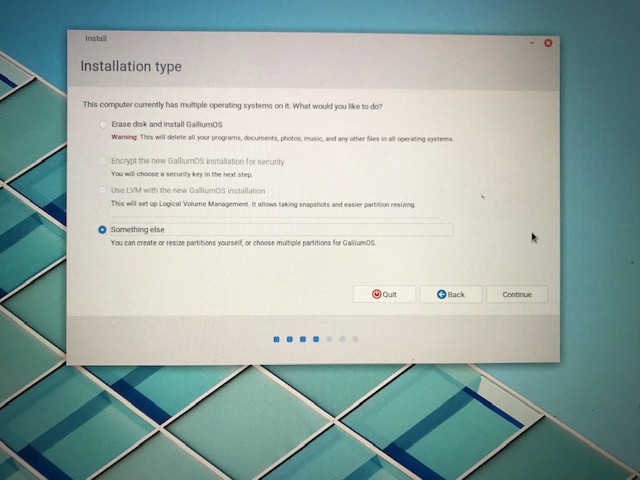
!!! Step 8 ? Something Else !!!
When you see the screen below it?s very, very, very important that you change the selection to Something Else as shown below. If you don?t you will wipe ChromeOS, which is not what we want. Click continue when you?re ready to proceed.
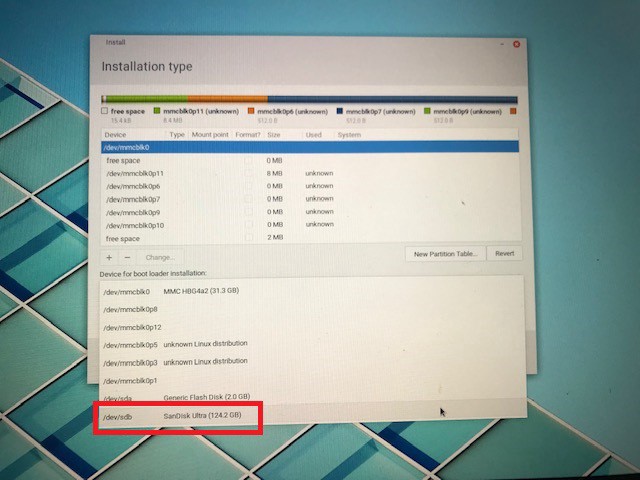
Step 9 ? Select the device for the boot loader
Just as I emphasized the importance of the last step, I cannot emphasize the importance of this one enough either. When you see the screen below you need to change the selected drive to the USB drive you?re installing Gallium onto. If you install the boot loader on your hard drive it may prevent you from booting ChromeOS. You can see below that the default selected was /dev/mmc/blk0 . We want to change this.
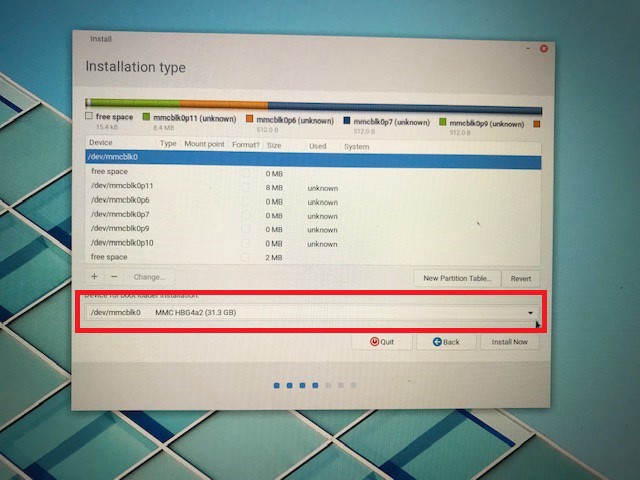
Change the drive above to your USB flash drive as shown below
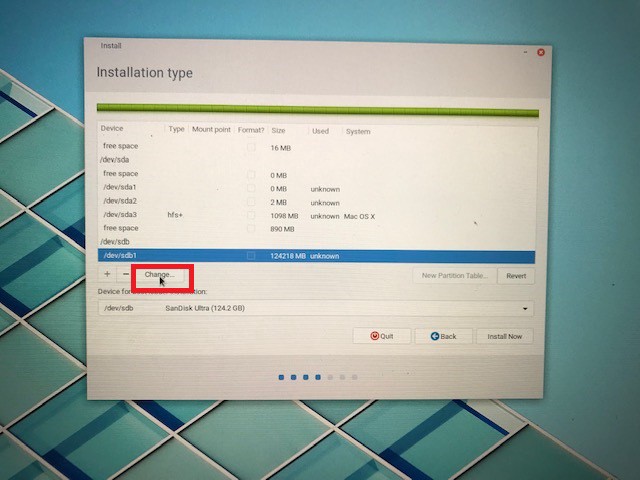
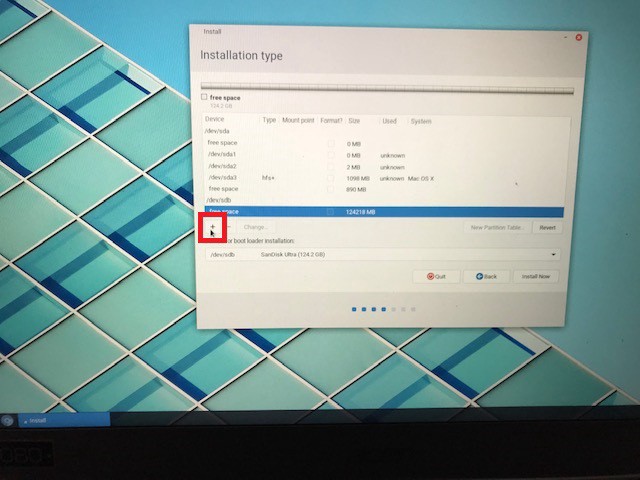
Step 10 ? Format your USB drive
Now find your USB in the main list of drive partitions. You can see below mine is called /dev/sdb1 .
In the unlikely event you can?t find /dev/sdb1 but instead can only find /dev/sdb and a partition under that called free space as shown in Step 11, you can skip the rest of this step.
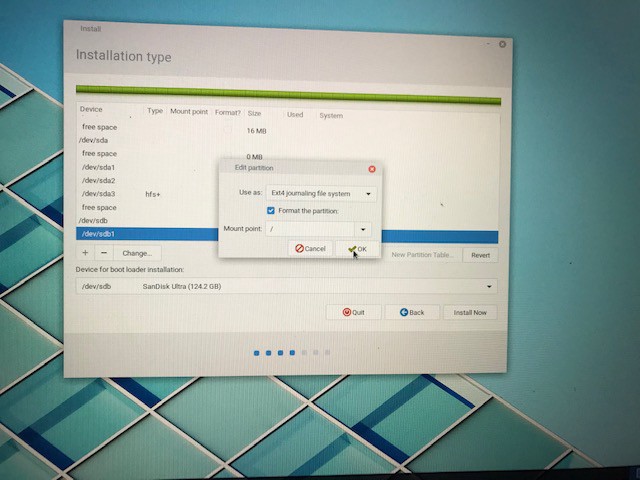
Click on the partition to highlight it and then click Change as shown below.
You will now see another box similar to below. Fill it in the same way as I have done and click ok
Step 11 ? Create your boot partition
The following few steps will cover the various procedures involved in creating the boot partition, root partition, swap area and home partition. There is a plethora of information online if you want to read more about this and there is more than likely a better way to do it. What I?m about to show you is what works best for me and I have settled on it after a fair bit of trial and error. The idea behind making these partitions is that if part of your flash drive becomes corrupt, the whole drive will not get corrupted. It will be isolated to a single partition.
Highlight the section called free space and then click the little + symbol.
You should now see another window like below, letting you allocate memory to a particular partition. We are going to allocate 1000MB to the boot partition.
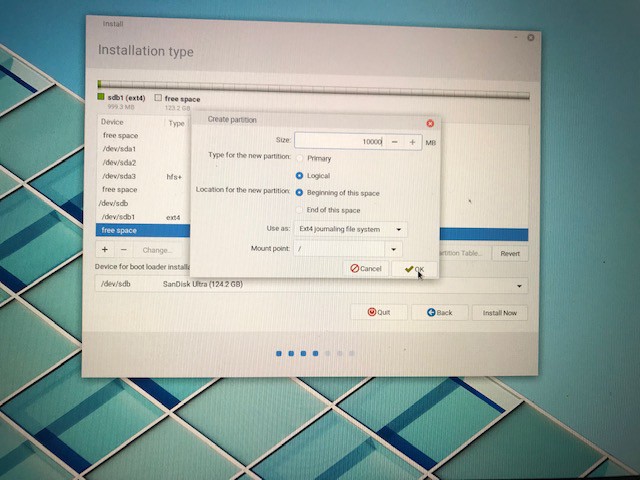
Fill in the blanks like above and click ok
Step 12 ? Format your root partition
Similarly, highlight the free space section and click on the + again. Now allocate 10,000MB to your root partition.
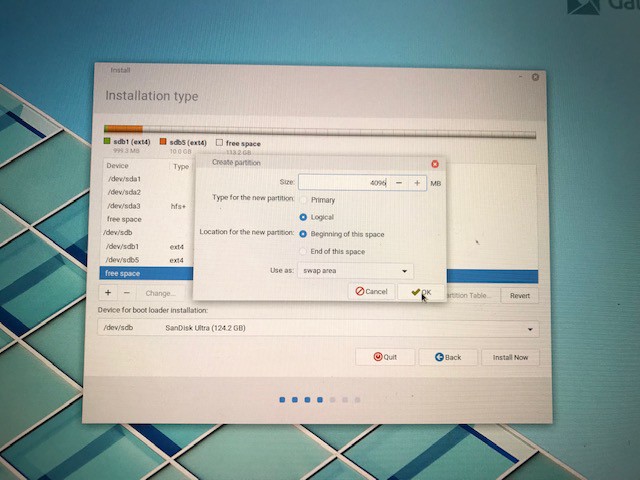
Step 13 ?Format the swap area
Similarly, allocate 4096MB to your swap area. It is debatable whether this is actually useful or not but its better to be looking at it than looking for it.
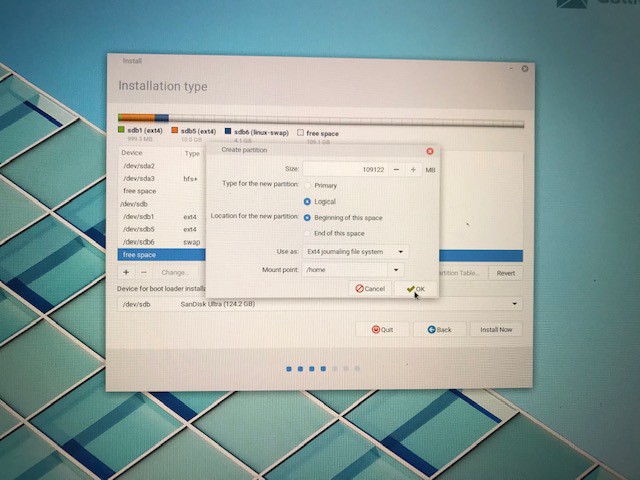
Step 14 ? Format your home partition
Allocate any remaining space to your home directory and click ok
Step 15 ? Install Gallium
Click Install now as shown below
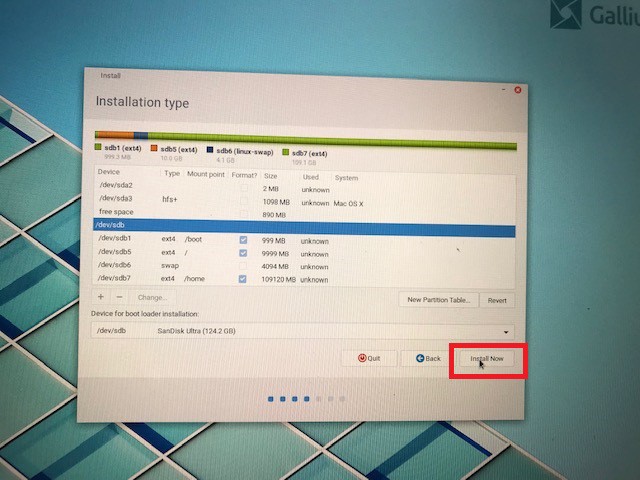
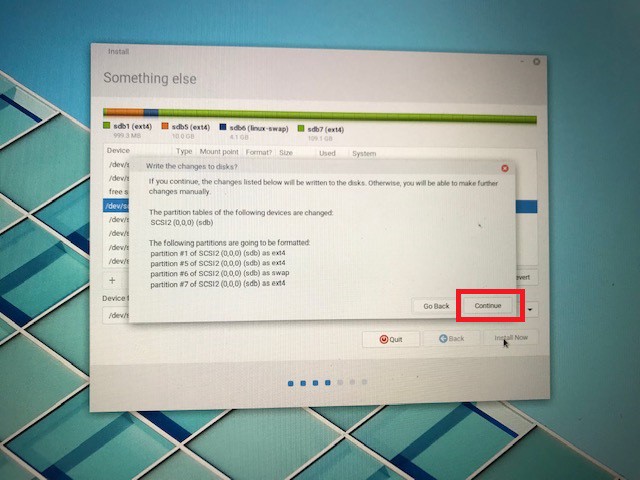
On the next screen click continue if you are happy with your partitions
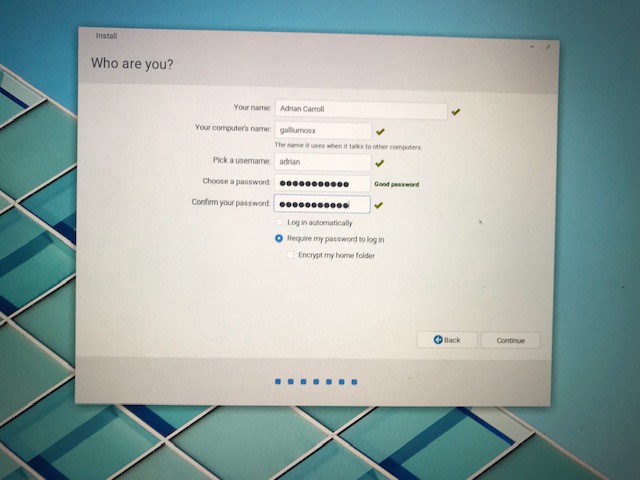
Step 16 ? Identify Yourself
The Gallium installer will ask you some questions for configuring the new operating system. Go ahead and fill it out. Click continue when you?re done.
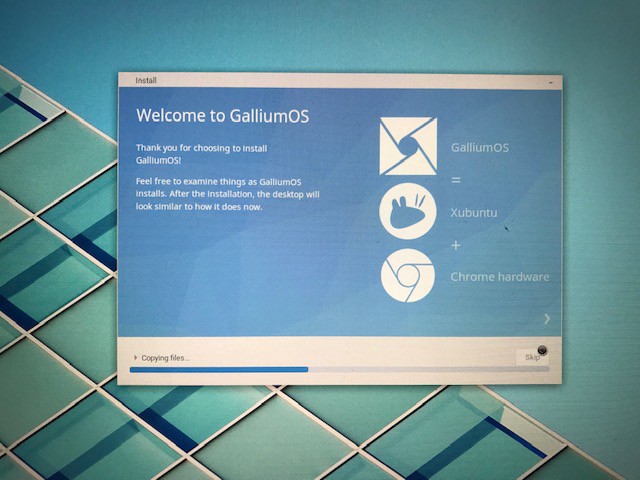
Step 17 ? Sit back and relax
Take a break, you?ve earned it! Gallium will spend a few minutes installing all the necessary files on your USB flash drive
Step 18 ?All done!
Congratulations, the installation has completed and your new operating system is ready to go!
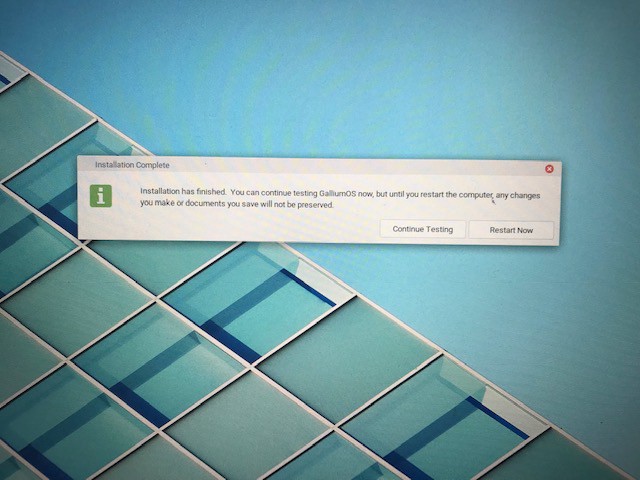
You may click on Restart Now
Step 19 ? Boot into your new OS
When your chromebook restarts you will be greeted again with the white screen and red exclamation mark. This is your new startup screen. Pressing Control + D will boot into ChromeOS and pressing Control + L will let you open the boot menu by pressing Esc
From the boot menu, select the USB drive you have just installed Gallium onto and enjoy your new operating system. You can remove the live USB and keep it for any future installation you need to make.
Conclusion
I hope the installation has gone well for you and you are now enjoying the benefits of dual booting your chromebook. Gallium is like a lightweight version of Ubuntu so most of the commands that work for Ubuntu will work for Gallium as well.
Gallium comes with a pre-installed chromium browser, which is the open source project Chrome is based on. While it is good enough for most things, there are some things like Netflix you will need Chrome for. You can install Chrome the same way as you would on Ubuntu and you?re good to go.
Let me know if it all worked out or if you ran into any obstacles. While I may not have all the answers, I?ll certainly try to point you in the right direction!

