
 Photo by Fatos Bytyqi on Unsplash
So you started working on your first React application with Create React App, and you?ve reached the development stage when it?s time to finally deploy your app. If your tool of choice for this is Heroku, you might do some research and realize that the documentation regarding this topic contains very little information. Because I was recently in a similar situation while building my own React application, I figured I would flesh out the steps that I went through in order to get this done.
I will mention from the start that I decided to go with the use-a-simple-Express-server way, so in case you prefer other ways of doing this, you might find useful documentation in the React deployment docs.
Step 1: Create Your React Application (If You Haven?t Already)
 React logo
If you are reading this, you most likely already have a functioning React application. But if you don?t and you just want to go through the whole process (from creating it to deploying it), I will start with the steps required to create a very basic React app.
- Make sure you have Node.js and npm installed.
- Open your terminal of choice, and run the following command by replacing my-app with the name of your application.
npx create-react-app my-app
3. After the process is done, change directory (cd) into the folder that was created for your app, and start the development server for a quick preview of what you created.
cd my-appnpm start
4. Push your code to Github. I am going to assume you already know how to do that, so I won?t go into these details.
Step 2: Create an Express Server
In the root of your project, create a new folder called ?server? (for example), and inside of it, add a file called ?server.js?.
The tool that I used to create the server is called Express, which is a great tool for creating web servers with Node. There are dozens of tutorials on the web which you can go through in order to learn this tool, but in our case, you just need to write a few lines of code in order to generate your own server.
So let?s begin!
- Install the latest version of Express.
npm install express –save
2. Import Express, and create a new instance of Express.
const express = require(‘express’);const app = express();
3. Tell Express to serve up the public folder and everything inside of it.
const path = require(‘path’);const express = require(‘express’);const app = express();const publicPath = path.join(__dirname, ‘..’, ‘public’);app.use(express.static(publicPath));
Basically, we pass in all of the pieces of the path, and path.join puts them together. The result is then passed into app.use(express.static()), so Express will know which files to serve.
4. Start the server by telling it which port to use. I am using port 3000 on my local environment; however, Heroku will assign a port for your app after deploying it, so both cases should be covered.
const path = require(‘path’);const express = require(‘express’);const app = express();const port = process.env.PORT || 3000;const publicPath = path.join(__dirname, ‘..’, ‘public’);app.use(express.static(publicPath));app.listen(port, () => { console.log(`Server is up on port ${port}!`);});
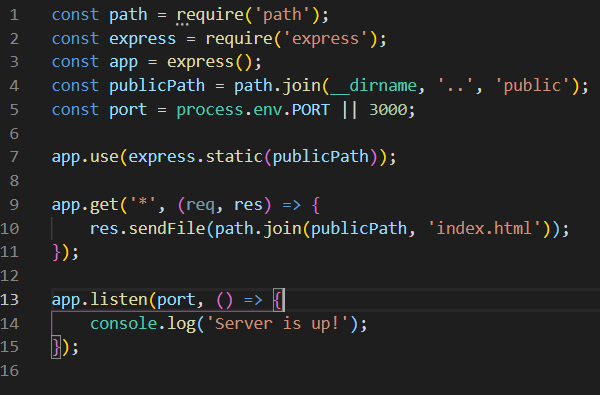
5. Make sure your index.html file is served, in case the user requests a resource currently not in the public folder.
const path = require(‘path’);const express = require(‘express’);const app = express();const publicPath = path.join(__dirname, ‘..’, ‘public’);const port = process.env.PORT || 3000;app.use(express.static(publicPath));app.get(‘*’, (req, res) => { res.sendFile(path.join(publicPath, ‘index.html’));});app.listen(port, () => { console.log(‘Server is up!’);});
At this point, if everything went well, you should be able to test your server locally to make sure everything was set up correctly. Then you can move on to actually deploying on Heroku.
In order to do that, you just need to create your production build by running npm run build. Then go to your terminal and run node server/server.js, which should boot up your server, making your app available to use at http://localhost:3000.
This is basically everything that your server file should contain:
Step 3: Deploy on Heroku
 Heroku logo
- In case you don?t have a Heroku account already, create one here.
- Again, if you don?t have this already, install heroku-cli. More details on that here.
- Go to your terminal, and log in to Heroku by running heroku login and entering your credentials when prompted.
- Create your Heroku application by running the following command in the terminal (and, of course, replacing my-app with the name of your own app).
heroku create my-app
At this point, you should have two Git remotes for your app: the original one and the one that was created by Heroku. In order to check this, just run git remote.
5. When Heroku starts your application, it is going to try to run the start script in your package.json. Therefore, this script should be changed to:
“start”: “node server/server.js”
6. Push your code to the Heroku remote repository.
git push heroku master
And that?s it! Your React app should now be deployed to Heroku!
You can open it directly from the terminal by running heroku open.
That?s all, folks!
Please let me know if you give this a try and run into any trouble or if anything I wrote here is not clear or easy to follow. I am always open to feedback.

