Introduction to React Navigation 5 and the differences from previous versions

React Navigation ? the standard routing solution for native apps
This article aims to help the reader get started with React Navigation that, covering the differences from previous versions of the package and some of the implications on your codebase. We?ll be discussing concepts and integration based on iOS, but the same concepts can also be applied to Android based projects too.
React Navigation 5 has now had its public release, that has come with a large amount of changes to the package, including component based rather than declarative navigator configuration, the compartmentalisation of the framework into various package using the @react-navigation/ group prefix, an expansion of the navigation prop with the introduction of the route prop, new hooks, and more.
These range of changes have made it easier to implement navigators within components, and at the same time giving the API more expandability, especially when it comes to theming and conditionally embedding navigators ? such as controlling which navigators are rendered depending on whether the user is signed in or out of the app.
A big effort has also been made to align the package with the latest React advancements, that include custom hooks and supporting projects that only adopt functional components. Hooks are preferred over HOCs, becoming extremely evident given the React Navigation organisation have now moved HOCs into a ?Compatibility package? called @react-navigation/compat. HOCs are therefore obsolete if you opt to use hooks, that offer a more streamlined API, but the compat tools are there to support projects that wish to upgrade one API at a time.
The React Navigation organisation have posted a document attempting to outline the changes from v4 to v5. It is worth reading for those familiar with React Navigation. If you are new to the package, check it out after this article.
React Navigation background
React Navigation has become the go-to routing solution for both iOS and Android projects in React Native; it is the standard library used to configure the navigation system within native apps, allowing the developer to easily configure their screen flow with a range of ?navigator? types, that range from stack navigators (incrementally navigating deeper into a screen hierarchy), tab bar navigators (top or bottom tab bars that switch screens), and drawers (a modal that slides in and out from one side of the screen). React Navigation is a routing framework and is fully customisable by design, meaning developers can develop their own screen flows, too.
The framework itself, that now consists of a collection of packages, is well maintained. One can see this by visiting the frequent releases on GitHub where the main packages are regularly updated and documented. A good indication of adoption rate is the weekly downloads of the @react-navigation/native package, a dependency required by every project using the framework. It has been on an upwards trajectory since its public release at the start of the year (2020), showing positive signs of adoption given the drastic changes in the API.
With the strong response to the latest release, React Navigation is now probably in the strongest position in its history. A bit of time has also passed since those major API changes have been announced to, so we can safely assume they are here to stay and the developer community support them. If you were on the fence about upgrading your projects to the latest version, now would be a good time to make the change.
Moving the article forward, we?ll now install React Navigation 5 within a React Native project and discuss some of the changes, before moving onto embedding the various navigators, as well as the range of hooks now available.
Installing React Navigation
The official documentation have a detailed getting started document that details the packages needed to get React Navigation up and running. Simply install the core package, @react-navigation/native, with yarn:
# core packageyarn add @react-navigation/native
React Navigation also relies on other dependencies, that they instruct you to install straight after the above package. The versions of these dependencies differ whether you are in an Expo managed environment or a bare workflow, where installing these with expo will ensure the correct versions are installed:
# installing dependencies for expo projectsexpo install react-native-gesture-handler react-native-reanimated react-native-screens react-native-safe-area-context @react-native-community/masked-view# or# installing dependencies for bare workflowyarn add react-native-reanimated react-native-gesture-handler react-native-screens react-native-safe-area-context @react-native-community/masked-view
If your version of React Native is < 0.60.0, you will need to link these packages. This article assumes that automatic linking is being used. Also note that pods (Cocoapoads) must be installed too, to manage native iOS dependencies. Running npx pod-install ios install this if you haven?t already.
React Navigation also relies on react-native-gesture-handler, a package that provides APIs to interact with a device via its native touch and gesture system, thus making UX interactions smoother and less processor intensive (E.g. cutting out middleware between the JavaScript layer and Objective-C layer, in additional to utilising the multi-threaded nature of Native APIs as opposed to React Native?s thread limitations). react-native-gesture-handler is simple to install, only being required in your app?s entry file (most likely App.jsx for React Native apps, or App.tsx in a Typescript environment).
// App.tsximport ‘react-native-gesture-handler’import React from ‘react’…
This covers the core package installation. We can now explore how to set up some navigators within a project, as well as the packages associated with them.
Navigators Overview
As we?ve already ascertained, React Navigation 5 have compartmentalised their various navigators and utilities into separate dependencies. This offers a more streamlined way to manage components, and suggests that each navigator has a radically different implementation to justify this separation. With React Navigation being split into various packages, your projects will also contain slightly less source code, a small but notable improvement.
If you think of each screen in a navigator as a component, you understand how navigators work. A navigator simply injects components (JSX to render for each screen) into their containers, and provide APIs to navigate between them in the process.
Navigator Setup
Navigators need to be wrapped in the NavigationContainer object supplied by @react-navigation/native, that acts as a context that provides navigation state. Import and wrap your navigators with it like so:
import { NavigationContainer} from ‘@react-navigation/native’export const App = () => { return ( <NavigationContainer> {/* navigators go here */} </NavigationContainer> )};
NavigationContainer sits at the top level of your component hierarchy, although other contexts, your Redux store, or other utilities like cookie or custom theme management should wrap NavigationContainer.
A Note on Theming
Although theming is not a focus of this article, it is important to highlight here the major differences of themes from version 4:
- Themes can be supplied via the theme prop of NavigationContainer, where you can either import DefaultTheme (supplied by React Navigation), or provide a custom theme object. This differs from the previous version where you just supplied either a dark or light value to the theme, a somewhat unconventional way of component theming.
- As navigators are now defined as components and not declared as a JSON configuration, themes can now be imported on a per-navigator basis, and do not actually have to be imported via the theme from of NavigationContainer.
The following example takes the DefaultTheme object of React Navigation, and amends a couple of its properties before embedding it in NavigationContainer?s theme prop. This demonstrates how to use the supplied theming (that I personally think they nailed as a vanilla light and dark mode), and then apply your own tweaks to match your own colour scheme:
…import { NavigationContainer, DefaultTheme } from ‘@react-navigation/native’export const App = () => { // some custom theme context const { theme } = useTheme(); // overwrite `DefaultTheme` properties based on my theme const MyTheme = { …DefaultTheme, colors: { …DefaultTheme.colors, background: theme.bodyBg, primary: theme.priCol, }, }; //apply `MyTheme` to `NavigationContainer` theme prop return ( <NavigationContainer theme={MyTheme}> … </NavigationContainer> );}
Strangely, the theme prop is not mentioned in the official App Container docs, but is indeed demonstrated on the dedicated Theming page. Nonetheless, check out the prior to see the remaining props of NavigationContainer ? if in fact more haven?t been left out of the official documentation.
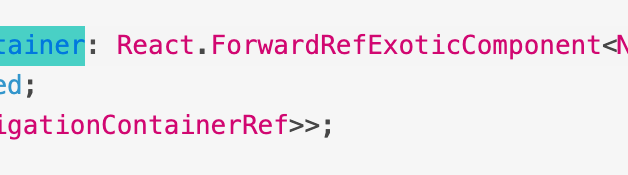
For those interested, it appears from the TypeScript declarations that theme was not originally planned to be added to NavigationContainer, and was slapped on as an additional type:

If you are using VSCode as your IDE, CMD + Click NavigationContainer to open its implementation. Simply hovering over the component in TypeScript environments will display its signature and types.
Navigator Components
There are 3 main navigators that React Navigation comes bundled with, that are suitable for both iOS and Android based projects. These navigators and their respective packages are as follows.
Stack Navigator
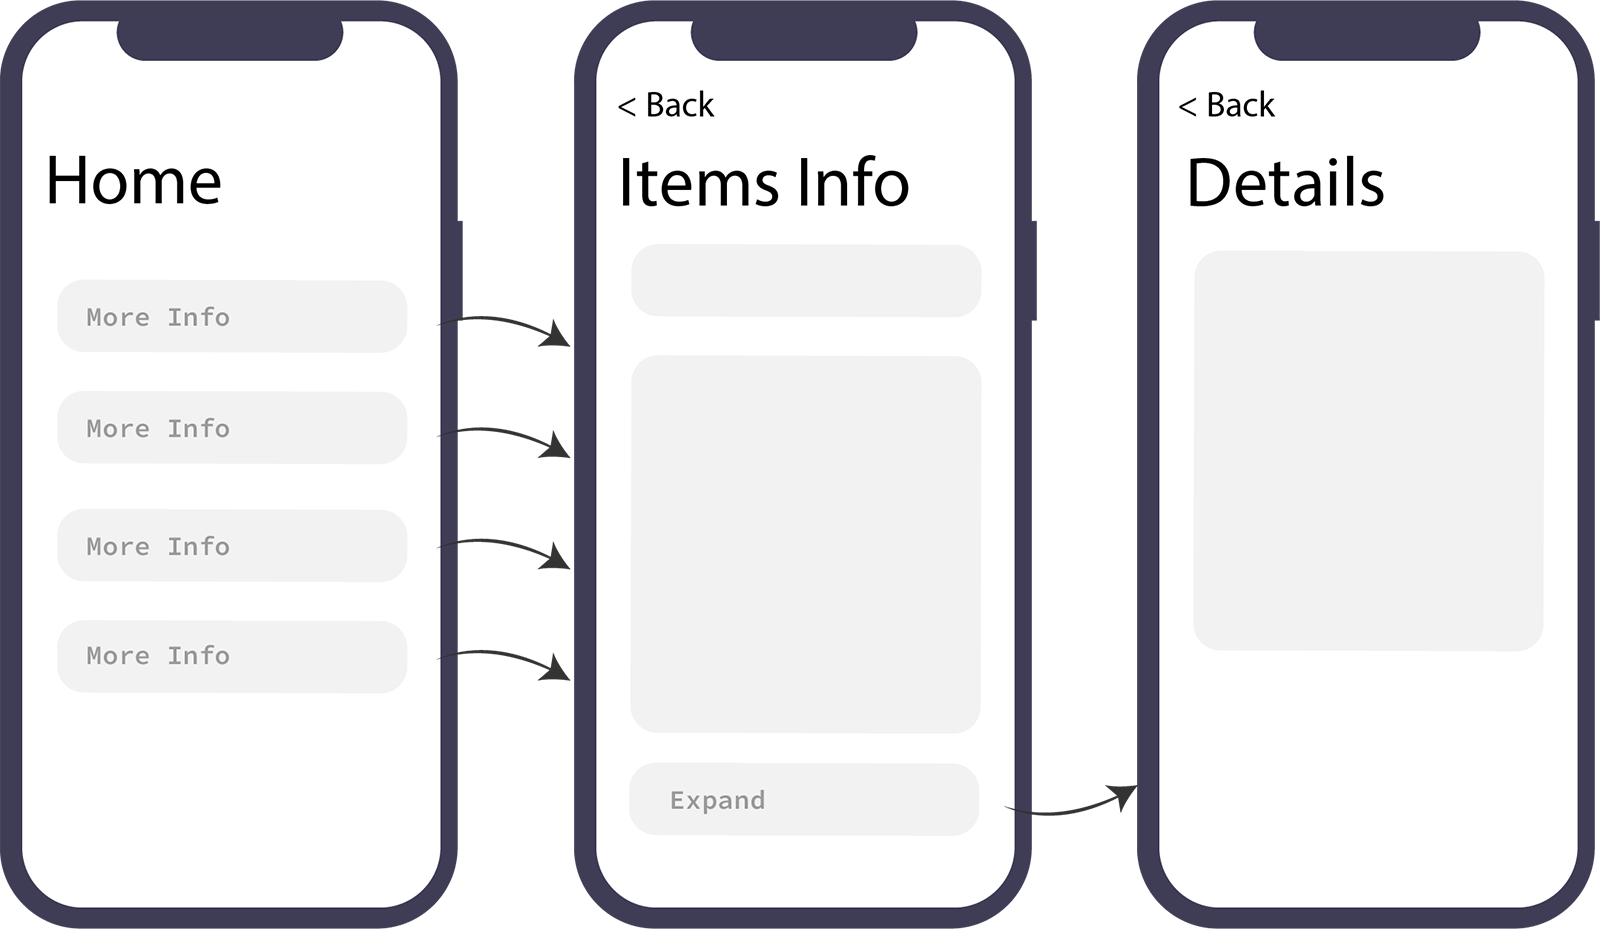
@react-navigation/stack (official doc): The most vanilla navigator you?ll find, a Stack navigator will navigate from screen to screen in a hierarchical fashion:
To set up a stack navigator, declare a stack navigator object via the createStackNavigator method. From here, the Navigator and Screen components derived from this method can be used to embed and wrap your desired screens:
import { createStackNavigator } from ‘@react-navigation/stack’const DashboardStack = createStackNavigator();function Dashboard() { return ( <DashboardStack.Navigator mode=’modal’ headerMode=’none’> <DashboardStack.Screen name=”Home” component={HomeScreen} /> <DashboardStack.Screen name=”Stats” component={StatsScreen} /> </DashboardStack.Navigator> );}
This pattern of declaring a new navigator and taking the resulting Navigator and Screen components is consistent throughout all the supplied navigators.
As you can see, the component-based declaration differs a lot from the previous version, but is quite self explanatory. Notice the mode and headerMode props of DashboardStack.Navigator ? these may be familiar to you if you have used React Navigation 4.
Essentially, the navigationOptions properties are now represented as props, all of which have been documented here.
In addition to this, each DashboardStack.screen also support an options prop to customise navigation options on a per-screen basis. Instead of defining headerMode=’none’ fort the entire navigator, we could disable the header to individual screens using options:
<DashboardStack.Screen name=”Home” component={HomeScreen} options={{ headerShown: false }}/>
There are quite a few ways to manipulate the header through options ? check out all the options properties here.
Bottom Tabs Navigator
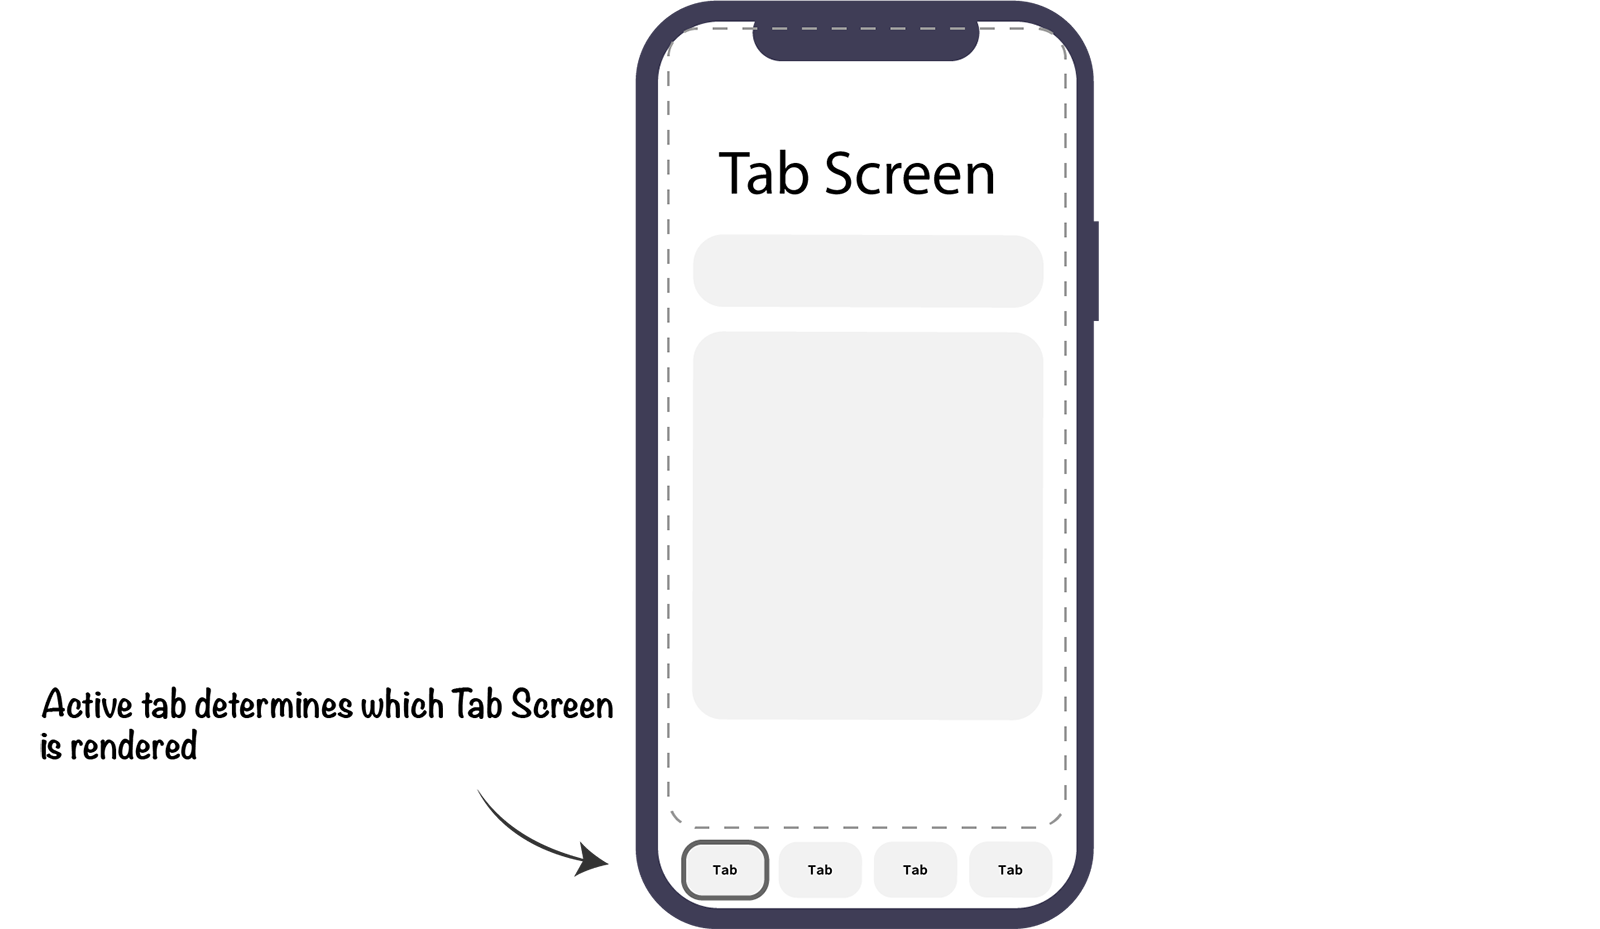
@react-navigation/bottom-tabs (official doc): Another valuable navigator that will set up the boilerplate for a tab bar navigator, popular amongst dashboard designs. This tab bar navigator offers quite a comprehensive solution, allowing the developer to customise the look and feel of tabs with ease.
The following gist demonstrates how to construct a Bottom Tabs navigator, with some customisation with SVGs and styling:
Again, the bulk of syntax may look similar to the previous version of React Navigation, with a couple of key differences:
- We?re now configuring the tabs within a screenOptions of the navigator component, where the tabBarIcon property is returned.
- screenOptions now provides a route prop (more on that further down) that provides context on the currently active screen. This is now used in your switch statement to determine the icon SVG.
- The tabBar options prop is also a part of screenOptions, that allows you to configure additional styling of the tab bar.
- Each Tab icon is embedded via JSX with a <BottomTabs.Screen /> component within the <BottomTabs.Navigator /> component.
All the props and more screenOptions examples are documented at the official docs, as well as a dedicated Tabs Navigation guide being available to read through.
Stack navigators can be nested within bottom tab navigators, but the bottom tabs UX will remain as you are navigating through the stack hierarchy. This may be what you intend to do, but in most cases, displaying tabs within deep hierarchies is confusing UX. To get around this, you can link from one screen to another screen in another navigator, that we?ll cover further down.
Drawer Navigator
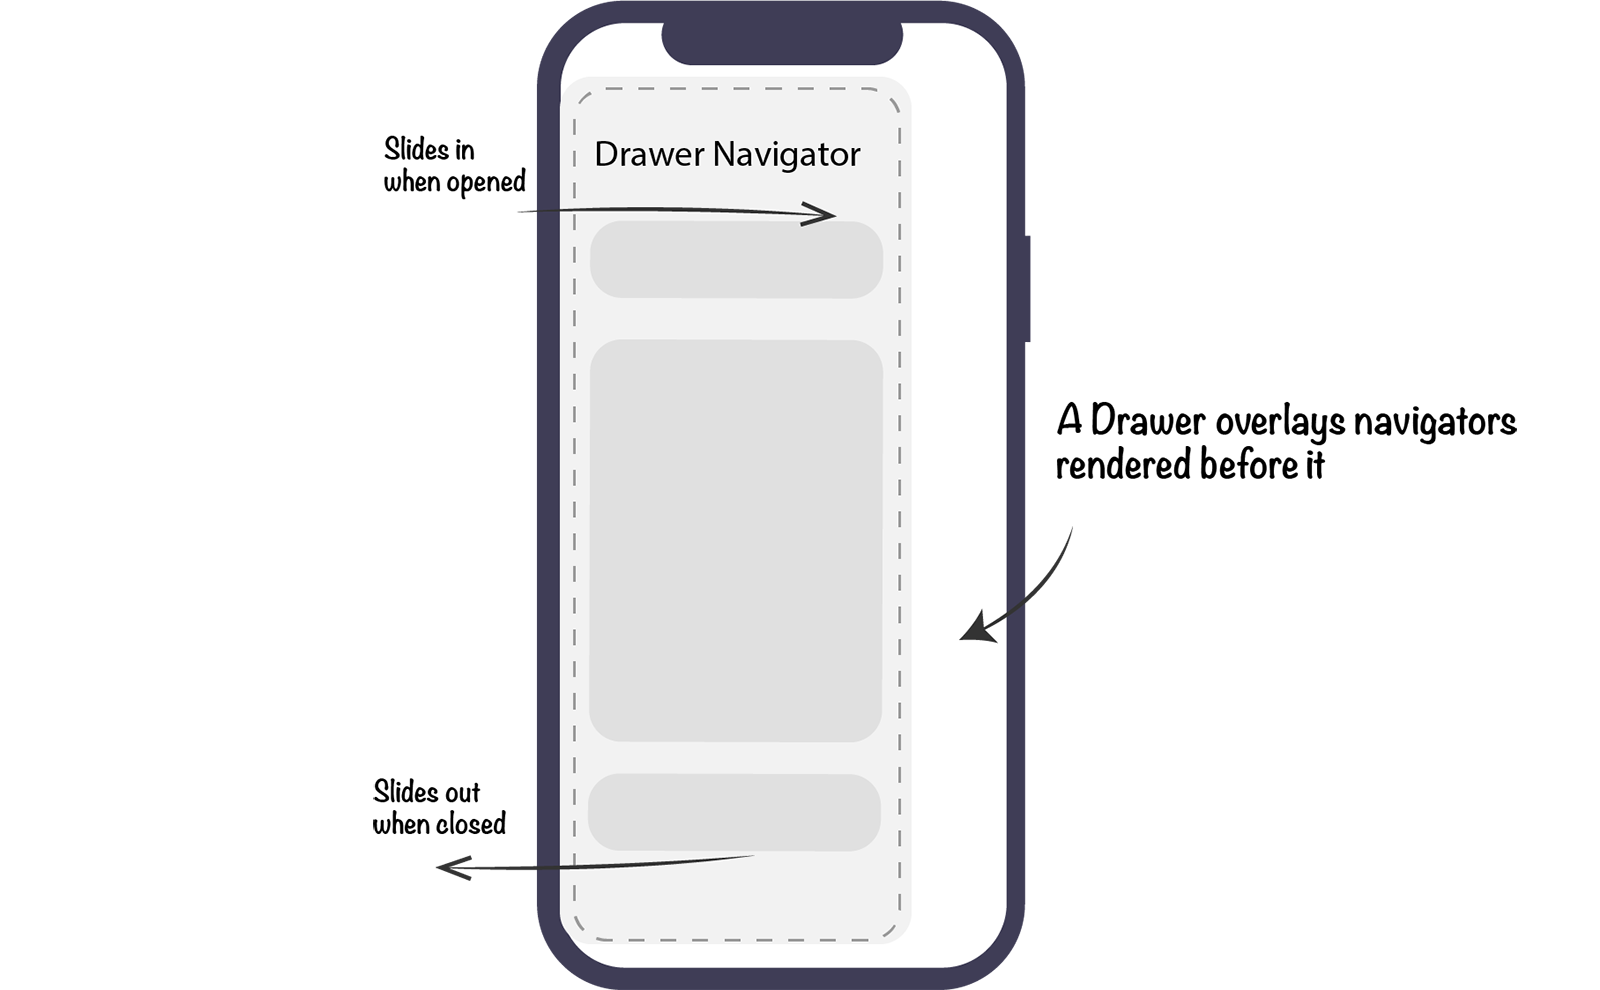
@react-navigation/drawer (official doc): Another useful navigator that allows screens to animate from one side of the screen to be revealed, and animate back when closed. Stack navigators can be nested within these types of navigators to expand on the content within it:
The Drawer Navigation documentation does a good job covering this navigator, so this article will not delve deeper into it, having covered the previous two navigators that demonstrate the same changes from the previous version. There are some useful props for the Navigator however, beyond screenOptions, that will be commonly used, with openByDefault, drawerPosition, drawerType and minSwipeDistance being some of those.
For completeness, there are two more Android focussed navigators that based on Google?s Material theme design, being createMaterialBottomTabNavigator and createMaterialTopTabNavigator.
These navigators are typically managed by the organisation themselves on GitHub, that can be seen on their GitHub organisation page along with all the other utilities React Navigation offer.
Nesting Navigators
It is common to nest navigators within other navigators, and navigate from one to another. Consider the following setup where a stack navigators are nested within a tab bar navigator:
// nesting navigatorsconst DashboardStack = createStackNavigator();export const Dashboard = () => { return ( <DashboardStack.Navigator> <DashboardStack.Screen name=”Home” component={HomeScreen} /> <DashboardStack.Screen name=”Stats” component={StatsScreen} /> </DashboardStack.Navigator> );}const BottomTabs = createBottomTabNavigator();export const Tabs = () => { return ( <BottomTabs.Navigator … > <BottomTabs.Screen name=”Dashboard” component={Dashboard} /> <BottomTabs.Screen name=”Settings” component={Schedule} /> );}
What if we wanted to navigate from one tab to a particular stack screen in another tab? Well, React Navigation provides a simple API to do so, using the navigate function within the navigation prop. Consider the following button:
// navigating through nested navigators<Button label=”Back Home” onPress={() => { navigation.navigate(‘Dashboard’, { screen: ‘Stats’ }); }}/>
Upon pressing the above button, the tab bar navigator will switch to the Dashboard screen, and the stack navigator within that will navigate to the Stats screen.
More detail on nesting navigators can be found here.
About the new `route` prop
Although the navigation prop is still used in v5, some of its properties have been delegated to a separate route prop, as a means to separate the current route properties from the navigation context. The upgrading from v4 to v5 post has outlined these changes of the navigation prop.
The route prop (at props.navigation.route), is now where the current screen?s data is hosted, that used to be in props.navigation.state.
Concretely, navigation supplies you with methods and context to navigate through your NavigationContainer, whereas route contains data pertaining to the currently active screen. For more info on these props:
- Go to the navigation API reference, that lists all the properties of the object, ranging from goBack, navigate, setParams, and more.
- Go to the route API reference, that details its properties, including the name, key and params properties.
In regards to setting params when navigating, not much has changed. However, there is no more getParam method to fetch params. Instead, params are fetched from route.params in the following fashion:
// getting a param from `route` const myParam = route.params?.myParam ?? ‘defaultValue’;
This is a more generic way of checking whether a param exists and assigning a default value if it does not, rendering the previous getParam utility somewhat obsolete.
Hooks in React Navigation 5
There has also been an introduction of new hooks in React Navigation 5, that make it easier to work with navigators within functional components, as well as put less (or no) reliance on HOCs.
The useNavigation hook for example removes the need for the withNavigation HOC that was depended upon before, that will fetch the navigation object from the navigation container?s context:
// useNavigation hook import { useNavigation } from ‘@react-navigation/native’;function MyComponent() { // get navigation without passing it down in props const navigation = useNavigation(); …}
This totally replaces withNavigation, that is now a part of the Compatibility layer of utilities.
useRoute can also be used to obtain the route object discussed in the previous section. There are a few more hooks to be aware of when upgrading from v4:
- useFocusEffect: triggered when the screen in question is focussed. This can replace an event listener setup that you may have relied upon in previous versions.
Event listeners are still supported, but have been simplified. There are now two events of navigation, focus and blur. Before, we had didFocus, willFocus, didBlur and willBlur to play with. focus can be implemented within useEffect like so:
let focusListener = null;useEffect(() => { focusListener = navigation.addListener(‘focus’, async () => { // do something }); return (() => { if (focusListener.remove !== undefined) this.focusListener.remove(); }) }, );
Notice that focusListener is null by default, as useEffect hooks are triggered after the component renders.
- useIsFocused simply checks whether the current screen is focused and returns either true or false.
- useLinking deals with deep linking within your app. To read more about deep linking for iOS, that walks through Universal Links and URL Schemes, check out my article: Deep Linking in React Native with Universal Links and URL Schemes.
- Used less frequently will be the useNavigationState hook and useScrollToTop hook, which may be useful for particular use cases you may find yourself implementing.
Where to go Next
This article has acted as a getting started vehicle to React Navigation 5, explaining the core concepts of navigators and how to implement them, and has highlighted the major differences from previous versions.
To continue endeavouring into these changes, refer to the Upgrading from v4 to v5 documentation, that acts as a guide for those already familiar with React Navigation concepts.
React Navigation 5 certainly feels simplified and more inline with component patterns in React, with a heavier reliance on components and props. This brings more flexibility to being additional contexts, such as theming, into components on a per-navigator basis, and brings equal support to both class and functional components ? with a bias towards the latter with the reliance on hooks.
Upgrading to the latest version of React Navigation may appear like a daunting task for larger projects, but I would recommend doing so, that will tidy up your project structure and bring more customisation to the style of your navigators. Documentation for the previous versions will progressively be harder to find as more article are published aimed for the newer releases.
React Navigation 5 was in a public pre-release state for a number of months, but now the APIs are in a finalised state, it is definitely a good time to upgrade.

