
As summer arrives and amidst ongoing public concerns about Zika Virus and its transmission by mosquitoes, the single most effective thing a homeowner can do to minimize the presence of mosquitoes is eliminate standing water wherever it occurs.
Because mosquitoes lay their eggs in still water, puddles and standing water can become a breeding ground after just one week, according to the Centers for Disease Control and Prevention. That?s why that low spot in the backyard where water always collects is now much more troublesome than just being an eyesore.
Homeowners may think solving their drainage problems will be difficult and costly, or that they?ll end up with an ugly drainage ditch on their property. But, it is possible to eliminate standing water cost-effectively and attractively by building one of the most popular and common solutions for getting rid of standing water, a French drain.
What is a French Drain?
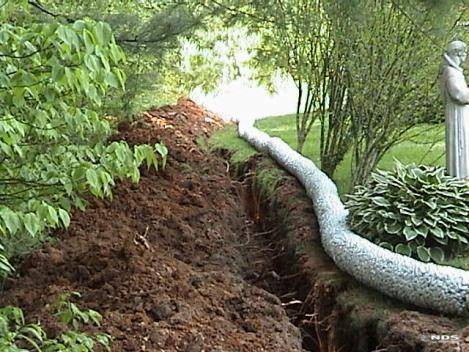
A French drain is a gravel-filled trench that includes a perforated or slotted pipe. It is used to direct surface water or groundwater away from a specific area, such as a home?s foundation. French drains direct surface level water toward the lowest point and allow it to seep through the surface level gravel into the drain. This gravel also blocks the passage of excess debris. The water is then collected in the perforated pipe, running at the base of the drain, and directed away from the home and toward a more suitable area for daylighting or infiltration. French drains differ from typical surface drains because they collect water over the entire length of the drain instead of one particular spot.
How Does a French Drain Work?
Remember that liquid always seeks out the lowest point it can reach along the easiest path, readily moving into empty pockets in loose soil. That?s the secret to a French drain: It provides a reliably easy path, creating a sunken channel that encourages water to percolate out of the surrounding soil and flow along a smooth course. Leveraging gravity is essential for a French drain to function properly, as it first forces water down from the surface and out of saturated soil, then pulls it along the downward-sloping pipe to the desired discharge point.
Where Should I Install a French Drain?
An easy way to site a French drain is to watch where water pools ? especially if it sits for hours or days ? after a rain. Some of the most common drainage problems homeowners face are:
Flooding in a backyard. If heavy rains have left your yard with an unwanted water feature or the spring thaw has saturated your yard, a French drain can help. Placing a French drain in this wet region allows the drain to collect unwanted water and redirect it to a safer location, giving you back your green space.
Damage to an outdoor patio. Your patio is a great source of pride and a meeting place for family and friends, but excess water can damage the area, deteriorate the pavers, and also create a breeding ground for mosquitoes, ruining your ability to spend time outdoors. A French drain can work as a shield, collecting water before it reaches the patio and diverting it away. This will eliminate the standing water that mosquitoes need.
Damage to a home?s foundation and low-level areas like a basement. Check the walls in your basement. If you notice a musty smell or wet floor, you need a French drain immediately. A French drain can stop this water from ever reaching your home, protecting your basement from flooding and your home?s foundation from incurring additional damage.
What Do I Need to Know Beforehand?
There are many factors to consider before installing a French drain. Slope is essential, as a downhill course must be downhill enough to keep water running along to its intended destination. Generally, a French drain should drop at least one percent in depth for every 100 feet of length.
Other key issues to consider include:
French drain depth: About 8 inches to 2 feet deep should be sufficient for many water-diverting projects, though related systems, such as those built around foundations and sub-ground living spaces, as well as the bases of retaining walls, may be deeper.
French drain aggregate: The size of the gravel used can vary from pea gravel to larger pieces of river rock. If aggregate of different sizes is used, smaller pieces usually go closer to the pipe, while larger pieces sit closer to and on the surface.
French drain pipe length: This really depends on a project?s specific elements. Of course, the pipe should be long enough to carry water from the underground areas where it collects to an end point, where it daylights.
French drain flow: Slope is a big factor in maintaining a free flow of water, as is the aggregate placement and surrounding fabric to prevent debris from clogging the pipe.
How Do I Install A French Drain?
Here?s a step-by-step guide to installing a French drain on your property.
1. Decide on the best location. Determining the best location depends on where the problem areas are located, nearby elevation, and the condition of the soil. Use the design tips above to help with siting to ensure proper slope, depth, and more. When it comes to the soil, sandy soil located in an out-of-the way area is preferred.
2. Prepare to dig. It?s your French drain, but it doesn?t affect only you. City codes must be considered, and you need to be aware of how your newfound drainage solution will affect your neighbors. This is also an ideal time to contact the local utility company to have any underground lines marked before digging begins. Once you start digging your drain depth will need to be anywhere from eight inches to two feet, depending on your needs and available options.
3. Measure the grading. This process begins by pounding two stakes into the ground to mark the dimensions of the trench. A taut string is tied between them, allowing for easy grade measurements as the digging process begins. Regular measuring checks will be performed throughout the process.
4. Dig a trench across the slope. Digging the trench is the most labor-intensive portion of the project and as it is being dug, constant grading measurements are necessary. The width of the trench will depend on how large the drainage problem is. Smaller drainage problems can be handled with a trench that is 5 to 6 inches wide, while larger problems will require a larger trench.
5. Add the fabric. Once the trench has been dug, it will be lined with landscape fabric, and then additional gravel is added. This fabric prevents dirt from mixing with the gravel and promotes water percolation. Once the fabric has been applied, a light load of gravel is shoveled over the top so the corners of the fabric can be wrapped around this gravel, holding it in place.
6. Add the pipe. Place a slotted or perforated pipe at the bottom of the trench. The pipe needs to be directed towards an outlet to drain away from the home.
7. Fill with gravel. The drain is nearly complete. Now the gravel of whatever size you choose will be shoveled in. Once the gravel is in, top it with another layer of landscape fabric and then cover it with topsoil and new sod.
For more information about how to use French drains to solve many of the most common water problems, visit the NDS Home Drainage Center.

