DISCLAIMER:
Hello! If you?re reading this, hopefully you?re having a lovely day. I am writing this disclaimer in August of 2020. Just a heads up, the tutorial you?re about to read was written, by me, in February of 2018. This tutorial has not been updated for the newer versions of Swift/xCode since then. In the wide world of programming that period of time is quite lengthy. A lot has changed since then. (Originally written for Swift 4, xCode V 9)
If you?re interested in getting started this tutorial may still offer a good place to touch down into the world of iOS app development. However, you may run into some things that don?t quite work as expected and require some problem solving. From my experience, this problem solving is actually super beneficial and an inevitable part of becoming a programmer, software engineer or any type of computer related creator. So take that as you will.
All in all, the response from this story has been amazing. It is my first piece of published writing and recently surpassed 100,000 views, which feels amazing! Thank you for taking the time to read it! Anyway, if you?d like to take the time to read the tutorial and give it a shot, have at it!
Introduction
So you?re interested in building mobile games? Maybe it?s the allure of taking off and buying a new car or maybe it?s simply the passion of creating your own game. Whatever your motive is, this tutorial will walk you through the steps of setting your computer up to build apps and creating a simple game from scratch! All the game code is included in the tutorial; no prior knowledge of programming is needed to complete this project.
After you complete this tutorial you will be able to run an IOS app of your own construction on your device or a device simulator. You will understand the basics of designing a game from scratch, how to save data to your device after your app closes, how to render sprites on the screen and you will begin to understand how to use the SpriteKit game engine. I will also walk you through how I designed the Snake game and how you can begin building a game of your own design!
Here is a download link to a slightly modified version of this game available in the App Store: https://itunes.apple.com/us/app/minimal-snake/id1355406338?mt=8 (completely free with no advertisements).
Note: Throughout the article I used the term copy/paste, a reader pointed out to me that this is bad practice and I totally agree. If you want to quickly copy down the code and create a functioning product that is fine, however, you will likely get more out of writing down each line by hand!
Completed Product
Here is a video demonstrating what you will have built and installed to your phone by the end of this tutorial!
Getting Started
In order to follow this tutorial, you will need to set up an Apple developer account and download Xcode (the program used to build IOS apps). Xcode is, unfortunately, only available for Macs; if you have a Windows/Linux machine here is a website that may help you set up Xcode.
These next steps will walk through registering for a free developer account and installing Xcode. If you already have an account and Xcode, you can skip to the next section. In order to get started first visit developer.apple.com and click member center, then sign in with your Apple ID. Go to the Apple Developer Agreement Page and accept the agreement; you now have a free developer account! In order to upload your projects to the app store you will have to pay a 100$ annual fee.
Now that you have a developer account you have to install Xcode. Xcode is available via the Mac App Store. After you have installed Xcode launch the program and click on Xcode -> Preferences -> Accounts -> + and choose Add Apple ID. Login with the Apple ID that used to register for the developer account. Congratulations, you can now test your apps in an iPhone simulator or run them on your personal device!
Beginning the project
Now that you have registered for a developer account and installed Xcode, you can begin developing your first mobile game!
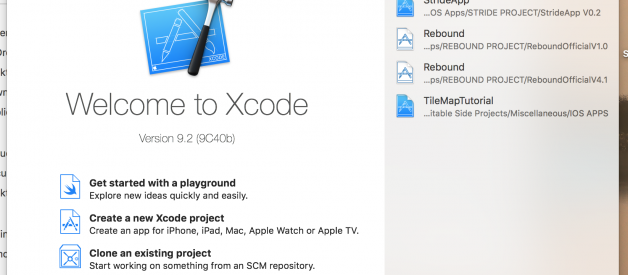
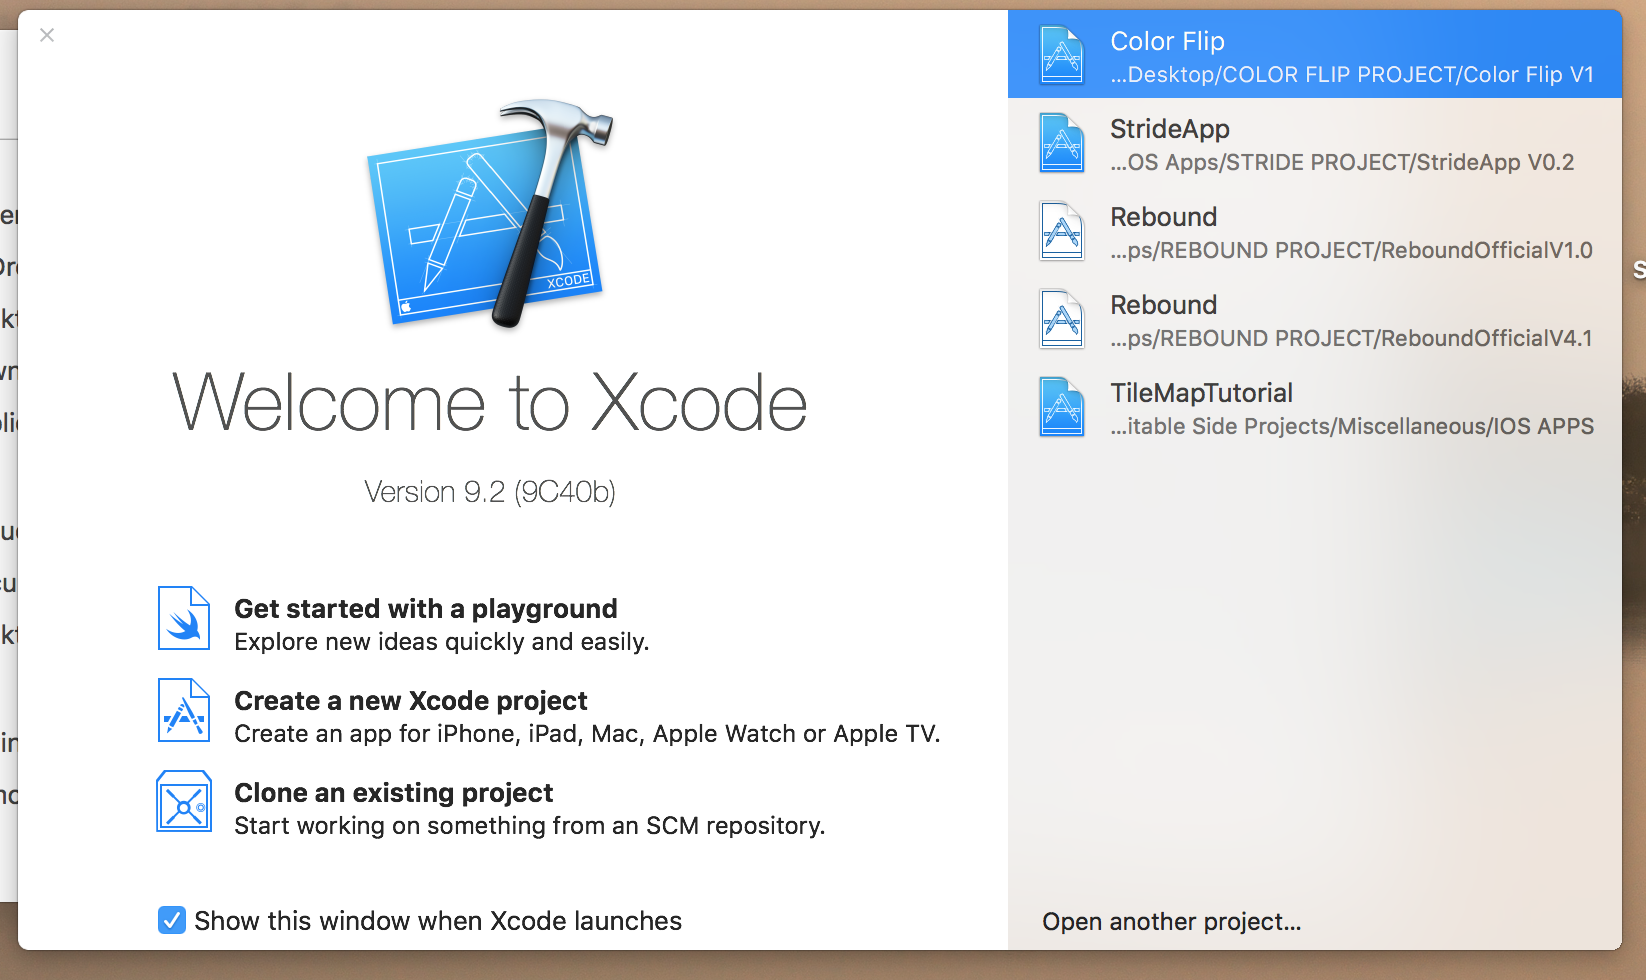
Launch Xcode and click on ?Create a new Xcode project?.
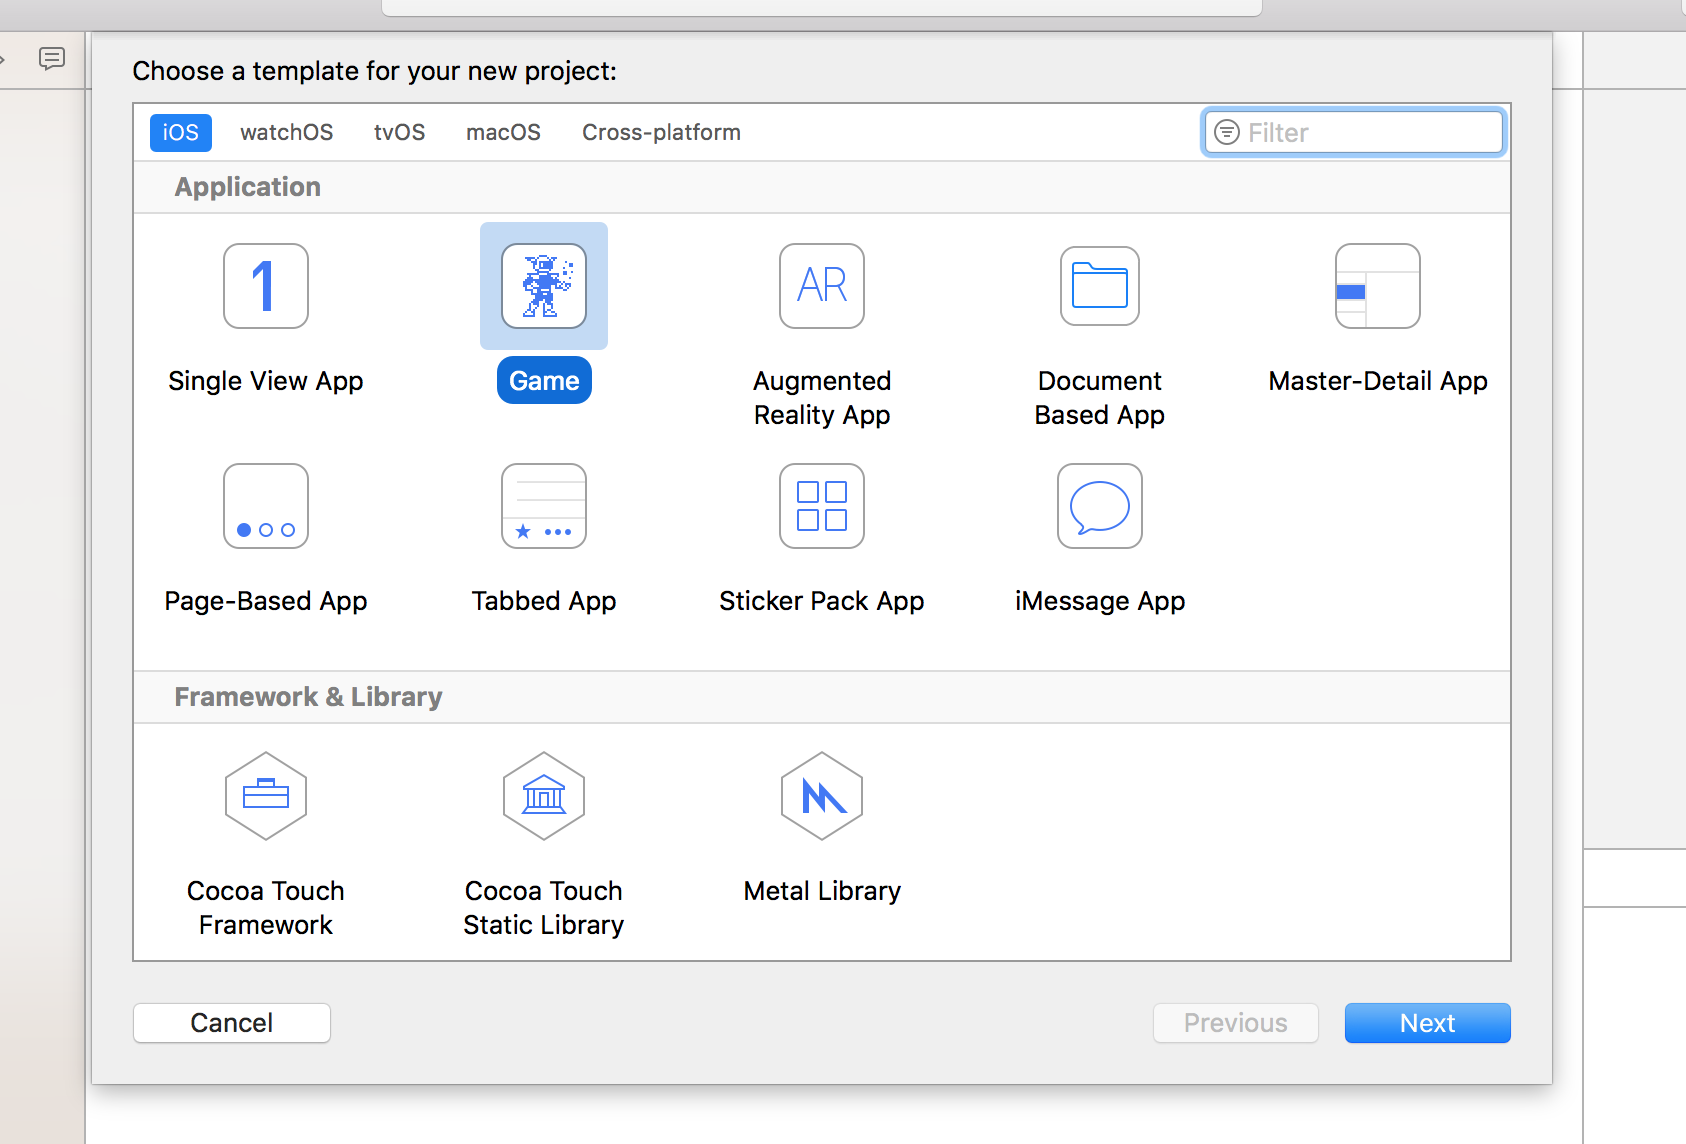
Click on the ?Game? template.
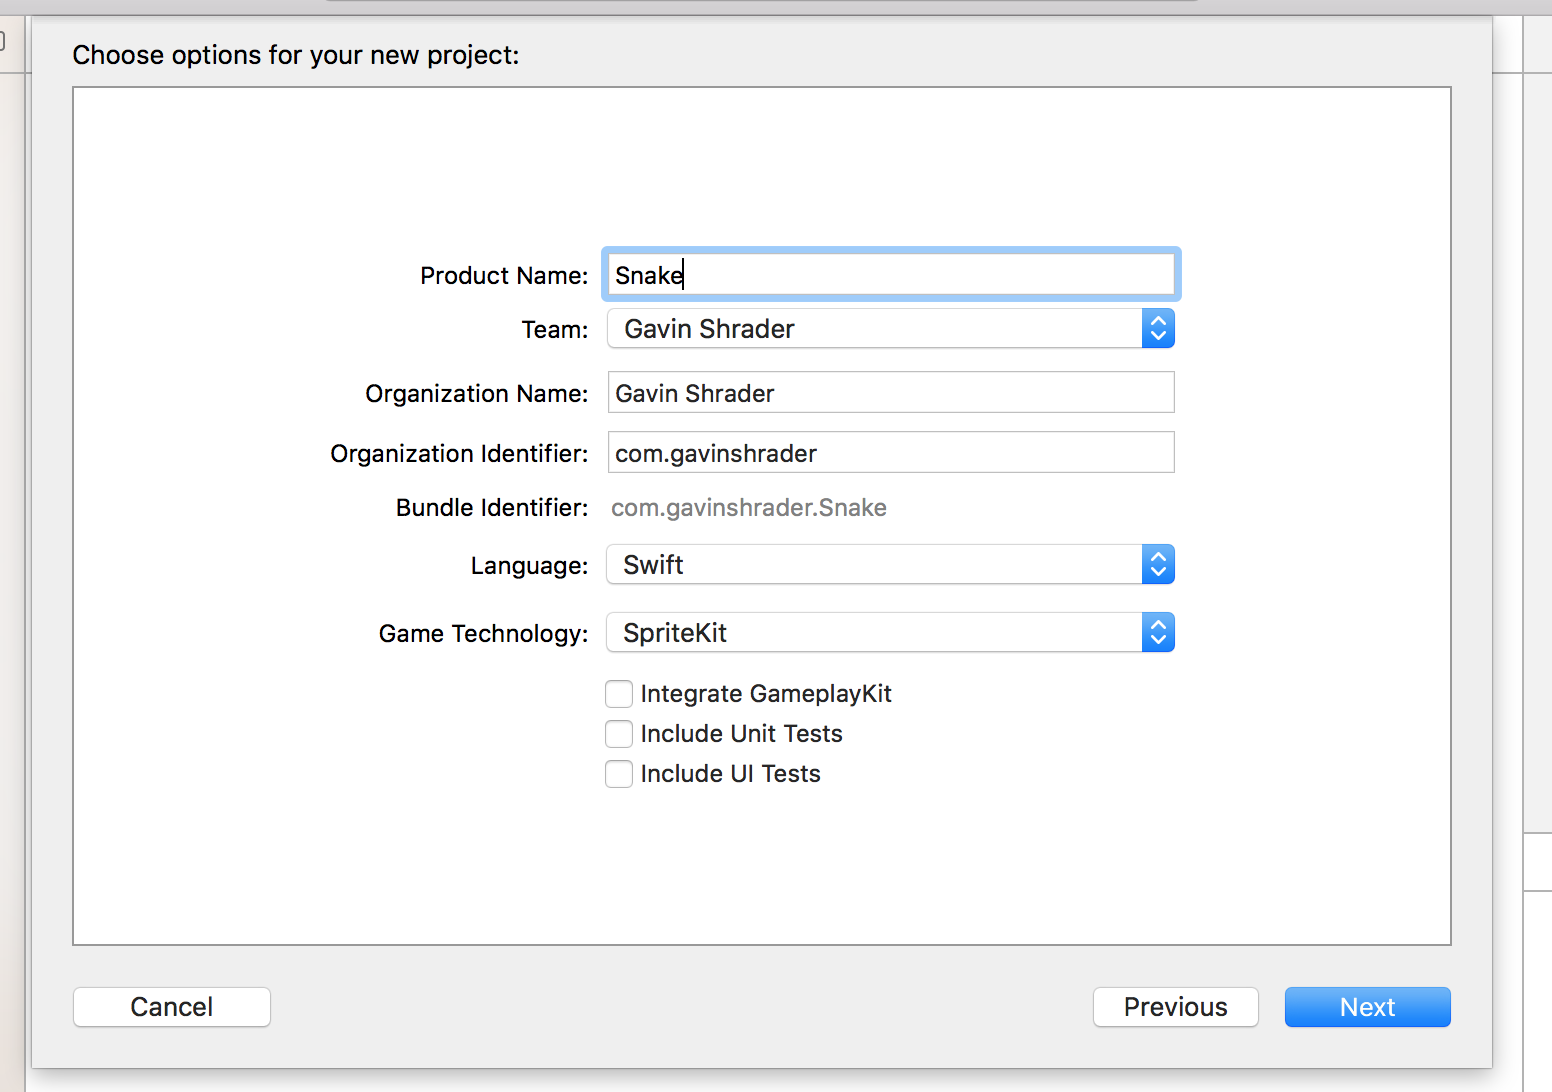
Enter in the name ?Snake? (or whatever you?d like) for your game. Pick an organization name, if you have a website you can enter that backwards (com.gavinshrader), or you can simply use your name as an identifier. Ensure the language is set to ?Swift? and the game technology is ?SpriteKit?. Uncheck the 3 check boxes if they are selected.
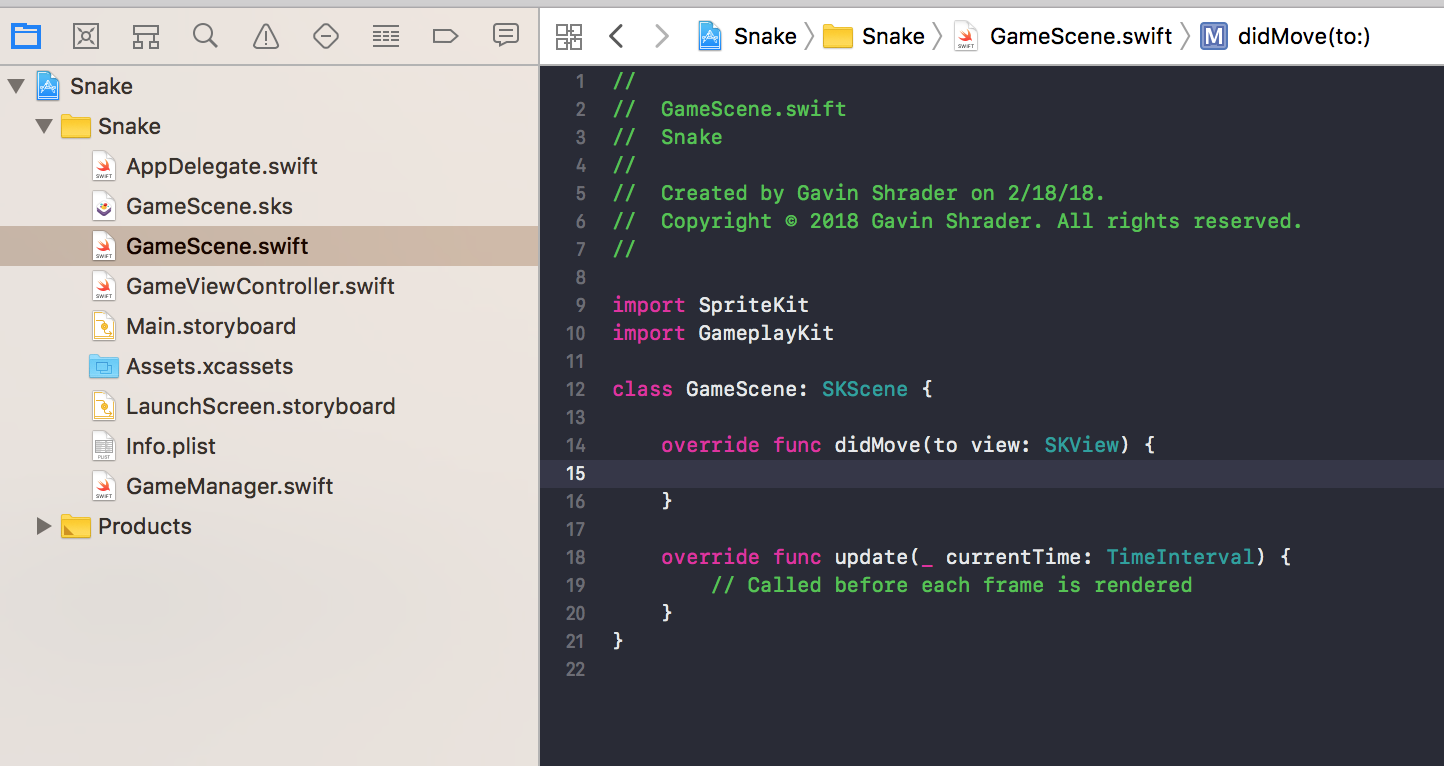
Right click ?Actions.sks? and move to trash. Go to GameScene.sks and click on the ?Hello World? text then delete it. Go to GameScene.swift and remove all the prebuilt code so that your file matches the image below.
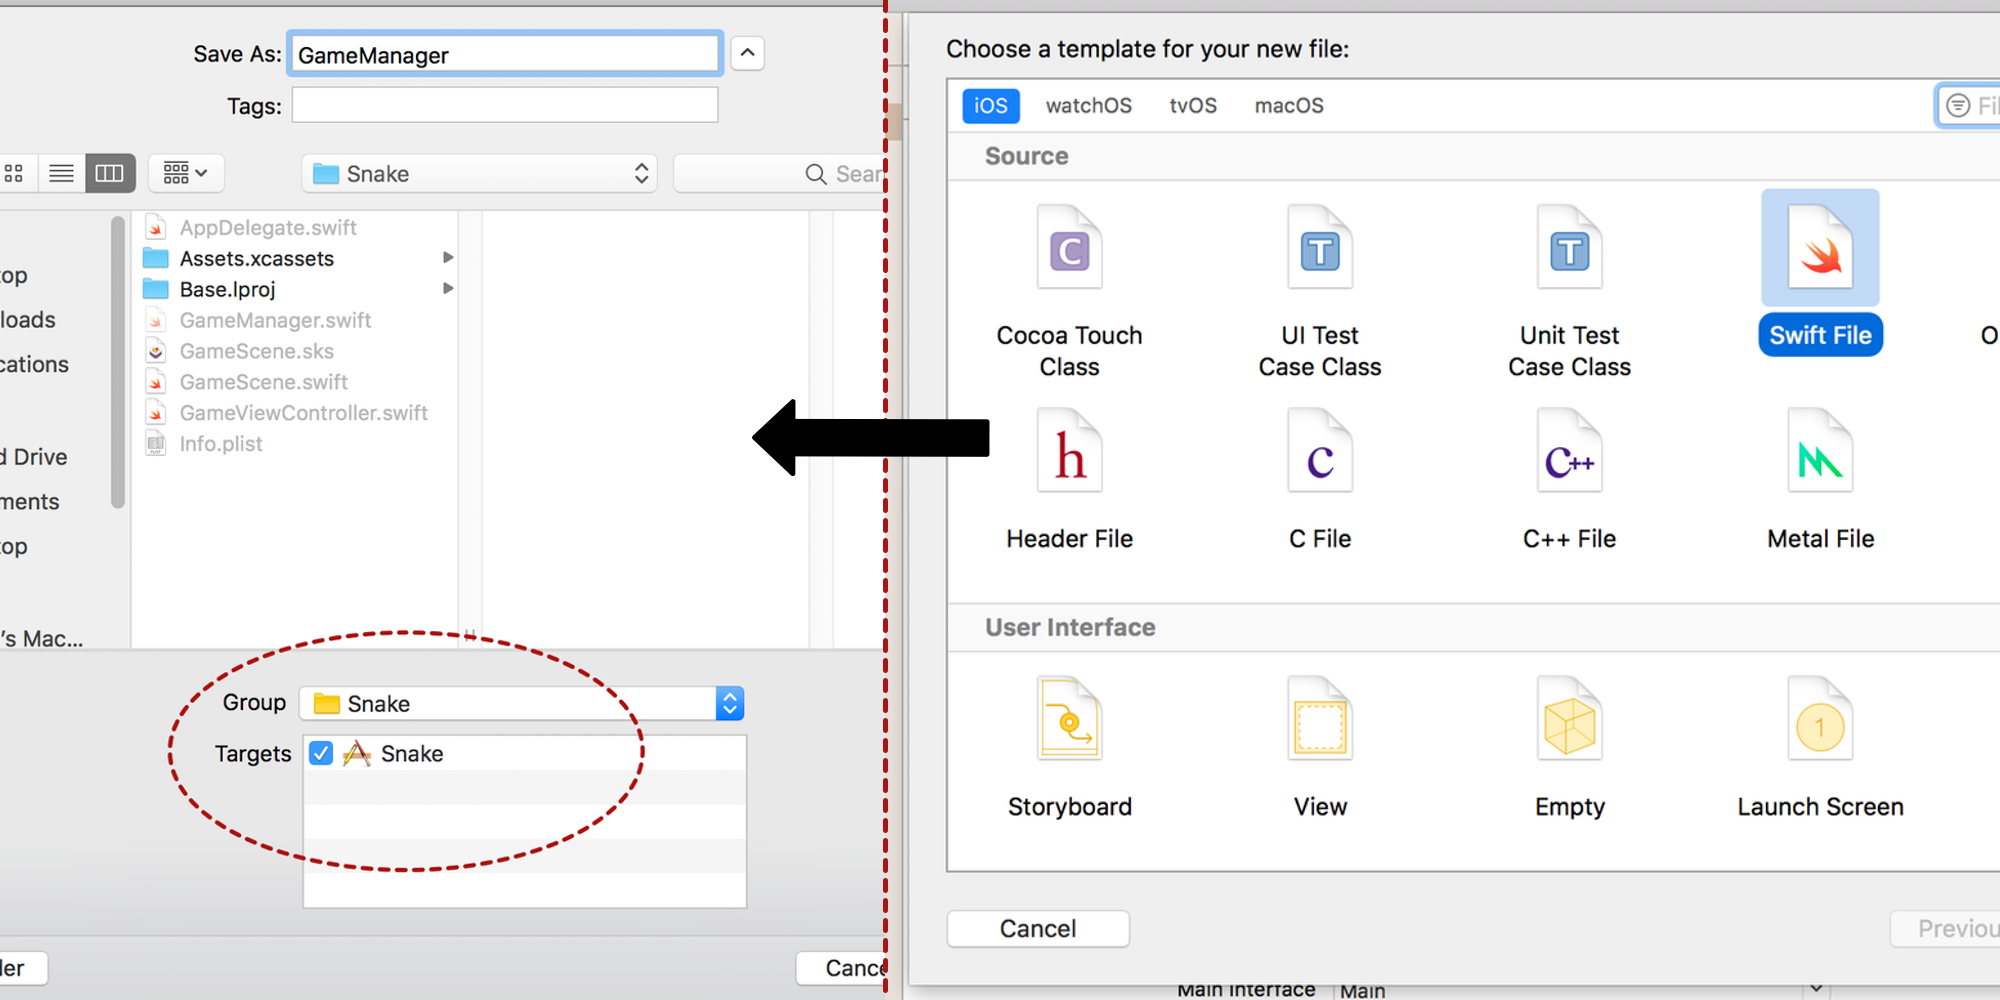
Create a new Swift file either by going to File -> New File and clicking on Swift File, or by right clicking your project folder (?Snake?) and selecting new file. Find the Swift File icon that is highlighted below, if it is not present type ?Swift? in the filter bar. Enter in the name ?GameManager? and ensure that your project (?Snake?) is selected under targets, click ?Create? to create your new swift file.
Building the game?s menu
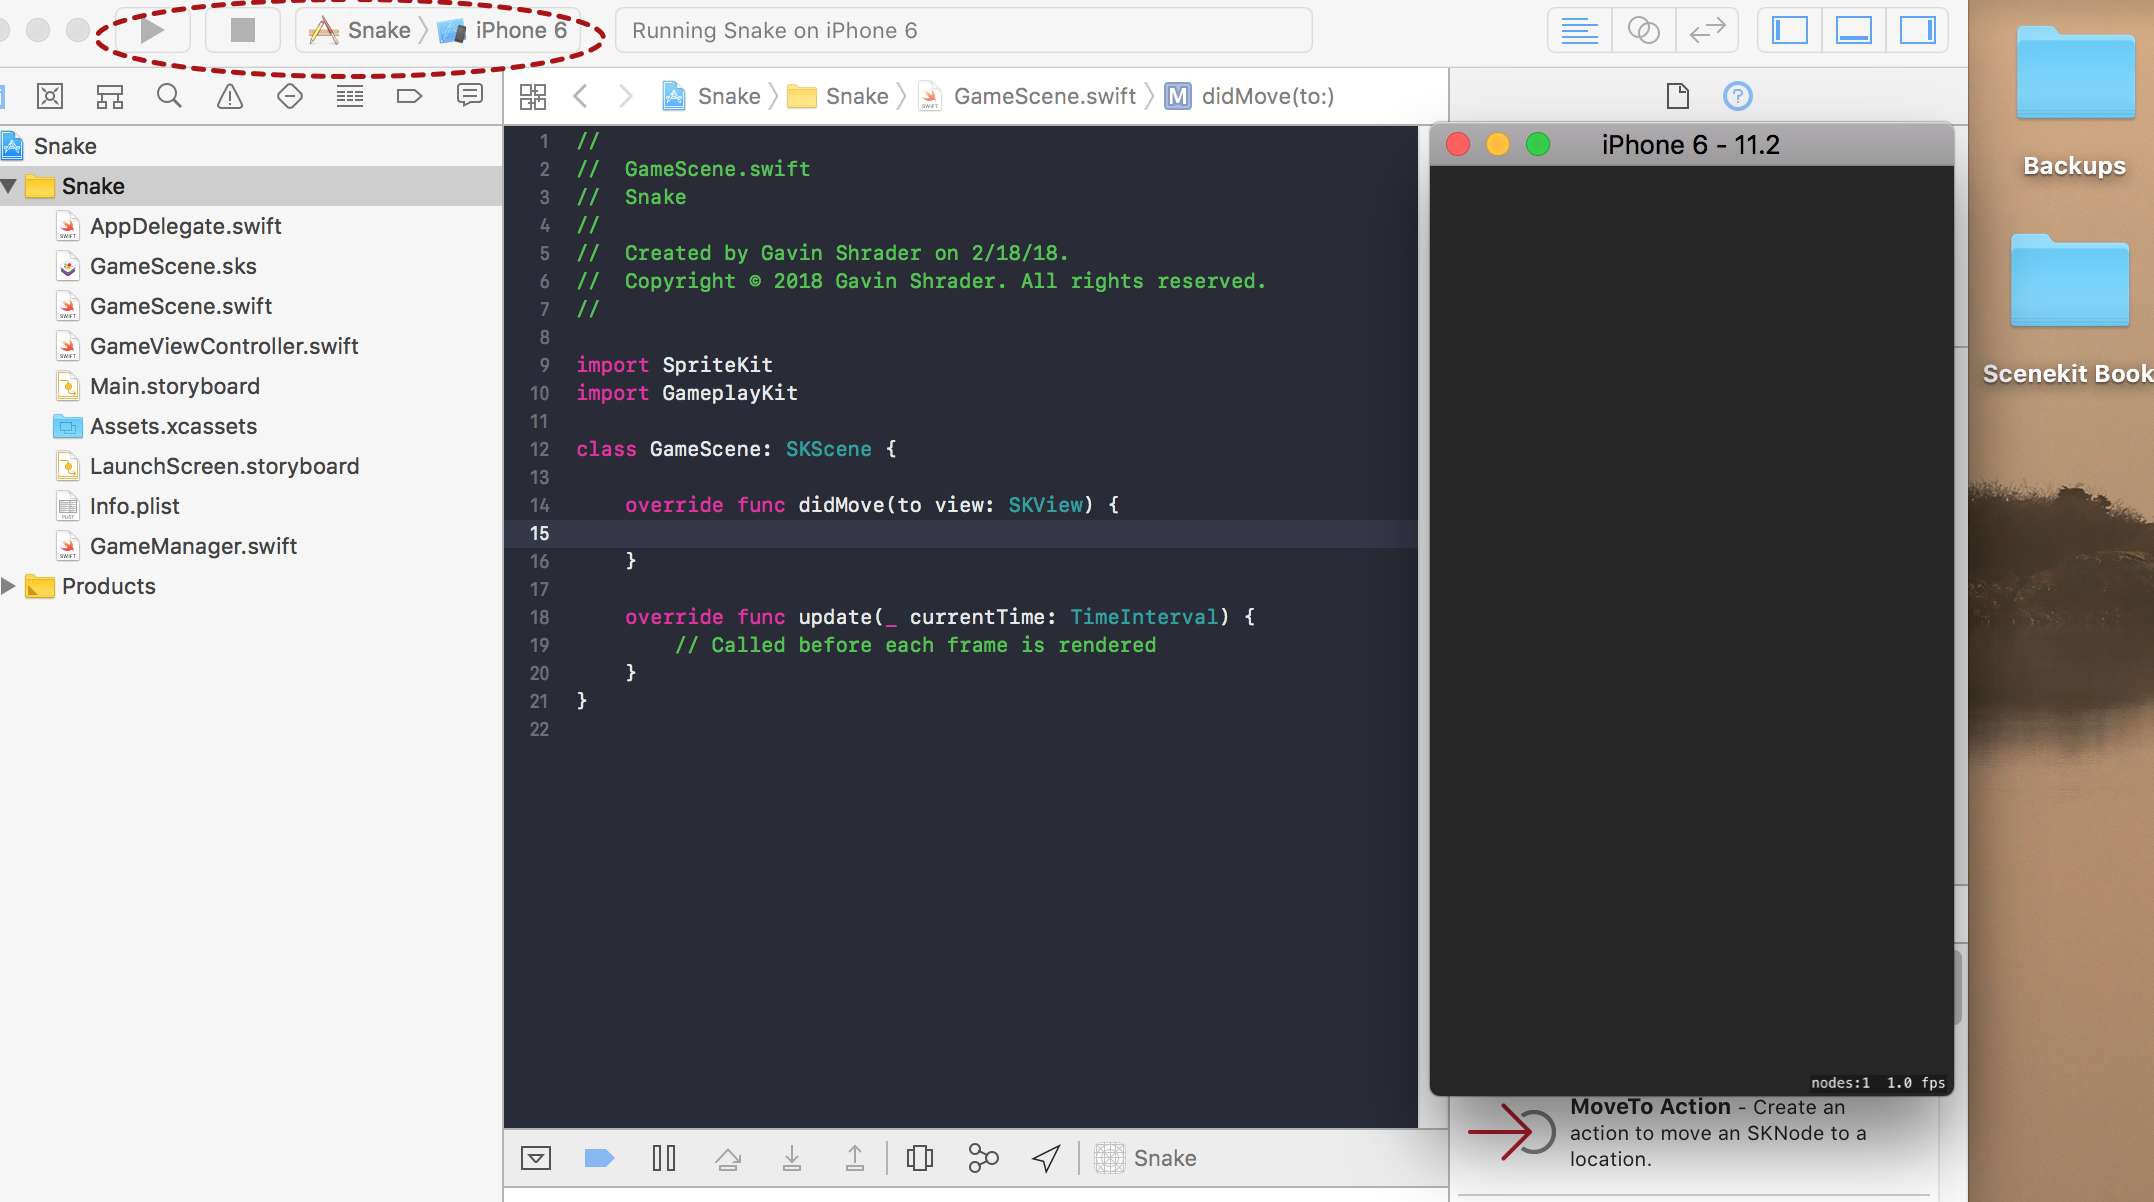
Before we begin coding, check to ensure that your project compiles after the changes you made in the last section. Select a device from the simulator list, click on the button where ?iPhone 6? is, it will likely be labeled ?Generic iOS device?. If you want to test on a physical device plug your iPhone in, give Xcode a few moments and then click on your device. After you have done this click on the triangular run button. If you chose a simulated device this screen should pop up:
If the screen shows ?Hello World? ensure that you deleted the label by going to GameScene.sks, clicking on the label and then selecting delete.
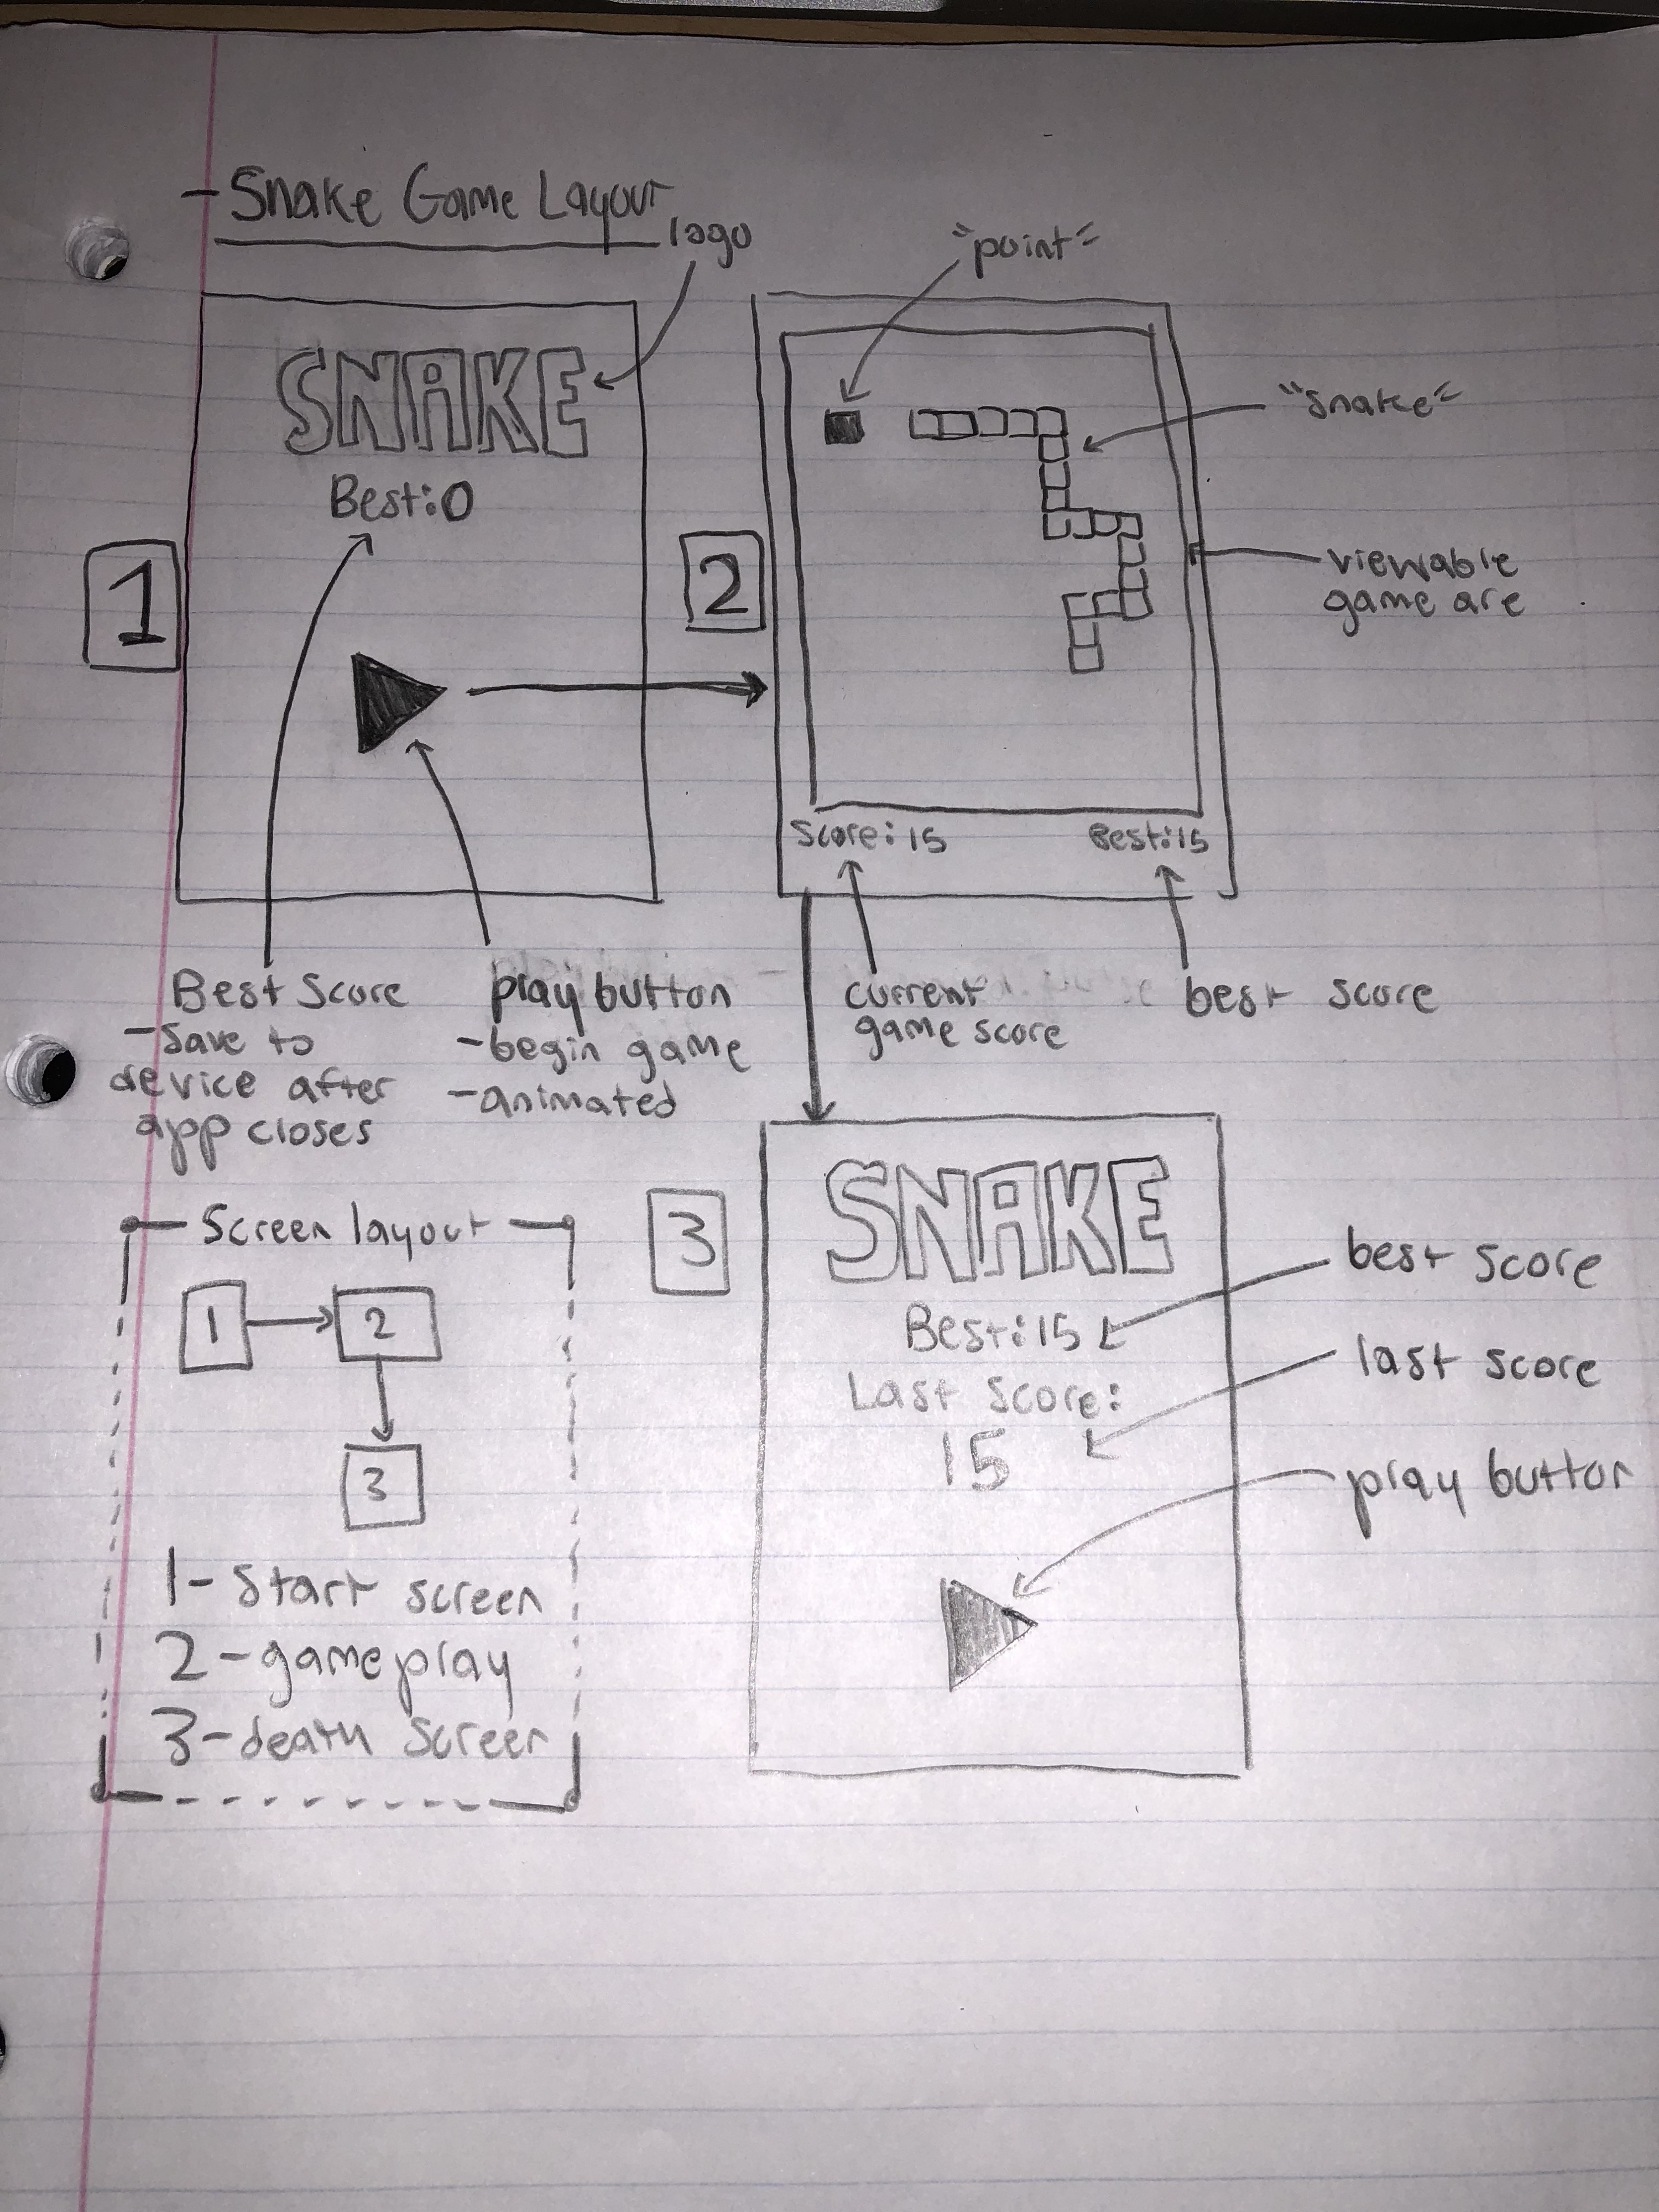
We are finally ready to start building the game! When you begin a game it helps to layout your screens beforehand. In this game we will begin with a simple menu screen that shows the game title/logo. A play button will launch a gameplay screen with a game area and two labels for your current score and best score. When you die the end game screen will display with an option to play again.
In order to get our game running we first have to build a menu to begin the game. We will start by writing code to initialize a menu by adding the game title, a ?best score? label and a play button. Open the GameScene.swift file and copy down all the code from below so that your file matches the image (Figure A).
//1var gameLogo: SKLabelNode!var bestScore: SKLabelNode!var playButton: SKShapeNode!//2 initializeMenu()//3private func initializeMenu() { //Create game title gameLogo = SKLabelNode(fontNamed: “ArialRoundedMTBold”) gameLogo.zPosition = 1 gameLogo.position = CGPoint(x: 0, y: (frame.size.height / 2) – 200) gameLogo.fontSize = 60 gameLogo.text = “SNAKE” gameLogo.fontColor = SKColor.red self.addChild(gameLogo) //Create best score label bestScore = SKLabelNode(fontNamed: “ArialRoundedMTBold”) bestScore.zPosition = 1 bestScore.position = CGPoint(x: 0, y: gameLogo.position.y – 50) bestScore.fontSize = 40 bestScore.text = “Best Score: 0” bestScore.fontColor = SKColor.white self.addChild(bestScore) //Create play button playButton = SKShapeNode() playButton.name = “play_button” playButton.zPosition = 1 playButton.position = CGPoint(x: 0, y: (frame.size.height / -2) + 200) playButton.fillColor = SKColor.cyan let topCorner = CGPoint(x: -50, y: 50) let bottomCorner = CGPoint(x: -50, y: -50) let middle = CGPoint(x: 50, y: 0) let path = CGMutablePath() path.addLine(to: topCorner) path.addLines(between: [topCorner, bottomCorner, middle]) playButton.path = path self.addChild(playButton)}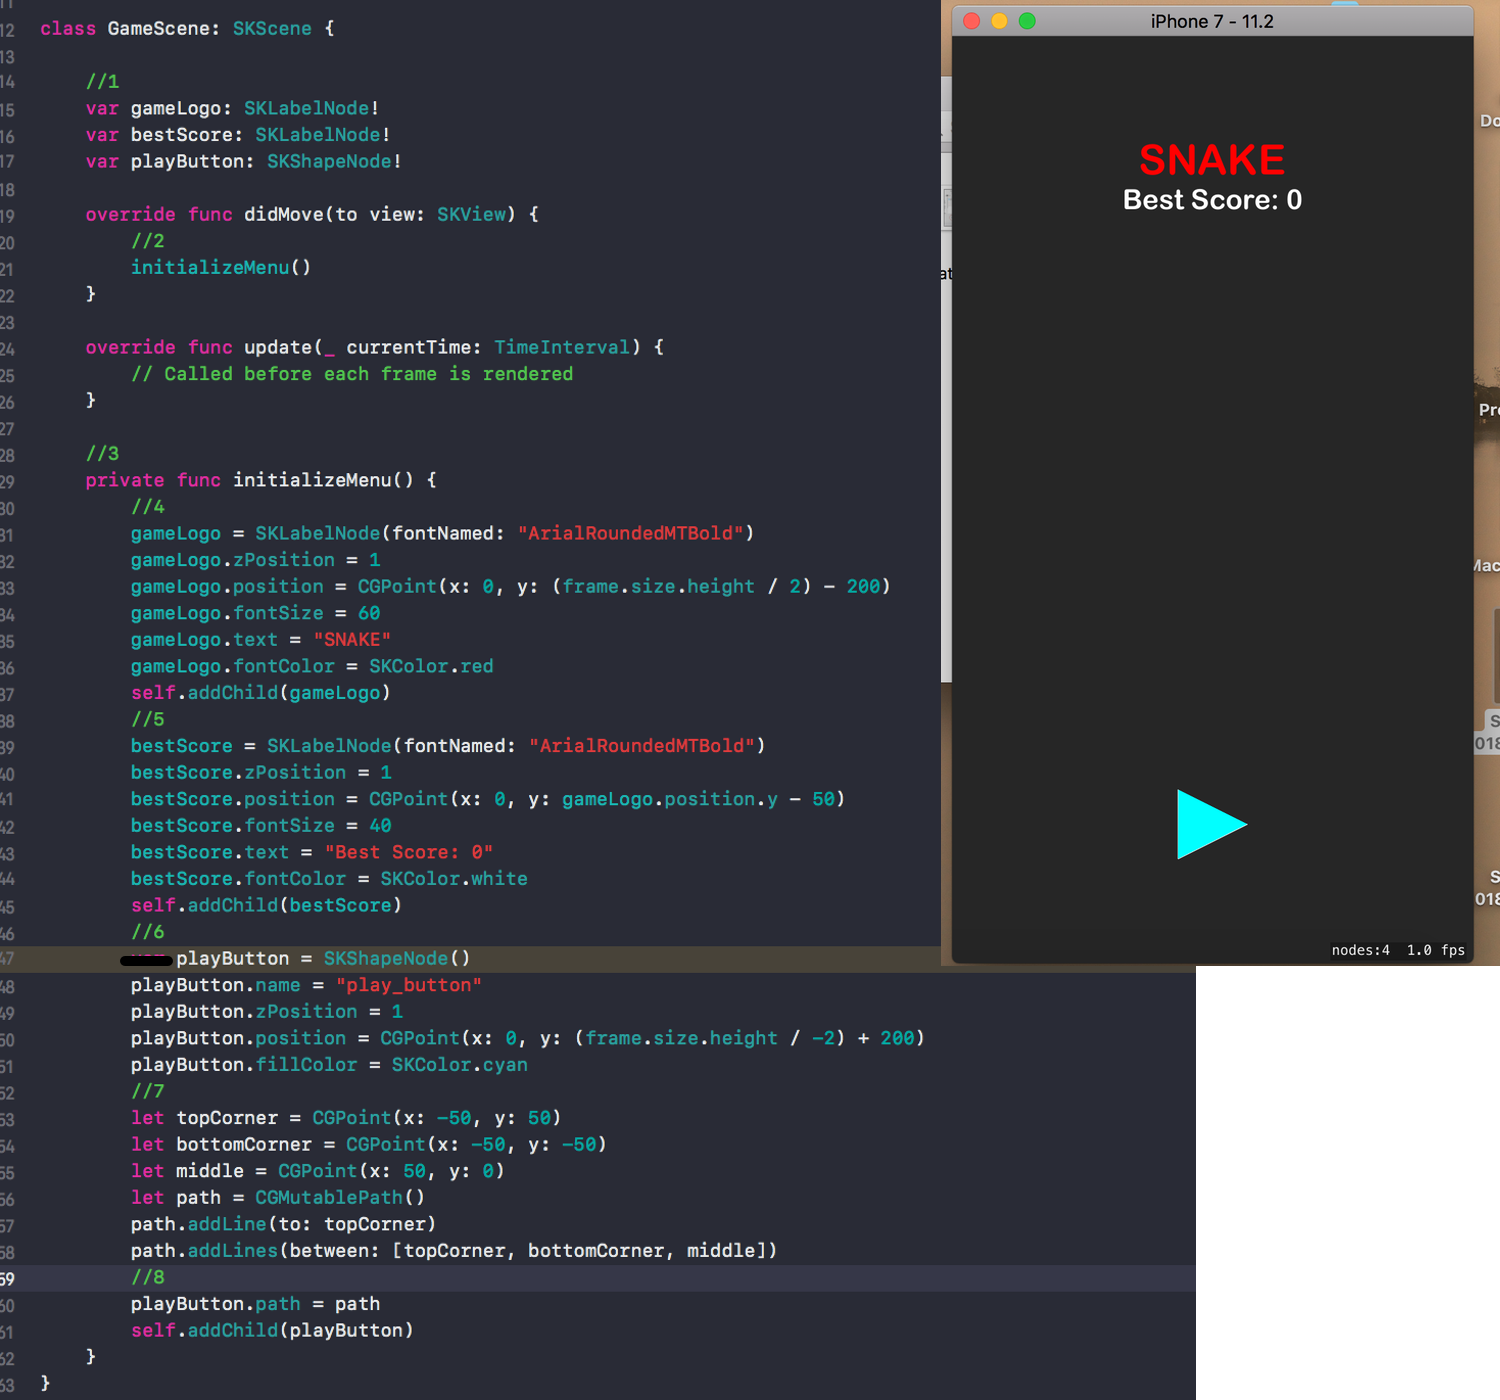 Figure A
Compile your code and check that your device shows the image from above. Here is an explanation for what?s going on here, this may look like a wall of code, but it is easy to understand when you break it down.
- 1: We create variables for the logos/buttons. The ?!? after the variable name means that we must initialize the variables, they cannot be empty or ?nil?.
- 2: We call the ?initializeMenu()? function once the game view is loaded. didMove(to: view: SKView) is the function that is called once our GameScene has loaded.
- 3: This is the intializeMenu() function that we wrote to create the menu objects.
- 4/5/6: Create the objects and add to GameScene by calling ?self.addChild()?.
- 7: I chose to use SKShapeNodes for this project due to their simplicity, this is an alternative to creating your graphics in an image editor. This line of code creates a path in the shape of a triangle. Please note if you plan on building and publishing an app you should use SKSpriteNodes to load an image you have created, ShapeNodes can cause performance issues when used in large quantities as they are dynamically drawn once per frame.
- 8: Set the triangular path we created to the playButton sprite and add to the GameScene.
Playing the game
Now that we have a simple menu setup let?s get the play button working. First go to your GameManager.swift file and replace all the code with this so that it matches the image below (Figure B).
import SpriteKitclass GameManager {} Figure B
Copy the code below into your GameScene.swift file so that it matches the image below (Figure C).
//1var game: GameManager!//2game = GameManager()//3override func touchesBegan(_ touches: Set<UITouch>, with event: UIEvent?) { for touch in touches { let location = touch.location(in: self) let touchedNode = self.nodes(at: location) for node in touchedNode { if node.name == “play_button” { startGame() } } }}//4private func startGame() { print(“start game”)}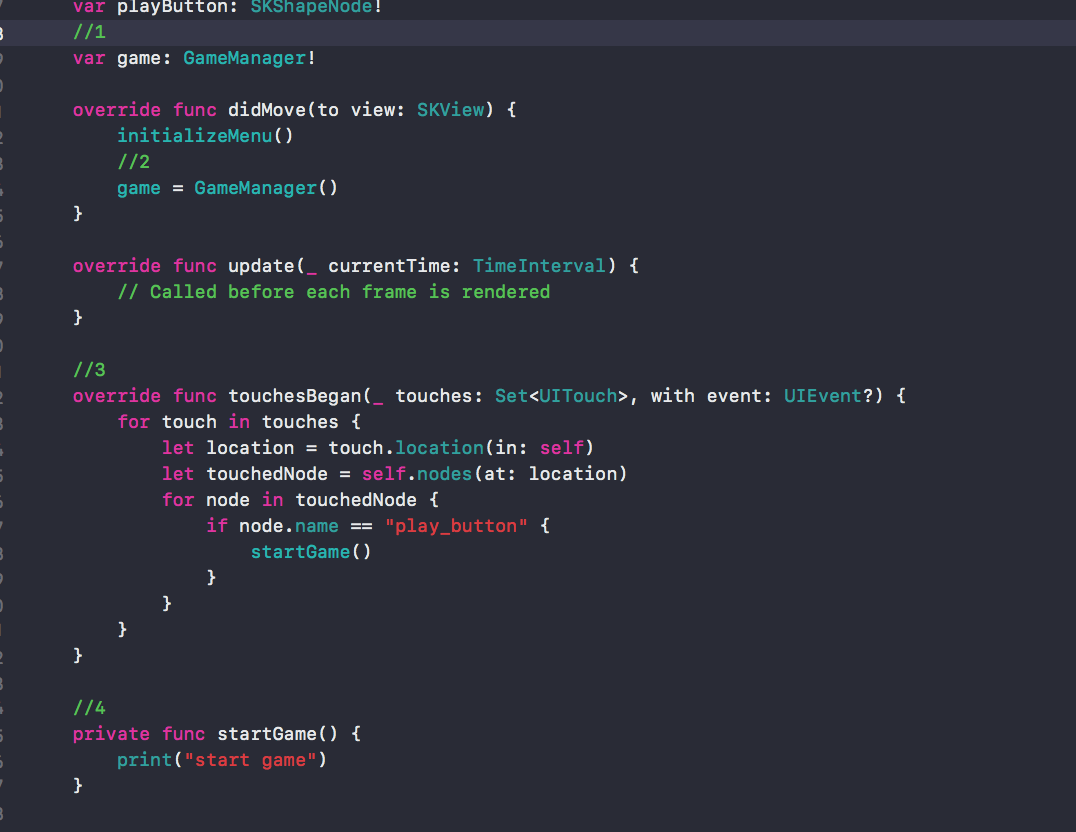 Figure C
- 1: Initialize a GameManager object. More on this later? this will hold score data and manage the movement of the player.
- 2: Set the game variable to a new GameManager() object.
- 3: This function is called by the game engine every time a user touches the screen. Recall that the play button we created earlier has the name ?play_button?. Using the name we can check if the user has touched a SpriteNode with the name ?play_button?, once this happens we call the startGame() function from bullet point 4.
- 4: This function starts the game.
Ensure that your code works properly by running your app and clicking the triangular play button. If your touches are being properly measured then the console should display ?start game? as noted in the image below (Figure D).
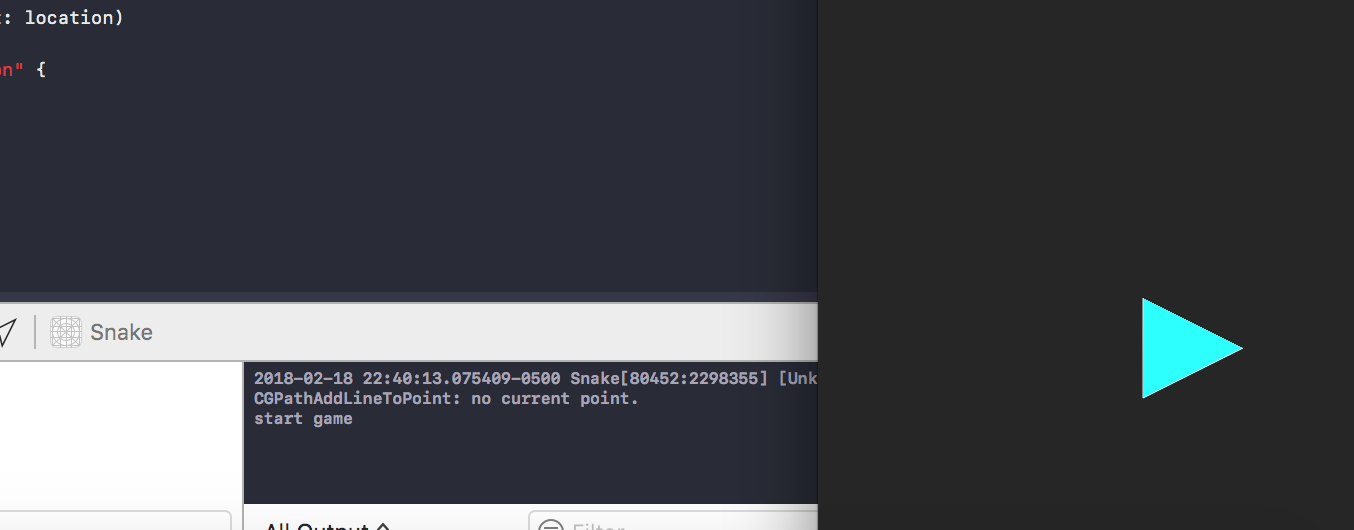 Figure D
If your console is not showing then go to the top bar and click on ?Help?, in the search bar type ?Console? and then click on ?Debug Area > Activate Console?. We now have a working menu system and a play button, this is where we can really start to have some fun.
Loading the Game View
So we have a play button now that can trigger a function, what should we do? In order to show the game view we first have to hide the menu buttons. Add this line of code to hide your menu buttons with a simple animation. Your code should match the image below (Figure E).
//start the gameprivate func startGame() { print(“start game”) //1 gameLogo.run(SKAction.move(by: CGVector(dx: -50, dy: 600), duration: 0.5)) { self.gameLogo.isHidden = true } //2 playButton.run(SKAction.scale(to: 0, duration: 0.3)) { self.playButton.isHidden = true } //3 let bottomCorner = CGPoint(x: 0, y: (frame.size.height / -2) + 20) bestScore.run(SKAction.move(to: bottomCorner, duration: 0.4))}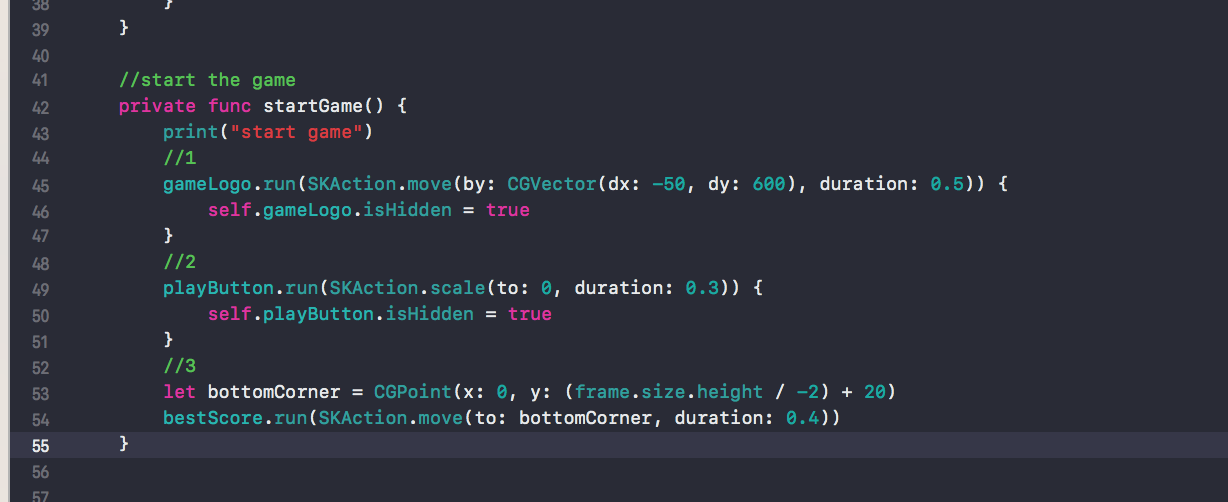 Figure E
 Figure F
- 1: Move the gameLogo off the screen and then hide it from view. The brackets after the SKAction run once the action completes. For instance if we run an SKAction of duration 10, the code inside the bracket would run after 10 seconds. Here is an example:
exampleNode.run(SKAction.move(by: CGVector(dx: 0, dy: 0), duration: 10) { print(“I am reached after 10 seconds”)}
- 2: Scale the playButton to 0; this action shrinks the button and then hides it from view.
- 3: Move the bestScore label to the bottom of the screen.
Your menu should now behave like this gif (Figure F) when you click the play button!
Now we are going to begin designing the actual ?snake? part of this game, start off by adding these lines of code so that your code matches the image below (Figure G).
//1var currentScore: SKLabelNode!var playerPositions: [(Int, Int)] = var gameBG: SKShapeNode!var gameArray: [(node: SKShapeNode, x: Int, y: Int)] = //2initializeGameView()//3private func initializeGameView() { //4 currentScore = SKLabelNode(fontNamed: “ArialRoundedMTBold”) currentScore.zPosition = 1 currentScore.position = CGPoint(x: 0, y: (frame.size.height / -2) + 60) currentScore.fontSize = 40 currentScore.isHidden = true currentScore.text = “Score: 0” currentScore.fontColor = SKColor.white self.addChild(currentScore) //5 let width = frame.size.width – 200 let height = frame.size.height – 300 let rect = CGRect(x: -width / 2, y: -height / 2, width: width, height: height) gameBG = SKShapeNode(rect: rect, cornerRadius: 0.02) gameBG.fillColor = SKColor.darkGray gameBG.zPosition = 2 gameBG.isHidden = true self.addChild(gameBG) //6 createGameBoard(width: width, height: height)}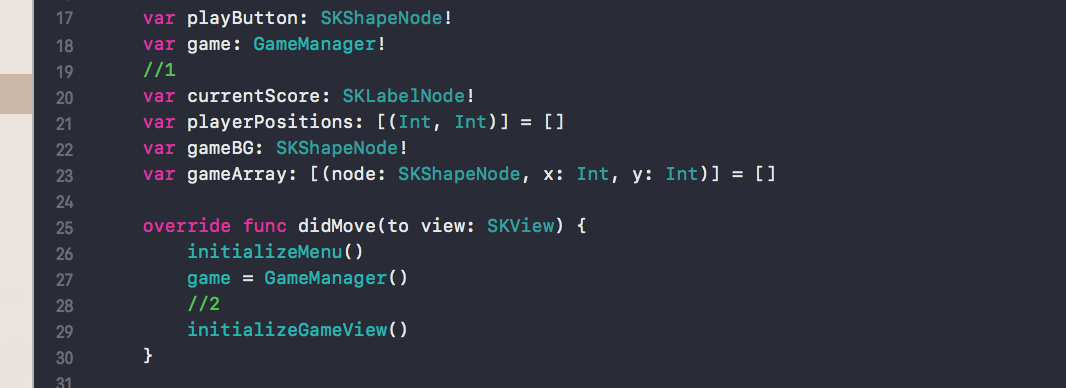 Figure G
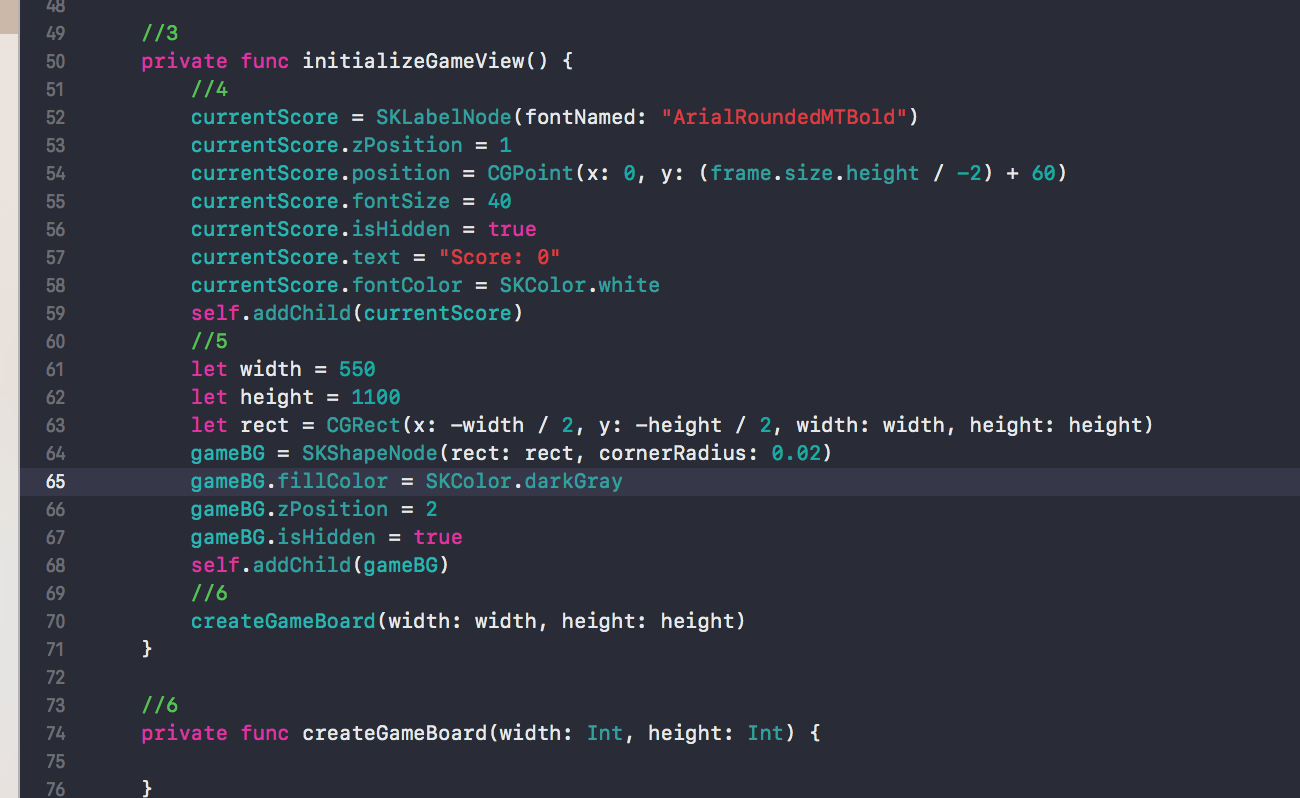 Figure G
- 1: New variables! We are creating a label to show the current score, an array of all the positions that the ?snake? or player currently has, a background for our game view and an array to track the positions of each cell in the game view.
- 2: Call the initializeGameView() function.
- 3: Initializes the game view.
- 4: Add the current score label to the screen, this is hidden until we leave our menu.
- 5: Create a ShapeNode to represent our game?s playable area. This is where the snake will be moving around in.
- 6: Create the game board. This function initializes a ton of square cells and adds them to the game board.
Next we want to create an array of cells which we will use to render the snake and the points on the screen. Create the createGameBoard function from the code below so that it matches Figure H.
//create a game board, initialize array of cellsprivate func createGameBoard(width: Int, height: Int) { let cellWidth: CGFloat = 27.5 let numRows = 40 let numCols = 20 var x = CGFloat(width / -2) + (cellWidth / 2) var y = CGFloat(height / 2) – (cellWidth / 2) //loop through rows and columns, create cells for i in 0…numRows – 1 { for j in 0…numCols – 1 { let cellNode = SKShapeNode(rectOf: CGSize(width: cellWidth, height: cellWidth)) cellNode.strokeColor = SKColor.black cellNode.zPosition = 2 cellNode.position = CGPoint(x: x, y: y) //add to array of cells — then add to game board gameArray.append((node: cellNode, x: i, y: j)) gameBG.addChild(cellNode) //iterate x x += cellWidth } //reset x, iterate y x = CGFloat(width / -2) + (cellWidth / 2) y -= cellWidth }}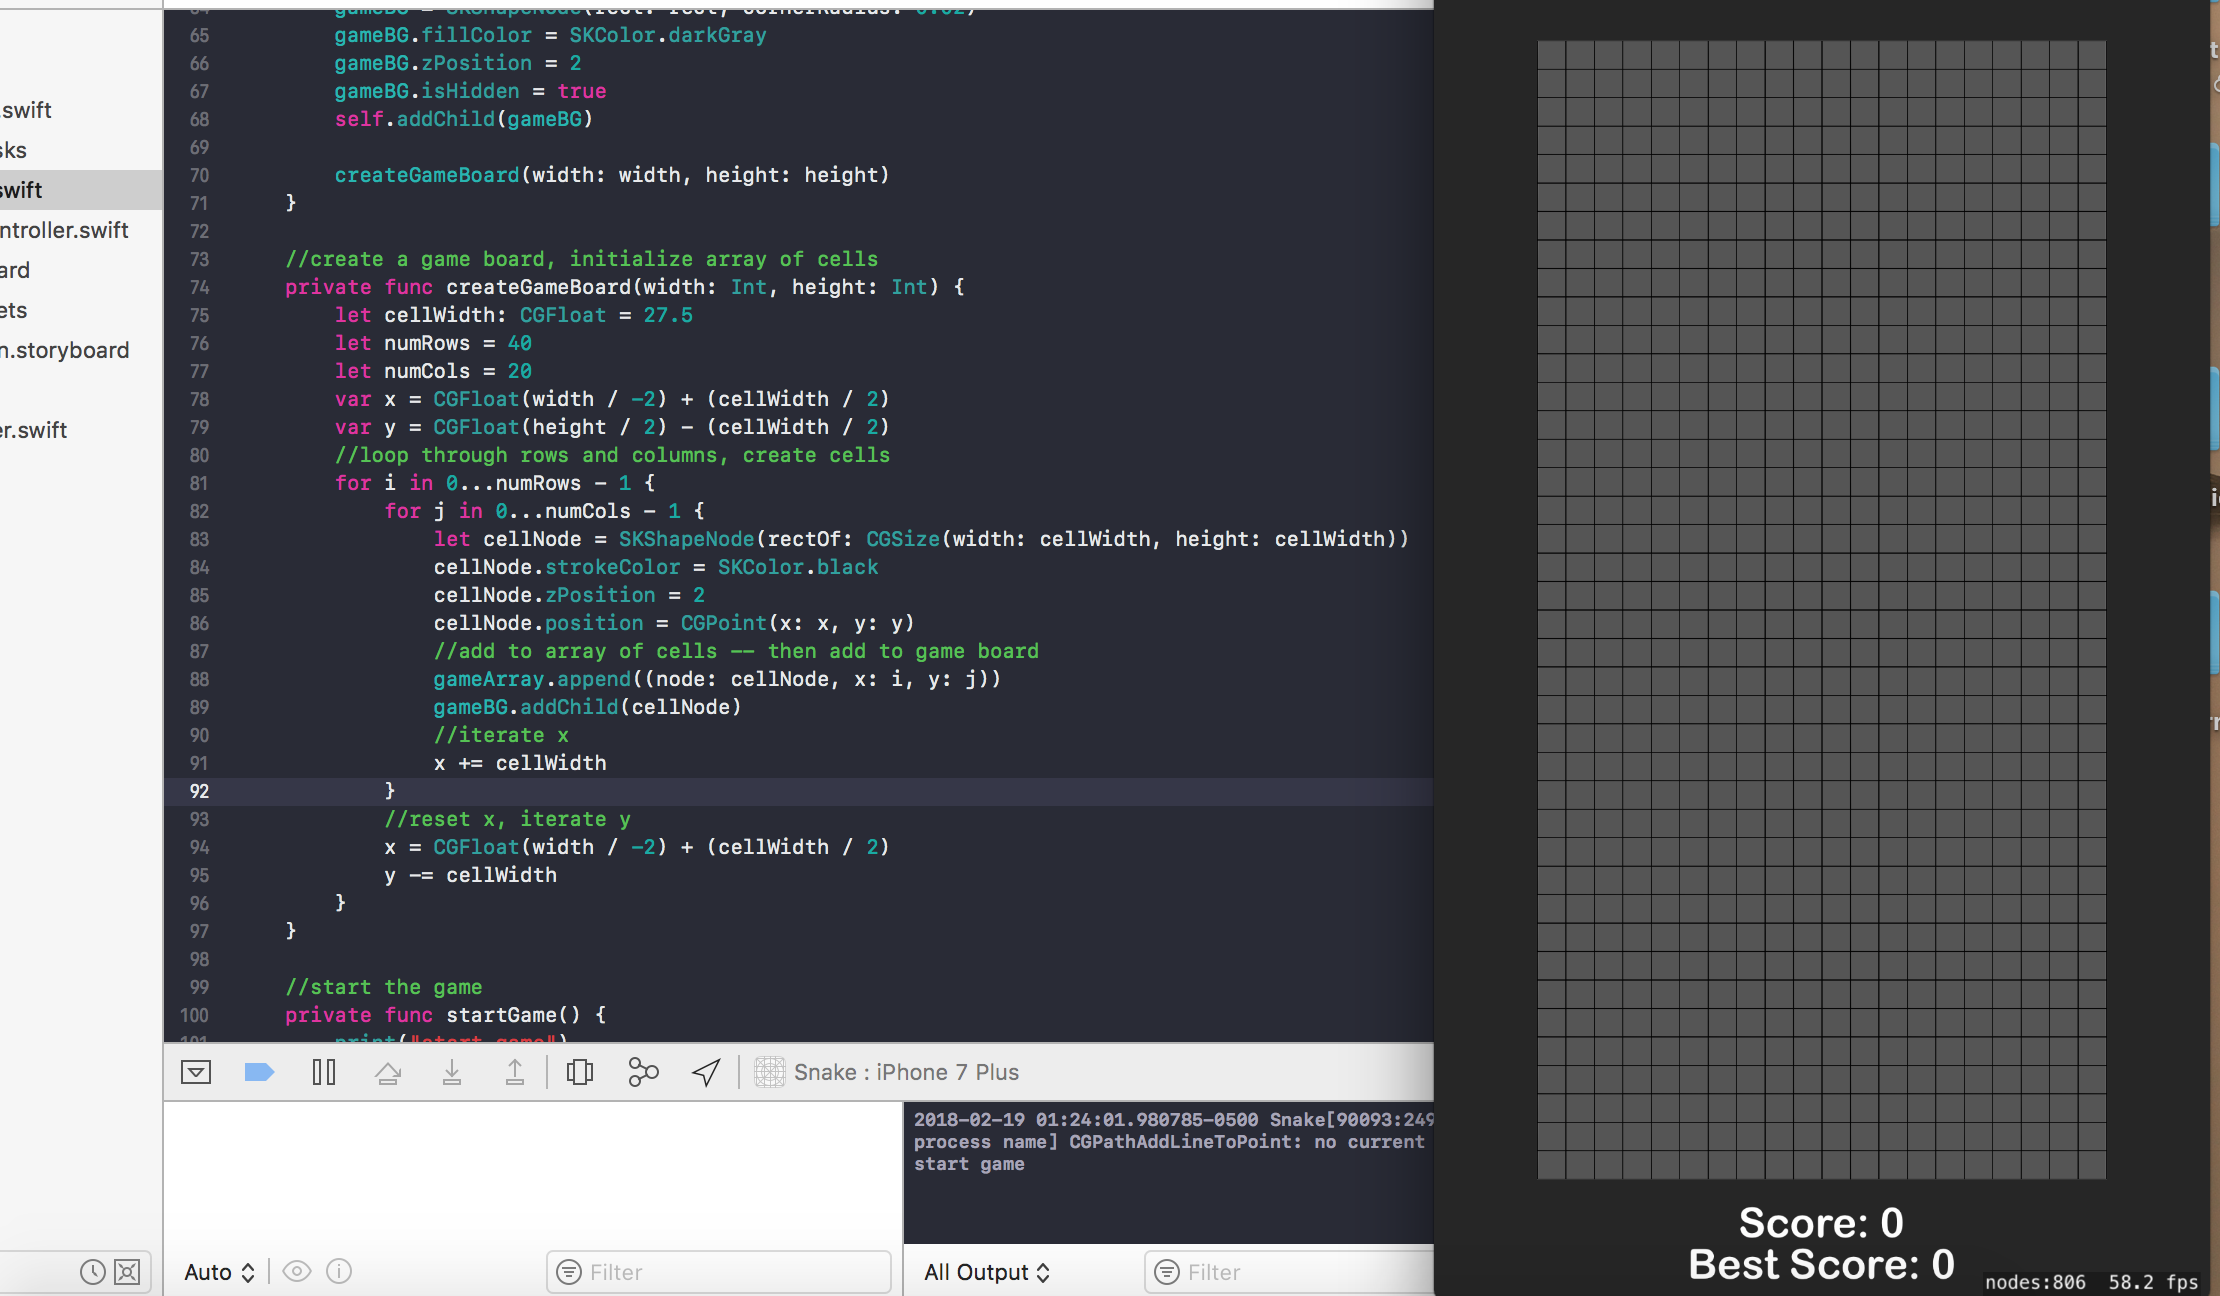 Figure H
Your code should match the code from above, upon running your game nothing will appear to have changed. If you want to see the game board like in the simulator screenshot above, add the following code to your start game function so that it matches Figure I.
bestScore.run(SKAction.move(to: bottomCorner, duration: 0.4)) { self.gameBG.setScale(0)self.currentScore.setScale(0)self.gameBG.isHidden = falseself.currentScore.isHidden = falseself.gameBG.run(SKAction.scale(to: 1, duration: 0.4))self.currentScore.run(SKAction.scale(to: 1, duration: 0.4))}
A brief explanation of the createGameBoard method before we move on. This method loops through 40 rows and 20 columns, for each row/column position we create a new square box or ?cellNode? and add this to the scene. We also add this cellNode into an array ?gameArray? so that we can easily pin point a row and column to the appropriate cell.
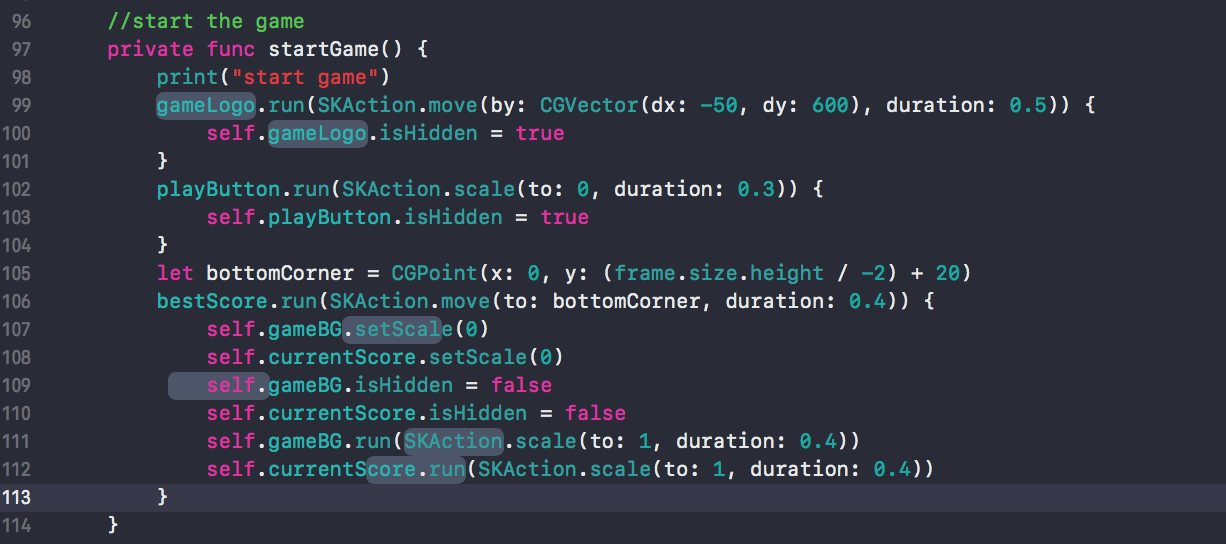 Figure I ? Displays new game board!
Creating a game instance
We now have a working play button, a box full of smaller boxes and some labels. How do we turn this into a game that is actually fun to play? First we will need an object to track the location of a ?snake? on the screen so that we can move around. Open the GameManager.swift class and create the following methods. Also add this change (//1) in the didMove(to view: SKView) function in GameScene.swift so that your code matches Figure J.
//1 — GameScene.swiftgame = GameManager(scene: self)//2 — GameManager.swiftclass GameManager { var scene: GameScene! init(scene: GameScene) { self.scene = scene }}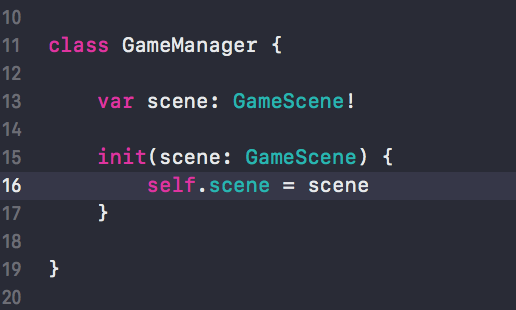
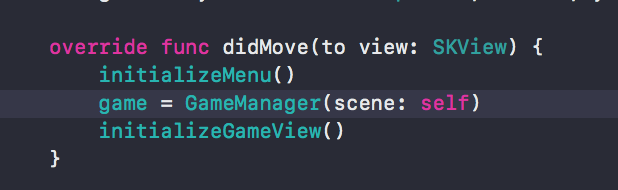 Figure J
By making these changes we are saying that GameManager must contain a reference to the GameScene class once it is initialized. Now the GameManager class can communicate to the GameScene by calling scene.method_name. For instance, scene.startGame() would run the start game function from within the control of the GameManager class.
Now we are ready to load the player into the GameView. First add the following code snippet into your GameScene.swift file in the startGame() method inside the brackets of the bestScore.run() { } This method will call the initGame function once the bestScore label finishes its SKAction.
//new codeself.game.initGame()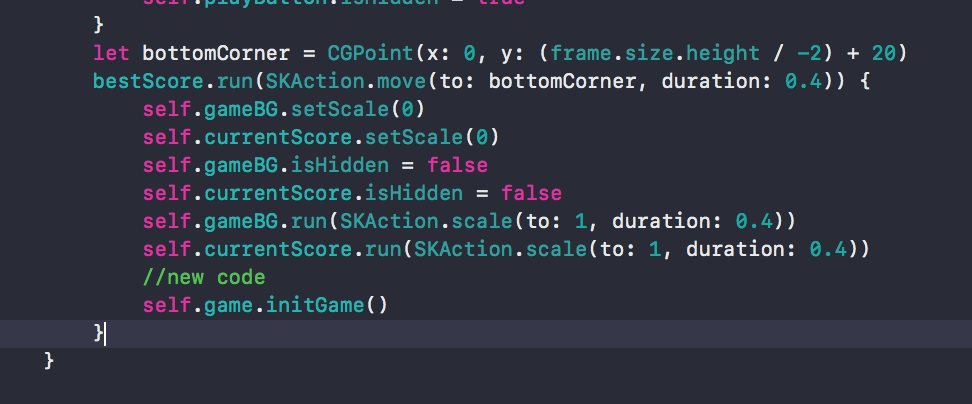 Figure K
Now go to your GameManager.swift and add the following methods below the init(scene: GameScene) method so that your code matches Figure L.
//1func initGame() { //starting player position scene.playerPositions.append((10, 10)) scene.playerPositions.append((10, 11)) scene.playerPositions.append((10, 12)) renderChange()}//2func renderChange() { for (node, x, y) in scene.gameArray { if contains(a: scene.playerPositions, v: (x,y)) { node.fillColor = SKColor.cyan } else { node.fillColor = SKColor.clear } }}//3func contains(a:[(Int, Int)], v:(Int,Int)) -> Bool { let (c1, c2) = v for (v1, v2) in a { if v1 == c1 && v2 == c2 { return true } } return false}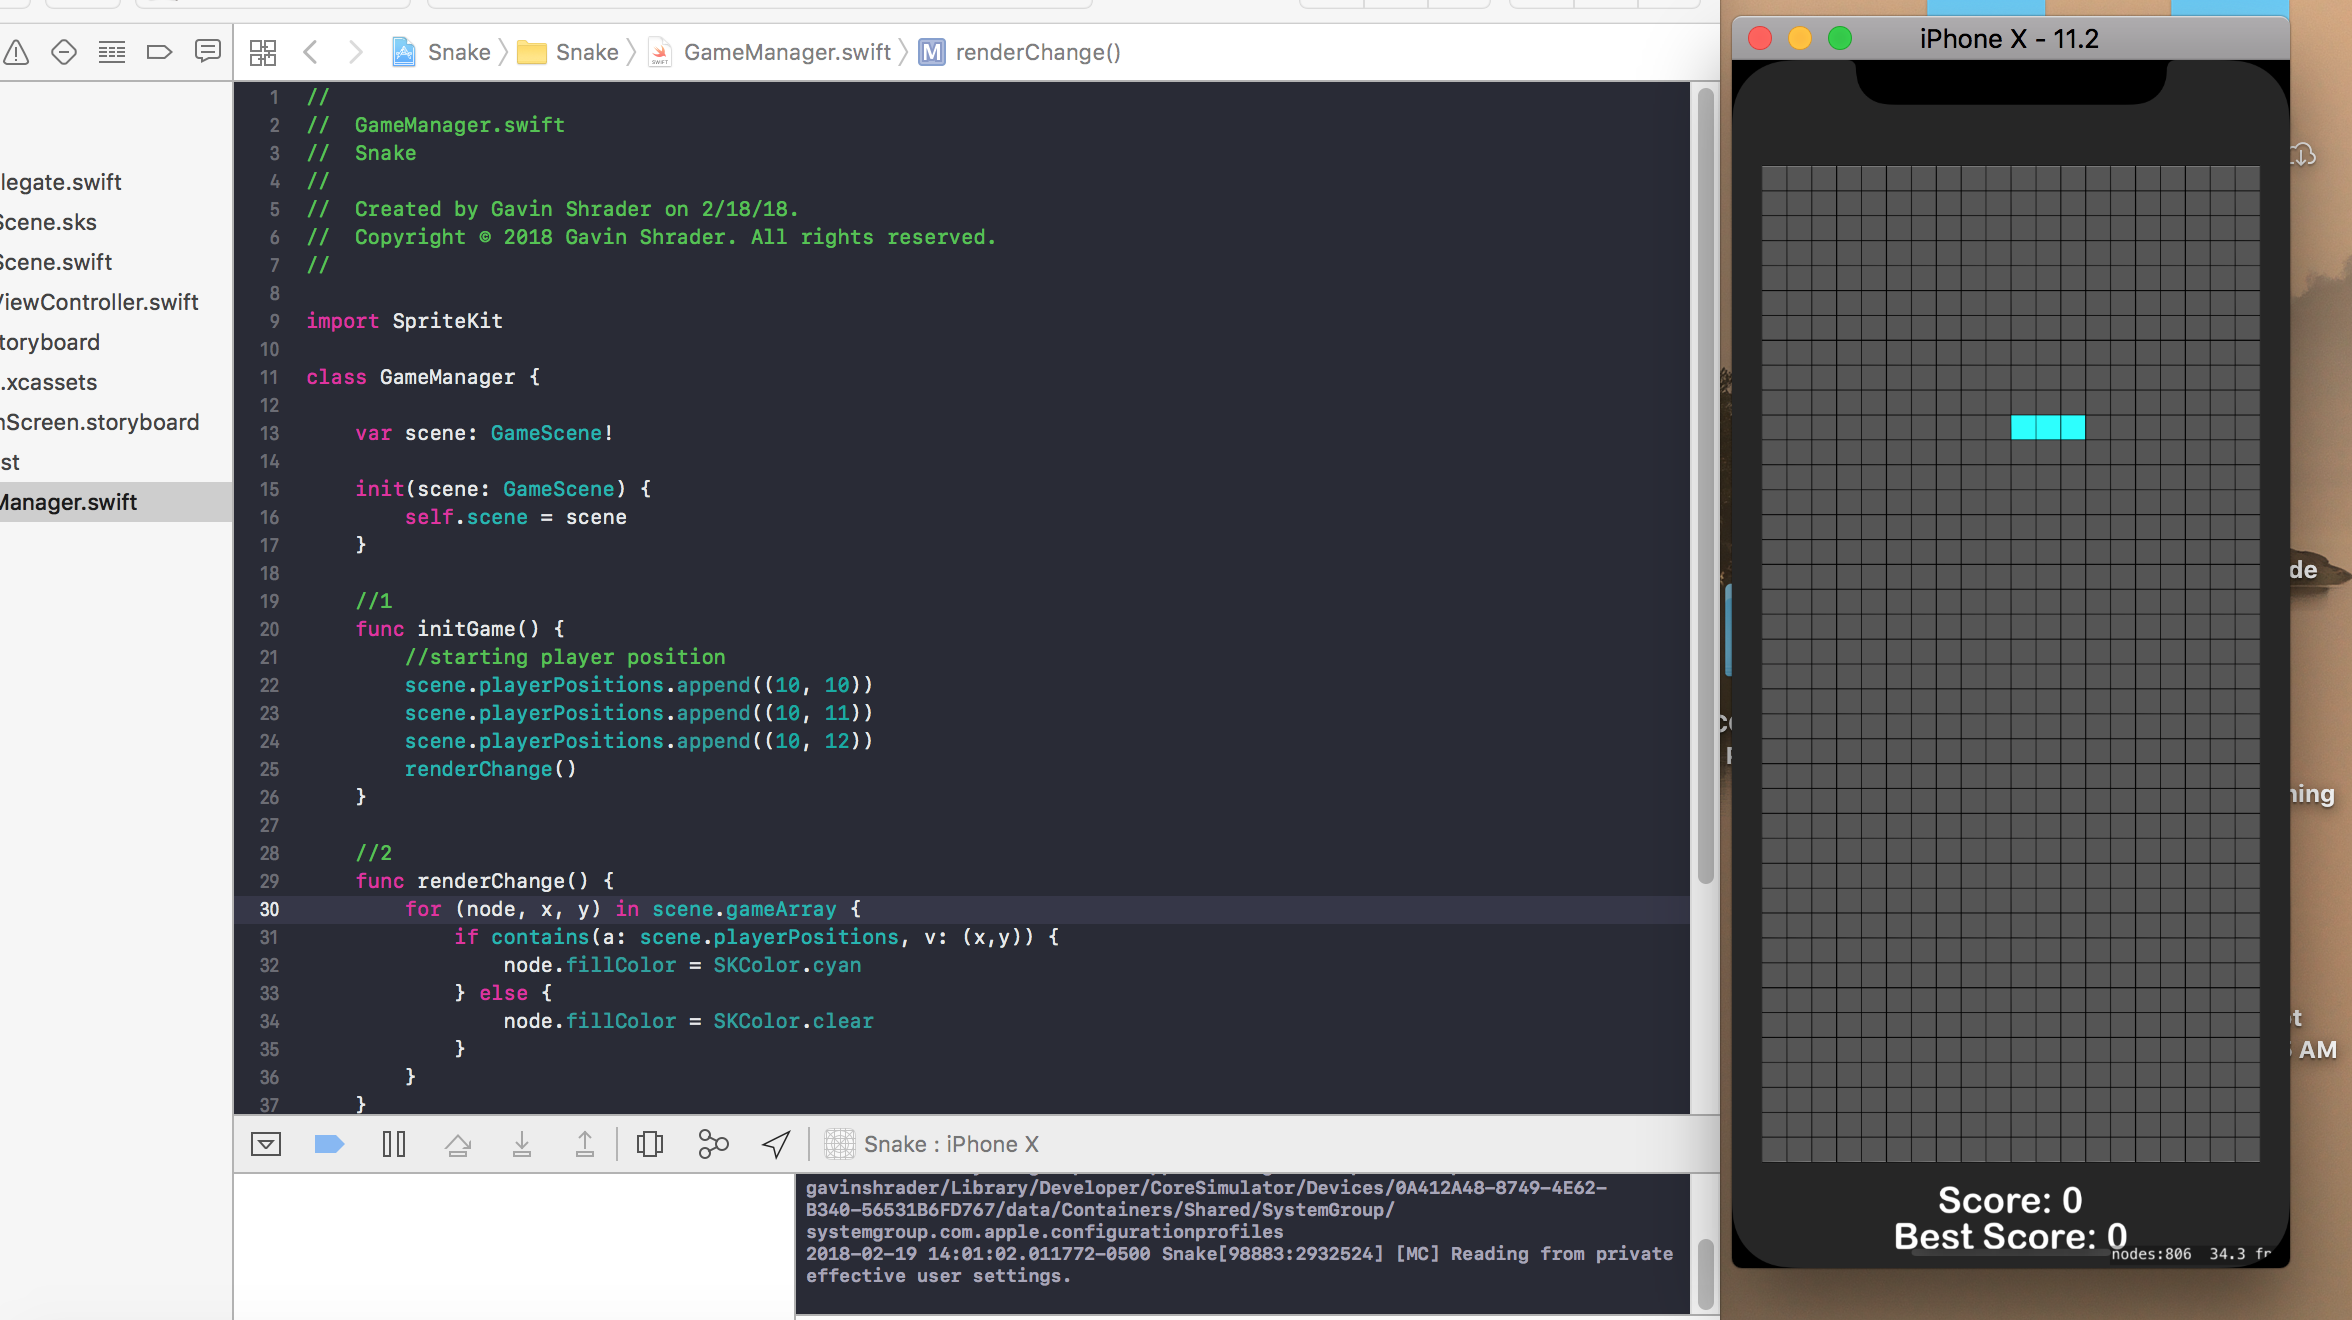 Figure L
- 1: initGame() function. This adds 3 coordinates to the GameScene?s playerPositions array,
- 2: renderChange() function. We will call this method every time we move the ?snake? or player. This renders all blank squares as clear and all squares where the player is located as cyan.
- 3: This is a simple function that checks if a tuple (a swift data structure that can contain an combination of types in the form of (Int, CGFloat, Int, String)?. etc) exists in an array of tuples. This function checks if the playerPositions array contains the inputted coordinates from the GameScene?s array of cells. This is not necessarily the most efficient way of doing things as we are checking every single cell during each update. If you want to challenge yourself, try to update the code so that it only modifies the squares from the playerPositions array!
Moving the Player
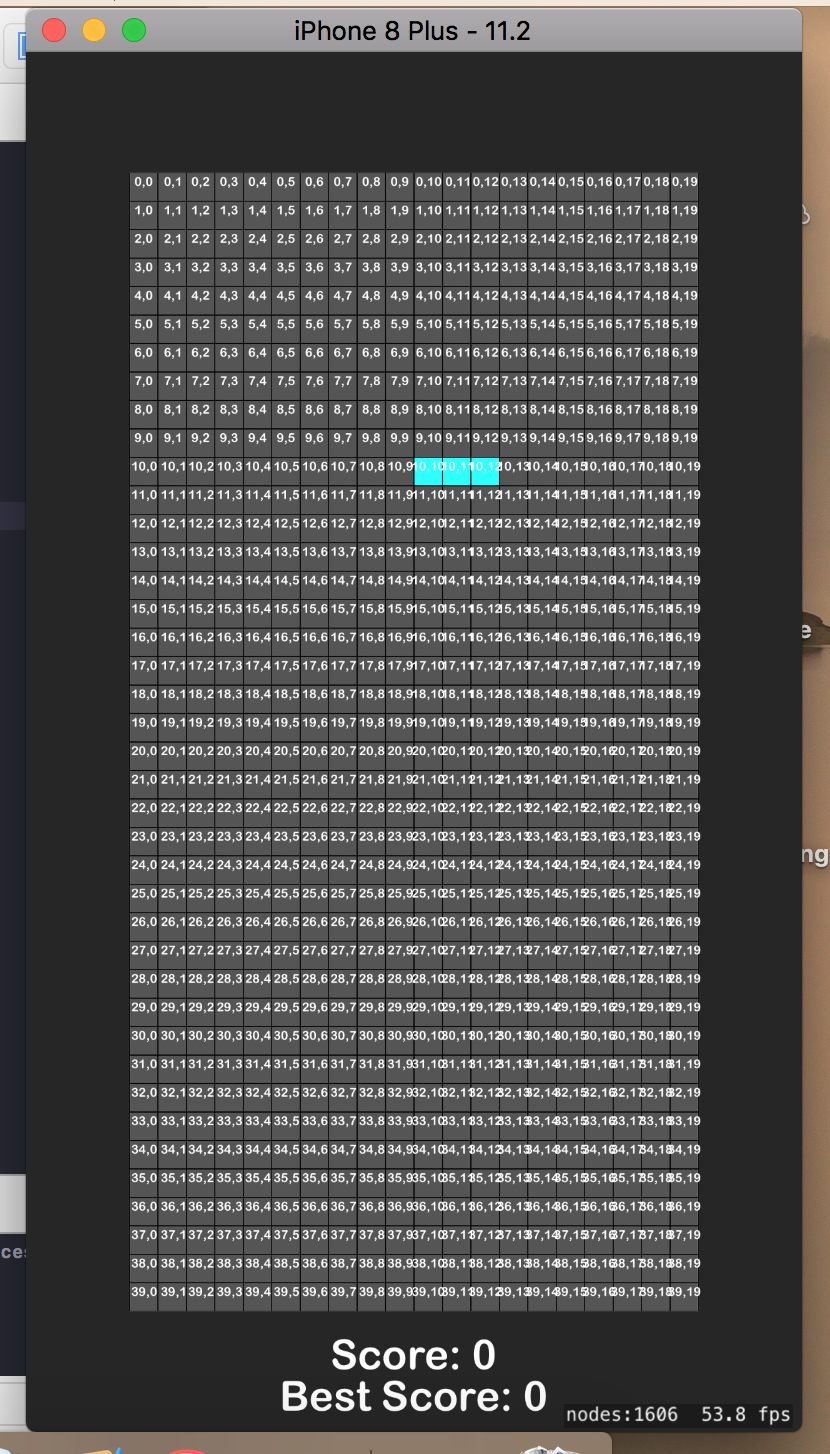 Figure M
We now have our player rendered on screen and the ability to render any number of positions. If you add more coordinates to the playerPositions array then more squares will be colored cyan. During the game we want to constantly move the ?snake? in one direction until the player swipes on the screen to change directions. Here is a grid showing the coordinates for our grid system so that you can easily understand how the coordinates work behind the scenes (Figure M).
As you can see by the abhorrently tiny labels, the top left corner is 0,0 and the bottom right corner is 39,19. This means that if we want to move our player in the directions left, right, up and down we do so by applying the following basic algebra (Figure N).
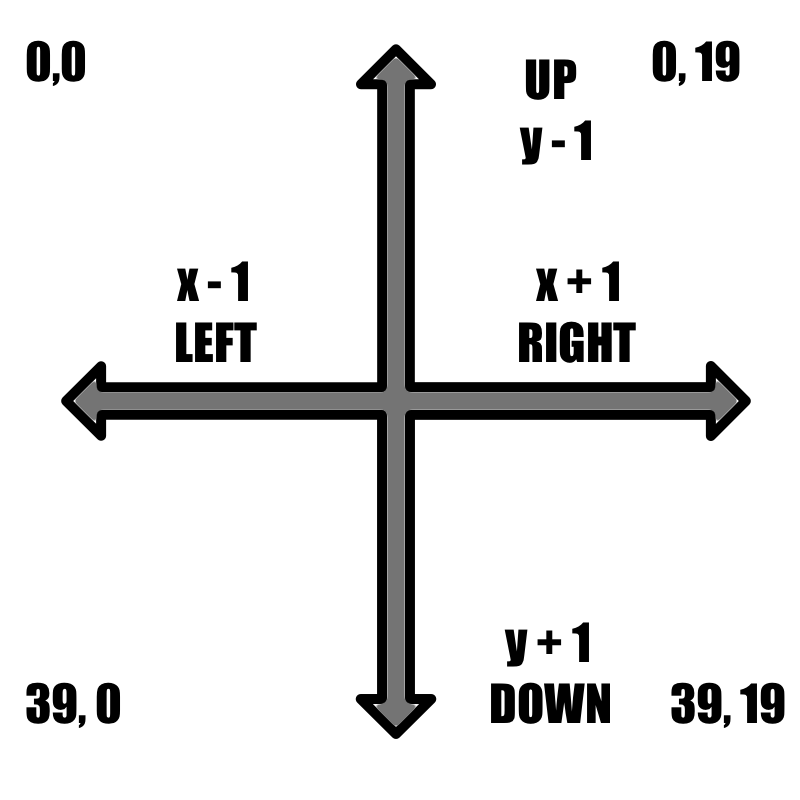 Figure N
As you can see, the left/right directions match that of a typical coordinate plane; left is negative and right is positive. However, in order to move up on the coordinate plane we want to decrease y and to move down we want to increase y. This is due to the fact that our for loop in the createGameBoard function started at the top and worked down.
Now that you understand the direction of the board you can implement a method that moves the player. If you open the GameScene.swift file you will notice a handy method called update(_ currentTime: TimeInterval). In the rendering loop, the update function is called once per second. This means if your app runs at 60 fps the function is called 60 times a second, if the game is running at 40 fps it is only called 40 times a second. Inside your update function add this line of code so that your code matches Figure O.
//1game.update(time: currentTime) Figure O
After you add this code a red error should pop up, to fix this navigate to your GameManager.swift file and add these lines of code so that your file matches Figure P.
//1var nextTime: Double?var timeExtension: Double = 1//2func update(time: Double) { if nextTime == nil { nextTime = time + timeExtension } else { if time >= nextTime! { nextTime = time + timeExtension print(time) } }}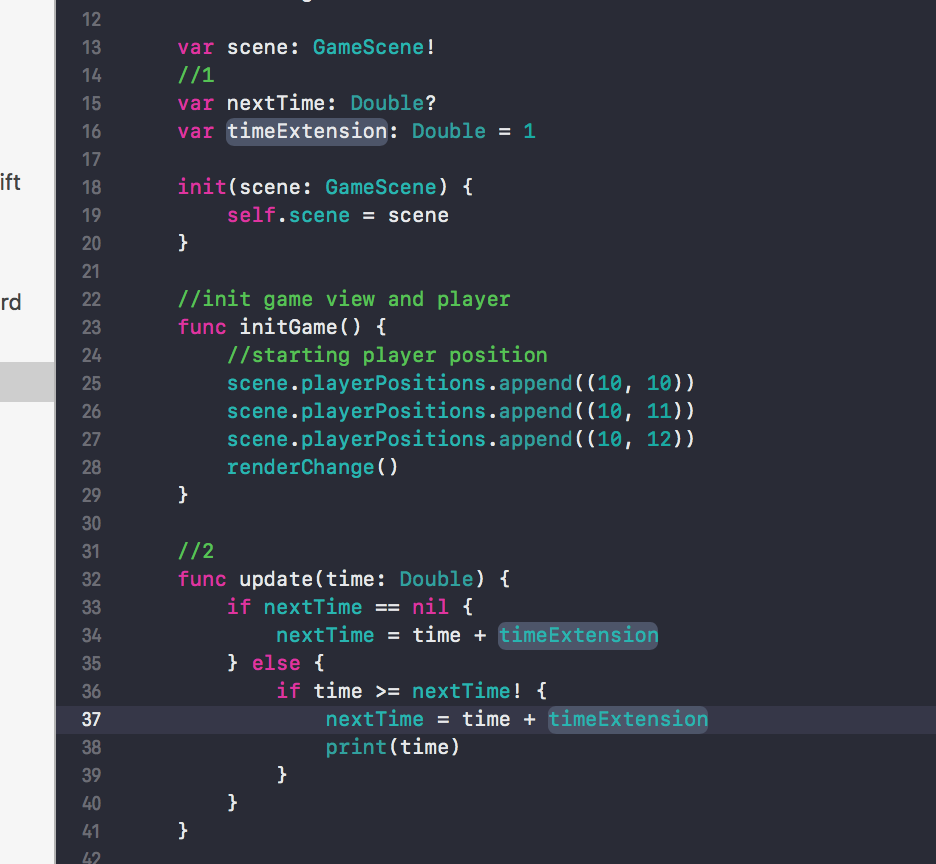 Figure P
Upon running your app the console should print out a new time each second. Here is a quick run through of what this code is doing.
- 1: initialize two new variables. nextTime is the nextTime interval we will print a statement to the console, timeExtension is how long we will wait between each print (1 second).
- 2: This update function is called 60 times per second, we only want to update the player position once per second so that the game is not ridiculously fast. In order to accomplish this we check if nextTime has been set. As you can see from //1, nextTime has been initialized to be an optional value. The ? ? ? after Double tells the swift compiler that we want nextTime to be a double and that it CAN be set to nil. When the update function is called we first check if the nextTime has been set, if it has not been set we set it to the current time + the timeExtension (1 second). Once the current time eclipses the ?nextTime? we then increase nextTime by 1 second. This function now takes an irregular update function (around 30?60 times / second) and only produces an output once per second.
We now have a function that runs once per second, if you want to increase the speed of your game simply lower timeExtension to a value that is greater than 0, if you want to slow down your game then increase the value of timeExtension. (Note: ?1? == 1 second for timeExtension).
We now want to move the player around the screen, add the following code so that your file matches Figure Q. Also, remove the ?print(time)? line from the update function we just created in GameManager.swift, this will spam your console and was only really useful for testing the validity of your code.
//1var playerDirection: Int = 1 //2updatePlayerPosition()//3private func updatePlayerPosition() { //4 var xChange = -1 var yChange = 0 //5 switch playerDirection { case 1: //left xChange = -1 yChange = 0 break case 2: //up xChange = 0 yChange = -1 break case 3: //right xChange = 1 yChange = 0 break case 4: //down xChange = 0 yChange = 1 break default: break } //6 if scene.playerPositions.count > 0 { var start = scene.playerPositions.count – 1 while start > 0 { scene.playerPositions[start] = scene.playerPositions[start – 1] start -= 1 } scene.playerPositions[0] = (scene.playerPositions[0].0 + yChange, scene.playerPositions[0].1 + xChange) } //7 renderChange()}
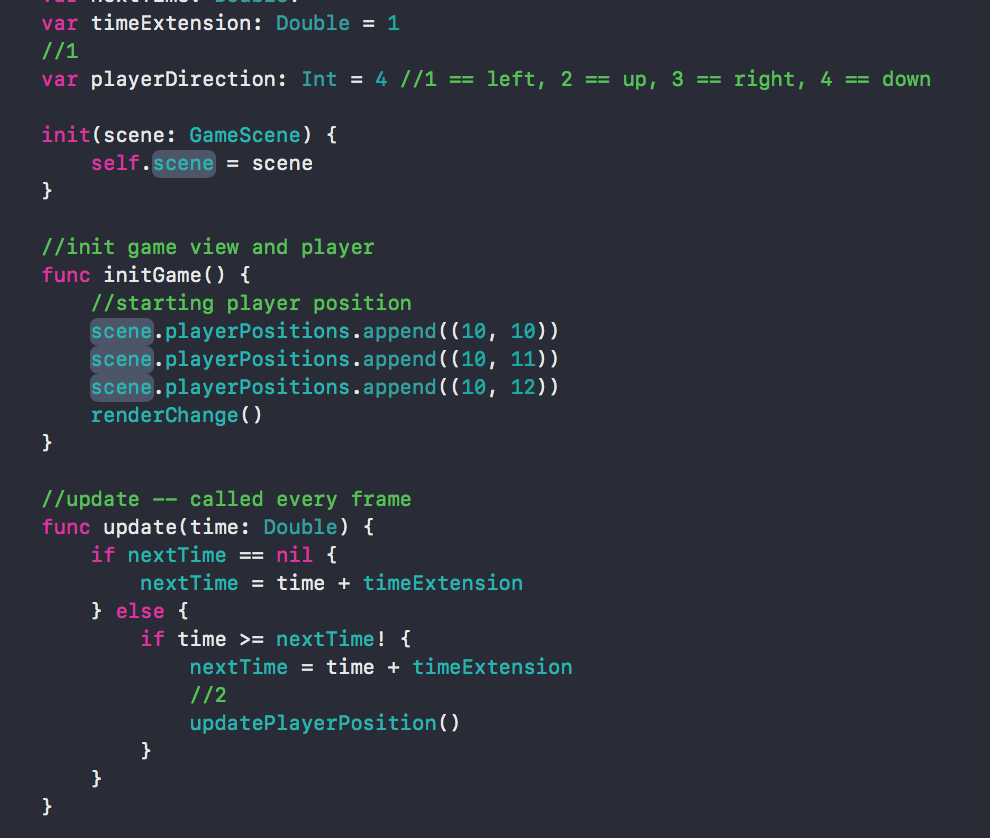
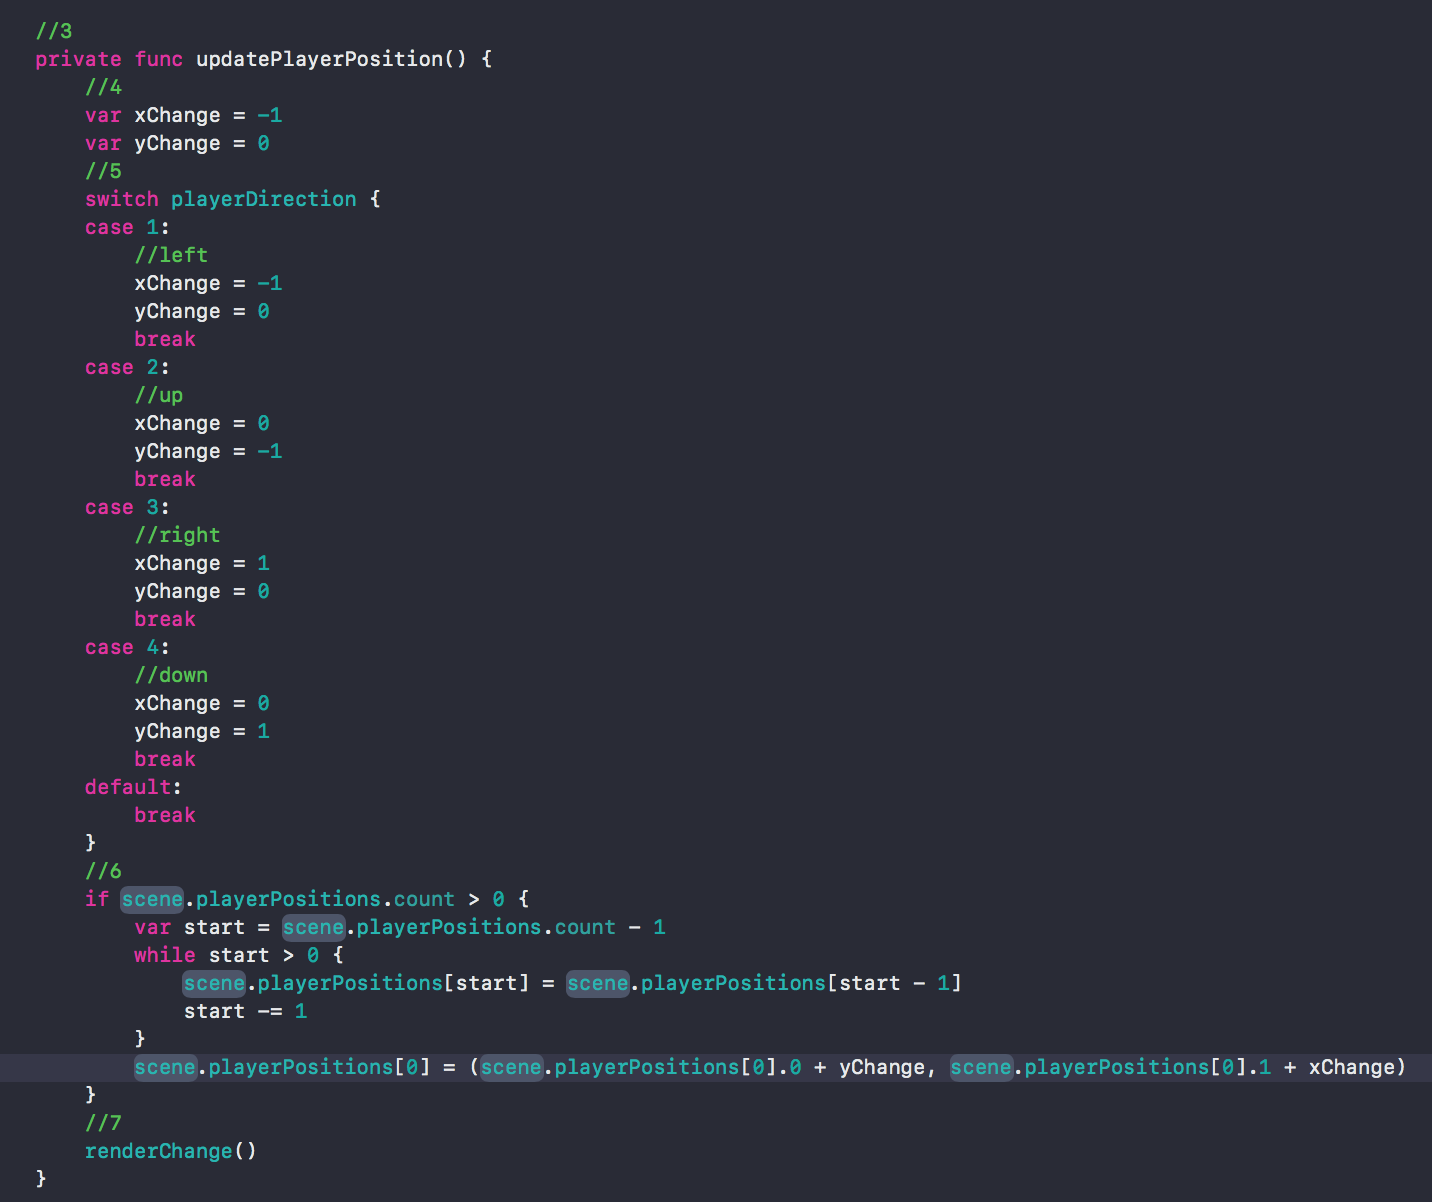 Figure Q
After you add this code your game should look like the gif from Figure Q (set playerDirection to 4 to get the same movement direction). Two things immediately stood out to me when I wrote this; first, the snake moves painfully slowly, perhaps we should increase the speed of the game from 1 second to 1/2 or 1/4 of a second. Second, what are we going to do when the snake hits a wall? In some versions of snake the player warps around the screen, in other versions a collision with a wall results in death. I like the look of a screen warp, so I think we will use that method for this game. Now an explanation for this code you just wrote:
- 1: Create a variable that is used to determine the player?s current direction. In the code the variable is set to 1, in the gif in Figure Q I set the direction to 4. Change this variable to see all the different directions.
- 2: We removed the print(time) and replaced it with a call to updatePlayerPosition(), in this iteration we are calling the update every second.
- 3: This method moves the player or ?snake? around the screen.
- 4: Set variables to determine the change we should make to the x/y of the snake?s front.
- 5: This is a switch statement, it takes the input of the playerPosition and modifies the x/y variables according to wether the player is moving up, down, left or right.
- 6: This block of code moves the positions forwards in the array. We want to move the front of the tail in the appropriate direction and then move all the tail blocks forward to the next position.
- 7: Render the changes we made to the array of positions.
Warping the snake around the screen
We now have a moving player, nice work! First we are going to want to increase the speed of the game, it turns out waiting 1 second is just too slow to be fun. This is a lesson you will learn in game design, there is a lot of tweaking and small changes you will have to make to perfect the feel of the game. When I work on a project I often spend the majority of my time making minor changes to adjust the feel, you have to perfect your mechanics in order to build a fun game; once you have perfect mechanics you can work on adding fancy additions like particles and sounds.
Change the timeExtension variable to 0.15 and compile your project.
//1 — GameManager.swiftvar timeExtension: Double = 0.15
Now we can begin warping the snake around the screen, add the following code so that your project matches Figure R. Note, this code is added to the updatePlayerPosition() function in GameManager.swift that we just wrote.
//1if scene.playerPositions.count > 0 { let x = scene.playerPositions[0].1 let y = scene.playerPositions[0].0 if y > 40 { scene.playerPositions[0].0 = 0 } else if y < 0 { scene.playerPositions[0].0 = 40 } else if x > 20 { scene.playerPositions[0].1 = 0 } else if x < 0 { scene.playerPositions[0].1 = 20 }}
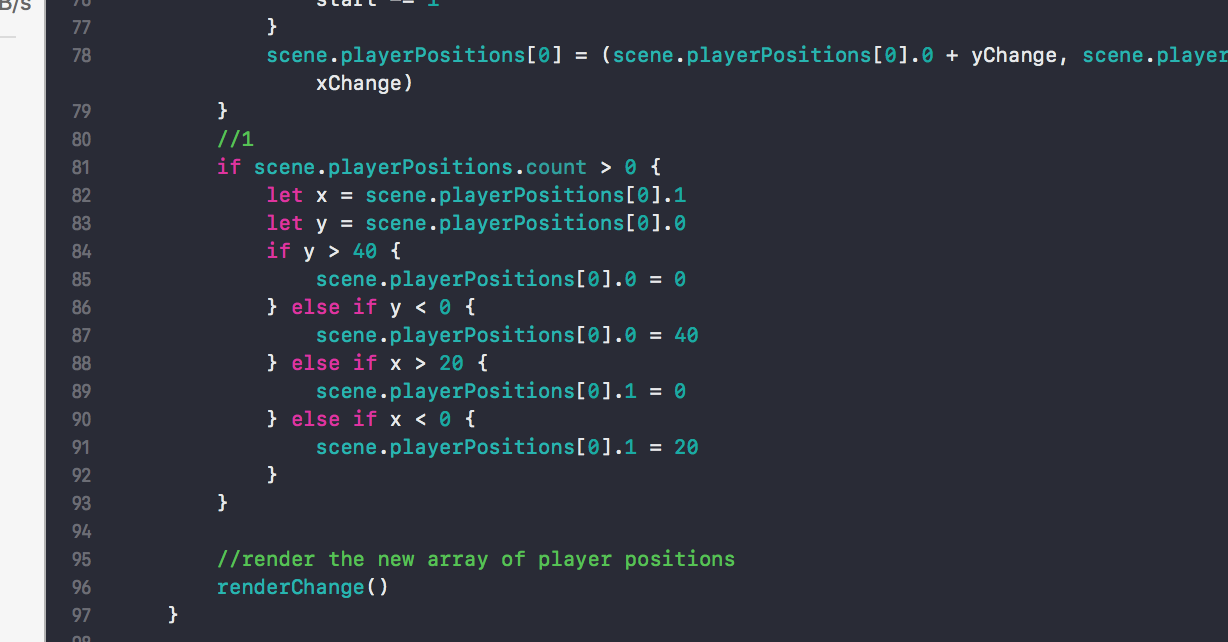 Figure R
Upon compiling your app your screen should match the gif from Figure R, I used playerDirection 4 in the gif. The snake can now warp around each side of the screen.
- 1: This code is fairly simple, it checks if the position of the head of the snake has passed the top, bottom, left side or right side and then moves the player to the other side of the screen.
Controlling the movement of the Snake using swipe gestures
Our game is coming along, we now need a method for controlling the direction of the snake. To implement this we will use swipe gestures to move left, right, up and down. Add this code to your GameScene.swift file so that it matches Figure S.
//1let swipeRight:UISwipeGestureRecognizer = UISwipeGestureRecognizer(target: self, action: #selector(swipeR))swipeRight.direction = .rightview.addGestureRecognizer(swipeRight)let swipeLeft:UISwipeGestureRecognizer = UISwipeGestureRecognizer(target: self, action: #selector(swipeL))swipeLeft.direction = .leftview.addGestureRecognizer(swipeLeft)let swipeUp:UISwipeGestureRecognizer = UISwipeGestureRecognizer(target: self, action: #selector(swipeU))swipeUp.direction = .upview.addGestureRecognizer(swipeUp)let swipeDown:UISwipeGestureRecognizer = UISwipeGestureRecognizer(target: self, action: #selector(swipeD))swipeDown.direction = .downview.addGestureRecognizer(swipeDown)//2@objc func swipeR() { print(“r”)}@objc func swipeL() { print(“l”)}@objc func swipeU() { print(“u”)}@objc func swipeD() { print(“d”)}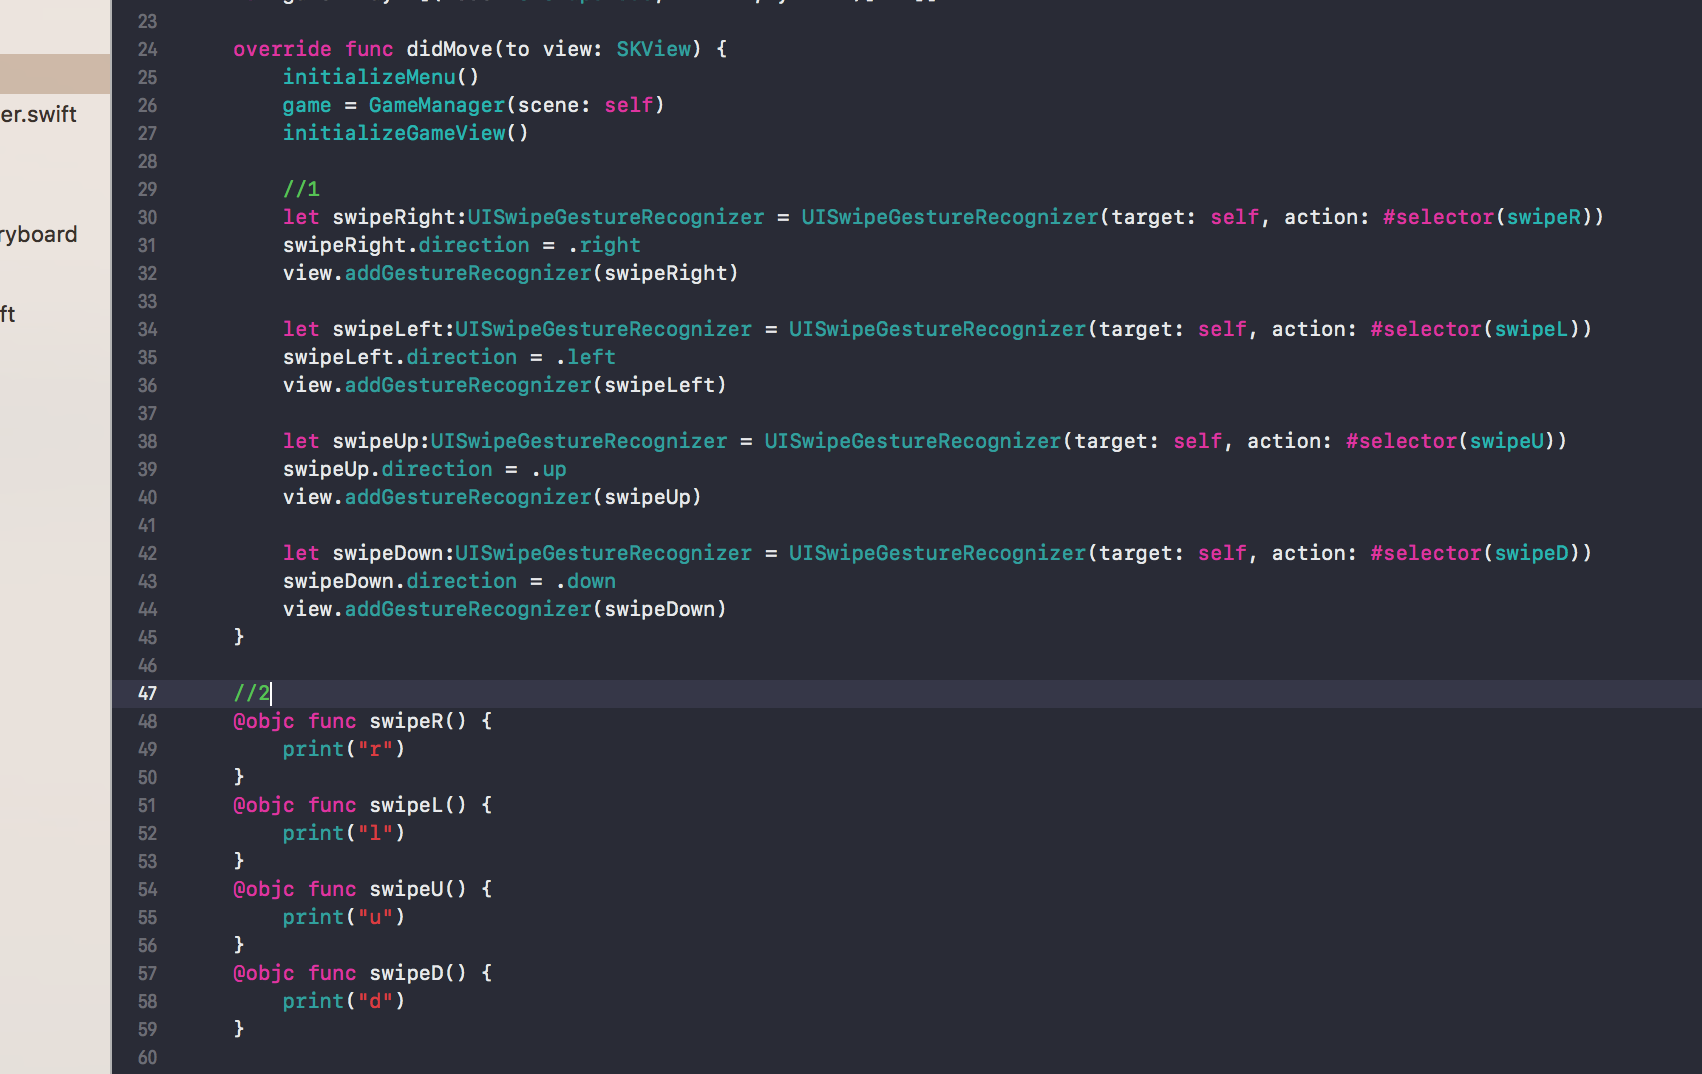 Figure S
- 1: Add swipe gestures to the didMove(to view: SKView) function.
- 2: Create functions that are called when the user enters a swipe gesture. The ?@objc? before the function creates an objective-c function, this is necessary in order to be called via the #selector in the original UISwipeGestureRecognizer.
Test your code by compiling your app and then swiping in all four directions, your console should print the corresponding letter for each swipe gesture. Now that we have gesture recognizers set up we need to change the direction of the player?s movement, replace the print statements inside the swipe functions with this code and add code to GameManager.swift so that your project matches Figure T.
//1 — GameScene.swiftgame.swipe(ID: 3)game.swipe(ID: 1)game.swipe(ID: 2)game.swipe(ID: 4)//2 — GameManager.swiftfunc swipe(ID: Int) { if !(ID == 2 && playerDirection == 4) && !(ID == 4 && playerDirection == 2) { if !(ID == 1 && playerDirection == 3) && !(ID == 3 && playerDirection == 1) { playerDirection = ID } }}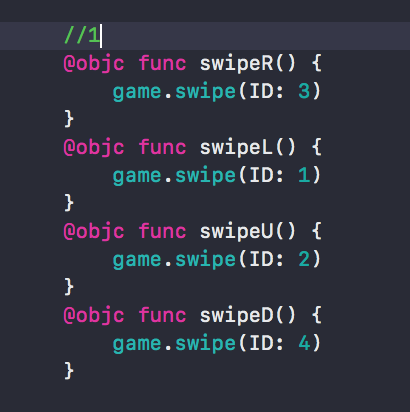
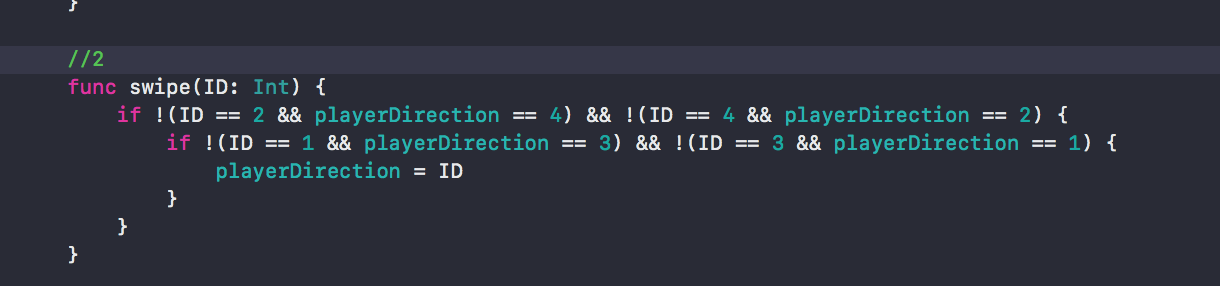 Figure T
 Figure T
- 1: Once a swipe gesture is detected the gameManager class is notified.
- 2: If a swipe is not conflicting with the current direction, set the player?s direction to the swipe input. If you are moving down you can?t immediately move up. If you are moving left you can?t suddenly move right. In some versions of snake inputting an improper move like this would result in death, but in this version we are simply going to ignore extraneous inputs.
Adding points to the game and adjusting the score
We now have a working menu system that opens a game board, an array of cells, an array of player positions, a player that can move around the screen and warp around the edges and a swipe recognizer for controls. Now we have to add a scoring mechanism so that the game is fun. This mechanism will generate random points which will increase the score and lengthen the trail of the ?snake? or player.
First step: Generate a random point and render it on screen. Add the following code to your GameScene.swift file so that it matches Figure U.
//1var scorePos: CGPoint?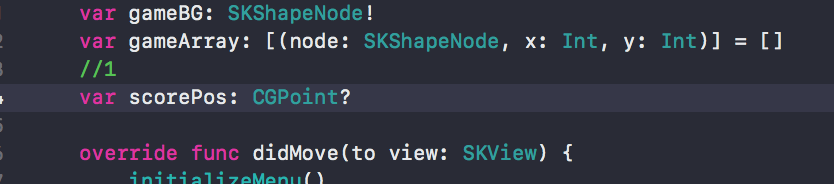 Figure U
Now go to your GameManager.swift file and add the following code so that it matches Figure V.
//2generateNewPoint()//3private func generateNewPoint() { let randomX = CGFloat(arc4random_uniform(19)) let randomY = CGFloat(arc4random_uniform(39)) scene.scorePos = CGPoint(x: randomX, y: randomY)}//4if scene.scorePos != nil { if Int((scene.scorePos?.x)!) == y && Int((scene.scorePos?.y)!) == x { node.fillColor = SKColor.red }} Figure V
After running your code your simulator should show a randomly placed red square.
- 1: Initialize a variable for the random score position. The ? ? ? indicates that this is nil (empty or not set yet) until we set the variable later.
- 2: Call the function inside the initGame() function that will generate a new random point.
- 3: This function generates a random position within the bounds of the board (20/40), arrays start counting at 0 so we count from 0 to 19 and from 0 to 39, this is a 20×40 array.
- 4: Inside the rendering loop we check if the current node?s position matches that of the randomly placed score, if we have a match then we set the color to red. You can modify the color to suit your liking. The variable that saves the score?s position is a CGPoint, this means we have to check the point.x and the point.y and compare it to the locations of the current node?s x and y. Note, the x/y positions are flipped in the array of nodes, that is why we are comparing x == y and y == x.
Now we need to assign a variable that holds the score of the current game and iterate it once the player hits a point. When the player hits a point we must generate a new random point and increase the length of the player?s ?tail?.
Add the following code to your GameManager.swift file so that it matches Figure W.
//1var currentScore: Int = 0//2checkForScore()//3private func checkForScore() { if scene.scorePos != nil { let x = scene.playerPositions[0].0 let y = scene.playerPositions[0].1 if Int((scene.scorePos?.x)!) == y && Int((scene.scorePos?.y)!) == x { currentScore += 1 scene.currentScore.text = “Score: (currentScore)” generateNewPoint() } }}//4while contains(a: scene.playerPositions, v: (Int(randomX), Int(randomY))) { randomX = CGFloat(arc4random_uniform(19)) randomY = CGFloat(arc4random_uniform(39))}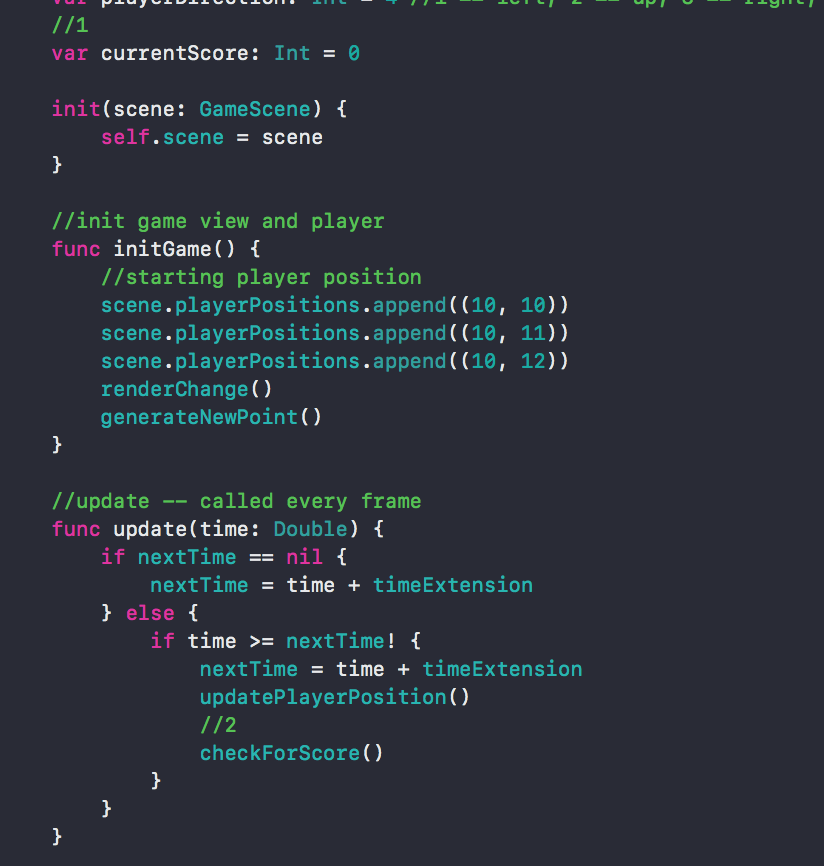
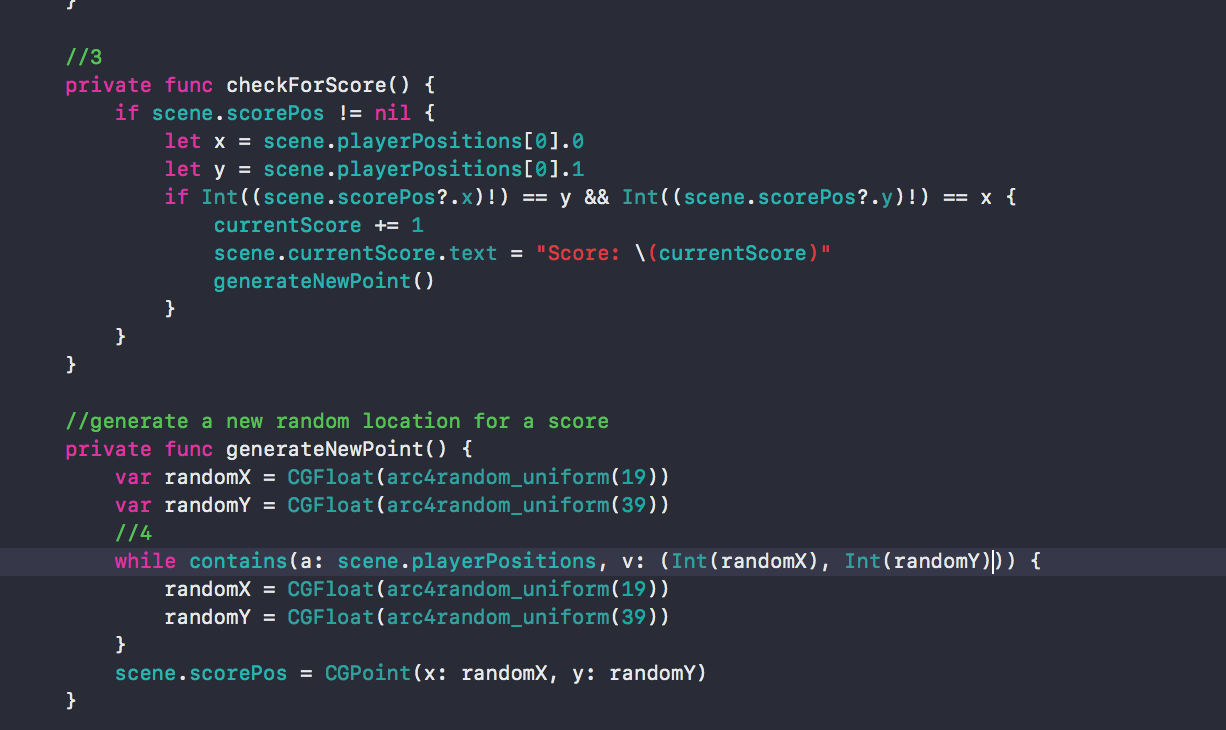 Figure W
- 1: Initialize a variable to track the current score in this game.
- 2: Call the checkForScore() function inside the update function, this is called every time the player moves.
- 3: This function checks if a scorePos has been set, if it has then it checks the head of the snake. If the snake is touching a point then the score is iterated, the text label showing the score is updated and a new point is generated.
- 4: I added this code into the generateNewPoint() method to ensure that a point is not generated inside the body of the snake. As the snake grows in length we will be more likely to run into this problem, so this code block should fix that issue.
Upon running your code you will notice that hitting a score will generate a new score on the board and iterate your score label. Now we have to increase the length of the snake so that the game play mechanics are closer to complete. This turns out to be incredibly simple, simply add this code snippet to your checkForScore() function so that your code matches Figure X.
scene.playerPositions.append(scene.playerPositions.last!)scene.playerPositions.append(scene.playerPositions.last!)scene.playerPositions.append(scene.playerPositions.last!)
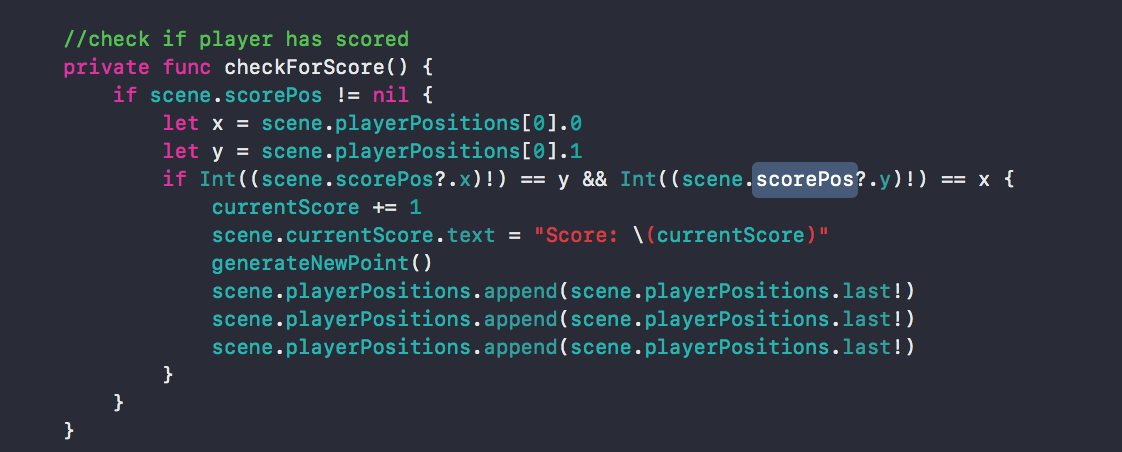 Figure X
Ending the game
We now need to implement a method that ends the game and returns to a menu system. In the game of snake, the game ends once the player runs into their own tail. We can achieve this effect by implementing the following lines of code into the GameManager.swift file. Ensure that your code matches Figure Y.
//1 checkForDeath()//2private func checkForDeath() { if scene.playerPositions.count > 0 { var arrayOfPositions = scene.playerPositions let headOfSnake = arrayOfPositions[0] arrayOfPositions.remove(at: 0) if contains(a: arrayOfPositions, v: headOfSnake) { playerDirection = 0 } }}//3if playerDirection != 0 { playerDirection = ID}//4case 0: //dead xChange = 0 yChange = 0 break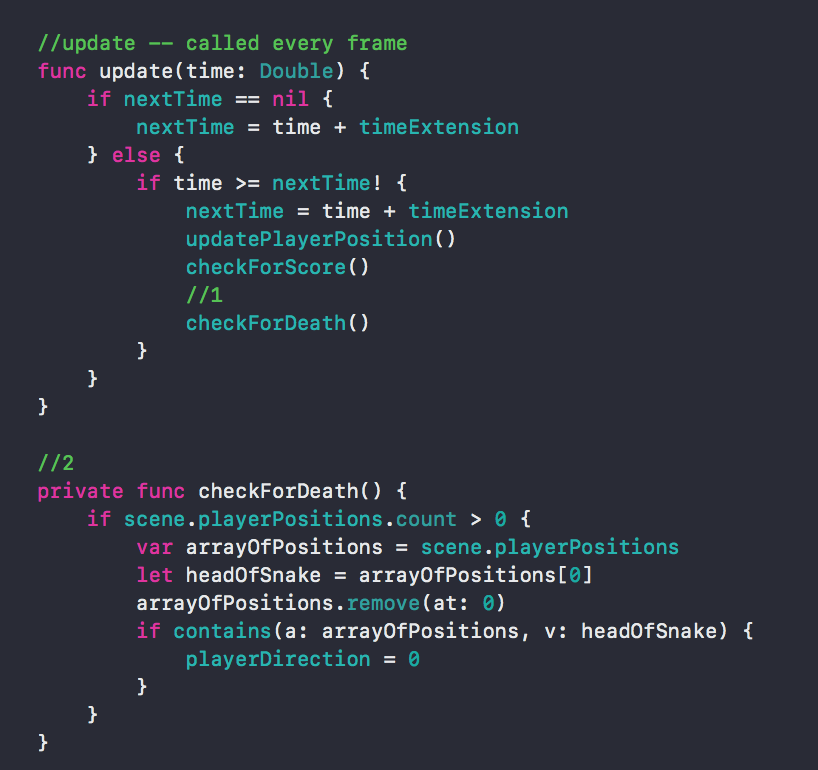
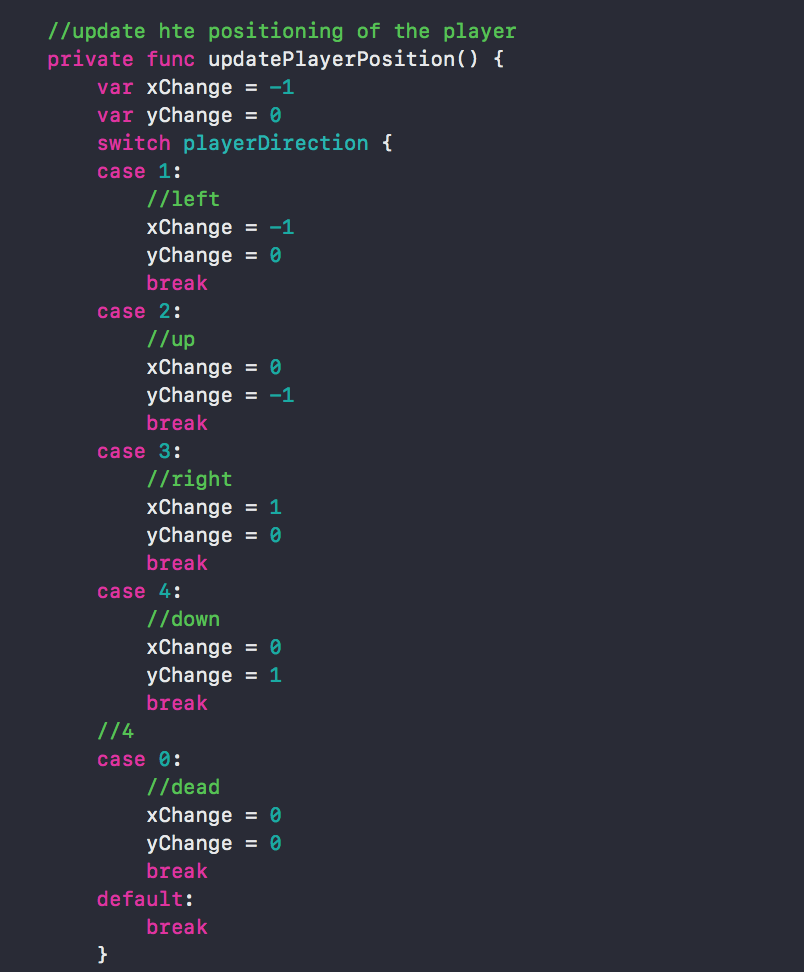 Figure Y
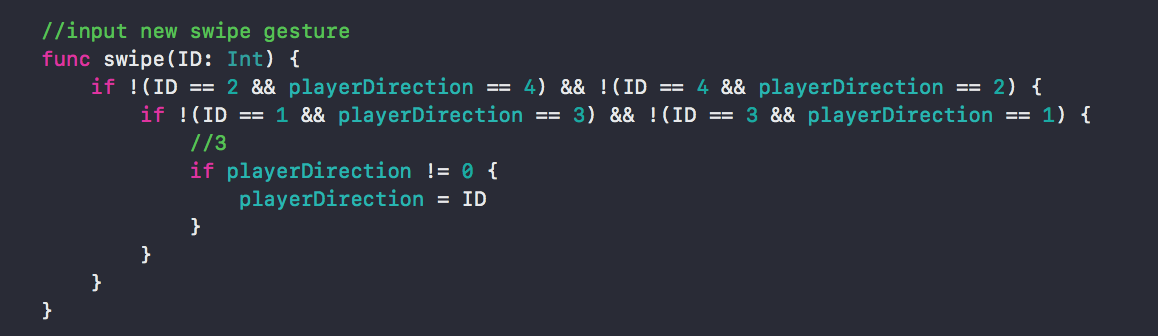 Figure Y
- 1: Call the checkForDeath() function.
- 2: Check if the player?s head has collided with any of the tail positions. If player has died then set playerDirection to 0.
 Figure Z
- 3: If player has died (playerDirection = 0), then do not allow new swipe gestures as inputs.
- 4: Add a new case in the switch statement in updatePlayerPosition(), if the playerDirection has been set to 0, then do not change the position of the head. This will allow the tail positions to slowly remove themselves from view.
After implementing these code changes your app should function like in the screen recording (Figure Z).
When the snake collides with itself the game has ended, we now need to build a method for restarting the game and saving the score as a highscore.
Restarting the game and saving high score data
We have now built a working snake game (for the most part). The final steps are within sight! We need a method for restarting the game and returning to the menu, we also need to save the high score data to the device if this round?s score was better than your best high score.
First let?s implement a method that returns to the menu once the snake has finished its closing animation. Add the following code to your GameManager.swift file so that your code matches Figure AA.
//1finishAnimation()//2private func finishAnimation() { if playerDirection == 0 && scene.playerPositions.count > 0 { var hasFinished = true let headOfSnake = scene.playerPositions[0] for position in scene.playerPositions { if headOfSnake != position { hasFinished = false } } if hasFinished { print(“end game”) playerDirection = 4 //animation has completed scene.scorePos = nil scene.playerPositions.removeAll() renderChange() //return to menu scene.currentScore.run(SKAction.scale(to: 0, duration: 0.4) { self.scene.currentScore.isHidden = true} scene.gameBG.run(SKAction.scale(to: 0, duration: 0.4)) { self.scene.gameBG.isHidden = true self.scene.gameLogo.isHidden = false self.scene.gameLogo.run(SKAction.move(to: CGPoint(x: 0, y: (self.scene.frame.size.height / 2) – 200), duration: 0.5)) { self.scene.playButton.isHidden = false self.scene.playButton.run(SKAction.scale(to: 1, duration: 0.3)) self.scene.bestScore.run(SKAction.move(to: CGPoint(x: 0, y: self.scene.gameLogo.position.y – 50), duration: 0.3)) } } } }}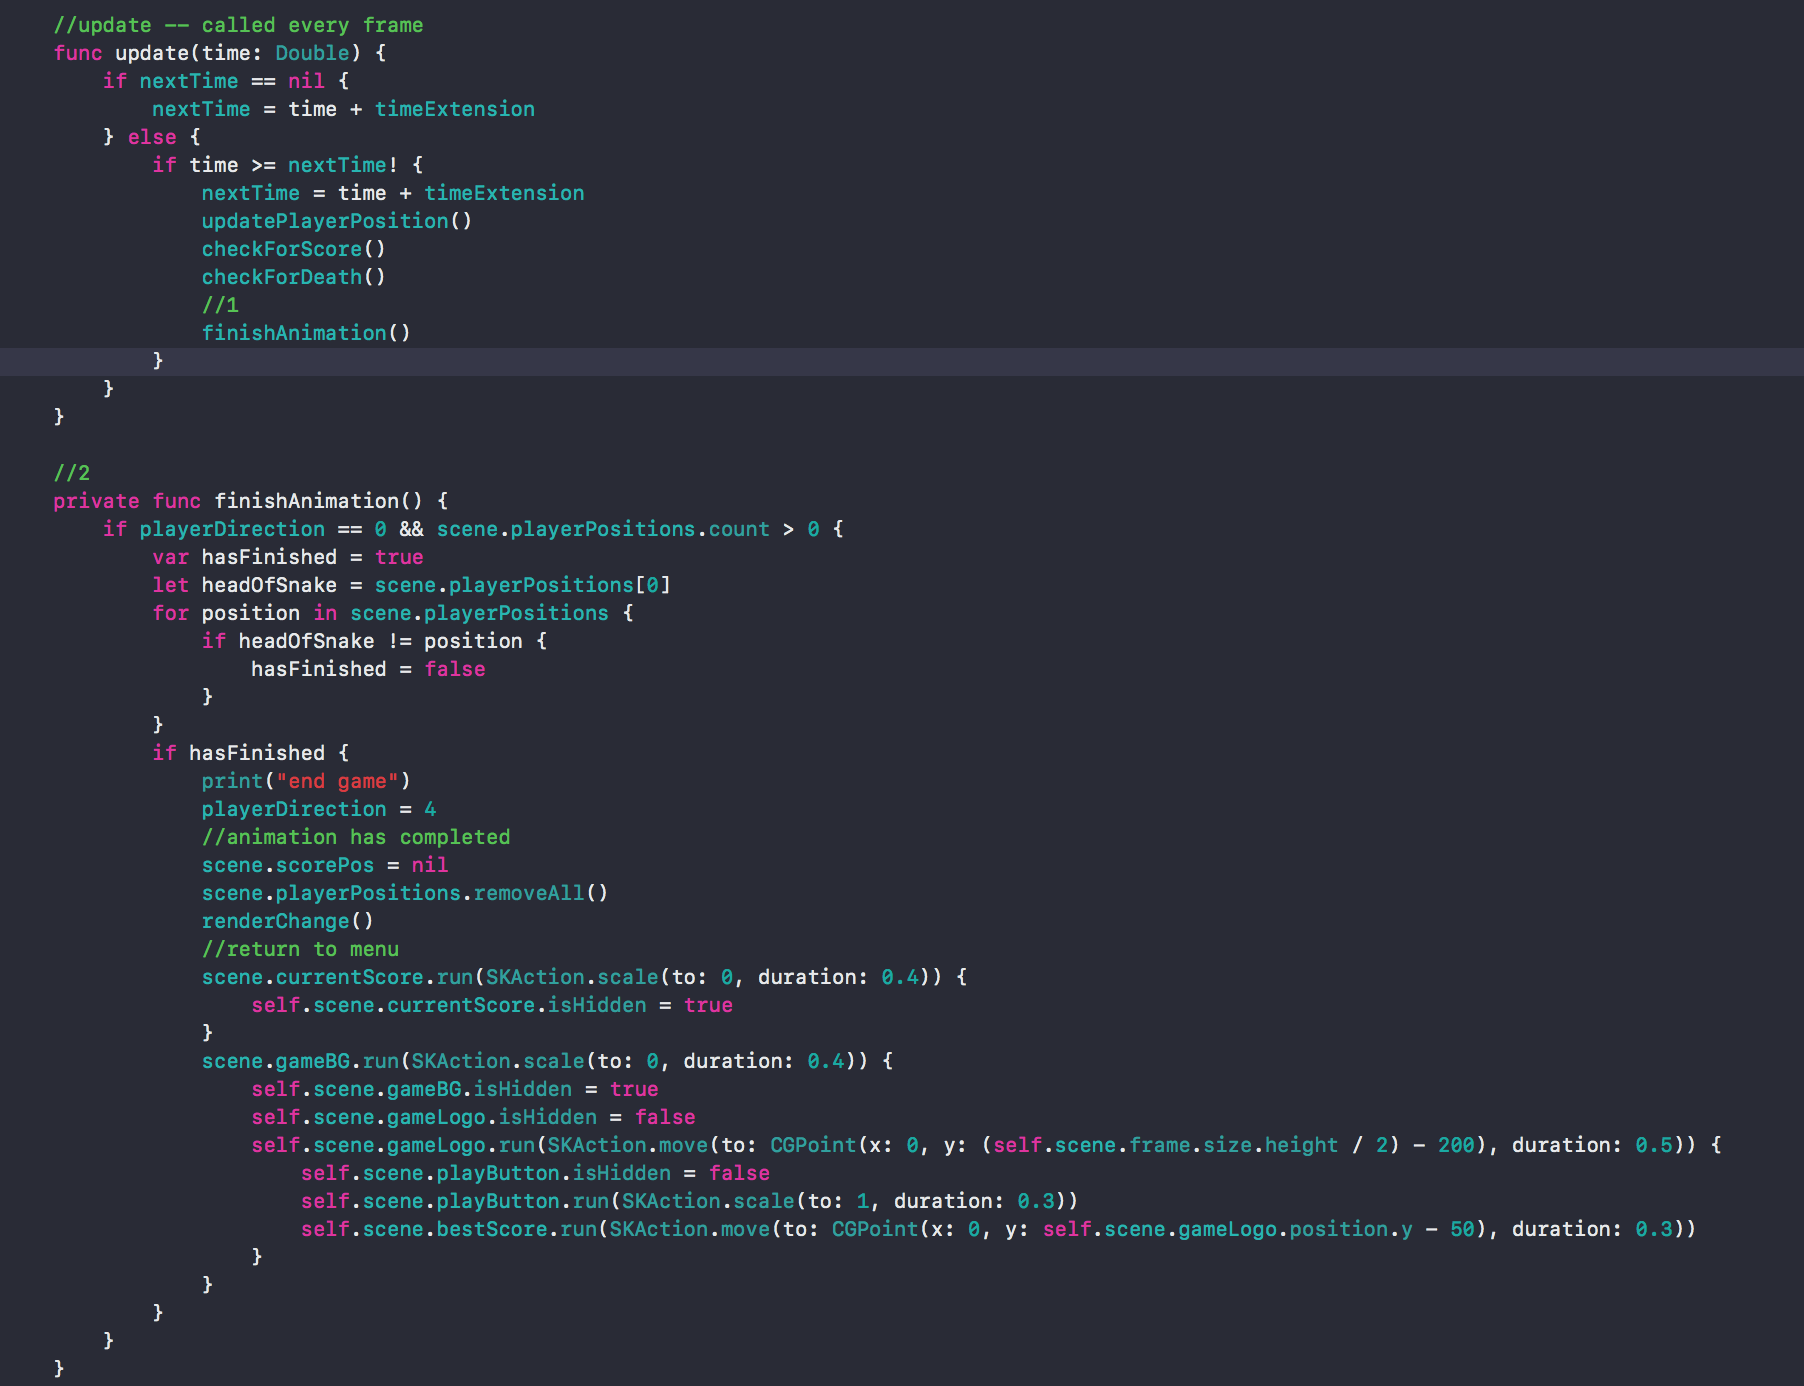 Figure AA
Here?s an explanation for this method:
- 1: Call the finishAnimation() function.
- 2: This function will check for the completion of the snake?s final animation when it closes in on itself. Once all positions in the playerPositions array match each other the snake has shrunk to one square. After this occurs we set the playerDirection to 4 (it was previously set to 0 indicating death) and then we show the menu objects. We also hide the currentScore label and gameBG object (the grid of squares).
Footage of death (unfinished version)
Let?s add a method that saves the high score to the device so that when the app closes we don?t lose our high score data. In the new method (finishAnimation()) you just wrote add this line of code so that your file matches Figure BB.
updateScore()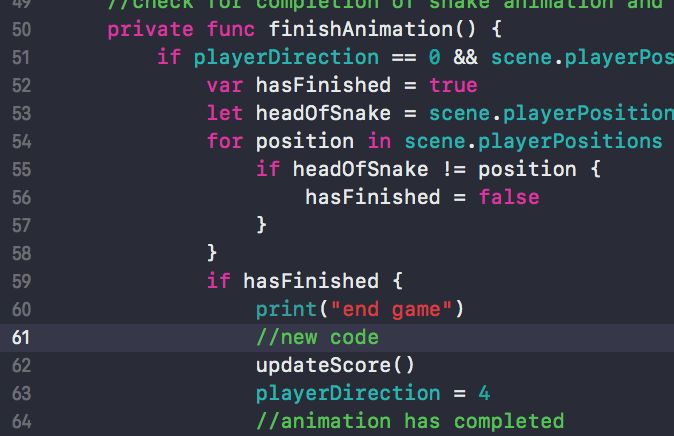 Figure BB
Now open up your AppDelegate.swift file and add the following lines of code so that your project matches Figure CC. This code snippet uses UserDefaults to save data to your device?s memory. If you are planning on building a project with huge amounts of stored data this may cause an issue, however, it works fine for simple things like settings toggles and variables.
let defaults = UserDefaults.standardlet defaultValue = [“bestScore” : 0]defaults.register(defaults: defaultValue)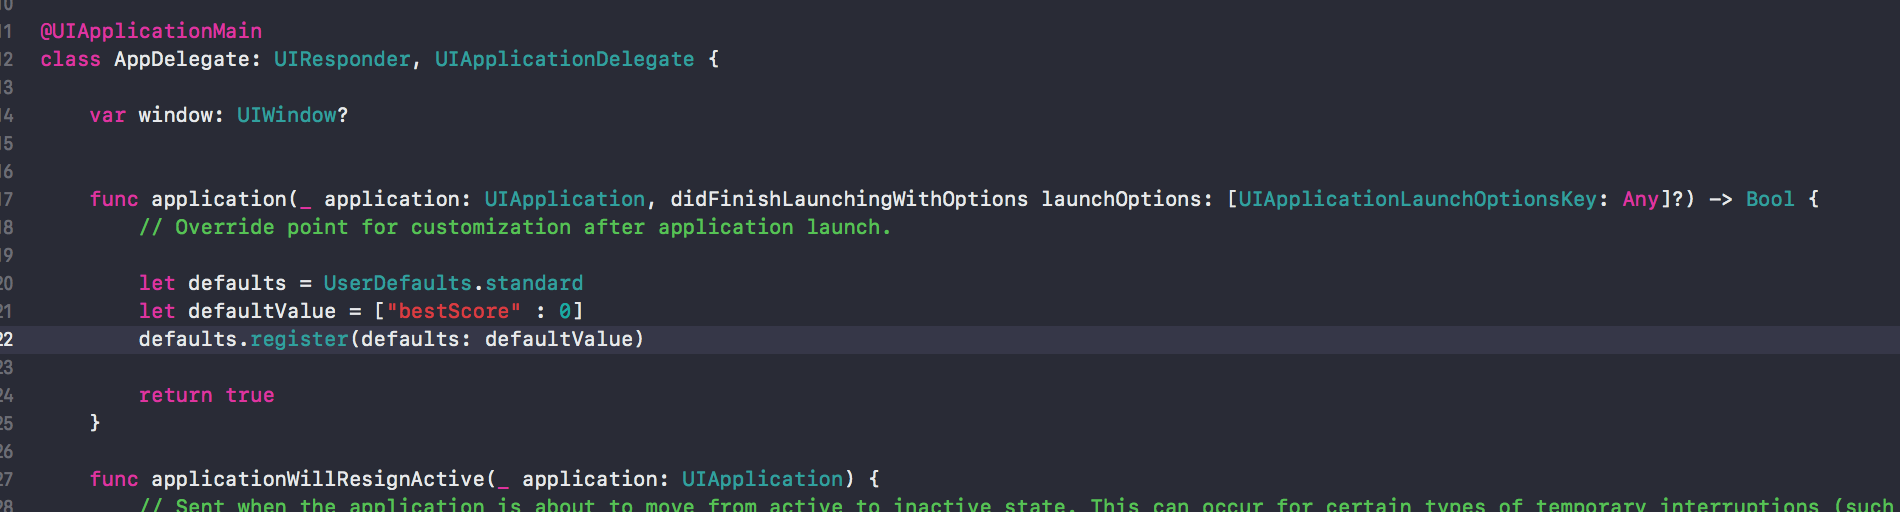 Figure CC
Now return to your GameManager.swift file and create the following method so that your code matches Figure DD. This block of code simply checks if the score has beat the best score and updates accordingly.
//1private func updateScore() { if currentScore > UserDefaults.standard.integer(forKey: “bestScore”) { UserDefaults.standard.set(currentScore, forKey: “bestScore”) } currentScore = 0 scene.currentScore.text = “Score: 0” scene.bestScore.text = “Best Score: (UserDefaults.standard.integer(forKey: “bestScore”))”}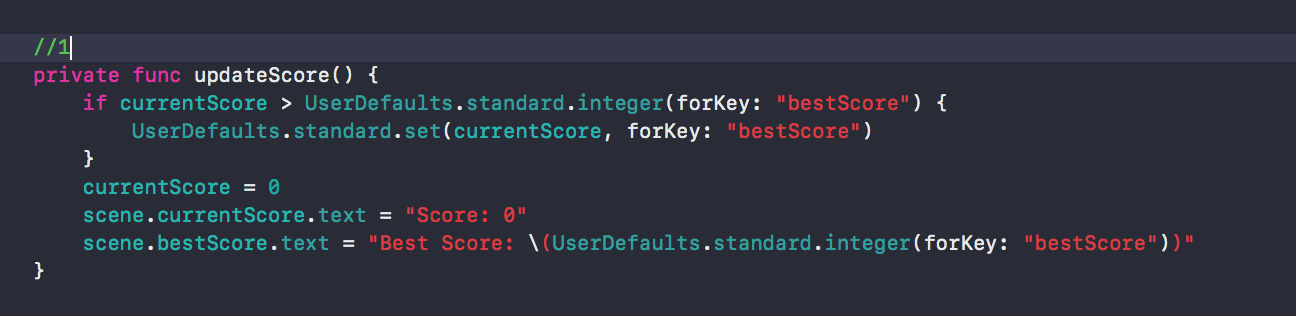 Figure DD
Open GameScene.swift and edit your initializeMenu() function so that your file matches Figure EE. This ensures that when the game loads the saved best score is showing, rather than 0.
bestScore.text = “Best Score: (UserDefaults.standard.integer(forKey: “bestScore”))” Figure EE
After adding this new code your high score will be saved to your device?s memory once the app closes.
Closing thoughts
In order to remove the developer info at the bottom of your screen open your GameViewController.swift file and set view.showFPS and view.showsNodeCount to false.
You have now built an entire iPhone game from scratch! Here is a video demonstrating the final product.
If you enjoyed the project consider checking out my IOS app! If you have any issues or questions feel free to email me at [email protected].
What we built today barely scratches the surface of the complexity that the SpriteKit game engine has to offer. In the future I plan on doing tutorials covering physics, level design and animations.
