
Guitar Chalk is an online magazine committed to quality content for guitar players and musicians. You can access the original version of this article there via: https://www.guitarchalk.com/guitar-lesson-plan-syllabus/
Teaching guitar is often thought of as a fairly fluid exercise, without a linear path to follow.
It?s true that some of what is covered in a guitar lesson plan is dependent on the student?s skill-set and what kind of guitar player they want to become. But, if you take away those variables, there is a teaching structure that can and should be followed.
This is particularly true in the beginner stages because of the learning curve plateau.
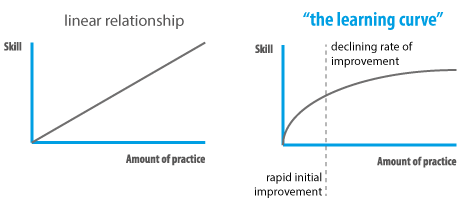
The learning curve ?plateau.? | Image via JamesHaytonPHD.com (View Larger Image)
Since improvement is usually at its fastest pace in these early stages of learning, it?s important to order topics correctly and teach guitar in linear succession, as much as possible.
It can be adjusted and tweaked but, you should never go into a guitar lesson without a clear overall picture of where your student is and what topics they need to cover at that point in time.
Think of it as going to a college class and being handed a syllabus. In this article we?ll design our own template for a guitar lesson syllabus that can be tweaked and used by any teacher.
Designing a Professional Syllabus
A professionally-designed syllabus should have the following elements:
- ?Your name and contact information
- Course details and description
- Schedules topics and objectives (application)
- Additional texts and resources (if applicable)
Here?s a good example of a syllabus from a 300-level education class. We?ll use it as a template to work off of while building our own.
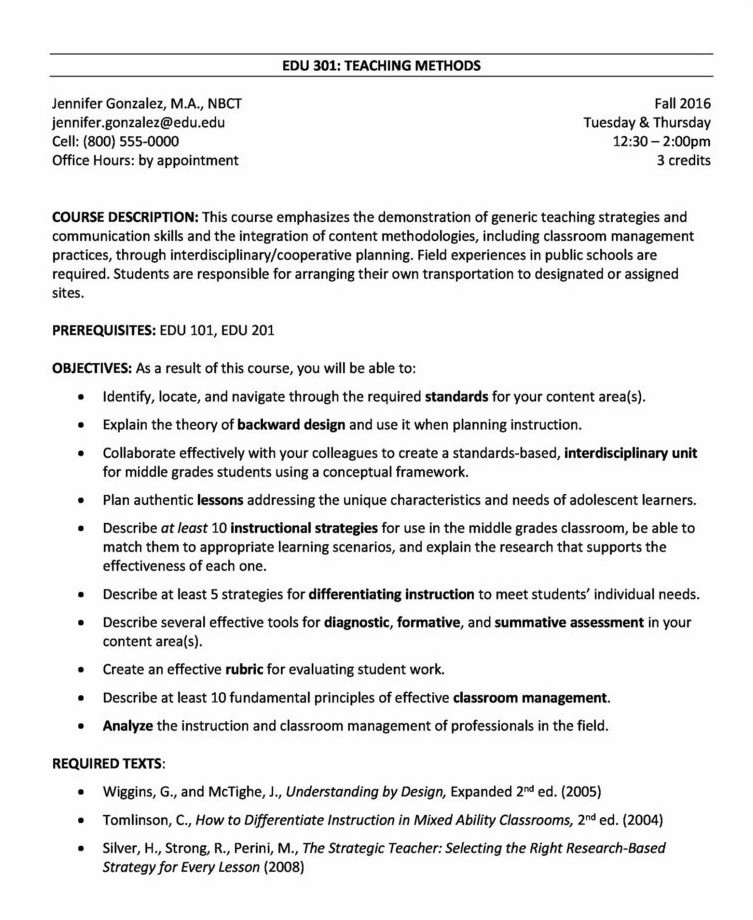
Template for a teaching methods class syllabus, highlighting elements we should including in our own guitar lesson plan. | Image via CultofPedagogy.com (View Larger Image)
A properly designed syllabus will also have, as perhaps its most crucial element, a course calendar that details every agenda by date and the expectations of the student on that given date.
For example:
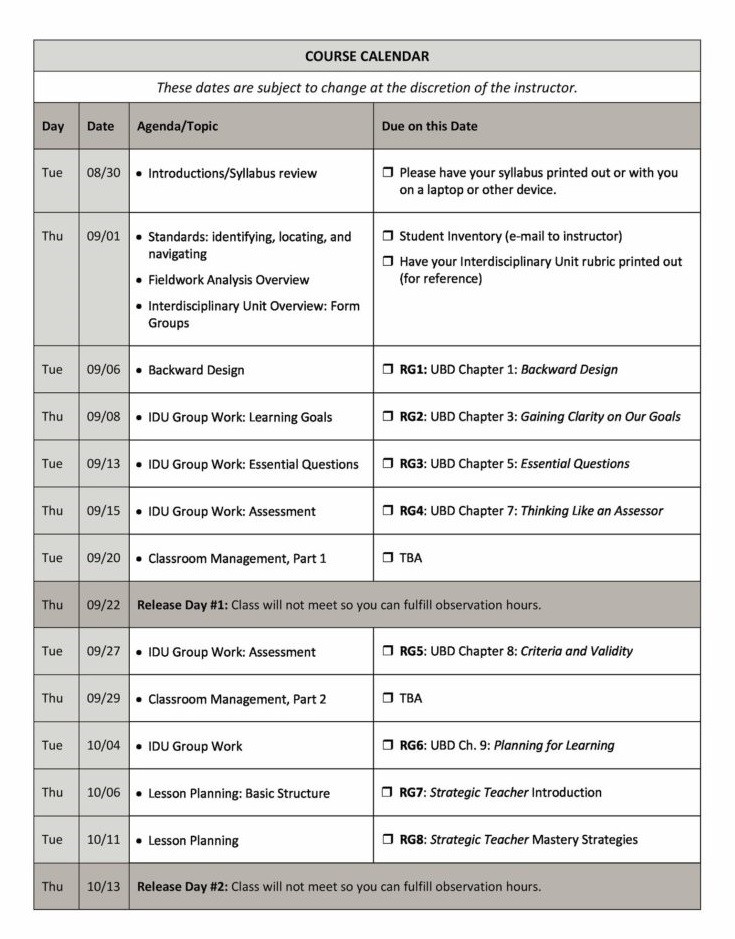
Course calendar syllabus template with agenda, topics and expectations for each day of class. | Image via CultofPedagogy.com (View Larger Image)
Our task is to understand the syllabus construction method enough to translate this into our own guitar lesson plan. Once we do, we?ll have a template that can be used either for private tutoring or for classroom, school of rock-style environments by guitar teachers and students, alike.
Need help planning and ordering guitar lesson topics?
Guitar Tricks provides full courses with properly ordered content for beginners, intermediates and experts. They?ll let you try their full membership free for 14 days. After that you?ve got 60 days to cancel, risk free.
That?s plenty of time to learn some new material and get some help with putting together a more professional and effective lesson plan for yourself or your students.?
If you do decide to purchase, you can click here to get 20 percent off your membership with coupon code GUITARCHALK.?
Topics versus Application and Bloom?s Taxonomy
Before we start designing our syllabus template, we need to look at a few educational concerns that pertain to teaching the guitar.
The first of those concerns is the difference between topics and application.
This comes from an educational principle called Bloom?s Taxonomy, which is essentially a way to order and understand how someone learns and puts into practice a new idea or concept.
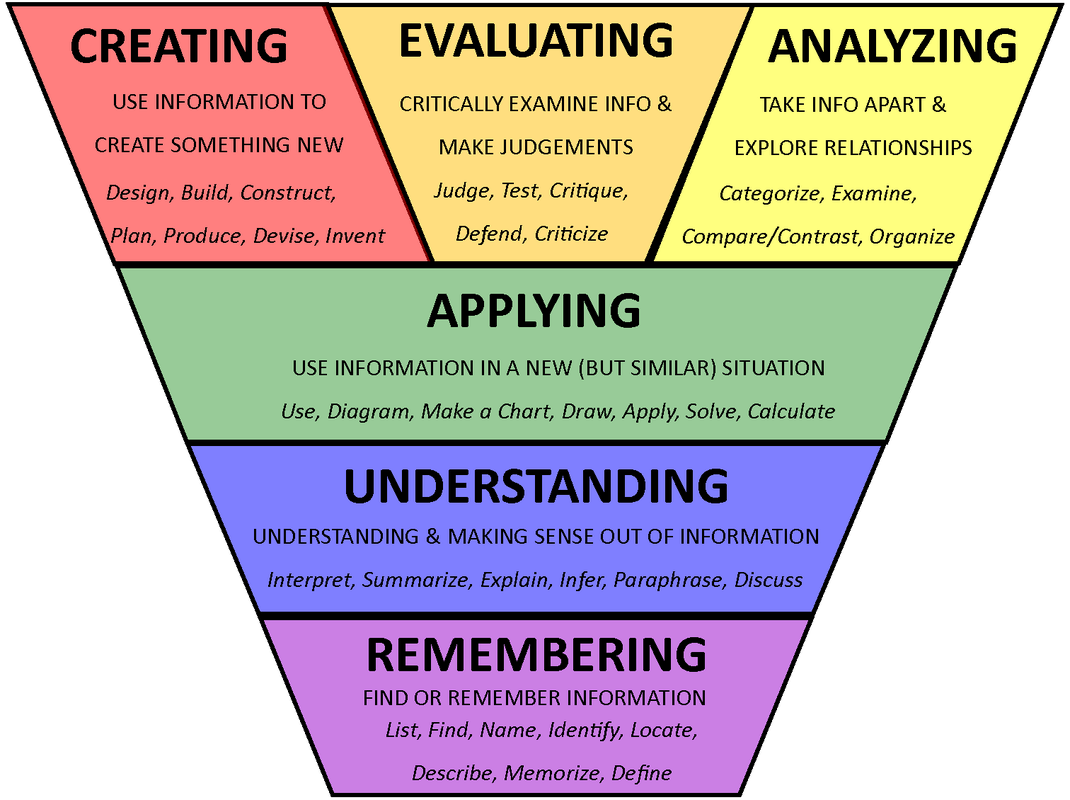
Bloom?s taxonomy model of learning and mastery of a subject. | Image via University of Michigan (View Larger Image)
The most direct way in which it applies to our situation is that creating, analyzing and evaluating topics leads directly into application which is described in this chart as including the following disciplines:
- ?Use
- Diagram
- Make a chart
- Draw
- Apply
- Solve
- Calculate
If I were to translate this to the guitar, I might say that application of guitar-related topics would include:
- Improvise
- Solo
- Learn a song
- Write a song
- Jam along to a track
- Develop a melody or riff
Once this layer of application occurs, we?re then led into understanding and remembering topics. This is why many music students don?t truly grasp a new musical pattern (chord, scale, mode, melody, etc.) until they can play it in a real-world context, namely an actual song.
For the purpose of building guitar lessons, I would define topics and application as follows:
- Topics: Fretboard concepts, shapes or movements that are new to the student(s).
- Application: The use of those movements to create and/or perform something distinctly musical.?
Every good guitar lesson will have both of these elements, in one form or another. They will show a pattern and then illustrate how to apply that pattern, which will lead to the student retaining the material.

A paraphrase of bloom?s path to memorization and subject mastery. (View Larger Image)
You will also have cross-pollination between certain topical studies and opportunities for application. For example, a student might not apply what they know about chords until they begin studying intervals. Application of both those topics can take place in the same way, perhaps by playing a song that involves power chords (power chords illustrate both a chord pattern and perfect fifth interval).
What?s difficult, is getting people to know how to move from topical learning into musical application without becoming too preoccupied with memorization. This is partly why a lot of guitar lessons start and stop with learning chords and scales.
Learning chords and scales is fine but, it?s just the beginning. You?ve got to do something with those shapes instead of just trying to memorize them cold.
If you don?t apply them, it?s going to be harder to recall them in the future.
The Responsibility of the Student
?Isn?t it the student?s responsibility to use what they?ve learned??
Yes, it absolutely is.
To use a tired cliche, the ?real learning? takes place while the student is playing guitar on their own during the rest of the week. If they don?t do that ? or if they?re not interested ? then the topics will likely never take root. Then again, this still points to a lack of application.
Far too many students avoid application on their own because they don?t know how to do it and they?re never able to see the connection between the guitar topics they?ve been taught and the music they?re hearing on their iPods.
As the teacher, you need to illustrate that connection to them and show them how application actually works.
It?s difficult, certainly more difficult than going over a chord sheet, but, it can be done and the syllabus we?ll create will assist in that process.
Ordering Guitar Topics
The second issue to consider is how you order the topics you?re going to teach. We?ve written an entire post on ordering guitar topics properly focusing particularly on the beginner stages, so I won?t rehash too much of that content here.
I?m also not trying to say that the order needs to be the same for every teacher.
Not every history teacher?s syllabus is the same, so not every guitar teacher?s topic order will necessarily be the same.
What you should do is sit down and plan out several weeks of lessons (I?ve put 10 weeks in our template). If you have to adjust on the fly, no big deal.
Just make sure you?ve got something on paper.
Now we can get to building our template.?
Making a Syllabus
We?ll set about the process of making a generic syllabus that gets us through 10 weeks of guitar lessons. Some people do 30 minute lessons as opposed to one hour, so if that?s the case, just cut the time in half, since I?m assuming one hour lessons.
- Works for 30 minute or 1 hour lessons.
- Assumes student is starting with little to zero knowledge of the instrument.
- Can work for individual lessons or classroom environments.
- Can work for acoustic or electric guitar.
- Covers 10 weeks of lessons.
We?ll do a basic schedule that outlines each topic and some ways in which those topics can be practiced and applied.
Guitar Lesson Plan and Syllabus
In this section I?ll walk you through the steps of building an actual syllabus template. Below is a screenshot for what it looked like after the first three weeks of planning, so you can get an idea of how it?s built in succession.
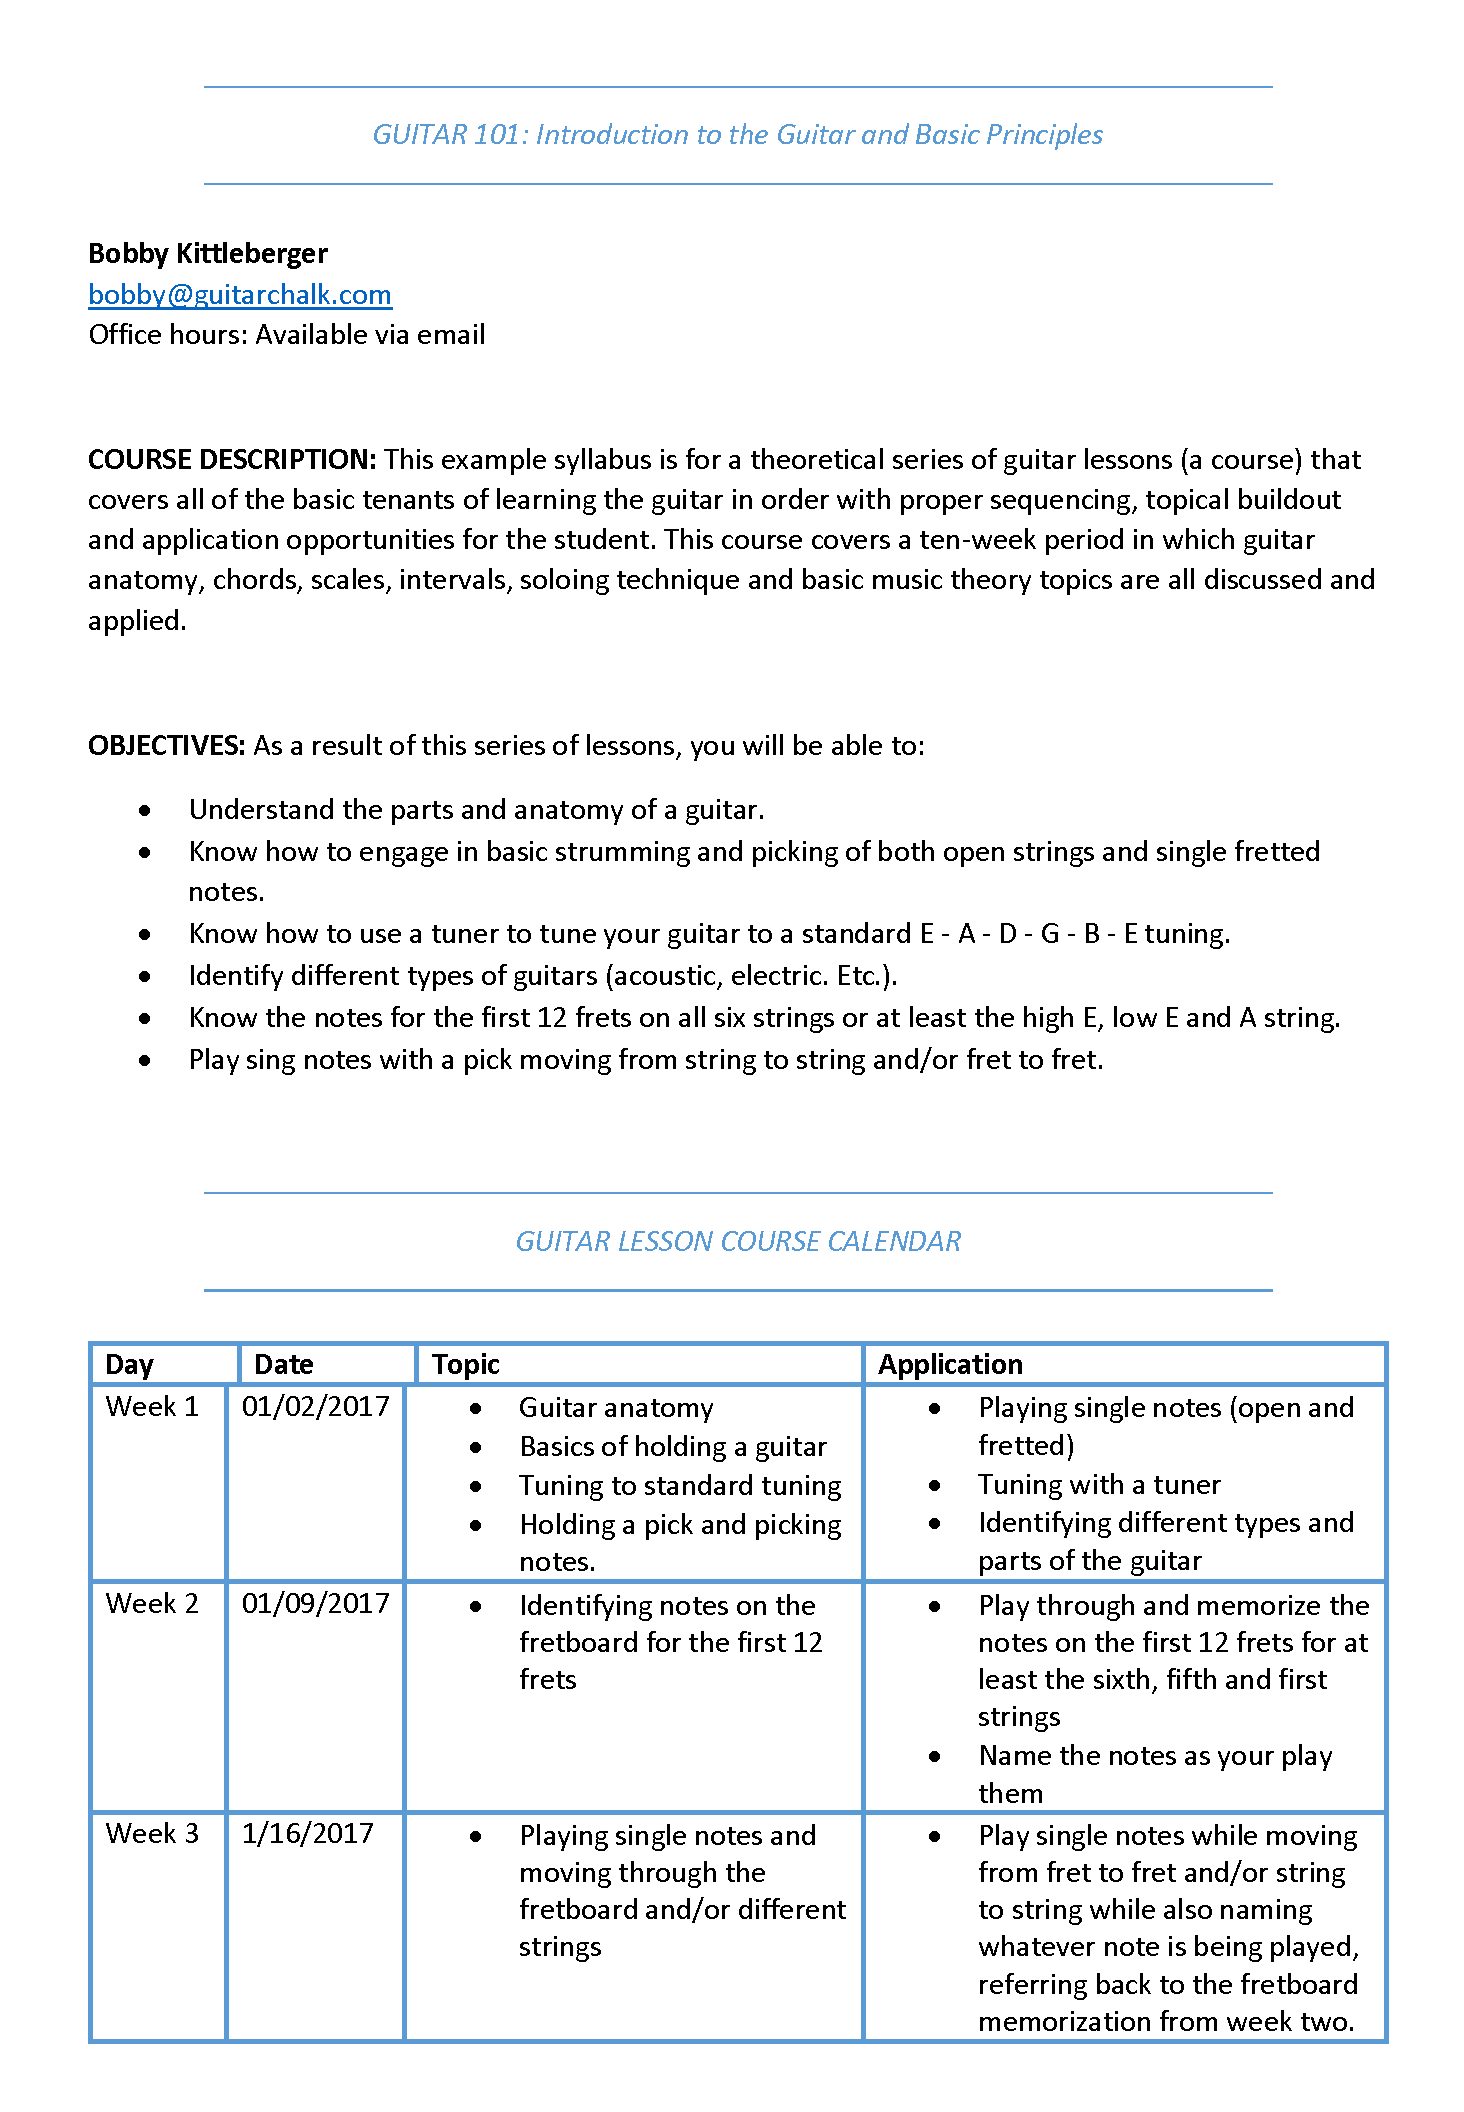
Syllabus template after week three. (View Larger Image)
If you want to download the full template as a customizable Word document, you can do so using the following form:
Download Our Guitar Lesson Syllabus Template in Word
Download the editable Word document for this template to get started building your own guitar lesson syllabus. You can use what you want and replace what you don?t.
DOWNLOAD NOW
Week #1: Basic Guitar Anatomy
In the first lesson (assuming the student is a complete beginner with no knowledge of the guitar) you should cover the physical construction of the guitar, different types of guitars, how to hold a guitar and pick as well as stringing and tuning to standard E-A-D-G-B-E. While a lot of students will know this information ahead of time, it?s smart to have at least a general feel for how to approach these topics, should they need to be explained.
There are plenty of graphics online that do a good job of explaining this for both acoustic and electric guitars:?
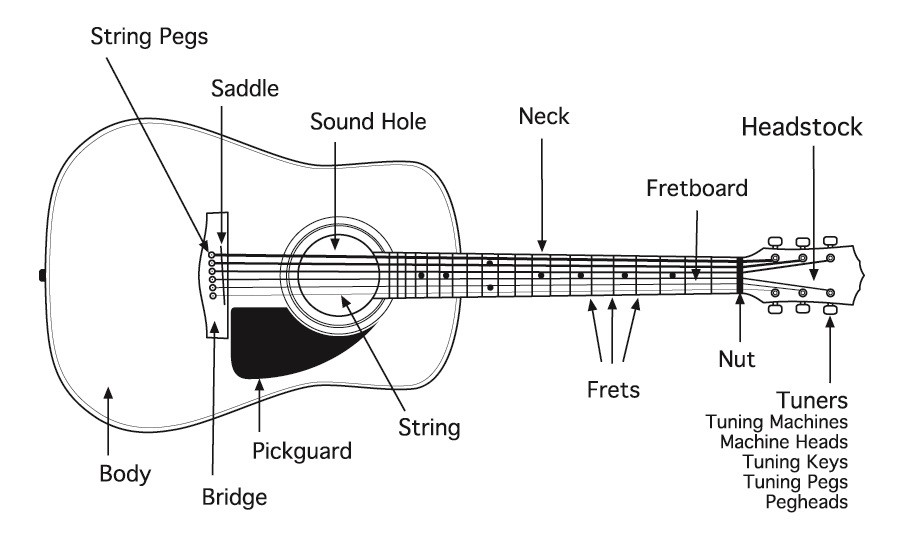
Diagram for parts of an acoustic guitar. | Image via Mark Starlin (View Larger Image)
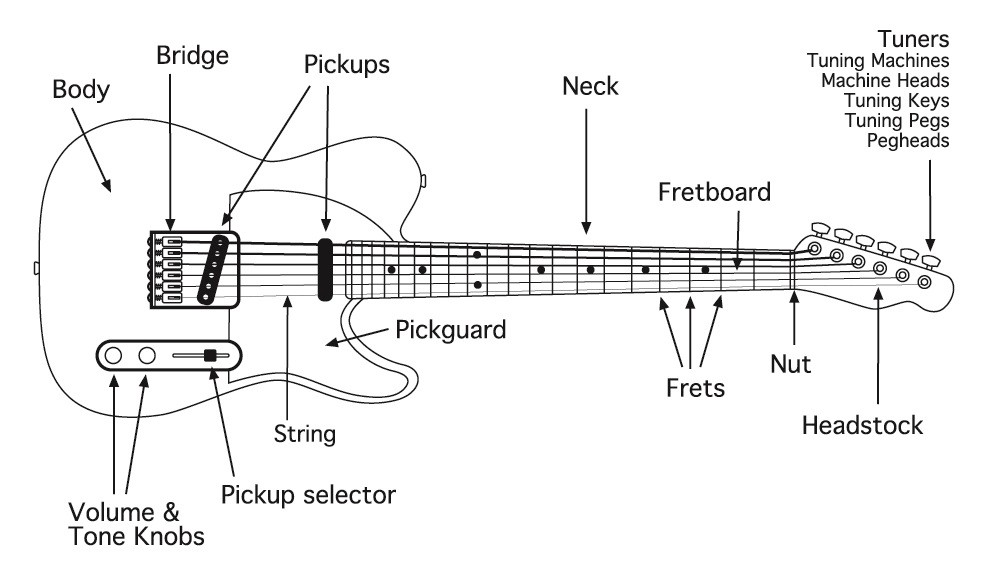
Diagram for parts of an electric guitar. | Image via Mark Starlin (View Larger Image)
WEEK #1 TOPIC CHECKLIST
- Physical parts of the guitar
- Difference between acoustic and electric guitars
- Holding a guitar properly (sitting/standing)
- Holding a pick properly
- Basics of stringing and tuning a guitar
Application
Basic strumming, picking (usually open or single strings) and learning how to use a tuner. Being able to identify the parts of the guitar from memory.
WEEK #1 APPLICATION CHECKLIST
- Alternate, back and forth strumming of open strings
- Picking of open strings and single notes
- Using a tuner and the tuning pegs
- ID parts of the guitar from memory
Week #2: Learning the Fretboard Notes
Build off of tuning the strings by learning the open notes of each string in standard tuning (E-A-D-G-B-E) and then learn the notes of the fretboard for the first 12 twelve frets for the sixth and fifth strings.
Once you get the sixth (low E and high E share the same notes) and fifth strings covered, you can move onto the notes of the remaining three strings, the fourth, third and second. You can find diagrams for the notes of the first 12 frets on all six strings here, if needed.
WEEK #2 TOPIC CHECKLIST
- Open notes of each string in standard tuning
- Notes of the fretboard (first 12 frets) for all six strings
Application
Assign the student to learn the other four strings, based on the repetitive pattern of every 12 frets (if you learn one, you can learn them all). Memorize each fretboard note by moving your finger through each one and calling out each note. Keep in mind that a lot of memorization won?t occur until they actually get to use these notes in a more musical context like playing songs or writing music.
WEEK #2 APPLICATION CHECKLIST
- Know the repeating note pattern of all 12 frets
- Call out notes as you move finger to different frets and strings
Week #3: Single Notes, Fretboard Tracking and Reviewing Week Two
Use the knowledge from week two to start playing more single notes, covering the physical technique as well as working on naming each note?s musical letter (G, C, D etc.). Cover basic fret to fret and string to string finger movement, without incorporating any speed or complexity.
You can use a cheat sheet like the one below if you?d rather have all the notes in one spot to help quickly confirm correct positioning for each one. This particular chart has only natural notes (no accidentals) but you can print the larger version and add them in if you?d prefer.
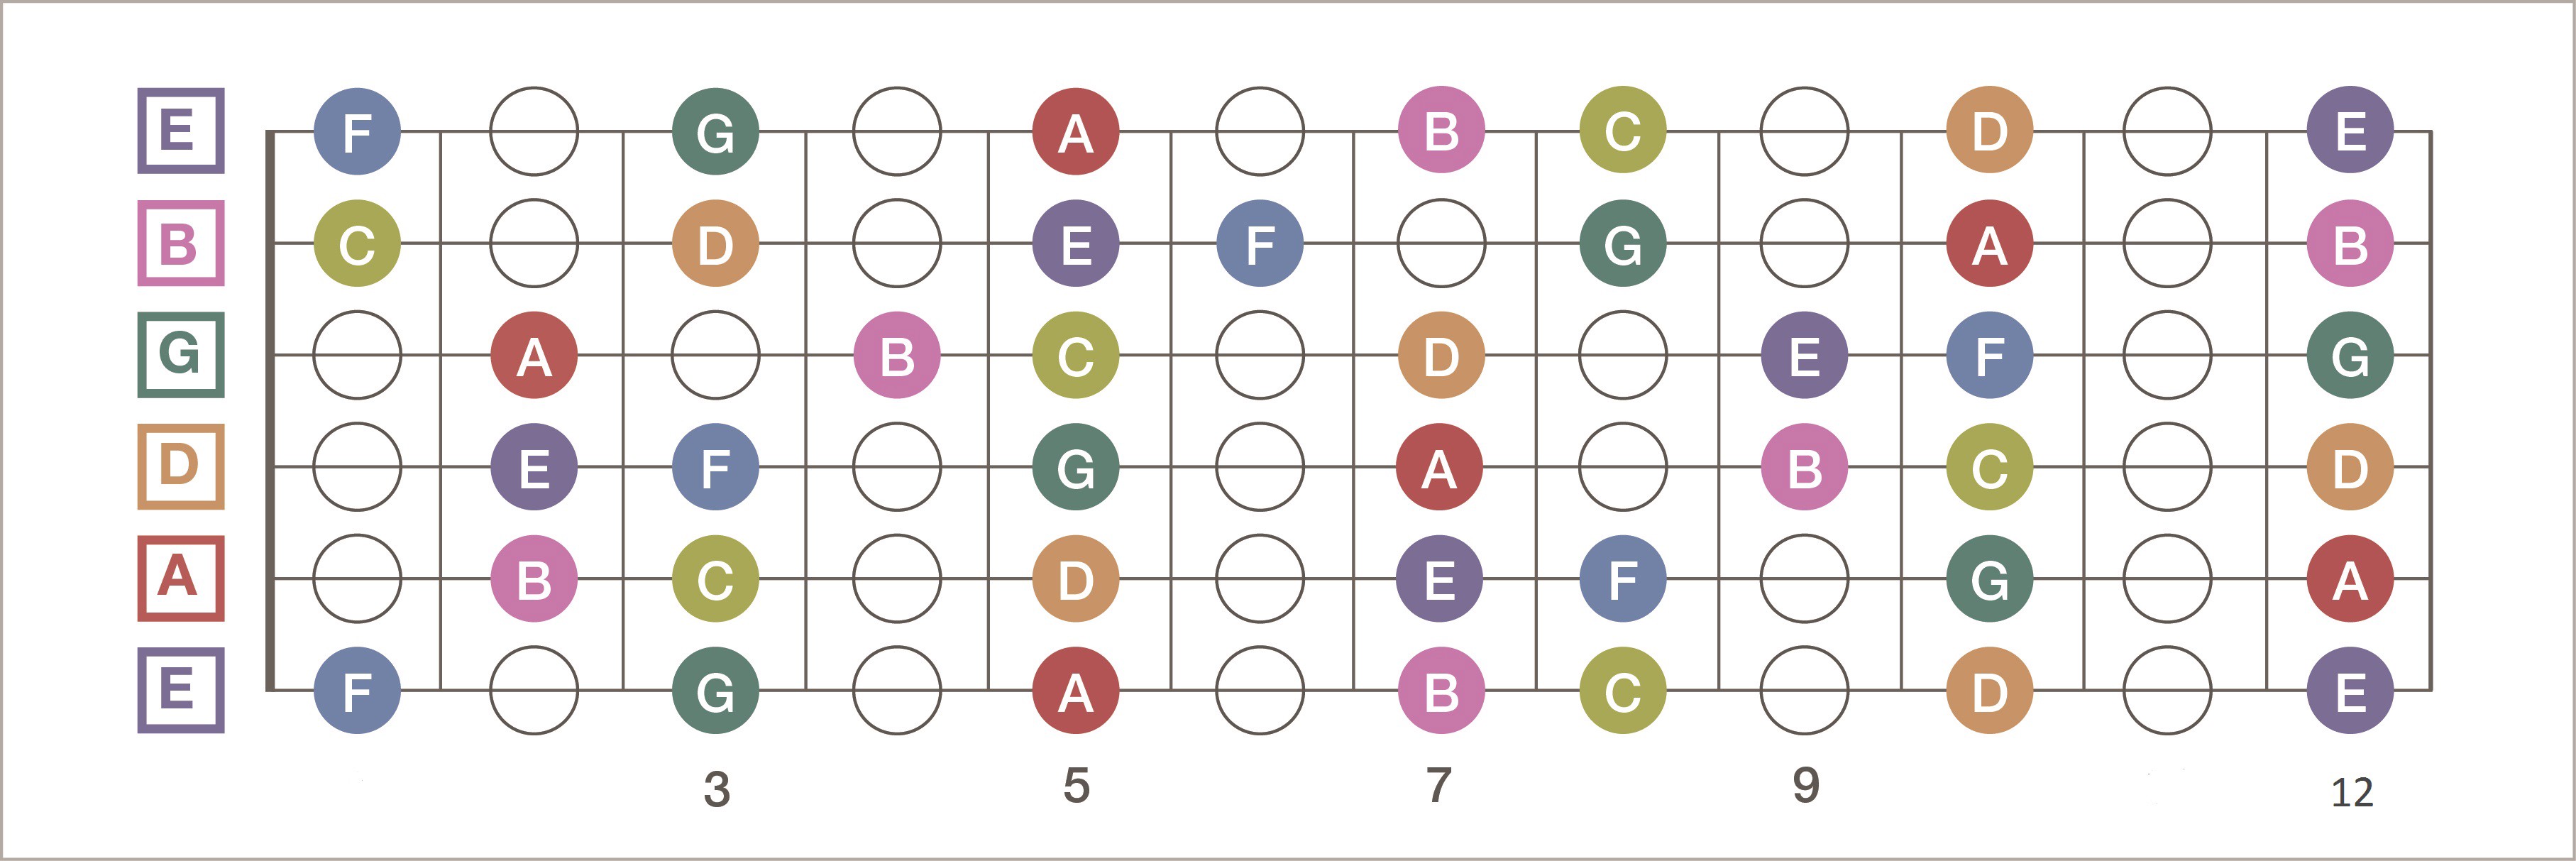
All the fretboard notes from the first 12 frets, with only naturals (no flats or sharps listed). | Image via Ultimate-Guitar (View Larger Image)
WEEK #3 TOPIC CHECKLIST
- Physical discipline of playing and moving single notes
- Identifying notes as you play
- Fret to fret and string to string movement
Application
Assign student to play single notes both in order (up and down the fretboard) and at random while naming the musical letter of each note as they play.
WEEK #3 APPLICATION CHECKLIST
- Play single notes in order and at random while naming each note.
- Continue using the application tactics from week two
Week #4: First Chords
You can cover basic power and open chords shapes, usually G, C, D, E, Em, A, Am and F, while also teaching how to avoid note buzzing and using chords to strengthen your fingers and prepare them for barre chords.
You can refer to this lesson on guitar chords for beginners and the diagrams provided there for visual aid.
Depending on how many chords you cover you might want to take more than one week for this section. If you have to break it up into two or three weeks, there?s nothing wrong with that, since this subject matter warrants a lot of attention.
WEEK #4 TOPIC CHECKLIST
- Basic open chords
- Basic power chords
- Chord polishing tactics
- Proper chord finger positioning
Application
Give the student a list of chords to play, along with some tabs that show how to break the chords out into arpeggios.
Instruct the student to concentrate on maintaining clear notes that don?t buzz and show them how to correct the ones that do.
WEEK #4 APPLICATION CHECKLIST
- Use tab sheets and diagrams to illustrate how to break the chords into arpeggios
- Work on chords that are problematic, particularly if there are buzzing or muted notes that aren?t ringing clearly
- Start on very simple and slow chord progressions
Week #5: Additional Chord Types
Discuss the difference between major and minor chords and introduce student to the basic barre chord shapes.
WEEK #5 TOPIC CHECKLIST
- Major chords
- Minor chords
- Major and minor third intervals
- Barre chord shapes
Application and Week 5 Section of the Syllabus
Give student some easy guitar songs and tabs that use the chords they?ve learned. By now, they have enough chords in their vocabulary to play a lot of music.
WEEK #5 APPLICATION CHECKLIST
- Work on longer, slightly more complex chord progressions
- Work on more songs and perhaps try strumming chords with a click track or metronome
Week #6: Intro to Basic Guitar Scales
Help the student learn both the pattern and the sounds of the scales that you?re covering, while also providing an understanding of the root note of a scale and how to move that scale on the fretboard.
Make sure to articulate how the single notes, chords and scales are all interconnected.
WEEK #6 TOPIC CHECKLIST
- Root notes
- Basic scales
- Moving and transposing scales on the fretboard
- Theory linking notes, chords and scales
Application
Illustrate how to use the scales for basic improvisation and allow the student to experiment by trying to incorporate ?new notes? into the scale that aren?t listed.
Introducing songs with basic lead guitar segments is fine at this point.
WEEK #6 APPLICATION CHECKLIST
- Memorize short, basic scale shapes
- Work on simple lead segments and melodies from familiar songs
Week #7: Intervals and Power Chords
Explain the theory behind intervals, how they can be used for chords and to understand fretboard spacing.
Also, cover how this can relate to improvising and playing lead guitar.
WEEK #7 TOPIC CHECKLIST
- Theory involved with basic intervals
- Intervals and improvising
Application
Take some of the scales you learned in week six and try to extend them by adding intervals.
Use this technique to develop the student?s ability to improvise on their own.
WEEK #7 APPLICATION CHECKLIST
- Extend the scale you?ve covered using intervals
- Work on some basic improvised solos
Week #8: Soloing Technique
Cover the physical and musical aspects of these techniques and show the student how to apply them to single notes and simple melodic patterns.
Also discuss how these are represented in tablature. A quick Google search will yield some good visual aids.
WEEK #8 TOPIC CHECKLIST
- Bends, vibrato, alternate picking and basic lead technique
- How they?re represented in tablature
Application
Provide a few of your own improvised tabs for the student to practice soloing techniques.
Assign the student to come up with their own improvised lead piece by using a scale of their choice and at least five extended notes (beyond the pattern you provide) based on intervals.
WEEK #8 APPLICATION CHECKLIST
- Work through some written lead guitar tabs that include the technique we?ve covered
- Use the scales, extend with intervals and build solos with the technique covered
Week #9: More Complex Scales and Improvising
Cover some more complex scales and modes that are more closely linked to the stylistic preferences of the student.
WEEK #9 TOPIC CHECKLIST
- Scales that are slightly more complex or longer
- Modes and scale variations related to a style (or styles) that interest the student
Application
After memorization the student should be able to work in and out of the scale and know when they?re improvising or ?extending? the scale as opposed to playing within the structure of the scale itself.
WEEK #9 APPLICATION CHECKLIST
- Work on extending and improvising scales
Week #10: Rhythm and Song Dynamics
Discuss how rhythm impacts your strumming technique, while also covering how the dynamics and intensity of a song should impact how the guitar is played.
WEEK #10 TOPIC CHECKLIST
- Rhythm and strumming
- Musical dynamics and playing intensity
Application
Assign songs for the student to listen to that exemplify the dynamics of the guitar and help the student hear when they need to pull back or play heavier.
Have the student work on their ability to play softer and louder on command by making use of effects and their own technique.
WEEK #10 APPLICATION CHECKLIST
- Play through songs characterized by heavy rhythms that are easy to follow
- Play through songs and work on paying attention to dynamics and intensity of the music
Accounting for Variables
This is a basic skeleton of a ten-week syllabus for teaching guitar, with plenty of room to adjust if you need to. If we go back to the variables I mentioned earlier, you?ll probably have a few of those coming into play. For example, a student might know some of this stuff already, particularly the more basic stuff like how to hold and tune a guitar.
When that happens, you can obviously just skip ahead.
What?s not straightforward is when you have a student with a specific goal or focus. Let?s say you?ve got someone who really wants to be a rhythm guitarist and is interested in jazz.
When that happens, you change your syllabus in terms of emphasis not necessarily in terms of content.
That means that you?ll focus more on beat and counting, along with chords and chord-changing mechanics.
As you cover the more basic topics, you?ll be ready to start incorporating jazz-specific lessons that will be much more interesting to the student.
What?s the best way to learn guitar and study music?
Thus, for the student:
What?s the best way to learn guitar and study music?
It?s not a static discipline, which means optimal methods (and syllabus construction) aren?t always obvious. Learning the guitar is a subjective flight path, where the waypoints depend on your style of learning.
Because not everybody learns the same way.
It?s tough to put 30 kids in a classroom and expect all of them to fully (or even partially) understand the material based on one particular teacher?s method.
Regardless of the topic, that format isn?t comprehensive for most students.
It doesn?t matter how well the syllabus is crafted.?
The formal classroom model is narrow, outdated and often times ineffective, because we?re all wired to learn differently. Some are visual learners, some auditory, while others thrive with formal instruction.
Thus I never recommend the crowded classroom model.
However, most of the alternative methods are all valid approaches, having both advantages and disadvantages, depending on the individual.
So, which one is right for your student?
Read on and we?ll discuss a little bit about each, as well as their pros and cons.
Self Taught
Self-taught individuals who are engaged and motivated make some of the most effective and promising guitar students.
That?s not to say they avoid formal lessons. But, it does mean that they often do their own research and learn most of the guitar independently, without third party assistance. It also means that you, as the teacher, assess their learning style and pursue methods that accommodate.
Are they a hands-on learner? Play songs instead of scales. Or perhaps they?re a mathematical-leaning brain? Stick to the scales and modal pattern changes.
Self-teaching the guitar involves self-assessing and understanding how you absorb and retain information.
If your student can do that, they have a number of distinct advantages with this method.
ADVANTAGES
- Opportunity to do their own research and develop a lesson plan
- Helps the student engage on their own without third-party motivation
- Often results in a more creative and self-sufficient musician
- Can help a student craft a more unique approach to the guitar
DISADVANTAGES
- Lack of direction and difficulty knowing ?where to go next.?
- Can result in skipping important topics and concepts
- Those who aren?t self-motivated can more easily slack off
Some people need the extra push of a third-party to get them to really stick with an instrument.
But, if you?re a good self-motivator, who likes to learn and be creative on your own, self-teaching and learning the guitar is going to work well for you.
One on One Lessons (Tutoring)
The personal touch of one on one guitar lessons can be beneficial for a number of different learning styles.
Those who like to take notes or who learn in a more linear and concrete fashion will fair better with someone who?s able to guide them through concepts one step at a time.
This is, however, assuming one caveat:
Getting guitar lessons shouldn?t abnegate one from the responsibility of self-teaching.
It?s also a more corrective environment, where a guitar student is able to get instant feedback. Mistakes, inconsistencies and bad habits are handled immediately instead of over time.
What a lot of people might not like about tutoring is that it can be a crutch for some players who find it difficult to play guitar outside of a weekly session.
Keep in mind, a guitar lesson is only an hour or so once a week (often an expensive hour) which means that your student won?t actually learn to play guitar in just that time span. They?ll learn concepts, topical knowledge and acquire tools that you hope will be applied later.
Thus, guitar lessons don?t abnegate one from the responsibility of self-teaching.
ADVANTAGES
- Personal and attentive
- Can quickly and easily correct mistakes and bad habits
- Relational learning component
DISADVANTAGES
- Cost
- Can make a player less innovative
- Is often used as a crutch
The disadvantages here are mostly self-inflicted as a result of a student putting too much faith in the guitar lesson itself.
A lesson is a tool in hand but, in and of itself, can?t make a great guitarist.
Video-Based
Before you pay any money, you could spend a lot of time working with free guitar lessons online and probably never have to spend a dime.
If you did want to purchase an online resource, the market is well-stocked with options.
That?s both a good and bad thing. Good, because it gives us a lot of great options to choose from, bad, because it can be difficult to find something of good quality. I?ve reviewed two websites where you pay to learn guitar in a video format, both of which I would recommend to someone looking to spend money.
- ArtistWorks Guitar Campus
- Guitar Tricks
These two websites offer routinely updated content and a live online community, neither of which you get with DVDs.
If you do decide to pay for a video-based lesson system, go with the reputable sites and avoid the outliers.
ADVANTAGES
- Ideal for visual learners
- Quicker and more succinct then written or in-person lessons
- Illustrative and easy to follow
DISADVANTAGES
- Inflated market
- Can in some instances be overpriced
- Explanations can often be incomplete and short-winded
Text-Based
This method would include any and all online or book resources (not unlike this website) that rely, either primarily or completely, on text and static media to communicate ideas and teach the instrument. It often works in conjunction with video, though it?s rare that someone who prefers to read their instruction will also find video to be an equally useful format.
Most people prefer one or the other.
Text-based and graphical content are more often coupled as they?re a time-tested and optimal combination.
Learning this way has a few distinct advantages over the others.
First, it?s an easy medium to access anywhere and on any device, electronic or otherwise.
Second, the written word allows you to set your own pace for absorbing content. However fast you read and process information is how long it will take you.
Though written lessons can in some cases be less descriptive then video lessons, that?s more so a fault of the writers and in no way reflects the true capability of the written word. Low-quality and incomplete content has (unfortunately) become a trademark of internet content, regardless of topic.
Cheap, short-form, low on detail and low on value are descriptors marking a high percentage of online content.
ADVANTAGES
- Allows the student to easily set their own pace
- Traditional method of sharing information and teaching
- Easily transported and shared via digital or hard copy
- Requires an engaged mind
DISADVANTAGES
- Can be susceptible to low-quality content
- In some cases will lack depth of explanation
Homeschooling Considerations
Those who are homeschooled have a unique opportunity to put time into their instrument. I was homeschooled K through 12 and was able to put a significant amount of time into the guitar.
First, we did school year-around from 8am to 12pm, which often gave me the entire afternoon to play guitar or do whatever else I wanted. From 14 to 18 years old, there were plenty of three and four hour practice sessions on any given day.
In that situation, being self-taught is one of the best ways to learn, whether you lean towards video or text-based material.
It?s also extremely conducive to those who are self-motivated learners, something being homeschooled always requires of you.
For those who don?t have quite so much time to devote, personal tutoring might be a better way to learn, especially since those who aren?t homeschooled might be more comfortable with an actual instructor.
So, what?s the best option?
Is there a best way?
There isn?t, if you?re talking about a universally accepted optimal method.
But, there are optimal methods for different people, depending on your own learning style, tendencies and one?s brain wiring. That said, the method that I most often recommend is a combination of the self-taught/text methodologies, with the following prerequisites:
- Must be a motivated self-learner and researcher
- Must be excited and interested in the guitar
- Must have the time to devote to the instrument
If you fit that description, go with the self-taught strategy and read up.
This is often the younger player with extra time on their hands, where someone who doesn?t have the time or who isn?t motivated outside of a casual interest in the guitar might be more comfortable with a combination of formal tutoring and quicker video-based lessons.
So you have two basic lanes for two different types of learners.
- Self-taught, slow-moving and comprehensive
- Lesson-taught, fast and focusing on the highlights
The first is good for developing a thorough and specific set of skills, while the second is more so designed to ?get you playing? and focusing on the foundational aspects of the guitar.
Concluding
It?s tough to understand what someone?s ideal learning patterns and situation might be. As a guitar teacher, you?ve usually got the advantage of having a 1-to-1 student to teacher ratio. Take advantage of that by having a structure in place that you can work off of, rather than just winging it and hoping for the best.
A student will be more confident in what they?re learning if you?re confident and assertive about when and how it needs to be taught.
Hopefully, this can help by giving you a framework to start from.
Download Our Guitar Lesson Syllabus Template in Word
Download the editable Word document for this template to get started building your own guitar lesson syllabus. You can use what you want and replace what you don?t.
DOWNLOAD NOW
Additional Reading and Resources
How to Write a Syllabus: https://www.cultofpedagogy.com/course-syllabus-how-to/
The Linear Learning Curve: jameshaytonphd.com/writing-why-practice-doesnt-always-make-perfect/
Bloom?s Taxonomy (University of Michigan): h ttps://lsa.umich.edu/iss/knowledge-base/active-learning-/bloom_s-taxonomy-history-and-development/history-and-development.html
?Guitar Anatomy Graphic: http://guitarless.com/2009/11/guitar-101-anatomy-the-basics/
Parts of the Guitar: http://www.markstarlin.com/guitar/2014/8/28/guitar-parts
Something to share?
What are your thoughts on music education and the best ways to learn guitar?
Is the classroom method dead or dying?
Let us know over on Twitter or in the Medium comments section below.
Wanna get in touch? Hit us up over at Facebook and Twitter.
Flickr Commons Image Courtesy of Kmeron

