
The antidote to bloated wood fired pizza ovens?
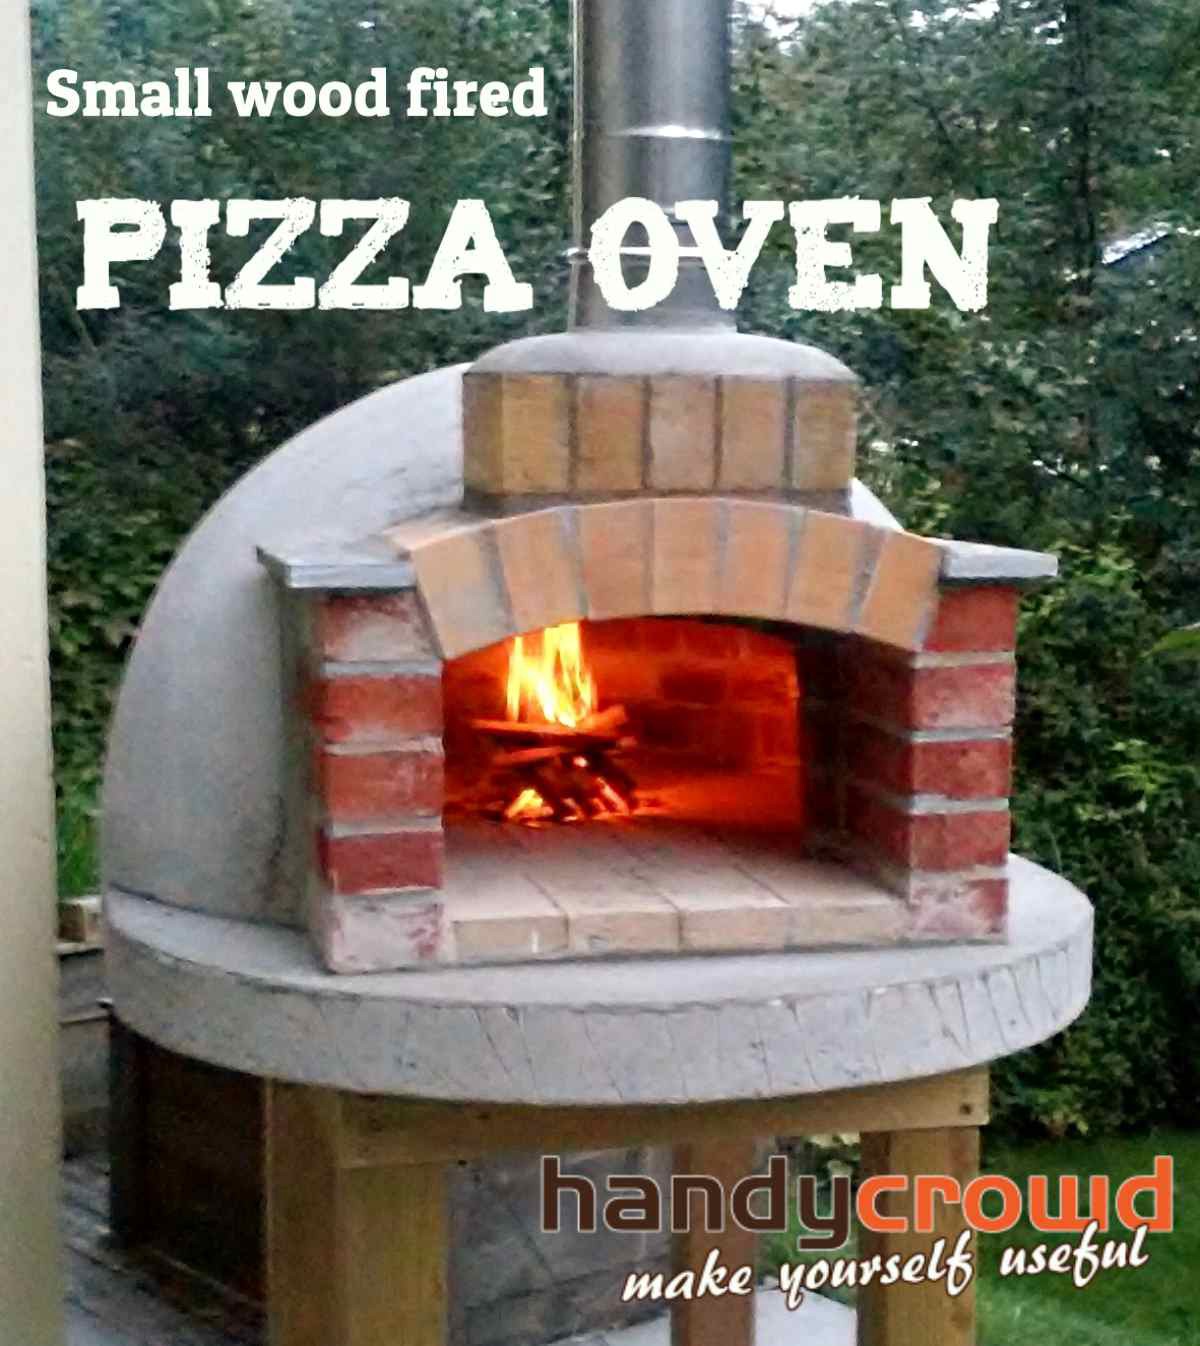
Small is beautiful. In this case it?s a 75cm or 30″ wood fired pizza oven.
I?ve wanted a wood fired pizza oven of my very own since I was in Rwanda back in 2007. Many pleasant evenings were spent eating delicious pizza made in the roaring hot oven in a little pizza place a stones throw from the Novotel Hotel (now the Umubano Hotel I think) just outside central Kigali. And to be honest there was a healthy logic to eating food heated to around 300C (570f or so), if you understand what I mean?..
However, I was put off by the complexity and size of just about every pizza oven you see built on the internet. Huge concrete foundations, massive concrete and steel reinforced walls and thick heavy bases and even thicker insulation etc. etc. But I only want to cook a few pizzas I lamented, not feed the five thousand!!!!
In the end I decided that good pizza is one of life?s essentials and built one mostly to my own design, cherry picking the bits I liked from others and ignoring the bits I thought were massive overkill. Now don?t forget I am a builder and carpenter, so some of the way I made this might be out of reach for the hobbyist; but I just wanted to show you that smaller, simpler pizza ovens are worth building. Trust me, you?ll have fun even with a three sided dry stack of bricks with a concrete slab on top??.
How I set about building a slimmed down pizza oven?
Primarily I wanted the pizza oven to be a feature but not dominate our small stone patio at the back of the house. To make it feel light I opted to build the oven on a wooden frame (I know, shock and horror right?). But it was a very sturdy wooden frame to be fair with some internal bracing wires etc.
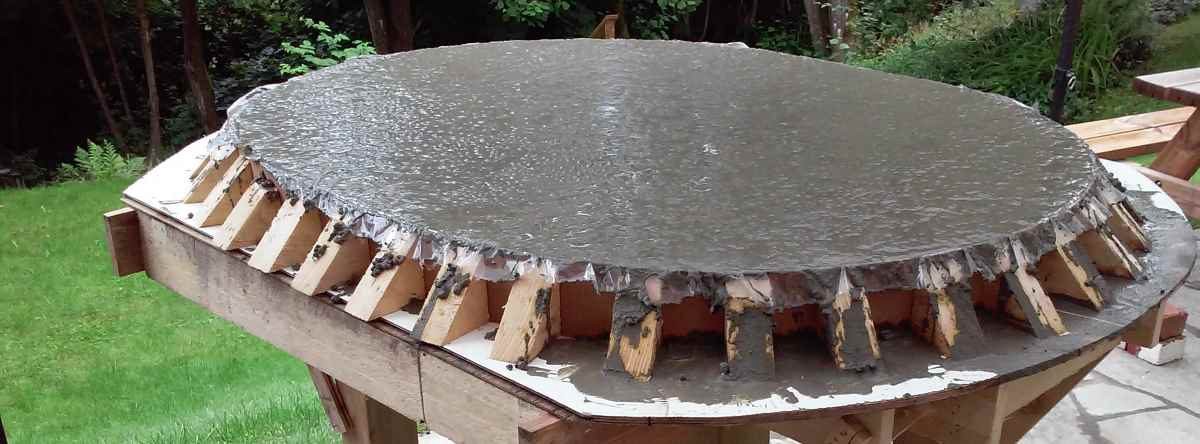
Shuttering needs to be sturdy and lined with thin polythene to stop leaks.
The oven base I cast onto an elaborate shuttering in an elongated oval shape. I wanted the internal size of the oven to be about 750mm or 30 inches, a good minimum size for two-at-a-time pizza cooking. This slab is a good 15cm (6″) bigger all round to allow for building the dome. I made my own concrete replacing the stone element with fireproof lecca balls (expanded clay stuff used in plant pots and building insulation). This gave me a lighter concrete with better insulation properties. The concrete slab 1300mm (4′ 3″) front to back and 950mm (37 3/4″) wide. Basically, I drew two circles with a 350mm (13 3/4″) gap between them to give a ?pill? shape or a tube with rounded ends if you like.
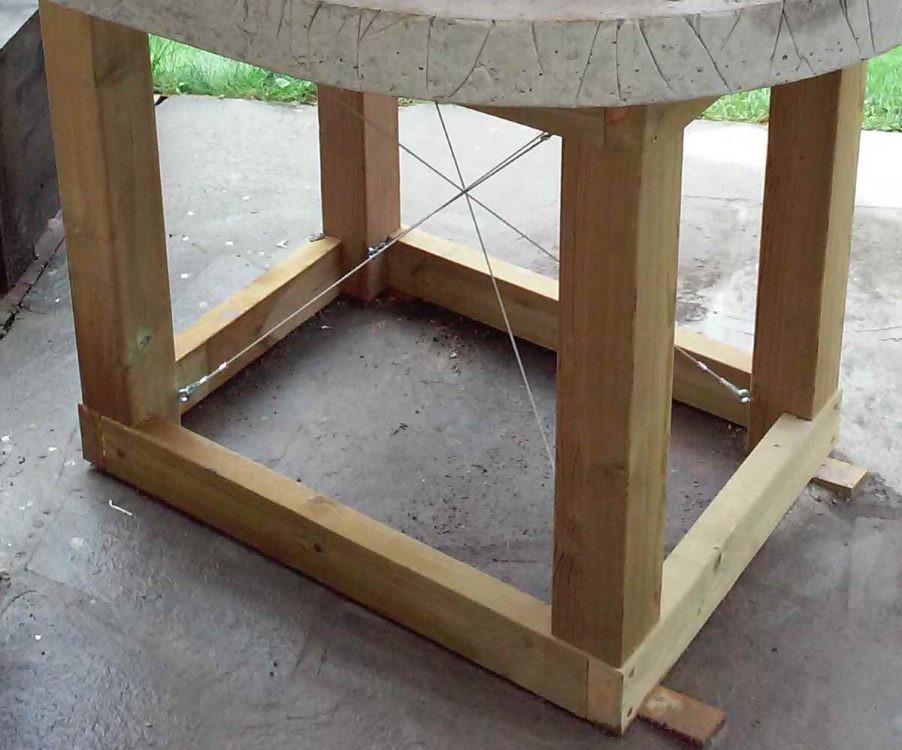
The wooden frame I built out of 100mm (4″) square treated timber very well glued and screwed together. This one is 900mm (3′) by 650mm (25 1/2″) in size and the concrete overhangs by 200mm (8″ on all sides). The internal bracing is steel wire and tensioners screwed into opposing corners. The concrete slab sits straight on top of the framework. This pizza oven must weigh about 300kgs so it needs to be well constructed.
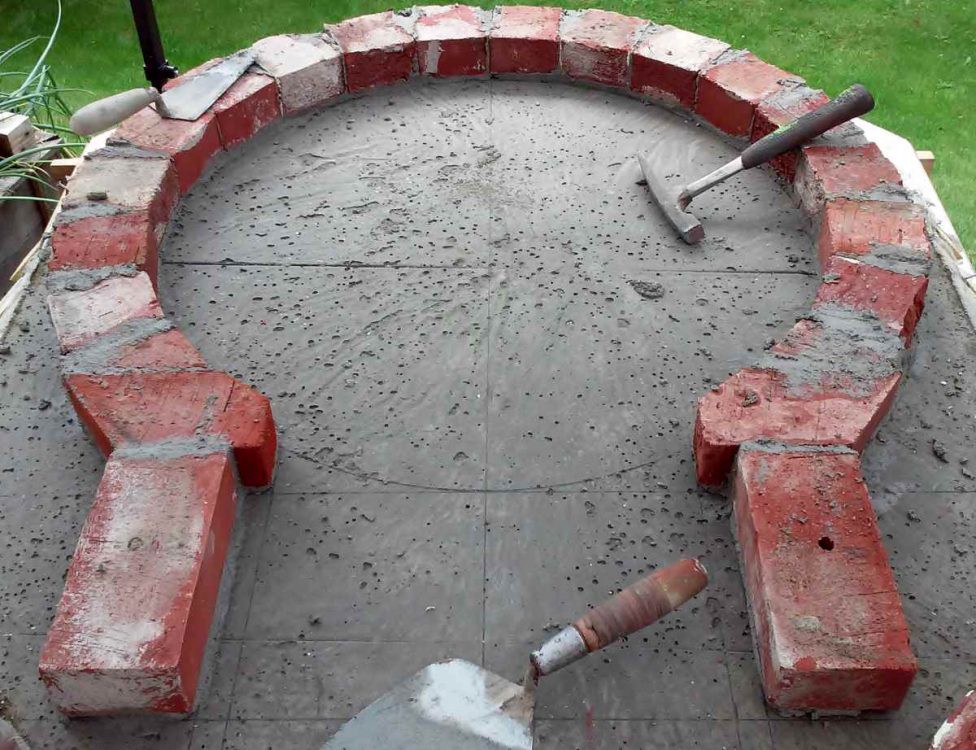
Setting out first course. Don?t forget to leave a 2.5cm (1″) rebate for the door on both sides. The chimney will sit outside the dome.
The walls or dome of the oven were built using ordinary hard clay bricks (also reclaimed from the fireplace in the house) laid in a lime rich mortar (to date no problems have been seen). Refractory mortar is recommended but it?s difficult to find here outside of tiny tubs and of course it?s expensive (welcome to Norway!). The first couple of firings spalled a few tiny brick pieces here and there but it?s been stable since then.

Firebricks, about 3.8cm (1 1/2″) thick sitting on 15mm (1/2″ or so) of soft sand and a hinged trammel in place to build the dome.
For the cooking base I used fire bricks recovered from my fireplace inside when I switched to a log burner. Once the first few courses of bricks in the dome had set up I cut and laid the firebricks, bedding the bricks on soft sand to make getting future damaged ones out easier, allow for expansion and also to keep a clean look to the outside. I chose to do this inside the dome as I thought building the dome on top of the firebricks silly as the firebricks are only sitting on sand.
I set up the trammel to build the dome and this was enough to get me quite far up before I chickened out and put in some support for the last few courses. I stuck a small piece of wood to the floor with the hot glue gun and then used a lightly screwed hinge to create the movement needed.
Laying the bricks was easy as the bricks had a good ?grab?, plus I was tapping them down quite hard to make the front joint as small as possible, virtually nothing really. This makes for a better dome as mostly only the bricks are facing the heat with minimal amount of mortar (which is much softer than the brick). I?ll be honest, I didn?t have the patience to cut each brick perfectly with a disc cutter, as it would have taken days. All my bricks were cut with a brick hammer and dressed a little with a ?scutch? hammer, but then don?t forget I?m a bricklayer by trade, so I might have made that look easier than it might be for you?

Drywall arcs glued together sitting on top of a plastic bucket supported the last few courses of brickwork.
To support the last few courses I used some old drywall pieces cut to the radius and stacked inside the dome. Drywall is easy to cut to shape, worked fine and was easy to pull out afterwards.
View upwards inside the pizza oven dome. As the dome progresses the brick pieces get smaller and smaller. Half ?bats? to start with and a quarter ?bats? towards the top and triangular shaped for the last few ?key? bricks.
Building the door and chimney was by far the most difficult bit and I still find it difficult to describe, it?s definitely a make-it-up-as-you-go thing. You know where the hole needs to be and how it works, it?s just difficult to get the bricks to behave at such extreme angles and locations! I used a metal stainless steel 15cm (6″) pipe for the actual flue which you must make sure isn?t cemented in place at any point. Seal the pipe into a pocket left out in the brickwork using fireproof rope found at your local fireplace store. If you cement it in, the brickwork around it will crack because the metal pipe expands?. a lot, much more than you?d think, (go on then, ask me how I know?).
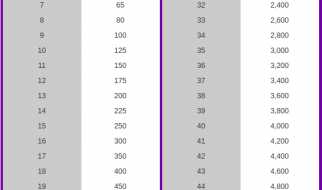
Height of the door and the chimney outlet is 63% of the dome height (opinions vary online, but it looks like 60% to 65% is all feasible). So, ours is 75cm diameter which means a 37.5cm radius and therefore dome height (assuming you?ve made an accurate dome!). This means you need a door height of around 24cm. (30 inch wide/15″ high oven needs a 9 1/2″ tall door or thereabouts). It?s also important that the door sits inside the chimney thus really closing off the air. To be honest I only use the door when firing up the oven (propped on a little block outside the oven) to direct the initial smoke up the flue. And then again when roasting meat or baking bread. You?ll not need a door when cooking pizza. (check here for more? explains the door to dome height ratio)
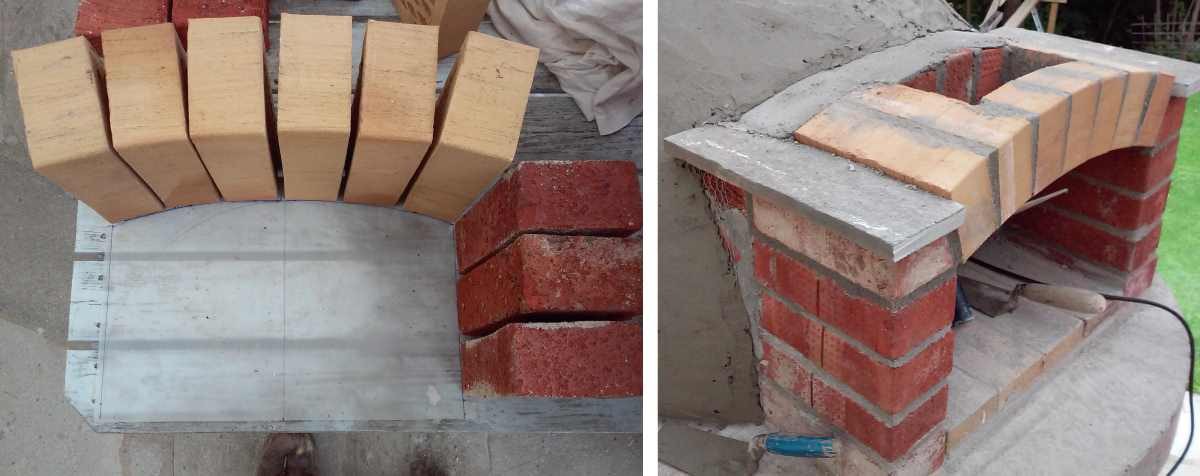
Set out the chimney arch on paper first, adjusting to fit. Built the arch, leaving out a hole for the flue, appx 15cm x 25cm (6″ x10″). It is VERY important that the height of the door/ chimney outlet is 63% of the height of the dome.
As I was going for small and limited time use I didn?t go crazy on the insulation. I wrapped the dome with aluminium foil to reflect some heat back into the brickwork and then I wrapped the whole thing in layers of fire blankets (NOTE: If I did it again I would use 25mm or 50mm thick fireproof insulation to better separate the brick dome from the outer rendering to minimise expansion cracking). To hold the fire blankets in place I added a layer of chicken mesh which also helps hugely to hold the first coat of mortar in place on the dome during its application.
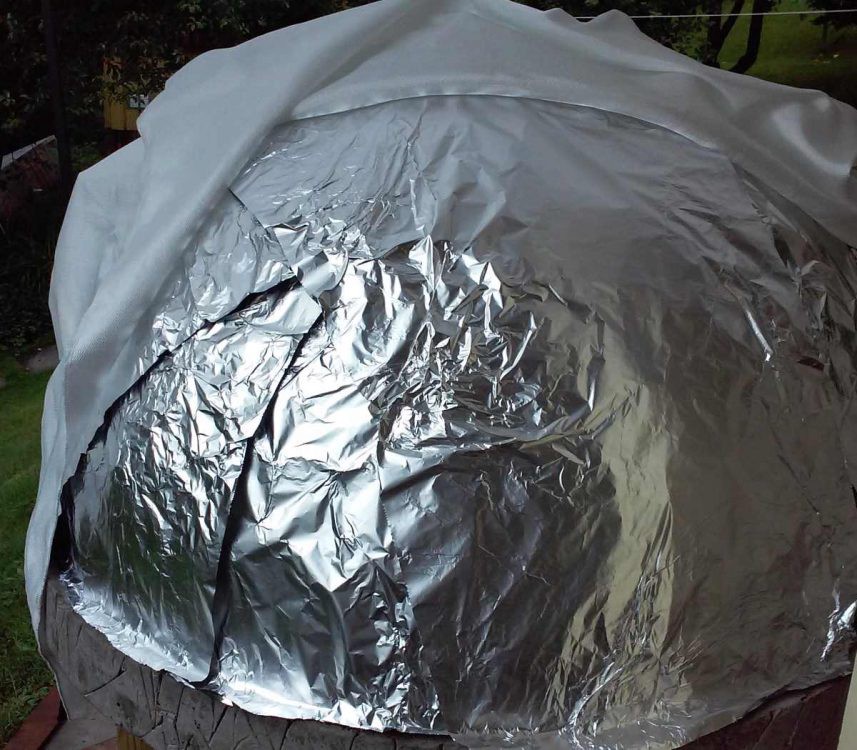
Insulating the dome of the pizza oven with foil and fire blankets, but thicker insulation would have been better to allow the dome to expand without hairline cracking the external rendering.
I then rendered the whole dome with about 38mm (1 1/2″ or so) of a lime rich mortar. Which, I have to admit was an absolute delight to do. It was actually therapeutic to work on such a perfect dome shape, but I?ll admit wet stuff is my ?thing? and I had been missing that kind of work lately, so you might not enjoy it so much.
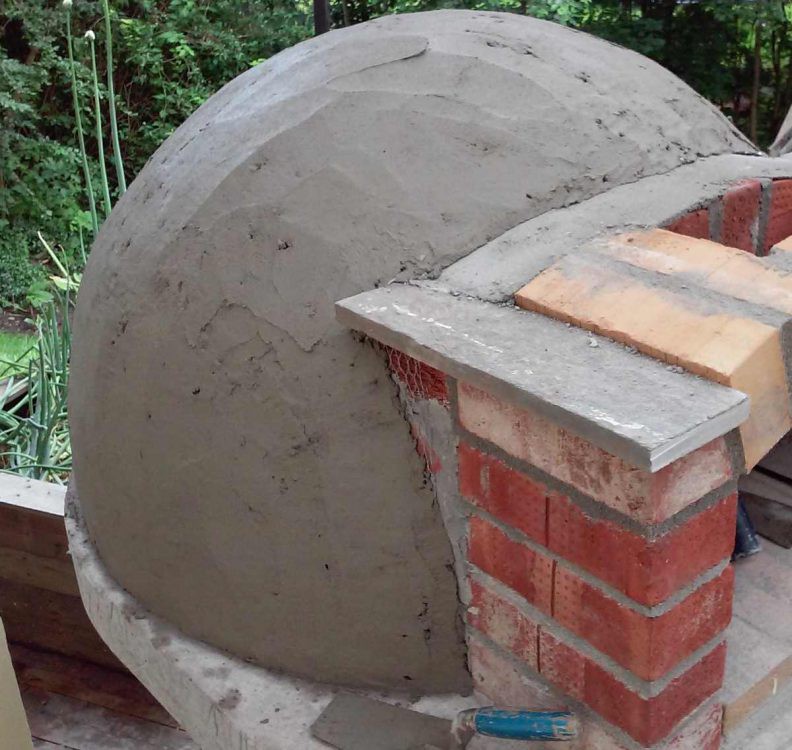
The first rough coat of render on the oven dome. Scratch the first coat up a little and then follow with a second coat.
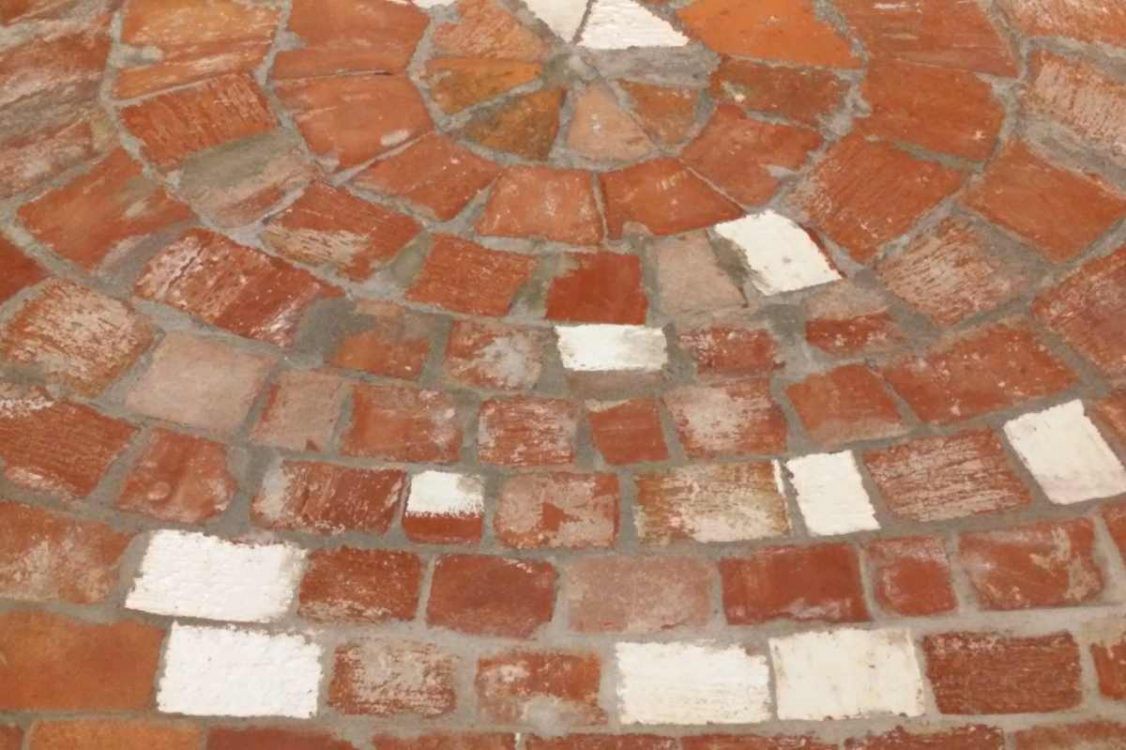
I put the render on in several coats to make up the thickness. I am still contemplating adding further protection, such as mosaic tiles etc., when time allows. For now, I keep the oven covered with a BBQ cover which I don?t like the look of, but since it?s important to keep the oven dry (to avoid long heating up times and escaping steam problems) I?ll just have to live with it for now.
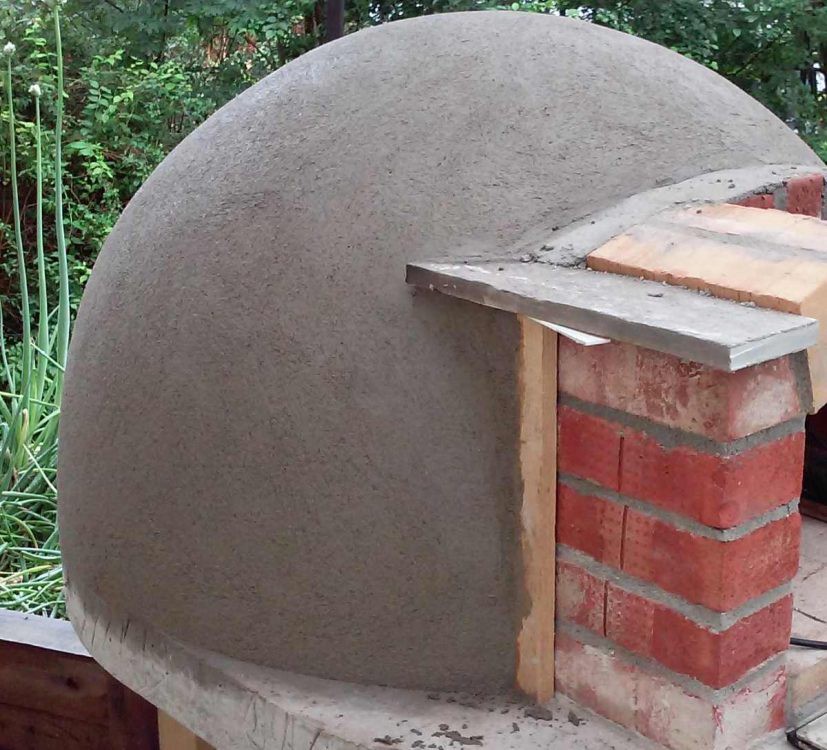
The final coat of render on the oven dome was rubbed up using a foam tilers grouting trowel, in circular and sweeping movements.
I let the oven dry out for a few weeks (it really does need a long time) to avoid the problem of moisture boiling inside the masonry and escaping as explosive steam. It took longer than I thought. Start firing the oven with a tiny fire each day for a week and then some bigger ones. I still had some problems with water coming out even after all the care taken above. Slow really is the word here. There are some small hairline cracks in the dome but hey, who cares. They don?t affect the operation and are probably just a result of heating the brick dome up to 300 degrees C and not giving it much room to expand (like I said, I?ll use thicker insulation ?next time?).
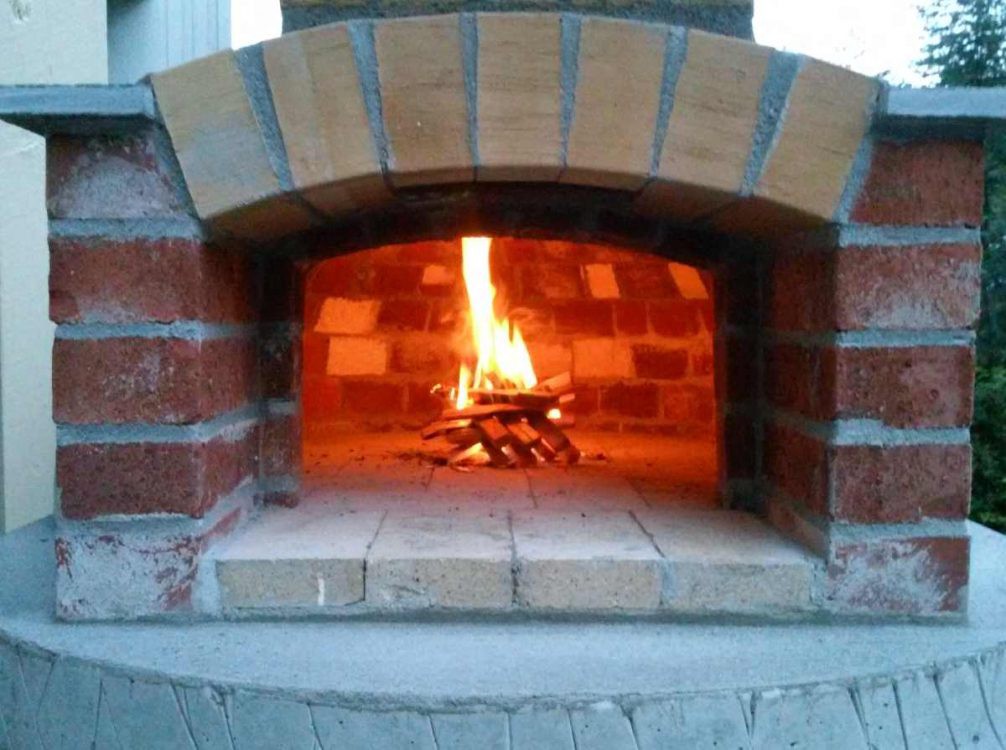
Typical size fire for the first firings of my shiny new wood fired pizza oven. Even when you think it?s dry, it?ll ?bleed? water all over.
I made my own tools from stuff I had lying around and they are good enough for our use, but you can buy pizza tools from amazon.co.uk or amazon.com easily enough if you?ve ?folding stuff? to spare.
Lessons learned building this particular pizza oven?
- Loosely cover your newly finished oven, but allow good ventilation to let the construction dry for a long time, weeks if you possibly can.
- Start firing with small fires over many days.
- Make a metal door for the oven and put it in place outside the opening when firing up the oven. Prop it on a block of wood, leaving a gap at the bottom. This will make the smoke go up the chimney aiding air flow.
- Build the fire in the middle of the oven and watch the dome colour. It?ll go from black to clean when the temperature is right.
- Push the fire to the back with a tool or garden rake just before you start cooking and add a few small pieces of wood. This creates the flames you need (licking up and over the dome) to cook the tops of the pizza.
- Flames should always be licking over the top of the dome as you cook.
- Keep a bucket of water next to the oven to dunk your ?brush on a stick? into before you sweep the oven floor (in between every 2 or 3 pizzas). If you don?t the brush will burn. Dunk and shake off excess and sweep? quickly!
- You shouldn?t be able to keep your hand inside the oven for much more than ?one mississippi?!
- If cooking over a longer period, consider taking a small break and raking the fire back to the the front and build it up a little. Push the fire to the back again before you want to start cooking and don?t forget the small sticks to create flames. (I?ve never needed to do this though cooking for around 12 folks).
- MASSIVE TIP! Use a pinch of course cornmeal on the pizza peel for easy sliding into the oven (really, it?s miraculous), don?t use flour it?s rubbish at sliding pizzas and it just burns on the oven floor.
- Turn the pizza after a minute or less. Turn it two or three times during cooking.
- Turn the pizza by picking up one side and rotating it around with a small pizza turning tool, (like a half size peel). I made one by flattening an old coal shovel from a fireside set and adding a long handle.
- Make the tool handles longer than you?d think, these ovens get really, really hot! Think around the 100cm or 3′ mark as a minimum.
- Make more dough than you think. 100g (4oz) as a minimum and can be closer to 150g (6oz) per person, yup it tastes that good?.
- You?ll need more space than you think for preparation, especially when several people are making pizzas. Allow space for at least two people rolling out dough and space for all the toppings.
- Don?t forget to make an ?after oven? space for the cooked pizzas, yum.
- Your pizza oven doesn?t have to look perfect, the pizza will taste fabulous just the same?
I have to say that the end result is everything I wanted and more, no problems at all getting the oven up to temperature (takes a couple of hours or so) and it bakes perfect pizza in two to three minutes or less. It holds the temperature well and even keeps it long enough to roast meat and then cook bread afterwards. Sure, it won?t stay hot for three days but we don?t have time for that anyways!
So the upshot is, build whatever you can from whatever you have and you?ll have fun I guarantee it. If it?s a choice between building ?a poor fellows? pizza oven or nothing at all, go for the poor fellows pizza oven. And trust me, you don?t need the Taj Mahal of pizza ovens to bake great pizza and have a whole lot of fun doing it.
Stay well
Ian
RESOURCES for building wood fired pizza ovens?
(p.s. thanks for the help guys)
community.fornobravo.com/forum/good-background-information outdoor pizza oven pompeii pinkbird.org/w/How_to_build_a_pizza_oven youtube.com/outdoor pompeii oven/ youtube.com/Pompeii Italian Brick Pizza Oven Construction slowfoodandhandforgedtools.com.au/pizza-party
Digital Laser Thermometers
You?ll definitely need a digital laser thermometer because they are sooooo much fun to play with and of course to impress your guests with the temperature in the oven! I generally get the floor on mine to well over 400 degrees C. (that?s 800f!). It?s also very useful to teach you about the oven and where it?s hot and where it?s cooler. Also perfect for letting you know when the temperature starts dropping, although the cooking times will also tell you that.
I bought mine from China via AliExpress (Digital laser thermometers at aliexpress) for about 8. Alternatively, you can try, eBay, (Digital thermometers at ebay) or amazon, (Laser thermometers at amazon.co.uk) or here for the rest of the world? (Thermometers at amazon.com. They are useful for finding cold spots around your home too, identifying where you need to work on the insulation?
Awesome Wood Fired Pizza Oven Book
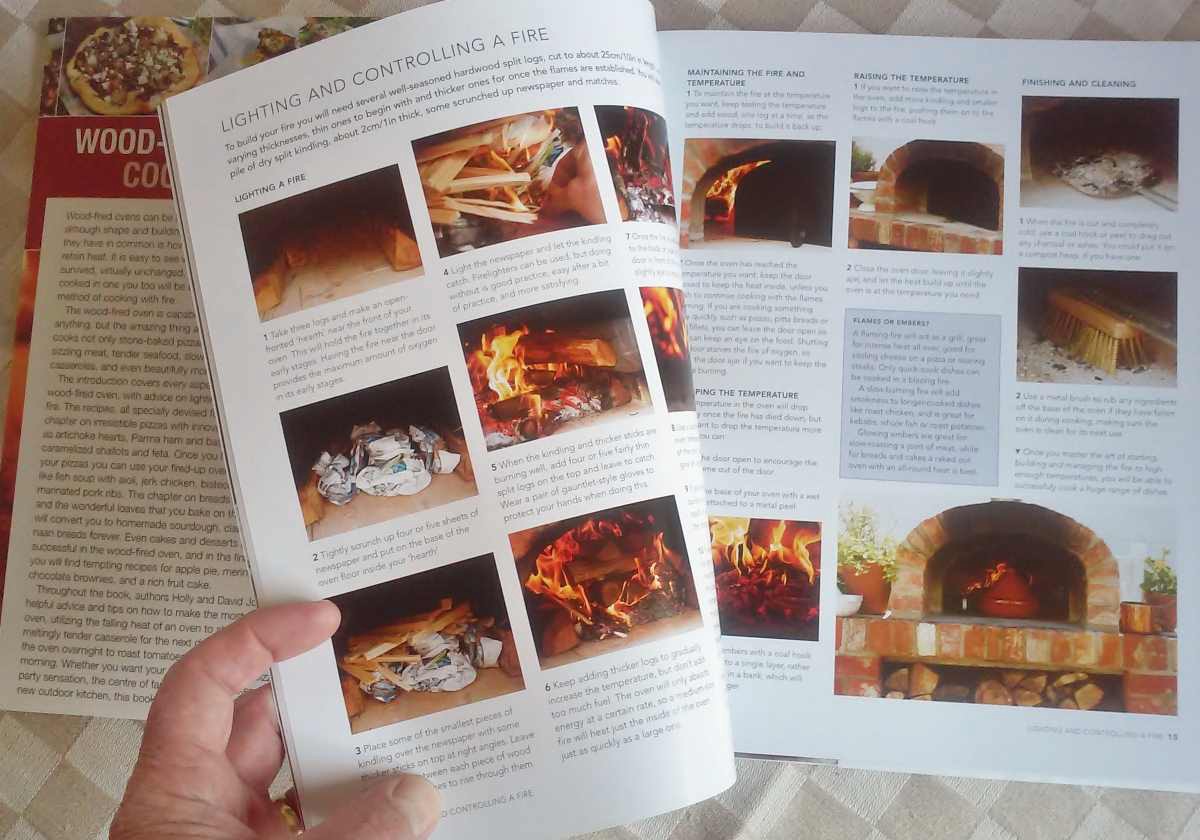
I found this great book this week, written by a couple who run teaching courses on cooking with fire. Learn how to use your new pizza oven properly and it includes many, many brilliant recipes? from Naan bread to desserts! But most importantly it teaches you how to run the oven, from building the fire to managing the heat throughout the cooking time. It opened my eyes to many more possibilities for cooking and getting the most food out of each firing.
As usual, you can buy The Wood-Fired Oven Cookbook from any amazon (it?s by Holly and David Jones).
Additional photos?
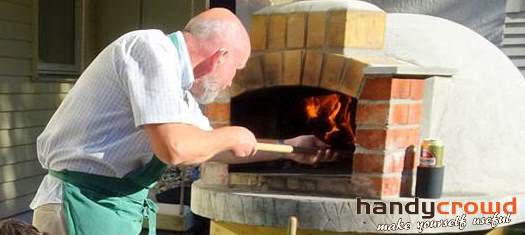
Wood fired pizza oven in action and yes, that?s me!
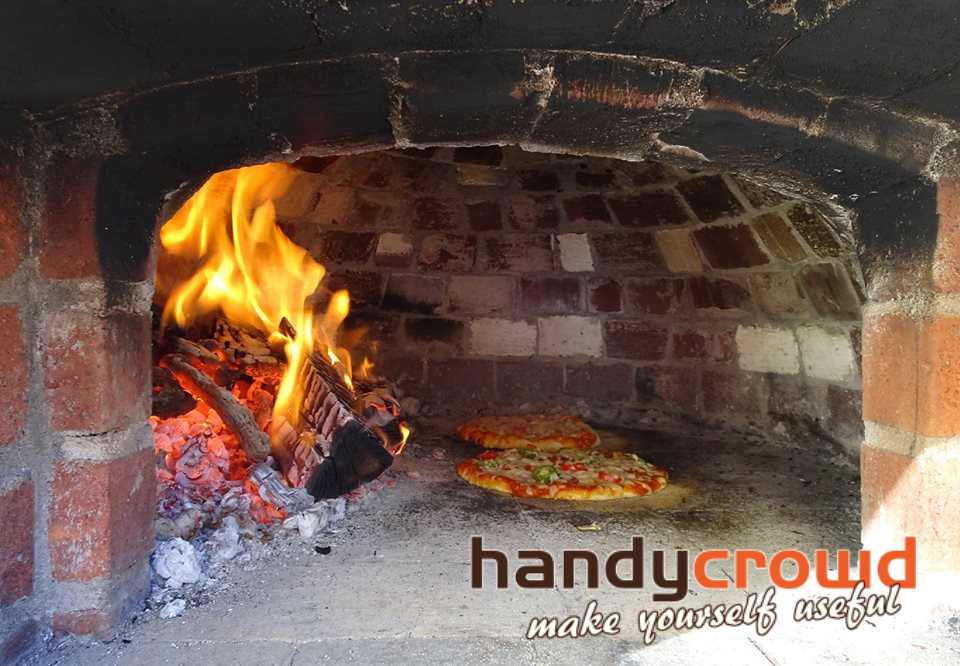
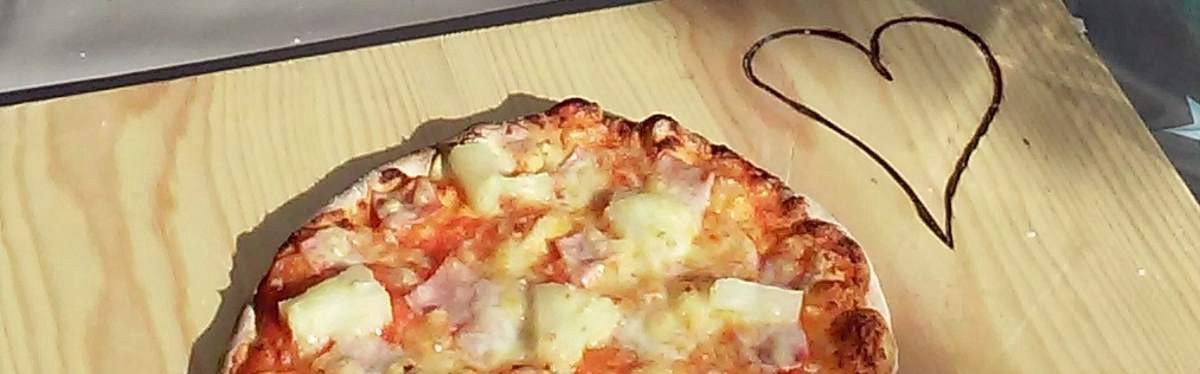
Real pizza from a real oven, even if it?s small!
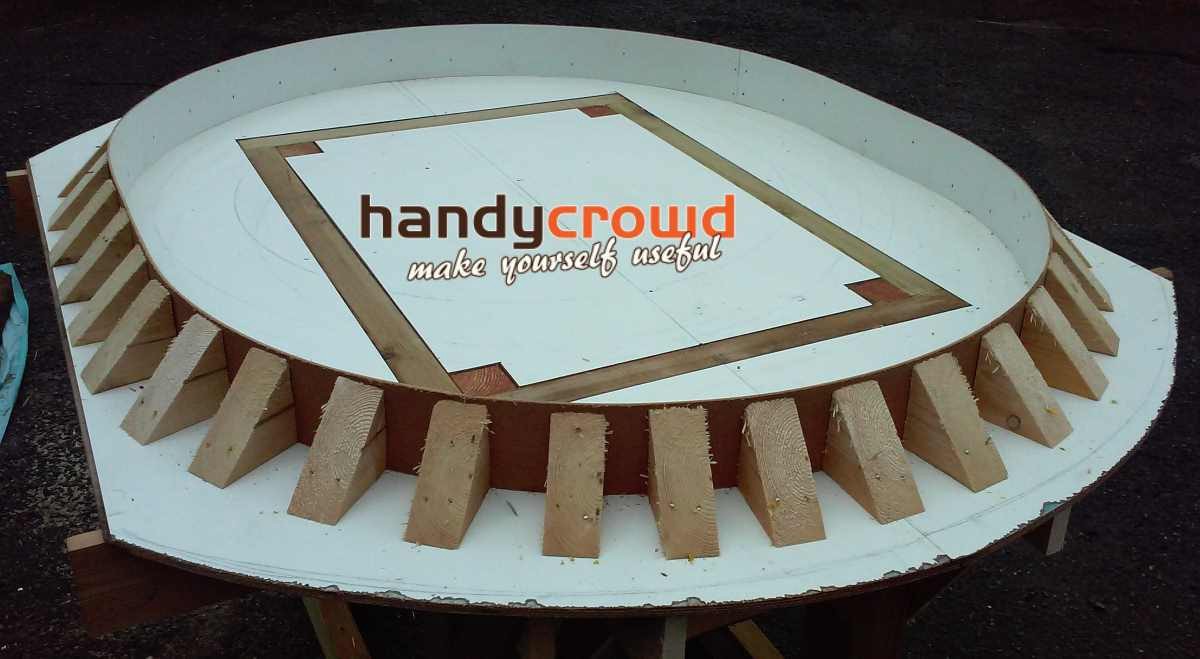
The shuttering was quite complex as the edge support had to be thin enough to form the radius. This means there needed to be support at very small intervals around the edge to prevent it ending up all wavy. The square you can see inside is the top edge of the permanent frame. This way the concrete sits directly onto it and the shuttering is completely removed.
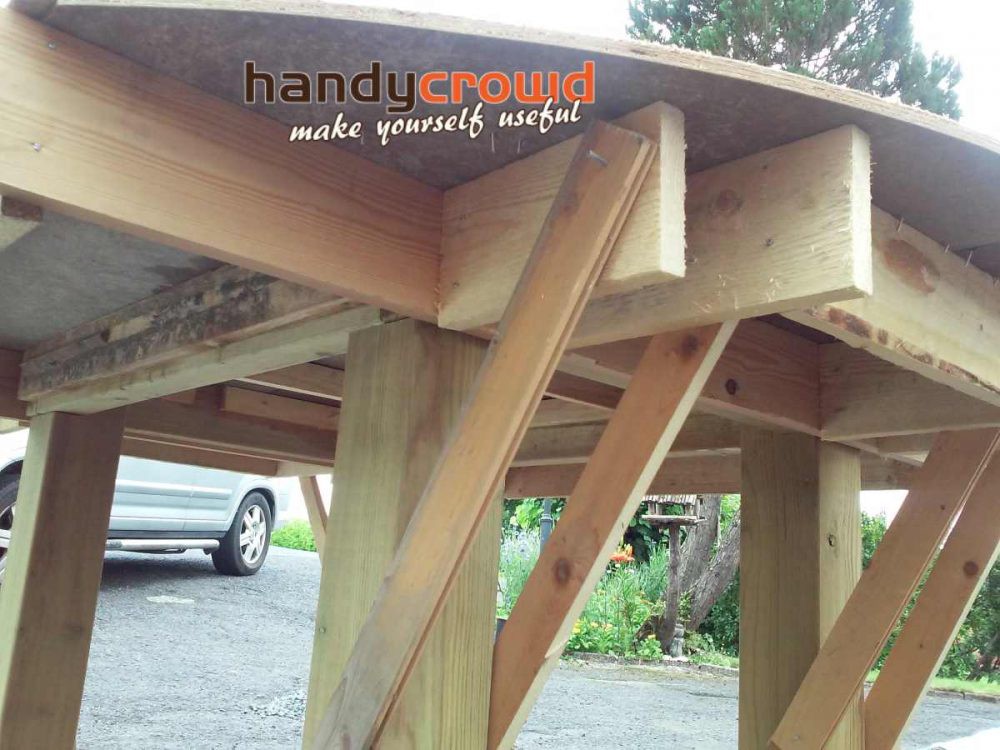
There was quite a weight to the concrete slab, even though I replaced the majority of the stone element with a lightweight expanded clay. Therefore decent support is needed underneath the plywood deck. Brace the outriggers down onto the frame itself. Triangles, the more the better!
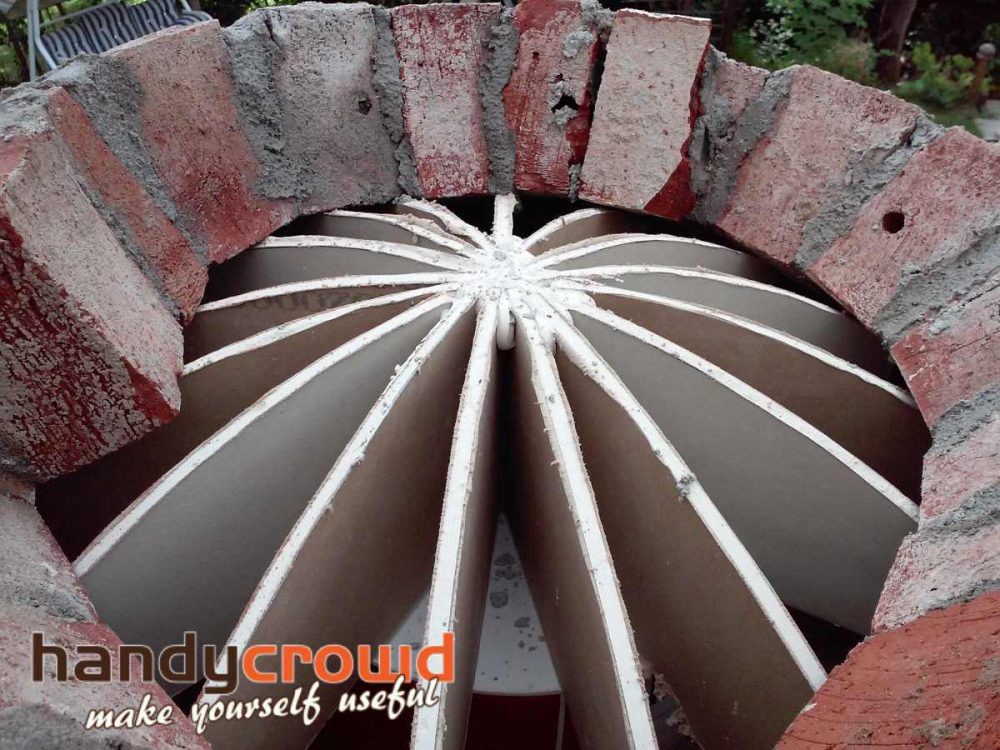
Close up of the drywall method I used to support the top part of the dome. I held it together using some old silicone sealant and propped it on an old plastic 10L paint bucket and small wooden wedges.

Can?t resist posting just one more pic of the freshly rendered dome as it was so much fun to do! Smooth as a snooker ball!
That?s all folks! Now go and build a wood fired pizza oven of your very own, go on, you know you want to 🙂
Cheers
Ian
Originally published at handycrowd.com.
