Or what I wish I knew when starting with Wepback.
Click here to go to the final Github repo.We are using Webpack 1.x. Webpack 2 will not work with this tutorial. Click here to view the Webpack changelog.
Webpack is the latest and greatest in front-end development tools. It is a module bundler that works great with the most modern of front-end workflows including Babel, ReactJS, CommonJS, among others. As a beginner to Webpack, this is what I have learned.
This tutorial has been updated to use Babel 6
Getting Started
Webpack Conventions
- Webpack works best with NPM, not Bower
- Uses a module system (AMD, CommonJS, ES6)
Installing Webpack globally:
npm install webpack -g
The most basic of builds:
In your root directory create 2 files: index.html & app.js
In app.js:
document.write(‘welcome to my app’);console.log(‘app loaded’);
In index.html:
<html> <body> <script src=”bundle.js”></script> </body></html>
Open your console, and run:
webpack ./app.js bundle.js
The above command uses the webpack command (webpack) to reference our app file (./app.js) and the last argument is the name of the file that we want Webpack to create for us (bundle.js).
The above command should have created a file called bundle.js that is our first Webpack bundle! Easy huh?
Defining a config file
A configuration file in Webpack is basically a common.js module. The config file is a place to put all of your configuration, loaders (explained later), and other specific information relating to your build.
In your root directory, create a file called webpack.config.js, and add the following code:
module.exports = { entry: “./app.js”, output: { filename: “bundle.js” }}
entry ? name of the top level file or set of files that we want to include in our build, can be a single file or an array of files. In our build, we only pass in our main file (app.js).
output ? an object containing your output configuration. In our build, we only specify the filename key (bundle.js) for the name of the file we want Webpack to build.
Now, to run our app, go to your command line and run the following command:
webpack
Once a webpack.config file is present, the webpack command will build your application based on the configuration made available in the file.
Expanding the functionality of our config file and webpack
Watchmode
With watchmode, Webpack will watch your files and when one of them changes, it will immediately rerun the build and recreate your output file.
There are 2 ways to enable watchmode
- From the commmand line
webpack –watch
2. Go into the config file, and add a key called watch, and set it to true
module.exports = { entry: “./app.js”, output: { filename: “bundle.js” }, watch: true}
After watch is set to true, when you run the webpack command, webpack will rebuild your bundle when any of your files change.
Webpack Dev Server
Webpack has a web server called webpack-dev-server.
From the command line, install webpack-dev-server globally:
npm install webpack-dev-server -g
From the command line, run the following command:
webpack-dev-server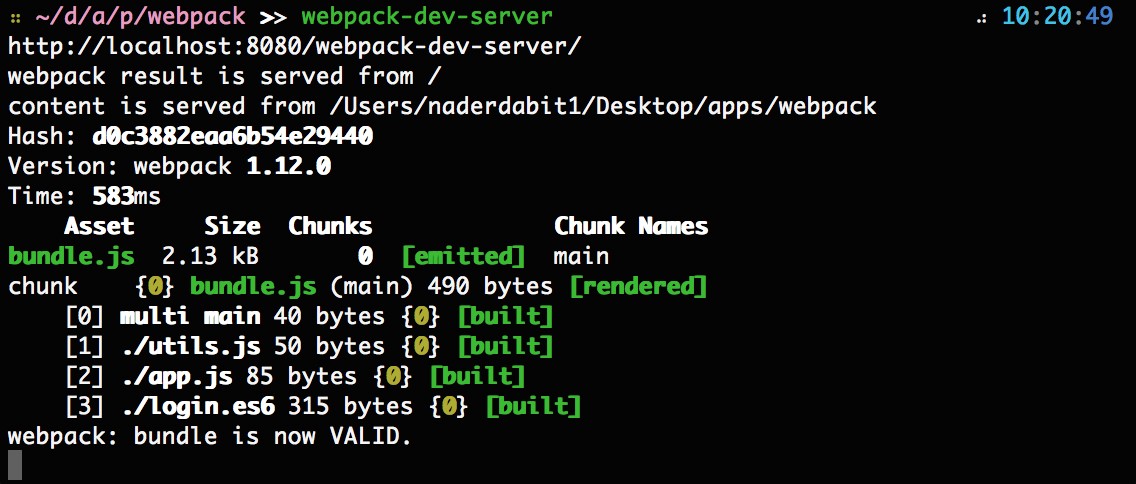
If you go to http://localhost:8080/webpack-dev-server/, you should see your application running there, along with any log statements in your app.
From the webpack docs:
?The dev server uses Webpack?s watch mode. It also prevents webpack from emitting the resulting files to disk. Instead it keeps and serves the resulting files from memory.? ? This means that you will not see the webpack-dev-server build in bundle.js, to see and run the build, you must still run the webpack command.
With Webpack dev server running, you will notice that if you go back to your app and make a change, the browser will automatically refresh (hot-loading).
The default is to have hot-loading enabled. To disable hot-loading and remove the App Ready status bar at the top, remove the /webpack-dev-server/ from the url, and go to http://localhost:8080/ .
To enable hot-loading and remove the App Ready status bar at the top, terminate the webpack-dev-server and rerun webpack-dev-server with the inline flag:
webpack-dev-server –inline
Navigate to http://localhost:8080/
Now you will see that hot-loading is still enabled, but the status bar is now removed.
Building multiple files
- Requiring files
Add a file called logger.js to your project.
In logger.js, add the following code:
console.log(‘logger.js is now loaded…’);
In app.js, add the following to require the logger.js file at the very top before any other code:
require(‘./logger’);
Now, close and rerun webpack-dev-server, you should see ?logger.js is now loaded? being logged to the console when you reload http://localhost:8080/webpack-dev-server/.
2. Adding an additional entry file to our webpack.config.js file
Add a file called global.js to your project.
In global.js, add the following code:
console.log(‘global.js is now loaded…’);
Now, open webpack.config.js, and make the entry key an array:
module.exports = { entry: [“./global.js”, “./app.js”], output: { filename: “bundle.js” }}
Now, close and rerun webpack-dev-server, you should now also see ?global.js is now loaded? being logged to the console when you reload http://localhost:8080/webpack-dev-server/.
Webpack loaders and preloaders
Loaders are how Webpack learns new functionality.
From the documentation: ?Loaders allow you to preprocess files as you require() or ?load? them. Loaders are kind of like ?tasks? are in other build tools, and provide a powerful way to handle frontend build steps. Loaders can transform files from a different language like CoffeeScript to JavaScript, or inline images as data URLs. Loaders even allow you to do things like require() css files right in your JavaScript!?
Below, we will install and use two loaders: Babel and JSHint. Before we start using these loaders, we will install a few npm modules. First, use npm init (answer yes to all questions) to create a package.json file. Then in the terminal, type the following:
npm install babel-core babel-loader jshint jshint-loader node-libs-browser babel-preset-es2015 babel-preset-react webpack –save-dev
babel-core is the babel npm package
babel-loader is the babel module loader for Webpack
jshint is a tool that helps to detect errors and potential problems in your JavaScript code
jshint-loader is the jshint loader module for Webpack
node-libs-browser is a peer dependency of Webpack. It provides certain Node libraries for browser usage.
babel-preset-es2015 is a babel preset for all es2015 plugins.
babel-preset-react is a babel preset for all React plugins.
? save-dev saves these modules as development dependencies
Using Babel with Webpack:
Now that we have babel installed, let?s write some es6, then include the babel loader.
- Open logger.js. Delete the console.log statement, and replace it with the following:
let checkName= (firstName, lastName) => { if(firstName !== ‘nader’ || lastName !== ‘dabit’) { console.log(‘You are not Nader Dabit’); } else { console.log(‘You are Nader Dabit’); }}checkName(‘nader’, ‘jackson’);
2. Rename logger.js to logger.es6
3. Open webpack.config.js and add babel loader. To add a loader in Webpack, you must first create a key named module that is an object. In the module object, create a key named loaders that is an array. In the array, create an object for each loader. Below we have added the configuration for the babel-loader:
module.exports = { entry: [“./global.js” , “./app.js”], output: { filename: “bundle.js” }, module: { loaders: [ { test: /.es6$/, exclude: /node_modules/, loader: ‘babel-loader’, query: { presets: [‘react’, ‘es2015’] } } ] }, resolve: { extensions: [”, ‘.js’, ‘.es6’] },}
As you can see above, we have added three keys to our first loader.
- test ? a regular expression that tests what kind of files to run through this loader. As you can see, we have added a regex to test all files with an es6 extension.
- exclude ? which files the loader should exclude /ignore. We have added the node_modules folder.
- loader ? the name of the loader we are going to use (babel-loader).
- query ? You can pass options to the loader by writing them as a query string or by using the query property as we have done above.
- cacheDirectory ? Default false. When set, the given directory will be used to cache the results of the loader. Future webpack builds will attempt to read from the cache to avoid needing to run the potentially expensive Babel recompilation process on each run
- presets ? lets us use the react and es2015 presets that were installed earlier
We have also added a key named ?resolve? to our module.exports object. resolve is a section which lets us specify what kind of file types we can process without specifically giving them a file extension. This will allow us to use syntax such as:
require(‘./logger’);
instead of:
require(‘./logger.es6’);
We have given ?resolve? a key of ?extensions? which takes an array of extensions, and we have passed three types of extensions.
We are now ready to rerun Webpack in our project. Close and relaunch the webserver by typing webpack-dev-server, and you should see the new console.log statement of ?You are not Nader Dabit?.
Congrats, you are now running babel with Webpack!
Preloaders: Using JSHint with Webpack:
We will be utilizing JSHint as a preloader. As you could have probably guessed, preloaders run before loaders do. Change your webpack.config.js to the following, including the preLoaders key:
module.exports = { entry: [“./global.js” , “./app.js”], output: { filename: “bundle.js” }, module: { preLoaders: [ { test: /.js$/, exclude: /node_modules/, loader: ‘jshint-loader’ } ], loaders: [ { test: /.es6$/, exclude: /node_modules/, loader: ‘babel-loader’, query: { cacheDirectory: true, presets: [‘react’, ‘es2015’] } } ] }, resolve: { extensions: [”, ‘.js’, ‘.es6’] }}
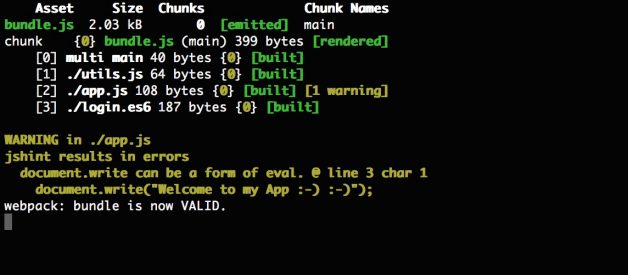
Close and rerun webpack-dev-server. You should see an error message:
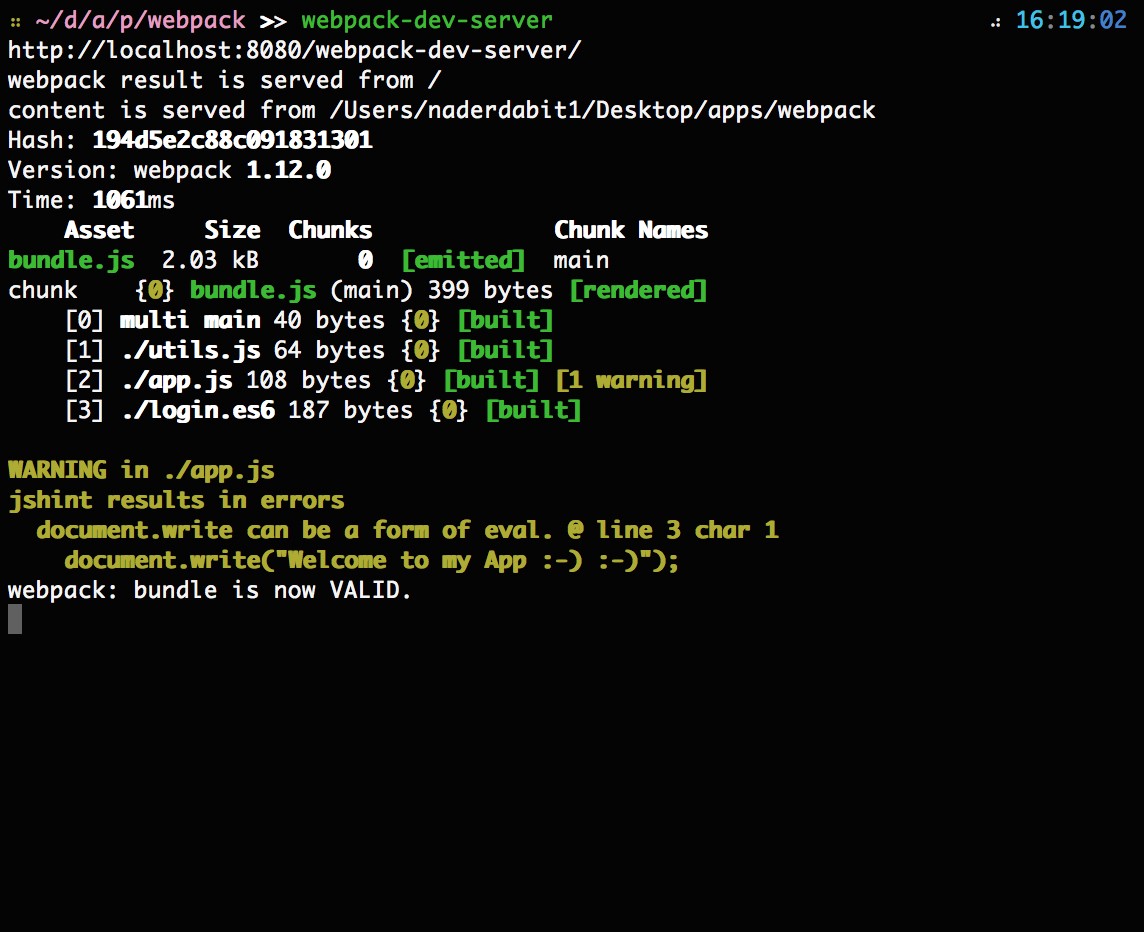
The warning is an eval error, and it means jshint is running!
Creating a Start Script
This is actually a feature of npm and the functionality you can use in your package.json file, but it is something worth doing to make your process easier.
In package.json, there is a key called scripts. Delete the contents of the scripts key, and replace it with the following:
“scripts”: { “start”: “webpack-dev-server”},
Now when we need to run webpack-dev-server, we can run the following instead:
npm start
This will make more sense in the future as we add more options into our webpack-dev-server command, and make it easier to rerun often, but is still nice to have even now.
Separate production and development Builds
Production Webpack bundles
To run a production bundle, letting webpack minify your code, run Webpack with a -p flag:
webpack -p
This will produce a minified bundle.
Working with different config files for production vs development
Install strip-loader:
npm install strip-loader –save-dev
strip-loader is a loader to strip arbitrary functions out of your production code (we will use this later) .
Create webpack-production.config.js
In webpack-production.config.js, write the following code:
var WebpackStripLoader = require(‘strip-loader’);var devConfig = require(‘./webpack.config.js’);var stripLoader = { test: [/.js$/, /.es6$/], exclude: /node_modules/, loader: WebpackStripLoader.loader(‘console.log’)}devConfig.module.loaders.push(stripLoader);module.exports = devConfig;
- WebpackStripLoader ? we require the strip-loader npm module
2. devConfig ? we require the original webpack configuration file
3. var stripLoader ? we create a new object, and pass in the test and exclude keys as seen before. Worth noting is the
loader:WebpackStripLoader.loader(‘console.log’)
line. Here we are asking strip-loader to remove any console.log statements from our build. WebpackStripLoader.loader() takes any number of arguments.
4. devConfig.module.loaders.push(stripLoader); ? we push the new object into our loaders array from our original config.
5. module.exports = devConfig; ? we export our new config object
In the terminal, run:
webpack –config webpack-production.config.js -p
This runs webpack with the config flag, letting us specify a custom config file. -p minifies the code for production.
Open bundle.js. If you do a find and replace you will notice there are no console.log statements in our bundle.
Implementing React with Webpack
Now that we have Webpack configured, let?s add React.
First, install react by going to the terminal and entering:
npm install react react-dom –save
Next, create a file named hello.js, and enter the following code:
import React from “react”;export default React.createClass({ render: function() { return ( <div> Hello, {this.props.name}! </div> ); },});
Open app.js. Remove the contents of app.js, and replace with the following:
import React from “react”;import ReactDOM from “react-dom”;import Hello from “./hello”;ReactDOM.render( <Hello name=”World” />, document.body);
Open webpack.config.js, and change the babel-loader test key to the following array:
loaders: [ { test: [/.js$/, /.es6$/], exclude: ‘node_modules’, loader: ‘babel-loader’ } ]
This allows for both .js and .es6 files to be passed to babel, letting us use jsx in our code.
Rerun webpack-dev-server, and you should see the following:

The final source is available for download here.
Thanks for reading, please let me know if you have any questions!
My Name is Nader Dabit . I am a Developer Advocate at AWS Mobile working with projects like AWS AppSync and AWS Amplify, and the founder of React Native Training.
If you enjoyed this article, please clap n number of times and share it! Thanks for your time.

