Hello guys! This post talks about another commonly used UI pattern namely the ?Navigation drawer?. With the navigation drawer one can navigate to many screens or functionalities of the app by clicking on the ?hamburger? icon. Swiping from the left is also a way to bring the drawer into view, a screen then slides in, showing many items. You can click on these said items and go to those screens to use that feature of the app. So Let?s get started!
Step 1:
Create a brand new Android Studio project and name it ?NavigationDrawer?. Choose an ?Empty Activity? as your MainActivity as we will be building the screen from ground up. Copy paste this code into your activity_main.xml file.
You might face an error in the 32nd line where we are including the header file. Do not worry we will be creating the header file in the next step and that?ll clear up the error.
We are using the ?NavigationView? widget which is a part of the support design library, so please make sure you have the latest gradle dependency in your Build.gradle file(app level) :
compile ?com.android.support:design:X.X.X?
Remember to replace the ?Xs? with the latest version number, if you are not sure a simple google search should do the trick.
Step 2:
Next, we need to create a layout resource file that will serve as the header for the Navigation drawer. Here?s how –
Right-click the res folder ? click new ?Select Layout resource file. Name the file as ?nav_header.xml? and click enter. Copy-paste the following code into the newly created layout file to define the header portion of the navigation drawer
After finishing creating the header we need to create a menu resource file that will hold the items to be displayed in the drawer. Here?s how to create the menu resource file:
Right-click the res folder ?Select new ?Android resource file ?Choose ?menu? under the resource type drop-down list.
Name the file as ?navigation_menu.xml? and copy-paste the following code into the file.
The above code will create three items for the drawer and you can view them in the preview mode. They look like items in an ?overflow? menu but this resource file will be used to populate items in the drawer.
Find out Free courses on Quick Code for various programming languages. Get new updates on Messenger.
Step 3:
In this last and final step, we will write Java code in the MainActivity.java file which will act as the brains and is responsible for the behavior of the Navigation drawer. So copy-paste the following code and I?ll explain what the lines of code mean in the subsequent paragraphs.
Rename the package name to whatever you had chosen in the beginning, you can find the package name in the Manifest.xml file.
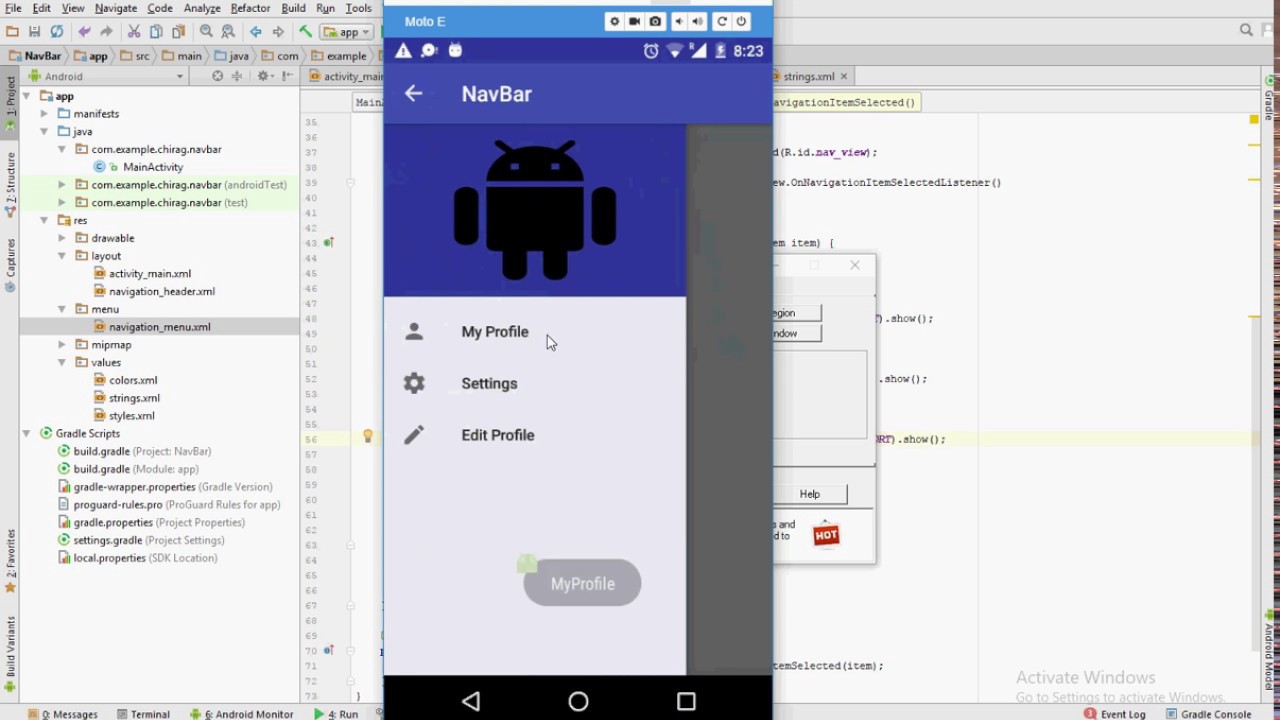
In lines 14?16 we declare instance variables required for the navigation drawer and we later find them using the findViewById method inside the onCreate() function. Then we add a ?setNavigationItemSelectedListener? on the ?nv? variable, which is the navigation view, to listen for any click events on selecting a particular item from the drawer. The code inside ?onNavigationItemSelected? method is simply displaying a toast message. You can replace the code with whatever functionality you want to achieve.
Finally, we override the ?onOptionsItemSelected()? method which is responsible for responding correctly to the items specified in the menu resource file. I have skipped over a lot of the finer details for the sake of brevity 😉
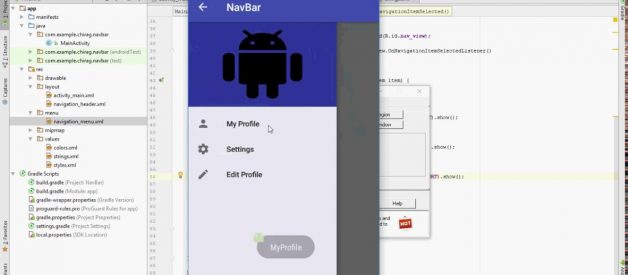
If you have followed all the steps correctly it should look a little something like this
 Navigation Drawer
That?s it guys! you have created a fully functional Navigation drawer so congratulate yourself or go find someone with whom you can share your success with. Click on the link below for a more live coding experience.
I hope you guys enjoyed this and be sure to hit that ?clap? button which will encourage me to write even more stuff like this. As always, happy coding:D
Please click ? button below a few times to show your support! ??
Thanks! Don?t forget to follow Quick Code below.

