
 photo by https://www.flickr.com/photos/lisbokt/5059563481
In The Old Days, We Only Printed the Good Ones
Photos used to be easy to manage in the pre-digital era. You bought some film, took some shots that you hoped would turn out well, and then printed all of the pictures. Or if you were more picky you decided to print only the good ones. It was expensive to print, time-consuming, and difficult to store.
Fast forward to 2017 and things are very different (duh.) Storage is almost free, it?s trivial to store tens of thousands of photos so that you can print them on demand, and relatively easy to store if you have an access device like a phone or a computer. Scrolling through a photo album looks much different than it used to, but also opens up many more opportunities for creativity and organization than ever.
What Happens if You Have A Lot Of Photos?
If you have a lot of photos (let?s call this 10,000+) that you want to load and maintain accessibility using a cloud service of your choice, managing these photos can be challenging. Here?s the Job To Be Done: determine how to synchronize 10+ years of photos made pre-cloud services so that they update with all of the handy-dandy cloud services without breaking the bank and while maintaining the discoverability we like from cloud services.
I?m choosing to optimize in this example for a consumer or pro-sumer set up where the main goal is viewing the image or movie on lots of different devices. I?m also viewing this from an Apple-biased point of view, so a spoiler here is that the recommendation will not end with the option to use Google Photos and Just Forget About it. (Though this is a perfectly fine answer).
What and How Do You Back Up?
There are a few obvious options when considering a backup procedure for your photos (or for your whole computer).
Here they are, in order of ?solves everything? to ?solves a point solution like photos?:
- back up the whole computer to a shared location (Carbonite, Crashplan, or similar)
- create a local backup NAS using RAID and AWS
- continue with lame local back up to a single hard drive
- upload photos to a cloud service like Google Photos or iCloud
Option 1: Whole Computer Backup
Backing up the whole computer to a shared location in some cloud somewhere seems like a great option if you have an unlimited symmetrical internet connection. For people with a fiber connection, this one would work great. For those of us with a typical cable modem connection for internet, have you thought about how long it takes to upload data?
If you haven?t thought about it, here?s a handy table from that article:
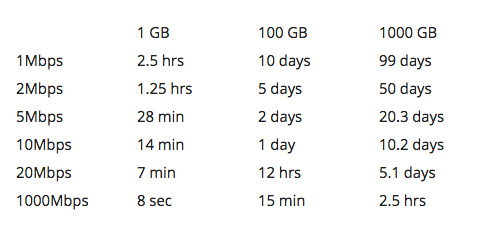
Most of us are looking at the 10Mbps link speed and somewhere between 100GB and 1000GB to upload. Once you start talking about hundreds of gigabytes or more of data this might take days (or almost a week) to complete unless you want to take the radical step of using an Amazon Snowball and putting your data in deep storage.
More practical services like Carbonite or Crashplan will still take days to run a full backup.
So what?s a way that you could back up everything yet still keep a copy locally?
Option 2: Network Attached Storage
Being geeky as I am, I love the idea of purchasing new hardware to back up files on the computer seamlessly to a local storage server on the network and then seamlessly upload the files as needed to a cloud service that maximized the savings.
This is a fun idea, but it?s not cheap either. If you were going to set up a home NAS you might investigate a Synology NAS (2 or 4 or 8 bay) which will set you back a minimum of $600?800 including the right number of hard drives for the storage you need. There are other, cheaper solutions available from Western Digital but frankly I?d be worried about uploading to someone else?s cloud not named Apple, Amazon, or Google.
The goal here was not to optimize for local storage but to find a place to upload about 175GB of photos and videos that have accumulated over a decade.
Maybe there is a simple, practical solution ? a local USB drive is fast, easy, and cheap (I have a 2TB Western Digital Passport, and that?s good for the Sneakernet at my place).
Option 3: Local Back Up to a Single Drive
This is the least bad option (given that I?m using it today) but it doesn?t protect against the inevitable hard drive failure that will happen at some point. Local back up also doesn?t protect against loss from theft or fire and fails to solve the basic problem of ?how can I use these images more effectively instead of looking at them in a file tree once every 6 months??
As a backup (not the only backup), I think this solution actually works quite well. The primary benefit of being able to put a 2TB drive in your pocket is that you can easily move a large number of files between computers even when you have a relatively fast wireless internet.
So we?ve got a solution for local backup, and haven?t yet landed on the right solution for cloud backup.
Option 4: Upload photos to a cloud service
There are lots of cloud services you might choose to solve this problem, though I lean toward the paid version to gain a little bit of leverage around getting the data out should one of the services go away in the future.
So which one should you choose? The free one (Google Photos), the paid one (Dropbox), or the more expensive and integrated one (Apple iCloud)? Perhaps you like to solve your own problems and would like to buy raw storage using AWS. For this solution I?m optimizing for ease of use and a turnkey system.
Google Photos gives you instant upload and permanent storage, and a decent photo editing and management service. It is also optimized for the Android ecosystem ? it works for iOS, but doesn?t show up natively within Apple Products unless you are super clever about how you set things up.
Dropbox offers plenty of storage (1TB for $99/year) but is more of a file synching service than a photo synching service. It is extremely handy for sharing large files and less easy to find that photo you were looking for (the Carousel photo app notwithstanding).
So, Apple has trapped me again into making a choice based on the discoverability of files and lock-in to the ecosystem I use most.
Getting the files to the service takes a little work
You?re not quite done. If you pick iCloud like I did there is some work you need to do first to ensure that you don?t fill up your hard drive.
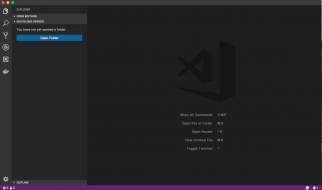
- Open Photos while holding down the option key ? this will give you the option to create a new System Photo Library in the place of your choosing.
- Make a new System Photo Library on an External Hard DriveThis gives you the ability to let OSX?s magic ?Optimize space setting? expand to whatever amount it needs to without taking up space on your primary hard drive. If you don?t care or have a gigantic hard drive, have at it. But until Apple changes this setting this is the only way to separate your iCloudified photos and videos from your hard drive space.
- Next, enable this new Photo Library to use iCloud
- If you don?t want to create an ever-growing photo library, deselect photo > settings > general > copy items to the Photos library
- Next, select photo > settings > iCloud > optimize mac storage or set to download originals if you?d like to make a backup at the same time. You?ll need to have enough iCloud storage to store your originals (but you knew that anyway).
Now, you?re ready to import photos from your external hard drive.
Use the Import option in Photos (file > import) to import the photos you?d like to add to your iCloud library.
When this is done select the Import New Items option to add these to your Photos Library.
There?s one more thing you?ll need to do ? create a smart folder of ?referenced? photos ? before you can add these external photos to iCloud. Now, use the File > Consolidate? option to add the photos to iCloud.
Great! You are on your way to seeing all of your photos and videos more often. There?s one final thing to consider, which is that iCloud imposes a daily, weekly, and monthly limit on uploading.
(also published at Information Maven)
