
 Photo by Omar Flores on Unsplash
The famous mathematician John von Neumann one said, ?In mathematics, you don?t understand things; you just get used to them.? However, I don?t agree with him. I believe that if we develop mathematical things, such as projects, we should definitely have an understanding about how mathematics works.
I believe that these projects will be a huge hit with students or children because most students don?t fully grasp the idea of a math topic when they see it. Projects are a hands-on learning experience which should be included in the schools curriculum.
Below, I have compiled a list of some unique and cool mathematical projects for any blooming mathematicians. So far, I have had a chance to make a few of these projects with my students. As for the rest of them, I am planning to institute them into my curriculum this year. Because life is short, I will show you below some of the easiest instructions available in a link below the description so that you can follow along with students or children.
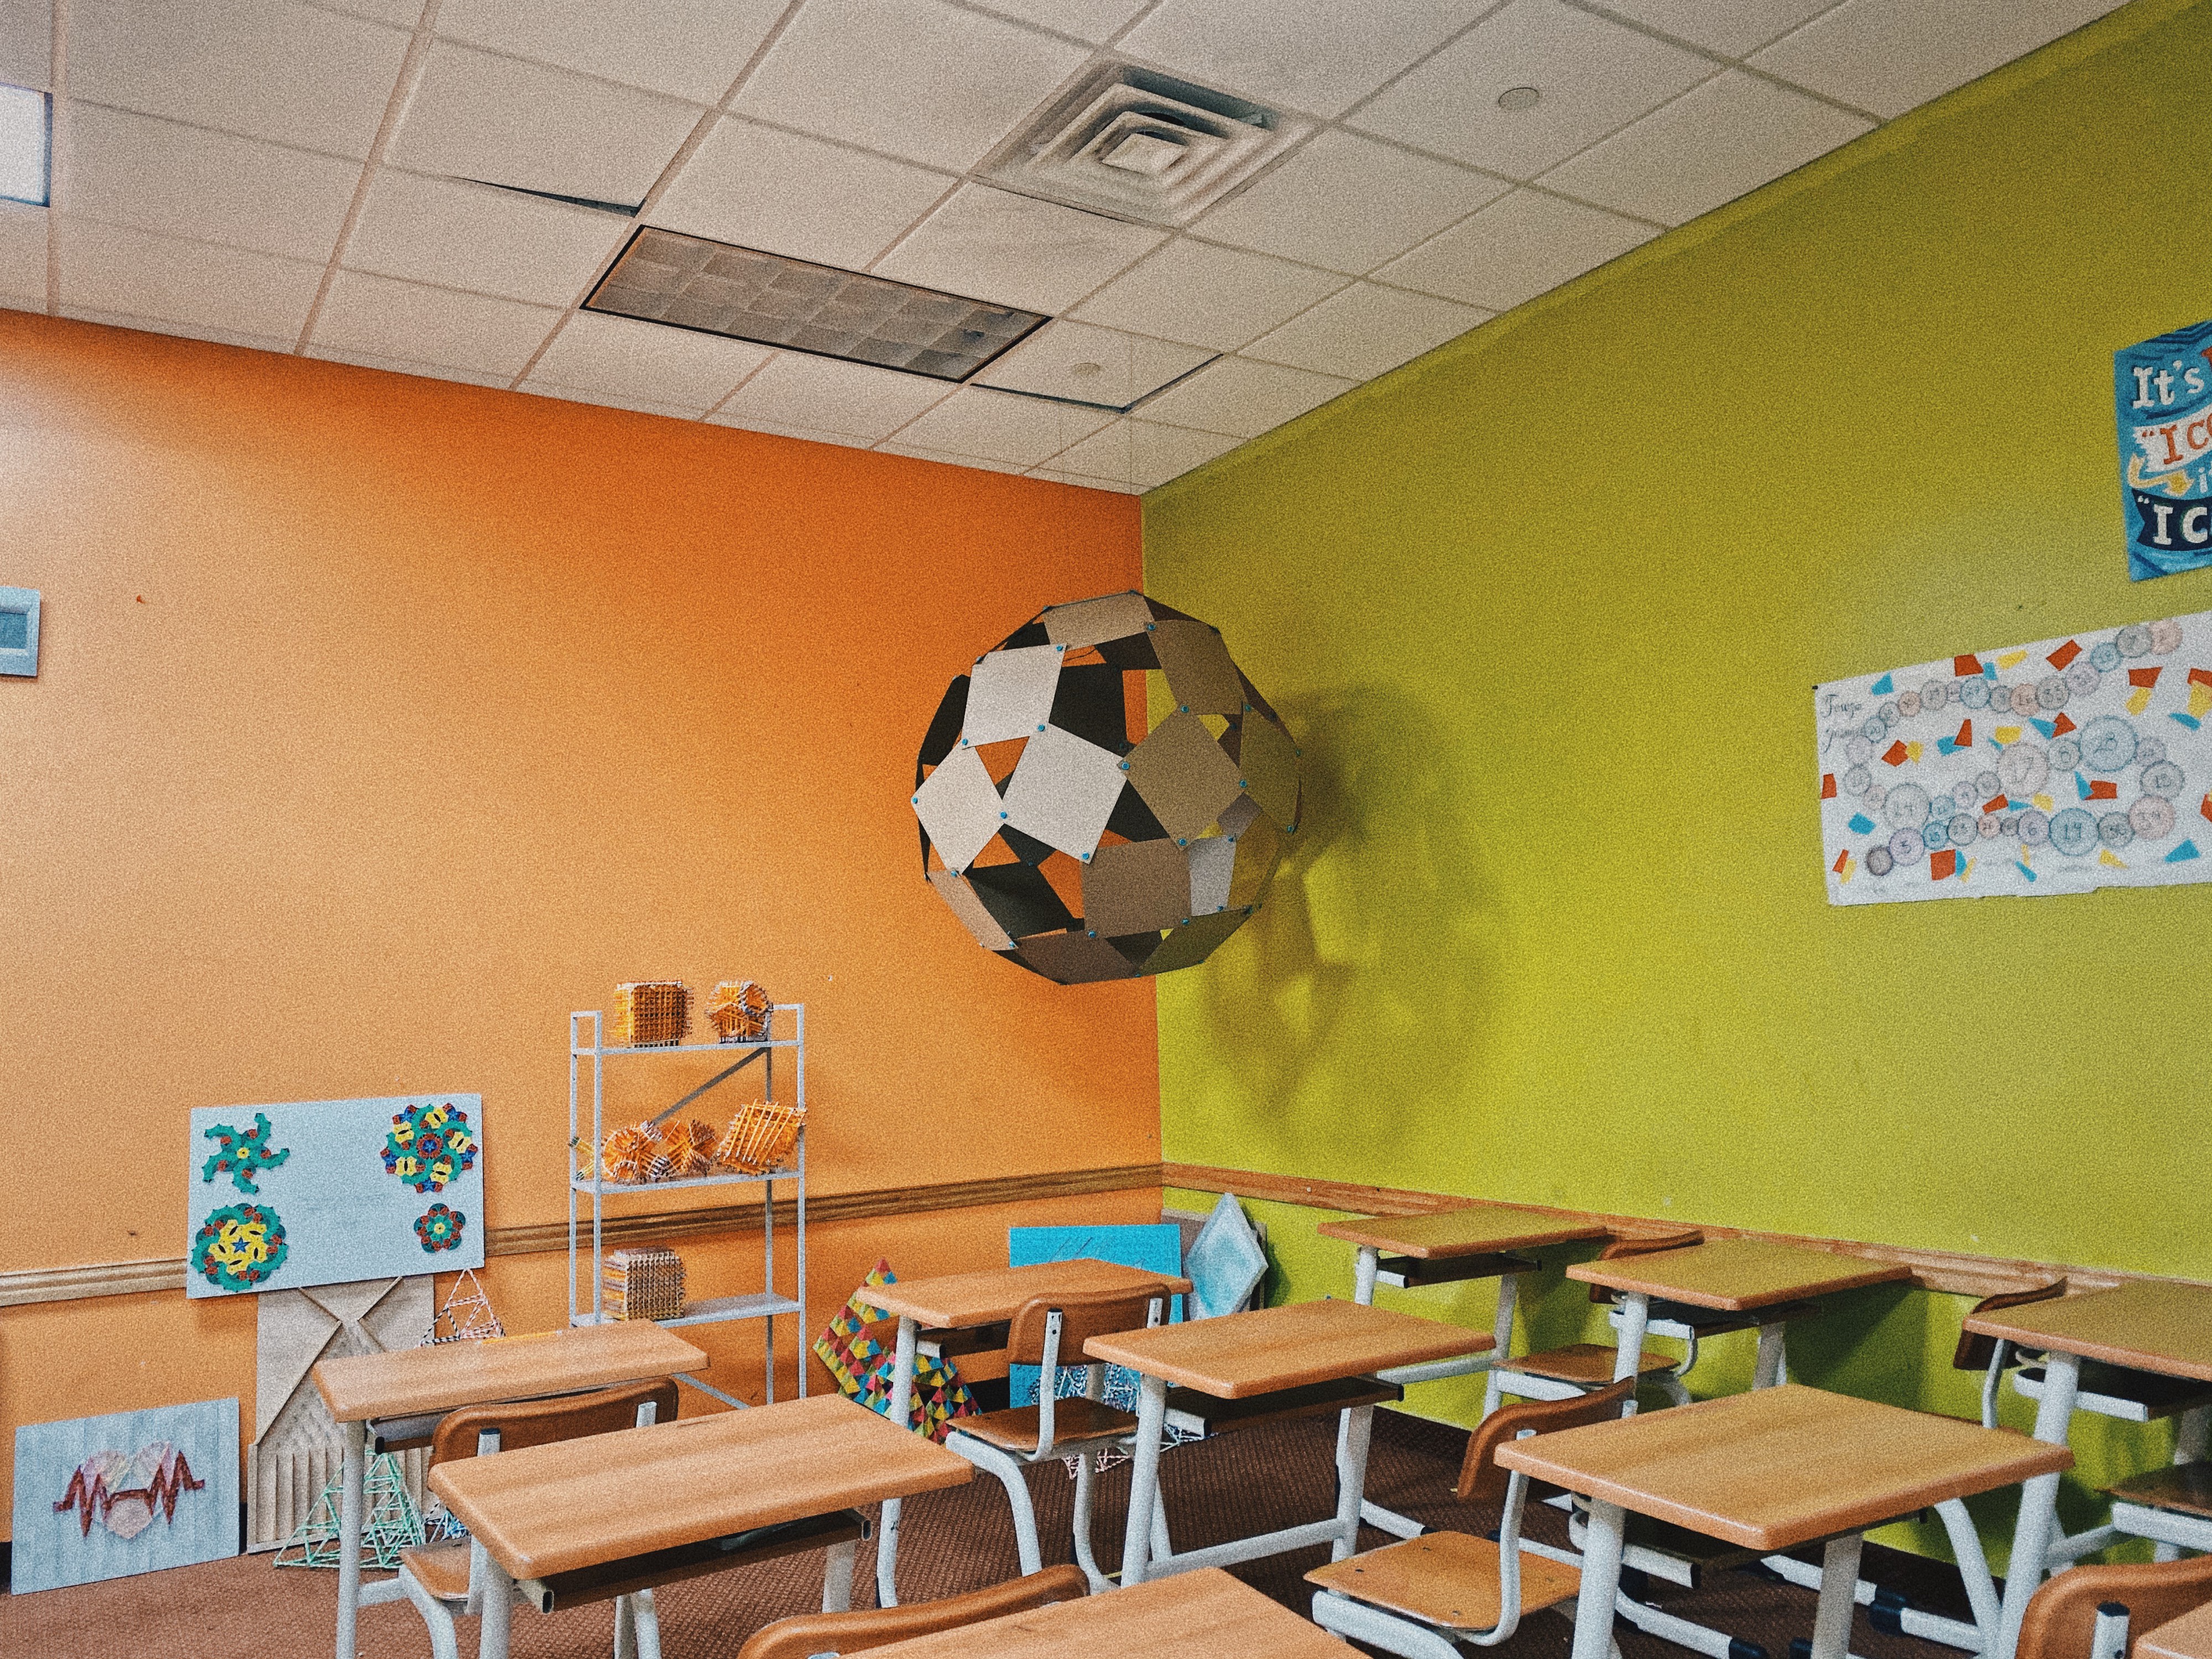
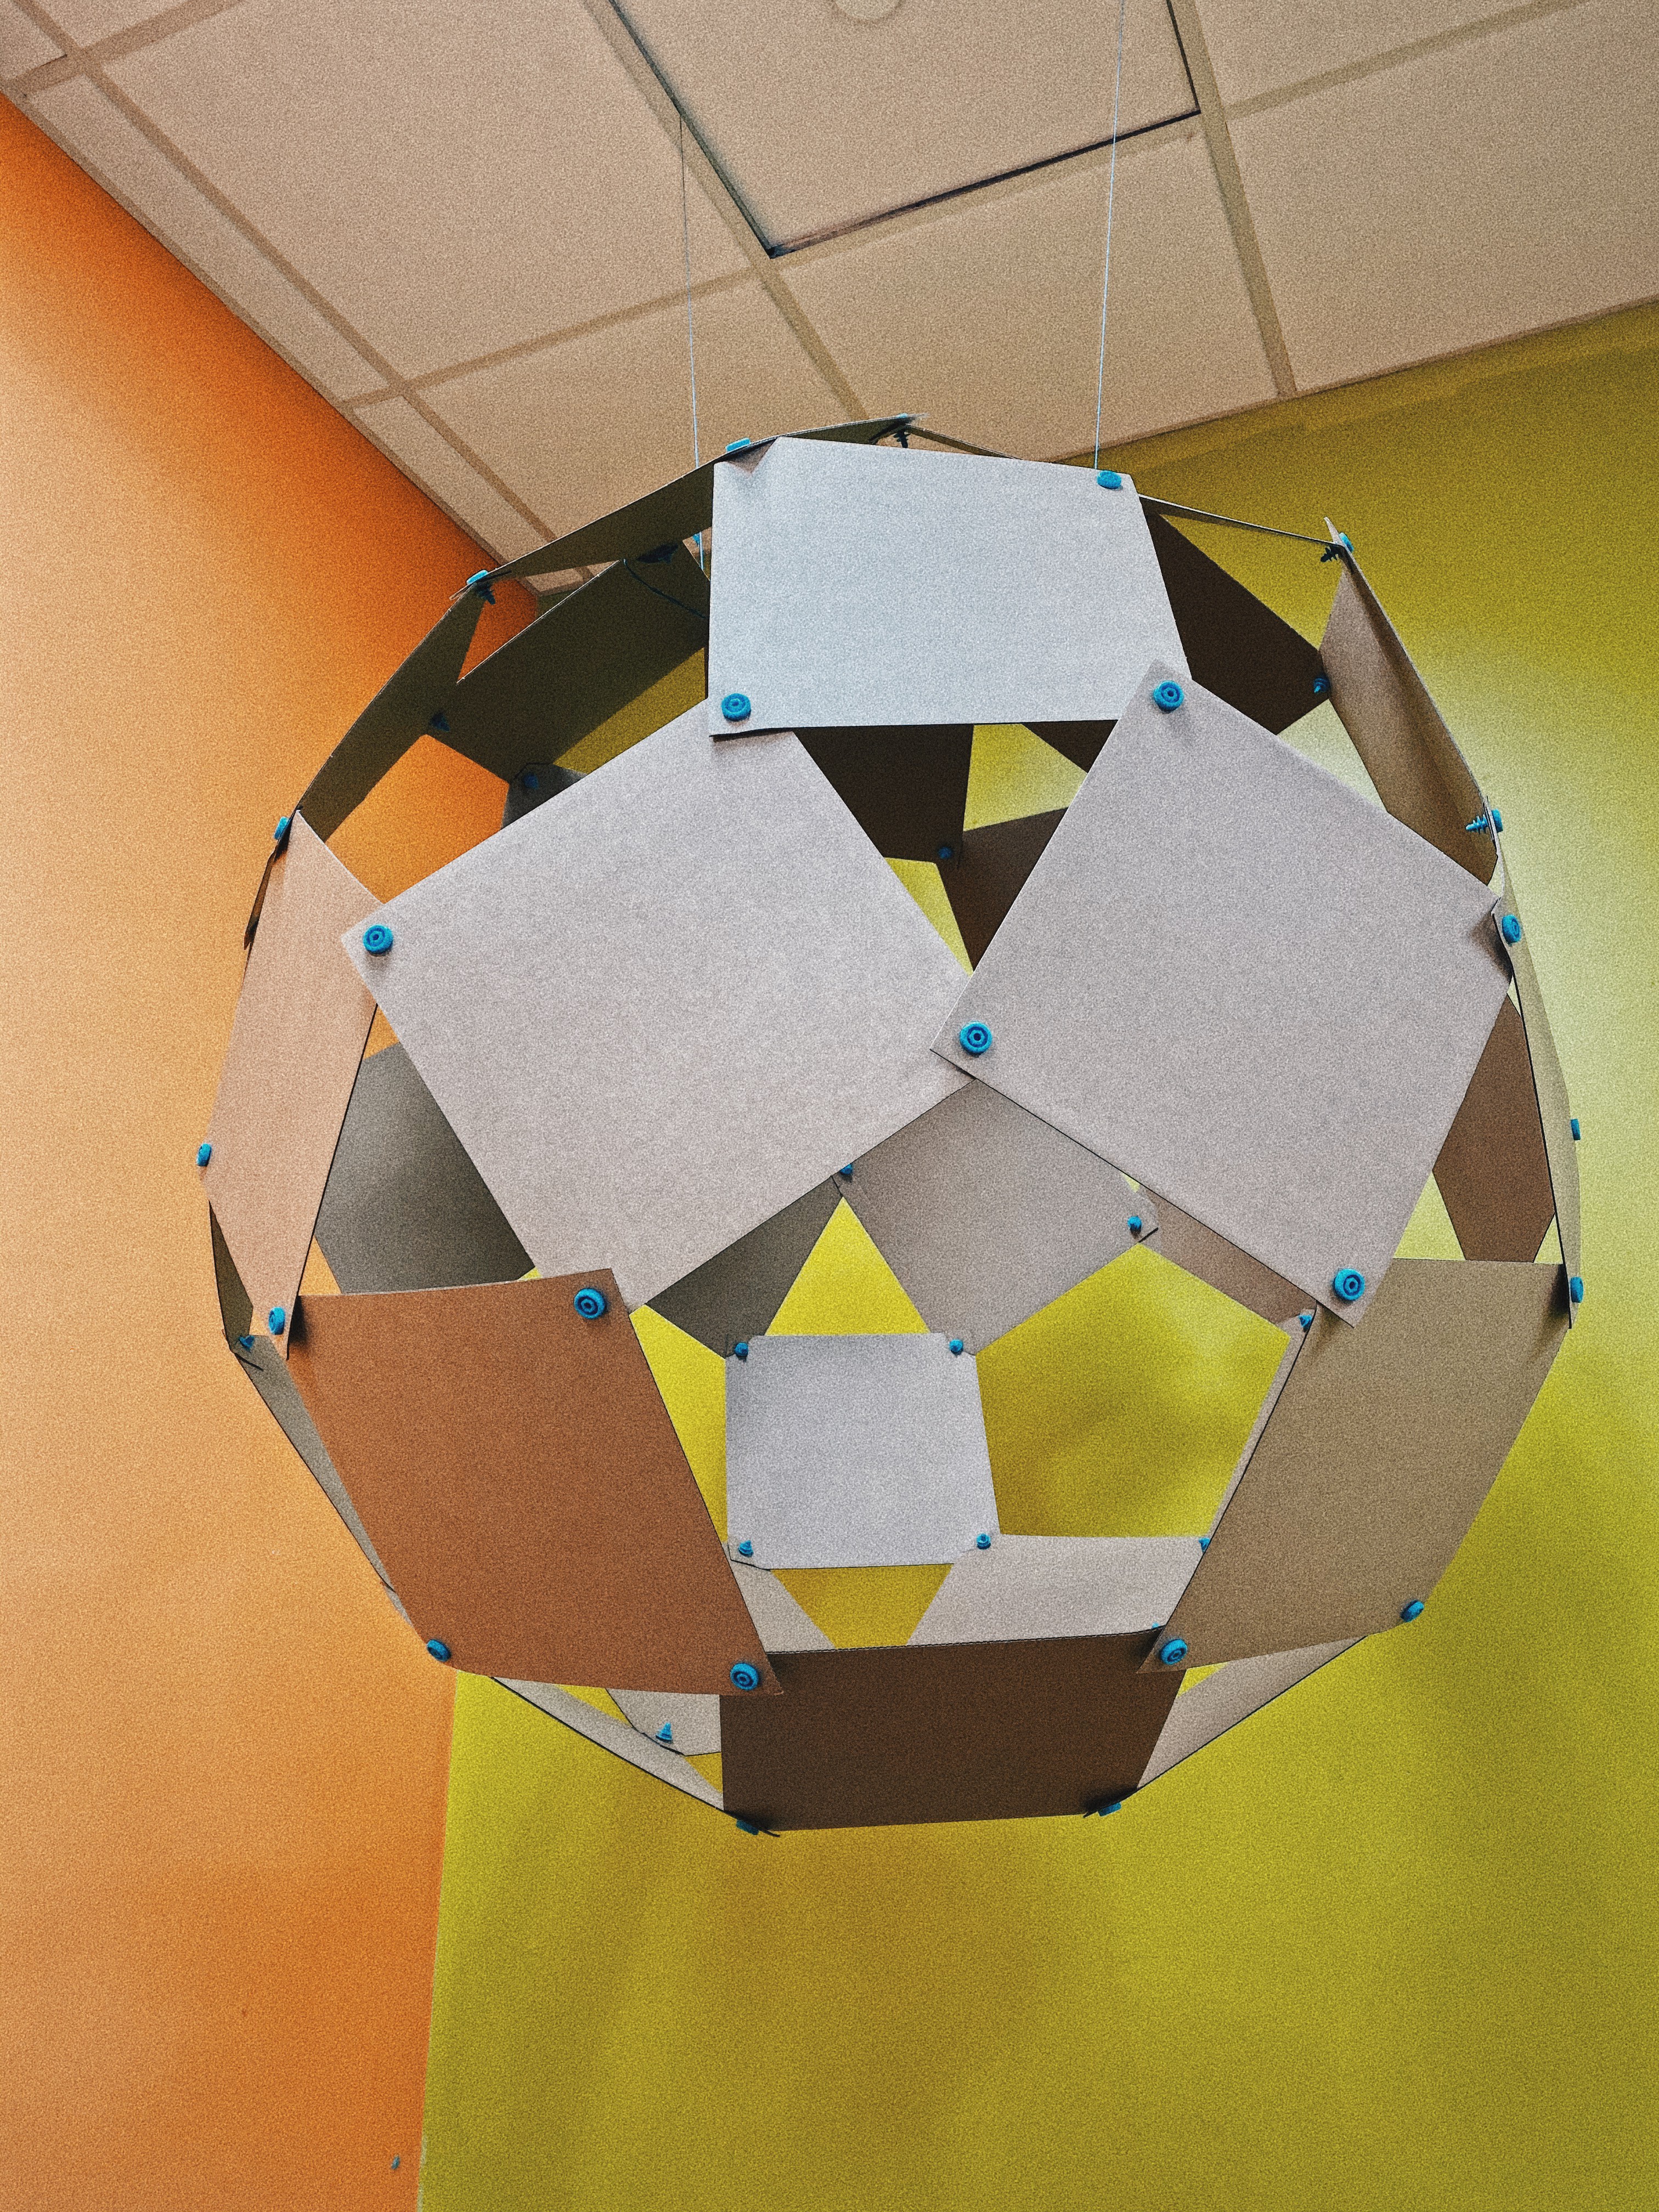
Makedo Windball
Makedo Windball is a simple, yet unique geometry project. Basically, all you do is assemble simple cardboards and turn them into a kind of art form. The main idea behind the project is actually quite abstract; it shows that there is no truly perfect sphere in this world. In addition, you can prove that spheres are made out of squares, hexagons, or triangles.
 Both Above: Makedo Giant Windball, Makedo Construction, via make.do
To begin, realize the following statement is true: There is no perfect spherical or circular object in our universe, and there will never be. The planets, raindrops, marbles, coins; none of these are perfectly rounded. You may think that gravity is holding us back from a perfect sphere, affecting the shape of the earth or of a raindrop, but even if there is no gravity, we still wouldn?t have a perfect sphere. This can be proven by you zooming in far enough- you will start seeing the edges of molecules. On Youtube, the user Veritasium explains this in a beautiful way.
A Makedo windball is the best way to grasp this idea. You are taking something that exists in square form and making it into a sphere. In the beginning, you need 32 12-inches squares. When you connect all of them, you will see some gaps in the shape of pentagons and triangles. To make that gap smaller, you will need smaller squares to fill it in. Every time you make your squares smaller, you will get closer to the perfect sphere. But keep this in mind; you can make it as round as you can, but it will still have miniscule holes , and it will not truly be a perfect sphere.
The Makedo Windball project also involves important fields for students such as design, prototyping, recycling, construction, and, of course- fun!
You can find the instructions here.
? Project Type: Abstract, Geometry, Engineering
? Supplies: Makedo Cardboard Construction Toolset for Whole Classroom or Makedo Cardboard Construction Toolkit and 12 x 12 Cardboards.
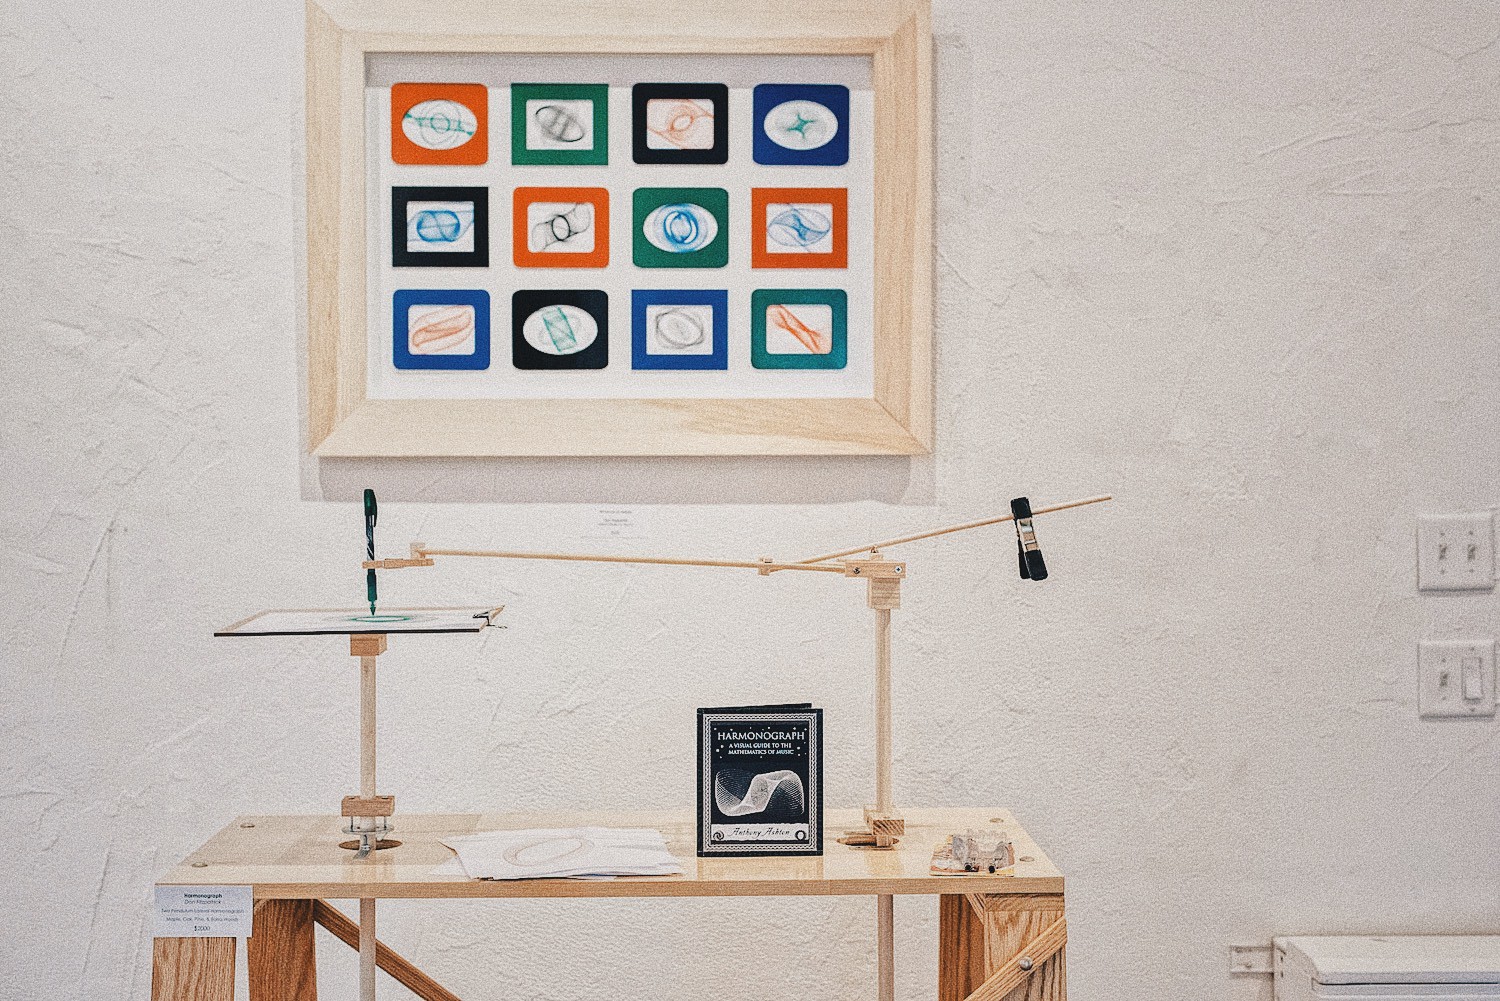
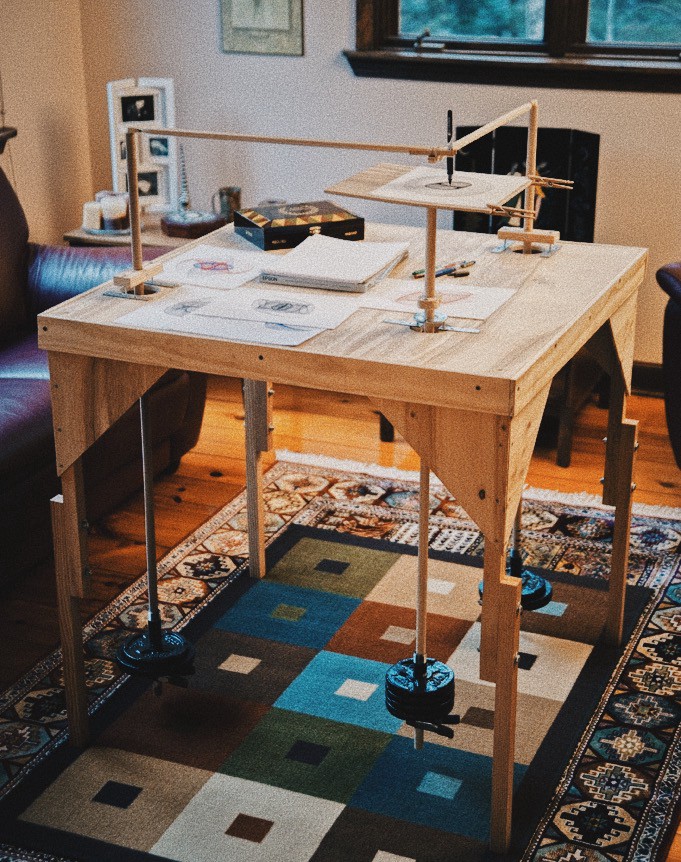
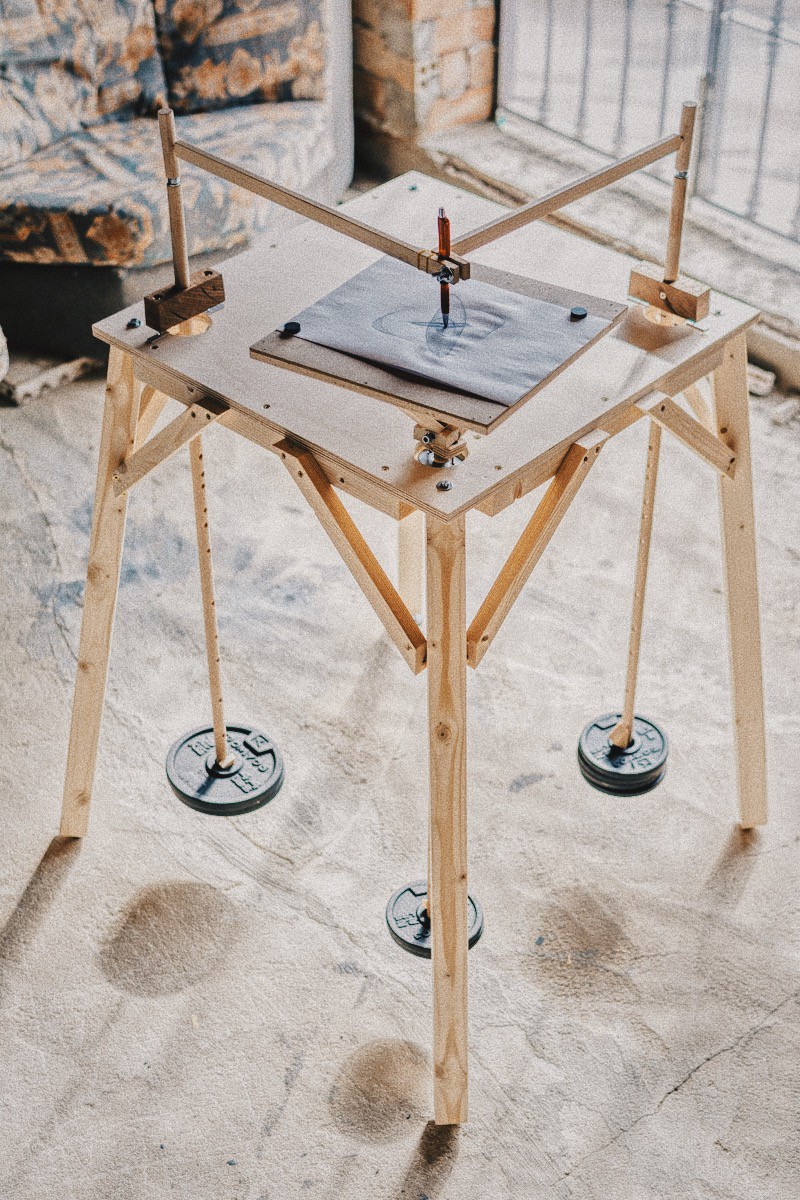
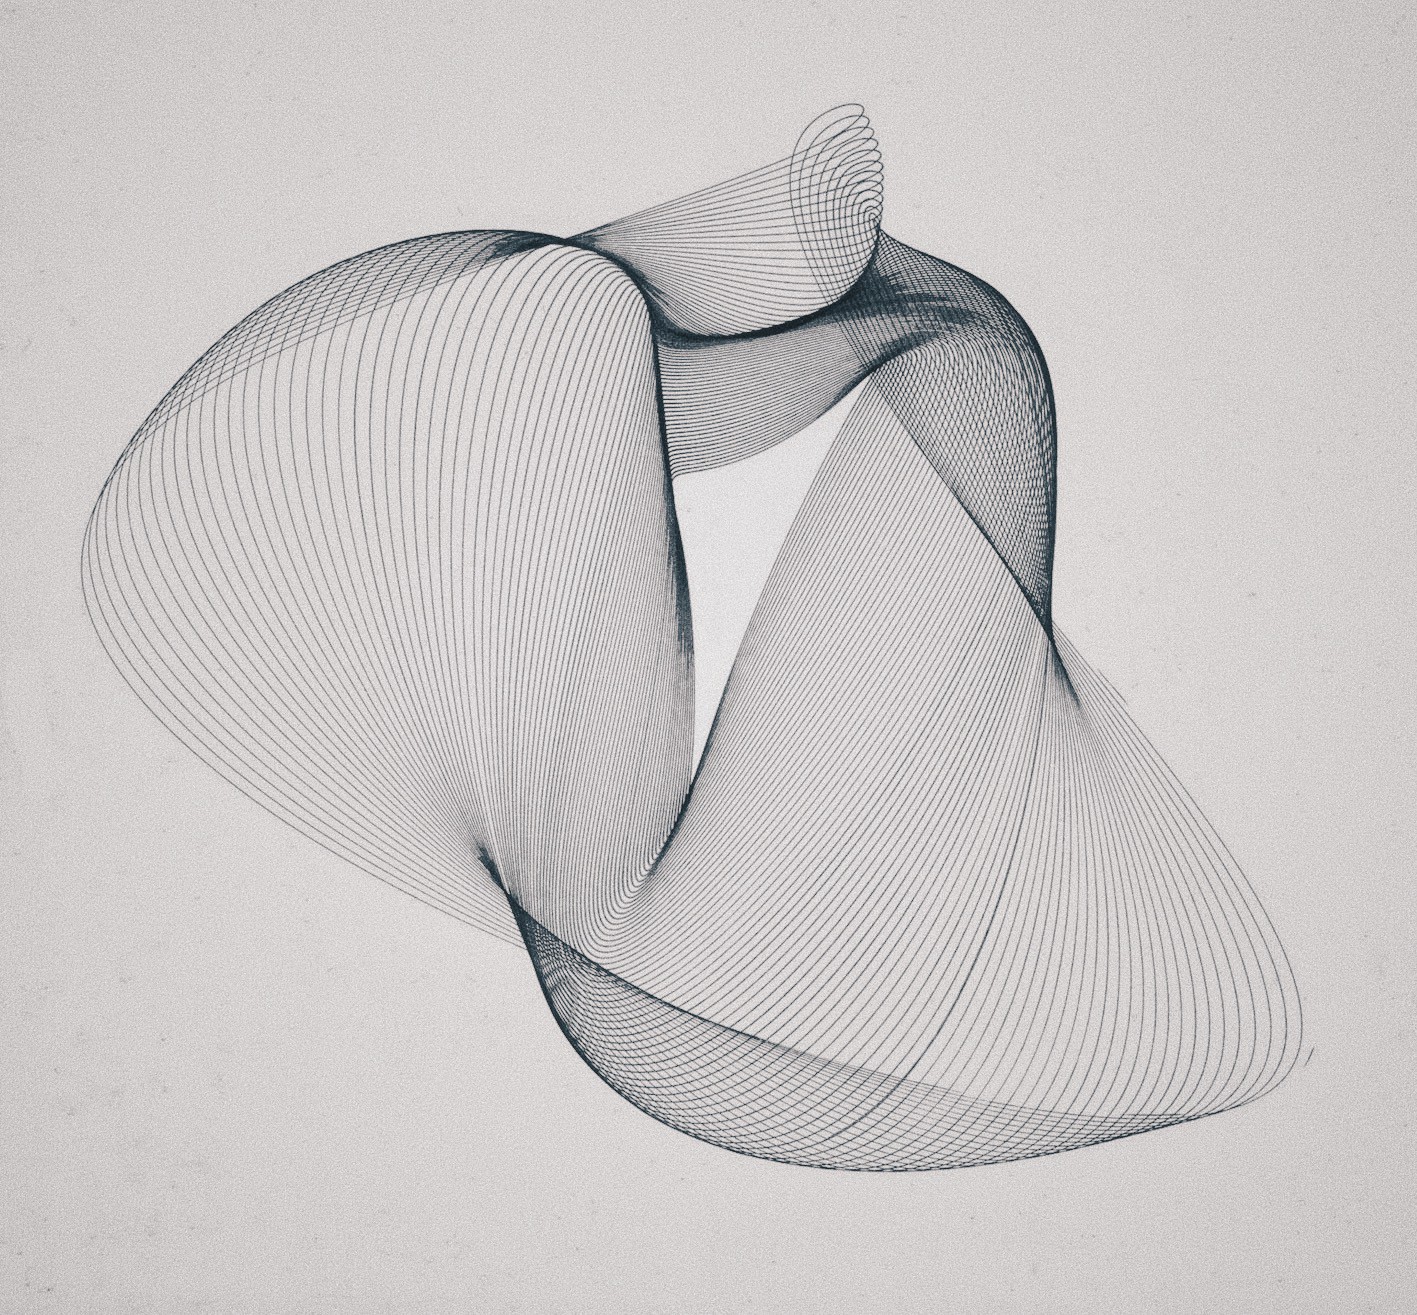
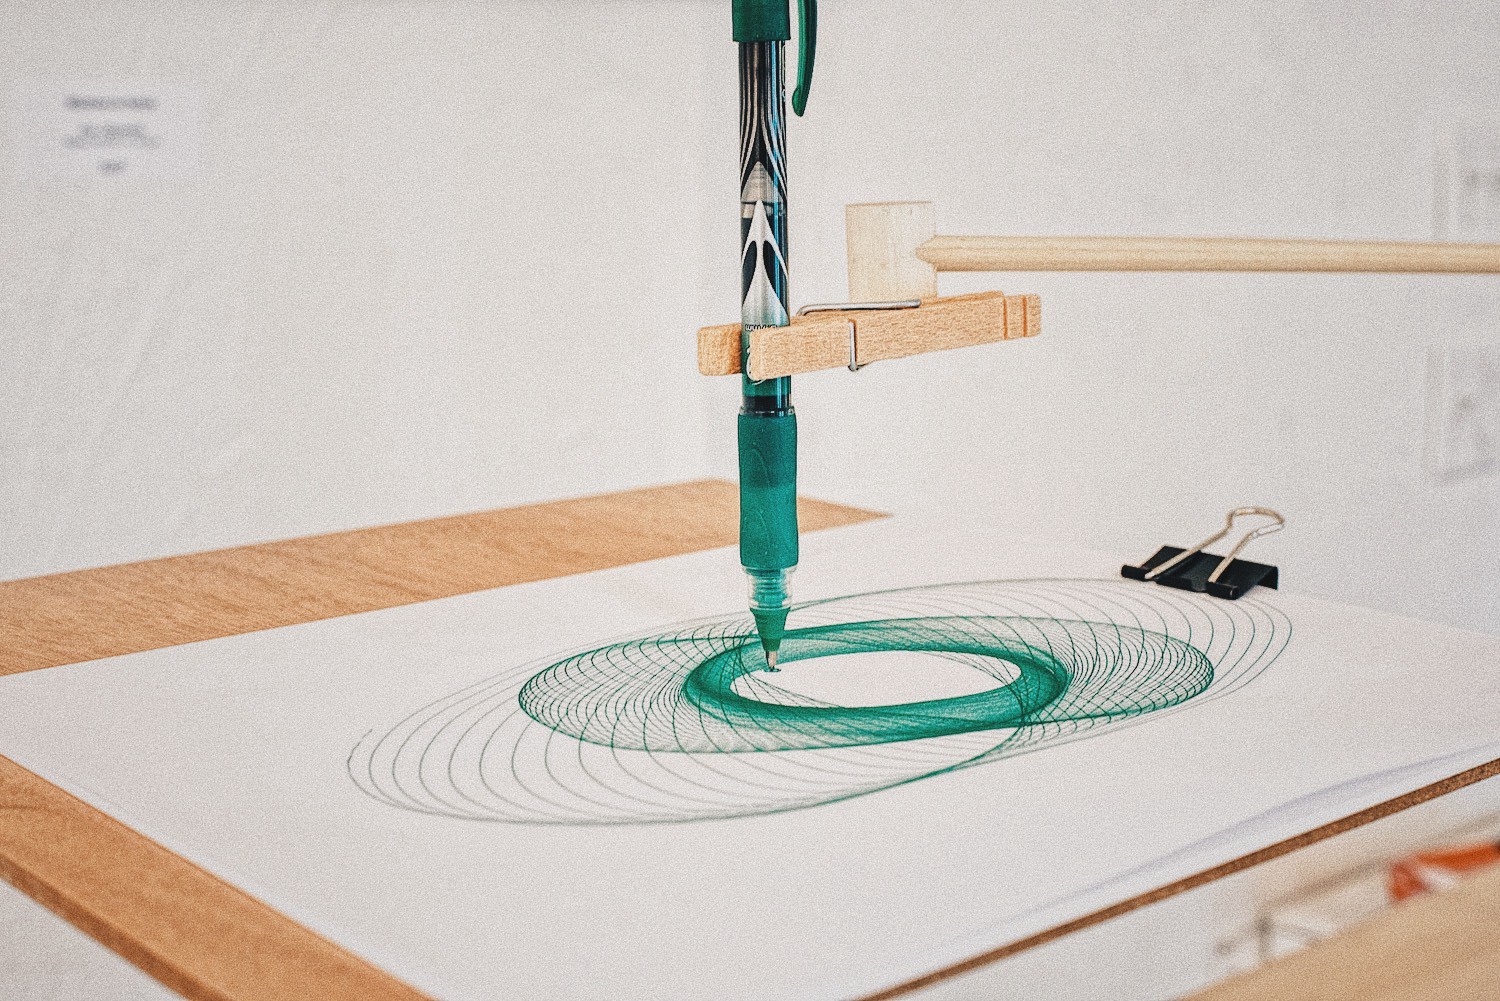
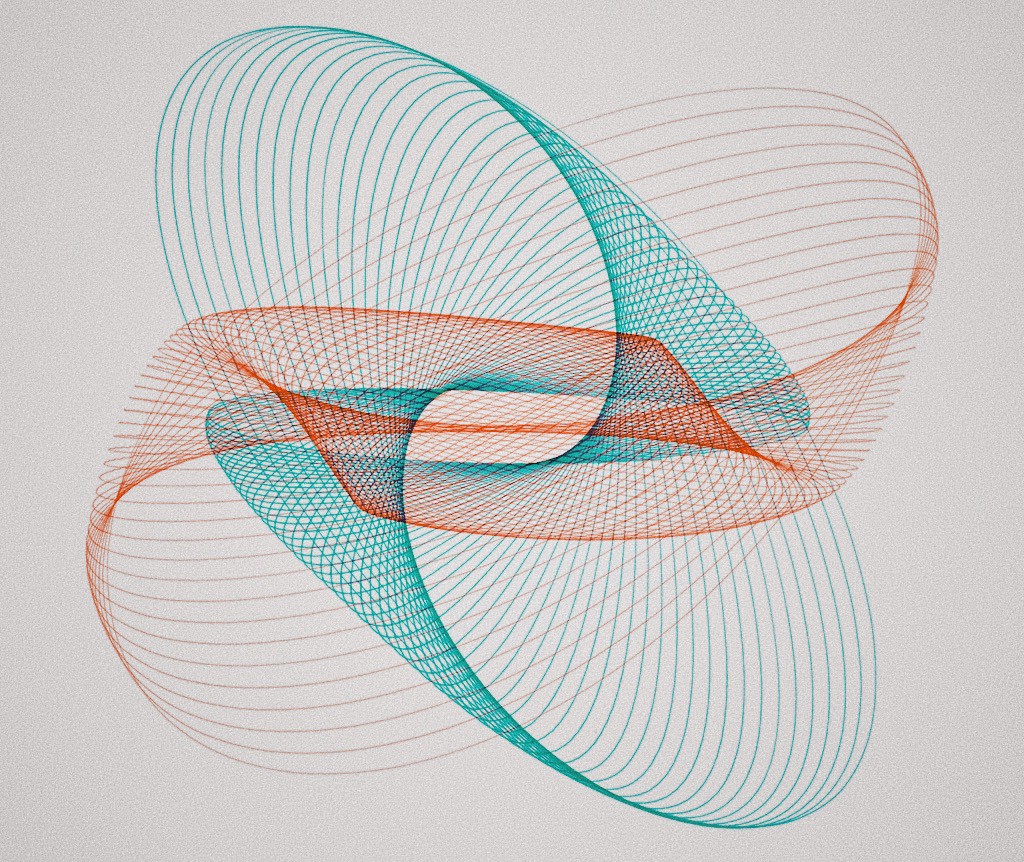
Harmonograph
A harmonograph is a drawing machine powered by the freedom of motion. It draws endless attractive geometric designs and patterns, in other words, harmonograms, using nothing but swinging pendulums, an oscillating pencil or pen, and 3?4 minutes.
 Above: Two-Pendulum Rotary Harmonograph, via inspektorgadget.com | Thre-Pendulum Rotary Harmonograph, via Donald Fitzpatrick
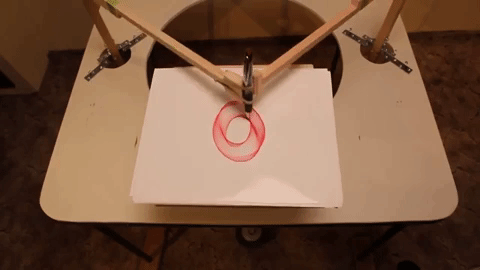 Above: Three-Pendulum Harmonograph, Wayne Schmidt via youtube.com
Making a harmonograph is one of my favorite projects to do with my students, especially those who are interested in design and engineering. Working on a harmonograph project with students is a fascinating process. It?s a great project to display science & engineering. For instance, while the pendulums are moving and pen/pencil is oscillating, you can see that the energy is transferred between the pen/pencil and the pendulum. You can also figure out the mathematics of a harmonograph, discussed by Paul Borke on his website.
 Above: Harmonograph Drawing, via Dan Fitzpatrick
Karl Sims wrote an amazingly detailed article about making a Harmonograph. I?ve improved some of the supplies from Mr. Sims? list, so you can make your harmonograph cooler. For instance, the magnetic balls will give you more freedom of movement than the nails and the foldable support brackets are perfect to connect legs of the table. You can also get these plywood and wooden dowels.
? Project Type: Art, Geometry, Engineering
? Supplies: Micron Pen, Magnetic balls, Foldable Support Brackets, Plywood, Wooden Dowels.
Euler?s Disk
Euler?s disk is a heavy disk and such a remarkable science toy that every science teacher should have one. The Euler?s disk is for teaching the relationship between magnetics, momentum, and gravity. It perfectly demonstrates the conservation of energy and introduces potential and kinetic energy.
When you show this toy to your students, they can?t help but spin it themselves over and over. Even the students who have no interest in physics would probably participate in your class for the first time. They would think it?s not going to stop spinning or that it has some electronic devices such as batteries. At that time, you can start your conversation about scientific principles and explain the natural physics that keeps Euler?s disk spinning.
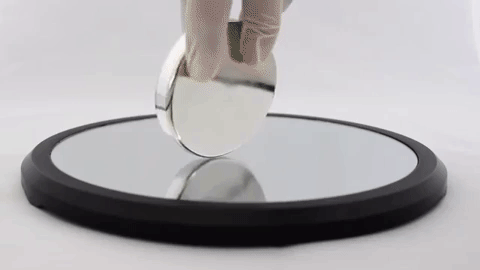
Your students don?t need to be smart to grasp the interesting idea behind the movement. This cool video explains everything about Euler?s disk.
It is also a perfect gift for your science teacher!
? Project Type: Science
? Supplies: Euler?s Disk
The Visual Proof of Pythagoras? Theorem
First of all, while students are playing with legos, I?m always aware of their creativity. Watching the students? creative thought process might be the best experience of being a teacher.
As a teacher, I?ve been thinking of something fun for my geometry class to inspire creativity, aid in stress relief, and also promote team building. For that purpose, I bought some boxes of legos to make geometry and mathematics projects because combining kids, bricks and legos are perfect for embracing creativity and building for students of all ages!
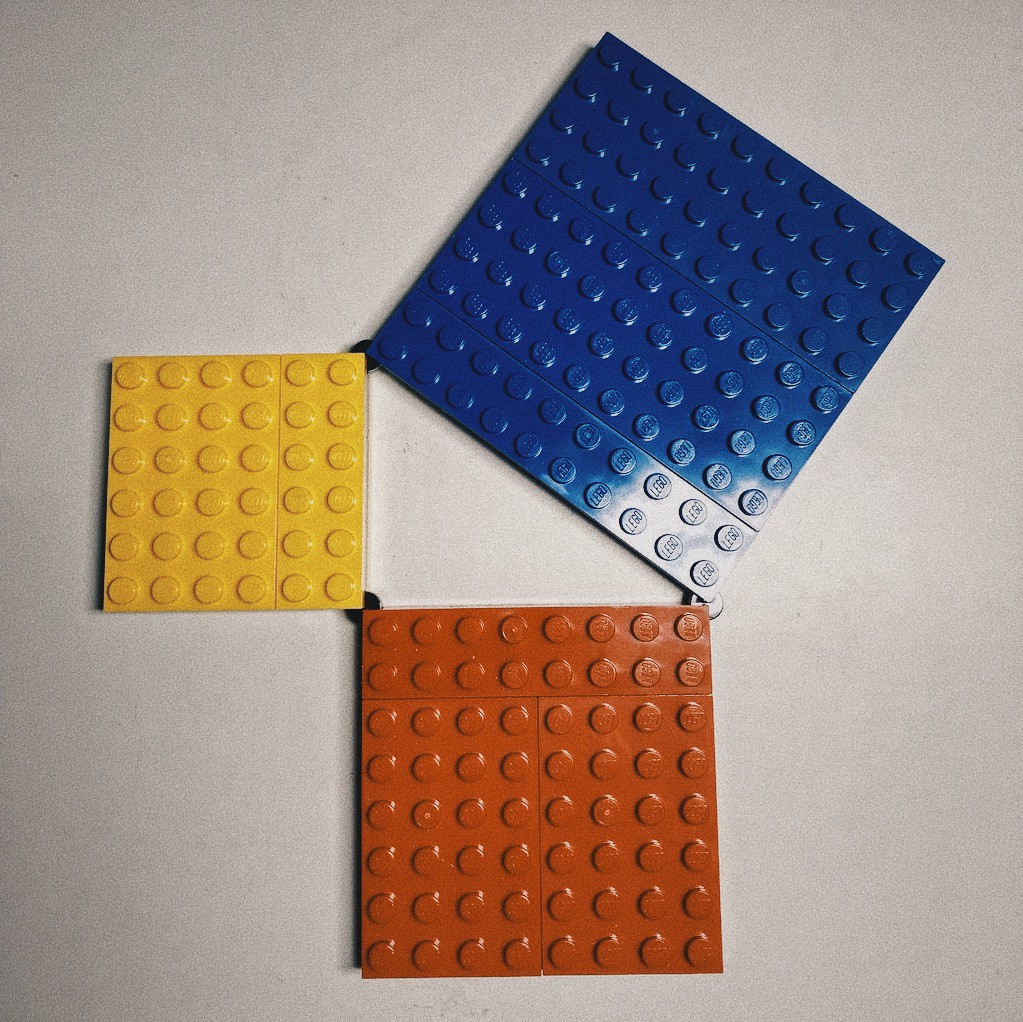
Our first project with legos was the visual proof of Pythagorean theorem because if you only use words to explain, only math minds will be able to grasp the idea of the theorem. So you need to use a visual apparatus to demonstrate Pythagoras? theorem.
If you order them online you can save some money. First of all, you need to decide which triangle you will use to show proof. Let?s say you want to make 6?8?10. Then you need 36 + 64 + 100 legos, which is equal to 200 legos. I believe this lego set and this base plate will work best for you.
? Project Type: Geometry, Construction
? Supplies: A lego set & Base plate
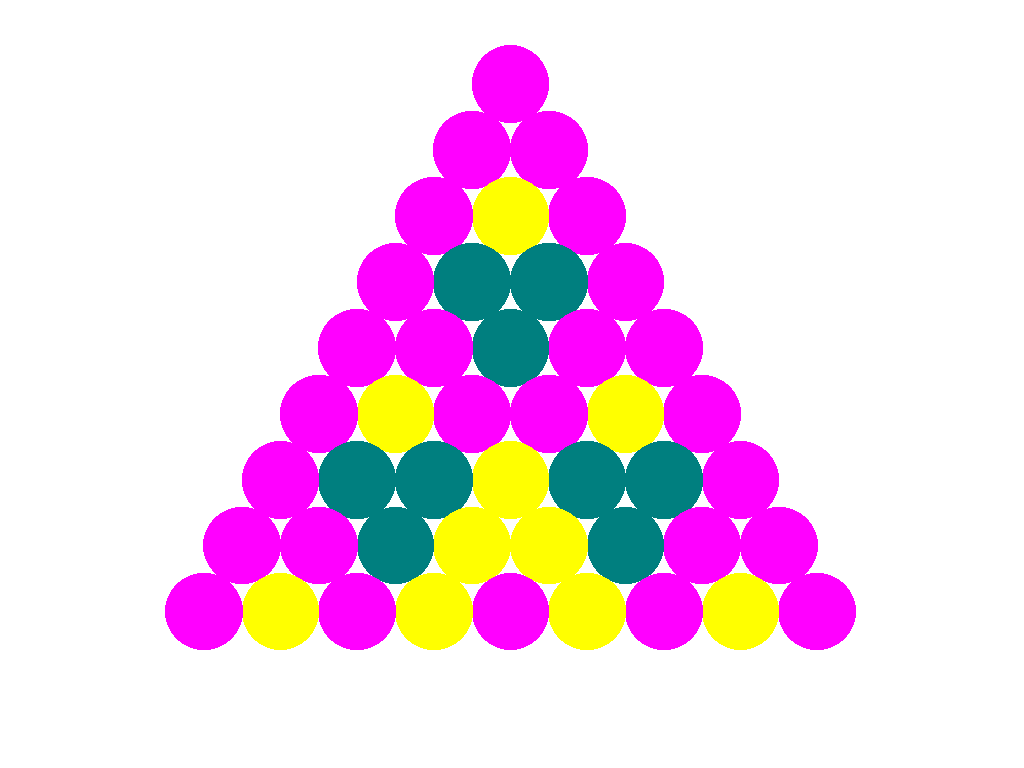
Sierpinski Triangle & Pyramid
Most students don?t know much about fractals and are completely unaware that these geometric structures have so many potential applications in the study of the natural world, computer graphics, and electrical engineering.
Simply put, fractals are complex repeating patterns. They are made up of smaller versions of themselves.
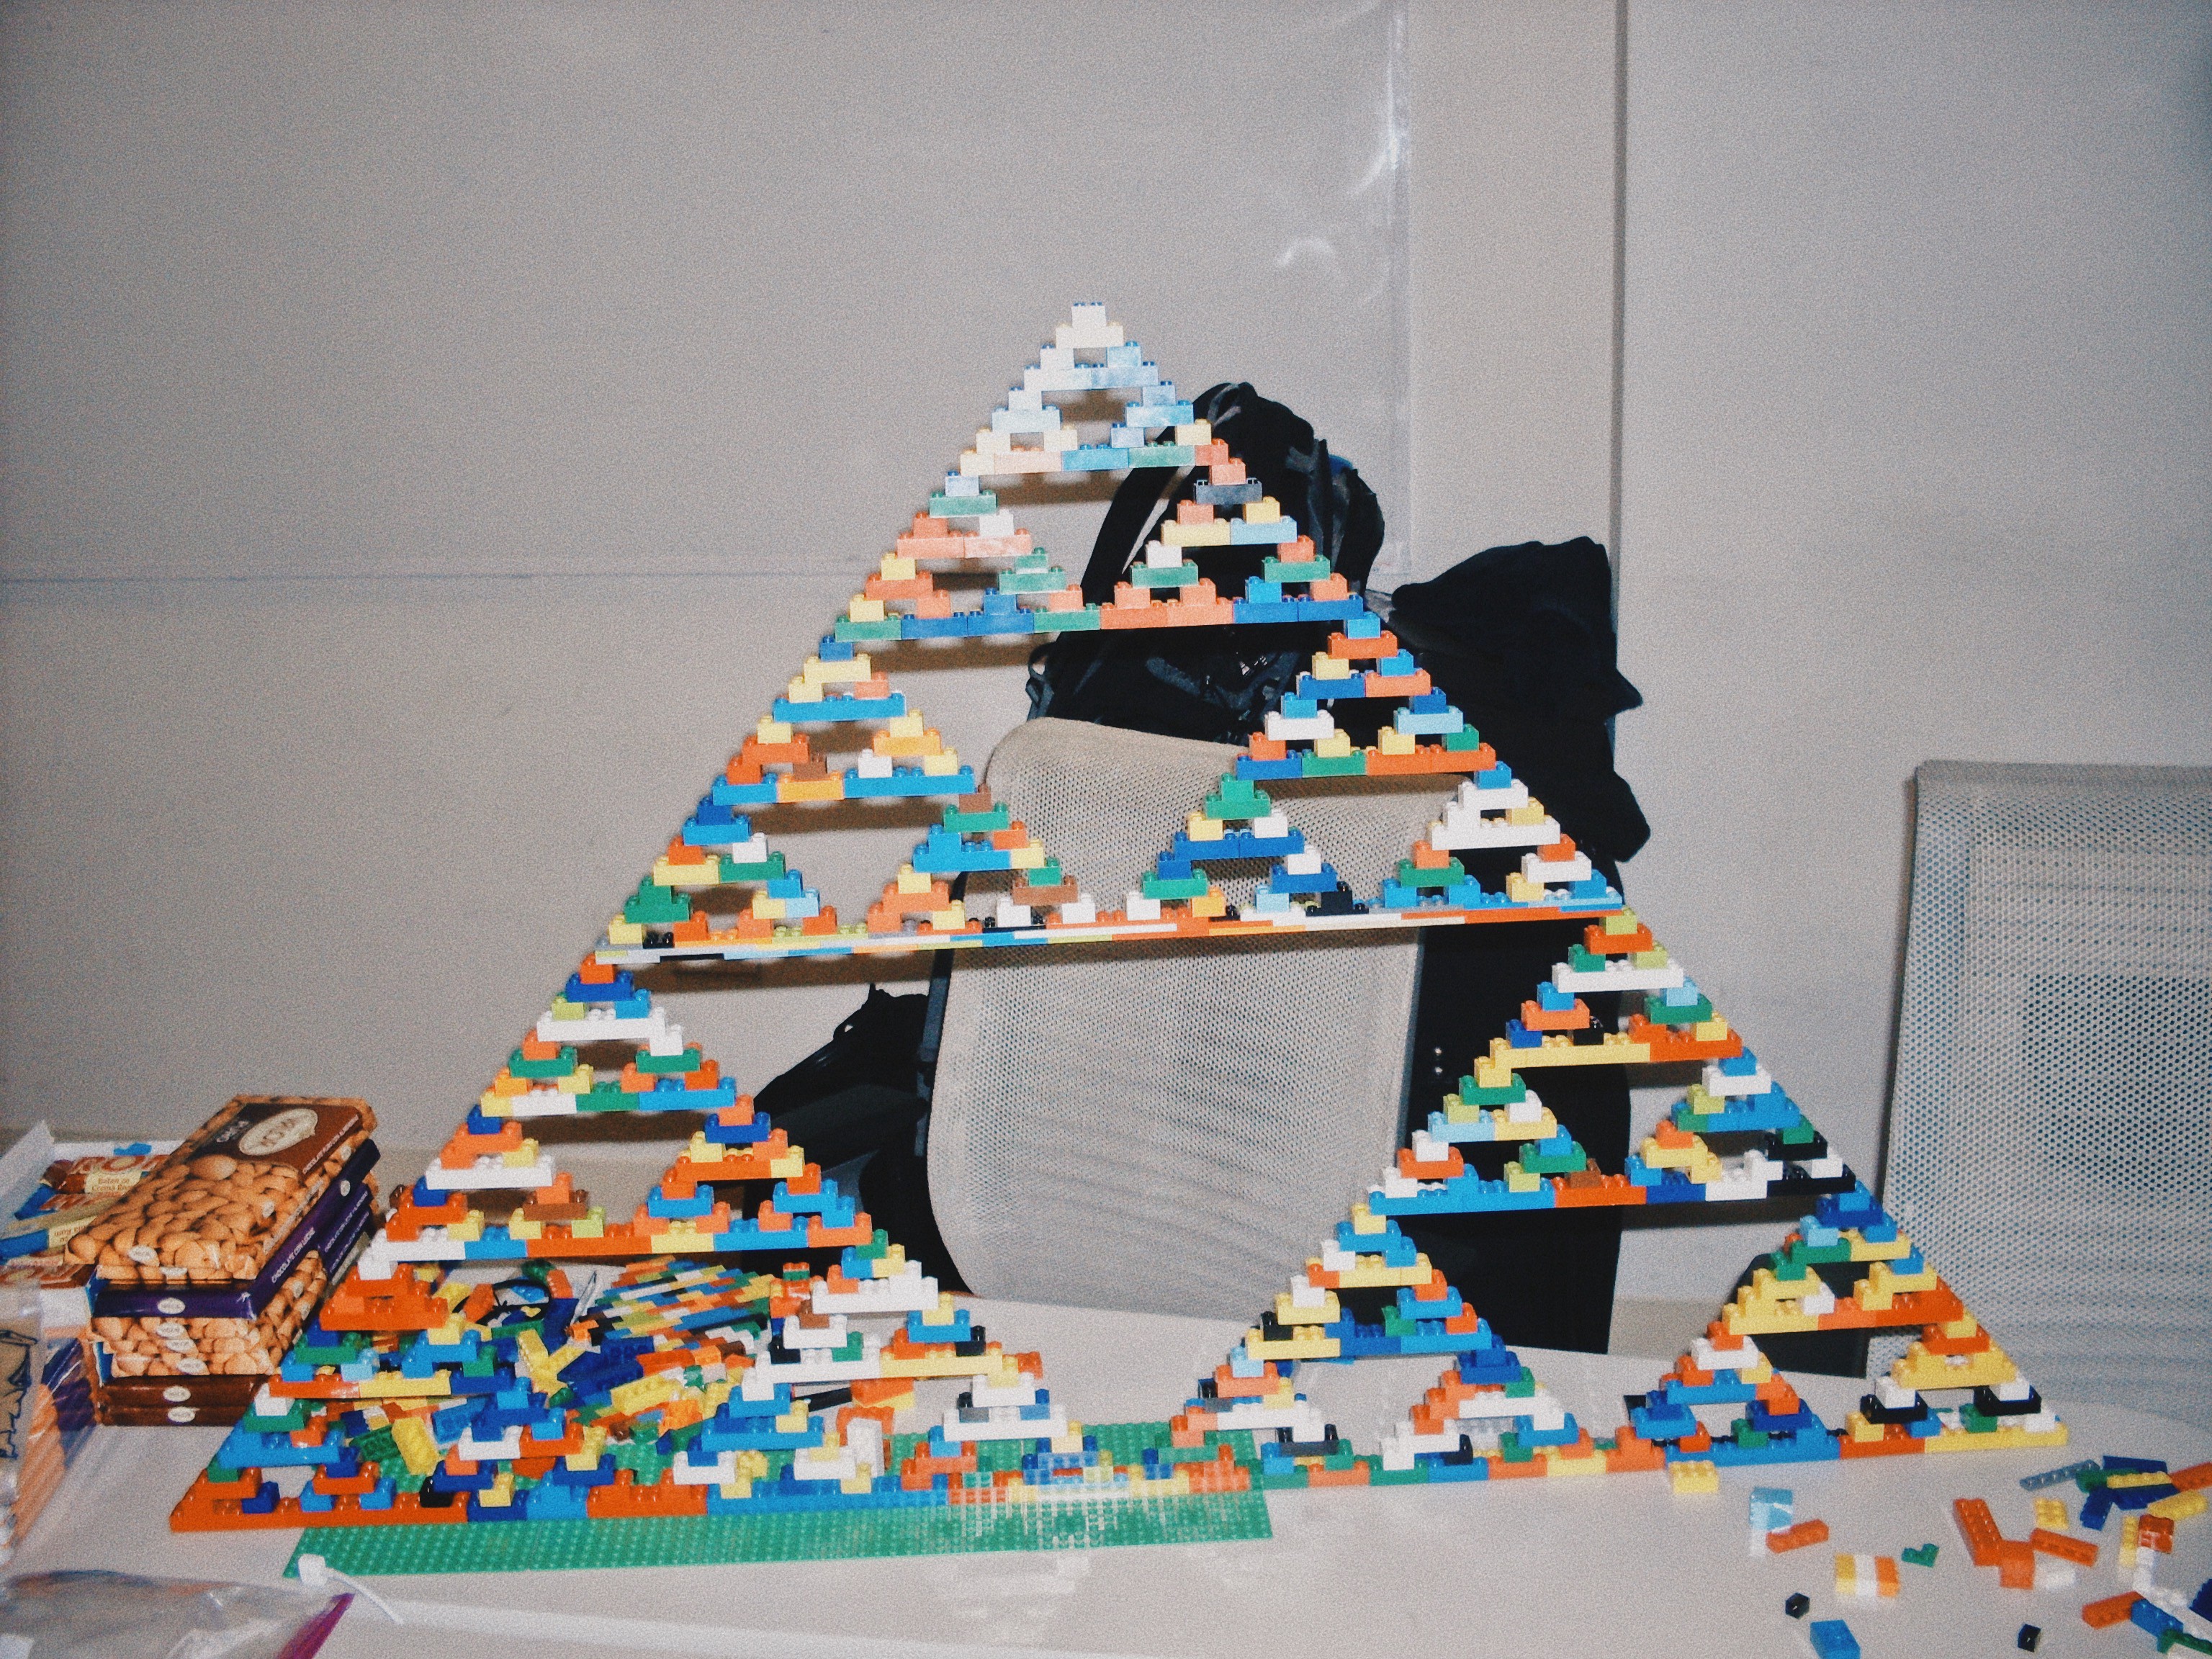
One of the simplest fractal forms is the Sierpinski triangle. The Sierpinski triangle is a fractal and attractive fixed set with an overall shape of an equilateral triangle subdivided recursively into smaller equilateral triangles. It is a beautiful way to show how a simple equilateral triangle use as a pattern to build a complex shape.
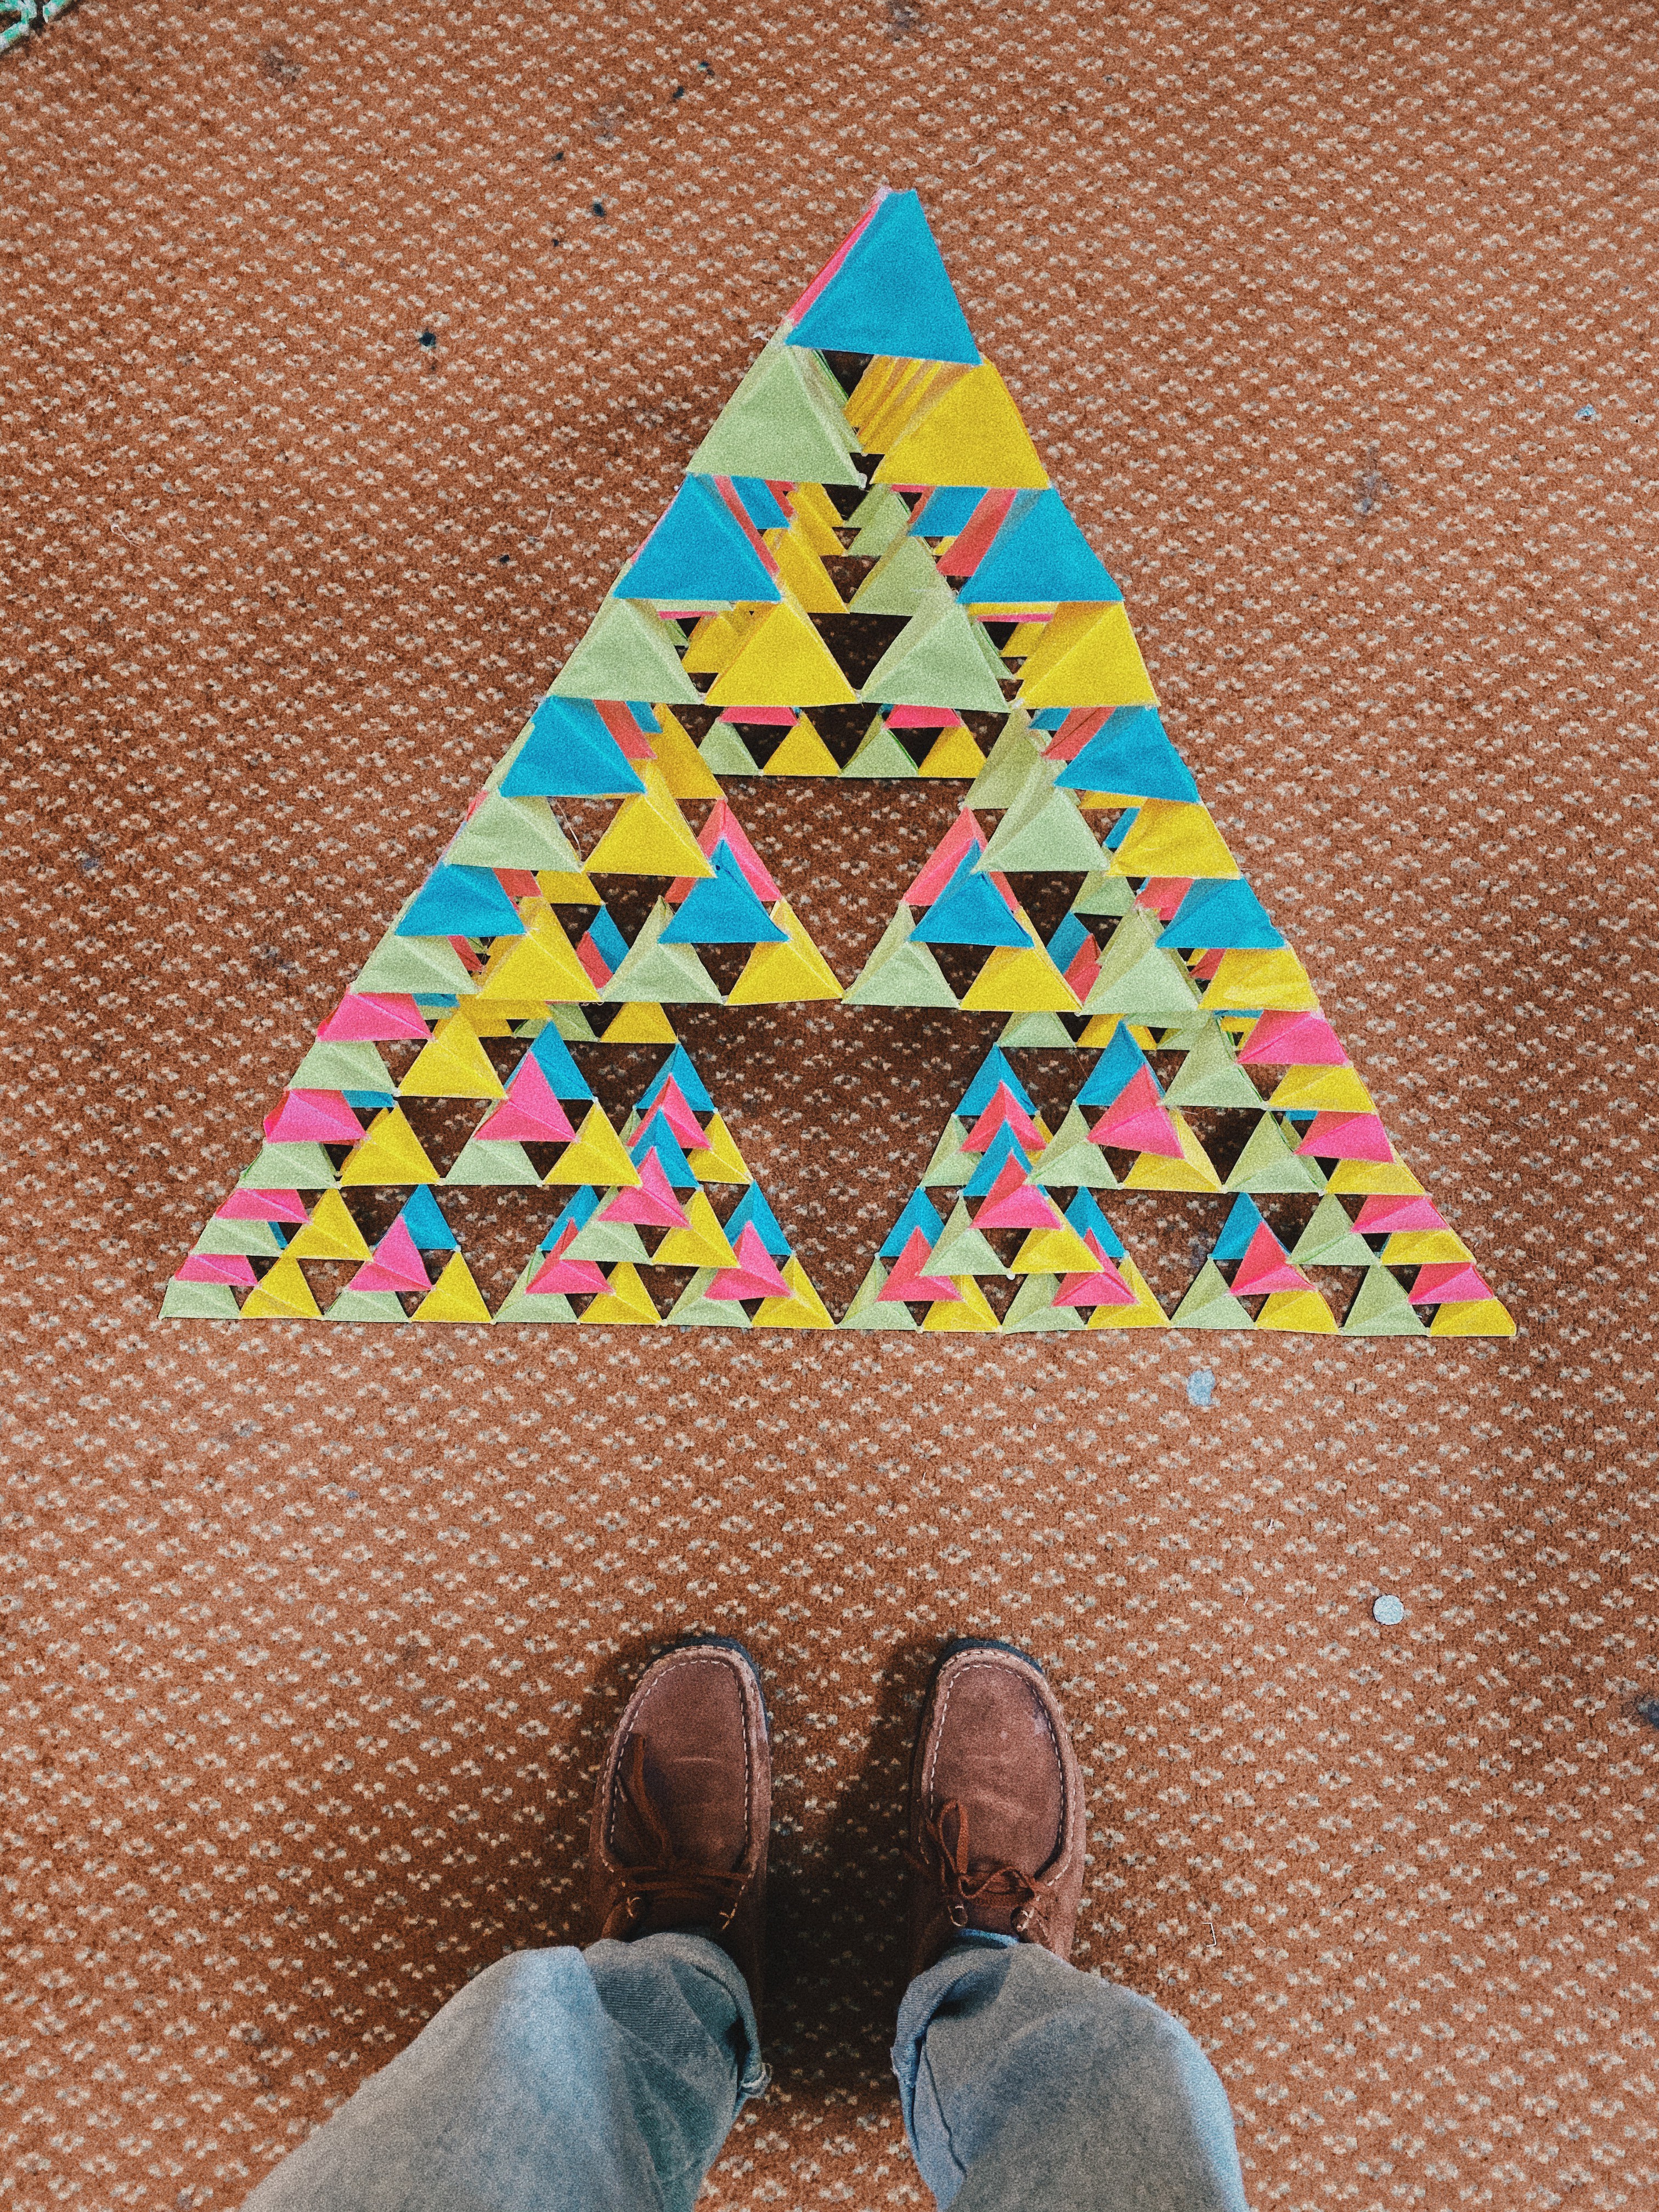 Above: Sierpinski triangle
You can see that the main triangle is made up of three similar versions of itself and each of them is also made up of three smaller versions of itself and also each of these is made up of three smaller versions of itself and so on? This pattern keeps on forever.
Legos are a toy for all ages, and they are the perfect apparatus to make fractals. This project is really cool to make if your students love geometry. If you are teaching triangles, similarity, fractions, or are attempting to have fun at the same time- This project turns mathematics into a game and an art.
To make this project, you may need a lot of legos. For instance, you need 3?=243 2×2 legos to make this Sierpinski triangle below. You can order them here so you may save some money.

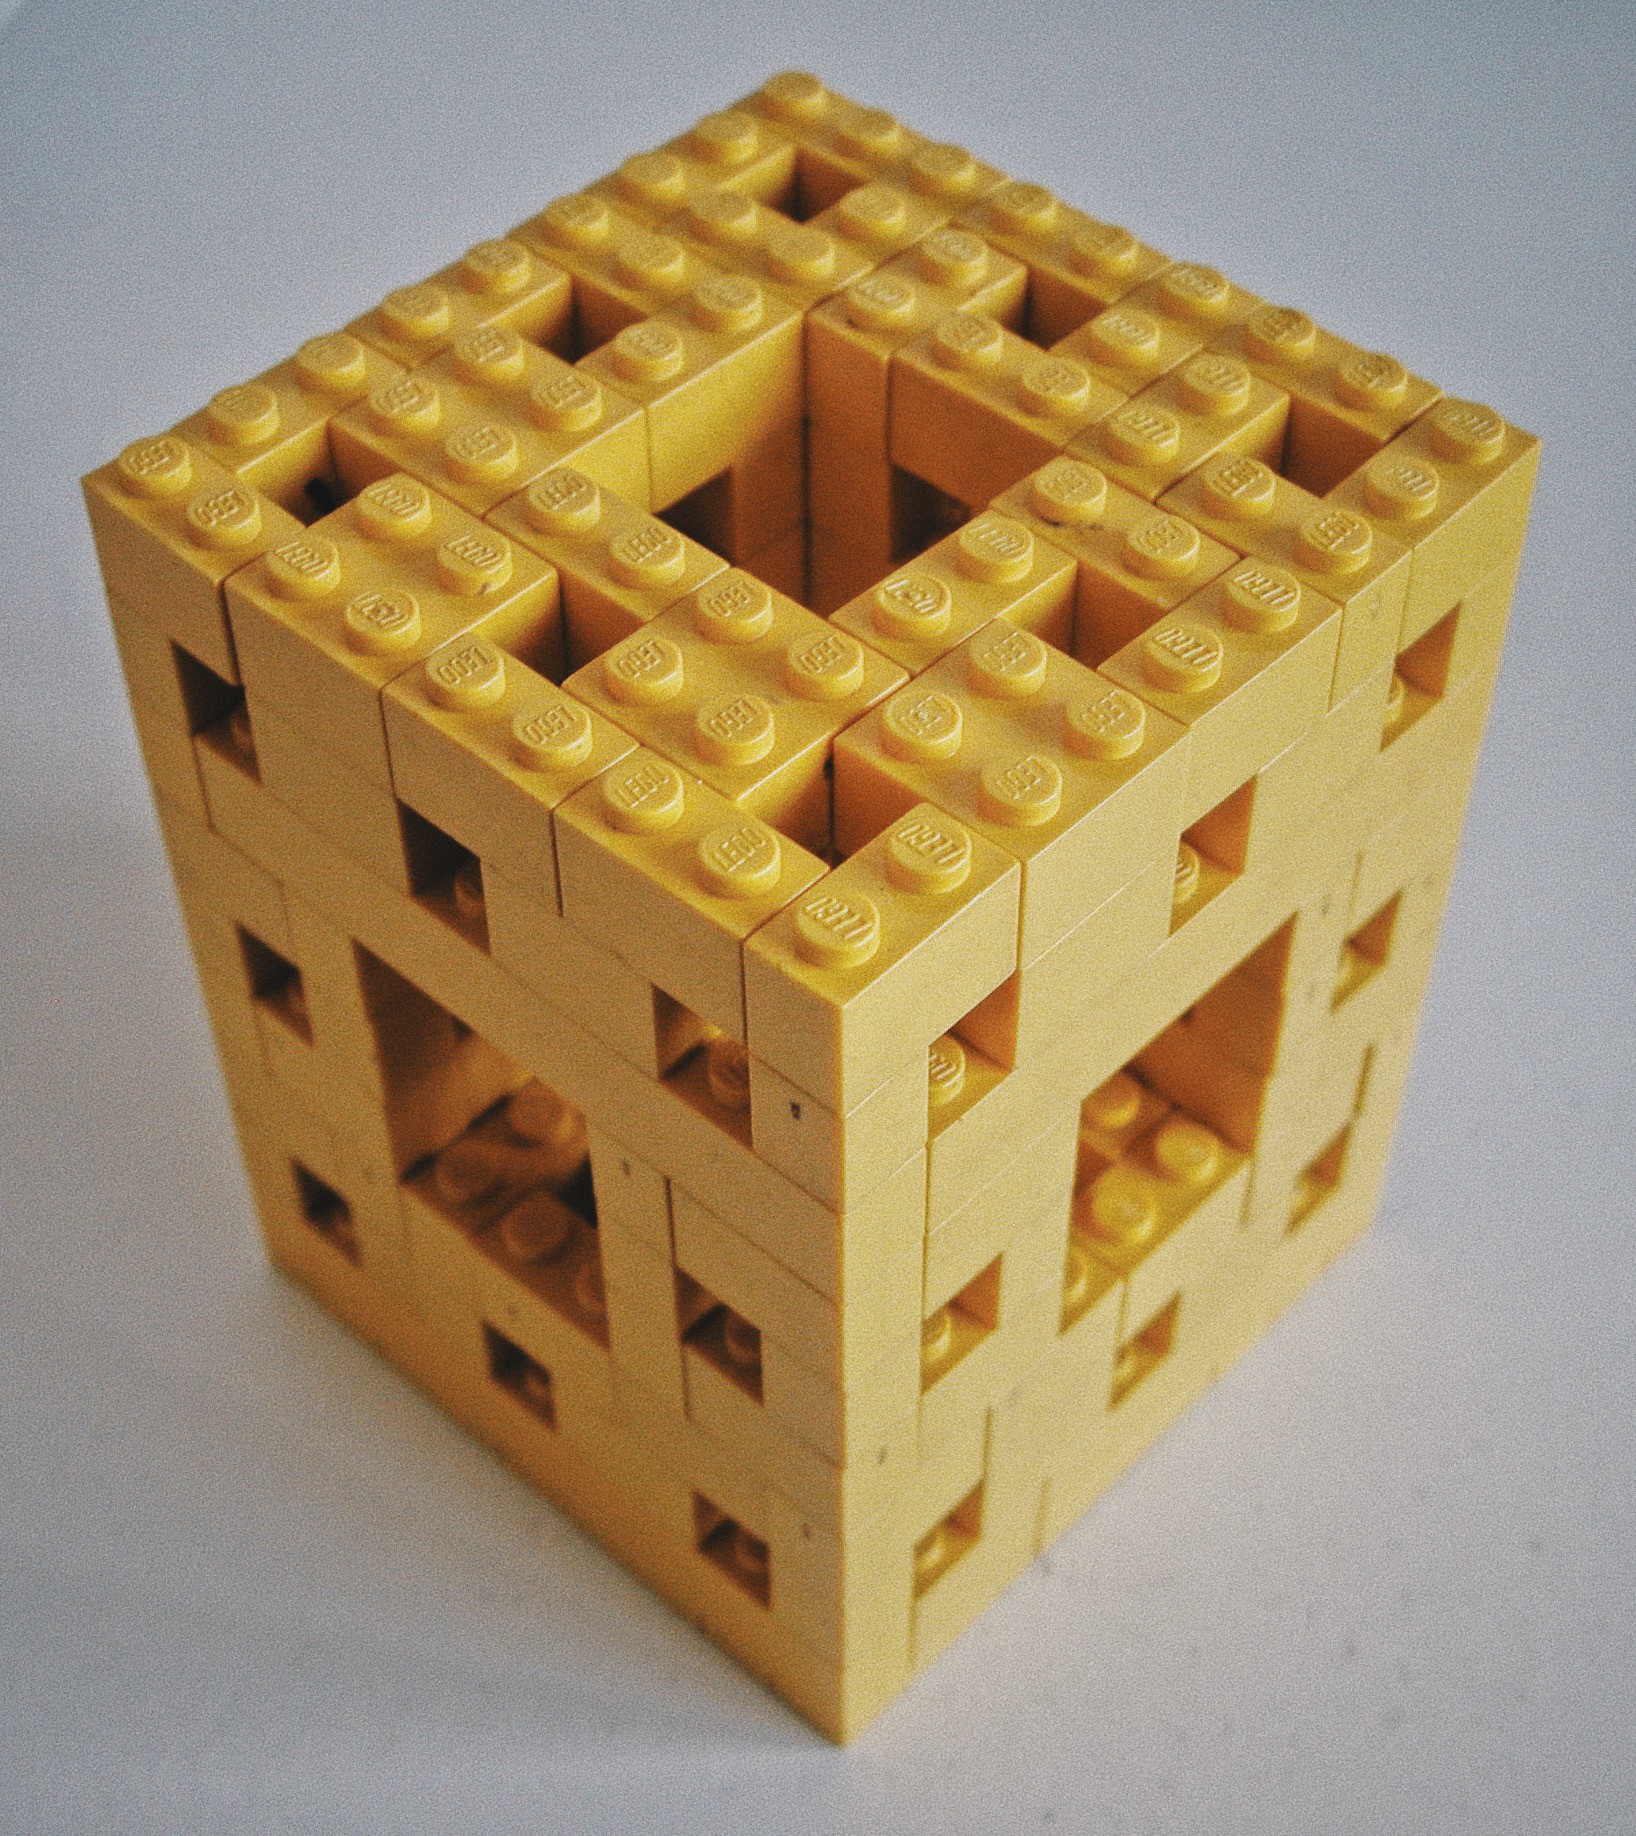 Above: Sierpinski Pyramid, via MathGarden | Sierpinski Pyramid, via Jenelopy, | Menger Sponge, via Marquis de Geek
You can also try Menger Sponge after you finish the Sierpinski Triangle. Here is the detailed instructions.
You can also join these crazy people if you want: Fractal Foundation
? Project Type: Geometry, Algebra, Construction, Art
? Supplies: A lego set
Estimate Pi by Dropping Toothpicks
Unfortunately most of the students only know pi as related to the circumference of a circle; however, pi is everywhere in nature and in the world of mathematics. One of the best examples to prove this statement is Buffon?s needle experiment, which is about statistics.
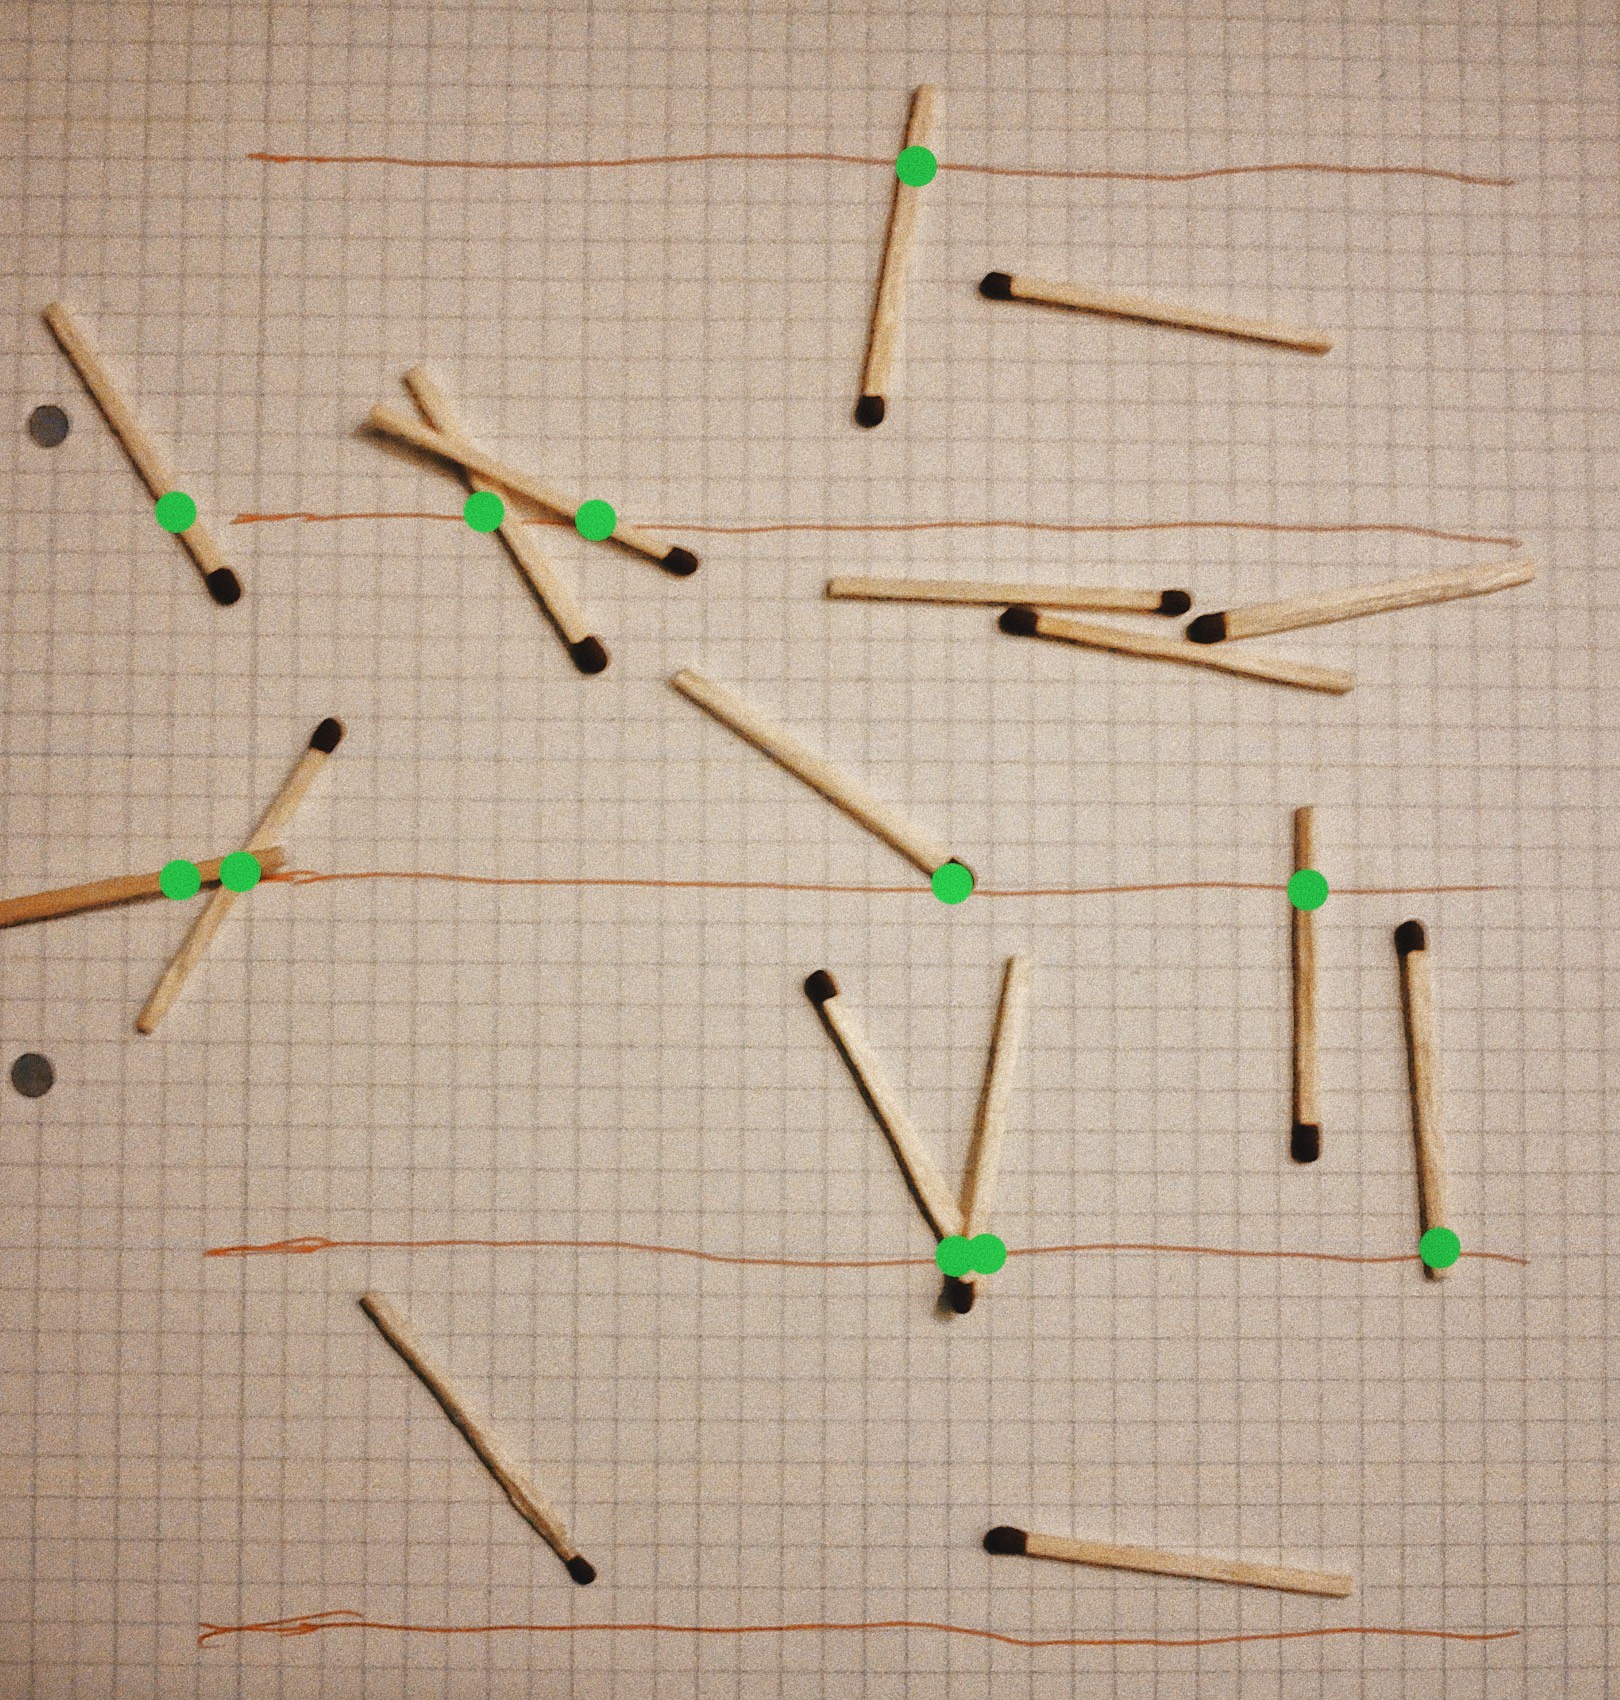 Above: An experiment to find ?, via Wikipedia
It is a super simple but a really cool math project to do and it?s about probability. Your students can find pi by only throwing dropping toothpicks on aboard. First, you measure the length of the toothpicks and draw lines and make the distance between lines exactly the same as the length of the toothpicks. Then you drop your toothpicks and count how many of them crossing the lines and how many of them not crossing the lines.
Then pi will be equal to 2 * (the number of times toothpick you drop / the number of toothpicks crossing the line times).
Researchers at the University of Illinois made a simulation to virtually drop needles and estimate pi.
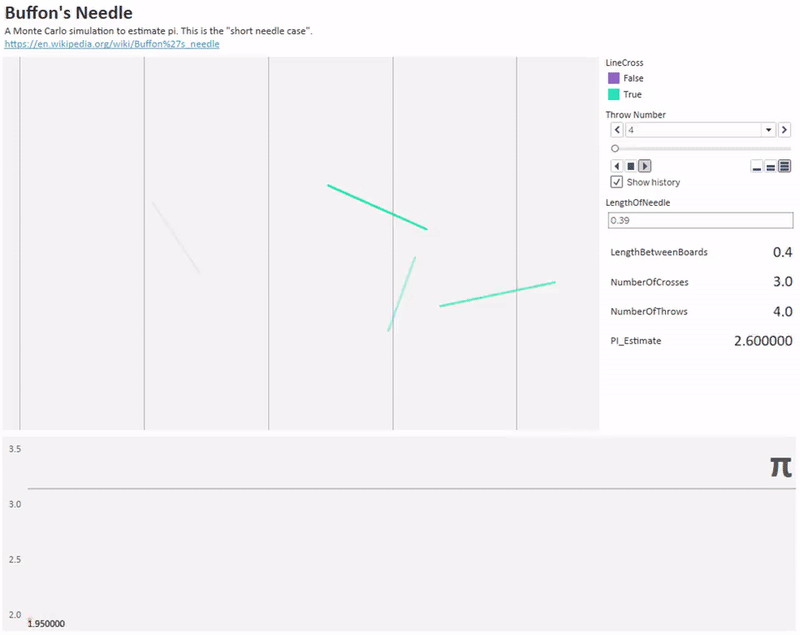 Above: Simulation of throwing 1000 needles to estimate pi, via Reddit
? Project Type: Probability & Data Science
? Supplies: A board, toothpicks, a marker
Pencil Star
Mathematics surprisingly lets us create infinitely many parabolic figures just using straight lines. Most importantly, we don?t have to be good at design.
One of the most popular shapes is called hexastix. It may seem a complex design if you are seeing for the first time in your life, but actually it has a simple idea behind it. It is a structure of intersecting hexagonal prisms. This project would definitely enhance your students? engineering and art skills.
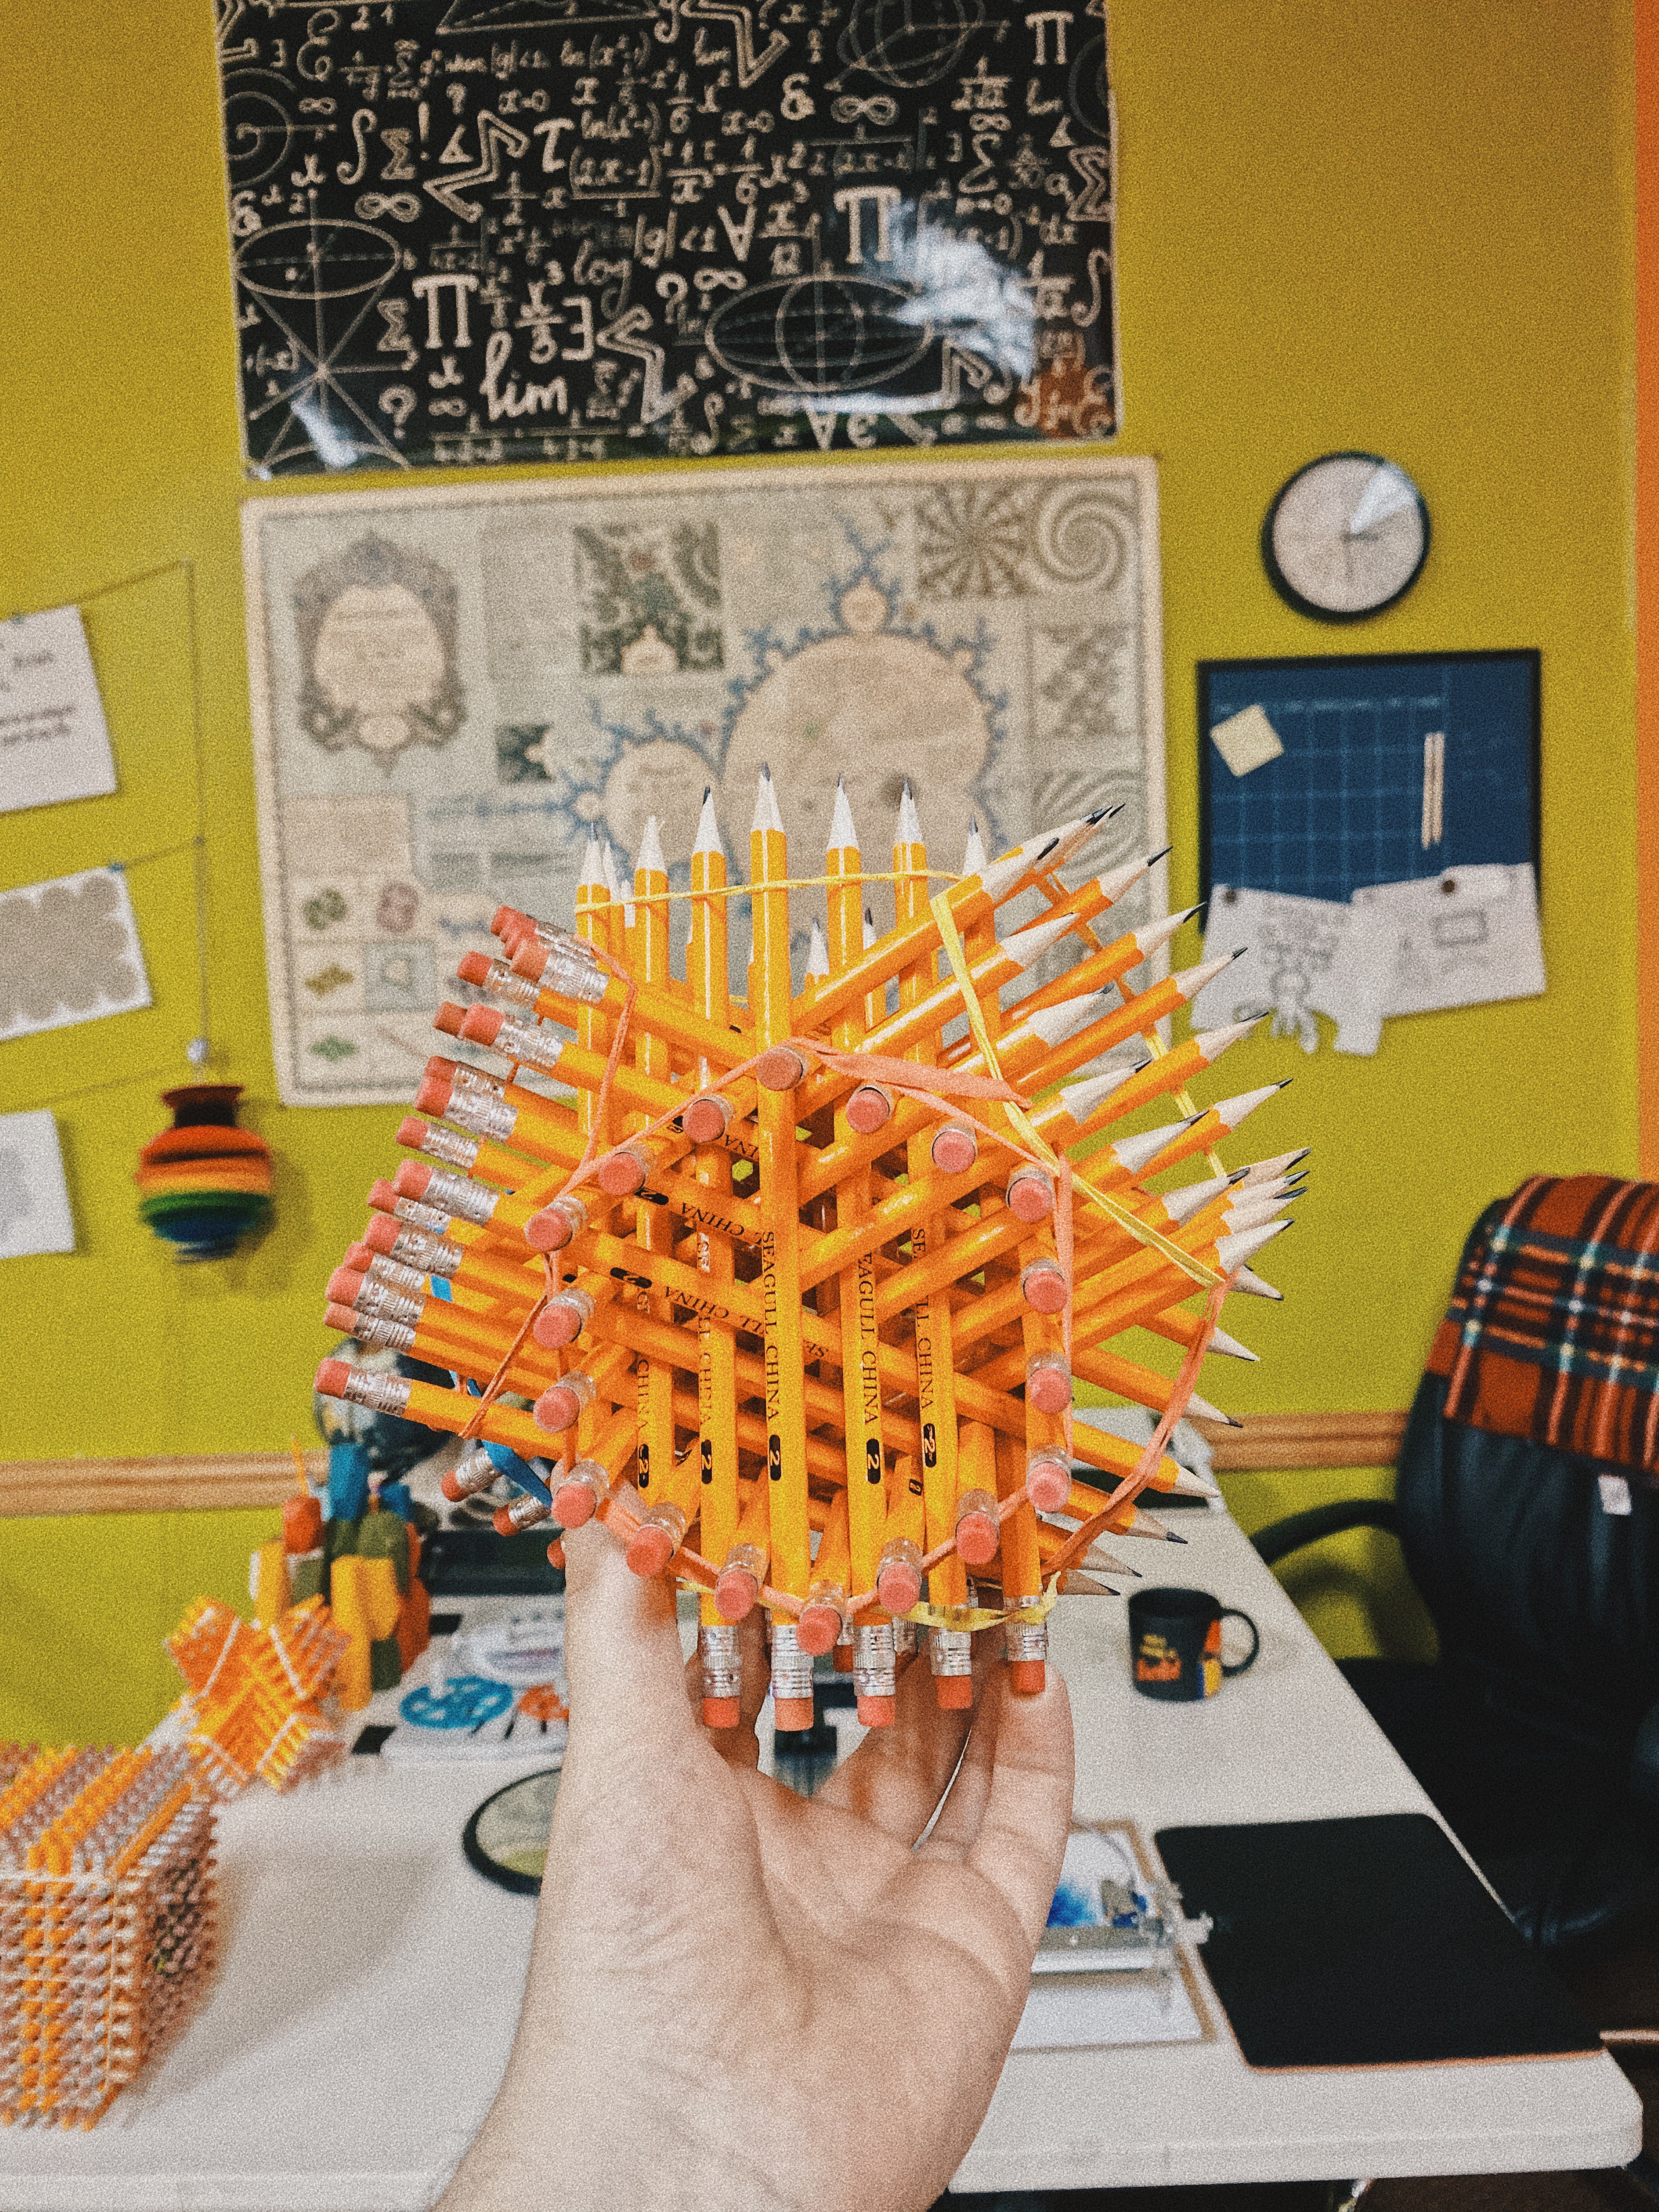

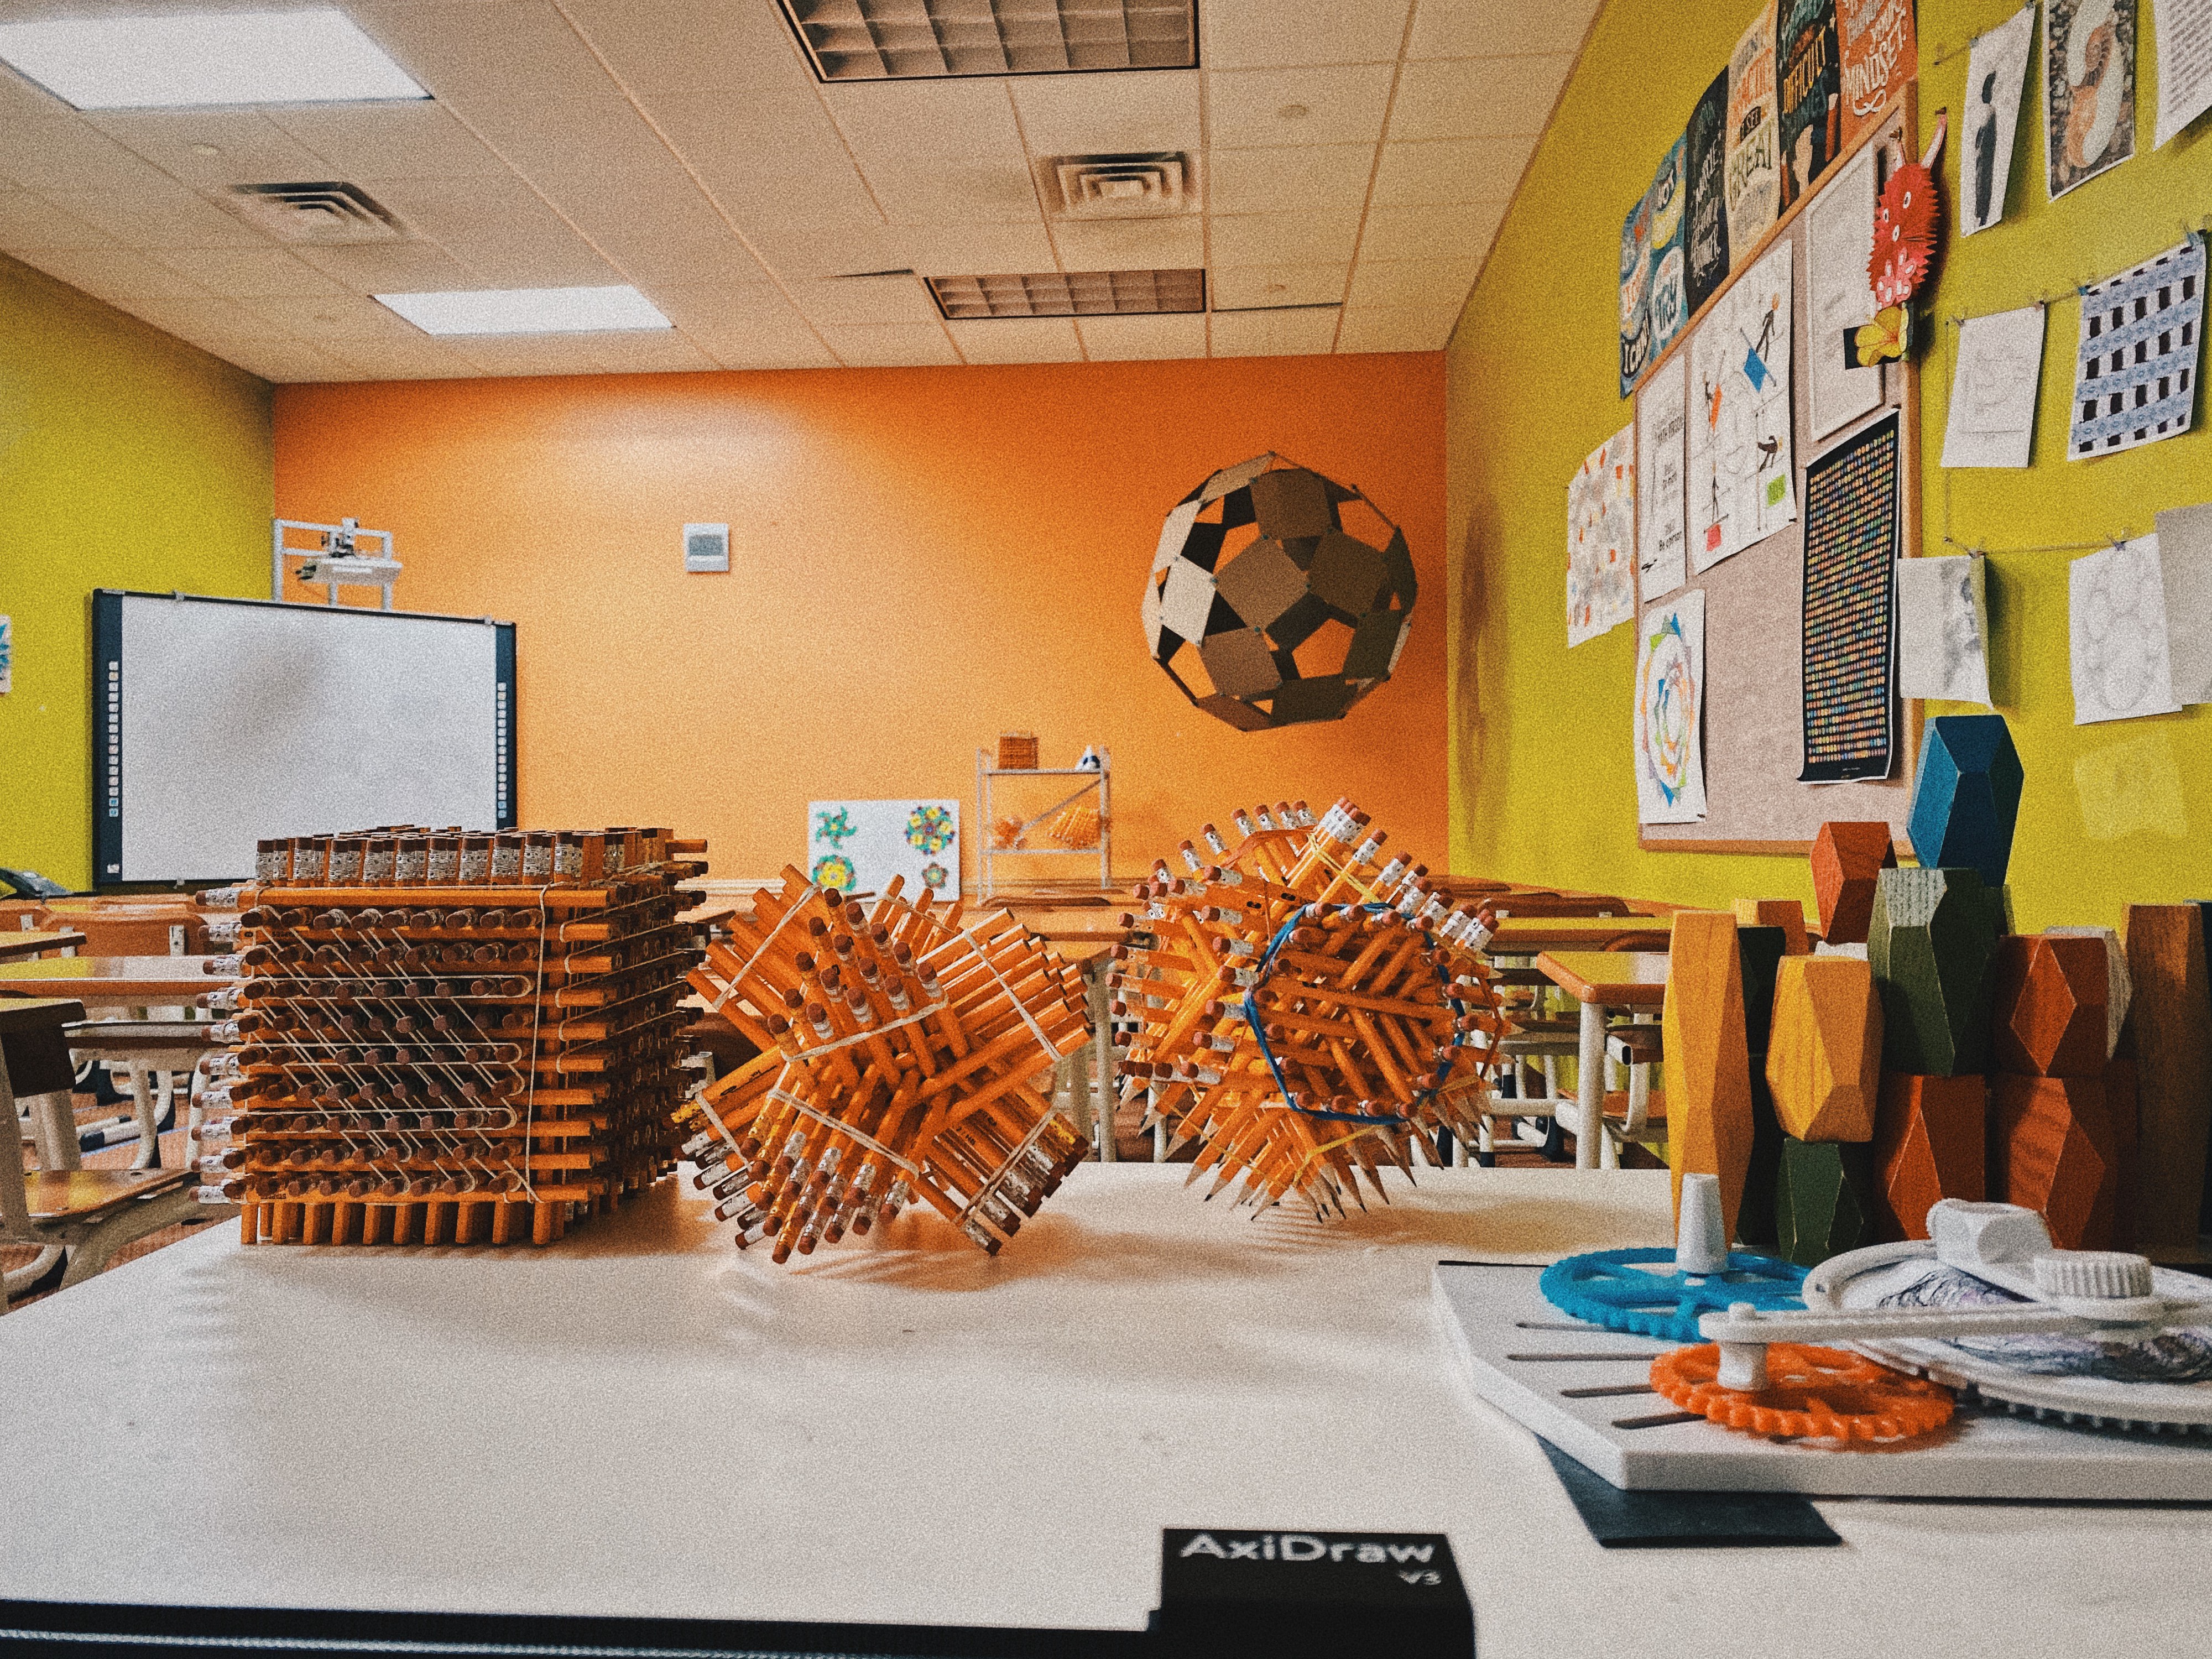
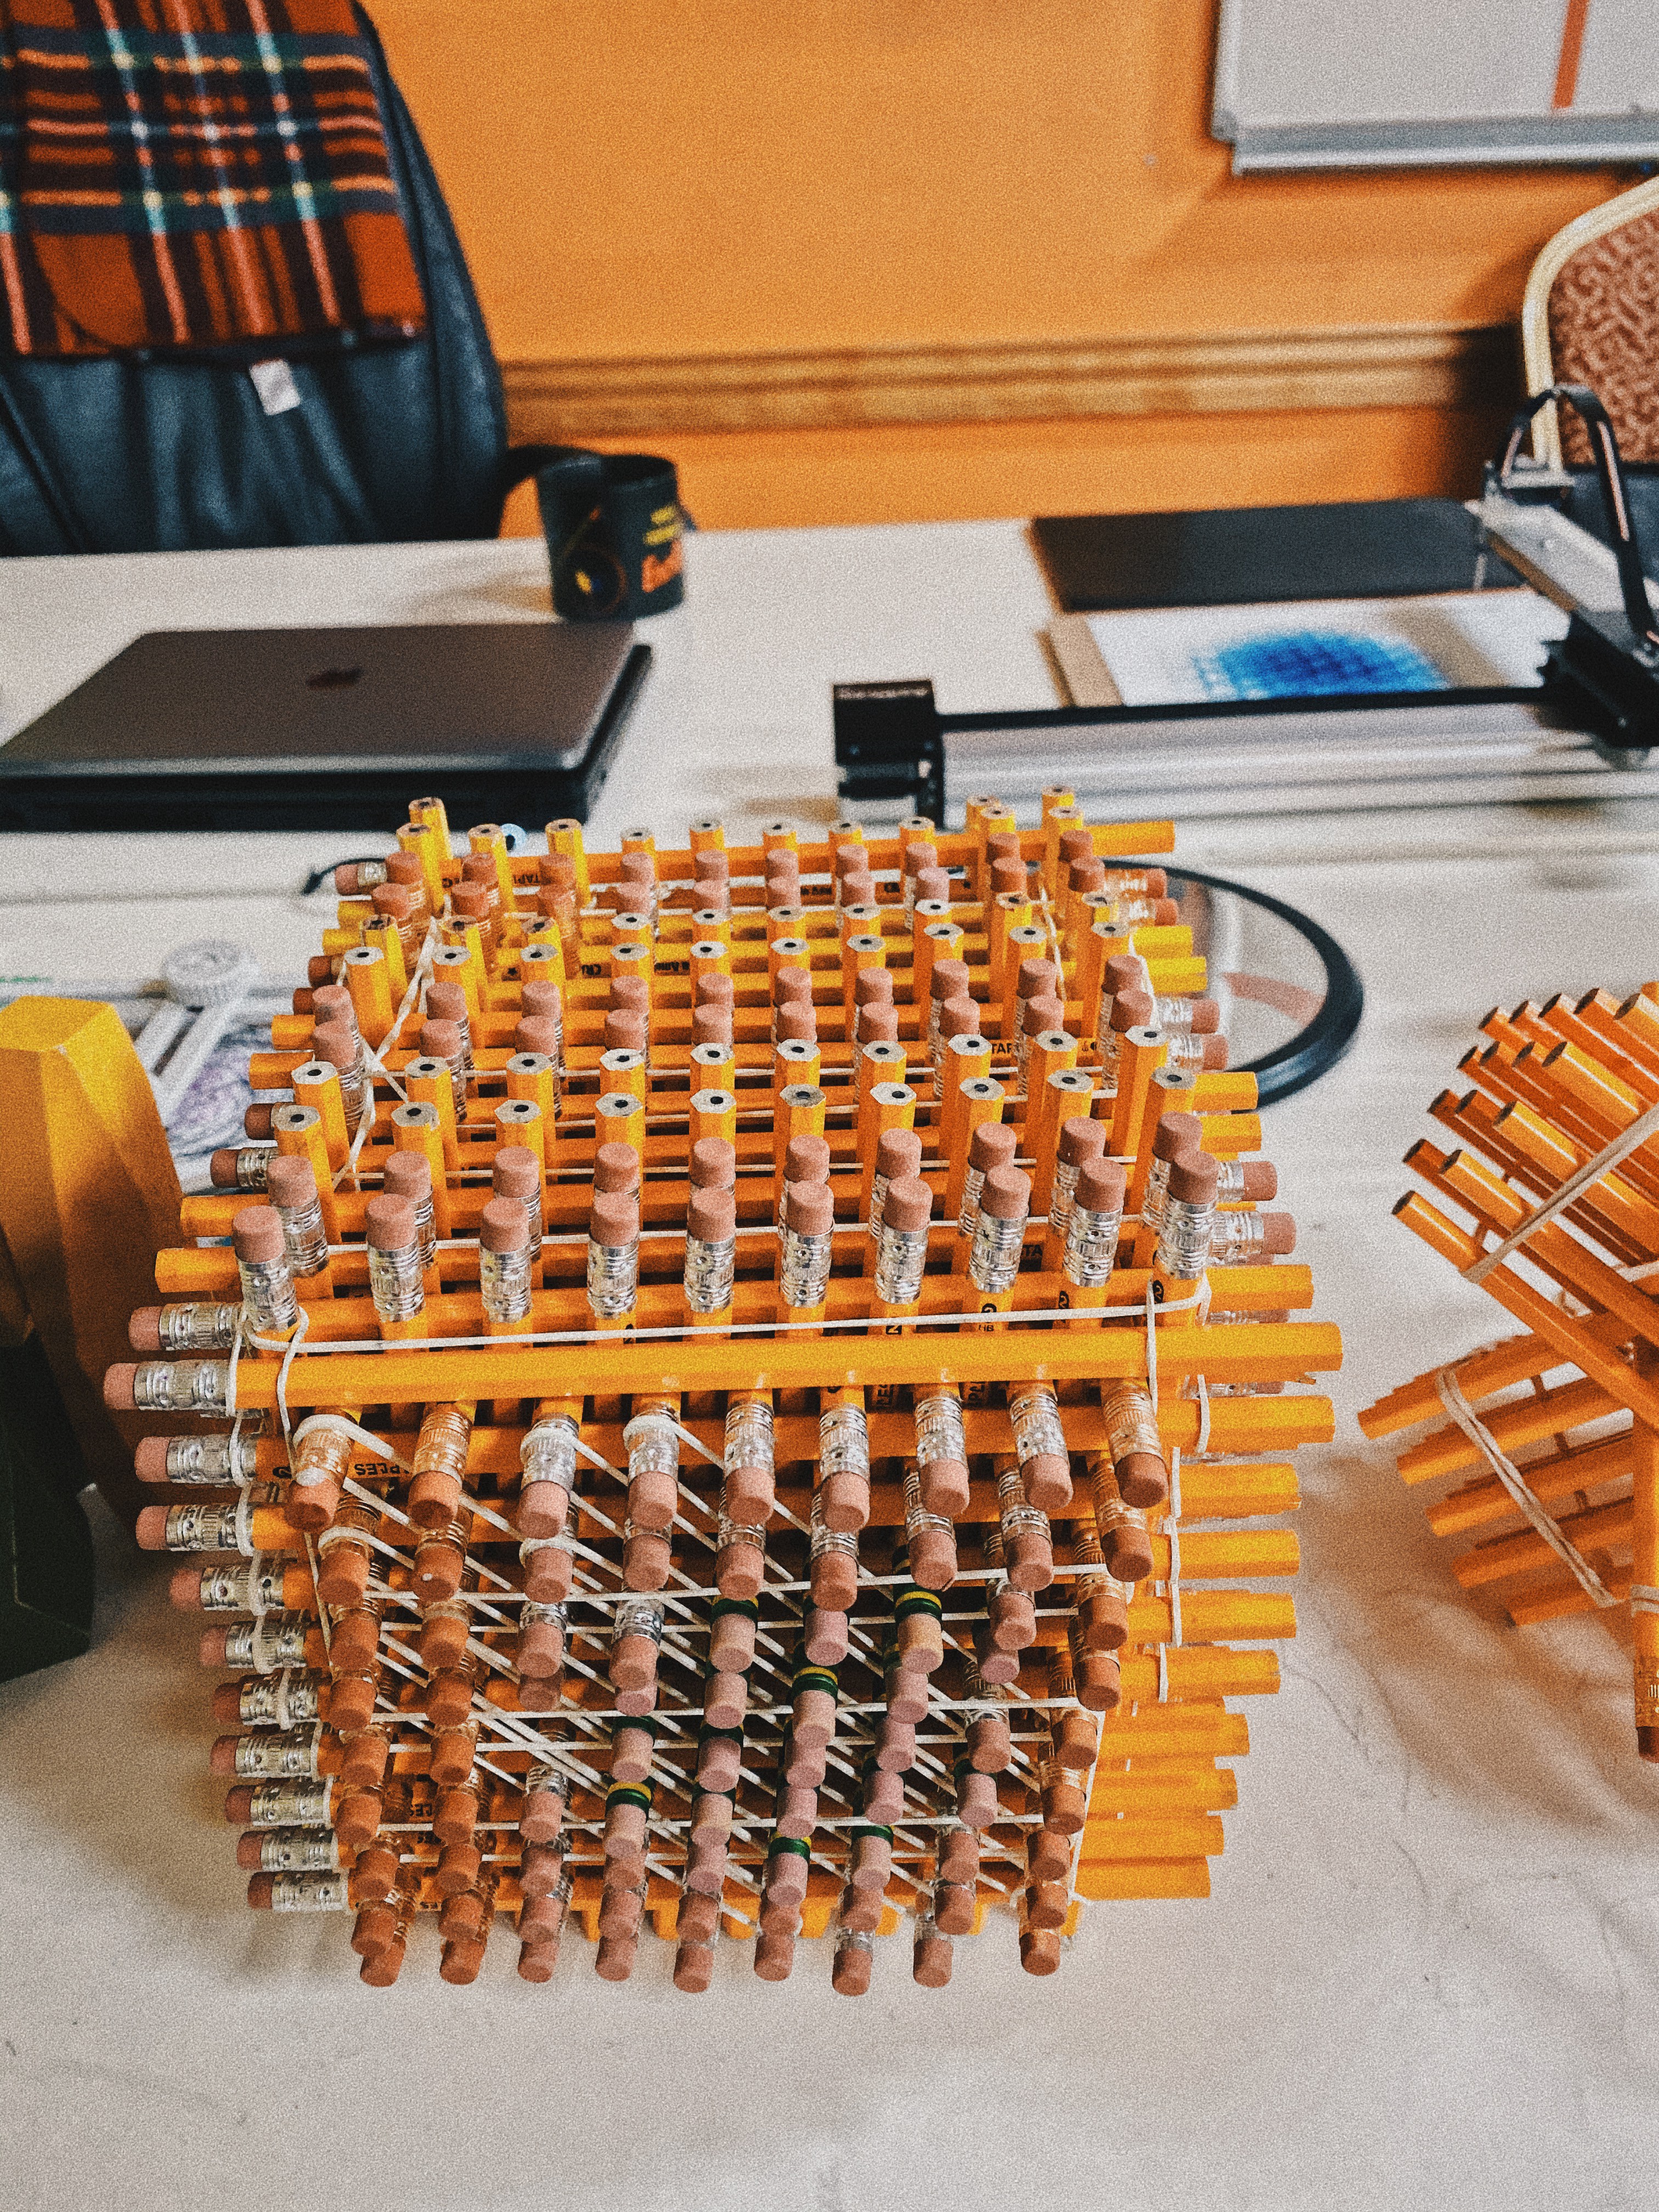
To make the most challenging one, you need 72 pencils and some elastic bands. It?s really fun to build. I want to warn you here to use unsharpened pencils because you may hurt yourself while you are working on hexastix. You can work different colored pencils to make your hexastix colorful also. You can find the instructions below.
There are also some other design that you can make. For instance, you can make a star, or a hotel design from China that I showed you above.
If you need more information about how to create parabolic curves using straight lines, just check out this article.
? Project Type: Geometry & Art
? Supplies: Unsharpened Pencils, Elastic Bands
Lego Macintosh
If you check online, you can find incredibly complex Lego creations, but few attract attention. If you and your students are working on Raspberry Pi, then you can have more fun with this Lego Macintosh project.
There are many cute Lego Macintosh designs you can find, but Jannis Hermans made it functional with using e-ink display and Raspberry Pi. We are also lucky because Hermans also shares the instructions on how to make it.
 Above: Lego Macintosh, via Jannis Hermans
This project is a good way to spark your students? imagination and make them love coding. You can try white legos to make it look like real macintosh and order your Raspberry Pi and e-ink display today and start working on it.
? Project Type: Geometry, Design & Coding
? Supplies: Lego Architecture, Raspberry Pi, e-ink Display
Pi Poster
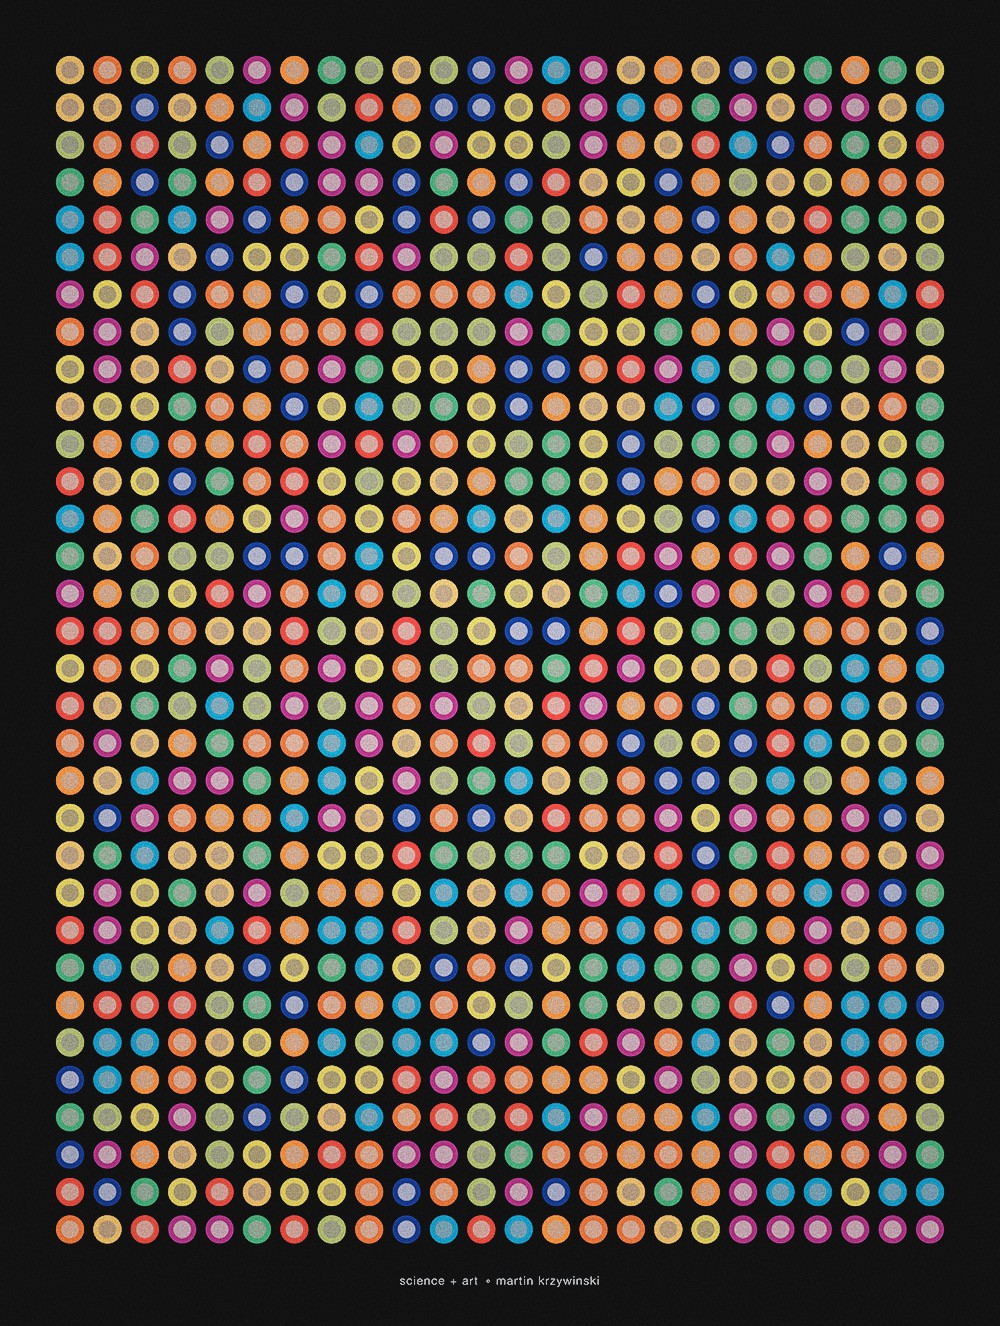
Everybody knows that pi is an irrational number; its digits never end and don?t have a pattern. However, if you write, let?s say, 1000 digits of pi, it is very hard to say that there is no pattern at first glance.
Fortunately, there is a beautiful artistic way to show that pi doesn?t have any pattern. We can turn the digits of the number ? into a visual presentation by converting each digit into a specific color. For instance, all ones become white dots, all twos become black, all threes become blue, etc.
This data visualisation was first Martin Krzywinski?s idea in 2013. When I told about this project- my students approached it in a very unique way. They represented the digits of pi by different colors of m&ms and then they drew the spots for digits on a board to glue each m&ms. It took a lot of time, but their masterpiece proved to be worth it.
With this project, students can improve their data analysis skills and explore more about numbers.
? Project Type: Algebra, Design & Data Analysis
? Supplies: Black Poster Board, M&M?s, Gorilla Glue
Volume By Slicing
This project is about Calculus and it is a wonderful idea to show the relationship between area and volume. This project is the best way to teach idea of integration to your kids.
Most teachers just show formulas when they teach volume but they don?t even mention the connection to the area. We know that area is about two dimensions and volume is about three dimensions. Technically, volume is the sum of areas because when we combine two dimensional objects we get a three-dimensional object.
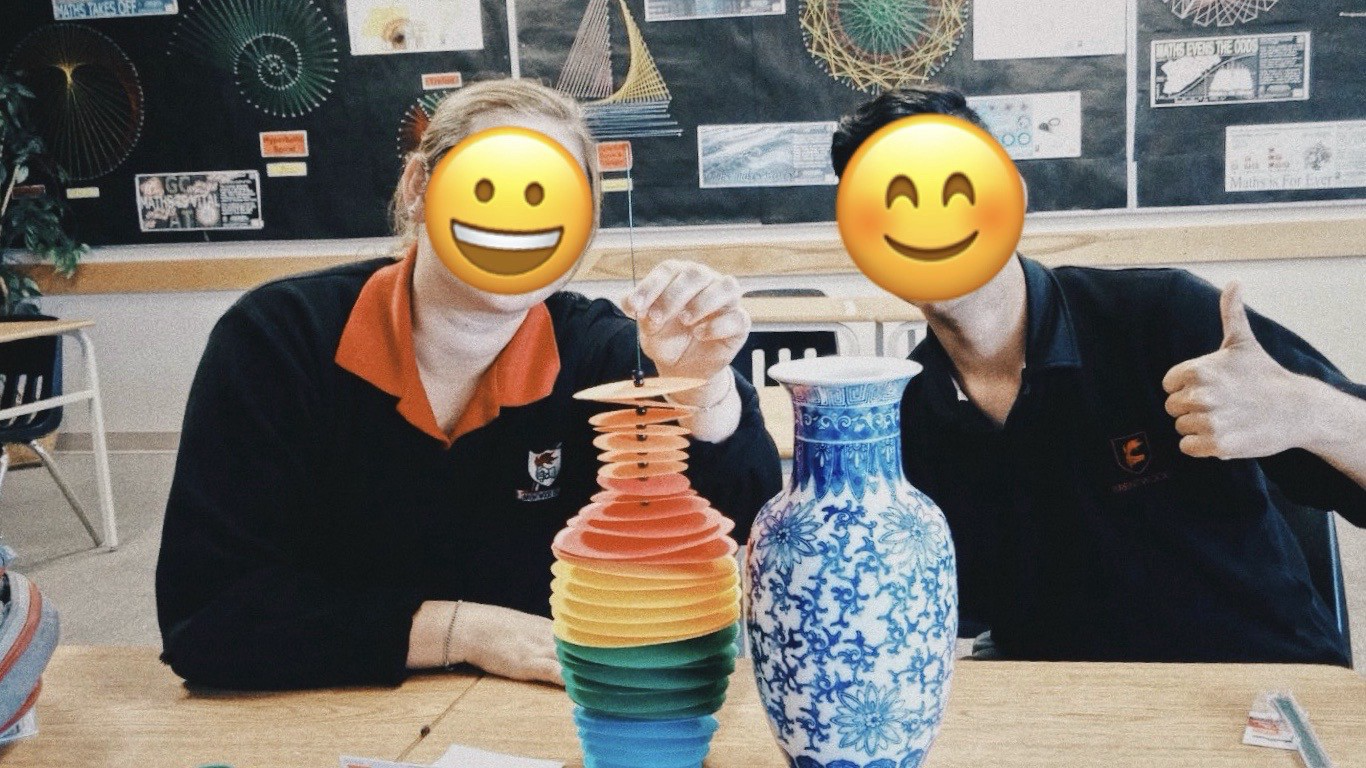
For instance, we can easily find the volume of a cube or a sphere, but how we can find the volume of a vase? We don?t even have a formula for that. So if we use the idea of adding the area of a two-dimensional object we can find it. So if you slice the vase into circles, then everything will be easy and you can get a very accurate value for the volume of your vase.
To make this project, you need a vase, high quality colored papers, beans, and a stick.
? Project Type: Calculus & Design
? Supplies: A ceramic vase, cardstock paper, beads
Archimedes? Trammel
Archimedes? Trammel, also known as the ?nothing machine? or ellipsograph is a mechanism that helps draw perfect ellipses. The construction of it takes a lot of time but it is fun and very satisfying thing to play with.
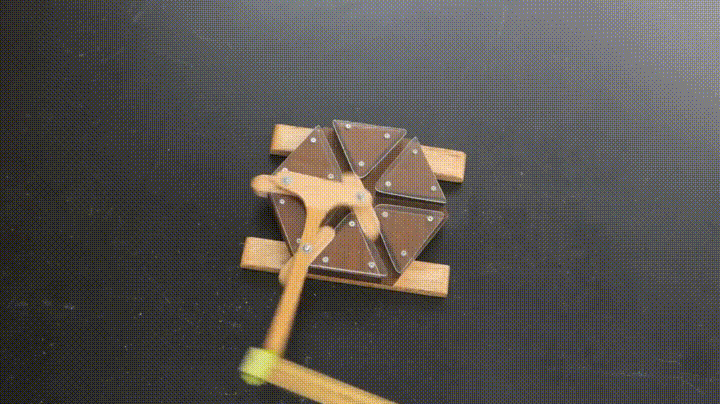
When you start playing with it, at first glance it really does seem to do nothing. However, if you figure out the mathematics behind it, you will see that you can produce many different shapes just by using that ?nothing? machine. It might be the easiest mathematical way to construct ellipses.
This project will help your students enhance their engineering and geometry skills. There are many different instructions on Youtube. I suggest you to use cool materials to make your design more attractive. You can watch the video below for the instructions.
? Project Type: Calculus, Geometry, Engineering, Construction & Design
? Supplies: A ceramic vase, cardstock paper, beads
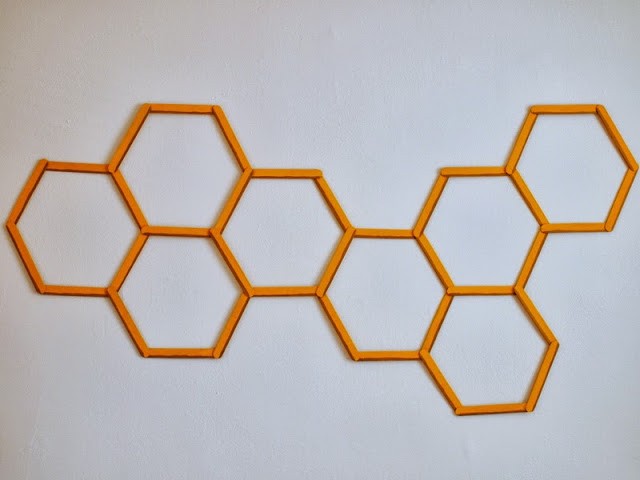
Honeycomb Wall Art
For me, honey bees are the smartest animals on the planet. I explained the reason behind that idea in one of my articles, which is a great read. Honeybees are great at mathematics. For example, they use the most efficient shape, hexagon, for their honeycomb to save money, energy, time and their future.
To prove why hexagons are more efficient than other regular polygons you just need to find the ratio of the area and the perimeter of each regular polygon. To make this proof more fun you can use ice cream sticks. Also you can get a nice wall decoration for your classroom.
Here, these ice cream sticks and this wood glue are the best for you. The length of the icecream stick is 8 cm, so I found a hexagon shape to print out.
 Source | Honeycomb Wall Art
? Project Type: Geometry, Algebra, Construction & Design
? Supplies: Ice cream sticks, wood glue
Design Snowflakes
Snowflakes are beautiful and mesmerizing geometric shapes that are useful for teaching symmetry. What makes them so interesting for mathematicians is each of the snowflakes have a unique design.
For this project, you can use Perler beads and pegboards to make your own cool snowflake design. The main goal of this project is teaching transformations and showing the connection between mathematics and nature.

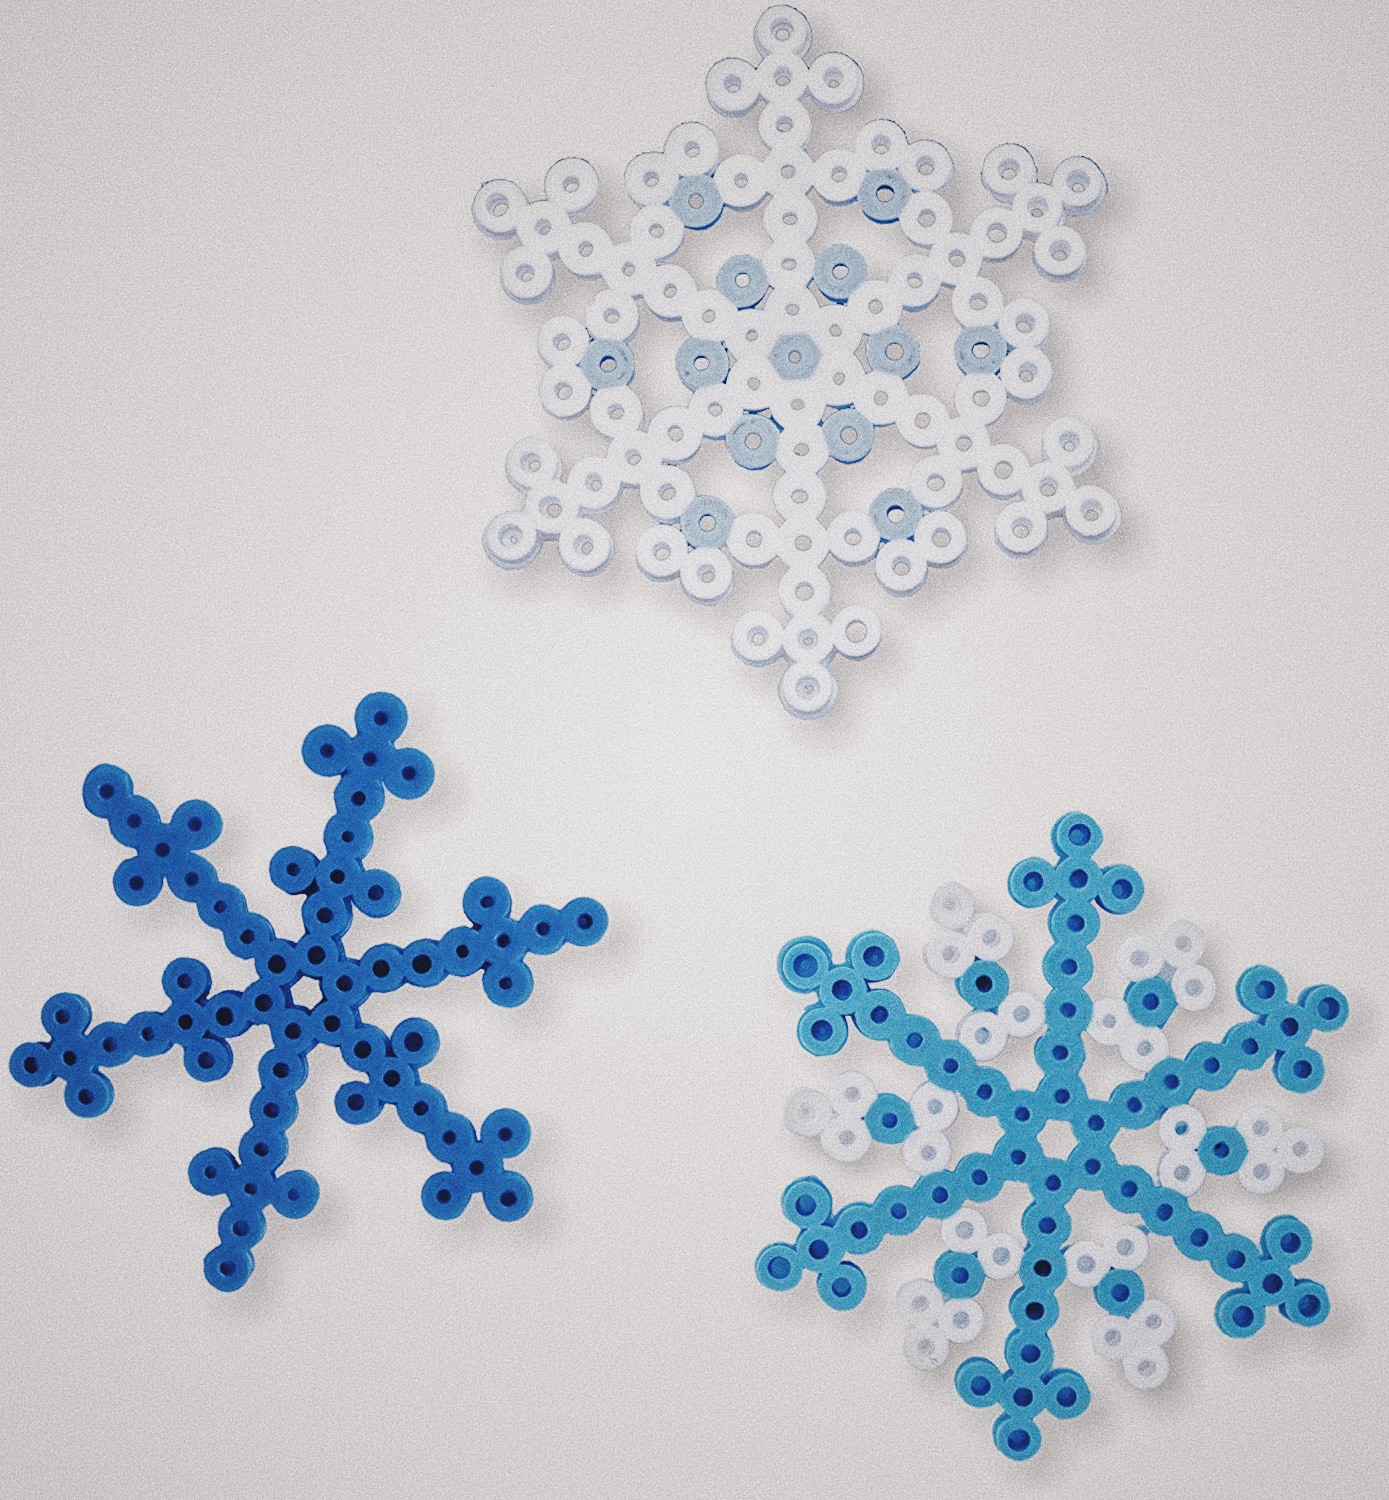 Above: Snowflakes Designs
You can find the instructions here. You can also find some extra snowflakes design with perler beads here.
? Project Type: Geometry, Construction & Design
? Supplies: Perler beads & pegboards
Leaf Tessellation
When a shape repeats to make a pattern without a gap, you get a tessellation. To make a tessellation, we apply 3 rules: translation, rotation, and reflection. So, that?s why making tessellations is a good activity to teach your students transformations.
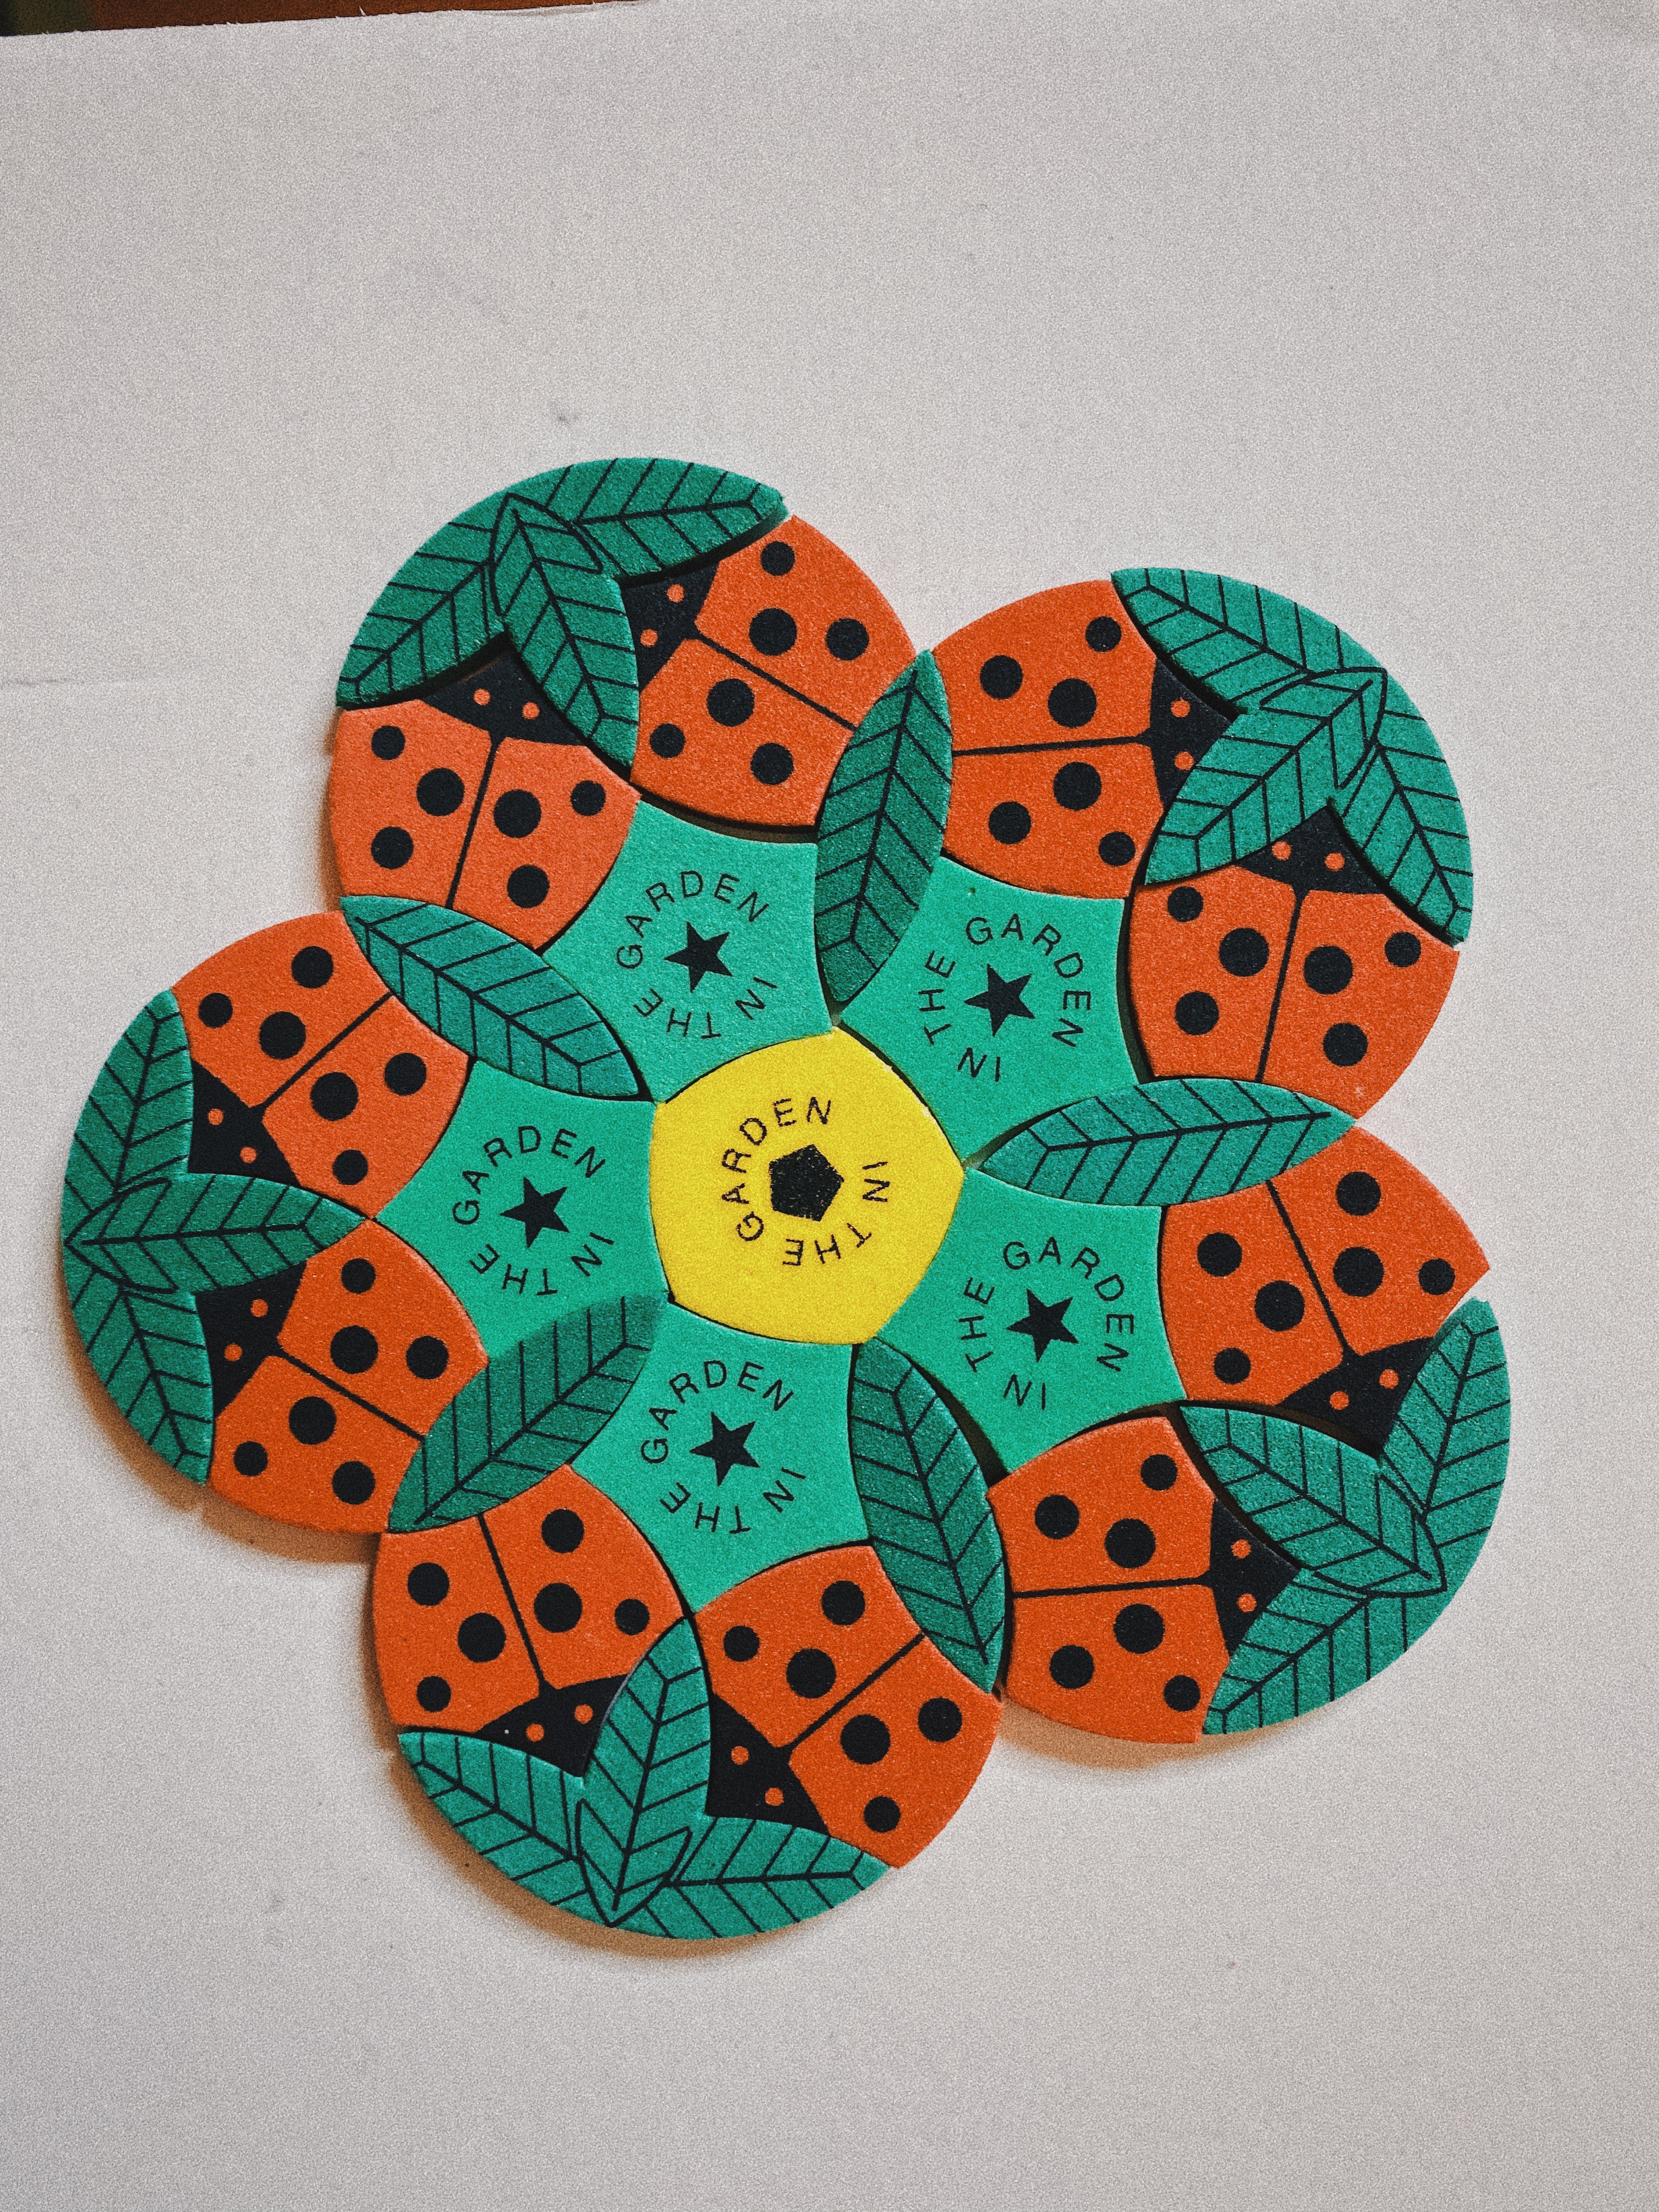
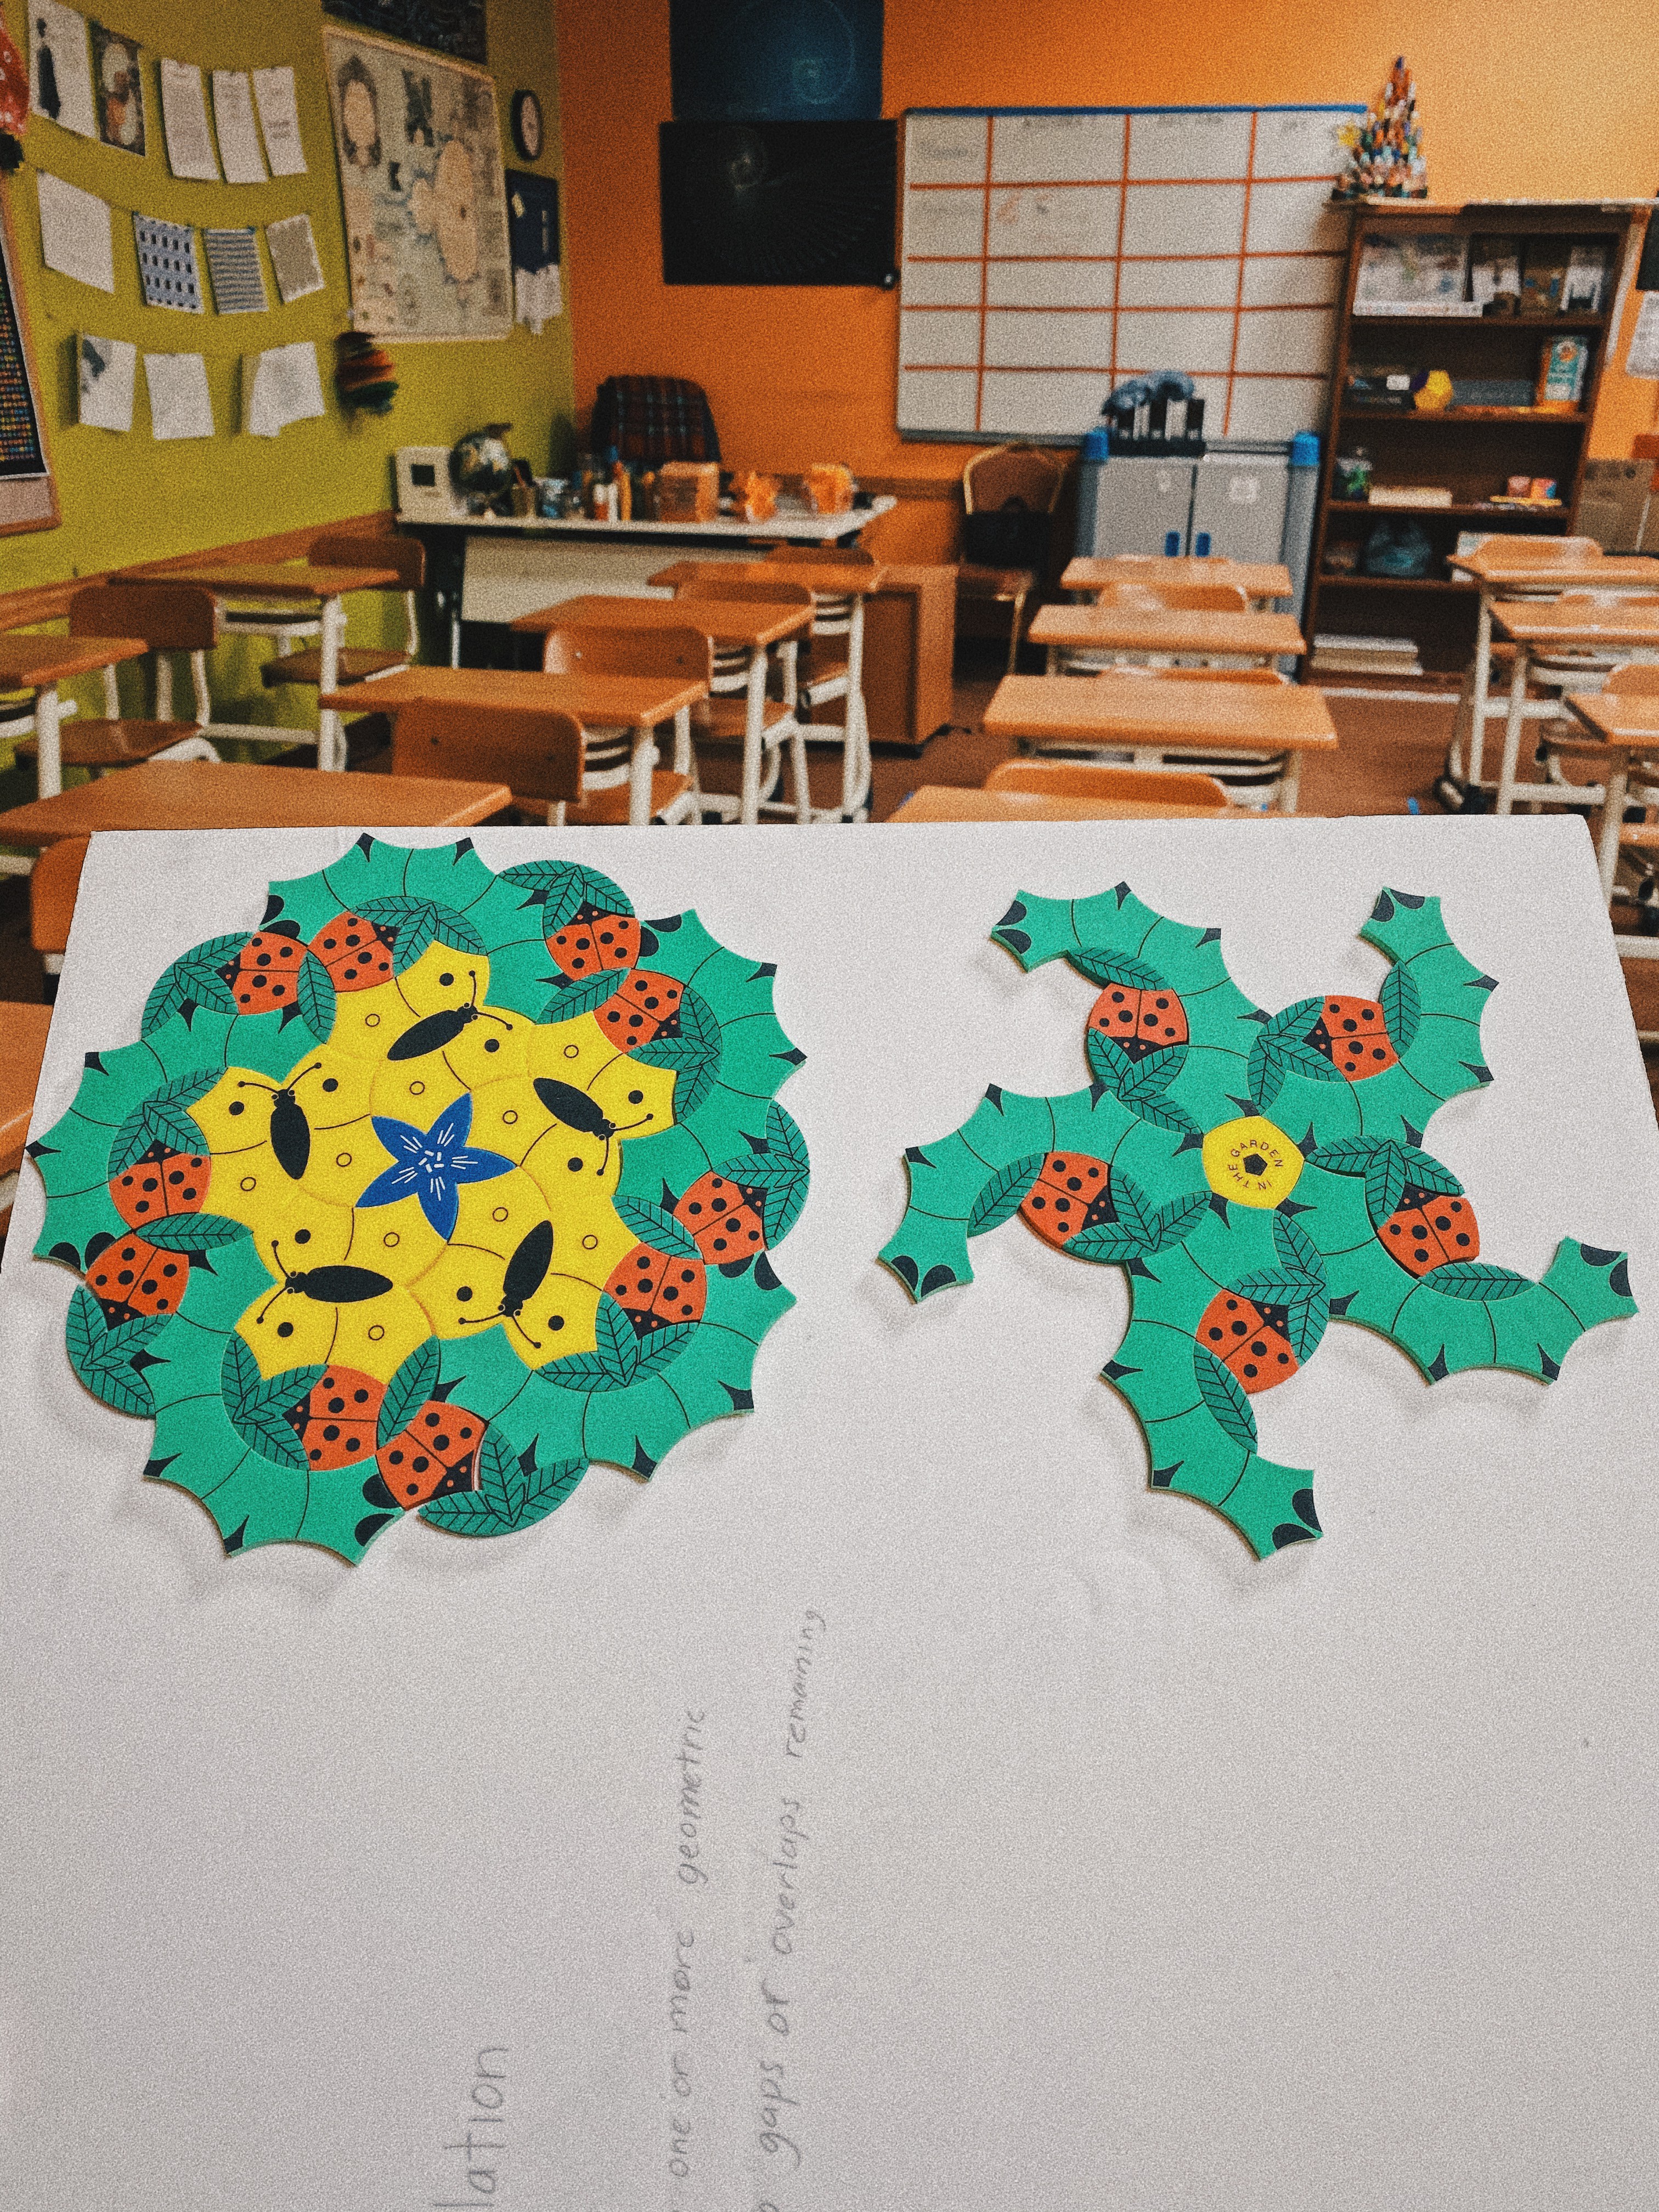
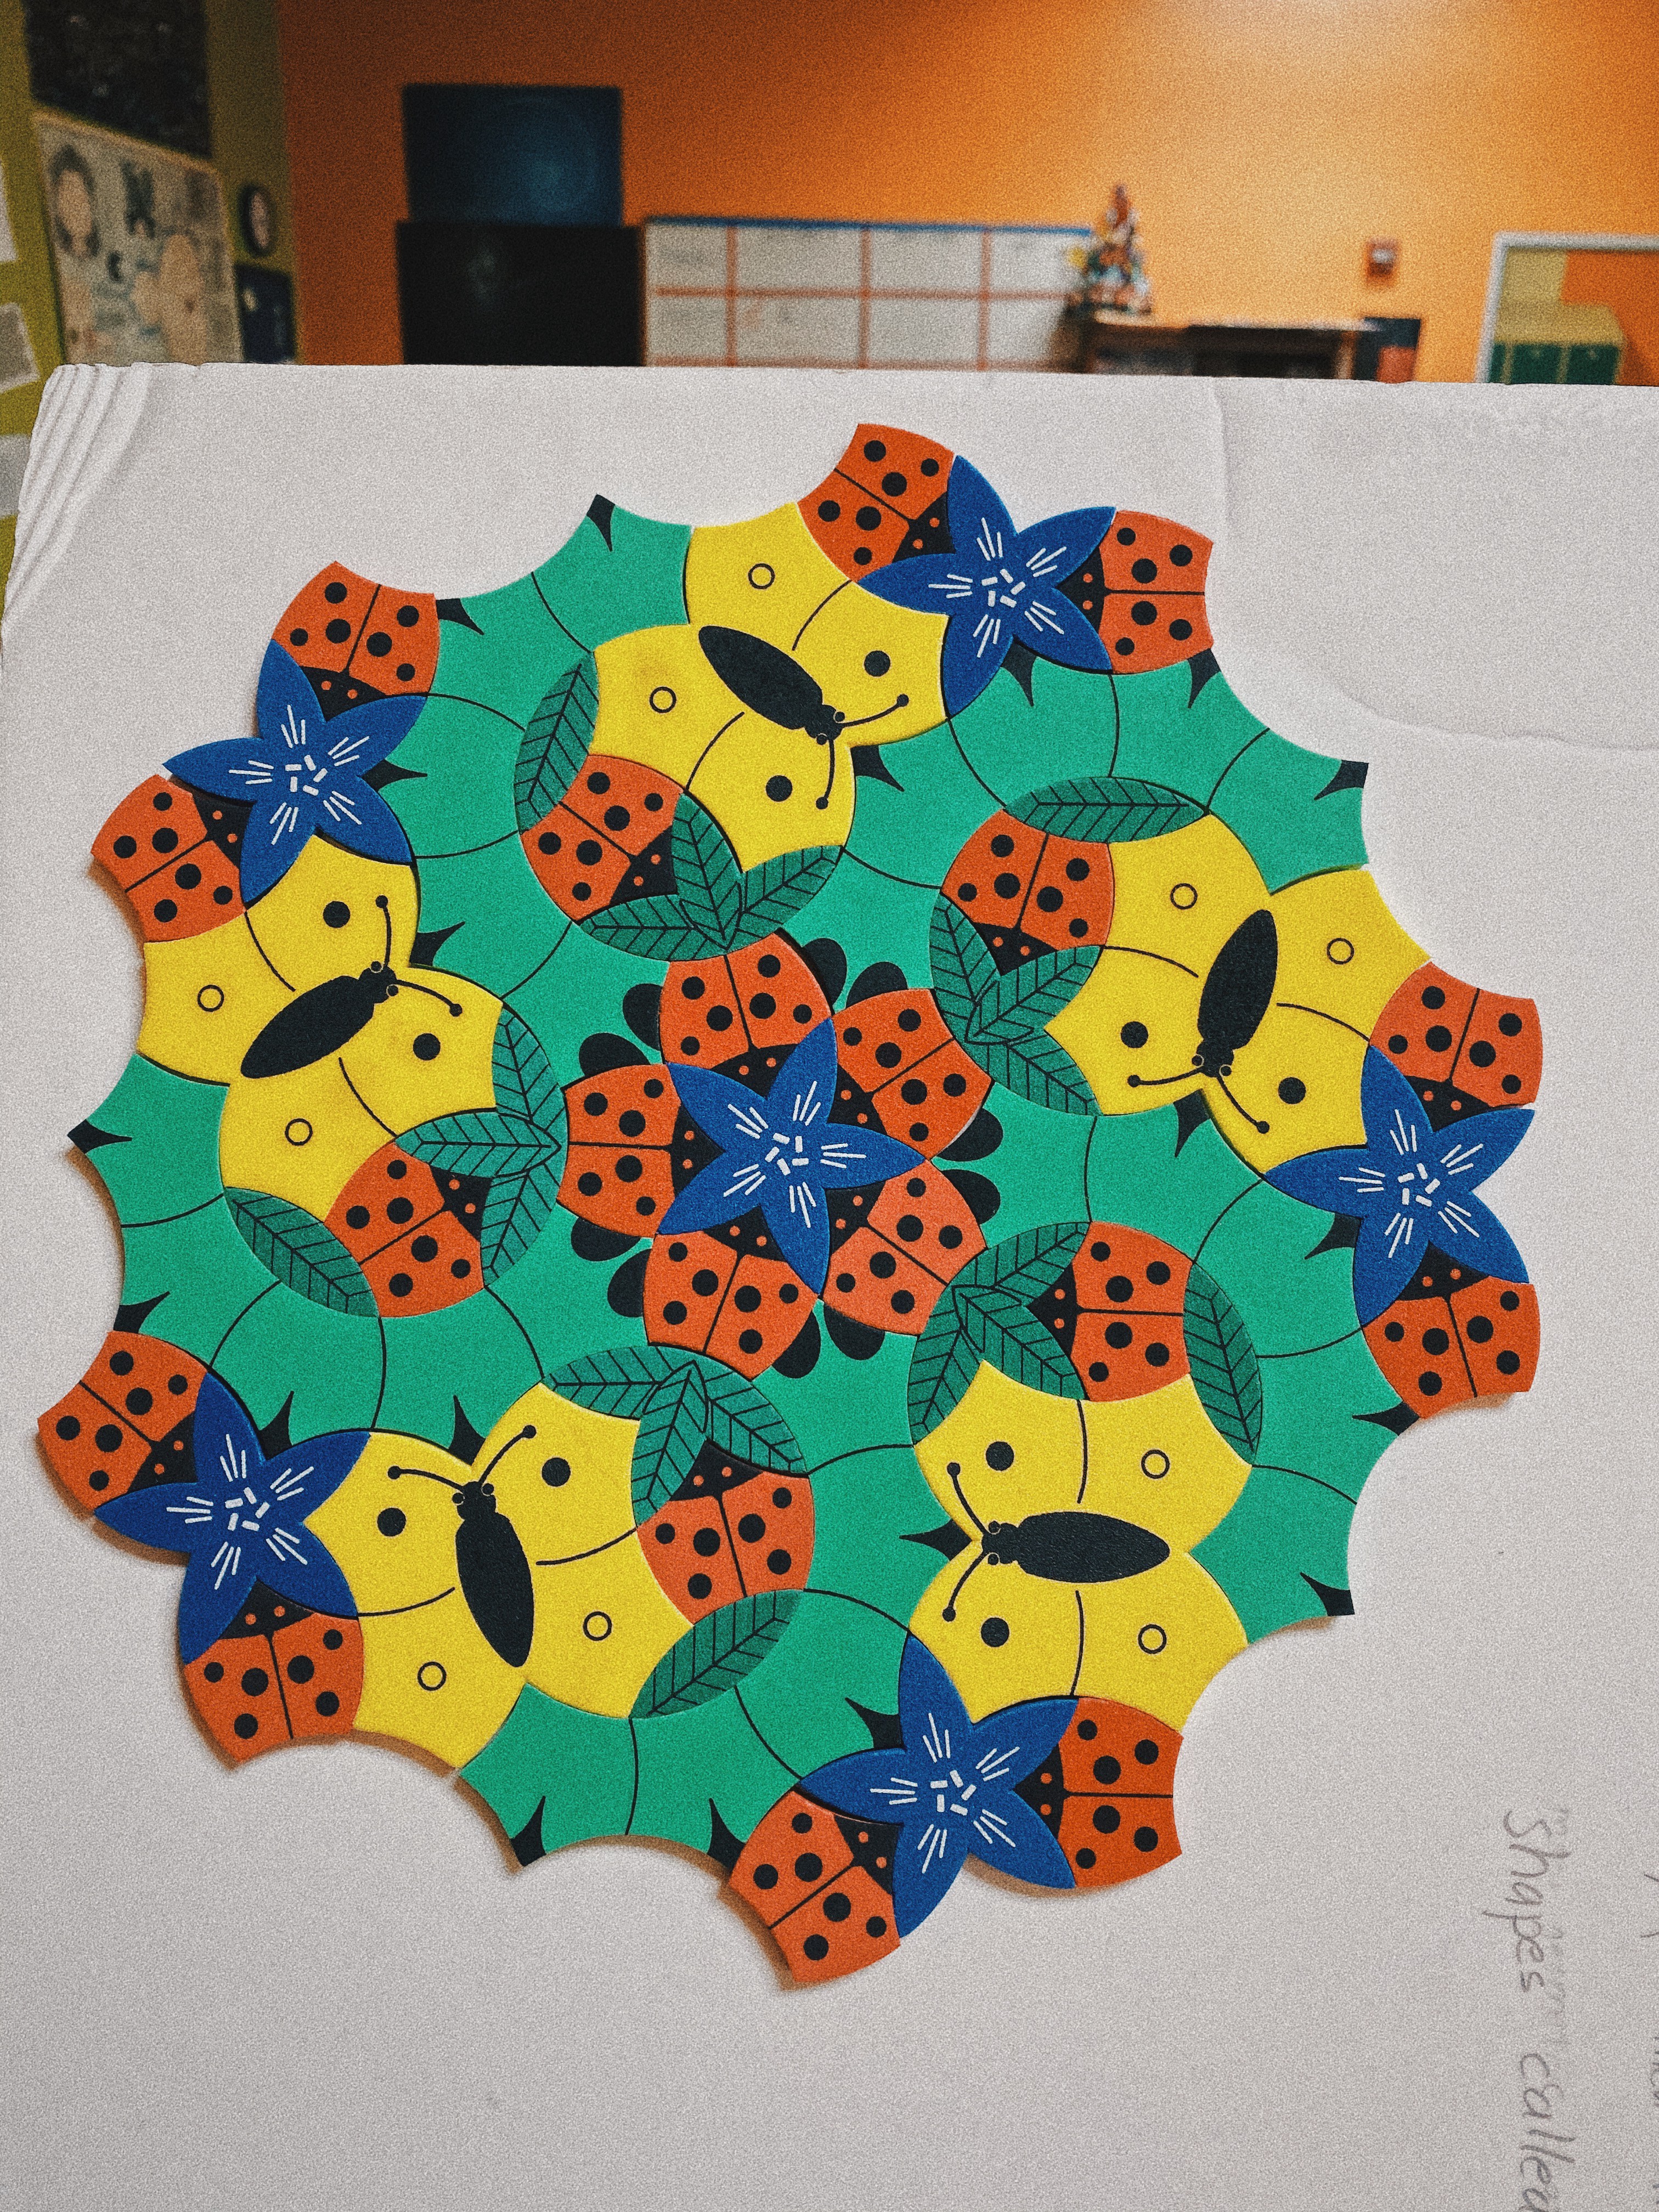 Above: Example of Tesellations
I found Mrs. Sarah?s leaf tessellation design online and it might be a good start to make a tessellation. The supplies you need to make a tessellation are papers, pencils, scissors, and tape. You can design it and color it with whatever you want to.
You can also buy these patterns to make cooller designs.
? Project Type: Geometry, Construction & Design
? Supplies: Perler beads & pegboards
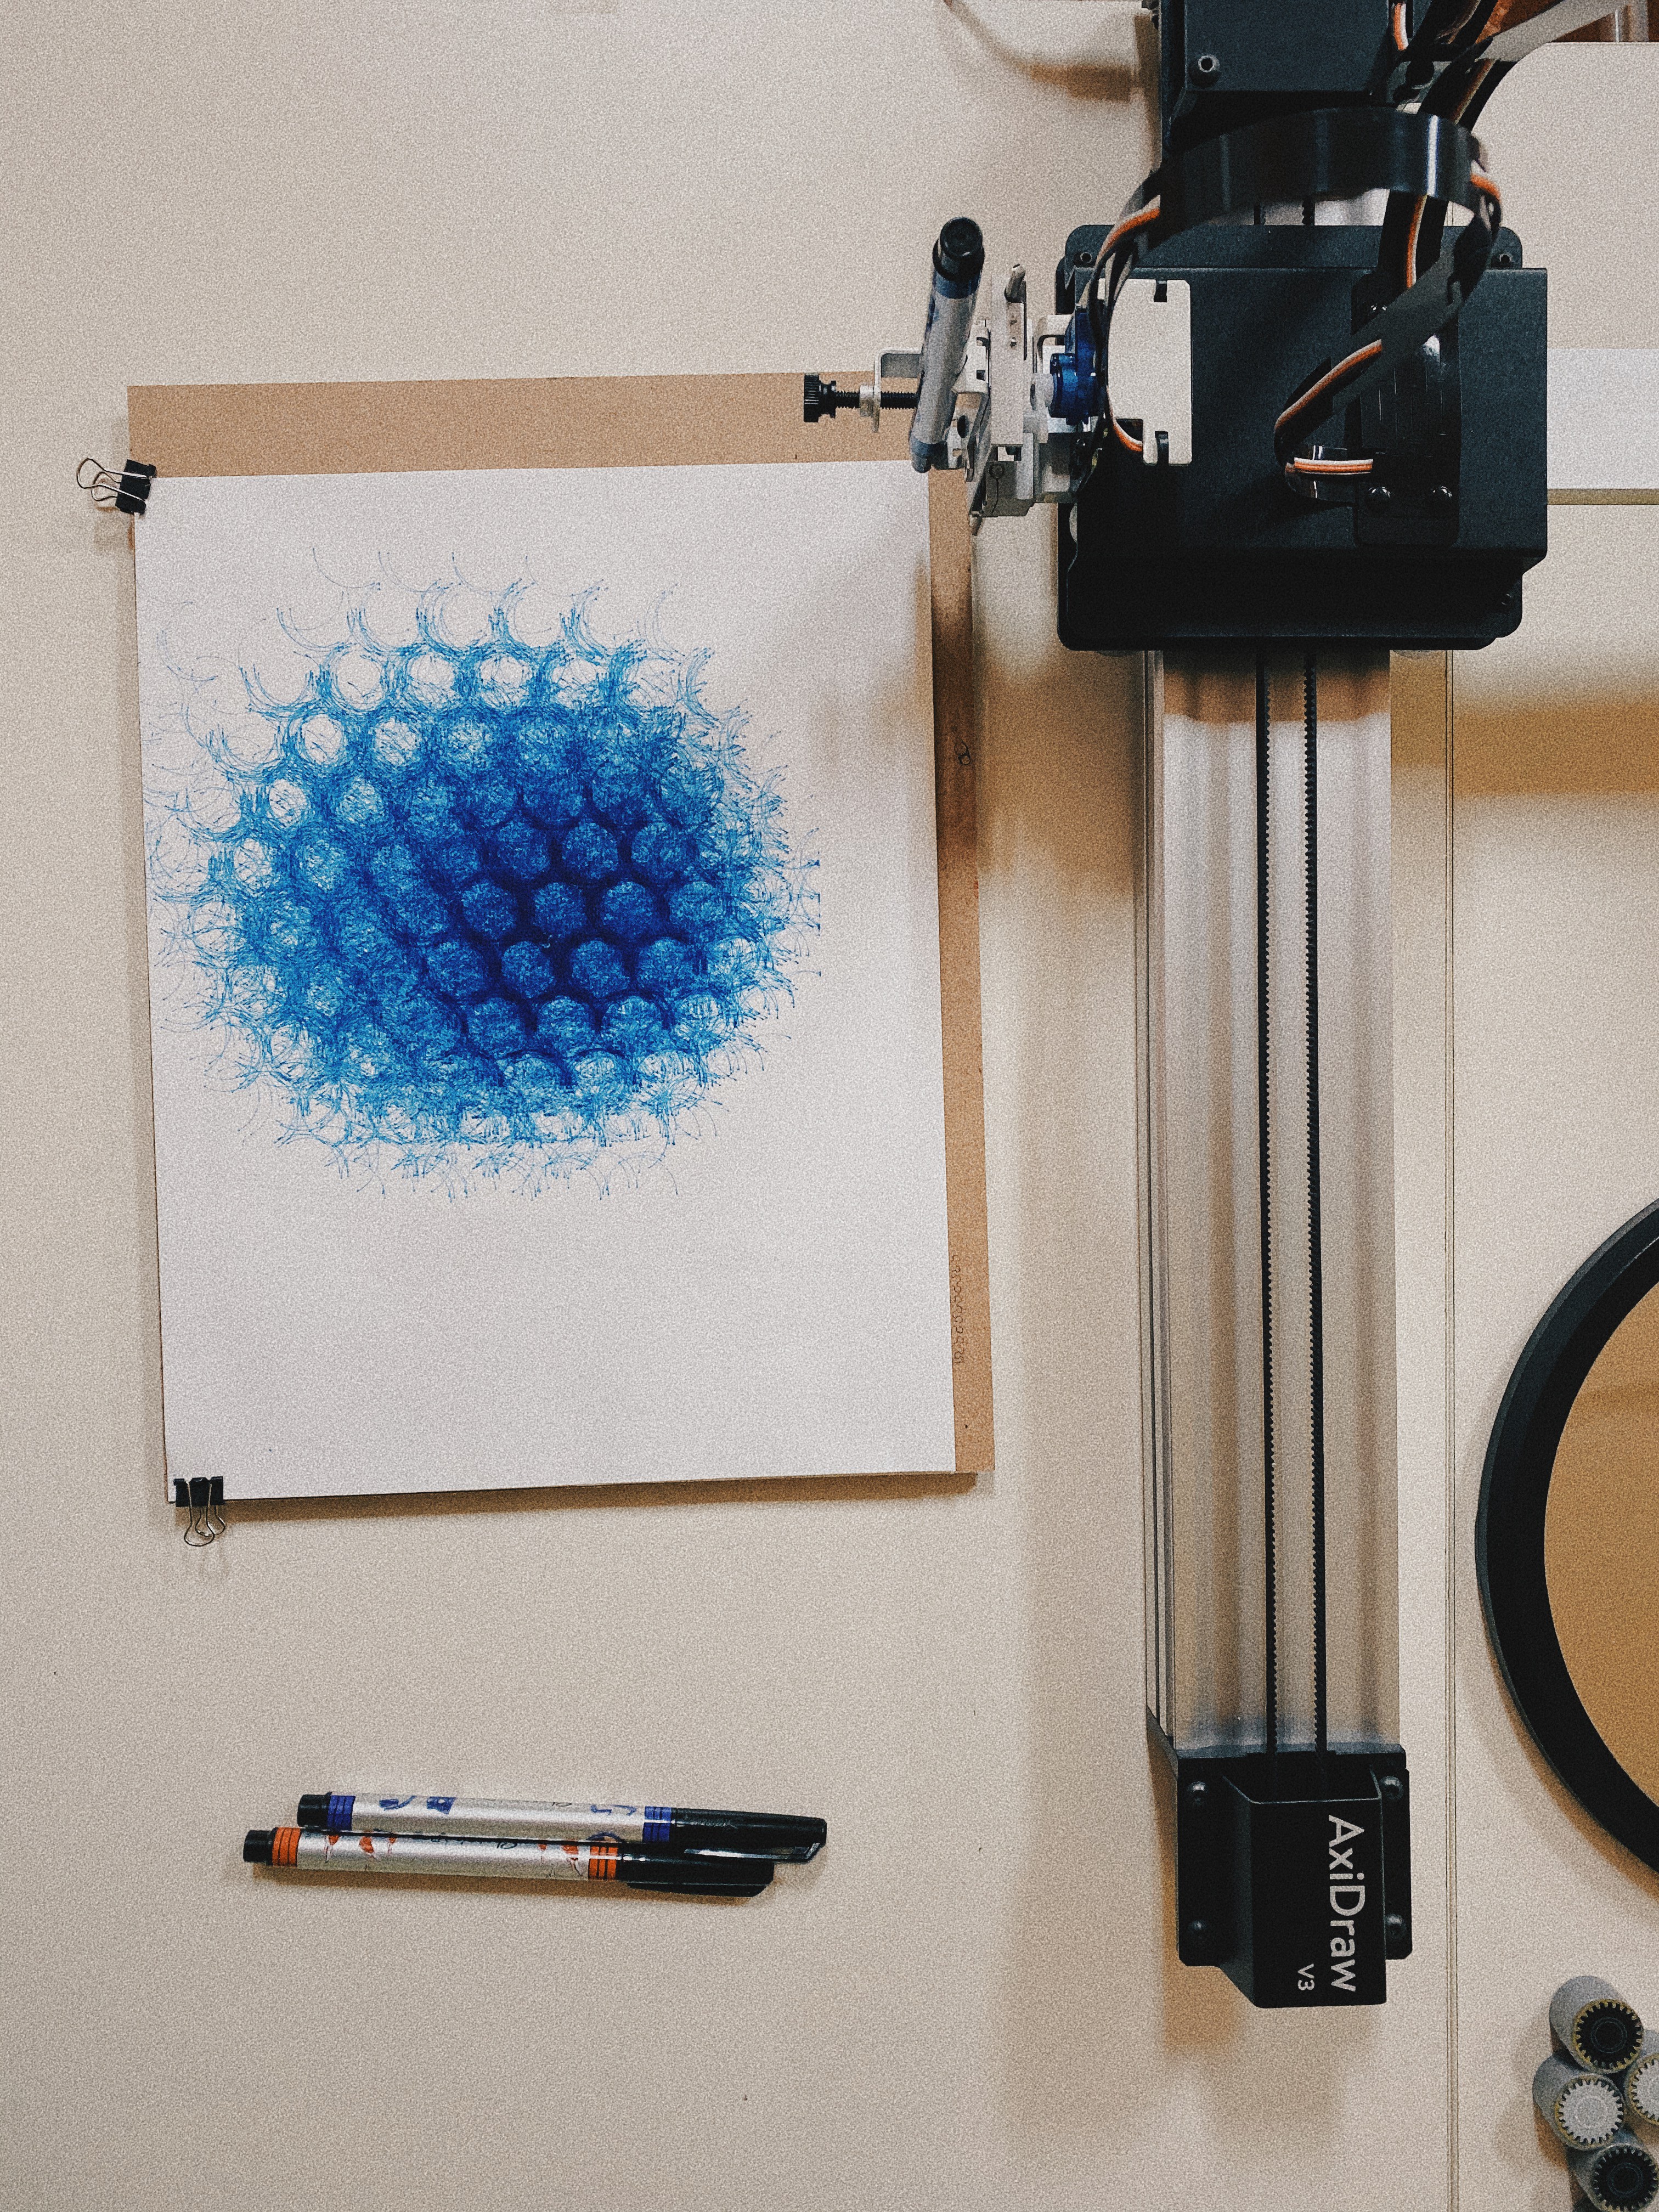
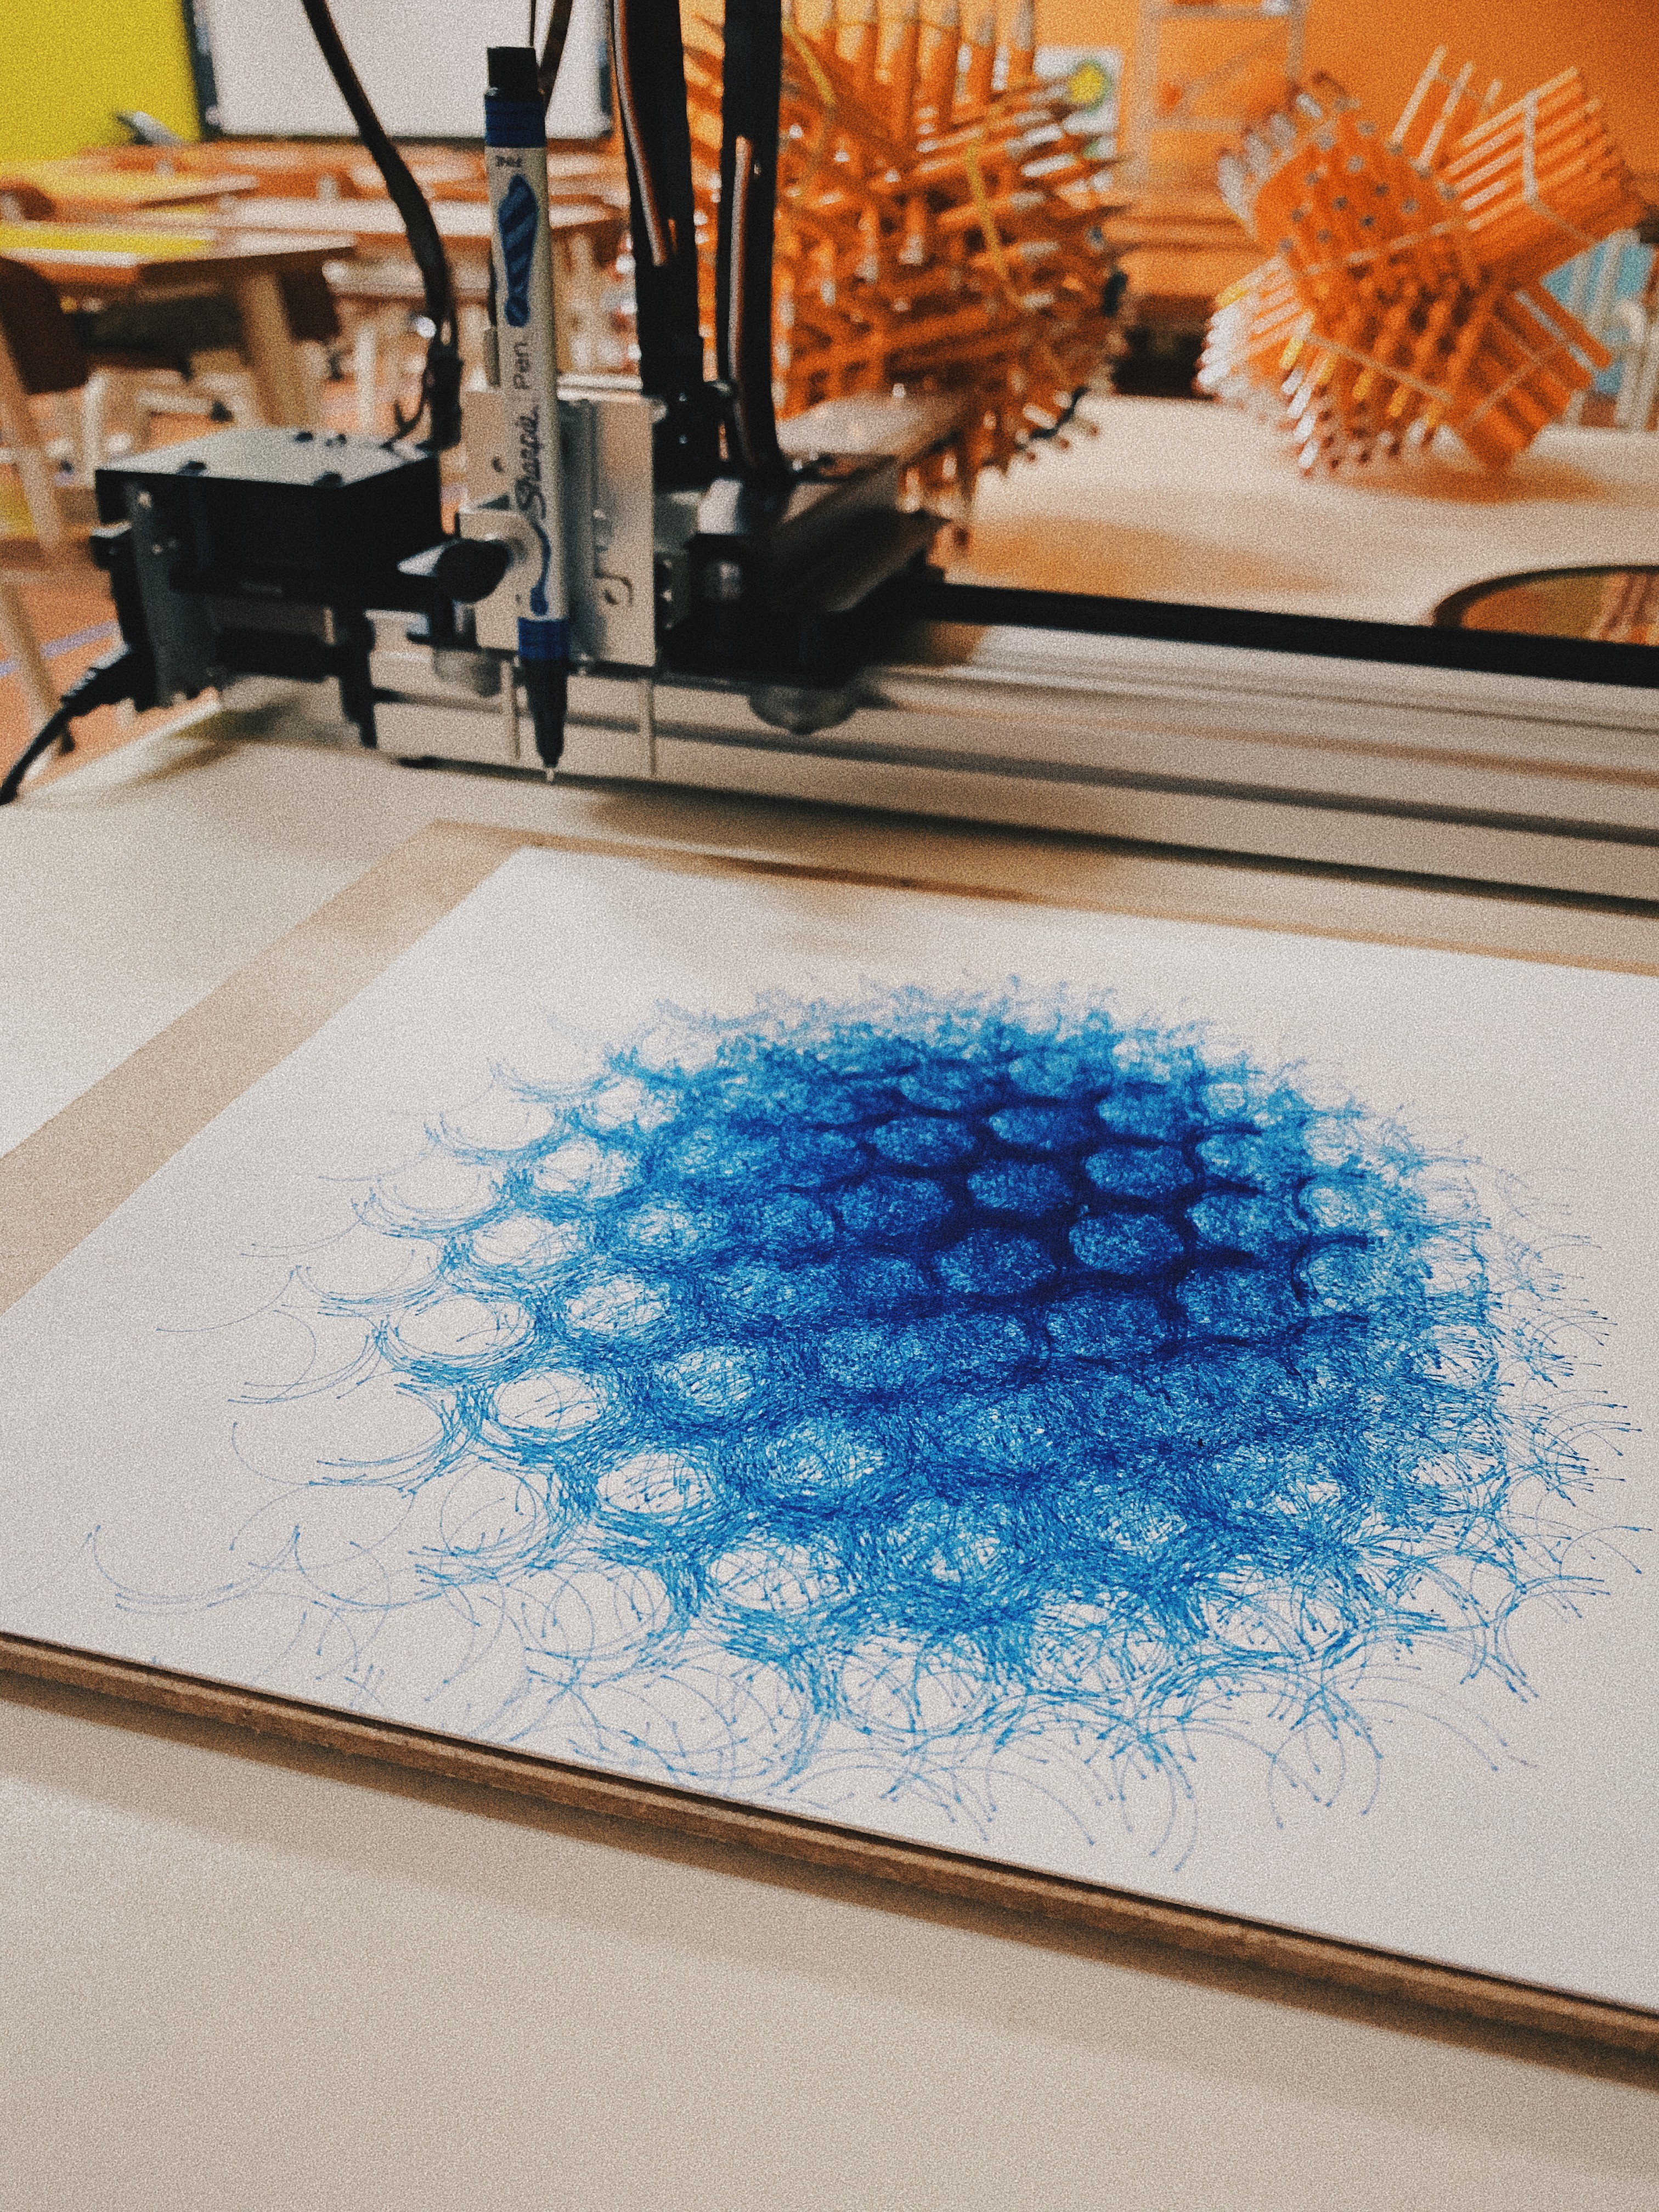
The AxiDraw
The AxiDraw is my favorite toy in my classroom. It?s the best tool to explore mathematical design.
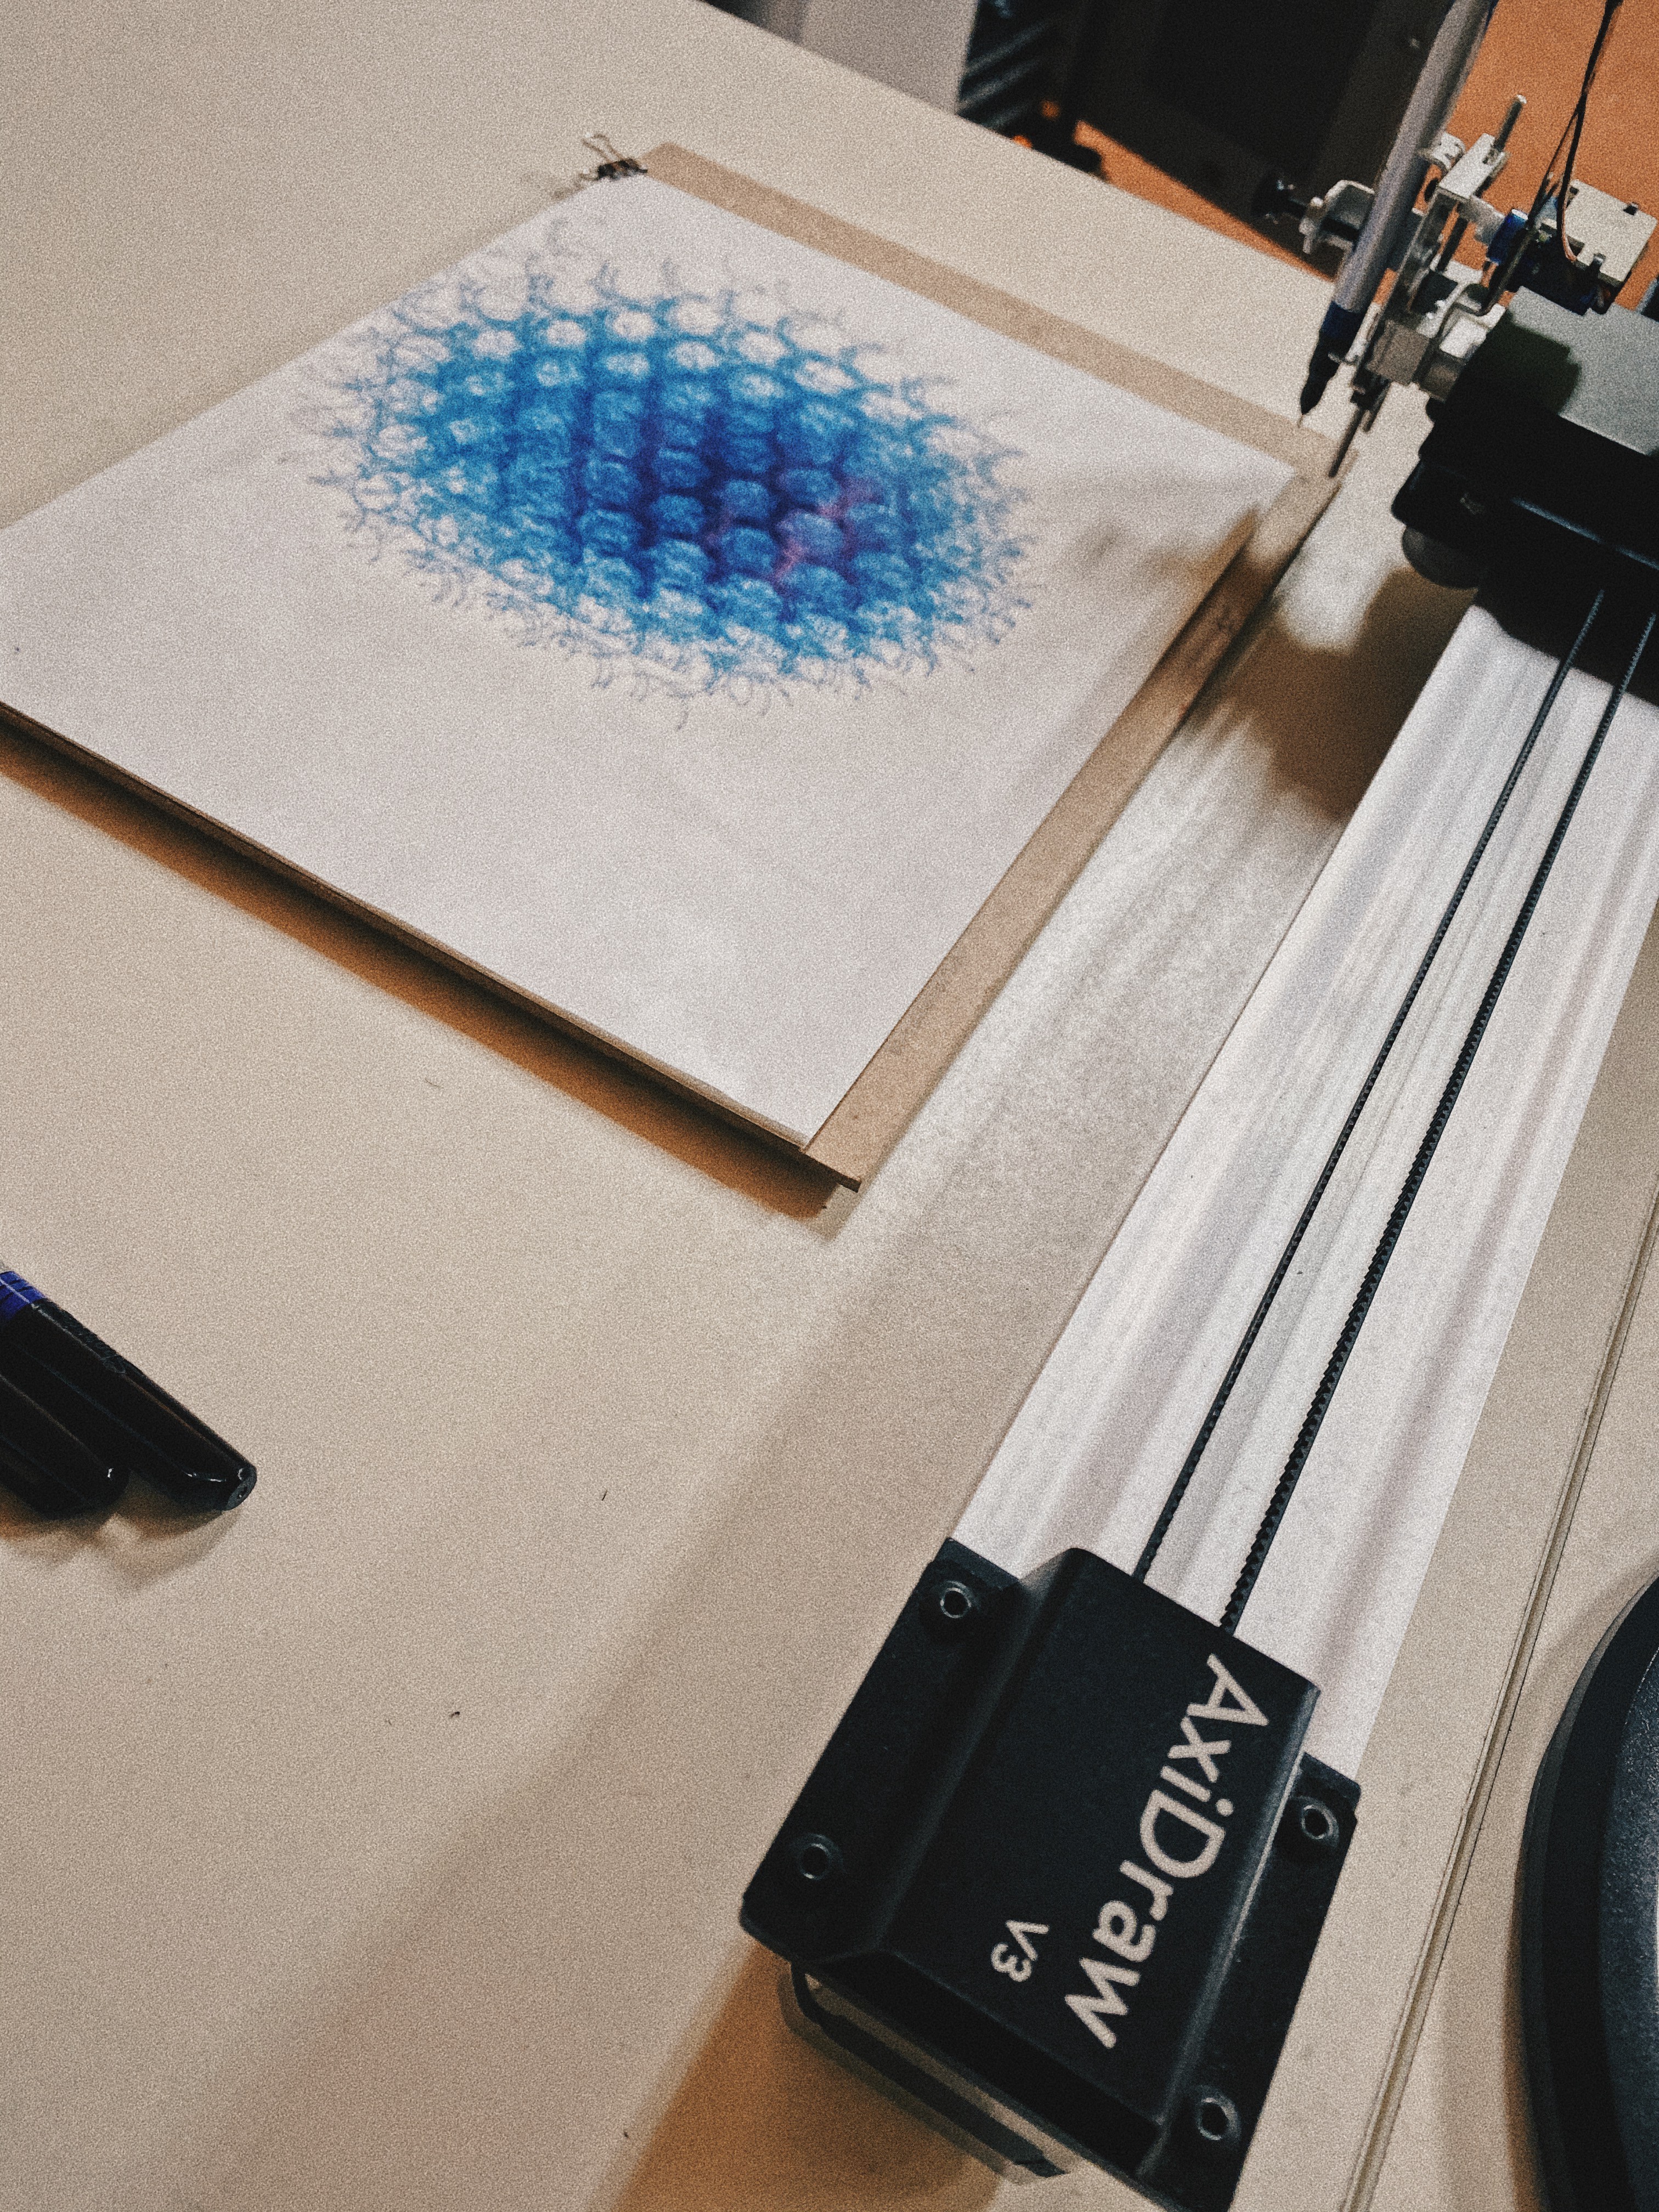
 Above: My Axidraw Drawing Robot
I found a way to convince my principal to buy an Axidraw for my classroom so m class and I can design a variety of cool mathematically complex shapes to make an exhibition. So far, we made many designs, each of them more mesmerizing than the last.
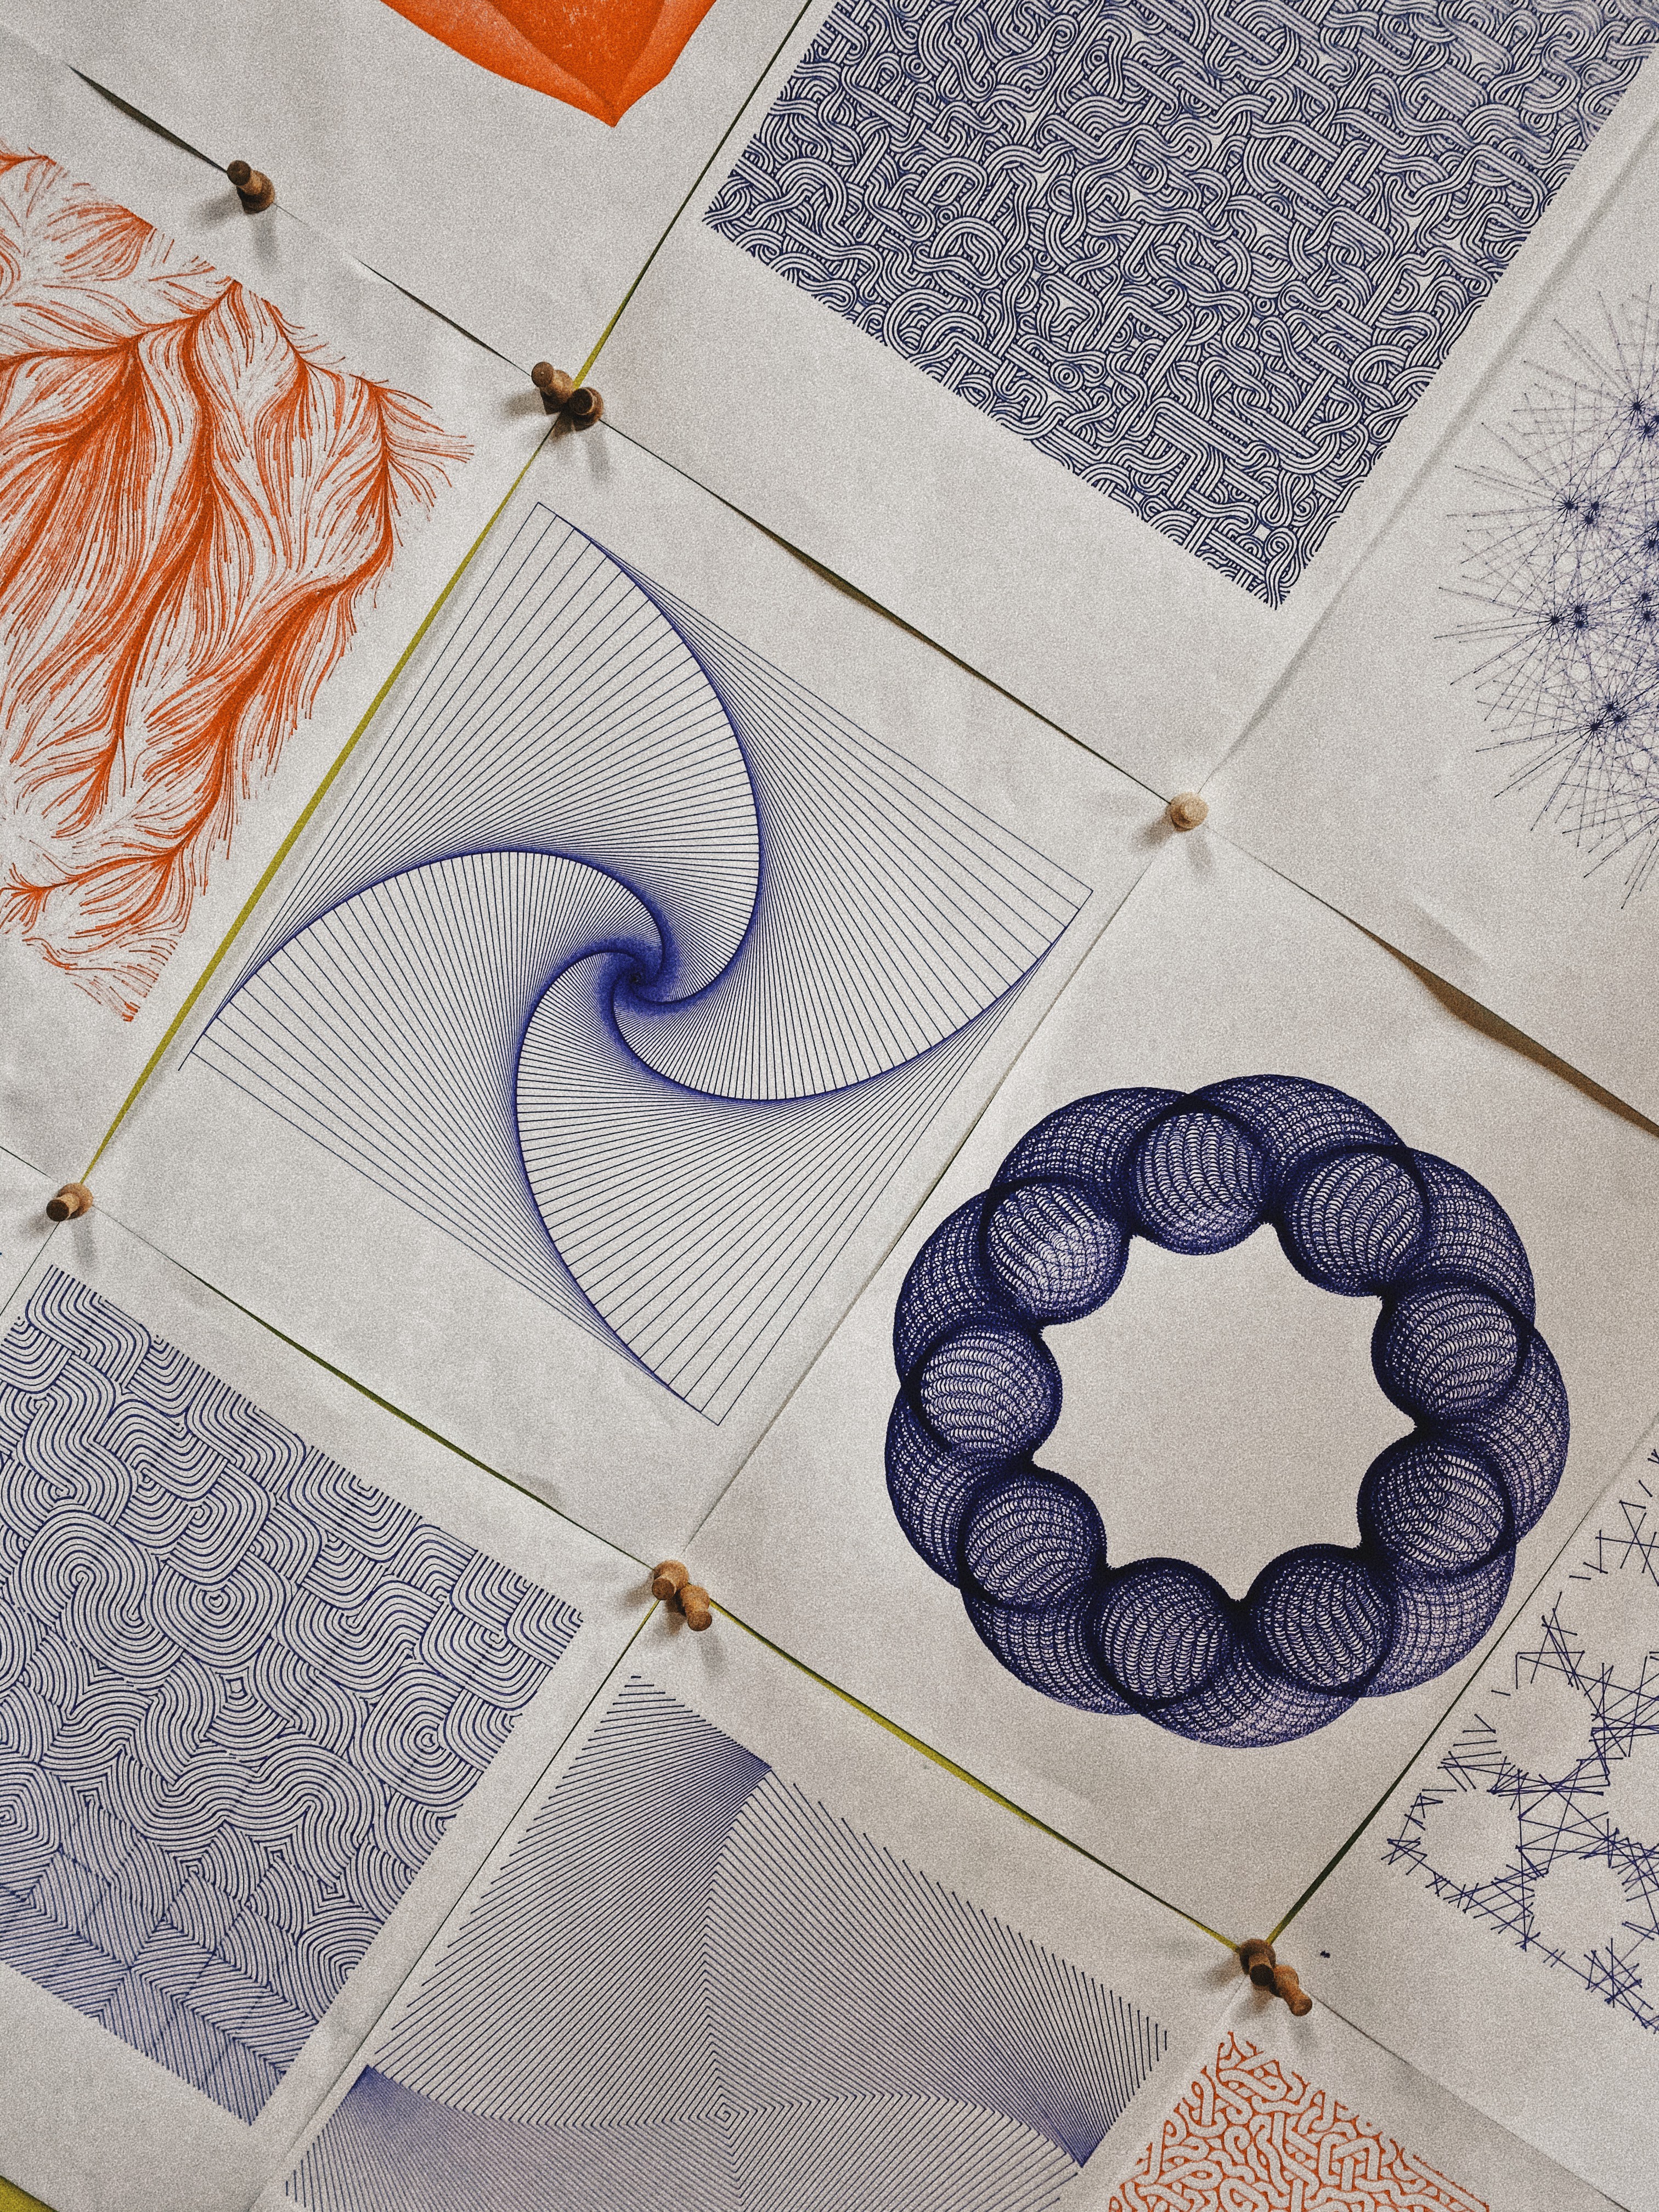
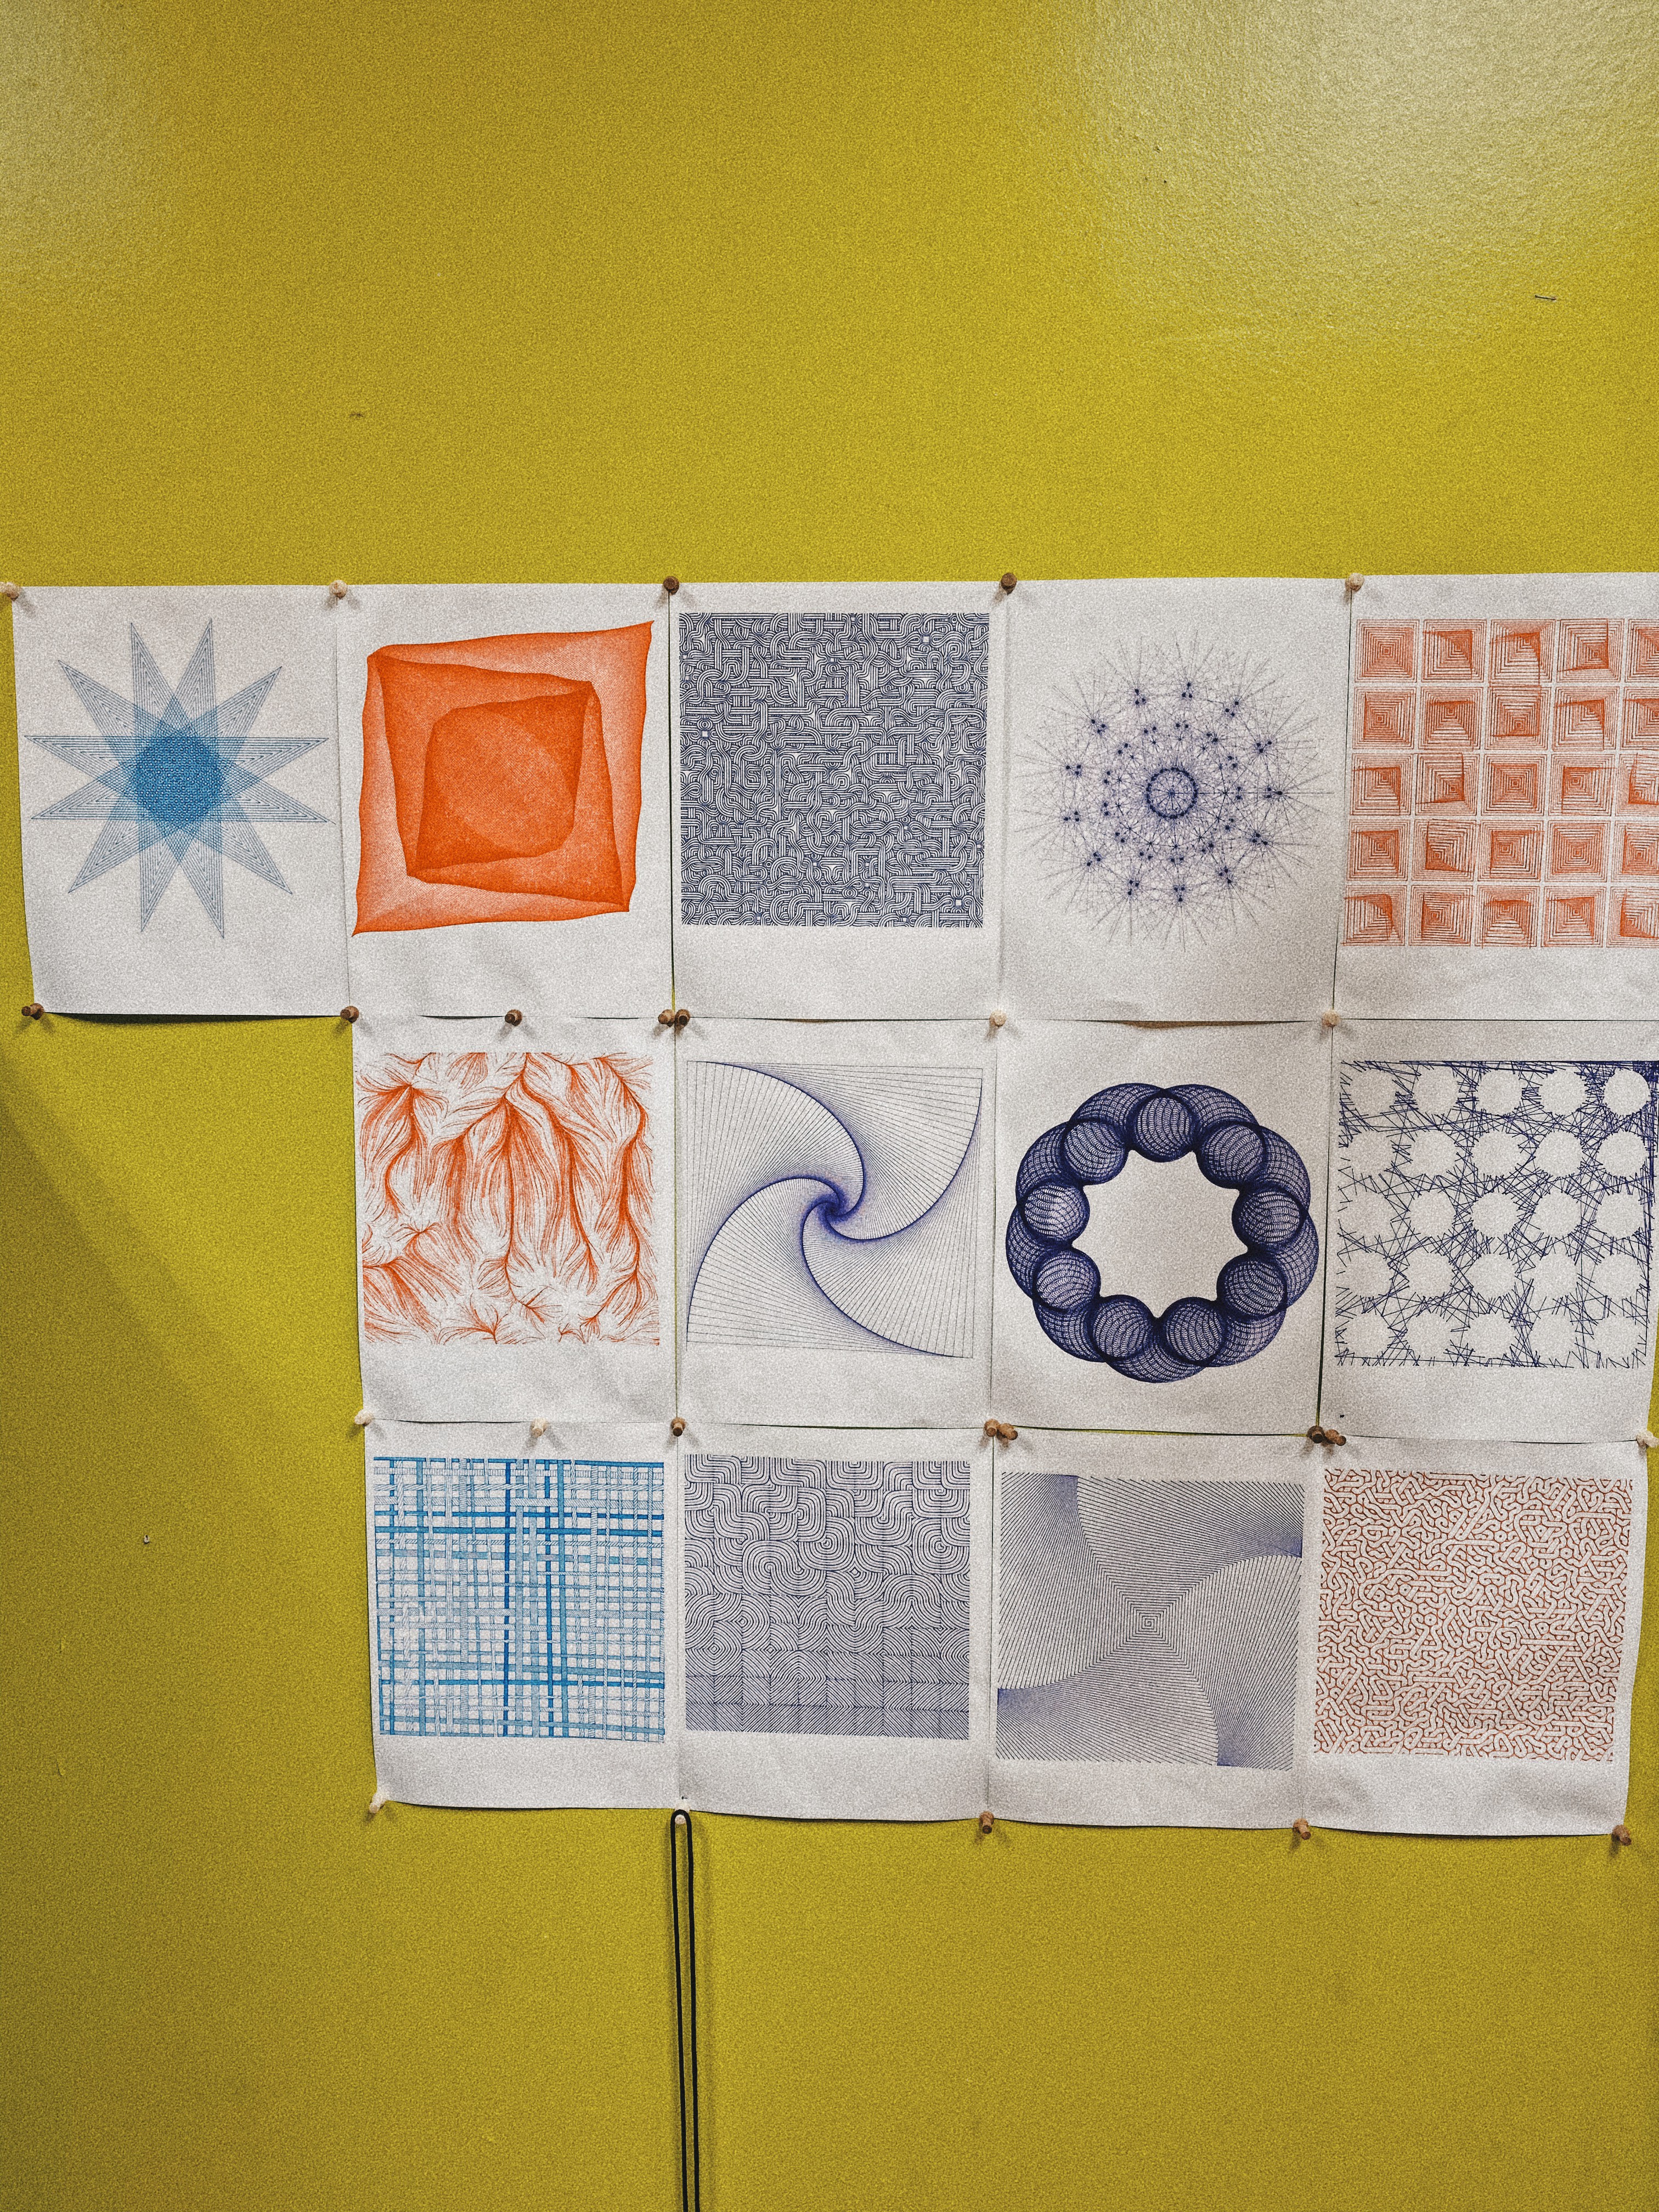
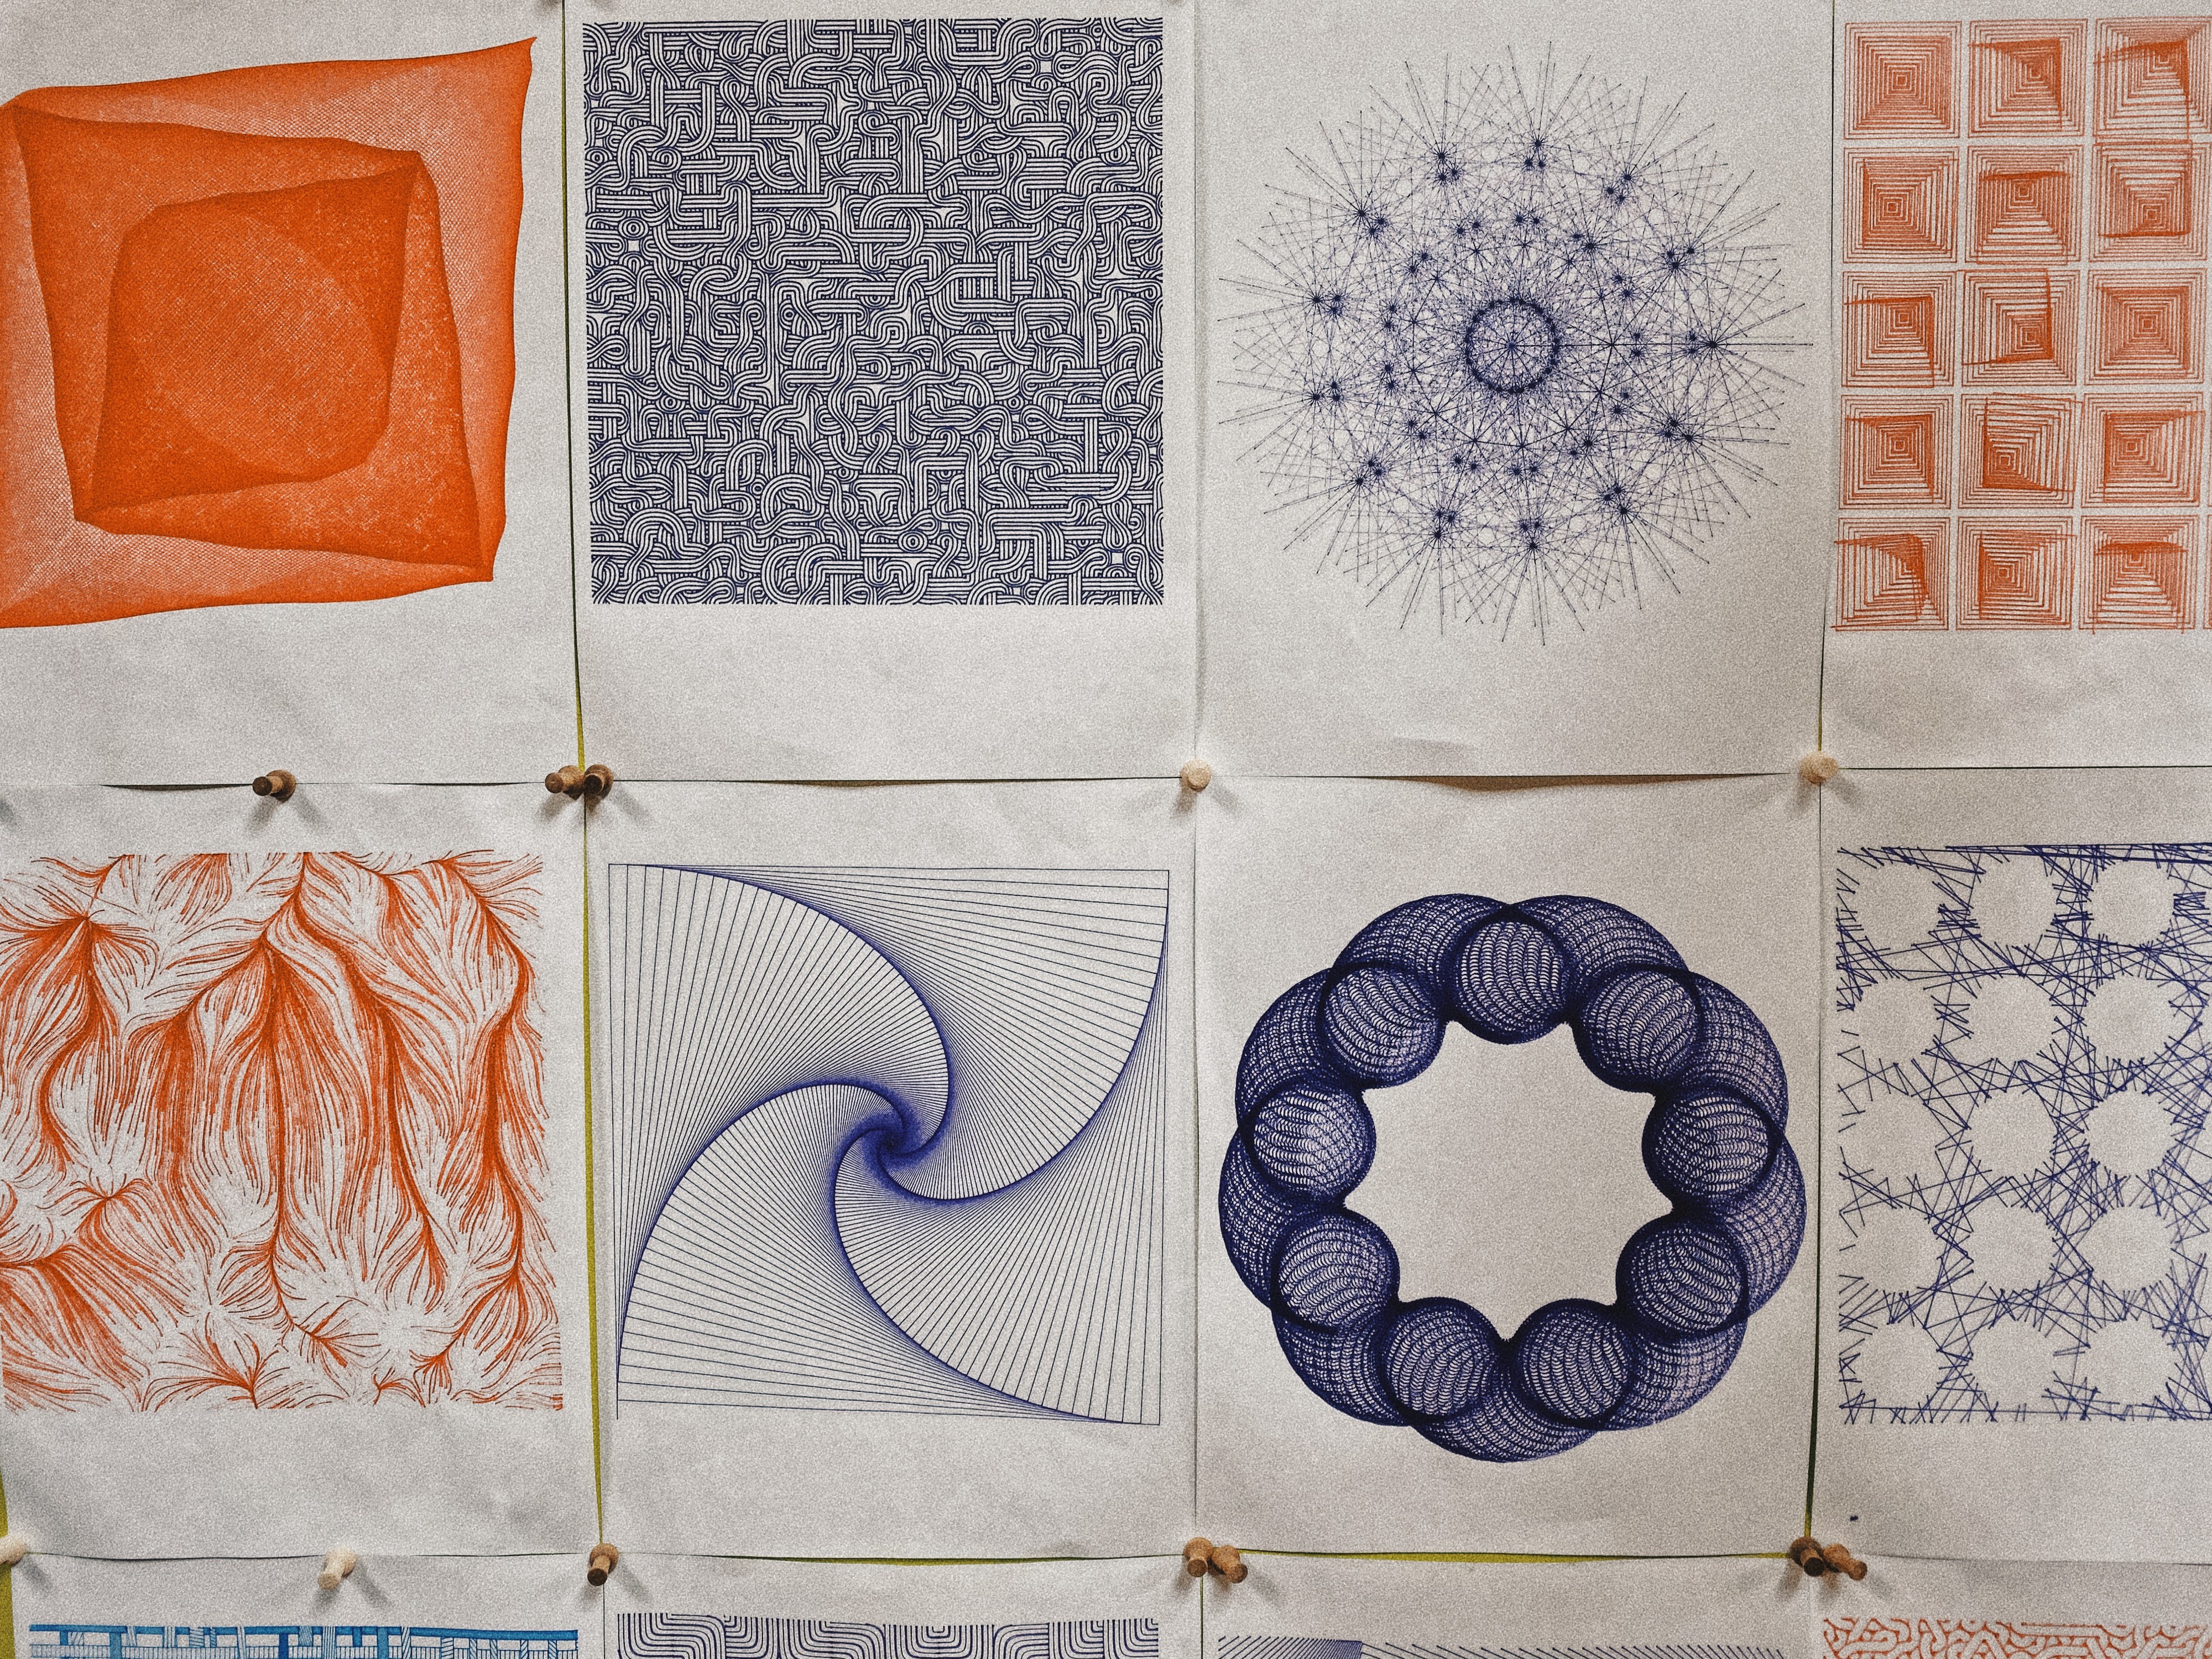 Above: Some examples of drawings
AxiDraw is literally a perfect tool to make your students love coding or mathematical designing.
? Project Type: Geometry, Coding & Design
? Supplies: Axidraw Drawing Robot, Bristol weight paper, Cutting Mat, Prismacolor Markers, Micron Pen
Sand Pendulum
Sand Pendulum machines are popular in science classrooms. Pendulums use the freedom of motion to make interesting patterns.
You may think this project is clich, but if you improve the materials that you use, you can make it more attractive. One interesting idea is using a magnetic sheet and iron fillings like user Mr. Yeany on YouTube instead of sand and he was receiving better results.
The reason for that was that he realized that sand bounces on the surface and makes lines wider.
You can find the instructions here.
? Project Type: Geometry, Construction & Design
? Supplies: Iron fillings, magnetic sheet
Mirror Symmetry
It?s a proven fact that kids love reflections and symmetry. So, that?s why mirrors always become a magnet for them. They love making symmetrical shapes with different colors.
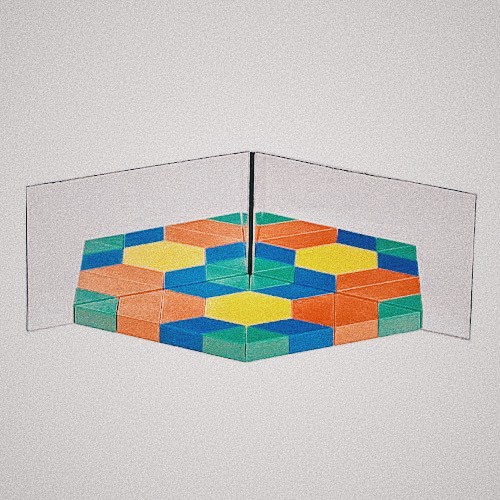
With this project, students can make amazing patterns just by using two mirrors and a bucket of wooden pattern blocks. For instance, when you make a simple triangle with wooden blocks and put them between two mirrors, you will see many new rotated triangles. Or instead, you can make half of a butterfly and use a mirror to complete your butterfly.
If you want your students to explore the ideas of symmetry, reflection, and rotation just let them use pattern blocks and mirrors. Ask them to change angles between mirrors or ask them to figure out how to increase the number of reflections of a pattern.
? Project Type: Geometry, Construction & Design
? Supplies: Rectangle Mirror, Connector, Geomagic Mosaics

