
This post has been published first on CodingTheSmartWay.com.
Subscribe On YouTube | Live Demo | Code on GitHub
Material Design is a design language developed in 2014 by Google and is very popular for web and mobile applications.
Material Design is inspired by the physical world and its textures, including how they reflect light and cast shadows. Material surfaces reimagine the mediums of paper and ink.
With the components from the Material-UI library it?s very easy to make use of Material Design elements in your React web or mobile application. The library?s website can be found at: https://material-ui.com.

In this tutorial you?ll learn how to setup and use Material-UI in your React web application. We?ll start from scratch and build a real-world sample application from the ground up.
In this tutorial you?ll learn how to use the Material-UI library in your React application. By following the steps you?ll learn how to build the following sample application from start to finish:
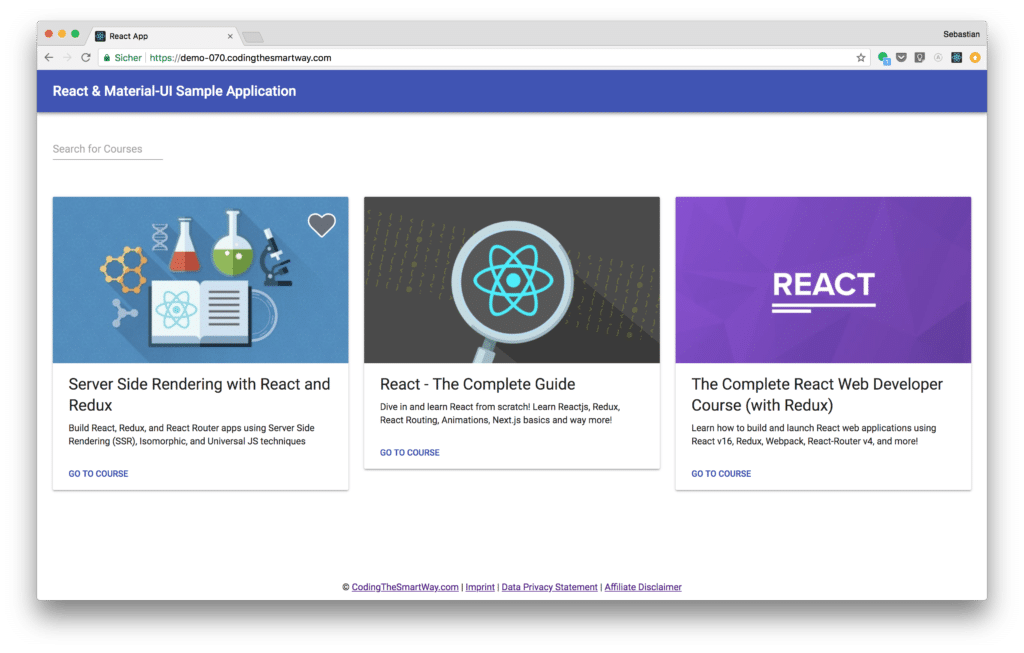
As you can see the user interface consists of material design elements. We?ll use Material-UI components to display a list of courses to the user. The application consists of a navigation bar on top which contains the title of the application, a text field which can be used to initiate a full text search for courses and a responsive grid which contains the course results.
The courses are retrieved from the CMS back-end Contentful (https://www.contentful.com/).
Setting Up The React Project
First we need to setup a new React project. This can be done by using the create-react-app script in the following way:
$ npx create-react-app react-material-ui
By using the npx command (which is part of the Node Package Manager (NPM) installation we?re able to execute create-react-app without the need to download and install it first.
Having executed this command a new project directory react-material-ui is available. Change into the newly create project folder and you?ll find the React starter project.
Installing Material-UI Library & Dependencies
Next we need to install further dependencies. By using the following command we?re making sure that the Material-UI library is installed:
$ npm install @material-ui/core
Next, we need to install the Contentful JavaScript library to be able to access the Contentful backend:
$ npm install contentful
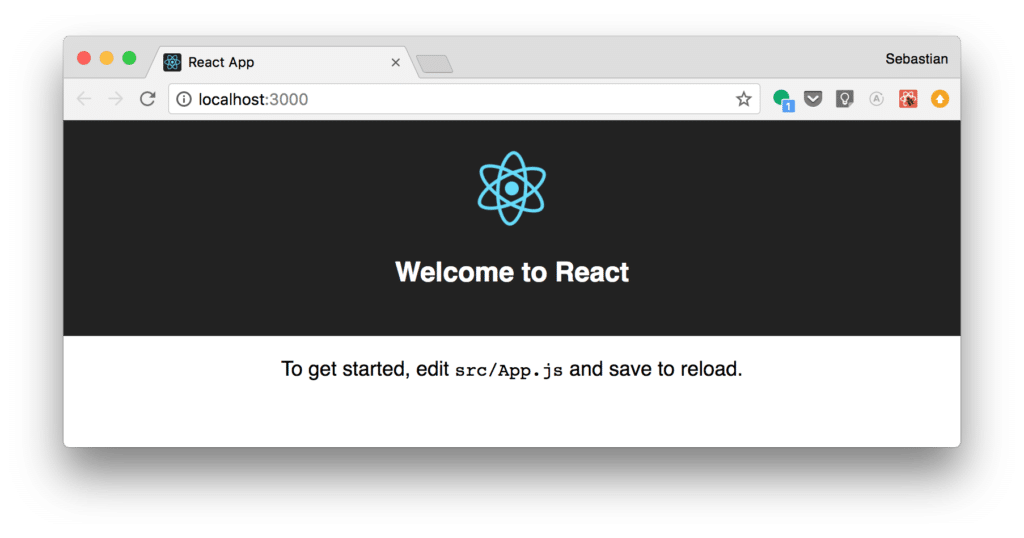
Let?s try out if everything is working by starting the development web server with
$ npm start
The browser opens up, the start page of the default React application is loaded and you should be able to the see the following output in the browser:
Now we?re ready to implement the sample application, so let?s get started.
Implementing The Sample Application
Deleting The Default Content
The first thing which needs to be done is to delete some parts of the default implementation. First open file src/App.js and apply the following changes:
- Delete the JSX code which is available inside the return statement
- Delete the import statement which is importing from ./logo.svg (you can also delete this file as it is no longer needed).
Now we?re ready to add our own code to the project.
Implementing NavBar Component
First let?s add a navigation bar to our application. The code which is needed to display the navigation bar by using Material Design components from the Material-UI library is added in another component. To implement that new component create a new subfolder components in directory src and add a new file NavBar.js. Insert the following code in the newly created file:
import React from ‘react’import AppBar from ‘@material-ui/core/AppBar’import Toolbar from ‘@material-ui/core/Toolbar’import Typography from ‘@material-ui/core/Typography’const NavBar = () => { return( <div> <AppBar position=”static”> <Toolbar> <Typography variant=”title” color=”inherit”> React & Material-UI Sample Application </Typography> </Toolbar> </AppBar> </div> )}export default NavBar;
Here we?re using the AppBar, Toolbar and Typography component from the Material-UI library to output the navigation bar as shown before. To be able to include NavBar in our main application component App we need to make sure that NavBar is exported.
Now we?re ready to import NavBar in src/App.js:
import React, { Component } from ‘react’import NavBar from ‘./components/NavBar’class App extends Component { render() { return ( <div> <NavBar /> </div> ) }}export default App
The <NavBar /> tag is inserted into the JSX code, so that the navigation bar will be part of the output.
Implementing CourseList Component
Next we?re adding another component to our application: CourseList. Add a new file named CourseList.js inside the src/components folder and insert the following code:
import React, { Component } from ‘react’import Grid from ‘@material-ui/core/Grid’;import TextField from ‘@material-ui/core/TextField’;import * as contentful from ‘contentful’import Course from ‘../components/Course’const SPACE_ID = ‘[INSERT CONTENTFUL SPACE ID]’const ACCESS_TOKEN = ‘[INSERT CONTENTFUL ACCESS TOKEN]’const client = contentful.createClient({ space: SPACE_ID, accessToken: ACCESS_TOKEN})class CoursesList extends Component { state = { courses: , searchString: ” } constructor() { super() this.getCourses() } getCourses = () => { client.getEntries({ content_type: ‘course’, query: this.state.searchString }) .then((response) => { this.setState({courses: response.items}) console.log(this.state.courses) }) .catch((error) => { console.log(“Error occurred while fetching Entries”) console.error(error) }) } onSearchInputChange = (event) => { console.log(“Search changed …” + event.target.value) if (event.target.value) { this.setState({searchString: event.target.value}) } else { this.setState({searchString: ”}) } this.getCourses() } render() { return ( <div> { this.state.courses ? ( <div> <TextField style={{padding: 24}} id=”searchInput” placeholder=”Search for Courses” margin=”normal” onChange={this.onSearchInputChange} /> <Grid container spacing={24} style={{padding: 24}}> { this.state.courses.map(currentCourse => ( <Grid item xs={12} sm={6} lg={4} xl={3}> <Course course={currentCourse} /> </Grid> ))} </Grid> </div> ) : “No courses found” } </div> ) }}export default CoursesList;
This component is responsible for retrieving course data from the Contentful back-end service and displaying the list of courses to the user.
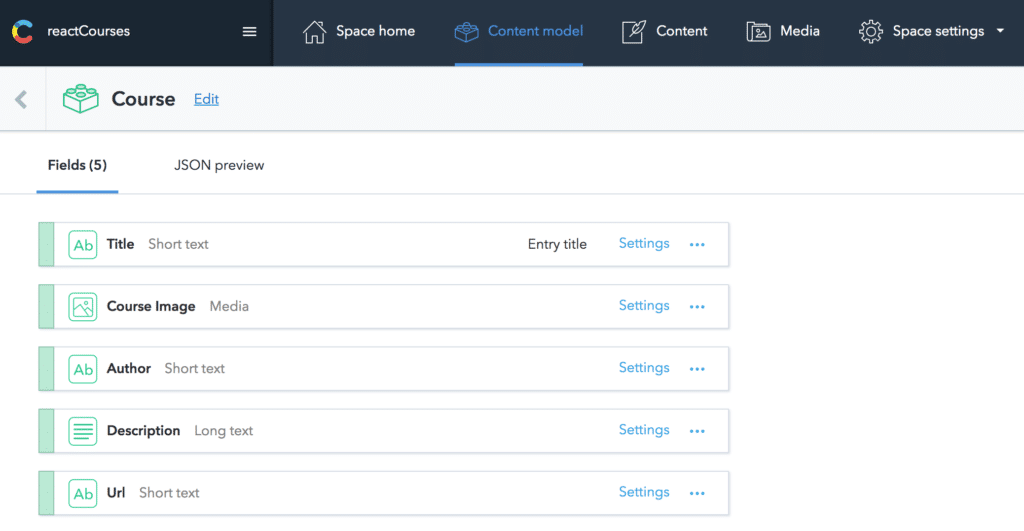
First the connection to Contentful is established by using the Contentful JavaScript library. To establish the connection you need to log in to the Contentful back-end (https://be.contentful.com/login), create a new space, insert a Course model like you can see in the following screenshot, and access Space ID and Access Token from the Space settings ? API Keys.
To access those values you need to create a new key by clicking on button Create API Key. Both values ? Space ID and Access Token needs to be copied and inserted into the string which is assigned to SPACE_ID and ACCESS_TOKEN constants.
Both constants are used to initiate the back-end connection by using the following lines of code:
const client = contentful.createClient({ space: SPACE_ID, accessToken: ACCESS_TOKEN})
The connection to the Contentful space is stored in client. To retrieve the list of courses from this connection the method getCourses is added to the component class:
getCourses = () => { client.getEntries({ content_type: ‘course’, query: this.state.searchString }) .then((response) => { this.setState({courses: response.items}) console.log(this.state.courses) }) .catch((error) => { console.log(“Error occurred while fetching Entries”) console.error(error) }) }
The request to retrieve the list of courses from Contentful is done by calling the client.getEntries method. This method is expecting to get a configuration object as parameter. This configuration object needs to contain two properties:
- content_type: The Contentful content type which should be queried. In our case: course.
- query: It?s possible to perform a full-text search across all text and symbol fields with the query parameter. The value which is assigned to this property is available in this.state.searchString. This state property is updated every time the user changes the value of the search input field.
As the call of getEntries is an asynchronous operation it returns a promise so that we can connect to the result by using then. Inside the then method the list of courses is available in response.items. Those items are stored inside the courses property of the component?s state.
The component?s output is defined by the JSX code which is returned by the render method:
render() { return ( <div> { this.state.courses ? ( <div> <TextField style={{padding: 24}} id=”searchInput” placeholder=”Search for Courses” margin=”normal” onChange={this.onSearchInputChange} /> <Grid container spacing={24} style={{padding: 24}}> { this.state.courses.map(currentCourse => ( <Grid item xs={12} sm={6} lg={4} xl={3}> <Course course={currentCourse} /> </Grid> ))} </Grid> </div> ) : “No courses found” } </div> ) }
Here we?re making use of two Material-UI components: TextField and Grid. Both components are added to the output only if course items are available in this.state.courses. In this case the the user is able to use the TextField to initiate a free text search. If the value of the text field changes the method onSearchInputChange is called and the searchString property of the state object is updated with that new value.
The Material-UI Grid component is used to display the courses in a grid layout which is responsive to the screen size. The output for a specific course is generated by the custom Course component which is implemented in the next step. The current course is handed over to this component via the course parameter.
Again we need to import and add CourseList component in App.js:
import React, { Component } from ‘react’import NavBar from ‘./components/NavBar’import CoursesList from ‘./components/CoursesList’class App extends Component { render() { return ( <div> <NavBar /> <CoursesList /> </div> ) }}export default App
Implementing Course Component
Next let?s implement Course component. Create a new file Course.js in folder src/components and insert the code from the following listing:
import React from ‘react’import Card from ‘@material-ui/core/Card’import CardActions from ‘@material-ui/core/CardActions’import CardContent from ‘@material-ui/core/CardContent’import CardMedia from ‘@material-ui/core/CardMedia’import Button from ‘@material-ui/core/Button’import Typography from ‘@material-ui/core/Typography’const Course = (props) => { console.log(props) return( <div> { props.course ? ( <Card > <CardMedia style={{height: 0, paddingTop: ‘56.25%’}} image={props.course.fields.courseImage.fields.file.url} title={props.course.fields.title} /> <CardContent> <Typography gutterBottom variant=”headline” component=”h2″> {props.course.fields.title} </Typography> <Typography component=”p”> {props.course.fields.description} </Typography> </CardContent> <CardActions> <Button size=”small” color=”primary” href={props.course.fields.url} target=”_blank”> Go To Course </Button> </CardActions> </Card> ) : null} </div> )}export default Course
As the current course is handed over as a property we?re able to access the course?s data via props.course. If data is available the course is displayed by using the Card component from The Material-UI library. Furthermore we?re making use of the following Material Design components: CardActions, CardContent, CardMedia, Button and Typography.
Having completed the implementation, our application should now output the final result as shown at the beginning of this tutorial.
Conclusion
By using the Material-UI component library it?s easy to enhance the output of your React application with Google?s Material Design. In this tutorial you?ve learned how to setup and use Material-UI in your React project and implement a real-world sample application from scratch.
This post has been published first on CodingTheSmartWay.com.
#1 React ? The Complate Guide
Dive in and learn React from scratch! Learn Reactjs, Redux, React Routing, Animations, Next.js basics and way more!Go To Course ?
Disclaimer: This post contains affiliate links, which means that if you click on one of the product links, I?ll receive a small commission. This helps support this blog!

