
WebSockets allow for extremely fast two-way networking communication
 Photo by Christopher Gower on Unsplash
WebSockets allow for extremely fast two-way networking communication, which lets you send and receive updates quicker and more often, not to mention securely.
WebSocket is a communication protocol that uses sockets, providing duplex communication over a single TCP connection. It was standardized by the IETF in 2011 and is a different protocol from HTTP.
WebSockets are widely used in chat apps, streaming real-time notifications, and stock prices.
WebSocket Lifecycle
Shaking hands with the server
The handshake app is the web part in WebSockets. It?s the bridge from HTTP to WebSocket. The client sends a pretty standard HTTP GET request to the server:
GET /chat HTTP/1.1Host: example.com:8000Upgrade: websocketConnection: UpgradeSec-WebSocket-Key: dGhlIHNhbXBsZSBub25jZQ==Sec-WebSocket-Version: 1
The most interesting thing here is Sec-WebSocket-Key, which is needed for security reasons and is generated according to the WebSocket standard.
The server validates the request and, if everything is fine, sends back an HTTP response:
HTTP/1.1 101 Switching ProtocolsUpgrade: websocketConnection: UpgradeSec-WebSocket-Accept: s3pPLMBiTxaQ9kYGzzhZRbK+xOo=
Exchange the information
At any time, the server or client can send data that follows this specific format:
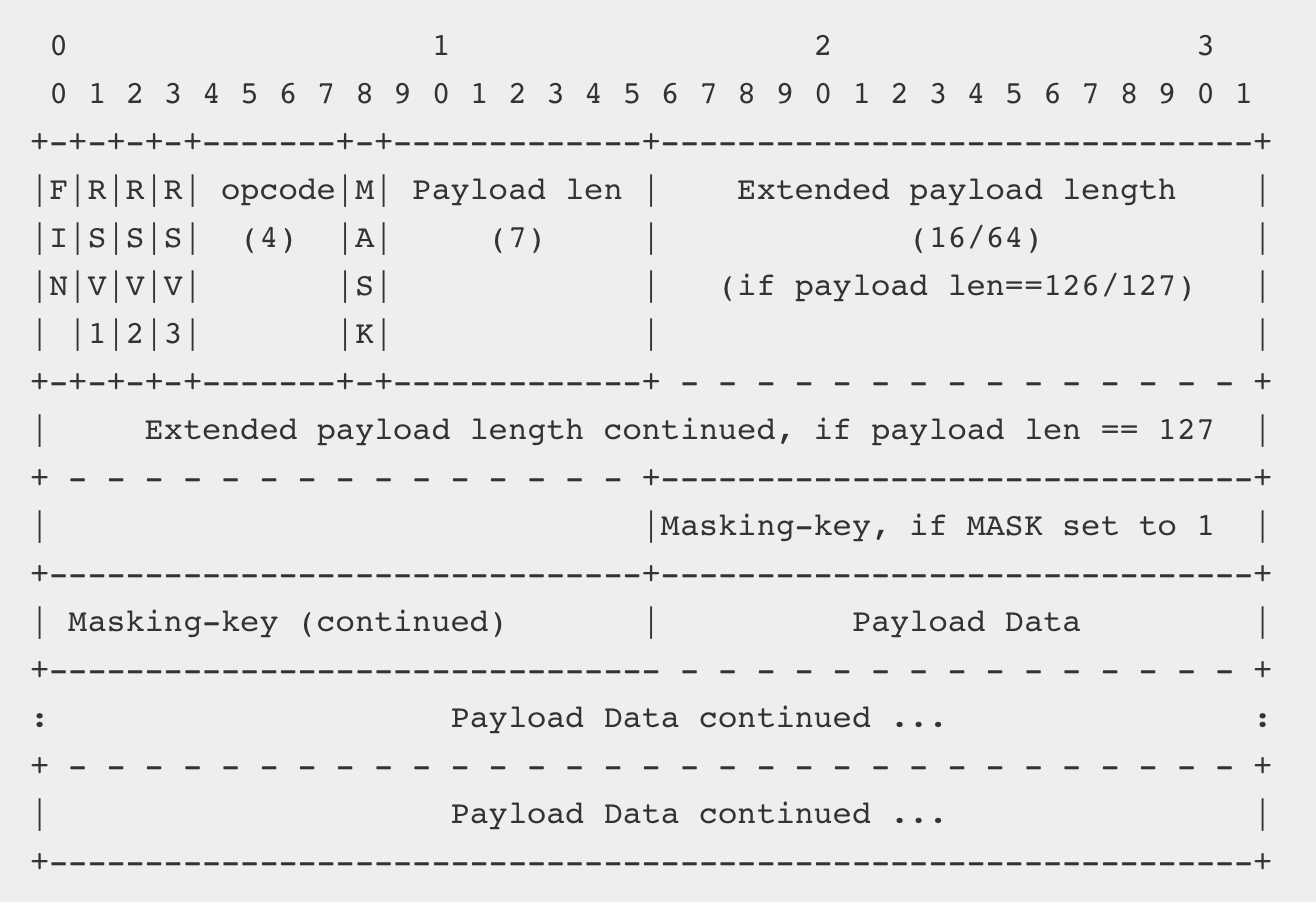 WebSocket frame format
I will not go over each part, but you can find out more in the standard.
Pings and pongs
At any point, the client or server can send a ping and the other party must send back a pong.
Closing
The connection can be closed by any party by sending a specified control sequence.
Implementing WebSockets in iOS
Implementing WebSockets in iOS, macOS, tvOS or watchOS isn?t a trivial task. New Network.framework can simplify that but you still need to deal with underlying tasks like upgrading connection and setting up a WebSocket frame.
Starscream
The Swift WebSocket client library Startscream simplifies all the heavy-lifting tasks. Install the library and import it in any Swift file.
import Starscream
Creating the connection
After that, create a connection and set up the delegate.
let url = URl(string: “ws://echo.websocket.org”)! let request = URLRequest(url: url) let websocket = WebSocket(request: request)
Setting up delegation
Then we need to set up delegate and implement didReceive method with event WebSocketEvent type.
func didReceive(event: WebSocketEvent, client: WebSocket) { switch event { case .connected(let headers): print(“connected (headers)”) case .disconnected(let reason, let closeCode): print(“disconnected (reason) (closeCode)”) case .text(let text): print(“received text: (text)”) case .binary(let data): print(“received data: (data)”) case .pong(let pongData): print(“received pong: (pongData)”) case .ping(let pingData): print(“received ping: (pingData)”) case .error(let error): print(“error (error)”) case .viabilityChanged: print(“viabilityChanged”) case .reconnectSuggested: print(“reconnectSuggested”) case .cancelled: print(“cancelled”) } }
Once this is done, we can start the connection. Making the handshake and upgrading connection is done behind the scenes by the library.
socket.connect();
Sending data
There are several ways to send data:
- binary
- string
- ping
- pong
The easiest way is to just send a string:
socket.write(string: “Hi Server!”)
Closing the connection
At any point, we can check close it if it?s not needed anymore.
websocket.disconnect(closeCode: CloseCode.goingAway.rawValue)
TL;DR
WebSocket isn?t a first-class citizen in iOS, macOS, tvOS and watchOS. It can be quite overwhelming to implement, use and understand it, but the Swift library Starscream can help you take care of all these tasks.
Links
- The WebSocket Protocol
- Writing WebSocket servers
- Starscream Swift WebSocket library
- Websocket Frame implementation in Swift
- WebSockets 101
- WebSocket Security

