Learning Unity-ARKit-Plugin through example.

Motivation
I have a hunch that augmented reality is going to be an important technology in the coming years and I want to start developing with it. I, however, am not ready to spend thousands of dollars on either Magic Leap or HoloLens augmented reality headsets. On the other hand, given the prevalence of iOS devices, I thought to explore iOS ARKit.
The problem, however is that I am not an iOS developer. Luckily I have been learning Unity and with the Unity-ARKit-Plugin one can develop iOS applications using iOS ARKit. Moreover, Unity is particularly handy at developing 3D applications.
Prerequisites
If you wish to follow along; you will need:
- macOS (series written with macOS 10.14.3)
- Xcode 10.0.+ (series written with Xcode 10.1)
- Unity 2017.4+ (series written with Unity 2018.3.9f1)
- iOS Device (iPhone 6S+ or iPad 2017+) with iOS 12+ (series written with an iPhone 7 with iOS 12.1.4)
- An Apple Developer account (can be the free account without a paid subscription) and in Xcode, sign into the account; Xcode > Preferences > Accounts.
While it is helpful to know a bit about Unity development and C#, this series is written assuming the reader has little to no experience with either of them.
Other Documentation and Tutorials
The official Unity-ARKit-Plugin documentation is fairly minimal; it is essentially an outline of a reference guide.
Of the many guides and tutorials that I looked at the best that I could find is the no-cost Udacity course, Learn ARKit using Unity. The problem with this course, however, is that it starts with high-level theory and jumps to a mostly complete example.
The Build Process
Our first goal is to simply build an existing Unity application and deploy it to an iOS device.
We begin by downloading the BitBucket repository Unity-ARKit-Plugin using the Downloads menu item. This repository has both the plugin and example code. Unzip the download into a folder, rename it (as desired), and open it using Unity.
note: My first mistake was to create a new Unity project and import the UnityARKitPlugin asset; using this approach I could never get the build process to work. Obviously, there is something undocumented configured in the project settings.
Other than the expected warnings of opening a project from an earlier Unity version, one will also get an ominous error:
Unity failed to read signed 32 bit int at line 183 of ?projectsettings/projectsettings.asset? due to type mismatch. This problem occurs when a member field in the script has changed and Unity is attempting to load data with the old format, or when the data is corrupt.
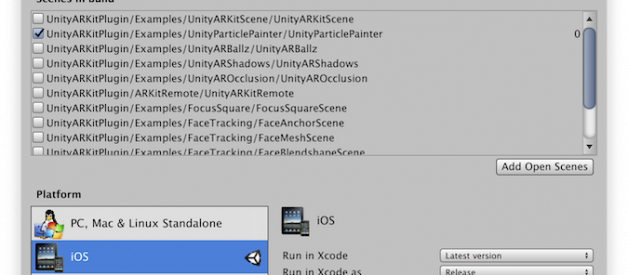
Turns out that by switching the build to iOS and doing a build resolves this error; File > Build Settings > iOS > Switch Platform. Include the UnityParticlePainter scene in the build and using the Build button, build the project. By the way, it is common practice to save the builds into a separate folder, e.g., Builds.
note: This was my second mistake, I spent too much time trying to figure out what was causing this error.
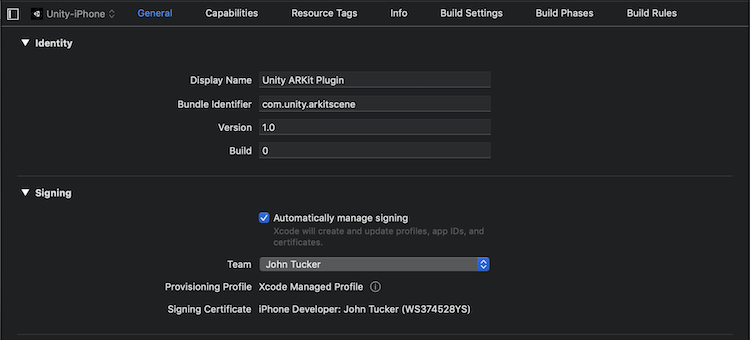
Open the generated build (folder) with Xcode. By selecting the top entry in the left-most pane, one will bring up the build settings screen in the middle pane.
note: My third mistake was that because I had the project selected (top of middle pane) instead of the target, I could not find the build settings screen.
On the build settings screen be sure to leave Automatically manage signing checked and select your Apple Developer account.
With an iOS device connected through an USB, press the Build and Run button (the triangular play button). If all goes well, an application will load that allows one to paint in augmented reality.
Building and Running ARKitRemote
It would be challenging to develop iOS applications using ARKit if one had to always wait to build to an iOS device (a time consuming process) to see the results of their work. Luckily the Unity-ARKit-Plugin project includes a feature, ARKitRemote, that allows one to quickly iterate the application without leaving Unity.
The best explanation of ARKitRemote is in the long standing Unity Forum topic ARKit support for iOS via Unity-ARKit-Plugin.
This is a two part solution for game developers who want to iterate on ARKit apps (made with Unity ARKit Plugin) from within the Unity Editor. It consists of an iOS app (UnityARKitRemote) that provides the ARKit data from a compatible device that it is installed on, working in conjunction with a GameObject called ARKitRemoteConnection in your Unity scene for your ARKit project. This GameObject simulates ARKit working in the editor by passing data via UnityARSessionNativeInterface to the other GameObjects in the editor. The UnityARKitRemote app on the device will forward the following information to Unity scene in editor:
-The video feed coming from the device camera (separated into Y and UV textures) as provided by ARKit.-The camera translation and rotation based on device movement-The ARPlaneAnchor addition, removal and update events along with data about the plane affected-Point cloud data
? Unity Forum ? ARKit support for iOS via Unity-ARKit-Plugin
We begin by building and deploying to an iOS device the UnityARKitRemote application in much the same way that we did for an existing, UnityParticlePainter, application above.
We, however, begin this time by changing the application?s bundle identifier; the bundle identifier is used to uniquely identify the application on the iOS device. This step is important as we want to keep this application on our device indefinitely.
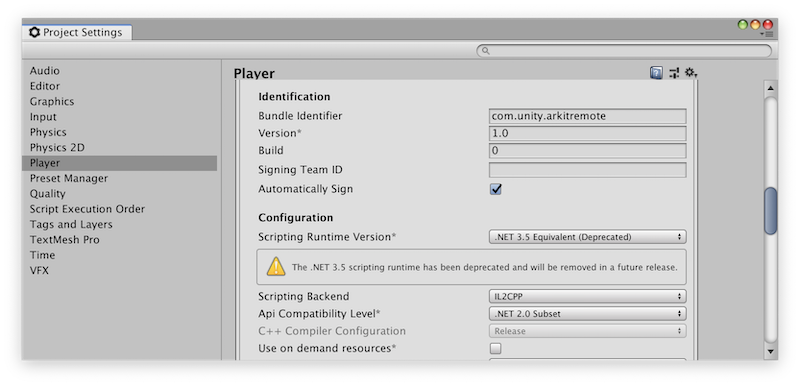
Starting from the Unity menu, change the bundle identifier to com.unity.arkitremote:
Edit > Project Settings > Player > Settings for iOS > Other Settings > Identification > Bundle Identifier
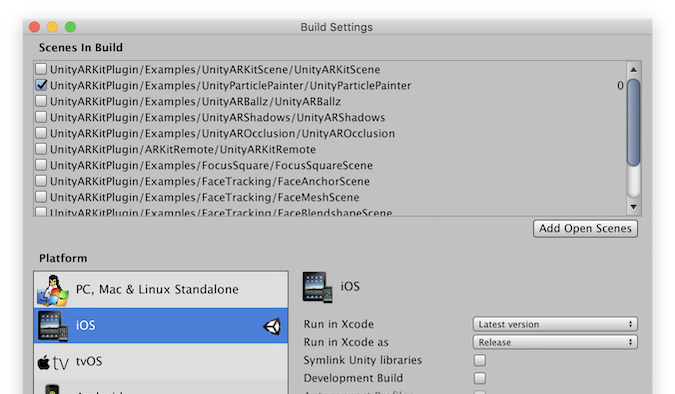
As before we generate the iOS build folder using menu: File > Build Settings > iOS. This time we only include the UnityARKitRemote scene in the build and check the Development Build checkbox; used to allow the UnityARKitRemote application to communicate through an USB connection.
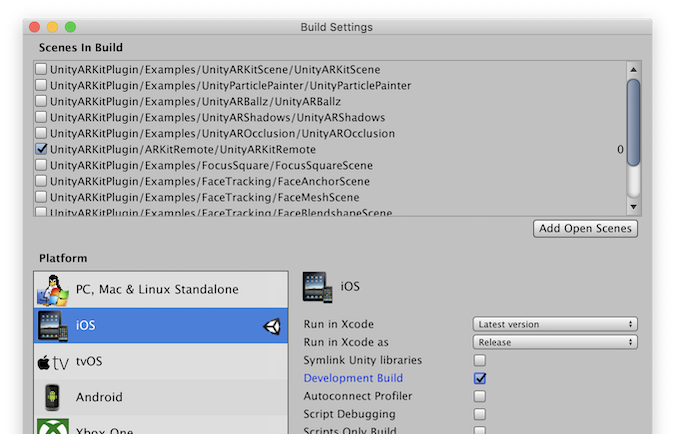
note: My fourth mistake was to forget to check the Development Build checkbox.
Pressing the Build button, we save the build to a new folder, e.g., Remote.
Using Xcode as before we:
- Open the generated build (folder)
- On the build settings screen be sure to leave Automatically manage signing checked and select your Apple Developer account
- With an iOS device connected through an USB, press the Build and Run button (the triangular play button).
With this, we have installed and run the UnityARKitRemote application; it should show the text Waiting for editor connection?
Using ARKitRemote
Now that we have installed the UnityARKitRemote application, we will use it to run the UnityParticlePainter application from Unity. We begin by:
- Close Xcode
- Open Unity
- Open the UnityParticlePainter scene; Assets > UnityARKitPlugin > Examples > UnityParticlePainter > UnityParticlePainter
- Play, pressing the triangular Play button, the Unity application
- Connect iOS device, using an USB cable, to the development machine
- Open the UnityARKitRemote application on the iOS device
- Change the Editor to the iOS device, e.g., Console > Editor > iPhone 7 (415896); do not use the iPhonePlayer option

8. Press the Start Remote ARKit Session button in Unity?s Game pane
At this point one should see the iOS devices camera output in Unity?s Game pane.

Next Steps
We have, so far, spent quite a bit of time getting our development environment setup. In the next article, Unity ARKit By Example: Part 2 we will create our first application.

