 Source
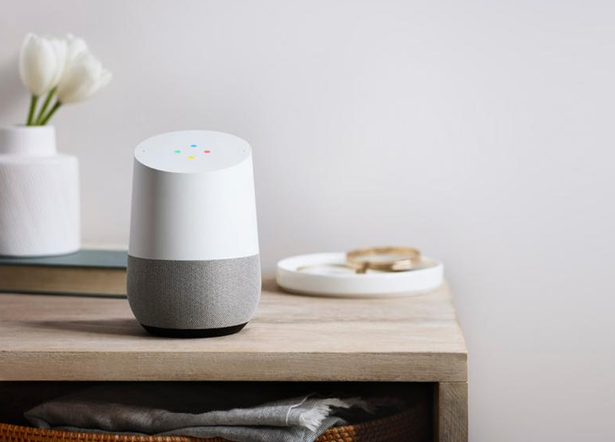
Google Home is a beautiful device with built-in Google Assistant ? A state of the art digital personal assistant by Google. ? which you can place anywhere at your home and it will do some amazing things for you. It will save your reminders, shopping lists, notes and most importantly answers your questions and queries based on the context of the conversations.
In this article, you are going to learn to turn your Raspberry Pi into homemade Google Home device which is,
- Powered by Google Assistant.
- Voice activated. No need to press any button, just say ?Ok Google? or ?Hey Google? and ask your question.
- There will be a LED indicator which will stay on whenever the conversation between the user and the Google Assistant it in progress.
- It can initialize on boot so no need to login and run the script from terminal after reboots.
So, let?s get started.
The Chatbot Conference
The Chatbot Conference On September 12, Chatbot’s Life, will host our first Chatbot Conference in San Francisco. The?
www.eventbrite.com
What things will you need?
- Raspberry Pi model 2 or 3.
- MicroSD card with Raspbian on it (Minimum 8GB recommended).
- Power supply to feed your raspberry pi. (Any USB mobile charger with minimum 5V, 2A output will work.)
- USB mic (As Raspberry Pi doesn?t have an inbuilt mic. I used MI-305).
- A speaker.
- A LED.
- A couple of wires to connect LED.
Once you have all these things, login to Raspbian desktop and go to the following steps one by one.
Step -1: Setting up USB mic.
- Raspberry Pi doesn?t have inbuilt microphones. If you want to record audio, you need to attach a USB microphone.
- Plug your USB mic into any of the USB slots of your Raspberry Pi.
- Go to the terminal and type following command.
- This command will list all the available audio record devices. You should get below output.
As you can see your USB device is attached to card 1 and the device id is 0. Raspberry Pi recognizes card 0 as the internal sound card (which is bcm2835) and other external sound cards as external sound cards.
- Now, let?s change the audio configs. Type below command to edit the asound.conf file.
- Add below lines in the file. Then press Ctrl+X and after that Y to save the file.
This will set your external mic (see pcm.mic) as the audio capture device (see in pcm!.default) and your inbuilt sound card (card 0) as the speaker device.
- Create a new file named .asoundrc in the home directory (/home/pi) by issuing following command and paste above configurations (which you added in /etc/asound.conf file.) to this file.
Step -2: Setting up your speaker output.
- Connect your speaker to 3.5mm headphone jack of the Raspberry Pi.
- Run below command to open raspberry pi configuration screen.
- Go to Advanced Options > Audio and select the desired output device.
Step -3: Test the mic and speakers.
- To test your speaker run below command in the terminal. This will play a test sound. Press Ctrl+C when done. If you are not able to hear the test sound check your speaker connection.
- To test your mic run following command. This will record a short audio clip. If you get any error check step 1 again.
- Play the recorded audio and confirm everything works correctly by issuing following command.
Okay. Our hardware is set.
Step -4: Download required packages and configure Python environment:
- First, update your operating system.
- Run below command one by one in the terminal.
This will create Python 3 environment (As the Google Assistant library runs on Python 3.x only) in your raspberry pi and install required dependencies.
- Activate the python environment.
- Now, install the Google Assistant SDK package, which contains all the code required to get the Google Assistant running on the Raspberry Pi. It should download the Google Assistant Library and the demo.
Step -5: Enabling the Google Assistant cloud project.
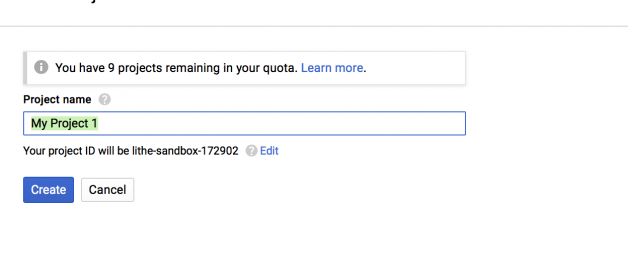
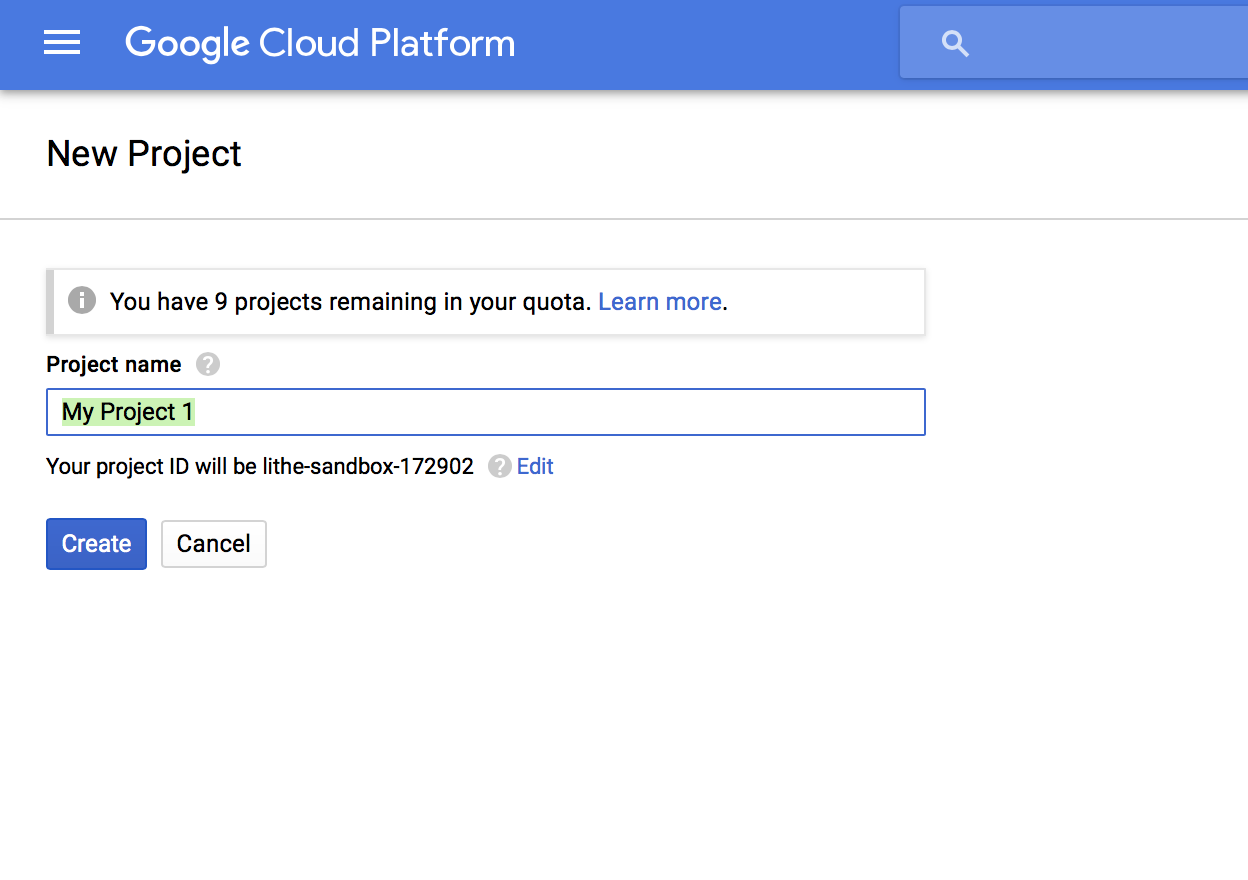
- Open the Google Cloud Console and create a new project. (You can name it whatever you want.) The account with which you sign in will be used to send queries to Google Assistant and get your personalized response.
- Head over to API manager and enable the Google Assistant API.
- – Make sure that you enable Web & App Activity, Device Information and Voice & Audio Activity in Activity Controls for the account.
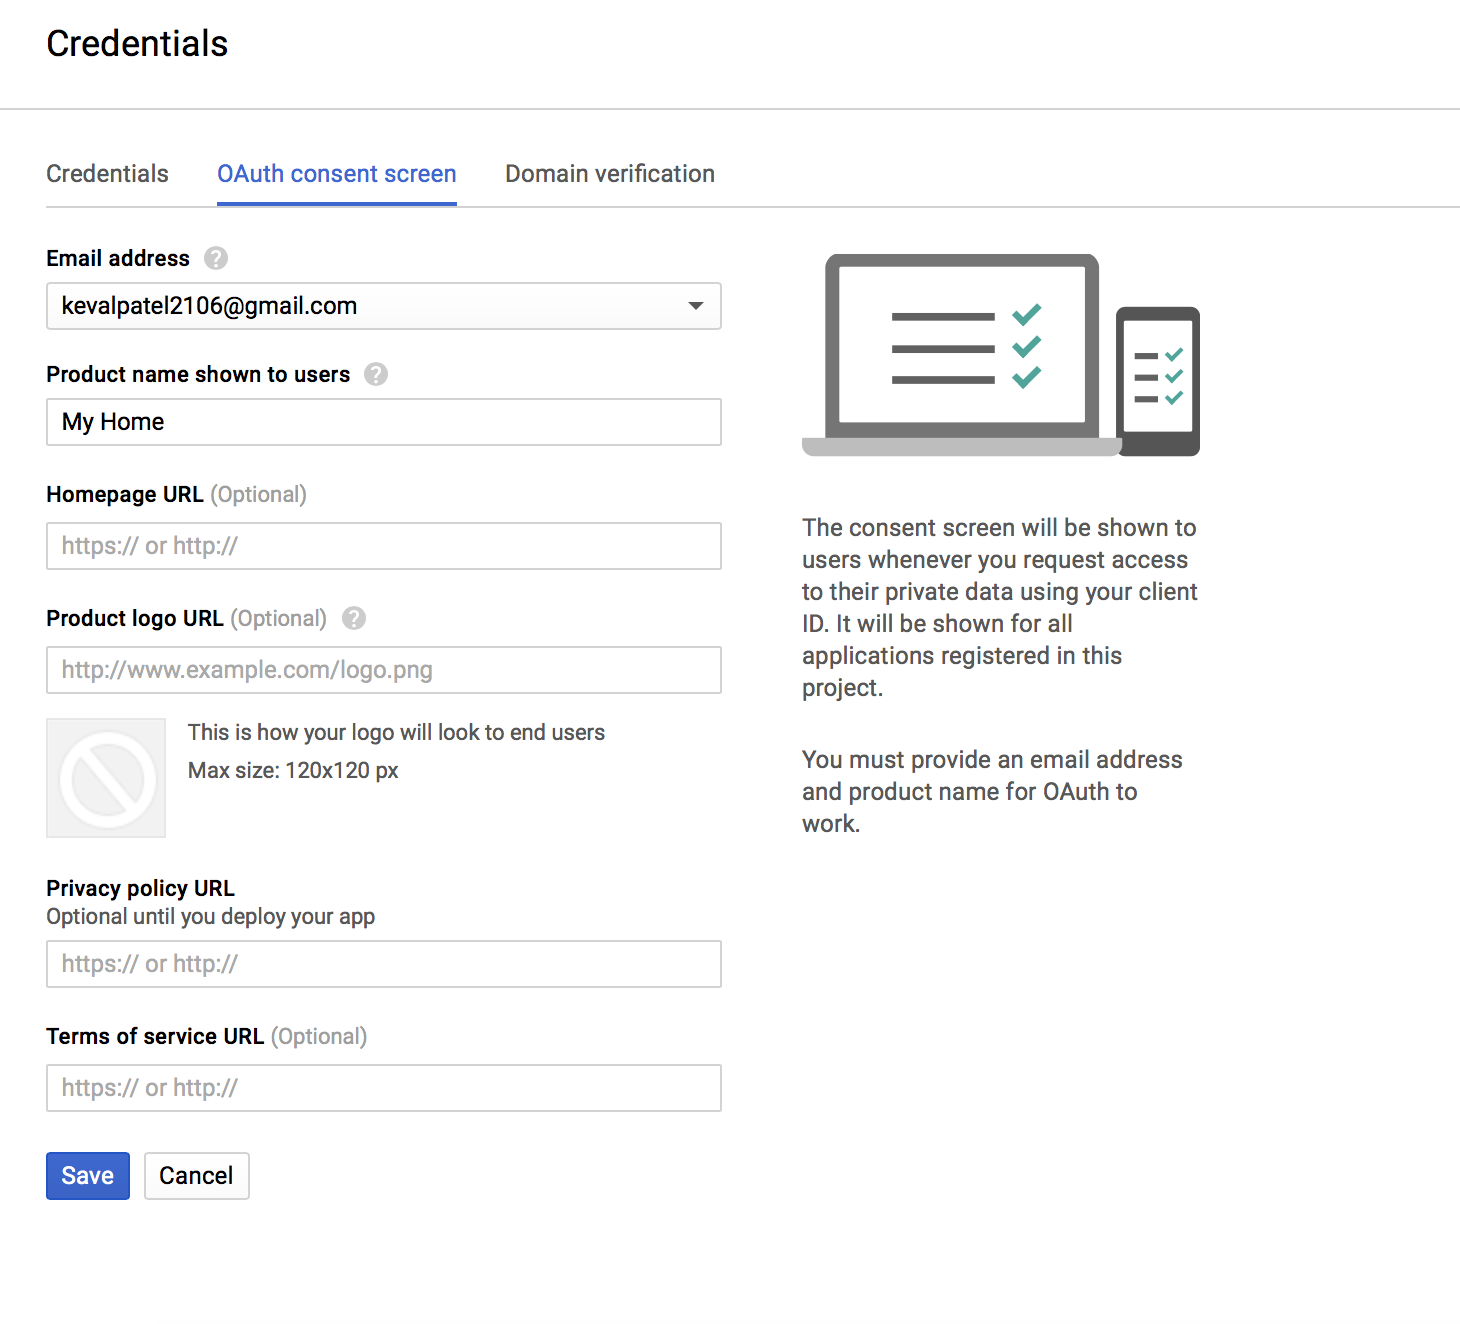
- – Go to ?Credentials” and set up OAuth Content Screen.
- Go to ?Credentials? tab and Create new OAuth client ID.
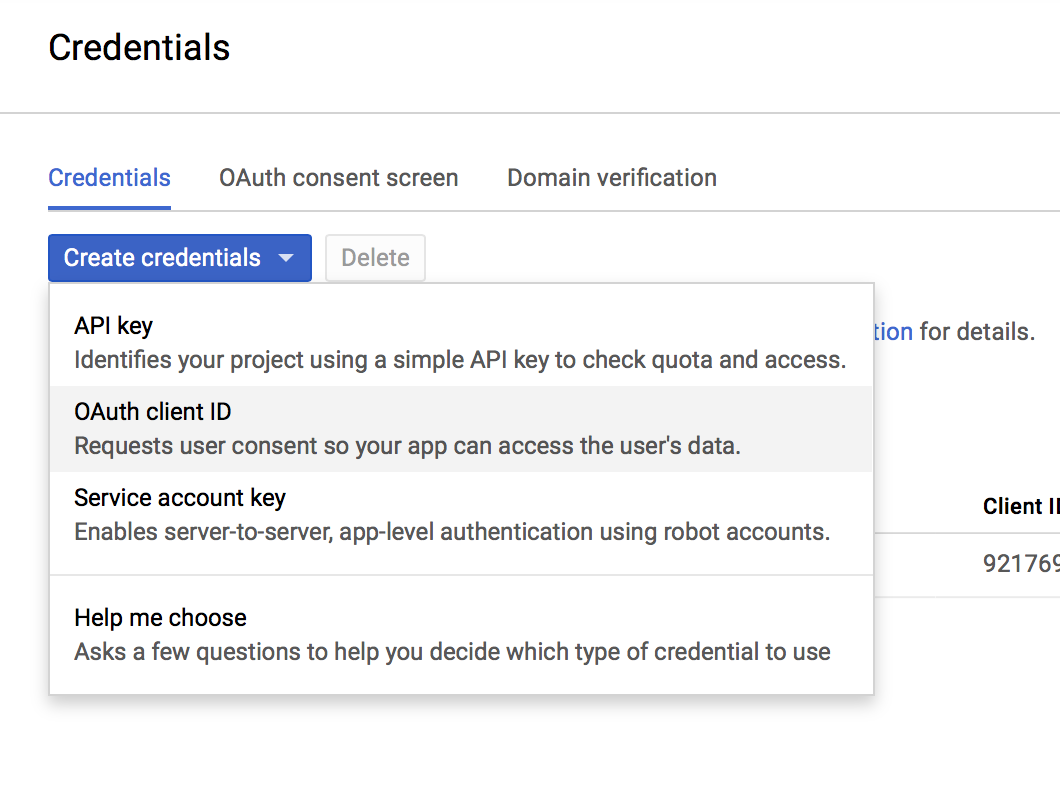
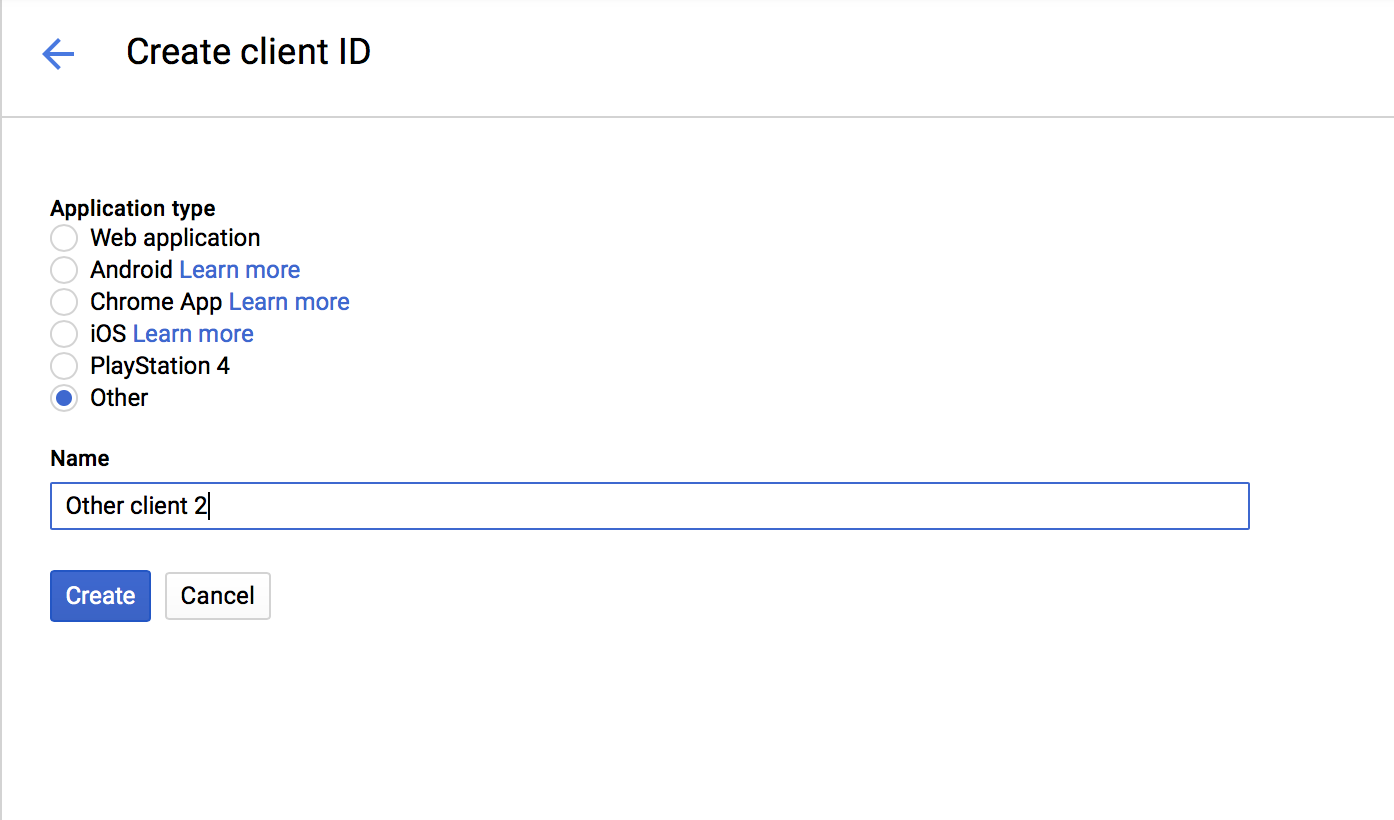
- Select application type as ?Other? and give the name of the key.
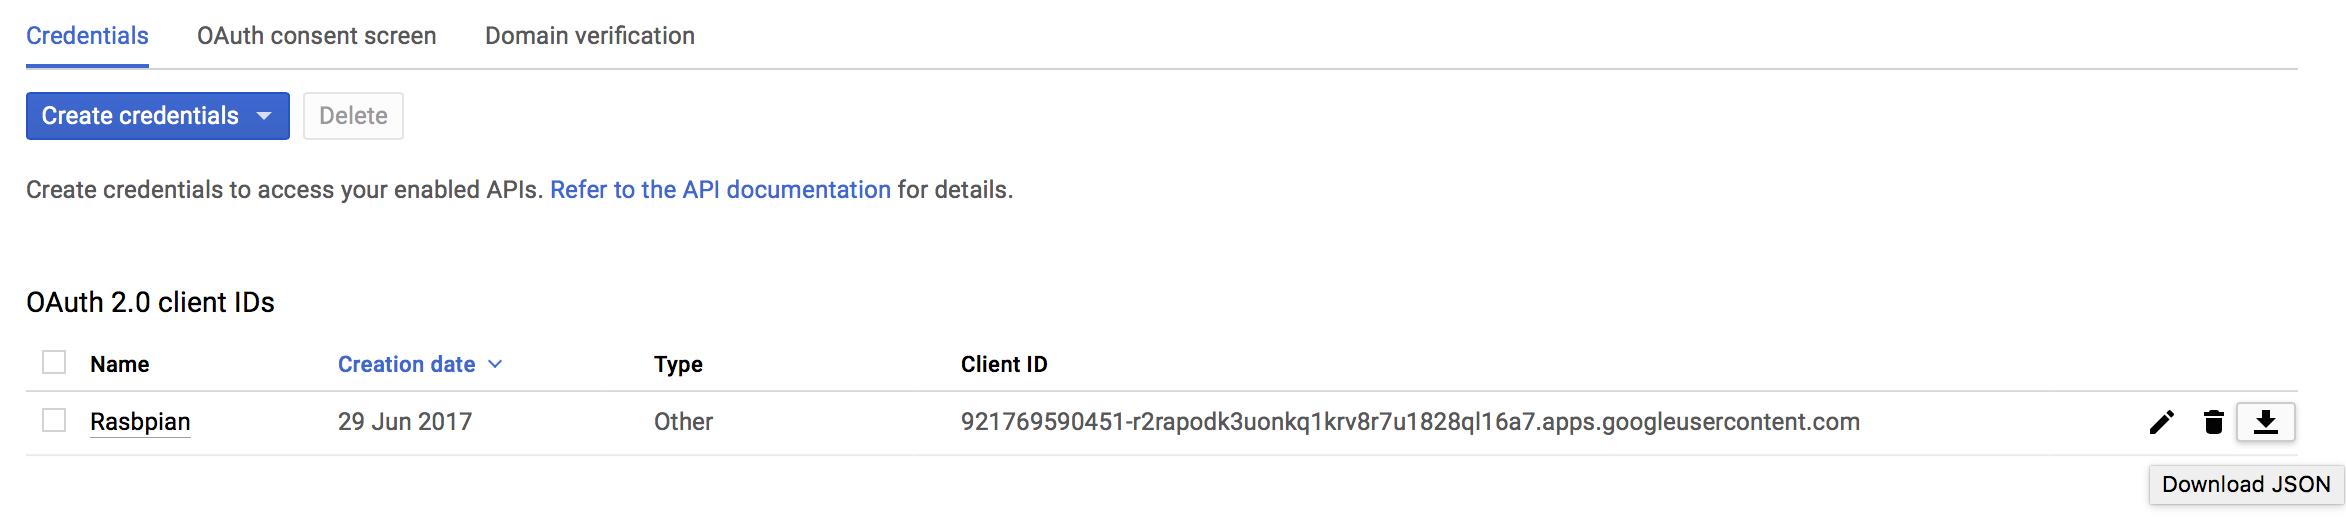
- Download the JSON file that stores the OAuth key information and keep it safe.
Step -6: Authenticating your Raspberry Pi.
- Install authorization tool by running below command.
- Run the tool by running following command. Make sure you provide correct path for the JSON file you downloaded in step 5.
- It should display as shown below. Copy the URL and paste it into a browser (this can be done on your developmen
If instead, it displays: InvalidGrantError then an invalid code was entered. Try again.
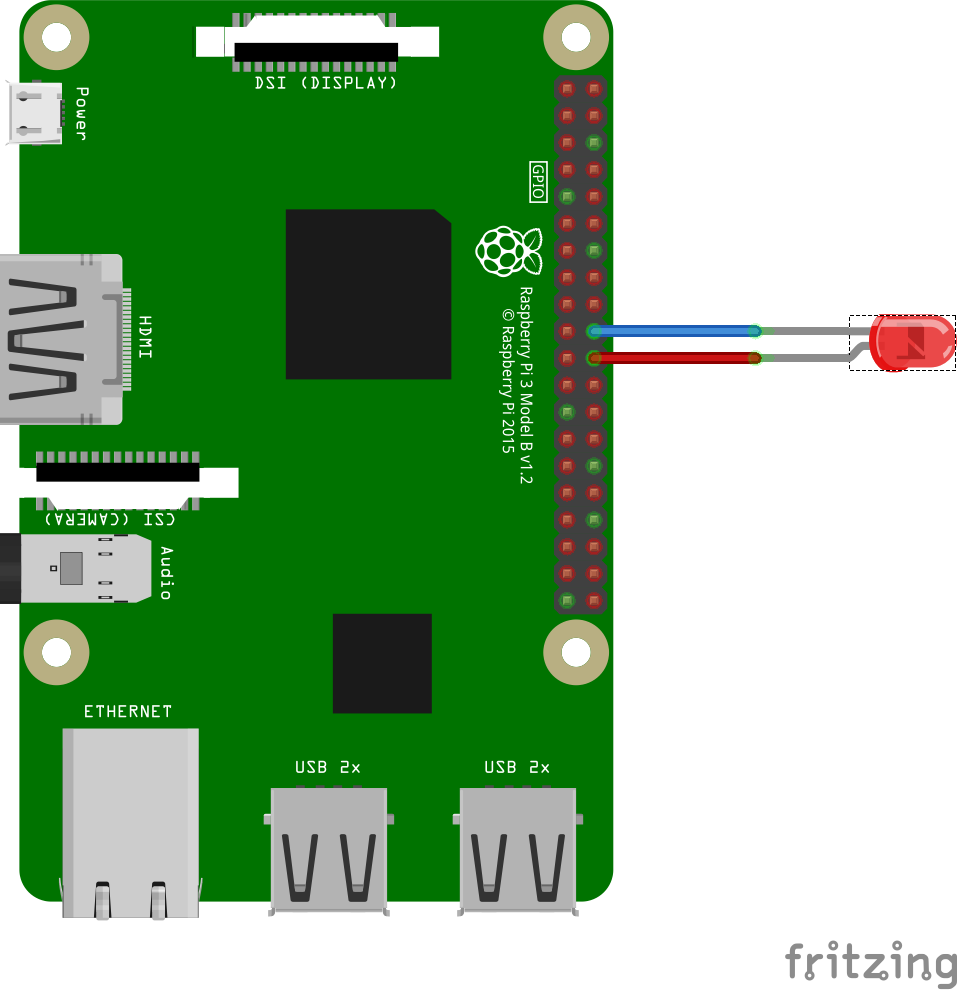
Step -7: Setting up the LED indicator.
- Connect your LED between GPIO pin 25 and ground.
- The idea here is simple. We are going to set the GPIO pin 25 as the output pin. Google Assistant SDK provides a callback EventType.ON_CONVERSATION_TURN_STARTED when the conversion with the Google Assistant begins. At that point, we are going to set the GPIO 25 to glow the LED. Whenever the conversation terminates EventType.ON_CONVERSATION_TURN_FINISHED callback will be received. At that point, we will reset the GPIO 25 to turn off the LED.
Step -8: Initialise on boot complete:
- Whenever your Raspberry Pi completes boot process, we will run a python script that will authenticate and initialize the Google Assistant on boot.
- First add RPi.GPIO package to add GPIO support using following command.
- Go to the user directory. Create new python file main.py.
- Write following script and save the file.
- Now create one shell script that will initialize and run the Google Assistant.
- Paste below lines into the file and save the file.
- Grant the execute permission.
You can run google-assistant-init.sh to initiate the Google Assistant any time.
Let?s see how you can start the Google Assistant while booting.
- To enable Google Assistant on Boot there are two ways. Let?s see each of them.
1. Autostart with Pixel Desktop on Boot:
- This will start the Google Assistant as soon as Pixel desktop boots up. Make sure you have ?Desktop? boot selected in Raspberry Pi configurations.
- Type below command.
- Add the following after @xscreensaver -no-splash
- Save and exit by pressing ?Ctrl+X? and then ?Y?.
2. Autostart with CLI on Boot:
- This will start the Google Assistant if you have set CLI boot. Make sure you have ?CLI? boot selected in Raspberry Pi configurations.
- Type below command.
- Add below line at the end of the file.
- Save and exit by pressing ?Ctrl+X? and then ?Y?.
That?s all!!! You ?Homemade Google Home? is now ready. Reboot the device and ask your first question to your Google Assistant.
Conclusion:
You can do many daily stuff with your Google Home. If you want to perform your custom tasks like turning off the light, opening the door, you can do it with integrating Google Actions in your Google Assistant. If you have any trouble with starting the Google Assistant, leave a comment below. I will try to resolve them.

~If you liked the article, click the ? below so more people can see it! Also, you can follow me on Medium or on My Blog, so you get updates regarding my future articles!!~


