

This article aims to explain the basic concepts of Redux and React Redux as simply and as clearly as possible, both through theory and examples by building two very simple applications.It is divided into two parts ? Redux alone and React-Redux (implementing Redux in React):
- In the first part, we?re going to take a look at Actions, Reducers and Store in Redux.Then, we are going to implement Redux in a simple, vanilla JavaScript application.Finally, we?ll talk about initializing our application state and wiring our application with the Redux DevTools browser extension.
- In the second part, we are going to implement the same Redux application in React and learn about React-Redux, the package that lets us connect with Redux from our React components.
The GitHub links to both projects:
- First application (Redux with vanilla JS)
- Second application (React with Redux)
Note:
- Throughout both parts, I will assume that you have a solid understanding of JavaScript and EcmaScript 6/7
- Throughout the first part, I will assume that you have worked with NodeJS before (and have NodeJS and NPM installed on your computer) and at least know what Webpack and Babel are.
- We are going to be using NPM throughout this article. If you are using yarn, please refer to the installation pages of both Redux and React-Redux documentation.
- Throughout the second part, I will assume that you are comfortable building a more complex application than a ToDo application in React and know what HOCs (Higher Order Components) are.
- We won?t write any styling in order to keep everything as simple as possible. I know what it?s like when someone throws at you a bunch of unnecessary stuff at once for no reason and leaves you confused.
- I won?t enforce using any Redux browser extensions. We?ll take a brief look at the Redux DevTools extension at the end of the first part of the article, but I would highly encourage you to get more familiar with it, since you are very likely to use it in almost all of your projects.
- I won?t compare Redux with similar libraries like Flux. If you are interested in such topics ? consider researching it on your own.
- I would suggest that after reading this article you go over the docs of both Redux and React-Redux, since we can?t cover everything in this article alone.
Also, I don?t want this to be another ToDo tutorial (I?m sick of ToDo tutorials myself, it?s like Hello World v2.0), so we?re going to make an application for writing notes instead in which the user will be able to specify a title and a content for each note.
And without further ado, let?s start learning!
Part One ? Redux
Redux is a popular JavaScript library for managing the state of your application. It is very common and if you are working with React, chances are ? you?ve already heard about it.
For those of you who have no idea what an application state is: it is like a global object which holds information that you use for various purposes later in the app (e.g. making decisions on which components to render and when, rendering the stored data etc).
An example that we face often is to display a loading indicator while the page is loading. In this case, if we used the store only for that purpose alone, the state object would store a boolean field whether the page is loaded and we?d use that field to toggle the display of the loading indicator.
Another example is ? if we were to build a social media application, we would store several objects and arrays inside our application state? the current user?s information, the current posts that we would render in News Feed, the current stories from the profiles the user is following etc.
There are no rules as to which data should be kept in Redux, so, it?s all up to you. However, bear in mind to always store only serializable data.
Big applications have big application states and managing them gets more and more inconvenient as your app grows.That?s why we need state management libraries like Redux.
The way Redux works is fascinating and yet, so simple. Its pattern is very intuitive and its function names are self-explanatory. Trust me, you?re going to love it!
Before we dive into Redux, I want to mention two crucial patterns that Redux follows (and I would highly recommend you to always keep this information in the back of your mind while writing your Redux applications!):
One pattern that Redux follows is called ?Single Source Of Truth?, which means that we have only one place (called Store) where we store the only state for the whole application.In other words, one app ? one store ? one state.
However, components in React or other frameworks are free to contain their own internal state as well. Normally, you wouldn?t want to put literally everything in the application state.
Another pattern that Redux follows is called ?immutability?. And you will find this term quite often in other frameworks and libraries as well.
In short, immutability means that we don?t change the state object and its properties directly. Instead, we make a new object, recalculate the new application state and update it with our newly created object. We want to leave our old state object intact.
The three building blocks of Redux
 The three building blocks of Redux ? Actions, Reducers and Store
Redux has 3 main parts:
- Actions
- Reducers
- Store
Store
As you?ve already guessed, the store hold the state of the application.The store is actually an object, not a class, although it may feel like one at first. It contains a few extra things other than your application?s state as well (like functions and other objects).
Although, theoretically, it is possible to create multiple stores, this is against the pattern that Redux follows.Remember, we create only one store per application!
We can subscribe to listen to events whenever the store updates. In a non-React app, we might use this subscription to update the UI, for example, as we will be doing in our application.
The state in Redux is in the form of a JavaScript Object and is often referred to as the ?state tree?. You can put whatever values you want to store in it and you can nest them as much as you need.
Actions
Actions are plain JavaScript objects that describe WHAT happened, but don?t describe HOW the app state changes.
We just dispatch (send) them to our store instance whenever we want to update the state of our application. The rest is handled by the reducers, which we will familiarize ourselves with in just a moment.
One important thing to remember is that Redux requires our action objects to contain a type field. This field is used to describe what kind of action we are dispatching and it should usually be a constant that you export from a file.All other fields in the action object are optional and are up to you.
For example: In the app that we?re going to be building, whenever the user clicks the ?Add Note? button, we will dispatch to our store something similar to the following action:
Notice, we are not handling any logic about how the store changes. We are only informing the store that we would like to add a new note with the provided title and content.The title and content fields are optional. The type field, as we said, is mandatory.
Another term that you?ll often encounter is Action Creators.They are basically functions that generate and return plain JavaScript objects. They are used so that we can ?insert? dynamic data in our actions (or generate actions with dynamic data, in other words). In our case ? we would have a function that accepts two parameters ? title and content and it would return a plain JavaScript object with the information we provided.
An action creator example
Reducers
Reducers are pure functions that define HOW the app state changes. In other words, they are used to recalculate the new application state or, at least a part of it.
Whenever we dispatch an action to our store, the action gets passed to the reducer.The reducer function takes two arguments: the previous app state, the action being dispatched and returns the new app state.
(previousState, action) => newState
In other words, the reducer will calculate the new state of our app based on the action (and its type) we dispatched.
In a real-world application, your reducers most probably will get very complex. To deal with reducer complexity, we chunk them down in multiple, simpler reducers and later, we combine them with a Redux helper function called combineReducers.
The main reducer is conventionally called Root Reducer.
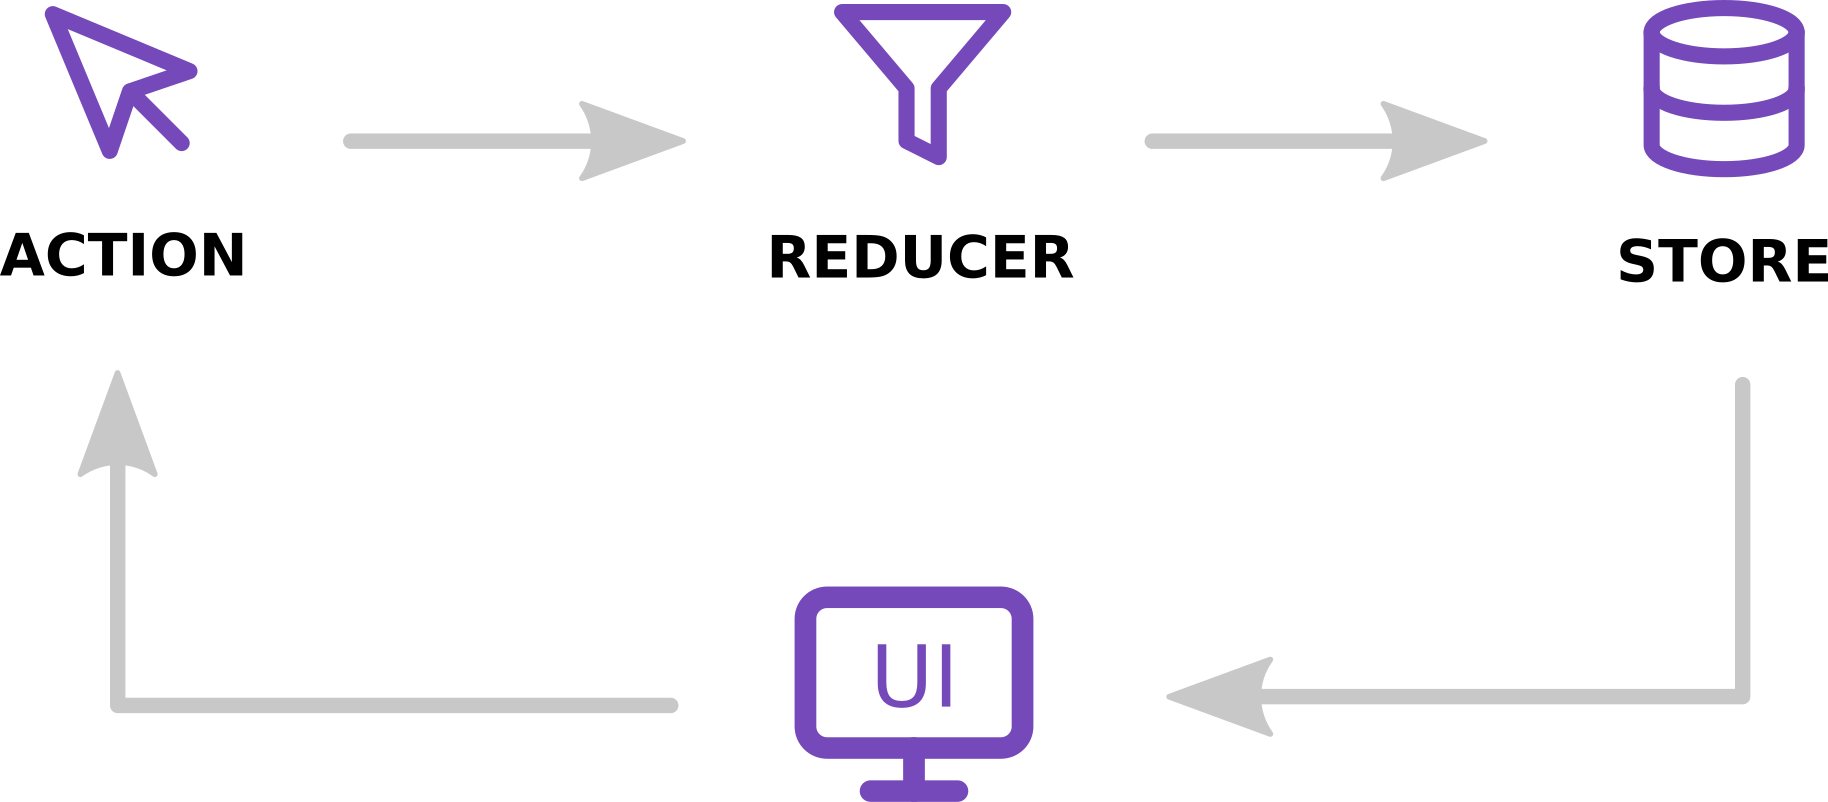
Data Flow
Although it looks a bit complicated at first, the data flow in Redux is actually pretty simple.
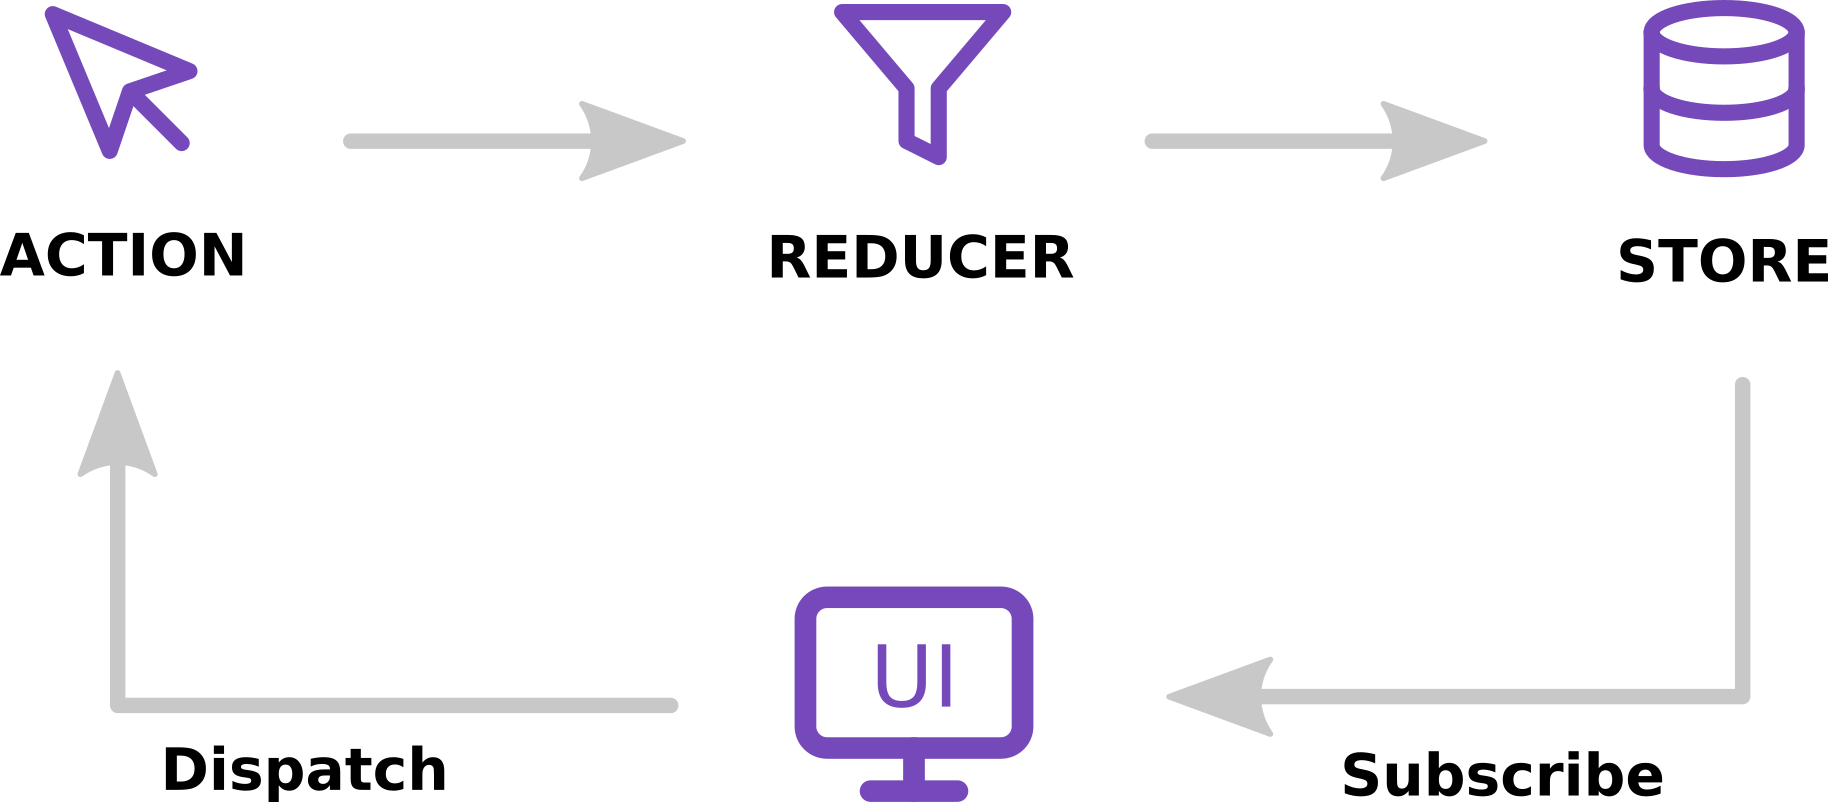 Data flow in Redux
Let?s say that the user triggers an event (for example, clicks the ?Add Note? button) and the app state updates (i.e. a new note is inserted into the app state). Here?s what happens under the hood:
- The button click handler function dispatches an action to the store with the store.dispatch() method
- Redux passes down the dispatched action to the reducer
- The store saves the new state returned by the reducer
- Since we have subscribed to the store, the function we provided will be called and it will update the UI accordingly (i.e. append the new note in the list of notes)
Setting up our app
Let?s now start creating our first application.
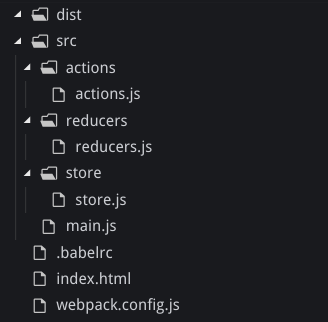
- If you?re on Linux, just navigate to your projects directory and paste this in the terminal. It?ll save you the trouble from having to create all the necessary files and folders by hand:
mkdir -p redux-notes-app/{dist,src/{actions,reducers,store}} && cd redux-notes-app && touch {index.html,.babelrc,webpack.config.js,src/{actions/actions.js,reducers/reducers.js,store/store.js,main.js}}
- If you?re not on Linux, create the necessary files and folders manually and make sure your folder structure is the same as mine:
- Inside your new project?s directory run the following commands:
npm init -ynpm i reduxnpm i webpack webpack-cli @babel/core babel-loader @babel/preset-env –save-dev
- Inside the webpack.config.js file insert the following content
The webpack.config.js file
- Inside the .babelrc file, add the following content
The .babelrc file
Inside the package.json file, add the following line in the scripts object
“dev”: “webpack –watch –mode=development”
- Finally, run
npm run dev
And let?s get down to business!
Defining our App State
Before you even start writing code, it?s always a good practice to get a piece of paper and write down all the features of your application, draw schemes about how everything is interconnected and try to work out what you need in the application state and how the app state should look like at the end.
In other words, don?t jump straight into writing code and do some planning instead!
?Every minute you spend in planning saves 10 minutes in execution; this gives you a 1,000 percent Return on Energy!? ? Brian Tracy
At the end, let?s assume that our application state is going to look like this:
{ notes: [ { title: ‘Note 1 Title’, content: ‘Note 1 Content’ }, { title: ‘Note 2 Title’, content: ‘Note 2 Content’ }, … { title: ‘Note N Title’, content: ‘Note N Content’ } ]}
Each object inside the notes array will represent a single note.
In other words, our app state will be a very simple object consisting of only one property, notes, which will be an array of objects(individual notes).Since we?re not using an API, we?ll assume that the IDs of the notes will be their indexes in the array ? hence the missing ID field in the final note format.
Initial code
I?ve prepared some initial code that we?re going to need for our application. Insert the following code in your index.html file:
index.html
Now insert this code in your src/main.js file:
stc/main.js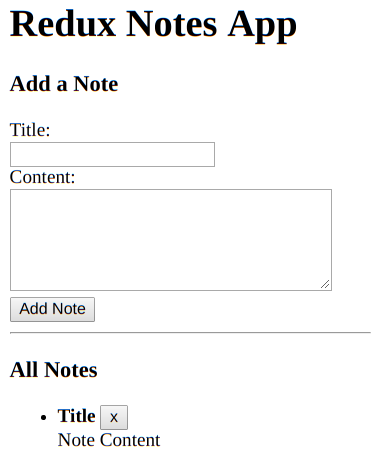 Result (our initial index page)
As you can see, we have quite a simple form with only title and content fields.This form will be used for adding new notes.
The ul#notes is where we?ll be rendering all of our notes as list items.There is one hard-coded list item that serves as a template for what our notes will look like, which we will remove from our code right away.
We will let the user delete their notes as well by pressing the button right to the note?s title. The data-id attribute on the button will help us get the id (index) of the note we?ll be deleting, thus giving us the idea about which note we should delete.
Actions
Now that we know what we?re going to do, let?s start creating an action for adding a note.Inside actions.js, we?re going to add our initial code:
src/actions/actions.js
Let me go line by line here to explain what?s going on:
- We are exporting a constant ADD_NOTE, since we?re going to be needing it in several places later on.Yes, we could?ve gone everywhere writing the string ?ADD_NOTE?, but that?s just bad, bad practice! Imagine your project growing huge and out of the blue your boss says: ?rename the ADD_NOTE action to ADD_NEW_NOTE?. See where I?m going with this?
- We are exporting the function addNote. As we?ve discovered earlier, this function is an action creator, which means that its job is to only return a plain object. And notice ? it?s not doing any logic. It just returns an object. Because, as we said before ? actions define WHAT changed, not HOW!
This is the convention of Redux about actions.It might look a little weird, but exporting constants and action creators is the most logical way to go about it, trust me.
Reducers
Before we create the store and start dispatching actions, let?s create our main (root) reducer first:
src/reducers/reducers.js
As you can see, we are declaring an initial state object for our reducer, which in this case, turns out to be the state of the entire application because this is the only reducer in our app.
Just like we said before, reducers receive 2 parameters ? previous state and the action being dispatched.We are checking what the action type is and depending on its value, we are returning the new state.
Remember, we NEVER modify the state directly! We want to keep all our reducers immutable!Notice, after all our cases are exhausted, we simply return our app state (more on this later, but this has to do with Redux initialization).
Note:
case ADD_NOTE: return { notes: [ …state.notes, { title: action.title, content: action.content } ] };
Here, we are returning the entire new state object of our app and we assume that the notes property is the only property of our new state.If we had other properties in our previous state, they would get lost because we are not keeping them.
In a case where you have other properties and you don?t want them to get excluded from your new state, use the spread operator before or after the notes property:
case ADD_NOTE: return { …states, // <- like so notes: [ …state.notes, { title: action.title, content: action.content } ] };
One more thing: if the switch statement is hurting your eyes, you are fine going with if statements as well! However, more often than not, you will reach for the switch statement.
Store
Let?s now create our app store!
src/store/store.js
Redux has this createStore function, which is remarkably simple and self-explanatory ? it is used for creating the application?s store.It accepts 3 arguments (the last 2 are optional), but for now, we?re going to use only the first one, which accepts the root reducer of your application.
Next, we?re going to import the store in our main.js file and dispatch some actions to see what our state looks before and after adding a few notes.
Excerpt from src/main.js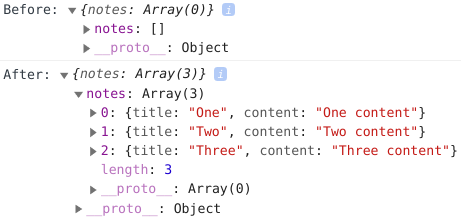 Chrome DevTools console
Adding Notes
To add a new note, we?ll simply add 3 new lines in the form event handler:
Excerpt from src/main.js
All we?re doing is simply dispatching an action to our store!Our action creator object returns an object with the title and content values we are feeding it, which in fact are the content we put into our form fields. And that?s it!
(re)Rendering Notes
As we mentioned earlier, the store in Redux is an object. It has a function called subscribe, which we can use for subscribing to changes made to the state tree, i.e. whenever we dispatch an action to the store.We?ll use the subscribe method to our advantage and use the subscription to re-render our notes.
Note: we?re going to simply re-render all the Notes in our unordered list.Conversely, if you?re using a framework / library like React, Angular or Vue, there?s probably going to be some optimized diffing algorithm that will calculate what needs to be updated and save you the trouble of having to do this on your own or even completely re-rendering stuff in your DOM, like we do.
We?re first going to update our renderNotes function:
Excerpt from src/main.js
And we?re now going to subscribe to the store:
Excerpt from src/main.js
Now, go back to your page and try to add a new Note!It feels like magic, doesn?t it?!
Unsubscribing from the store
If you want for some reason to unsubscribe from the store, the store.subscribe function returns a function. Thus, by calling that function we unsubscribe from the store:
Removing Notes
First, we?ll go to our actions.js file and add a new constant and a new action creator.
Excerpt from src/actions/actions.js
Next, we?ll go to our reducers.js file and add a new case to our switch statement (remember to import REMOVE_NOTE as well).
Excerpt from src/reducers/reducers.js
Finally, we?ll update the deleteNote function in main.js.
Excerpt from src/main.js
Voil! Now our users can delete notes. As easy as pie.
Initializing State
Before we get into initializing our app state, it would be wise to take a second look at reducers and really understand what?s going on:
1) Each reducer has its own state, which might be different from the app state (in cases when you have more than one reducer).Now, because we only have one reducer (the root reducer), it ends up being the state of our app.
2) When Redux initializes our app, it sends an action that won?t satisfy any of our cases in the switch statement.In fact, if we log the action type it in the console, this is what we?ll get the first time we visit the page:
![]() Chrome DevTools console
Chrome DevTools console
Because we didn?t supply an initial state of the app, the state is undefined, so it defaults back to our initialState object.
3) Your apps will most likely have more than one reducer, because I bet they will be more complex than a simple note / todo application. In that case, you will be writing multiple reducers.
Redux provides a function called combineReducers that lets us combine multiple reducers and pass them down to the createStore function as if they were a single reducer.
Here?s where it gets interesting:Inside the combineReducers function, we pass an object of our reducers. Each reducer handles its own part of the application state (reducers now don?t care about the app state as a whole). Redux then builds the state of the application from all the keys and values of the object.
First, we?ll crate a new file notesReducer.js inside the src/reducers directory to which we will move the code from the src/reducers/reducers.js file and modify it a little:
src/reducers/notesReducer.js
Note: I?ve changed the first parameter from state to notes.Since our reducer will only manage notes, it will always return only an array. Any other piece of the state won?t be passed down in the reducer!
Next, we?ll add another reducer. Let?s call it visibilityFilter. It will handle filtering notes by visibility.Note: Because this article is getting really huge, we won?t write the UI for this part or extend the the visibility filter feature. That?ll be for your homework!Hint: To utilize the visibility filter, one option would be to add a tags field in your note objects. Then, add a couple of tags (e.g. archived and important) and add actions for changing the tags of a single note. Finally, add a select element that will help show only the notes tagged with archived, important or all notes.
src/reducers/visibilityFilter.js
Notice how we deal with only the visibility part of the state and we?re not interested neither in the notes part of the application state nor the whole app state? That?s why Redux is so powerful and awesome!
In the actions.js file, insert the following content:
Excerpt from src/actions/actions.js
We are now going to combine the reducers in our reducers.js file.
src/reducers/reducers.js
Finally, let?s rewrite the store.js file to be more descriptive:
src/store/store.js
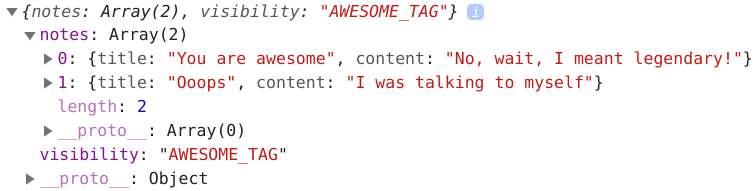
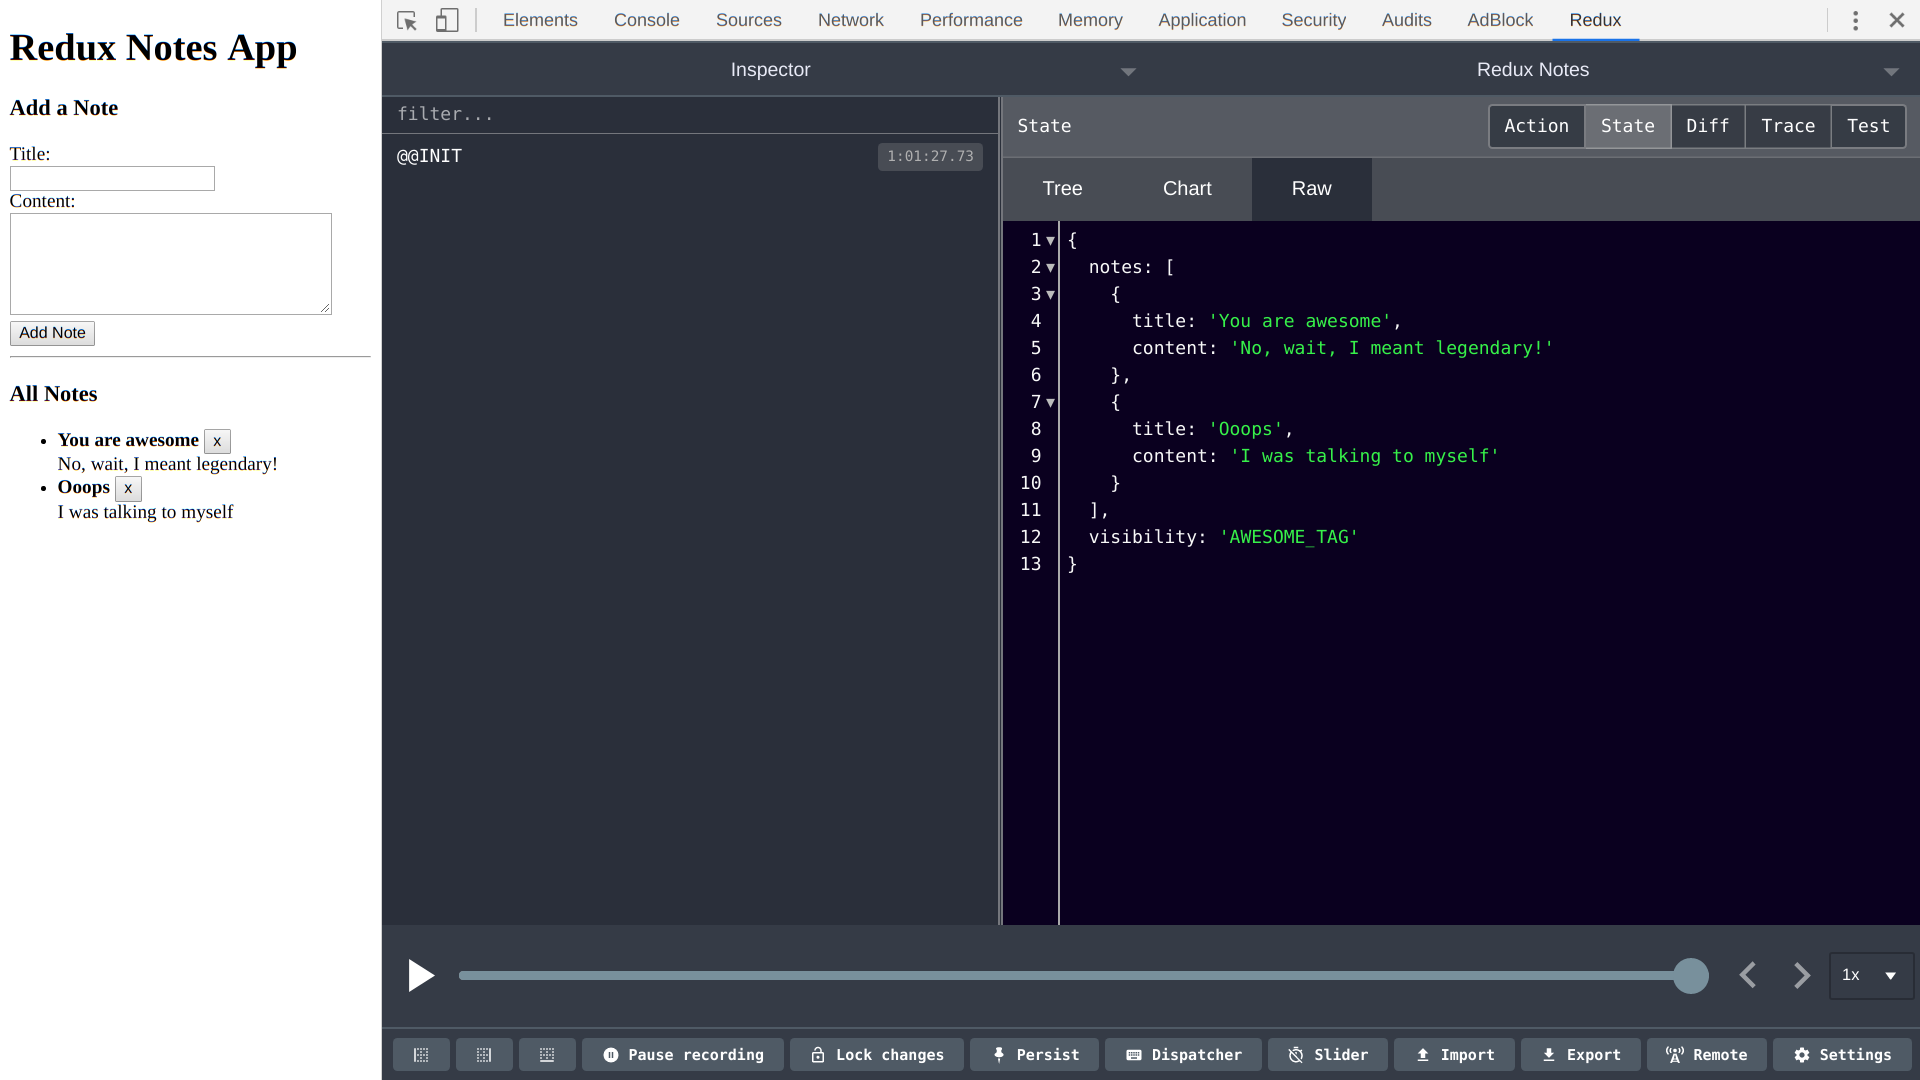
If we now try to log our state application in our main.js file, this is what we?ll get:
![]() Chrome DevTools console
Chrome DevTools console
See? Our state ended up as an object with the keys that we provided in the combineReducers function and each of our reducers manages its own piece of the state. Beautiful!
4) As the second parameter of the createStore function, we can supply the initial state of the application. This will overwrite any default values we have in our reducers.
 Our application?s initial state after being logged in Chrome?s DevTools console
For example, if we kept a copy of our previous app?s state in local storage, we would?ve gotten its value before supplying it as a second parameter.However, make sure you only feed the second parameter synchronous data (the local storage API is synchronous, so no trouble there!).
?All right, but what if I want to load my initial state from an API instead??.
Well, in that case, you want asynchronous initialization of your state. Do the API call in componentDidMount() if you are using React (or some equivalent lifecycle event if you are using another library / framework) in your root component and then dispatch an action for setting the initial state of the app (or dispatch multiple actions instead ? whatever you prefer).You might also want to take a look at this package as well.
Connecting our app with Redux DevTools browser extensions
The Redux DevTools extension is a very powerful tool.I didn?t want to force you using this until you were ready because I?m sure it would?ve felt a little overwhelming in the beginning of this article.
Anyway, add this line as the third parameter of the createStore function:
window.__REDUX_DEVTOOLS_EXTENSION__ && window.__REDUX_DEVTOOLS_EXTENSION__()
This is how your store.js file should look like now:
src/store/store.js
If you?re not supplying an initial state of your application, just pass undefined as the second parameter and it should be okay.
 Feel free to explore the Redux DevTools extension on your own
For more complex apps, however, make sure you check out the Redux DevTools extension docs.
The third parameter in the createStore function is where we?d put enhancers such as middleware in Redux. Since that is out of this article?s scope, which is already long enough, I will leave you eager to pay a visit to the advanced section in the Redux docs.
That?s it about our first project. You can find it on GitHub here.
Part Two ? React-Redux
There is a package called react-redux which we use to wire up our React components with Redux.
You can install both Redux and React-Redux packages by opening up a terminal window in your React project?s directory and executing the following command:
npm i redux react-redux
Note: for the sake of keeping this example as simple as possible we won?t implement the visibility filter in this project.
First and foremost, there are two things we need to know about React-Redux:
1) React-Redux provides a React component called Provider, which makes our application store available throughout our entire application.This is done by surrounding the App with the Provider component in our index.js file and passing the store as a property to the Provider component.
Using the Provider component
The store is a plain Redux store, just like the one we created before.
2) React Redux provides a connect function. We use this function whenever we want to ?connect? a component to Redux, i.e. make a React component interact with our Redux store.
Note: We almost never access the store directly. We just fire actions creators and all of the logic later is handled automatically by the connect function.
This function is actually a Higher Order Component.It returns a function to which we supply the class name of our component (notice the extra parentheses after the connect function in the later example).It also takes in two optional arguments: mapStateToProps and mapDispatchToProps.
The first argument, mapStateToProps, has to do with subscribing to the store by mapping store values in our component?s properties.If we want to subscribe to the store, we provide a non-null first argument. Otherwise, if we don?t want to subscribe to the store, we provide null as the first argument.
The second argument, mapDispatchToProps, has to do with injecting action creators in our component?s properties. If we don?t want to inject any action creators at all, we provide null as the second argument.
mapStateToProps
This is the first argument of the connect function.As its name suggests, we map part of our application state into the actual properties of our component.
mapStateToProps is actually a function which takes the entire state of our app as its first argument and returns an object of data that our component will need, i.e. the first parameter is equivalent to store.getState() .
mapStateToProps takes an optional second argument, which lets you use some of the component props. This can be useful when we need additional information from the component?s props to retrieve data from the store.
(state, ownProps?) => stateProps
mapStateToProps is called every time our app state changes (the state parameter) or any field of the ownProps object changed.Further, our component will re-render when either ownProps or stateProps is different, which means we?ll always get the most recent values from the state.
mapDispatchToProps
As we previously mentioned, this argument is used for mapping (injecting) action creators to the component?s props.
mapDispatchToProps can actually be either an object or a function. The official React Redux documentation recommends it to be an object and to be fairly honest, most of the time that?s what you?ll go with.
In the case when it is an object, the keys will be mapped to the component?s props. From there, we can call the action creator function to persist the new note to the state.
mapDispatchToProps use case
However, note that as we mentioned before, in React we don?t access the store directly, thus we never call store.dispatch(). We just call our action creator and the rest is handled magically by the connect function.
?What about if mapDispatchToProps is a function, not an object? And when would I want to use it as a function??I?m going to quote this from the React-Redux documentation, since it?s pretty straightforward:
?Defining mapDispatchToProps as a function gives you the most flexibility in customizing the functions your component receives, and how they dispatch actions. You gain access to dispatch and ownProps. You may use this chance to write customized functions to be called by your connected components.?
dispatch and store.dispatch are actually the same thing, while the ownProps, as we already know, are the component props that get passed when creating the component.
There?s one more thing I want to stress out about mapDispatchToProps:The dispatch function will be available out of the box in your component if you don?t provide a second argument in the connect function or the object you returned from the mapDispatchToProps function returns a dispatch field.For more information, visit this link from the React Redux documentation.
Recreating our Notes app in React
For this example, I am using create-react-app to create this fairly simple application.
I rewrote the App component to simply return our Notes component.The Notes component renders two more components ? NotesForm and AllNotes.
We will be keeping our Notes, AllNotes and NotesForm components in our src/Notes folder.
src/App.jssrc/Notes/Notes.js
NotesForm
This component has to do with the form for adding notes.All this component will ever do is dispatch an action to the store for adding a new note. Since we don?t care about the app?s state and we have no intention to subscribe to it, we provide null as the first parameter (mapStateToProps).
src/Notes/NotesForm.js
For the second parameter (mapDispatchToProps), however, we provide an object, through which we map the addNote action creator function we imported from the actions.js file.
The connect function does its magic and by simply calling this.props.addNote() in our component, we dispatch the add note action to the store.
AllNotes
We are going to use this component for rendering all the notes, which are stored in our Redux state. Likewise, we?re going to need to dispatch an action to delete the state.In other words, we?ll have to fill out both parameters in the connect function.
Simply put, we?ll have to subscribe to the state of our application (because we want to display immediately whenever a note gets added or deleted from the state) and map the deleteNote action to our component?s props, since we will be needing it to dispatch an action for deleting the note.
src/Notes/AllNotes.js
That?s it about our second project as well. You can find it on GitHub here.
Conclusion
Congratulations on learning Redux and React Redux!
As your next step, I would highly recommend paying a visit to the official Redux and React Redux docs and reading the advanced guides as well.You might also want to consider the following additional resources that I think might give you a more in-depth understanding of Redux and React Redux.
Resources to consider
- Redux Docs
- React-Redux Docs
- Dan Abramov ?s course on EggHead
- Redux-related videos from Academind, The Net Ninja and Traversy Media
- If you?re using Angular, check out NgRx and NGXS
If you find any additional resources that helped you understand Redux better, please provide them in the comments below so that other people can learn from them as well.
I hope you enjoyed this article and that it at least helped you get a more clear picture about both Redux and React Redux.As a challenge for you, try extending this project by:
- Adding a feature for editing the notes
- Adding an eye-pleasing design to the application and making it responsive
- Improving the UX of the application. Consider adding a form validation as well, to force the users to supply a content, but not necessarily a title for the new note that is about to be persisted to the store.
- Adding labels to the notes and extending the visibility filter which will filter notes to be displayed based on their labels
- Adding an archive functionality and an archive section where all the archived notes will be rendered
- Splitting the root reducer into multiple sub-reducers
- Creating a separate Note component
- Connect this app on the cloud or consider creating an API with your favorite programming language (if you?re interested in back-end development)
- Think out of the box, use your own creativity and create an awesome project on a totally different topic instead!
Best of luck to you on your journey to further Redux mastery!
JavaScript In Plain English
Show some love by subscribing to our YouTube channel!

 you’ll ever need)
 you’ll ever need)