To style text in Android, use spans! Change the color of a few characters, make them clickable, scale the size of the text or even draw custom bullet points with spans. Spans can change the TextPaint properties, draw on a Canvas, or even change text layout and affect elements like the line height. Spans are markup objects that can be attached to and detached from text; they can be applied to whole paragraphs or to parts of the text.
Let?s see how to use spans, what spans are provided out of the box, how to easily create your own and finally how to test them:
Styling text in Android
Applying spans
Framework spans
- Appearance vs metric affecting spans
- Character vs paragraph affecting spans
Creating custom spans
Testing custom spans implementation
Testing spans usage
Android offers several ways of styling text:
- Single style ? where the style applies to the entire text displayed by a TextView
- Multi style ? where several styles can be applied to a text, at character or paragraph level
Single style implies styling of the entire content of the TextView, using XML attributes or styles and themes. This approach is an easy solution and works from XML but doesn?t allow styling of parts of the text. For example, by setting textStyle=?bold?, the entire text will be bold; you can?t define only specific characters to be bold.
<TextView android:layout_width=”wrap_content” android:layout_height=”wrap_content” android:textSize=”32sp” android:textStyle=”bold”/>
Multi style implies adding several styles to the same text. For example, having one word italic and another one bold. Multi style can be achieved using HTML tags, spans or handling custom text drawing on the Canvas.
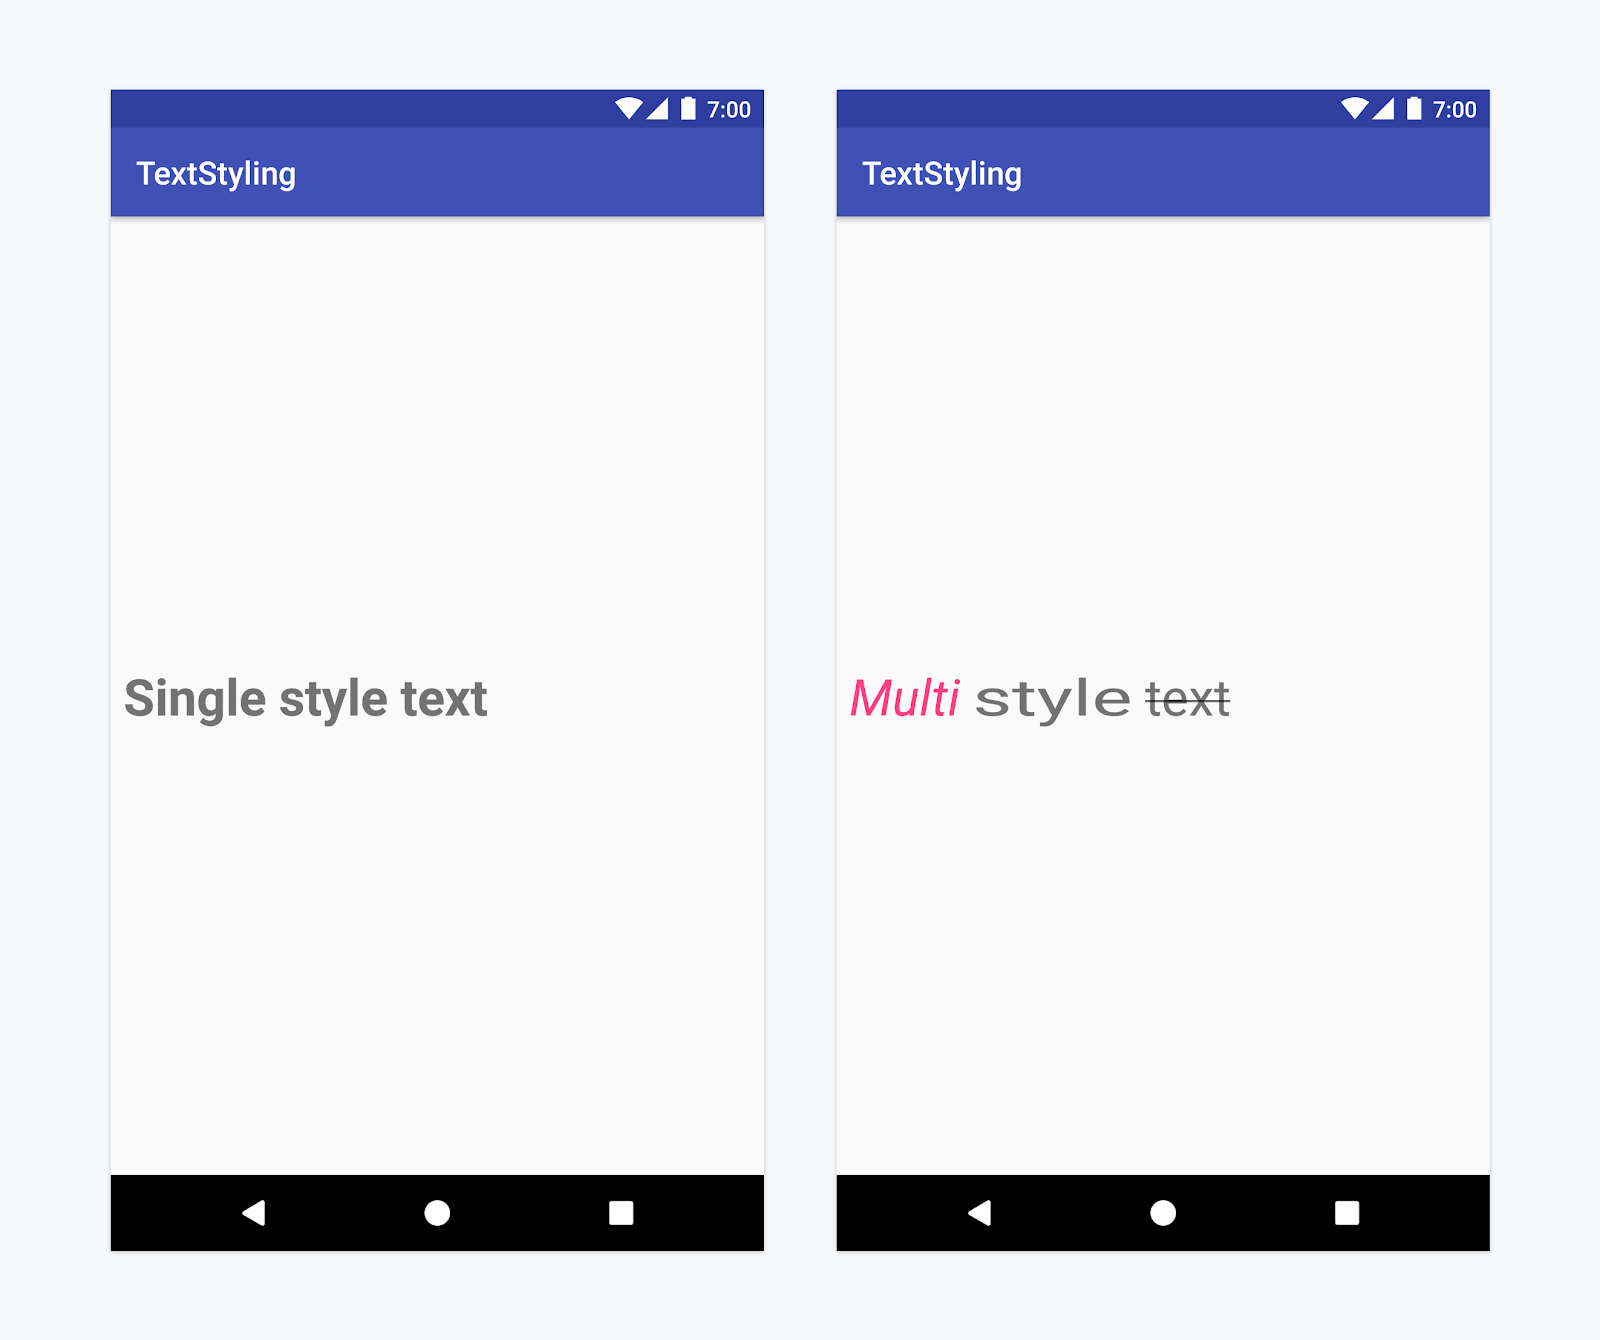 Left: Single style text. TextView with textSize=?32sp? and textStyle=?bold?. Right: Multi style text. Text with ForegroundColorSpan, StyleSpan(ITALIC), ScaleXSpan(1.5f), StrikethroughSpan.
HTML tags are easy solutions for simple problems, like making a text bold, italic, or even displaying bullet points. To style text containing HTML tags, call Html.fromHtml method. Under the hood, the HTML format is converted into spans. Please note that the Html class does not support all HTML tags and css styles like making the bullet points another colour.
val text = “My text <ul><li>bullet one</li><li>bullet two</li></ul>”myTextView.text = Html.fromHtml(text)
You manually draw the text on Canvas when you have styling needs that are not supported by default by the platform, like writing text that follows a curved path.
Spans allow you to implement multi-style text with finer grained customisation. For example, you can define paragraphs of your text to have a bullet point by applying a BulletSpan. You can customise the gap between the text margin and the bullet and the colour of the bullet. Starting with Android P, you can even set the radius of the bullet point. You can also create a custom implementation for the span. Check out ?Create custom spans? section below to find out how.
val spannable = SpannableString(“My text nbullet onenbullet two”)spannable.setSpan( BulletPointSpan(gapWidthPx, accentColor), /* start index */ 9, /* end index */ 18, Spannable.SPAN_EXCLUSIVE_EXCLUSIVE)spannable.setSpan( BulletPointSpan(gapWidthPx, accentColor), /* start index */ 20, /* end index */ spannable.length, Spannable.SPAN_EXCLUSIVE_EXCLUSIVE)myTextView.text = spannable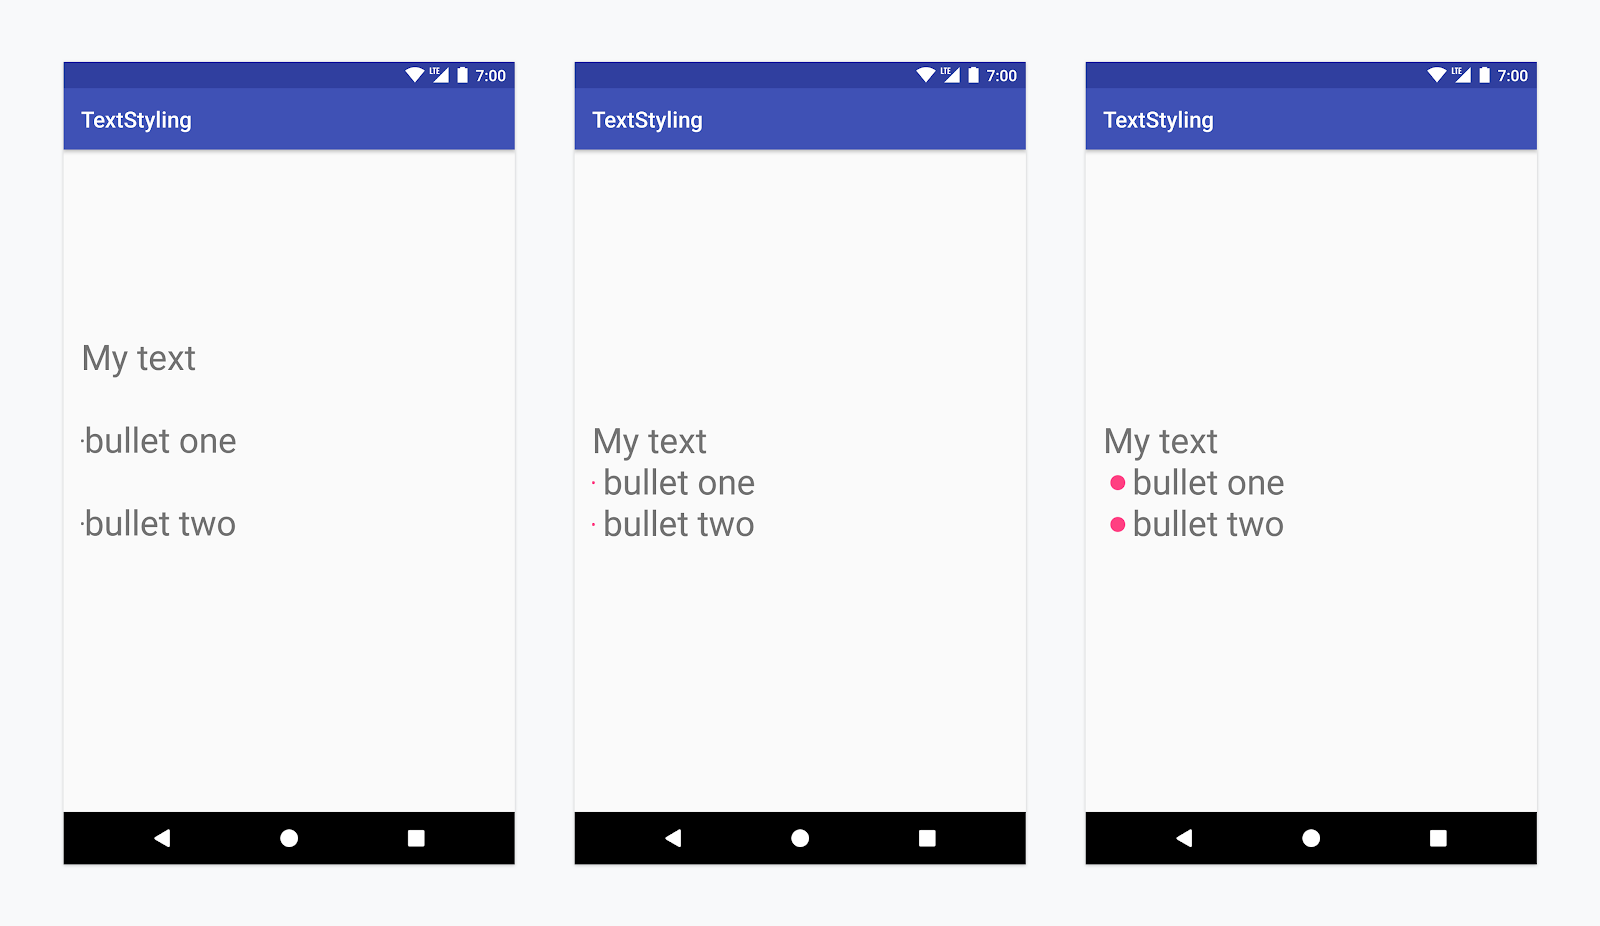 Left: Using HTML tags. Center: Using BulletSpan with default bullet size. Right: Using BulletSpan on Android P or custom implementation.
You can combine single style and multi style. You can consider the style you apply to the TextView as a ?base? style. The spans text styling is applied ?on top? of the base style and will override the base style. For example, when setting the [email protected]? attribute to a TextView and applying a ForegroundColorSpan(Color.PINK) for the first 4 characters of the text, then, the first 4 characters will use the pink colour set by the span, and the rest of the text, the colour set by the TextView attribute.
<TextView android:layout_width=”wrap_content” android:layout_height=”wrap_content” android:textColor=”@color/blue”/>val spannable = SpannableString(?Text styling?)spannable.setSpan( ForegroundColorSpan(Color.PINK), 0, 4, Spannable.SPAN_EXCLUSIVE_EXCLUSIVE)myTextView.text = spannable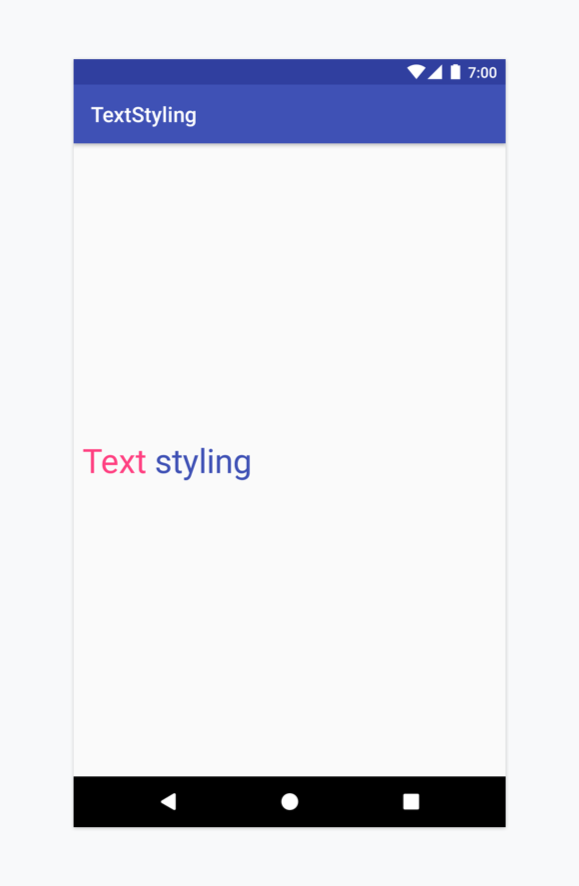 Combining TextView with XML attributes and text with spans
Applying Spans
When using spans, you will work with one of the following classes: SpannedString, SpannableString or SpannableStringBuilder. The difference between them lies in whether the text or the markup objects are mutable or immutable and in the internal structure they use: SpannedString and SpannableString use linear arrays to keep records of added spans, whereas SpannableStringBuilder uses an interval tree.
Here?s how to decide which one to use:
- Just reading and not setting the text nor the spans? -> SpannedString
- Setting the text and the spans? -> SpannableStringBuilder
- Setting a small number of spans (<~10)? -> SpannableString
- Setting a larger number of spans (>~10) -> SpannableStringBuilder
For example, if you?re working with a text that doesn?t change, but to which you want to attach spans, you should use a SpannableString.
??????????????????????????????????????????????????????????? Class ? Mutable Text ? Mutable Markup ???????????????????????????????????????????????????????????? SpannedString ? no ? no ?? SpannableString ? no ? yes ?? SpannableStringBuilder ? yes ? yes ???????????????????????????????????????????????????????????
All of these classes extend the Spanned interface, but the classes that have mutable markup (SpannableString and SpannableStringBuilder) also extend from Spannable.
Spanned -> immutable text with immutable markup
Spannable (extends Spanned)-> immutable text with mutable markup
Apply a span by calling setSpan(Object what, int start, int end, int flags) on the Spannable object. The what Object is the marker that will be applied from a start to an end index in the text. The flag marks whether the span should expand to include text inserted at their starting or ending point, or not. Independent of which flag is set, whenever text is inserted at a position greater than the starting point and less than the ending point, the span will automatically expand.
For example, setting a ForegroundColorSpan can be done like this:
val spannable = SpannableStringBuilder(?Text is spantastic!?)spannable.setSpan( ForegroundColorSpan(Color.RED), 8, 12, Spannable.SPAN_EXCLUSIVE_INCLUSIVE)
Because the span was set using the SPAN_EXCLUSIVE_INCLUSIVE flag, when inserting text at the end of the span, it will be extended to include the new text:
val spannable = SpannableStringBuilder(?Text is spantastic!?)spannable.setSpan( ForegroundColorSpan(Color.RED), /* start index */ 8, /* end index */ 12, Spannable.SPAN_EXCLUSIVE_INCLUSIVE)spannable.insert(12, ?(& fon)?)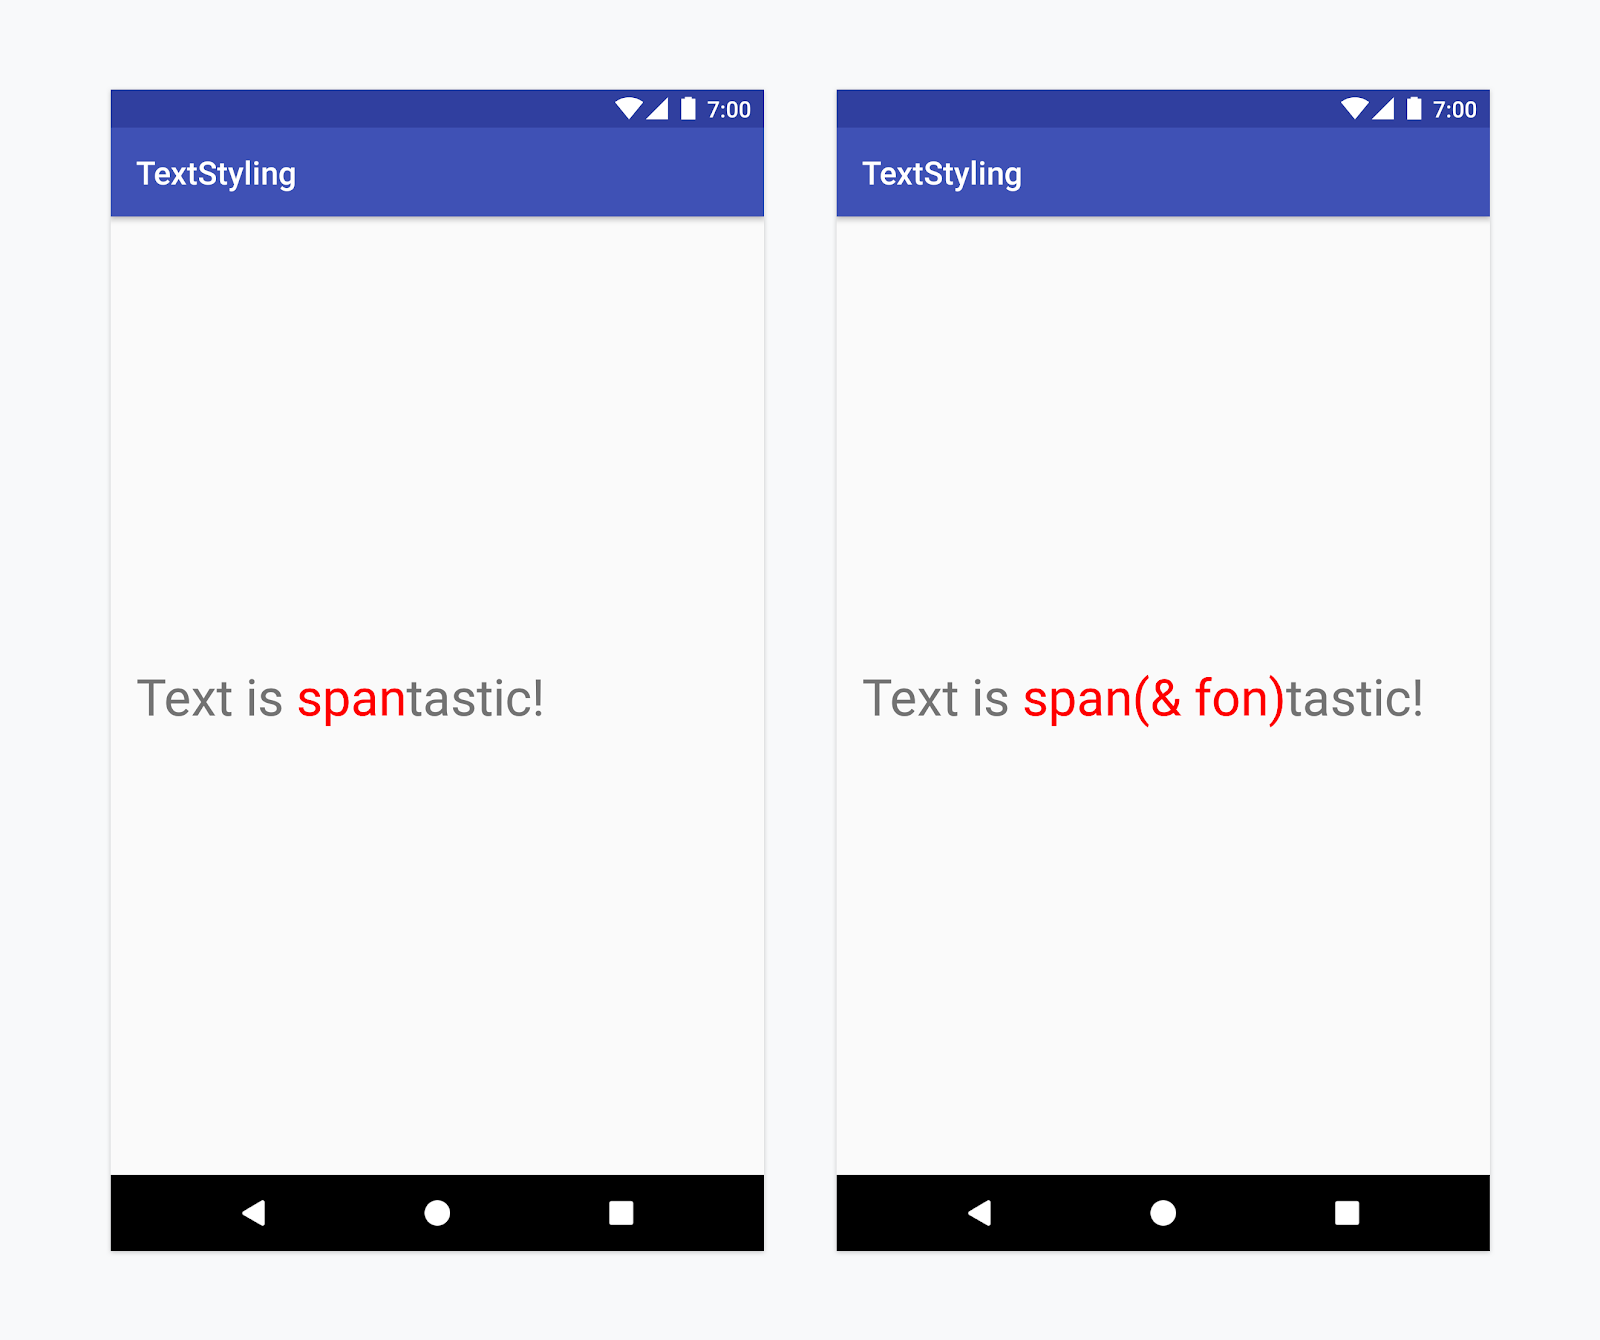 Left: Text with ForegroundColorSpan. Right: Text with ForegroundColorSpan and Spannable.SPAN_EXCLUSIVE_INCLUSIVE
If the span is set with Spannable.SPAN_EXCLUSIVE_EXCLUSIVE flag, inserting text at the end of the span will not modify the end index of the span.
Multiple spans can be composed and attached to the same text segment. For example, text that is both bold and red can be constructed like this:
val spannable = SpannableString(?Text is spantastic!?)spannable.setSpan( ForegroundColorSpan(Color.RED), 8, 12, Spannable.SPAN_EXCLUSIVE_EXCLUSIVE)spannable.setSpan( StyleSpan(BOLD), 8, spannable.length, Spannable.SPAN_EXCLUSIVE_EXCLUSIVE)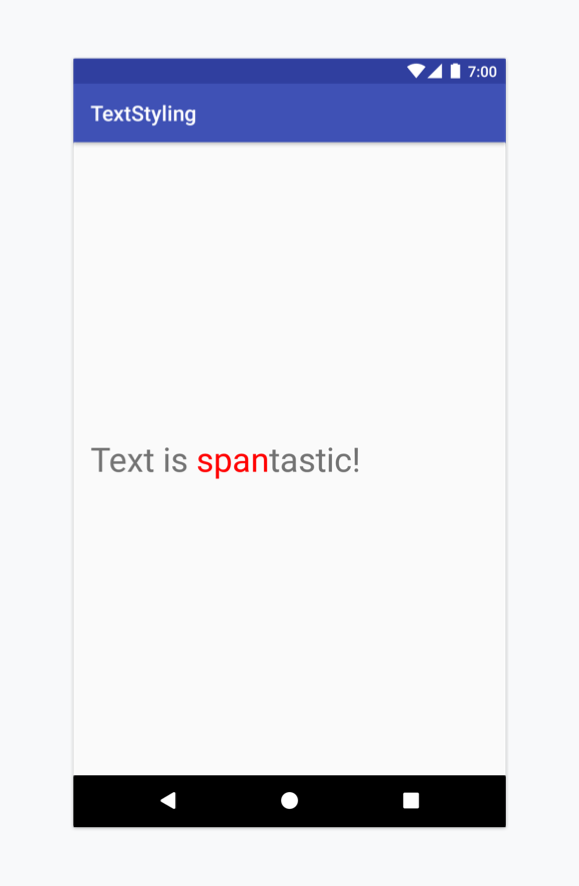 Text with multiple spans: ForegroundColorSpan(Color.RED) and StyleSpan(BOLD)
Framework spans
The Android framework defines several interfaces and abstract classes that are checked at measure and render time. These classes have methods that allow a span to access objects like the TextPaint or the Canvas.
The Android framework provides 20+ spans in the android.text.style package, subclassing the main interfaces and abstract classes. We can categorize spans in several ways:
- Based on whether span changes only appearance or also the text metric/layout
- Based on whether they affect text at character or at paragraph level
 Span categories: character vs paragraph, appearance vs metric
Appearance vs metric affecting spans
The first category affects character-level text in a way that modifies their appearance: text or background colour, underline, strikethrough, etc., that triggers a redraw without causing a relayout of the text. These spans implement UpdateAppearance and extend CharacterStyle. CharacterStyle subclasses define how to draw text by providing access to update the TextPaint.
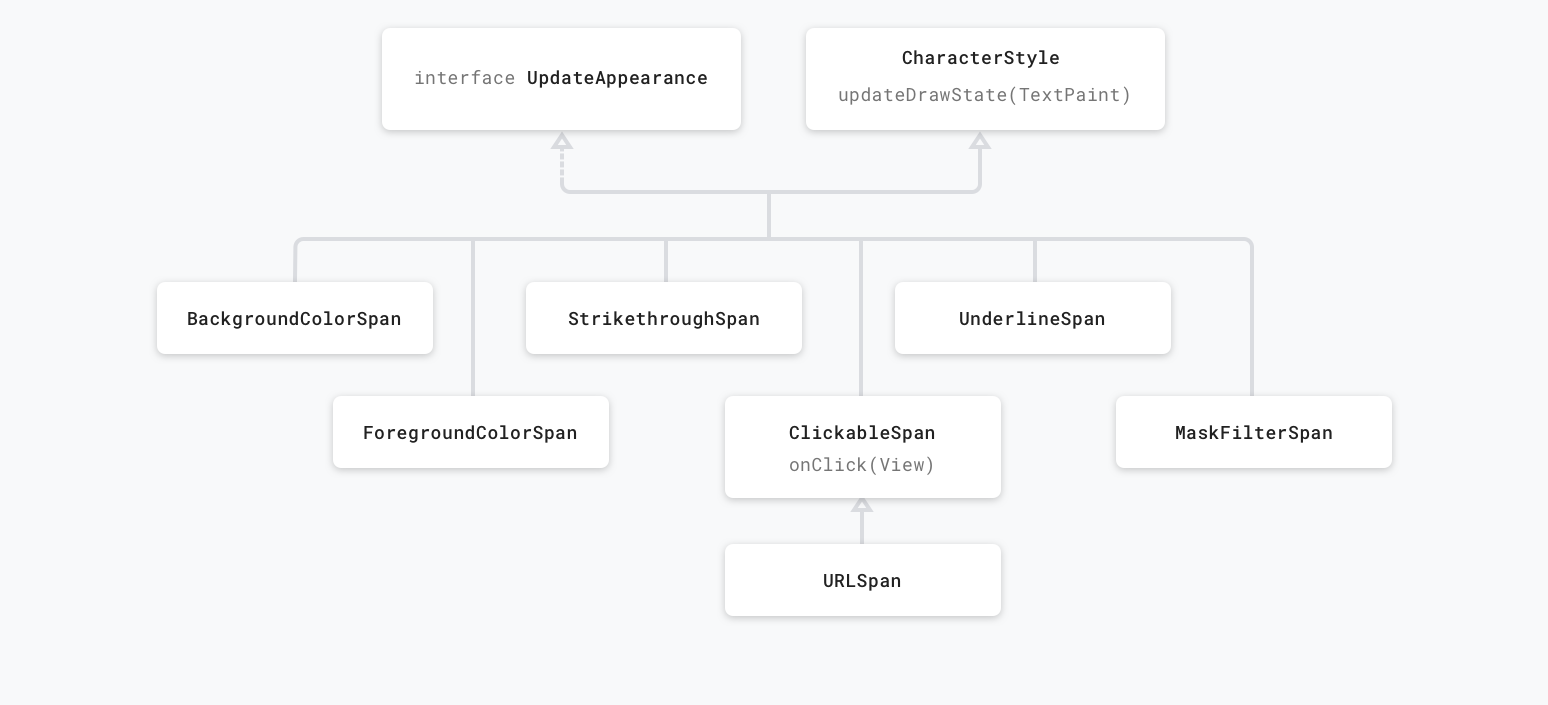 Appearance affecting spans
Metric affecting spans modify text metrics and layout, therefore the object that observes the span change will re-measure the text for correct layout and rendering.
For example, a span that affects the text size will require re-measure and layout, as well as re-drawing. These spans usually extend the MetricAffectingSpan class. This abstract class allows subclasses to define how the span affects text measurement, by providing access to the TextPaint. Since MetricAffectingSpan extends CharacterSpan, subclasses affect the appearance of the text at character level.
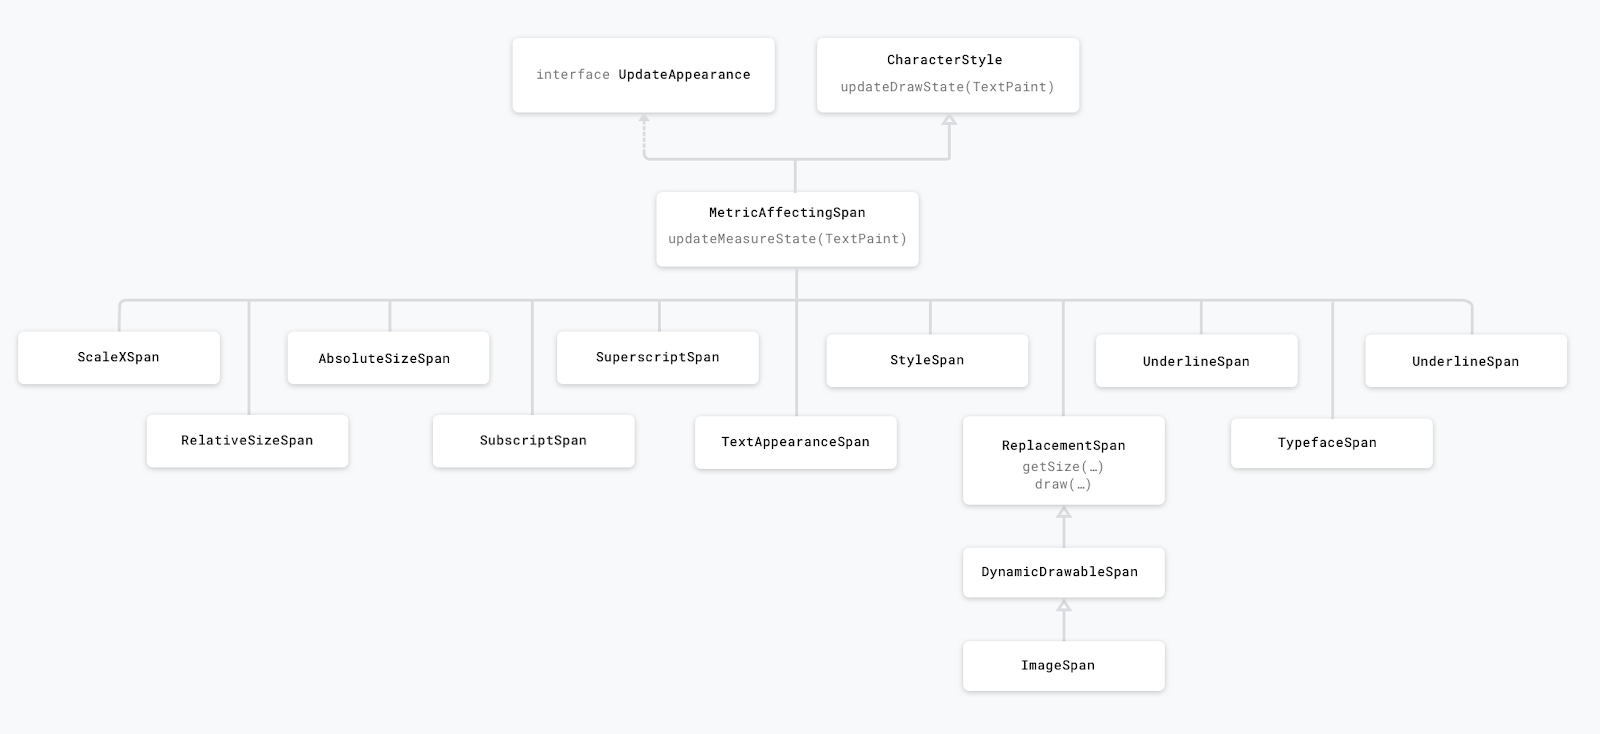 Metric affecting spans
You might be tempted to always re-create the CharSequence with text and markup and call TextView.setText(CharSequence). But this will almost always trigger a re-measuring and re-drawing of the layout and extra objects being created. To decrease the performance hit set the text with TextView.setText(Spannable, BufferType.SPANNABLE) and then, when you need to modify the spans, retrieve the Spannable object from the TextView by casting TextView.getText() to Spannable. We?ll go into more details on what?s going on under the hood with TextView.setText and different performance optimisations in a further post.
For example, consider the following Spannable object set and retrieved like this:
val spannableString = SpannableString(?Spantastic text?)// setting the text as a SpannabletextView.setText(spannableString, BufferType.SPANNABLE)// later getting the instance of the text object held // by the TextView// this can can be cast to Spannable only because we set it as a// BufferType.SPANNABLE beforeval spannableText = textView.text as Spannable
Now, when we set spans on the spannableText, we don?t need to call textView.setText again because we?re modifying directly the instance of the CharSequence object held by TextView.
Here?s what happens when we set different spans:
Case 1: Appearance affecting span
spannableText.setSpan( ForegroundColorSpan(colorAccent), 0, 4, Spannable.SPAN_EXCLUSIVE_EXCLUSIVE)
Since we attached an appearance affecting span, TextView.onDraw is called but not TextView.onLayout. The text is redrawn, but the width and height will be the same.
Case 2: Metric affecting span
spannableText.setSpan( RelativeSizeSpan(2f), 0, 4, Spannable.SPAN_EXCLUSIVE_EXCLUSIVE)
Because the RelativeSizeSpan changes the size of the text, the width and height of the text can change and the way text is layed out (for example, a particular word may fall into the next line now, without the TextView size changing). The TextView needs to compute the new size so onMeasure and onLayout are called.
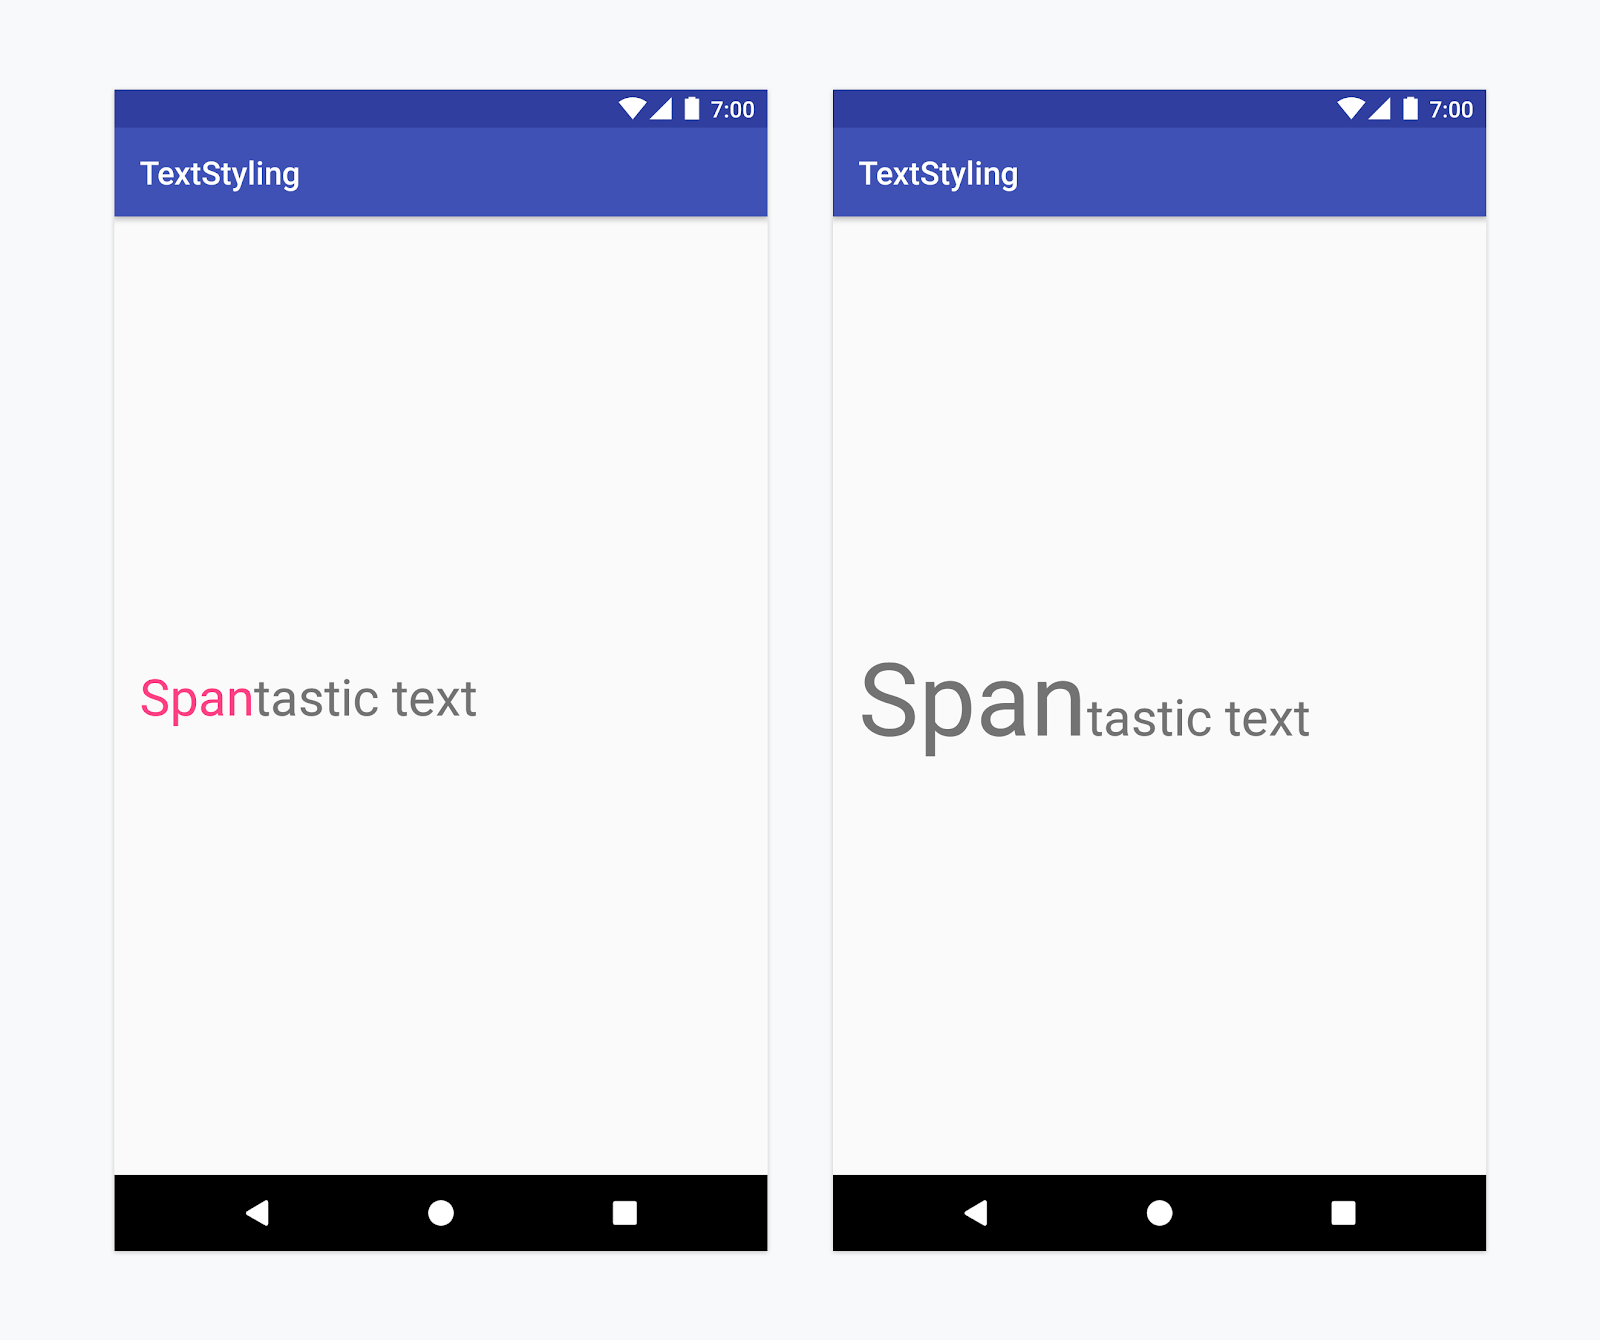 Left: ForegroundColorSpan ? appearance affecting span. Right: RelativeSizeSpan ? metric affecting span
Character vs paragraph affecting spans
A span can either affect the text at the character level, updating elements like background colour, style or size, or a the paragraph level, changing the alignment or the margin of the entire block of text. Depending on the needed styling, spans either extend CharacterStyle or implement ParagraphStyle. Spans that extend ParagraphStyle must be attached from the first character to the last character of a single paragraph, otherwise the span will not be displayed. On Android paragraphs are defined based on new line (n) character.
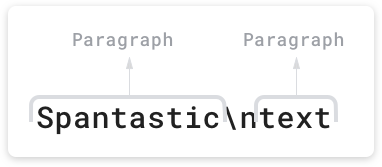 On Android paragraphs are defined based on new line (?n?) character.
 Paragraph affecting spans
For example, a CharacterStyle span like BackgroundColorSpan can be attached to any characters in the text. Here we?re attaching it from the 5th to the 8th character:
val spannable = SpannableString(?Text isnspantastic?)spannable.setSpan( BackgroundColorSpan(color), 5, 8, Spannable.SPAN_EXCLUSIVE_EXCLUSIVE)
A ParagraphStyle span, like QuoteSpan, can only be attached from the start of a paragraph, otherwise the line and the text margin don?t appear. For example, ?Text isnspantastic? contains a new line on the 8th character of the text, so we can attach the QuoteSpan to it and just the paragraph starting from there will be styled. If we attached the span to any position other than 0 or 8, the text would not be styled at all.
spannable.setSpan( QuoteSpan(color), 8, text.length, Spannable.SPAN_EXCLUSIVE_EXCLUSIVE)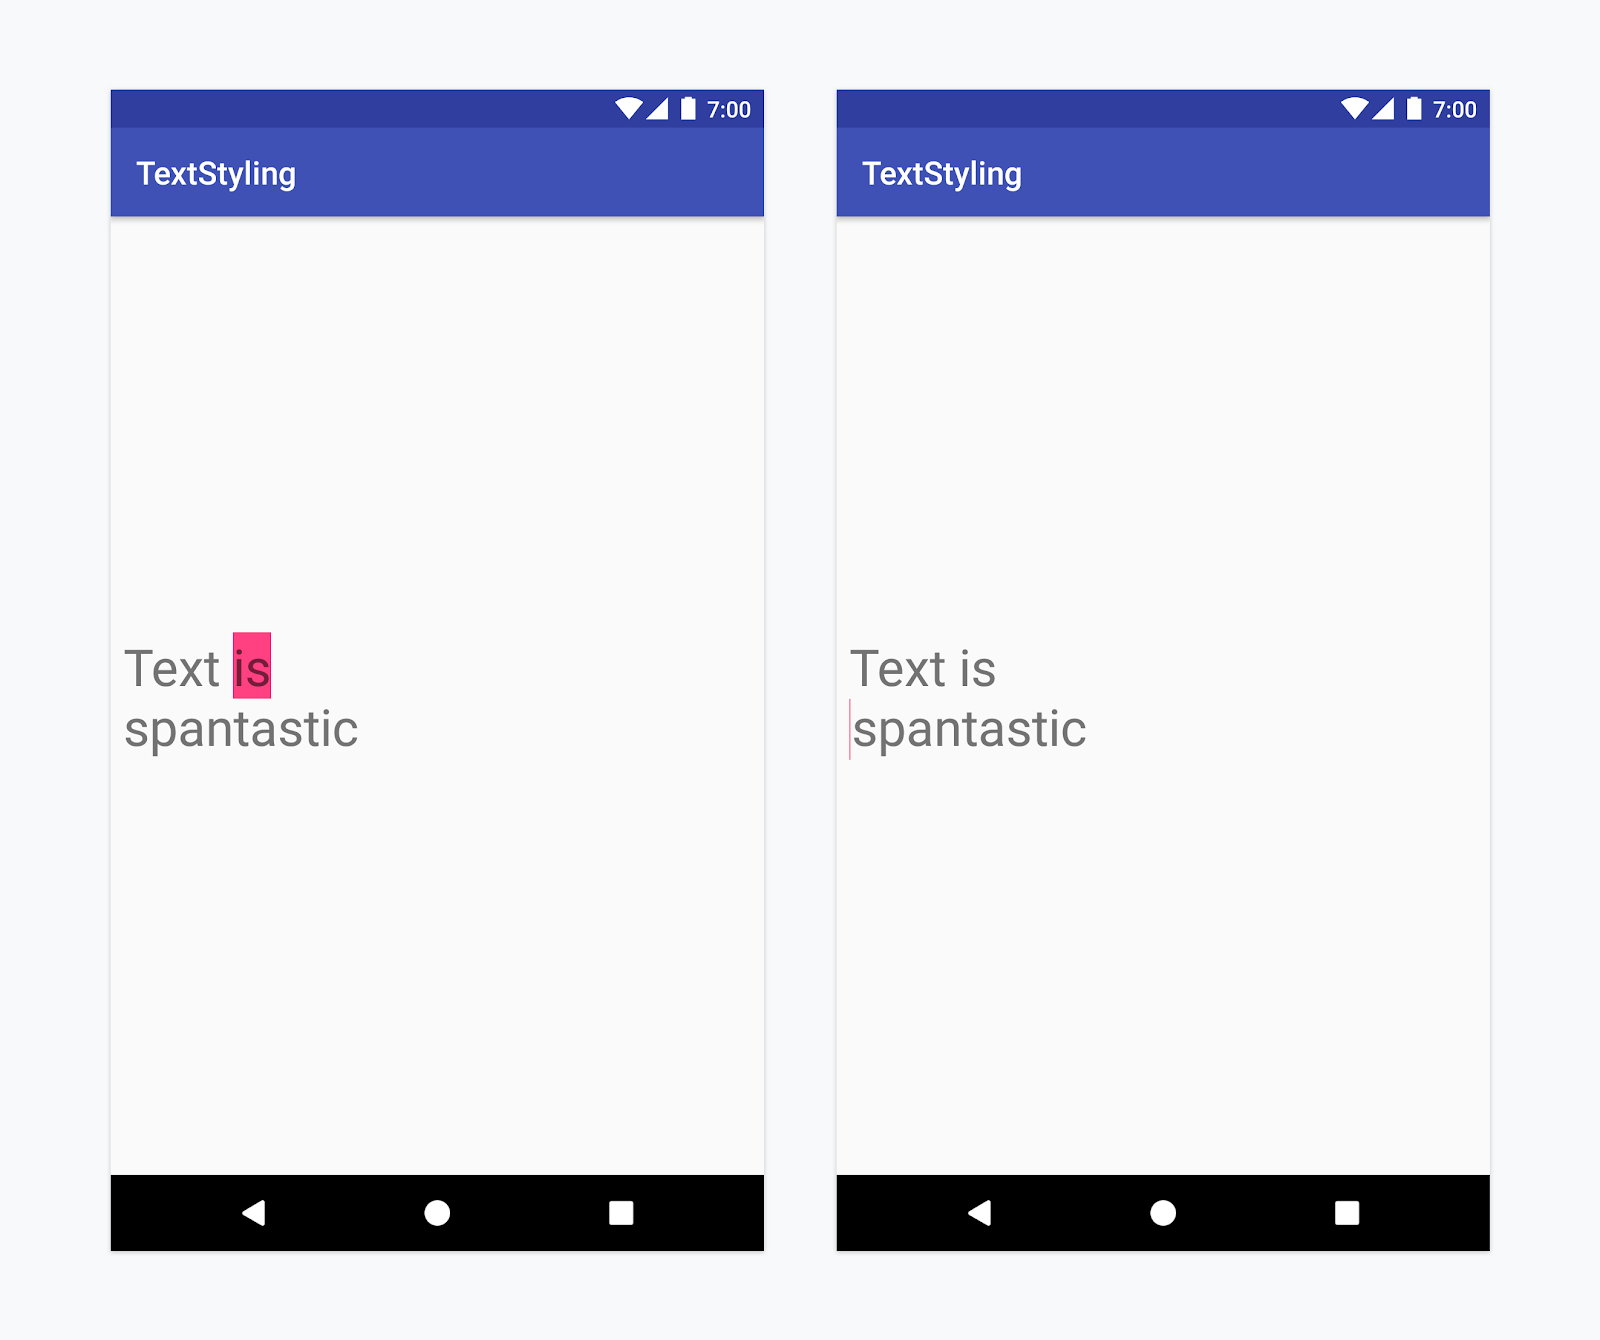 Left: BackgroundColorSpan ? character affecting span. Right: QuoteSpan ? paragraph affecting span
Creating custom spans
When implementing your own span, you will need to decide whether your span affects the text at character or paragraph level and whether it also affects the layout or just the appearance of the text. But, before writing your own implementations from scratch, check whether you can use the functionality provided in the framework spans.
TL;DR:
- Affecting text at the character level -> CharacterStyle
- Affecting text at the paragraph level -> ParagraphStyle
- Affecting text appearance -> UpdateAppearance
- Affecting text metrics -> UpdateLayout
Let?s say that we need to implement a span that allows increasing the size of the text with a certain ratio, like RelativeSizeSpan, and setting the color of the text, like ForegroundColorSpan. To do this, we can extend the RelativeSizeSpan and, since this provides callbacks for updateDrawState and updateMeasureState, we can override the drawing state callback and set the colour of the TextPaint.
class RelativeSizeColorSpan( @ColorInt private val color: Int, size: Float) : RelativeSizeSpan(size) { override fun updateDrawState(textPaint: TextPaint?) { super.updateDrawState(ds) textPaint?.color = color }}
Note: the same effect can be achieved by applying both a RelativeSizeSpan and ForegroundColorSpan to the same text.
Testing custom spans implementation
Testing spans means checking that indeed the expected modifications have been made on the TextPaint or that the correct elements have been drawn on to your Canvas. For example, consider the custom implementation of a span that adds a bullet point, of a specified size and color to a paragraph, together with a gap between the left margin and the bullet point. See the implementation in the android-text sample. To test this class implement an AndroidJUnit test, checking that indeed:
- A circle is drawn on the canvas, of a specific size
- Nothing is drawn if the span is not attached to text
- The correct margin is set, based on the constructor parameters values
Testing the Canvas interactions can be done by mocking the canvas, passing the mocked object to the drawLeadingMargin method and verifying that the correct methods have been called, with the correct parameters.
val canvas = mock(Canvas::class.java)val paint = mock(Paint::class.java)val text = SpannableString(“text”)@Test fun drawLeadingMargin() { val x = 10 val dir = 15 val top = 5 val bottom = 7 val color = Color.RED // Given a span that is set on a text val span = BulletPointSpan(GAP_WIDTH, color) text.setSpan(span, 0, 2, Spanned.SPAN_EXCLUSIVE_EXCLUSIVE) // When the leading margin is drawn span.drawLeadingMargin(canvas, paint, x, dir, top, 0, bottom, text, 0, 0, true, mock(Layout::class.java)) // Check that the correct canvas and paint methods are called, //in the correct order val inOrder = inOrder(canvas, paint) // bullet point paint color is the one we set inOrder.verify(paint).color = color inOrder.verify(paint).style = eq<Paint.Style>(Paint.Style.FILL) // a circle with the correct size is drawn // at the correct location val xCoordinate = GAP_WIDTH.toFloat() + x.toFloat() +dir * BulletPointSpan.DEFAULT_BULLET_RADIUS val yCoord = (top + bottom) / 2f inOrder.verify(canvas) .drawCircle( eq(xCoordinate), eq(yCoord), eq(BulletPointSpan.DEFAULT_BULLET_RADIUS), eq(paint)) verify(canvas, never()).save() verify(canvas, never()).translate( eq(xCoordinate), eq(yCoordinate))}
Check out the rest of the tests in the BulletPointSpanTest.
Testing spans usage
The Spanned interface allows both setting and retrieving spans from text. Check that the correct spans are added at the correct locations by implementing an Android JUnit test. In the android-text sample we?re converting bullet point markup tags to bullet points. This is done by attaching BulletPointSpans to the text, at the correct location. Here?s how it can be tested:
@Test fun textWithBulletPoints() {val result = builder.markdownToSpans(?Pointsn* onen+ two?)// check that the markup tags are removedassertEquals(?Pointsnonentwo?, result.toString())// get all the spans attached to the SpannedStringval spans = result.getSpans<Any>(0, result.length, Any::class.java)assertEquals(2, spans.size.toLong())// check that the span is indeed a BulletPointSpanval bulletSpan = spans[0] as BulletPointSpan// check that the start and end indexes are the expected onesassertEquals(7, result.getSpanStart(bulletSpan).toLong())assertEquals(11, result.getSpanEnd(bulletSpan).toLong())val bulletSpan2 = spans[1] as BulletPointSpanassertEquals(11, result.getSpanStart(bulletSpan2).toLong())assertEquals(14, result.getSpanEnd(bulletSpan2).toLong())}
Check out MarkdownBuilderTest for more test examples.
Note: if you need to iterate through the spans outside tests, use Spanned#nextSpanTransition instead of Spanned#getSpans as it?s more performant.
Spans are a powerful concept, deeply embedded in the text rendering functionality. They give access to components like TextPaint and Canvas that allow a highly customisable way of styling text on Android. In Android P we?ve added extensive documentation to the framework spans so, before implementing your own, check out what?s available.
In a future article we?re going to tell you more about how spans work under the hood and how to use them in a performant way. For example, you?ll need to use textView.setText(CharSequence, BufferType) or Spannable.Factory. For details as to why, stay tuned!
Lots of thanks to Siyamed Sinir, Clara Bayarri and Nick Butcher.

