You build your Node.js apps to work first and foremost on your computer. You know it?s important that apps also work everywhere they need to run. This could be on your colleagues? computers, internal company servers, cloud servers, or inside of a container (maybe using Docker). Enter environment variables.
 an illustrated guide to using environment variables
Environment variables are a fundamental part of developing with Node.js, allowing your app to behave differently based on the environment you want them to run in. Wherever your app needs configuration, you use environment variables. And they?re so simple, they?re beautiful!
This post walks you through creating and using environment variables, leading to a Node.js app you can run anywhere.
People ask me a lot how I decide what to learn and invest my time in, and what to let slide. For me, this starts with these two same questions (e.g., asking why and when). I?ll bet you do something similar, don?t you?
Why and When?
When someone tells you something is important, and you should use it, I recommend asking two simple questions.
- Why should I use it?
- When should I use it (or not use it)?
Why?
Now it is time for you to ask me why you should use environment variables. Go on; it?s OK.
If you care about making your app run on any computer or cloud (aka your environments), then you should use them. Why? Because they externalize all environment specific aspects of your app and keep your app encapsulated. Now you can run your app anywhere by modifying the environment variables without changing your code and without rebuilding it!
When?
OK, so now you ask me when you should use them. In short, any place in your code that will change based on the environment. When you see these situations, use environment variables for anything you need to change or configure.
Here are some specific examples of common scenarios when you should consider using environment variables.
- Which HTTP port to listen on
- What path and folder your files are located in, that you want to serve
- Pointing to a development, staging, test, or production database
Other examples might be URLs to server resources, CDNs for testing vs. production, and even a marker to label your app in the UI by the environment it lives in.
Let?s explore how you can use environment variables in Node.js code.
Using Environment Variables
You may be setting a port number for an Express server. Often the port in a different environment (e.g.; staging, testing, production) may have to be changed based on policies and to avoid conflicts with other apps. As a developer, you shouldn?t care about this, and really, you don?t need to. Here is how you can use an environment variable in code to grab the port.
// server.jsconst port = process.env.PORT;console.log(`Your port is ${port}`);
Go ahead and try this. Create an empty folder named env-playground. Then create a file named server.jsand add the code above to it. Now when you execute node server.js you should see a message that says ?Your port is undefined?.
Your environment variable isn?t there because we need to pass them in. Let?s consider some ways we can fix this.
- using the command line
- using a .env file
Command Line
The simplest way to pass the port into your code is to use it from the command line. Indicate the name of the variable, followed by the equal sign, and then the value. Then invoke your Node.js app.
PORT=8626 node server.js
You will see the port displayed in the message like this ?Your port is 8626?.
What?s all this 8626 stuff? Why not 4200 or 3000 or something more conventional? Well, I?m a huge fan Disney, and there is a character named Stitch who was also known as Experiment 626.
You can repeat this pattern and add other variables too. Here is an example of passing in two environment variables.
PORT=8626 NODE_ENV=development node server.js
Follow the pattern of environment variable name followed by the equal sign followed by the value. This is easy to do, but also far too easy to make a typing mistake. Which leads to the next option.
Less Mess with a .env File
Once you define several of these, the next thought that may cross your mind is how you can manage them, so they don?t become a maintenance nightmare. Imagine several of these for database connectivity and ports and keys. This doesn?t scale well when you type them all on one line. And there could be private information such as keys, usernames, passwords, and other secrets.
Running them from a command line is convenient, sure. But it has its drawbacks:
- there is no good place to see the list of variables
- it?s far too easy to make a typing mistake from the command line
- it?s not ideal to remember all of the variables and their values
- even with npm scripts, you still have to keep them current
A popular solution to how you can organize and maintain your environment variables is to use a .env file. I really like this technique as it makes it super easy to have one place where I can quickly read and modify them.
Create the .env file in the root of your app and add your variables and values to it.
NODE_ENV=developmentPORT=8626# Set your database/API connection information hereAPI_KEY=**************************API_URL=**************************
Remember Your .gitignore File
A .env file is a great way to see all of your environment variables in one place. Just be sure not to put them into source control. Otherwise, your history will contain references to your secrets!
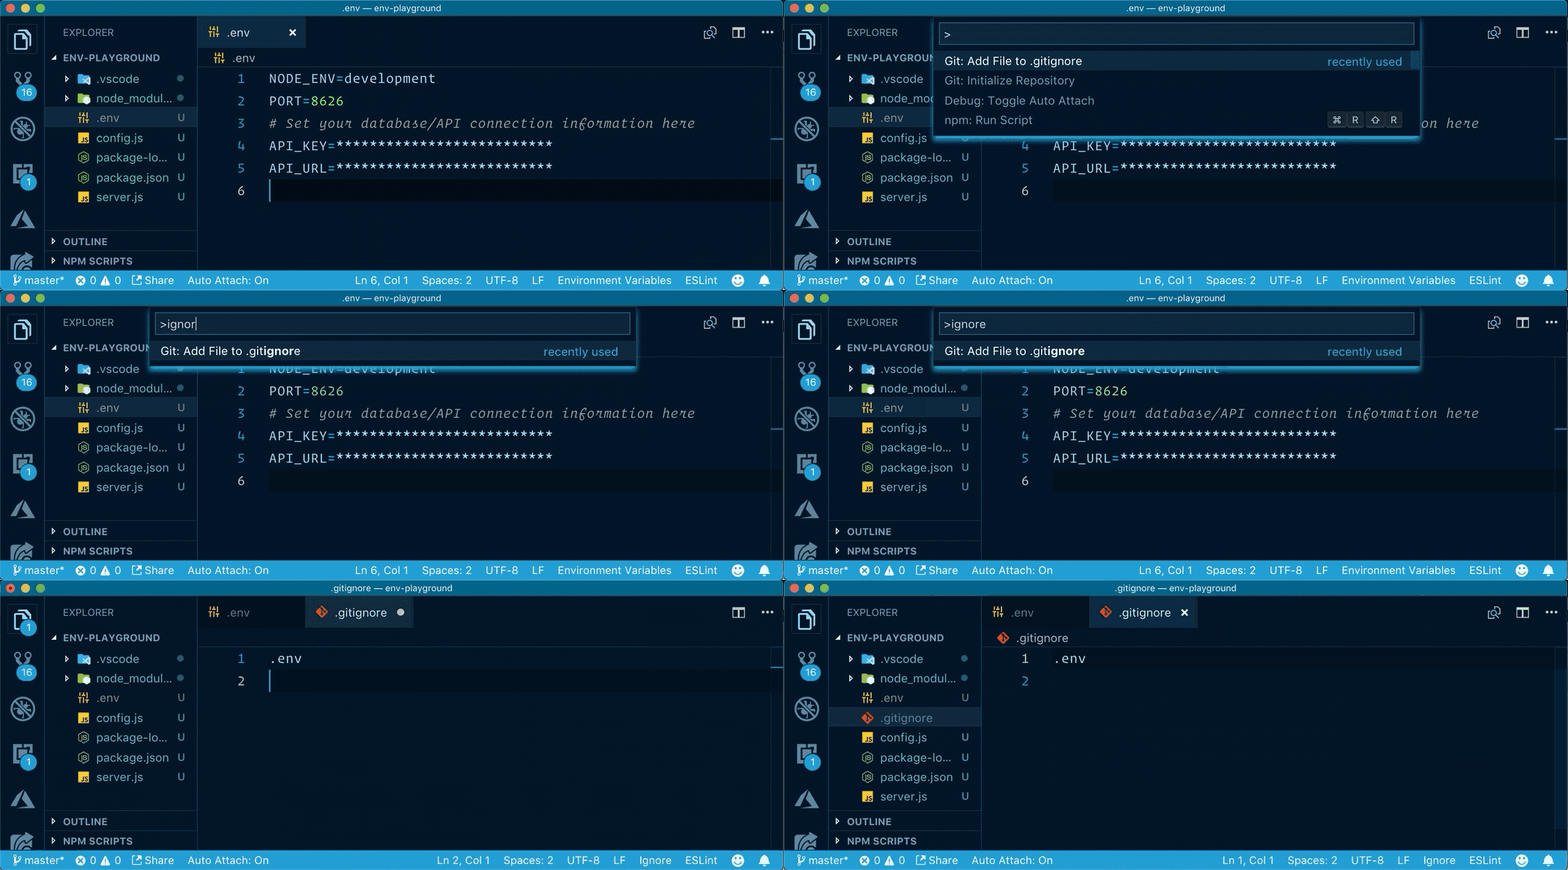
Create a .gitignorefile (or edit your existing one, if you have one already) and add .env to it, as shown in the following image. The .gitignore file tells source control to ignore the files (or file patterns) you list.

Be careful to add .env to your .gitignore file and commit that change before you add your .env. Otherwise, you run the risk of committing an early version of your .envto source control.
You can add a file to your .gitignore file by using the command palette in Visual Studio Code (VS Code). Follow these steps:
- Open the file you want to add to the .gitignore in VS Code
- Open the Command Palette with CMD + SHIFT + P on a Mac or CTRL + SHIFT + P on Windows
- Type ignore
- Select ?Git: Add file to .gitignore from the menu?
This will add the name of the current file you have open to the .gitignore file. If you have not created a .gitignore file, it will create it for you!
 adding the .env to .gitignore
Syntax Highlighting for Your .env File
If you use VS Code you?ll want to add the dotenv extension. This lights up the contents of your .env file with syntax highlighting and just plain old does it easier to work with the variables inside of a .env file.
Here is a glimpse of the file in VS Code with the dotenv extension installed.
 .env file with syntax highlighting in VS Code
Reading the .env File
Right about now you?re probably thinking that something has to look for the .env file, and you?re right!
You could write your own code to find the file, parse it, and read them into your Node.js app. Or you could look to npm and find a convenient way to read the variables into your Node.js app in one fell swoop. You?d likely run across the dotenv package on npm, which is a favorite of mine and what I recommend you use. You can install it like this npm install dotenv.
You could then require this package in your project and use it?s config function (config also has an alias of load, in case you see that in the wild) to look for the .env file, read the variables you defined and make them available to your application.
Follow these steps:
- create a package.json file
- install the dotenv npm package
- write the code to read the .env
- run the code
Create a package.json File
You will want a package.json file to configure your versions, track your dependencies, and contain your npm scripts. Try this by running the following command
npm init -y
This creates a package.json file with the basic settings filled in for you.
Install dotenv from npm
You want to read the .env file and the dotenv package on npm does this very well. Install the dotenv package by running the following command
npm install dotenv
This will add the dotenv package and its files to your node_modules folder and create an entry in your package.json file for dotenv.
Read the .env File
It?s time to read the .env file with a little bit of code. Replace the contents of your server.js file with the following code.
// server.jsconsole.log(`Your port is ${process.env.PORT}`); // undefinedconst dotenv = require(‘dotenv’);dotenv.config();console.log(`Your port is ${process.env.PORT}`); // 8626
The code displays the initial value of the PORT environment variable, which will be undefined. Then it requires the dotenv package and executes its config function, which reads the .env file and sets the environment variables. The final line of code displays the PORTas 8626.
Run the Code
Now run the code from the command line without passing the port, using the following command
node server.js
Notice the console log messages show the port is initially undefined and then later 8626. The dotenv package is reading the values and setting them, effectively doing the dirty work for you!
Find Your Variables Easily
Now that we have a single place to create our variables in a .env file, it might be nice to consider how we can make it easy to retrieve all of these variables in our Node.js code. Why? Good question! Well, you can refer to the variables in code using the following syntax:
process.env.YOUR_ENV_VAR_GOES_HERE
But do you want to do this everywhere you need it (and you may need them in multiple places)? Or should you gather all of our environmental variables in one place? The latter of course! Why? If you do reference the variables everywhere that you need them it could make refactoring and maintenance more difficult than if they are in one place.
I recommend creating a module that has the responsibility of gathering environment variables. This makes it easy to see them all at once and map them to readable names.
Here are two good options to consider:
- setting and exporting them manually in a module
- use a library to read and export them in a module
Both techniques involve creating a module, but they differ in how the environment variables are mapped and exposed. Let?s take a closer look at the techniques and weigh the differences.
Organizing Manually
Create a module (the example below shows config.js) where you gather the variables, map them well-named and readable properties, and export them.
Let?s create a new module in a file named config.js. Then copy and paste the following code into the file.
// config.jsconst dotenv = require(‘dotenv’);dotenv.config();module.exports = { endpoint: process.env.API_URL, masterKey: process.env.API_KEY, port: process.env.PORT};
This example shows how we can consolidate our environment variables in one file.
Let?s modify server.js once again, this time to import the config.js module and use it to access our environment variables. Replace the contents of server.js with the following code.
// server.jsconst { port } = require(‘./config’);console.log(`Your port is ${port}`); // 8626
Run the code using node server.js and you will see the message ?Your port is 8626?. The environment variables are being read by the dotenv code in the config.js file. Your server.js file imports the module in config.js and extracts the port variable.
You can import the config.js file where you need it and use destructuring to pull out what you need. You only pulled out port, but you could certainly pull out any of the values that are exported from the module.
const { endpoint, masterKey, port } = require(?./config?);
What?s the value in this technique?
- it is easy
- clarity on how all environment variables are being mapped
- you can rename variables to more readable properties
- you can add other configuration properties from non-environment variables
The key point here is that the config module?s purpose becomes to gather and expose all configuration, regardless of where it comes from.
Organize Using a Library
A consequence of the manual technique is that when you add a new environment variable you have to add it to the config module. For example, if you need to make a new variable you?d need to go into this config module and add something like this
visionApiUrl=process.env.VISION_API_URL
I don?t mind this consequence, as I?d have to go through my code anyway and use the new value. But I point this out because there is a way to gather them automatically.
The dotenv.config() function from the dotenv npm package will read the .env file, assign the variables to process.env, and return an object (named parsed) containing the content. it will also throw an error if it failed.
The following code reads the .env file and collects the variables in the envs object.
// config.js const dotenv = require(‘dotenv’);const result = dotenv.config();if (result.error) { throw result.error;}const { parsed: envs } = result;console.log(envs);module.exports = envs;
You can then export this object from a module and make it easily accessible in your app once again. Your code to access the variables might look like this
const { endpoint, masterKey, port } = require(?./config?);
Which option should you use? That?s for you to decide. But consider if you want to make the npm package dotenv a runtime dependency or not. Perhaps there are other ways to get to the environment variables in higher environments (such as production) where security is paramount. Do you even want code in your node app being able to read such an important file? You might be cool with that, but what if there was a way to read the variables and make the dotenv package a devDependency in your package.json file?
I recommend that you use the first technique where you manually set the environment variables in a module, such as config.js. This allows you to remove dotenv as a runtime dependency ? assuming you do one more thing: preloading your environment variables. This also allows you to reduce your runtime dependencies.
Reducing Your Dependencies
You have a lot of dependencies on packages from npm. Every one of these is something you should consider as you plan the lifetime and maintenance of your application. You may already be thinking about how you can reduce your dependencies to the bare minimum. I do this too.
The dotenv package is fantastic, but we don?t need it to be a runtime dependency. The dotenv package provides an option where you can preload the variables outside of your code. You can load the variables and eliminate the code that reads the .env file from our code. Less code is fewer lines that could break or be maintained.
Not sold yet? Have you thought about how you will access these environment variables in the cloud? Do you want your code trying to read a file? I vote a resounding ?no? to that. I prefer my code not to try to read a file because if I take it to the cloud, I want those solutions to not even have a .env file.
How do you remove the runtime dependency of dotenv from our code but not lose the value you gained already? First, when installing the dotenv npm package, you can save it as a dev dependency like this
npm install dotenv –save-dev
Then remove any code that uses require on dotenv. This includes the dotenv.config() code mentioned previously in this article.
The problem now is that you previously were relying on dotenv to load the environment variables. This is where the preloading option comes into play.
You can run your node app using the ? require ( -r ) command line option to preload dotenv. The following command will preload all environment variables from the file .env using dotenv and make them available in your app. So you?ve now removed all references to dotenv from your code.
node -r dotenv/config server.js
This is useful when you want your app to run somewhere where the file does not (and maybe should not) exist, such as in a running docker container or a cloud server.
Leveraging npm Scripts
I highly recommend putting your commands into an npm script. This makes it easier to run instead of typing all of these flags. Perhaps you create a custom script for it or use the npm start script. Here is how the script might look if you use a custom one.
scripts: { “start_local”: “node -r dotenv/config server.js”}
The command npm run start_local would then kick off this command. You can name the script how you please, of course.
Why not use npm start? Good question. You certainly can do that. I like to reserve npm start for how I run it in production with our without a docker container, which might simply be like this.
scripts: { “start”: “node server.js”}
The key here is that with either npm script you are running the exact same node code! The difference is in how your variables get set. You?ve now abstracted your configuration from your app.
Great npm Tooling
How do you memorize all of your npm scripts? That?s easy ? you don?t! I rely on great tooling to help run my npm scripts. While I like to pretend I know all of my script names and what they do exactly, the fact is that I?d rather have a tool that shows me the list and I can select it.
There are two fantastic tools for this built into my code editor of choice: VS Code.
- the npm scripts outline
- the npm extension
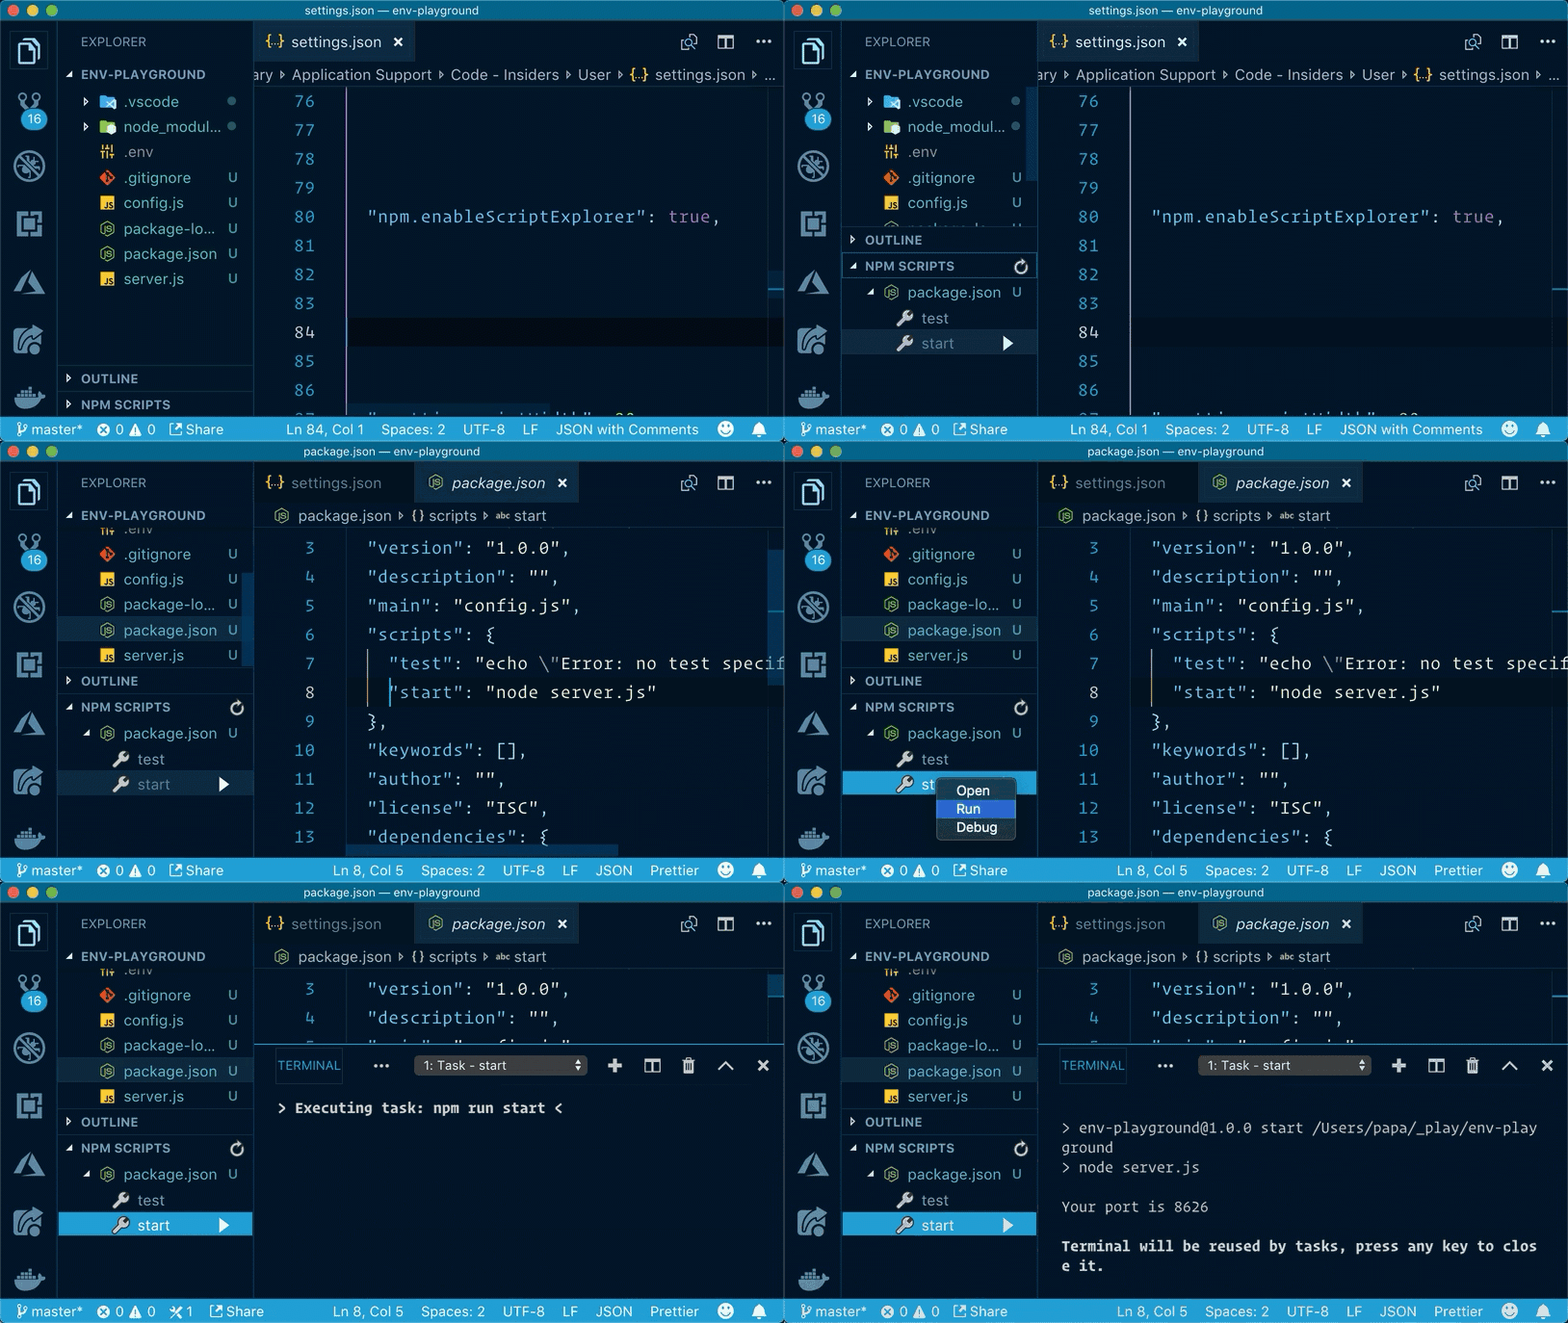
The npm scripts outline is built into VS Code and shows up in the Explorer view. Notice the following screenshot shows the npm scripts that are in my package.json file. If you do not see this in your project be sure to set the npm.enableScriptExplorer setting to true, in your settings.json for VS Code.
You can right-click an npm script and open, run or debug it.

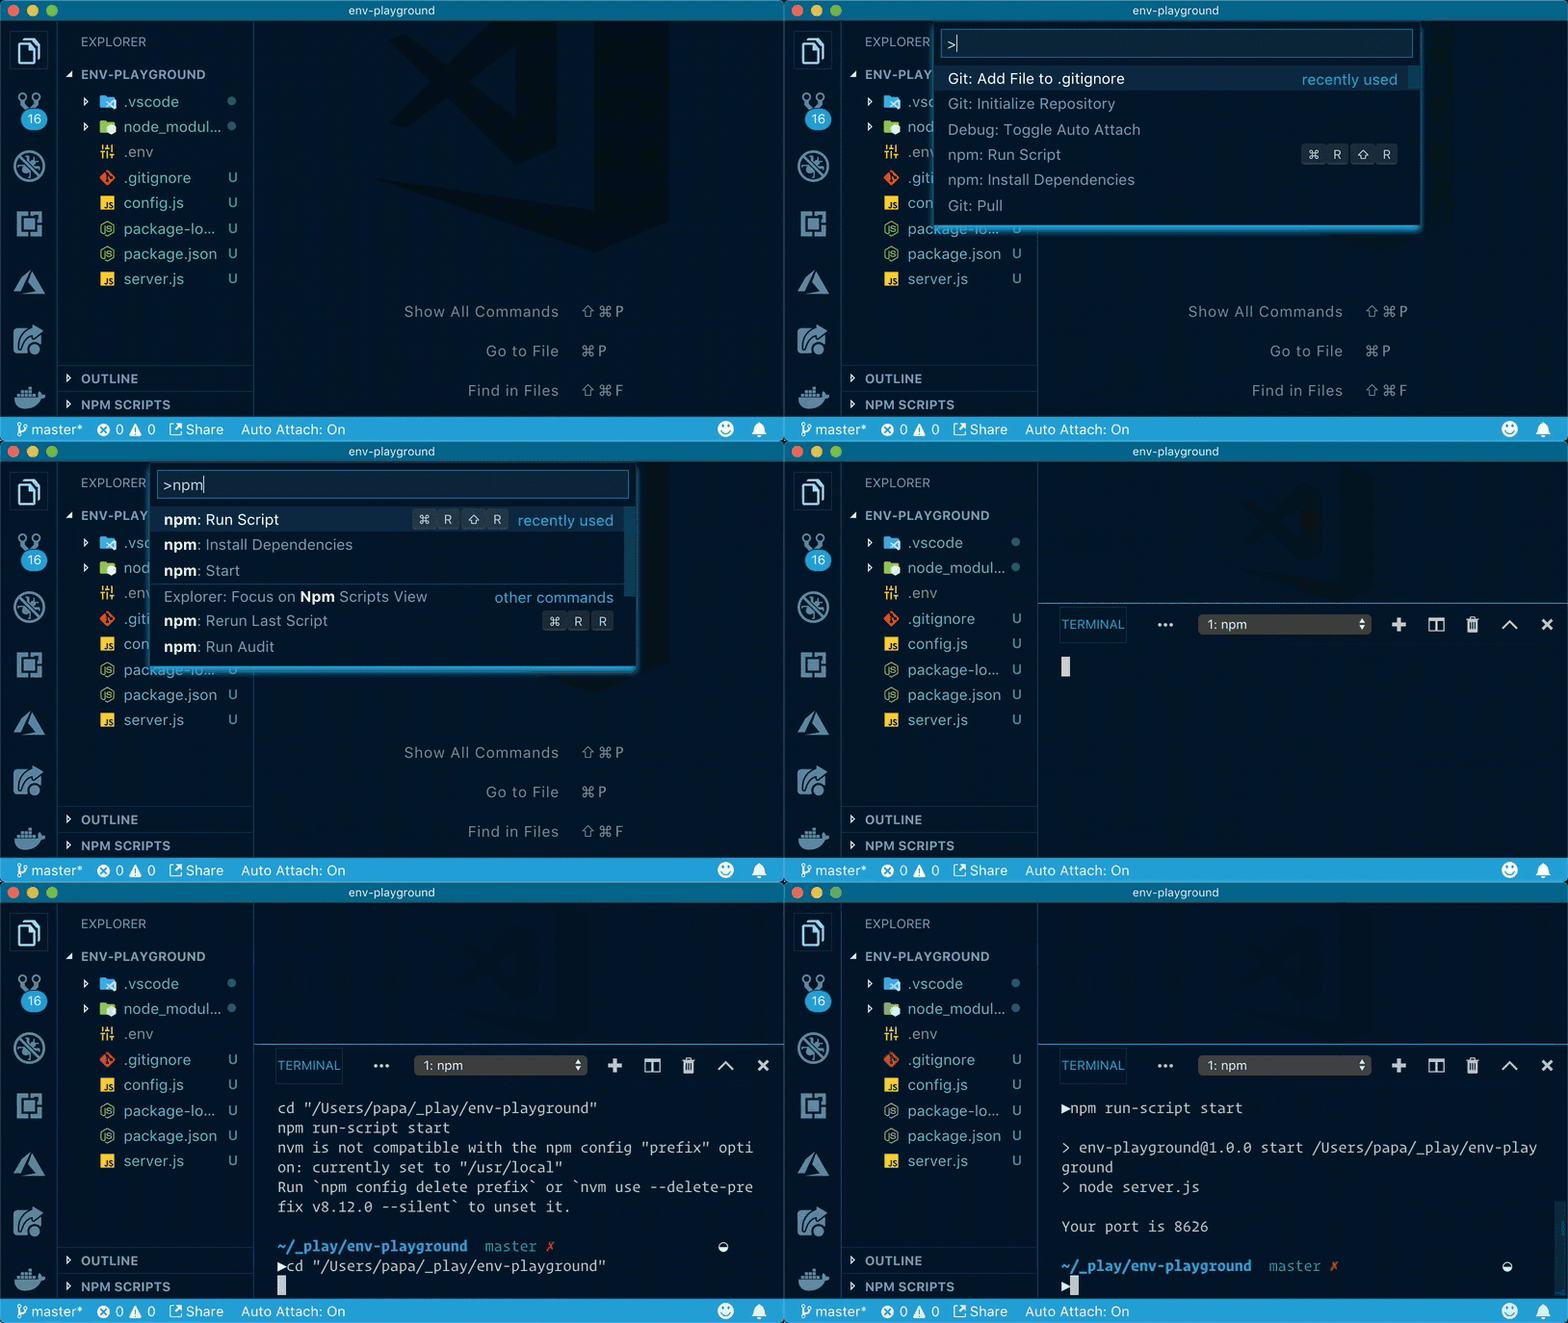
If you like to keep your hands on the keyboard, as I do, then you may prefer the npm extension for VS Code. After installing the npm extension for VS Code, you can to run npm scripts from the command palette.
Just type CMD + SHIFT + P on a Mac or CTRL + SHIFT + P on Windows. Then start typing npm and select ?npm: Run Script?, as shown in the image below.

Then you?ll be presented with a list of your npm scripts. From here you can start typing the name of the one you want until the one you want is highlighted. Or you use the arrow to select the script you want. Then press ENTERto run it.
I love this as it keeps my hands on the keyboard which feels more productive to me than swapping between mouse/trackpad and the keyboard.
Give one of these a try.
Your Code is the Same No Matter Where it Runs
Your app has no awareness of where the environment variables come from. The way you run it, with preloading, is what provides them on your local machine.
Let?s explore more about why you may want your app to not have awareness of its configuration.
Docker Containers
Imagine we are running in a Docker container. The conventional guidance for containers says that the apps inside the container should not know about their configuration. This way the container can run anywhere as long as the container and whatever is running the container have an agreement on what variables must be provided.
Running in the Cloud
When you take our app to the cloud, the various cloud providers all have ways for you to set environment variables, too. So once again, if the app merely uses the variables and the thing running it (in this case the cloud provider?s services) provide you a way to define those variables, you are all set.
- A lot of this separation of your app from its configuration comes from the guidance known as 12-factor. If you haven?t read up on this yet, please learn more here https://12factor.net.
Sharing With Your Team
How do your teammates know which environment variables to create for your app? Should they scour your code for those? Should they call you and ask? Certainly not, you don?t have time to visit every developer personally!
When your .env file is not pushed to source control (which it shouldn?t be), it is important to make it clear to everyone what the shape of that file should look like. The technique I recommend is to create a file named .env.example that contains the variables, but with fake values. This file might look something like the following template.
# .env.exampleNODE_ENV=developmentPORT=8626# Set your database connection information here API_KEY=your-core-api-key-goes-here
Your team can copy the content of this file to their own .env file and enter the values they need. It is perfectly normal to have values that are not secrets listed in the example file. Notice that the PORT and the NODE_ENV in the .env.example file are set, but not the API_KEY. Choose what you push to source control wisely.
You can then reference this file in your README.md where your teammates can quickly learn how to set up their own values. Problem solved.
Environment Variables FTW!
This is just a glimpse at how you can use environment variables and some of the fantastic tools that you can use with them. In summary, I recommend that you use environment variables and follow these steps:
- create a .env file
- ignore it in your .gitignore file
- use VS Code to edit your .envfile
- install the dotenv extension for VS Code
- install the npm extension for VS Code
- read the .envfile with the dotenv npm package as a dev dependency
- use the preloading option of dotenv to remove any runtime references to it
- use npm scripts to run your node app
- create a template file for your variables called .env.example
If you like the font and theme I am using, they are Dank Mono and Winter is Coming (Blue). You can find the Dank Mono font here and install the Winter is Coming theme here. The font costs 40 the last time I checked, while the theme is free.
But wait? Do you want your server to have a .env file? Do you use Docker or a cloud server? These are good questions to ask yourself. The approach you learned here is a foundation for that and can work in concert with other solutions. I?ll dive into this in a future post soon, so stay tuned.
More Good Resources on Environment Variables
- Here?s how you can actually use Node environment variables
- Working with environment variables in Node.js
- A video presentation showing a Node.js app that behaves differently based on environment variables
- Source code for the app presented in the video


