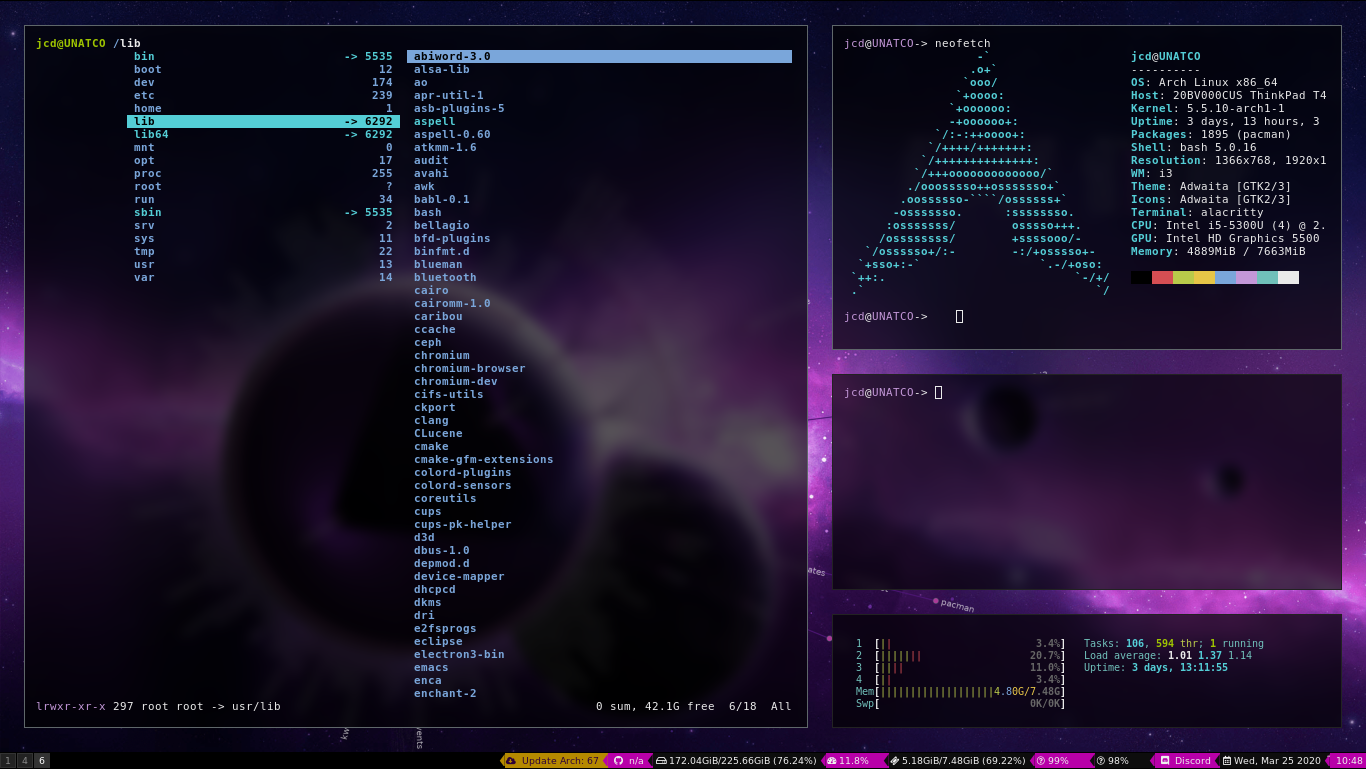
 The latest iteration of my current installation.
When I first began venturing away from Ubuntu I was struck by the steepness of the learning curve present when attempting to install Arch for the first time. This was only worsened by the lack of ?beginner-friendly? material available. Most guides provided a purely procedural installation without explaining any of the intricacies of the actions being undertaken. Though this is effective in getting users from point A to point B, it does little to help them when things inevitably go off course. Though the Arch Linux wiki is a prolific source of wisdom, it is also potentially overwhelming to a user who barely knows where to begin in the first place. Furthermore, the archlinux.org?s installation guide is adequate but lacks visual guides and omits many details necessary for a user to understand the whys and wherefores of their actions. This guide seeks to fill this gap by providing beginners to the distro with a visual installation guide that follows the same structure as the installation guide present on archlinux.org. This is done with the intention of being supplementary to the official wiki such that, in the event a user becomes stuck, they may smoothly transition between the two guides while attempting to solve their issue.
For the purposes of this guide we will define beginner in the following way:
- Some degree of comfort when operating with a terminal
- Some degree of experience on a more beginner-friendly GNU/Linux distribution (e.g. Ubuntu).
If you do not fall into this category then proceed at your own risk and with a healthy attitude towards failure. It will be more difficult and may take many iterations to understand and become successful but it is possible to get there. I would suggest ensuring you can wade in shallow water with Ubuntu before leaping into the deep end with a fully terminal-based installation of Arch but hey?difference strokes for different folks.
Creating a Bootable USB
The first step is to create a bootable USB drive from which to install the system. For this step ensure you have the following items:
- The latest version of Arch
- A modern USB drive (please use a USB 3.0?.)
- A computer whose contents have either been backed up or you are fine with being overwritten.
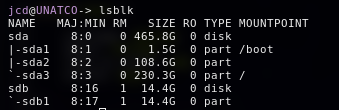
After inserting the USB drive run the command ?lsblk? lists all locally available block devices. Its output should appear similar to the following:
The output of this can be a lot to take in at first but there are only a few elements we care about for the purposes of creating a boot disk:
- NAME ? This column prints a tree-like list of all storage devices and their partitions. By tracing through the tree we can construct a path to access the device that we wish.
- SIZE ? Size just indicates a given disk or partitions current size. This is useful for tracing down the mount point for your USB at a glance if you have multiple disks mounted to your system.
- TYPE ? This field indicates whether the block device with the corresponding name is a disk or a part(ition). This is important as we cannot write to a raw disk. We must first create a file-system and partitions on said disk which we may then write to.
Looking at the output we can see that my USB was mounted under sdb. From this we can construct the path /dev/sdb each element of which has the following meaning:
- /dev ? This prefix is used to indicate we are going to be accessing devices.
- /sdb ? This stands for SCSI (Small Computer System Interface) Device B. SCSI is a set of standards for data transfer occurring between computers and peripheral devices. As more drives are mounted they will be enumerated /sda through /sdz. Partitions on devices are further enumerated /sda/sda1 through however many partitions you can manage to fit on that device. To be clear a USB drive is NOT SCSI device. This acronym is just a relic of a bygone era when SCSI hard drives were common and is now used to refer to any block device.
Whew, That was a lot! But now we can construct the dd command that will be used to create our bootable drive:
dd bs=4M if=<path to your .iso> of=<path to your USB> status=progress
Once again? a lot to take in at first. Here it is in more bite size-chunks:
- bs ? This stands for ?block size?. The Arch wiki recommends a size of 4MB so that?s what we?ll be using.
- if ?This stands for ?input file?. Since our input file will be the iso file you downloaded earlier provide it with the path to that file.
- of ?This stands for ?output file?. In this case, all of our output will be directed at the USB device provided it with the device path we constructed earlier.
- status ? There are a number of values we can provide here however the most useful would be to see the progress so we know things are happening.
In the case of my system this works out to the following:
dd bs=4M if=Downloads/archlinux-2020.03.01-x86_64.iso of=/dev/sdb status=progress
This process might take a while so be patient. Once it is complete remove the drive, grab the computer on which you wish to install the operating system, and get ready to begin the installation process.
Installation
Booting into the Live Environment
Now for the fun part! Time to begin the installation process. To do so execute the following steps:
- Insert the USB we just finished preparing into the system of choice and turn the device on.
- Enter the boot selection menu. Doing this is device-specific however it is generally F9, F12, or the Del key so pressing all of those rapidly while the device is booting generally does the trick. 🙂
- Select the USB as the device you wish to boot onto from the menu
At this point, you will arrive at this menu and select the first option to boot into the live environment.
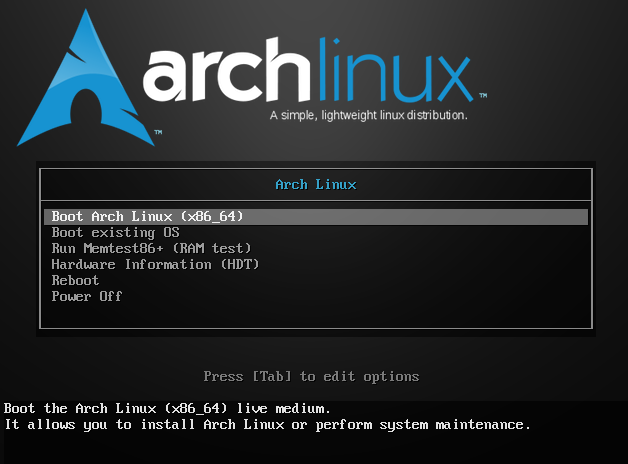 This is a BIOS boot screen. If your system is UEFI then it will look a bit different so don?t panic?
Pre-Installation Phase
 What you will be greeted with upon first booting into the live environment
Before we begin installing the operating system to the disk several preparatory steps are required:
- Setting the keyboard layout
- Verifying the boot mode
- Network configuration
- Updating the system clock
- Setting up the disk partitions and file system
Each of these steps can be as intricate as wish them to be depending on your comfort level and willingness to explore.
Keyboard Layout
If you are in North America, using an ANSI (American National Standards Institute) English keyboard, using a QWERTY layout, and your keyboard seems to be functioning correctly you can safely skip this step as the US layout is set as default. If not, or you are simply curious, please continue.
As of this version of Arch, there are 225 available layouts all of which are stored in ?/usr/share/kbd/keymaps/?. If you are not sure where exactly to start I would recommend opening all of them in less and scrolling through until you find the one that suits your needs.
ls /usr/share/kbd/keymaps/**/*.map.gz | less
If you are not familiar with less just use the up and down arrow keys to scroll through options and ?q? to leave once you?re ready.
Now that you have selected your keyboard layout, enable it through the use of the following command:
loadkeys <your-layout-here>
Determining the Boot Mode
For just a moment we are going to take a step back from the installation to learn about boot modes. For the purposes of this there are two with which we need to concern ourselves:
- UEFI (Unified Extensible Firmware Interface)
- BIOS (Basic Input/Output System)
Knowing which of the two boot modes your system is using is essential for determining the partition scheme and bootloader setup you will use later. Determining your boot mode is as simple as running the following command:
ls /sys/firmware/efi/efivars
If this ls is valid and it spits out a number of files onto the screen then you are in UEFI mode. If not and you see ?No such file or directory? then your system is in BIOS mode. As previously mentioned this is VERY important so jot it down for later.
Network Configuration
If you are on a device that has wifi connectivity then connecting to the internet is as easy as running the following command, selecting your network, and entering your password :
wifi-menu
However, if you are running an ethernet connection it should have been automatically picked up and connected.
To test your network connection run ping -c 3 www.google.com to ping Google with three packets. If you are successfully connected to the internet you should receive a response for all three packets.
Updating the System Clock
This step is relatively easy and involves your first direct interaction with the infamous systemd. This formerly controversial software suite manages a number of system sub-components in the form of ?services?. In the case of updating the system clock, we will be using the systemd command ?timedatectl? to manage the system clock. This is a trivial task and can be accomplished as such:
timedatectl set-ntp true
Partitioning the Disks
Now for perhaps the most arduous portion of the installation process, the partitioning of the disks. However, here is where a bifurcation will occur between those of you with a UEFI system and those using a legacy BIOS system. For the sake of sanity, the partitioning process for each will be explained separately as they differ enough warrant separation.
? BIOS and MBR ?
If you currently find yourself in BIOS land welcome and to some extent congratulations! Though this system is legacy (a nice way of saying antiquated) it is simpler to setup. For BIOS systems we will be using an MBR (Master Boot Record) which was a system developed in this early 80s and first deployed on systems made by IBM. Given we are parked at beginner status we will be going with one of the simplest partition schemes available:
- 4 gb swap: You can think of the swap partition as a type of RAM overflow tank. As your RAM gets filled up through overuse of Chrome tabs we want there to be a place to continue storing data in the event the RAM is entirely used up.
- Root partition: Whatever remains for the root partition. This is where the entirety of your operating system will live and where we will be ultimately installing Arch to.
To do the actual partitioning of the disks we will employ the use of the ?fdisk? utility. Run fdisk /dev/sda to launch the utility. For this process there are a few commands that you will need to know:
- o ? This creates a new MBR partition table. In the partition hierarchy, you can think of the partition table as a master list of all partitions on a disk and their locations.
- n ? This begins the process of creating a new partition within the drives partition table.
- w ? This writes the partition table, and all the partitions therein, to disk, then exits the utility.
- q ? This quits the utility without making any changes to disk.
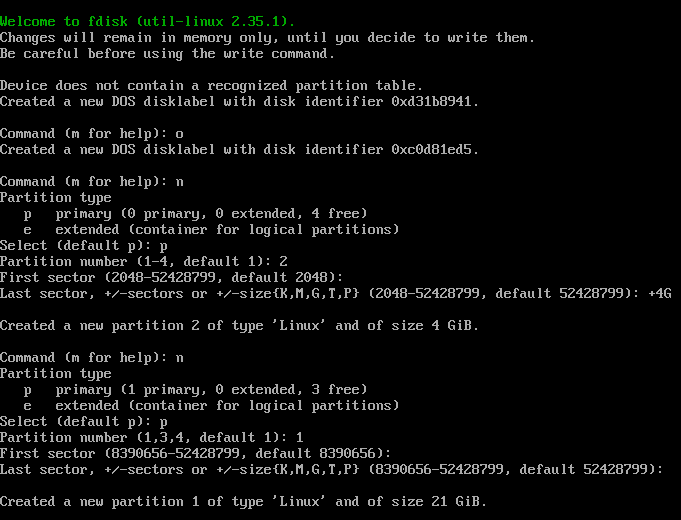
This process can be thought of as giving fdisk the recipe for what we want our partition table to look like. We are setting up the structure in the application without affecting anything on disk. Once confident everything is correct we can use the write command, w, to write everything to disk. This is not (easily) reversible so if you have a sudden realization you left a good deal of unbacked up and irreplaceable data on the disk you?re about to change STOP, hit q+Enter, and back away slowly. If not, pull the trigger and you should be greeted with a confirmation of partition alteration and disk?s syncing.
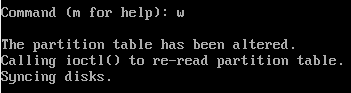 Yay! Everything worked 🙂
To confirm that the partitions are set up in the manner we wanted, run lsblk once again and you should have something resembling the output within the purple box. If its not the same no worries! Simply run fdisk again and overwrite. You can overwrite as many times as you like so
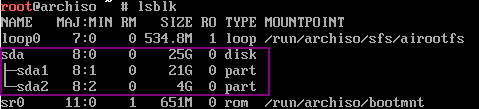 Ignore the loop0 and sr0.
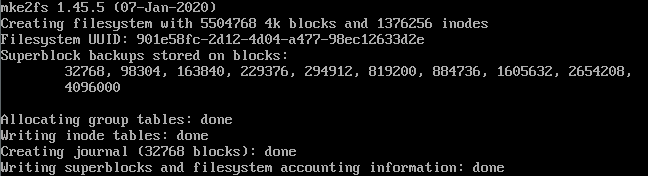
Now that the partitions have been created lets set them up our root drive. For simplicity?s sake, we will be using the Ext4 file system. However, there are a number of file systems to choose from each with their own extensive list of pros and cons. To set up the Ext4 file system on /dev/sda1 simply run the command:
mkfs.ext4 /dev/sda1
For which the following output should be produced:
As for our swap drive, there are only two commands necessary for its creation:
mkswap /dev/sda2swapon /dev/sda2
Finally, mount the root partition to /mnt.
![]() If all goes well this command shouldn?t print anything
If all goes well this command shouldn?t print anything
? UEFI and GPT ?
For UEFI systems we will be using GPT (GUID Partition Table). For this partitioning scheme we will be creating the following partitions:
- 512 mb boot: The partition that will ultimately contain the boot loader.
- 4 gb swap drive: You can think of this as the RAM overflow tank. In the event our RAM ever gets filled up the operating system will begin ?swapping? memory onto disk in an effort to keep things moving.
- Root: Whatever is left after making the swap and boot partitions will be used for the root file system. This is where the operating system will reside.
The utility we will be using is called fdisk. When you?re ready, launch it by calling:
fdisk /dev/sda
Once in the utility, there are a number of commands we will need to be aware of before proceeding:
- g ? This creates a new GPT partition table. In the partition hierarchy, you can think of the partition table as a master list of all partitions on a disk and their locations.
- n ? This begins the process of creating a new partition within the drives partition table.
- w ? This writes the partition table, and all the partitions therein, to disk, then exits the utility.
- q ? This quits the utility without making any changes to disk.
Now, follow the commands written in the following gif to see how to set up and write the partitions:

To confirm that the partitions are set up in the manner we wanted, run lsblk once again and you should have something resembling the output within the purple box.
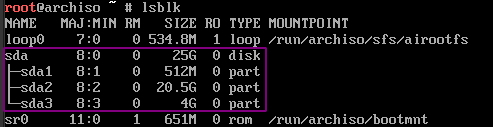 Ignore loop0 and sr0. They?re a byproduct of me doing this installation in a virtual environment.
If its not the same no worries! Simply run fdisk again and overwrite it. You can overwrite as many times as you like until you get the hang of it.
With the partitions out of the way, it?s time to set up our filesystems. The EFI partition needs to be formatted using Fat32. However, for the root partition,there are a number of file systems to choose from each with their own extensive list of pros and cons. To set up our filesystems for /boot and / respectively, run the following commands:
mkfs.fat -F32 /dev/sda1mkfs.ext4 /dev/sda2
As for our swap partition, we can initialize it with:
mkswap /dev/sda3swapon /dev/sda3
Finally, mount your boot and root partitions with the following commands:
mount /dev/sda2 /mntmount /dev/sda1 /mnt/boot
Congrats! The most difficult part is over! Time to move onto the base system installation.
Installing the Base System
The base system installation is fairly straight forward at this point. Now that the file system is set up and properly formatted we need only mount the appropriate partition, point the installation utility at it, grab a cup of coffee, and wait for it to complete before proceeding.
Begin by selecting the mirrors to install the base packages from. A mirror server is just a server that holds a copy of data on a master server. Somewhere, in the magical world that is the cloud, there is a master server to which the latest version of all this software is being pushed. However, there are hundreds of mirror servers around the world that, when an update is received by the master, ?mirror? it by receiving the updated software themselves. In order to make the installation as fast as possible, we want to select servers that are close to us. This can be done by using the pacman mirror list generator or, more simply, by editing the provided mirrorlist in /etc/pacman.d/mirrorlist to have the first ten or so entries be only those from within your country then save the file. It?s good to keep multiple servers in the file so if one server goes down you have backups.
 In this case, I?m using VIM. If you?ve not used a terminal text editor before I suggest using nano.
Now that we have our mirror servers selected it?s time to begin the process of installing. This can be achieved through the use of the pacstrap installation utility. We will need the following packages for a barebones installation: linux, linux-firmware, base, base-devel. Remembering back to earlier when we mounted our root partition to /mnt we will use this as the partition to which we install the base operating system. With all that in mind the installation is as easy as the following command:
pacstrap /mnt base base-devel linux linux-firmware
 Depending on the speed of your internet this might take a while?so hang tight
This concludes the installation of the base system. Now onto the configuration stage!!
System Configuration
The fstab file
The fstab file, for file system table file, contains information on how the file system should be mounted. Remember all that mounting and turning swap partitions on we did earlier? This is our way of keeping that on record so the system knows how we want our partitions configured every time it boots up. In order to generate this file we will need to use the genfstab with the -U flag:
genfstab -U /mnt >> /mnt/etc/fstab
This is the last change we can easily make operating outside of the system we just installed. Get ready to enter the file system we just spent all that time creating!
Changing Root
Now we want to change the root we are operating in from that of the live environment to the one on disk. This is done via the following command:
arch-chroot /mnt
Time Zone Setup
All of the timezone information on linux is stored in /usr/share/zoneinfo with the subdirectories therein containing specific regions and locations within those regions. Select a file path to a region that falls within your timezone and create a symbolic link between that path and /etc/localtime.
What is a symbolic link? Why are we using it? Well, a symbolic link (or symlink) contains a reference to a file or directory in another location so when a program or user attempts to access the symlink they are redirected. In this case, the system looks for localtime in the /etc/localtime path. However, all the time zones which we may select from are at the /usr/share/zoneinfo location. So, what we want is a way to say ?Hey, look over there if you want my localtime? when a program attempts to access /etc/localtime. In order to create this reference follow the gif and be sure to substitute in your own zone info:
 ln -sf /usr/share/zoneinfo/<Region>/<Subregion> /etc/localtime
Be sure to update the hardware clock after completing this step by running the following command:
hwclock –systohc
Localization
Now we need to be introduced to the concept of a ?locale?. This is a set of parameters that sets currency values, language, and any other preferences that may vary based on your region. The list of available locales are located in /etc/locale.gen. For this installation I will be wanting:
- Language ? American English
- Character Encoding ? UTF-8 (8-bit Unicode Transformation Format)
As such I will be uncommenting the en_US.UTF-8 line in the locale.gen file. Be sure to select the one that best suits your preferences, save the file, then run locale-gen to generate the locale.

Next, we will want to set the language by echoing the LANG variable?s preferred value into a new file /etc/locale.conf.
 Once again?be sure to substitute the variable with the one uncommented earlier
Network Configuration
Now we need to set the hostname. This is the name that will identify your computer when it is connected to a network. Pick something fun as it will be present at the system?s login screen for the duration of its lifespan. Once you?ve selected your name of choice echo it into /etc/hostname.
 I?m a bit of a Deus Ex fan?
Next, set up your hosts file as such being sure to use the exact same hostname you placed in /etc/hostname.

Set your Root Password
This step is fairly straight forward and consists of a single command, passwd. Run that command and there will be a prompt for you to enter your password and another one for you to verify it. Note that none of the text you type will show up in an effort to obfuscate your security credential but rest assured your keystrokes are being registered. Also? please don?t forget this password. It will be the first one you use when logging into your system for the first time and making your user account.
Installing a Bootloader
The boot loader is a piece of software with two key responsibilities:
- Loading the kernel and its parameters
- Loading the initial RAM disk, a temporary root file system from which early system initialization takes place, into memory.
There are many boot loaders to chose from but the most commonly used and the simplest is GRUB (GRand Unified Bootloader). Install this using the following command:
pacman -S grub
It is at this time you should try to recollect whether you are running a UEFI or a BIOS system and to use the appropriate installation instructions.
BIOS and MBR:
For BIOS the process is simple. Since we made no separate parition for the boot sector all is installed we simply select /dev/sda as the location for the install and run the installation utility as such:
 Note: i386-pc means this is installing for a 32-bit system
UEFI and GPT:
The UEFI installation will make use of the boot partition that was created earlier. However, first, we will need to install an additional package via the following command:
pacman -S efibootmgr
After that we will install the boot manager as such:
 Note: x86_64-efi means this is installing for 64-bit system
Boot Loader Configuration
With the boot loader now installed generate a configuration file in /boot/grub:
 Note: The -o flag is the output file flag.
Now we exit the system, unmount the partitions, power off the system, remove the USB, and turn it back on:

First Boot
Yay! Now we are officially at the finish line for the base system installation. Now just power off the system, remove the USB, and boot it up. You should be greeted by a login page and be able to login as root.
Creating a User
 Creating a user and checking the /home directory to see that user?s new directory
Now once you are logged into root on your brand new Arch installation there is one final step you should take. You should create a user account so that you are not performing all tasks as an admin. This is done via the useradd command:
useradd -m <username_here>
This will create a user with default settings as well as a home directory for said user.
Adding Superuser Privileges
Sudo, or ?Superuser Do?, privileges are essential for tasks such as installing packages, performing system updates, and performing general system management. By default, all users in the group ?wheel? are granted the ability to perform tasks as a superuser. To add a user to the wheel group execute the following command:
usermod -a -G wheel <user_name>
In addition to this, we will need to make a small modification to the /etc/sudoers file. By default the line allowing members of the wheel group to act as sudoers is commented out. Uncomment it, write, and exit the file to gain super user access:

Now, to ensure all those steps went off without a hitch, login to your new user account and attempt to gain root privileges by running the command sudo su:
 Note: When it asks for the password provide it with your user password rather than the root password.
User Password
Finally, we need to set the user password. For this simply use the passwd command followed by the user?s username:
 Setting up Anna Navarre?s password


)
)