

This is post 3 of 3 in our series ?Rising Barn Electrical Components,? where we explain how to wire your outlet to completion. Here are part 1 and part 2 of the series.
When building your own Rising Barn unit, you can convert your outlet to be controlled by a switch. This can be useful, for instance, if you want to light your room using a floor lamp. But how are these switches wired?
Before we begin, we want to stress that you should take all the precautions necessary to be safe when working with electrical equipment. Mistakes here could be DEADLY. You should NEVER attempt to do this with live wires, and always make sure connections are solid. If you don?t feel safe setting this up, feel free to call an electrician, and make sure the work is inspected afterward. And now for the fun part:
Let?s talk about outlets and wires. There are three kinds of connections: Hot (+), Neutral (-), and Ground. The wire you should be using for this (the interior residential wire) has three colors of insulation, for the three kinds of connections:
- Black (Hot)
- White (Neutral)
- Brown, green, or just a bare wire (Ground)
Both the outlet and the switch, on the other hand, come with screws that act as attachment points. These follow the same format of hot, neutral, and ground, however, they have a different color code:
- Bronze (Hot)
- Silver (Neutral)
- Green (Ground)
Usually, you connect the wires to the outlet/switch by wrapping them clockwise around the screw before tightening it.
Let?s begin wiring! Make sure that you have a jacketed wire running from the breaker to the outlet, and one from the switch to the outlet. Strip the ends of all the wires and twist them into a half loop.

(1) First, let?s take a look at the outlet box. Connect the white-colored neutral wire coming from the breaker to the silver-colored neutral side of the switch. Wrap the white-colored neutral wire clockwise around the silver-colored neutral screw of the outlet.

(2) Follow that by taking the ground wires from both the breaker and the switch, twist them together, and twist the two clockwise around the green grounding nut on the outlet. If you need help, reference the diagram below.

(3) Next, take the black-colored hot wires from both sources and connect them using a wire nut.

(4) Finally, take the wire coming into the outlet from the switch, and connect the white neutral wire to the brass-colored screw on the hot side of the outlet.
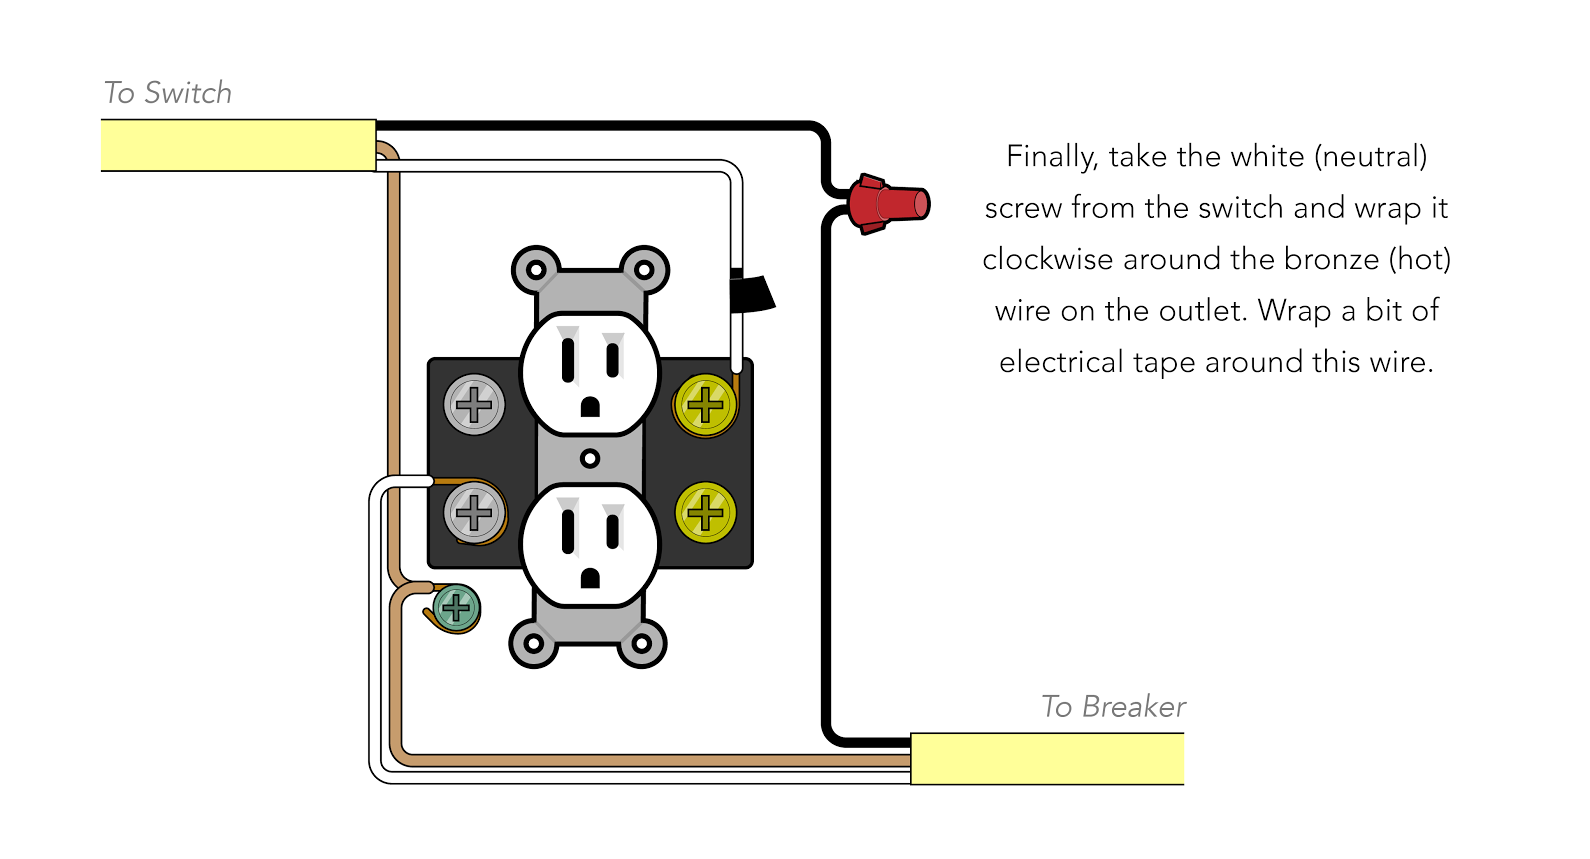
Now typically, white neutral wires are only supposed to be attached to the silver-colored screws on the neutral side of an outlet, while the black ?hot? wires are supposed to be connected to the brass-colored screws. So for now, to make sure that you aren?t confused as to why a white wire is suddenly wrapped around a brass screw later on, wrap the end of the white insulation on this wire with a little bit of black tape or shrink wrap.
(5) Now, after all that, you?ll be relieved to hear that wiring the switch is nowhere near as complicated. Simply take the brown grounding wire and wrap it clockwise around the green grounding screw on the switch.

(6) Then, take the black-colored hot wire and wrap it clockwise around the hot brass-colored screw on the switch.

(7) Finally, twist the white-colored neutral wire around the neutral silver-colored screw. Since you wrapped a bit of black tape around this wire in the outlet box, do the same with this wire- it will help you understand which wire is which.

(8) Finish it off by double checking all the connections to make sure they are solid and no bare wires are touching any kind of metal they aren?t supposed to be. Then fold the spare wires neatly into the outlet boxes and attach the fixtures to their boxes using the appropriate hardware, including the faceplate for the boxes. When your breaker is switched on, and the boxes are energized, carefully plug in a lamp to test your switched outlet.
