
6 Easy Steps, a Shopping List, and Essential Workout Advice
Can you picture it?
Landing that insane 60-plus inch static box jump, posting it to instagram, and being showered in likes and sponsorship deals?
Okay, neither can I ? and that?s okay! The truth is that those crazy high jumps are more dangerous than they are actually beneficial for your fitness. But more on that later.
This article, and the accompanying video, covers simple steps to make your own DIY plyometrics box. Plyo boxes are a great and inexpensive addition to any home gym or garage gym ? or even a regular gym.
Plyo boxes, used properly, can reduce your injury risks, enhance your training, and allow you to engage in drills you otherwise couldn?t. Whether your training includes calisthenics, crossfit, general functional fitness, or obstacle course racing and ninja warrior, you need one of these!
Here?s the video:
Best of all, this is one of the least expensive pieces of equipment you?ll ever build! Assuming you have the tools handy, the wood and screws might run you $35 total ? that?s a great deal considering wooden 3-in-1 plyo boxes can cost upward of $100 or more online (plus shipping ? yikes).
How to Build a Plyometrics Box
Okay, let?s dig into the build itself.
First you need to collect all of your parts and tools. I have links to get everything delivered if you don?t feel like going out. Heading to the store for your supplies? Click here for a handy printout!
Plyo Box Supplies & Tools List
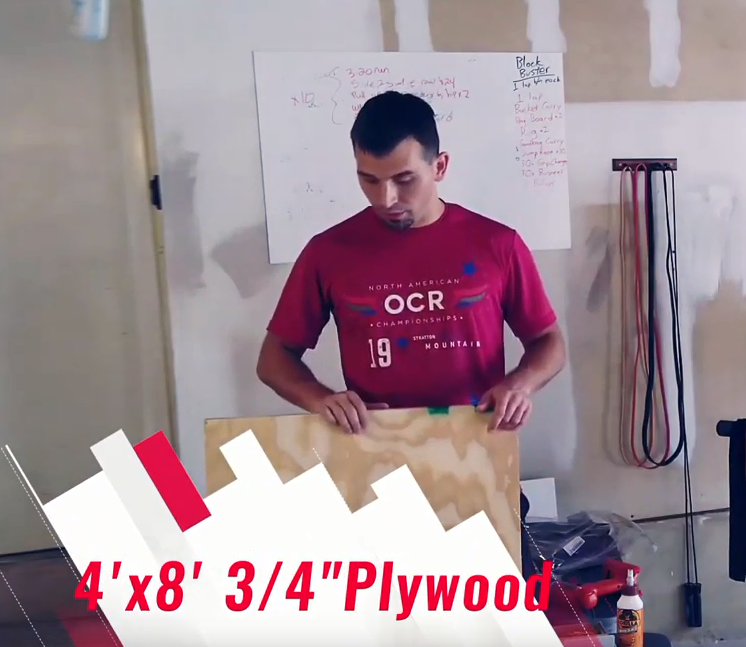
- 4′ x 8′ 3/4″ Plywoodhttps://www.lowes.com/pd/Severe-Weather-3-4-in-Common-Southern-Yellow-Pine-Plywood-Sheathing-Application-as-4-x-8/50277377
- 10# 2.5″ Wood Screwshttps://amzn.to/32pY4F7
- Wood Gluehttps://amzn.to/2NWMgFr
- Sawhttps://amzn.to/32sg9T5
- Drill & bitshttps://amzn.to/2K2wtUe
- Tape Measure &Pencil (don?t tell me you don?t have these!)
- OPTIONAL: Corner / Edge Protectorshttps://amzn.to/38eBkMH
- OPTIONAL: Sandpaper (I do recommend this. Whatever is cheap will work fine.)
Affiliate Link Disclaimer: This article contains a number of affiliate links, from which I may receive financial compensation. This money goes to support my family. You can generally find all of these supplies at any quality hardware store. Where the price is notably different, I have linked those options instead.
Step 1: Measure and Cut the Plywood
The first step, of course, is to measure and cut your plywood. I recommend tracing out each section on the board before cutting to make sure you don?t mess up.
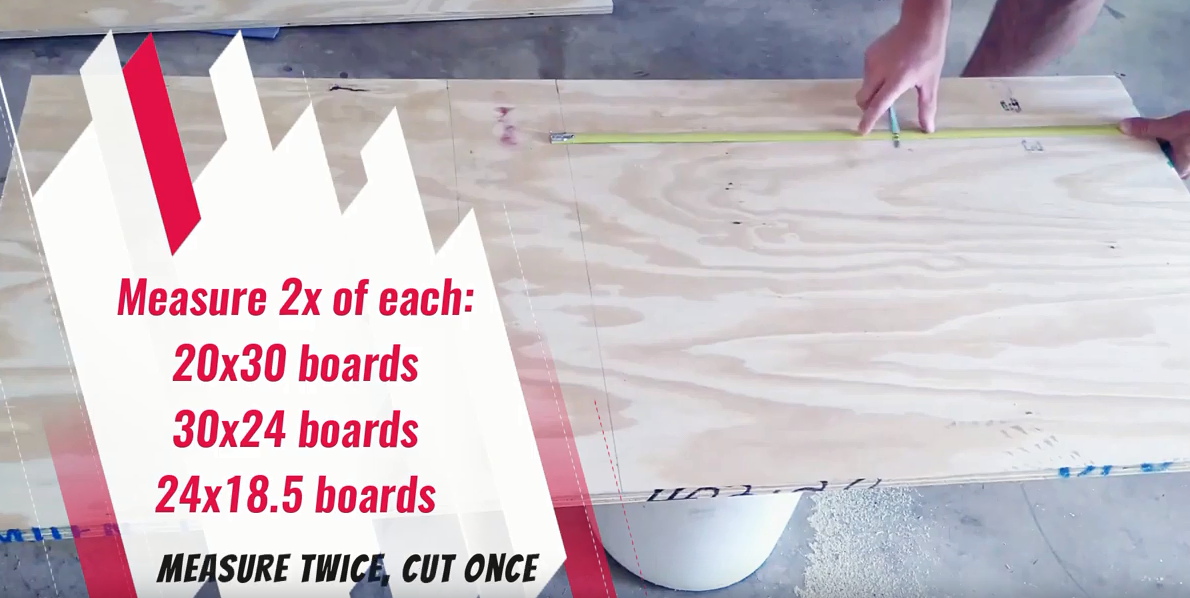 Seriously though, measure at least twice.
Note that the 3rd pair of boards has a side measuring 18.5″ rather than 20″. This is because it will be between two .75″ thick boards ? if you don?t cut it a bit shorter, it won?t line up right.
Here?s the link to my handout again as I think it helps to visualize this.
Step 2: Sand Down the Rough Edges
I gloss over this in the video for the sake of keeping things moving, but nobody likes splinters!
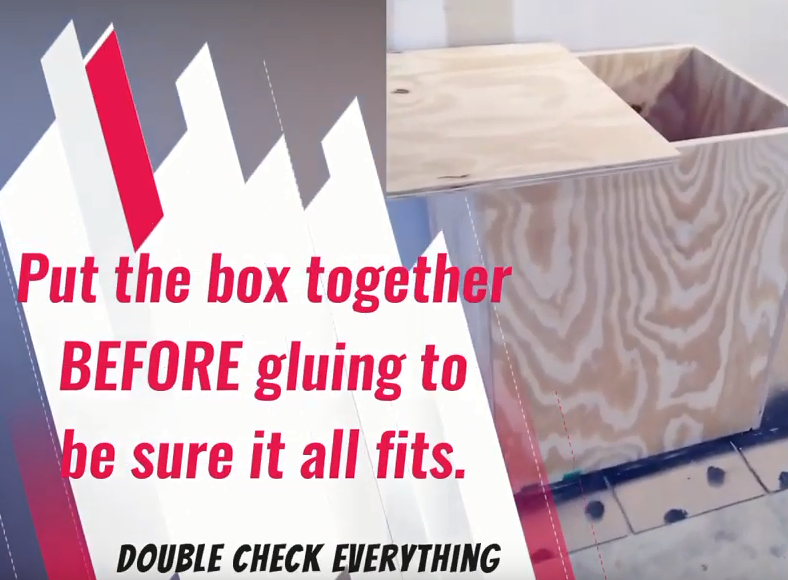
Step 3: Pre-Assemble the Box
This is so important!
If you?ve cut your boards accurately and sanded them smooth, you should be able to set the whole box up against a wall and it should all fit.
If you have a friend, SO, or kiddo who can help, this is when you want to call them.
Does it have to be perfect? No, but it should be pretty darn good. If you have any major gaps or other issues, you might need to cut or sand to even things out. Do it now, or risk ending up with an unusable box.
 If you have a friend, SO, or kiddo who can help, this is when you want to call them.
Step 4: Glue the Box Together
If we?re going to screw this box together, do we also need to glue it?
YES, and I?ll give you two great reasons.
First, if the box isn?t being held together by glue, good luck drilling and screwing without causing the whole thing to collapse.
Second, a quality wood glue will add additional strength and durability. I was able to stand on my box and move it around as soon as the glue dried.
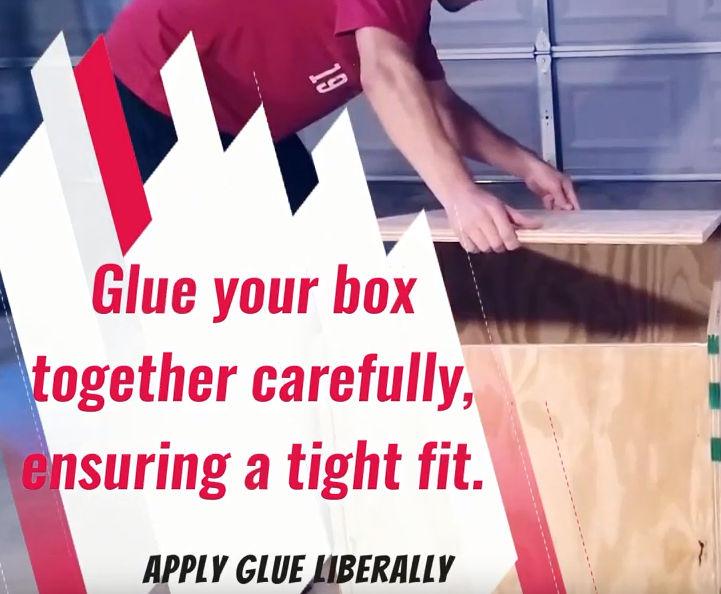 Gorilla Glue worked great for me and seems to be the standard. But you do you.
By the way, make sure you read your glue bottle and follow the drying instructions ? it might take several hours to completely set. Don?t rush this.
Step 5: Drill Pilot Holes
I harp on this in every DIY guide I write for a reason ? it just make life better!
Yes, you might be able to force a wood screw directly into plywood using brute strength or a powerful drill. However, your odds of getting off kilter or splitting the board are pretty huge.
Also, as ever, measure and mark everything!
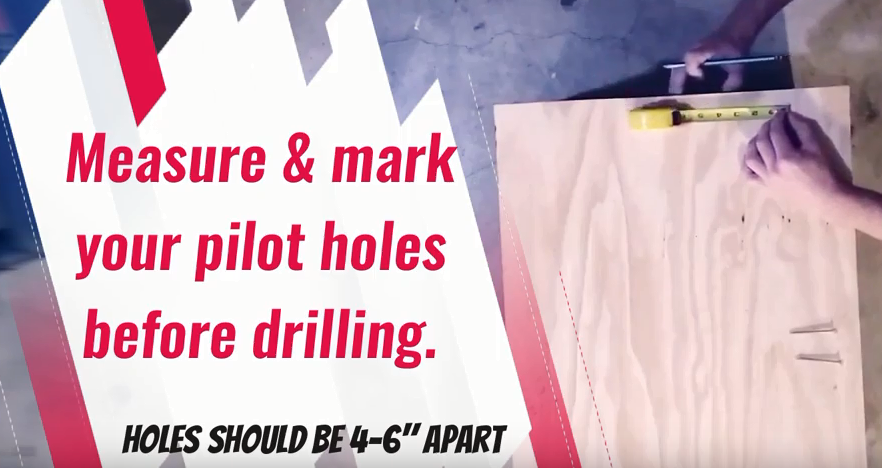
I ended up using about 3?4 screws on the shorter sides and 4?6 on the longer ones, so plan accordingly. Once you have your holes marked and measured, get to drilling. This part can take some time.
Step 6: Screw the Box Together
Okay, we?re nearly there! If you?ve drilled pilot holes straight down into the wood and recharged your drill, this should be easy.
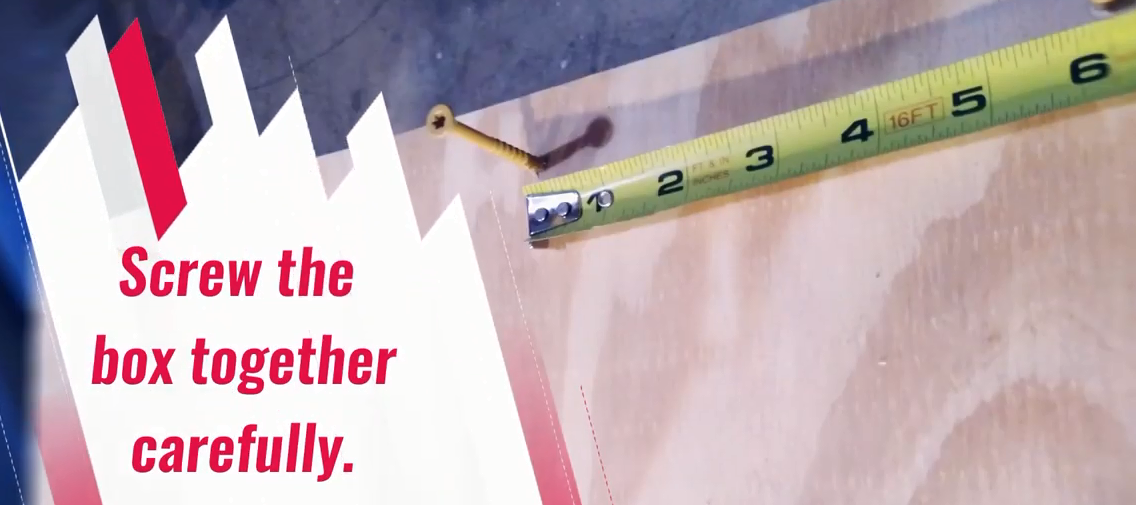 Reminder: Screws go 4?6″ apart. Put them too close together and you?ll compromise the wood.
As you?re putting the screws in, make sure to watch for signs of splitting wood. If you seen a screw going awry, take it out and fill in the hole with putty and wood glue.
You?re better off skipping one or two screws than breaking a board and ruining the whole project.
Bonus Step: (OPTIONAL) Add Corner and/or Edge Protectors
This part is totally optional, but I think at least adding the corner protectors is worth it. The box slides quietly and easily across my garage floor now, and I?m no longer as worried about dinging my shins.
Congratulations! You?re finished!
Keep scrolling to learn more about taking full advantage of your Plyo Box!
Why You Need a Plyo Box and How to Get the Most out of It
You can totally train explosiveness by jumping without a plyo box. In fact, you can use the floors, sidewalks, and ground you already have at home!
However, there are some risks that a box can help mitigate, and some advanced exercises that a box can help you engage in. I?ll go over the risks first, and then we can dig into some advanced plyo box exercises.
Plyometrics Injury Risks
Injury risk stems not so much from the actual jumping, but all those hard landings. Come down wrong just once and you could end up with a rolled ankle, joint sprain, or worse.
Don?t Jump Too High
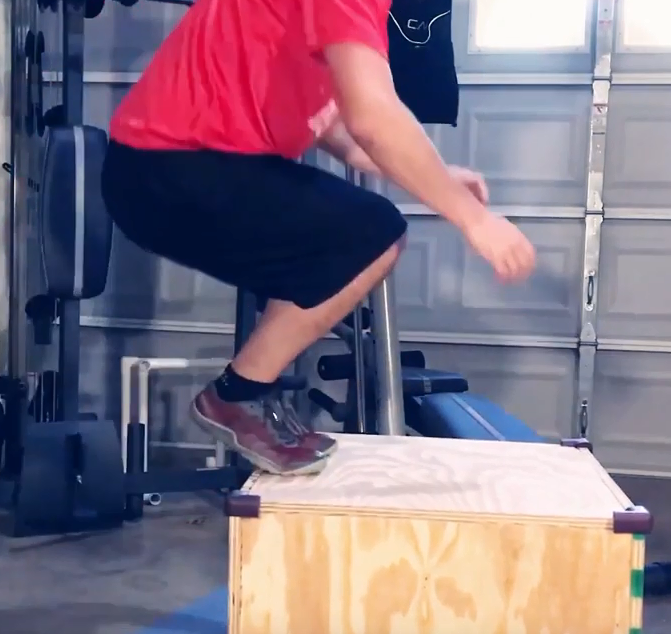
Jumping up onto a box (of a reasonable size for your height and fitness level) helps to remove this risk by catching you near the apex of your jump, shortening your fall and reducing the impact on your joints ? hence, less chance of getting injured.
Beginner adults should start between 18 and 24 inches high, and only increase incrementally over time.
That said, it?s really important to focus less on jumping super high, and more on jumping repeatedly with good form. Beginner adults should start between 18 and 24 inches high, and only increase incrementally over time. Jumping much higher doesn?t actually do a lot for you.
Personally, I only use the 30″ side of my box to reach things on top of my garage racks without getting the ladder out!
Land Carefully
I?ve already emphasized that sloppy landings are the biggest source of injury risk in plyometric training, but it needs to be said again.
If you?re too tired to land safely, STOP.
Plyo Boxes are great because you can practice landing correctly by stepping off the box and landing on both feet, absorbing the impact by bending your knees and squatting down.
When you land a jump, your legs should be shoulder-width apart. Keep your knees lined up over your toes all the way through ? they should never bow inward.
If anything, force them out slightly. Keeping them in line like this strengthens your stabilizers and reduces your risk of knee injuries like strains, sprains, or tears.
Speaking as someone who has torn his ACL completely through and had it reconstructed, trust me: good form is important.
Don?t Jump Too Much
The other thing that?s important to remember ? and this is on you, not the plyo box ? is not to push yourself too far.
You do need to stress your muscles to create an adaptive response and get stronger, but there?s no reason to hurt yourself in a training session. Most people dramatically overestimate how much exertion it takes to stress your muscles enough to see gains.
What?s worse, jumping until you?re fall-down-dead tired not only increases your chances of injury, but can actually hamstring your progress!
This happens in a couple of ways.
First, when you train with poor form, typically due to being exhausted, you don?t activate all of the right muscles. At best, this means you?re getting rapidly diminishing returns from each additional repetition.
Over-training can literally hamstring you.
At worst, you?ll overcompensate with the wrong muscles and end up with more potential pain and injuries down the road.
Second, you might end up over-training, and yes, that?s a real thing!
Severe over-training can result in depression, appetite changes, feelings of illness, and even permanent reductions to your athletic ability.
Over-training means that you?ve done so much damage to your muscles that they can?t recover properly, and it can cause a lot more than severe soreness. Severe over-training can result in depression, appetite changes, feelings of illness, and even permanent reductions to your athletic ability.
All this to say: be smart, start with something you?re comfortable with, and build up incrementally from there. I recommend starting with 3 sets of 5 jumps for beginners, making sure to rest between each set.
Advanced Plyometrics Box Exercises
 Be careful of landing too close to the edge ? accidents suck!
Jumping up to a plyo box in sets is a great way for beginners to build their strength and durability with minimal risk, but you can?t do the same thing forever and expect to keep improving.
Here are 3 Exercises you can try to level up your plyometrics skills:
1. The Floor is Lava
- Begin by standing near the edge of the box while facing toward its center (heels toward the edge). Step off backward and land with both feet, then jump back up onto the box as quickly as you can.
You can also think of the floor as a trampoline ? try to spring back up onto the box!
- This exercise trains your body to quickly absorb and redirect force, using something called the ?stretch shortening cycle?. This more closely resembles how we use our muscles in the real world and is a great next step from regular box jumps.
2. Stabilizer Jumps
- Begin on the ground, facing parallel to the side of the box (not facing toward it, like you might normally be). Jump up onto the box while remaining sideways, keeping your feet parallel to the side you?re jumping up onto. Step down on the other side and repeat.
Jump up onto the box sideways. You can also work your landings by jumping down.
- This exercise builds your ability to land with stability by redirecting forces to the side. Focus on keeping your knees straight in line with your toes ? don?t let them bend inward! You can also get a little crazy and try it at different angles once you?re comfortable landing sideways.
3. You Got Me Jumping Side to Side
- Begin by standing in the middle of the box, feet parallel to the sides. Jump down off the box to your left without turning (remaining sideways). Absorb the landing, and then jump back up onto the box as quickly as you can. Rest for a few moments (or longer if needed), and then repeat on the other side.
Jump up onto the box sideways, then jump down sideways on the other side. Repeat.
- This workout combines the previous two exercises into a single drill that will have your legs feeling strong, stable, and springy in no time! As always, start with a few reps per set and build up incrementally over time. Focus on good clean form and stop before you get tired enough to make mistakes.
Are you a beginner thinking ?This stuff sounds hard!? Not to worry, I have a few tips for you, too!
3 Plyo Box Exercises for Beginners
- Steps Ups ? Standing facing the box, step up onto the box, leading with your left foot. Then step down, again left first. Now repeat on the right. Continue for 3 sets of 10?20 reps. Just like with jumps, stop if you start to feel wobbly or your knees are bending inward.
- Side Step Ups ? Same idea as the side jumps, but now you?re stepping up onto the box sideways. Then step off on the other side and repeat, working both legs. Again, 3 sets of 10?20 reps is sufficient when you?re just starting.
- Shock Absorbers ? Stand on top of the box and step off (facing forward!). Land with both feet at the same time, bending your knees to absorb the impact. As I describe above, focus on good form over speed. Keep your feet pointing mostly straight forward or slightly out, and knees lined up over your toes as they bend. 3 sets of 5 is a good place to start, and you can build up from there.
As these exercises start to feel easy, it will be time to incorporate jumping up to the box rather than simply adding more reps. Progressively increasing the difficulty is often better than just going longer once you?ve achieved mastery.
Now get training!
Thanks for reading!
Did you complete this build or use our workout advice? Please let us know how it went and link us any videos or pictures in the comments!


 for your Garage Gym)
 for your Garage Gym)