 Brett M. Christensen ? 2019
When I was 14 years old, my dad and I bought a brand new Super 8 movie camera. It was the mid-1970s and we were living in the coastal town of Albany in Western Australia.
My parents left a settled life in Sydney to explore the country when I was just a baby. So, I grew up travelling around Australia. Normally, we would only stay in each town for a few weeks. But, we stayed in Albany for longer because of my dad?s work commitments there. We even rented a house rather than living in a caravan as we usually did.
A large jar on the kitchen bench served as the ?bank? for our camera fund.
I put in part of my pocket money each week along with any money I earned for doing odd jobs and collecting aluminium cans for recycling. Dad, of course, contributed the bulk of the funds, but it still took us months to save up for the camera. We weren?t rich, so there was not a lot of spare money for luxuries like movie cameras.
It was a momentous day when we counted our camera fund and found that we finally had enough money. We headed into our local camera shop and bought the movie camera, a projector and screen, and a few cartridges of film to get started.
I loved it from day one.
After the first film cartridges were used up, we posted them away in the mail to be processed. I vividly remember the excitement when the mailman delivered our first batch of processed films some weeks later.
That night, we sat together as a family and played back our films. This was the first of many family ?movie nights?.
I learned how to splice films together and store them on larger reels as well as cut out the bits that didn?t turn out. Our movie nights gradually became a little more streamlined. I?d even play music with the films to add an extra element. This involved making a mix tape of suitable songs on cassette and hitting the ?play? button when the film began showing on the screen ? pretty high tech, I know.
Over the next 5 years or so, I captured thousands of feet of film as we traversed the Australian continent from Western Australia to Far North Queensland.
 Brett M. Christensen ? 2019
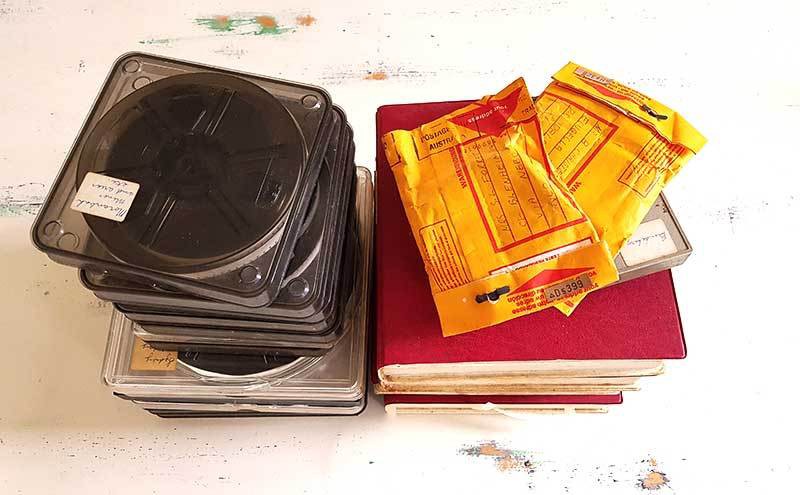
Fast forward 40 odd years and I found myself in 2018 with several boxes of reels holding old Super 8 film that was rapidly starting to deteriorate. Some of the films were becoming brittle and, whenever I opened the box, the telltale vinegar smell warned that the film was not in great shape.
So, I decided that the film needed to be converted to digital as soon as possible before all our precious family moments were irretrievably lost.
The Benefits of Digital
Once analogue film is digitized, it can be easily copied and distributed in various formats to anybody who wants it.
The film can also be easily edited. Long videos can be cut into smaller sections that focus on particular topics and events. Photographs and video from other sources can be incorporated. Titles, captions, narration, and background music can be added.
Moreover, once converted and edited, finished videos can be hosted online and easily shared via YouTube, Vimeo, and other services. If required, the videos can be set to private so that only invited friends and family members can view them.
Plus, of course, you can view the footage on a variety of digital devices rather than needing to set up a projector and screen.
And, theoretically, at least, it will last pretty much forever. I?d imagine that if the human race manages to survive for a few more generations, there will always be some method to convert and view ancient formats such as .mp4.
The Conversion Process
Converting Super 8 film to digital is not a particularly straightforward process. You can?t just plug a card or cable in and transfer the film to a computer.
One option is to send the film to a conversion service. However, given the amount of film that I needed to convert, this option was prohibitively expensive.
So, I decided to purchase a device that would allow me to do the job myself. Other members of my family got on board with the project and we agreed to share the cost between us.
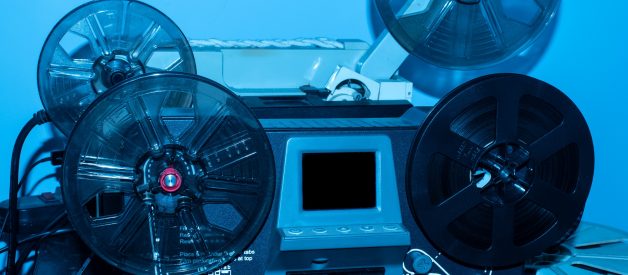
After some research and discussion, we opted for the Wolverine 8mm and Super8 Reels Movie Digitizer. The Wolverine is available via Amazon and other outlets and is listed at around $300 USD. A high-capacity SD card is also required.
The device looks similar to a Super 8 film projector and if you?ve used such a projector, you?ll likely understand how it works intuitively. You place the film to be digitized at one end, feed it through the capture pad, and connect it to an uptake reel.
This YouTube video shows how the device works
The digitization process is fairly slow. A full reel of film can take several hours to convert. But, once you get it started, it just clicks along on its own for the most part. You do need to monitor it just in case the film gets jammed in the capture pad or another problem occurs.
After the film is digitized and saved to the SD card inserted into the device, it can then be uploaded to any computer. You can also use the included cable to view the captured footage on a TV.
The device only takes 5-inch reels, so if you have your film stored on 8-inch or larger reels, you?ll need to split them on to smaller reels first. This can be a bit annoying, especially if you don?t have many spare 5-inch reels.
I found it helpful to leave my old film projector set up beside the Wolverine. It is quicker to use the projector for transferring film to smaller reels and rewinding.
Note that, if your film is very brittle, you may need to clean and lubricate it before digitizing. Thankfully I did not need to do this in my case. There are plenty of tutorials online that teach you how to restore and prepare your film if required.
Very stiff or brittle film or film with damaged sprocket holes may not feed through the capture pad properly and may jam up.
Do keep in mind that, if the film is highly deteriorated, you may need to seek the advice of an expert film restorer before attempting to digitize your film. Otherwise, it could be further damaged or even destroyed during the digitization process. There is an element of risk inherent in tackling the task yourself. So you?ll need to carefully examine your film and decide if the possible risk of damage or loss is warranted.
Results
Even the most advanced film conversion process is dependent on the quality of the source footage.
Much of my old film was rather grainy and had lost a lot of its original colour. So, of course, the final output does not have the sort of clarity and quality that we?ve come to expect from video these days.
But, overall I am very happy with the results. The Wolverine did a great job.
The converted footage provides an invaluable record of our family?s earlier days. I can?t help thinking that the sometimes less than optimal quality adds to rather than detracts from its overall charm.
Brett M. Christensen ? 2019 ? An example of a converted film
And, I managed to successfully convert almost all of the film. There was perhaps a hundred feet of film that was too brittle and damaged to be saved. But, considering that this film has sat in boxes under beds or garden sheds in all manner of climatic conditions for years on end, I think it?s remarkable that I was able to save and convert so much of it.
Post Processing
Once the film is converted to digital, it can be edited as you wish using video editing software.
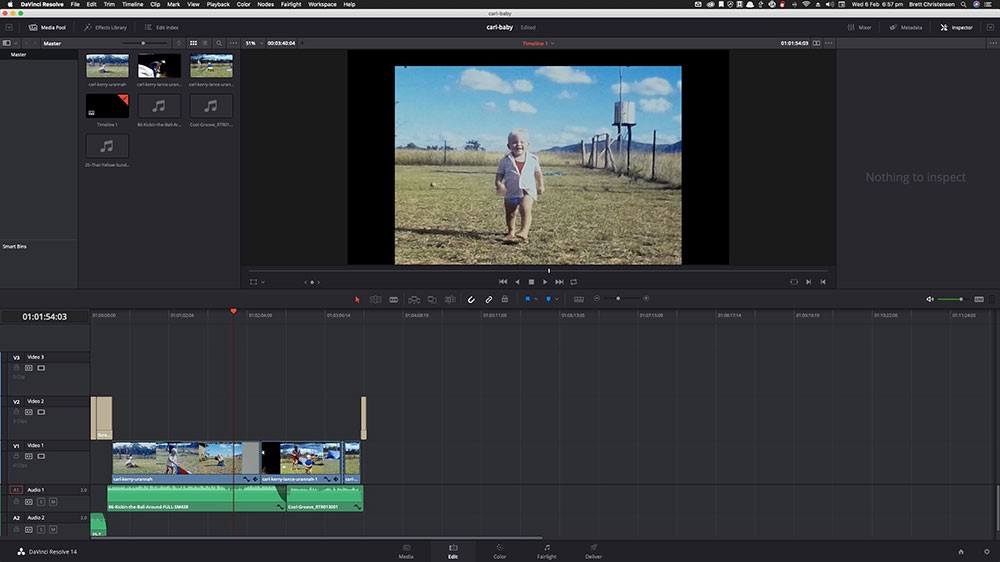
For my video editing work, I use a program called DaVinci Resolve. This outstanding software allows you to cut, add, and rearrange film clips, slow down and speed up clips, add audio tracks, add titles, images, and effects, and perform advanced colour correction. The standard version of DaVinci Resolve is free.
 Brett M.Christensen ? 2019
Some of my films had a strong purplish cast that I could not fully remove even with DaVinci Resolve?s colour correction tools. So, I converted this footage to black and white, which gave it a crisp and clear look that I really like.
Music
As I noted above, during our movie nights, I would play music on a cassette deck that I set up beside the projector. But, with digital, I can now add suitable music directly to the video. Well-chosen music gives the old movies a real boost and adds an extra dimension to the experience of watching them.
If you are intending to display videos publically, be mindful of copyright. Generally speaking, you cannot use music without the permission of the copyright holder even if it is just to add to a non-commercial family video.
I use a service called AudioHero to find music that I can legally and ethically use. The service has a large range of music and sound effects and you can subscribe for a quite reasonable monthly fee.
There are plenty of other stock music outlets available as well. Some sites allow you to download and use music tracks for free.
Video Sharing and Storage
Once you?ve digitized and edited your movies, you may want to make them available online so that other family members and friends can access them whenever they like.
You could use YouTube for this purpose if you like.
I opted for a paid Vimeo plan that allows me to upload plenty of videos and easily display and share them as I wish. This plan also allows people to download and store their own copies of videos.
It?s a good idea to encourage friends and family to download their own copies. The more copies that are floating around, the more likely that the films will be available for future generations to rediscover.
And of course, make sure that you create back up copies of your digitized films and store them on external hard drives or flash drives, in the cloud, or preferably, both.
Converting this old film has been a labour of love for me. Back when I first got the camera, Super 8 was cutting edge tech. At least to my dad and I. Now 40 years on, I?m working on the same film that I created all those years ago using technology that my 14-year-old self could not have even imagined.
So, if you have a box of old films under your bed, I?d encourage you to consider saving it to digital format before it?s too late. And, unless the film is already badly deteriorated, it is quite possible to do it yourself if you have the right tools. I?m certainly no expert in this field, but I managed to achieve the task and I?m very pleased with the results.
I hope this article inspires you to give it a go. If you have any questions about the process, please add them below and I?ll certainly try to help if I can.
