FaceBuilder? is an add-on for Blender for 3D-modelling of human faces and heads based on photos. With FaceBuilder you don?t need to be an experienced 3D modeler to create a quality 3D model with clean topology. You start with getting a few photos from different angles and then place a model on each of them to build a head or face model. The resulting 3D models can be later used for sculpting, animation, tracking or anything else either in Blender or being exported into a file and imported in any other 3D software.
Installation
Add-on
The complete installation process is covered in this video.
It all starts with downloading a .ZIP file with the add-on from from our site. When the zip file is stored locally, you need to open Preferences window in Blender and go to the Add-ons section (Edit > Preferences > Add-ons). In the right upper corner of this window you?ll see the Install? button. Click it and choose the downloaded .ZIP file ? the add-on will be installed. The next step would be to find ?KeenTools FaceBuilder? in the list of add-ons (in the Mesh category) and turn it on using a checkbox in the left upper corner.
 FaceBuilder for Blender add-on installation
Core library
Unfortunately we cannot ship our core library within the add-on package due to Blender license restrictions, but we made it as easy as possible to install it independently. There are two ways of doing that: online and offline. Both are accessible on the preferences pane of our add-on (Edit > Preferences > Add-ons > KeenTools FaceBuilder).
If the machine where you want to install our add-on is connected to the Internet, then you can try automatic online installation where after pressing the Install online button you can choose between two versions: Stable or Nightly. The first one is being updated within our main release cycle, usually once a month. The Nightly version is being updated almost every day, and although it?s always automatically tested, we can?t guarantee that you will not experience weird things if you decide to go with it. But if you do ? please let us know about any problems you encounter ? you?ll help us making it better!
After you choose the desired version and press OK button, our add-on will download the core library file, install it to the add-on directory and tell you that now you can use the add-on.
 KeenTools Core automatic online installation
You can also download the core library manually from our site and specify the path to the downloaded file using the Install from disk button. Our add-on will install the downloaded core library file and tell you that you can use the add-on now.
 KeenTools Core manual (offline) installation
First steps
Control panels
The way you control FaceBuilder in Blender is using panels in the sidebar on the right side of the 3D viewport. You can either bring them to the screen using the N shortcut, or by clicking the tiny little triangle in the right upper corner of the viewport.
 Opening FaceBuilder panel in Blender
FaceBuilder has one main and seven additional panels. On the main panel you can create, delete and select FaceBuilder objects. We don?t recommend having more than one FaceBuilder object in a scene because in Blender you can?t have cameras with different settings in one scene while most likely you?ll have different photographs for different people.
Using the seven additional panels you can control the chosen FaceBuilder object in various ways.
The first and second panels (Camera and EXIF) let you modify the scene camera settings and get the camera information from EXIF data stored in the loaded photographs.
On the Views panel you can load, remove and replace photographs, set the scene frame size, switch on Pin mode for different loaded photographs (more on that later) and perform some operations related to Pin mode.
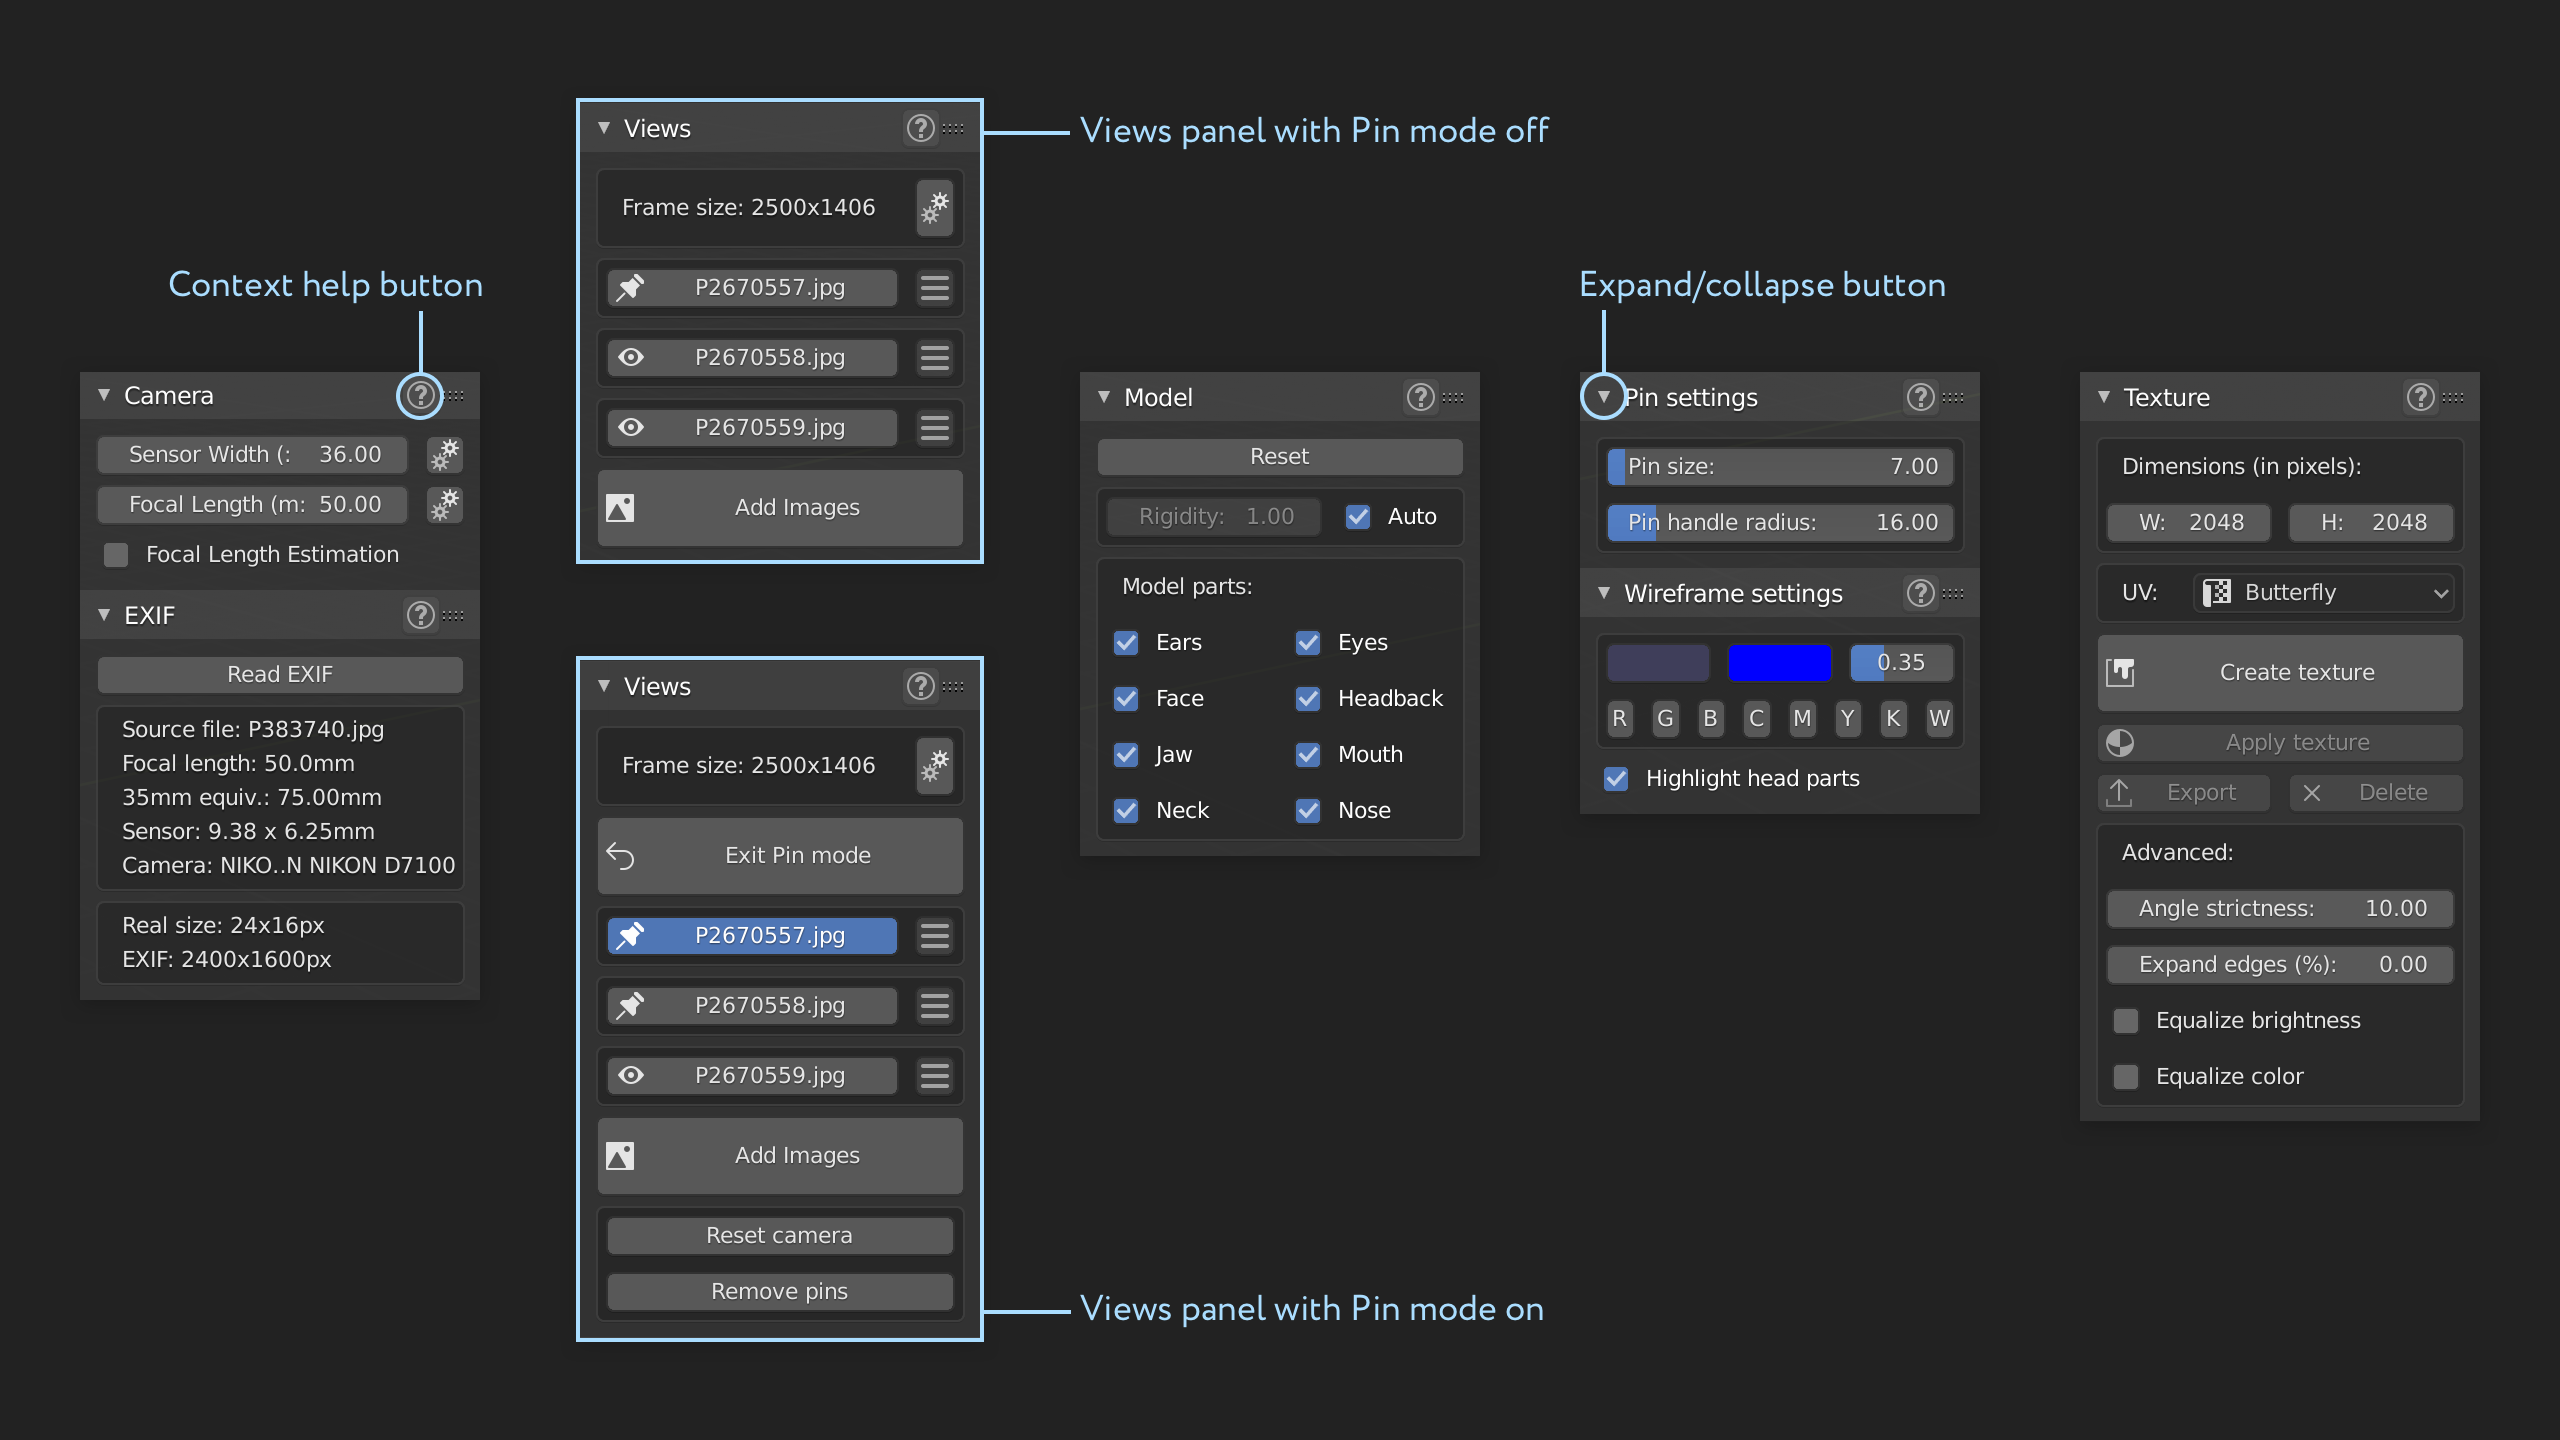 FaceBuilder panels in Blender
The Model panel gives you control over the parameters of the head 3D model, such as responsiveness to pins (Rigidity) and the visible parts (nose, ears, neck, etc).
Then we have the Pins and Wireframe panels where you can mainly tweak the appearance of pins and the wireframe in the Pin mode.
And finally the Texture panel gives you access to the experimental features of automatic texture generation.
Model initialisation
Before you create your first FaceBuilder head it?s better to remove all unneeded objects from the scene, especially the ones placed in the center of the scene, because a newly created head will be placed in the center as well and then you can run into situation when the objects will be interfering with each other. For example, by default Blender starts with a Cube, a Camera and a Light in the scene, you can either select them using your mouse and then delete them from the context menu (right mouse button), or you can just use the shortcut sequence: A ? X ? D (select everything ? delete ? confirm).
You start working with FaceBuilder creating a head 3D object if it?s not already created. To do this you need to open the sidebar, find FaceBuilder in it, and click Create a new head button placed on the main FaceBuilder panel.
 Initialising FaceBuilder for Blender with a new head
Photo loading
Once you?ve initialised the model, you can load the photographs of the person. You can do this on the Views panel clicking the Add images button. It?s possible to load multiple image files at once.
 Loading picture files into views and removing them
The distance to the person on the photos is not important, but it?s advisable to have them taking the most space of the frame and at the same time to keep distortions to a minimum (e.g. don?t use wide-angle lenses close to the subject). Also it?s important to know that FaceBuilder expects that the pictures have no lens distortion at all, so while it?s not a deal-breaker, still you?ll get much better results if you undistort photos before using them with FaceBuilder (lens distortion in Blender).
Whenever you load a new photo, the View is being created. It?s an imaginary entity made of a 3D camera and a picture you?ve loaded. So every picture loaded into FaceBuilder in the scene has its own camera.
Camera settings & EXIF
FaceBuilder can automatically set up the focal length and the sensor size for each photo. If there?s EXIF data, it?ll be used and you?ll get very precise results. If there?s no EXIF data, the focal length estimation will be turned on and used in a smart way taking into account the dimensions of every photo. Still, if you need to set up everything manually, we keep the manual control option.
To setup the camera manually you need to know the 35mm equivalent focal length used for each photo. You need to open the Camera panel, untick the Focal Length Estimation checkbox and enter the 35m equivalent focal length in the Focal Length field.
Pinning
When you?ve loaded photos, it?s time to decide if you plan to use facial expressions. If the photographed person doesn?t appear to have the neutral facial expression even on one of the photos, you need to turn on facial expressions support.
After that you can start what we call ?Pinning?: click on one of the buttons with an image file name (a View) on the Views panel and that will switch the Pin mode on, showing you a couple of new button on the View panel, a photo you clicked in the viewport and a default head mesh over it. Now you can start pinning the mesh to the photo.
We recommend starting with a 3/4 view, because it gives you more information about the head: the front and the side views at the same time.
You create pins by clicking anywhere on the mesh ? the red square dots that appear over it are what we call ?pins?. You don?t need to create many of them at once, instead do this one by one: creating a pin on a distinguishable part of the face or the head and then dragging it to the corresponding position on the photo.
 Setting up the Camera and pinning a model in a View
The first three pins will change position and scale of the mesh, the fourth one will start changing the identity. We recommend starting with corners of eyes, mouth, ears, nose and chin and then switching to another view to repeat the same ?draft? pinning. When you have pinned four or five views (e.g. two of 3/4, the frontal and two side views), you can return to the views you pinned earlier and refine the model position and shape on them creating new pins when necessary. Then you can pin more views and repeat the refinement process until you?re satisfied with the quality of the model.
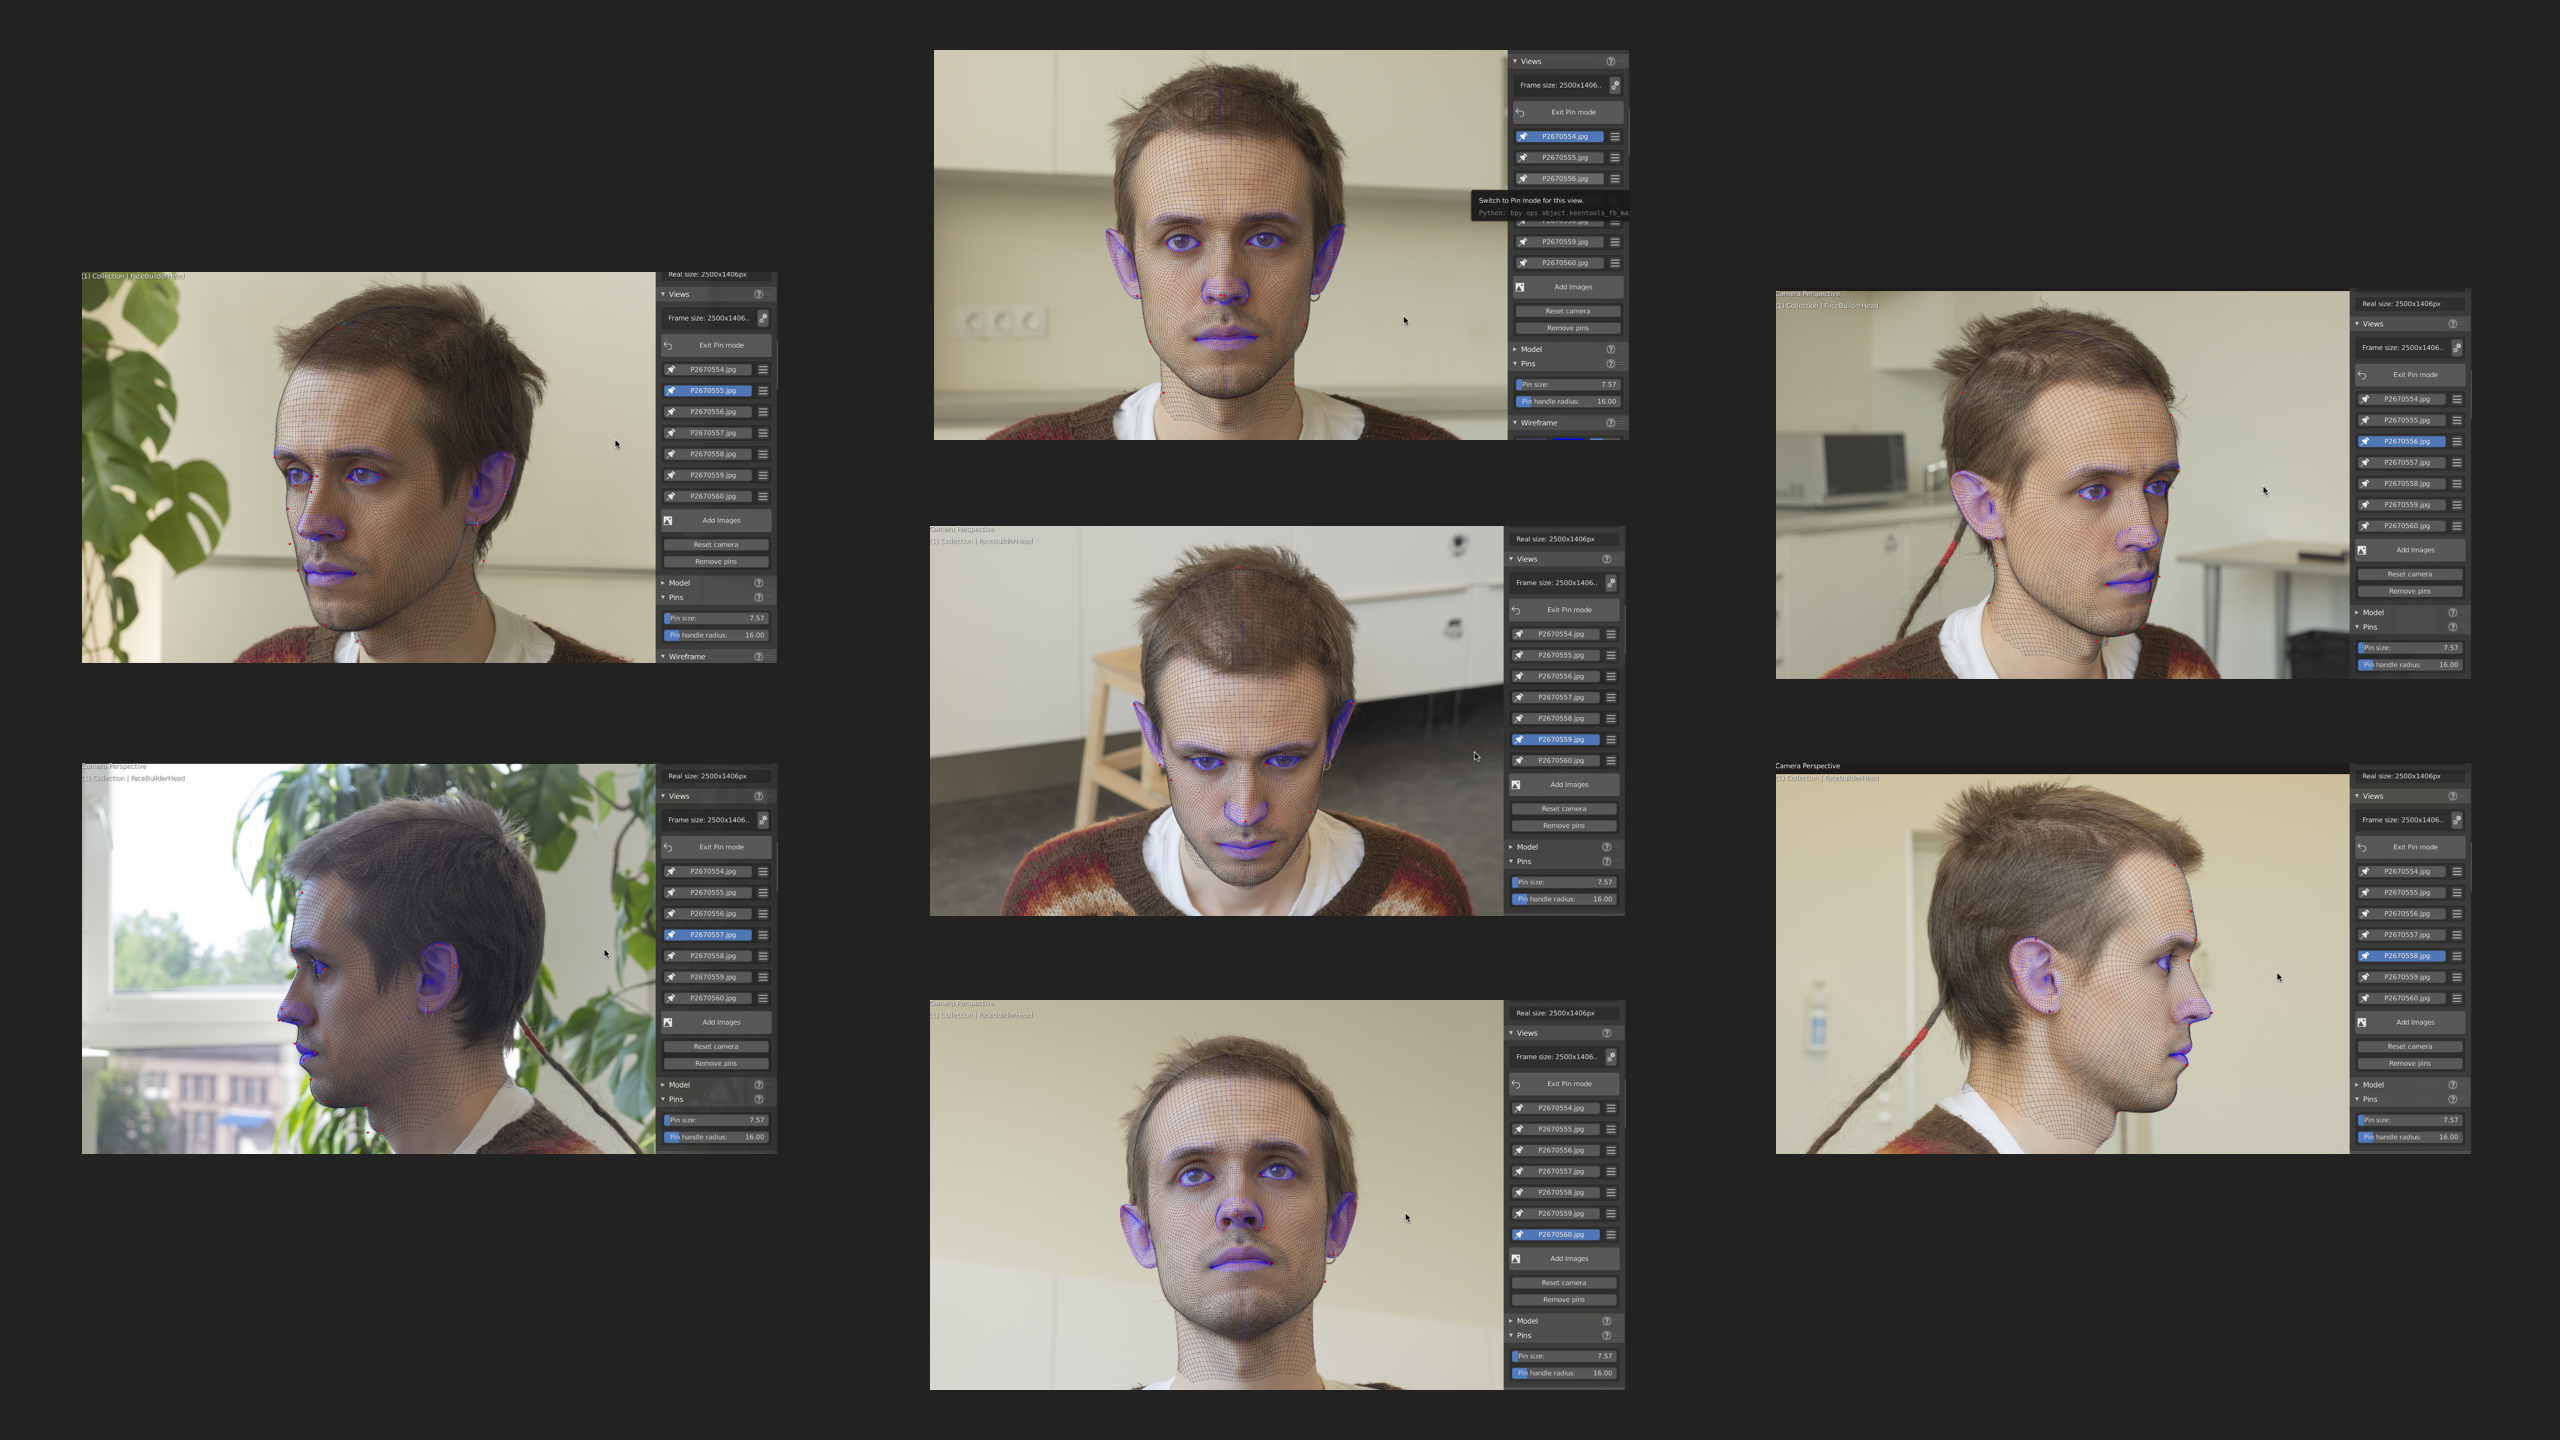 Pinned Views
Usually you need up to seven views: the frontal, two of 3/4, two side views, one bottom view and one top view, but you?re free to add more if you feel that you need them. Having less also works with the obvious outcomes of losing the details that you cannot see.
A couple of notes on taking photos. You can use any type of photos, including images with facial expressions. But it?s important to say that if you use facial expressions support and focal length estimation, the FaceBuilder algorithms get too many ?degrees of freedom? for their guesses, so not only the computation becomes slower, but also the preciseness of the model does suffer. That?s why if you?re after quality, you need to shoot the person yourself controlling the camera settings and the person?s appearance.
In an ideal case you can setup a number of cameras around a person, like if you?re setting up a photogrammetry rig, and then take all photos in one moment simultaneously. But usually asking a person to sit or stand relaxed and still for 15?30 seconds while you take all the required photos is more than enough. Also worth knowing that if you ask a person to change the position or their head ? the shape of their head close to the neck is going to be kind of distorted by the tensed muscles, so instead it?s better to walk around with a camera. And the last thing to keep in mind is that if you?re planning to grab a texture from those pictures ? you need to setup proper uniform lighting, otherwise the texture colours would be different in different areas. Usually it?s enough to walk outside to a wide open space with no direct sunlight, overcast weather works best in such cases. Also, it?s better to setup manual White Balance, otherwise colours would likely differ.
Texturing
The texture extraction algorithm built-in into FaceBuilder for Blender is still in its early experimental stage. We decided to include it to give you a simple approach of getting something good enough to start from.
It works using the views where you?ve pinned the model: projecting each pixel of the UV map to the photo according to the model position.
Before you launch texture creating process, you can setup the texture resolution and the desired UV map on the top of the Texture panel.
Then, after pressing the Create Texture button you can choose the views you want to use for texture grabbing (the views that don?t have a pinned model will be ignored automatically), pressing OK in that dialog will start the process of grabbing and stitching the texture, which usually takes a lot of processing power and also takes some time, so you need to be a little bit patient.
Once the process finished you?ll see the texture applied to the object if you left the corresponding checkbox checked, or you?ll see a message in the status bar telling you that the texture was created ? then you can apply the material automatically created with that texture using the Apply texture button.
You can also export and delete the texture using the buttons on this panel. Deleting may be useful when you want to transfer the project file without the texture (which changes the file size from kilobytes to megabytes).
 Texture generation
In the Advanced section of the Texture panel you can tweak the texture grabbing algorithm. The most important settings are the Angle strictness and the Expand edges.
The first one, Angle strictness, determines how the angle of view affects the pixel colour when we grab it. The possible values are 0?100. At 0 every pixel will have an average colour between colours taken from all pinned views where that pixel was visible. At 100 only the views where ?we?re looking? at this pixel at 90 will be used, so the colour becomes more accurate, but you?re losing the information for a lot of pixels at which you don?t have a 90 view. Usually, the best values are between 10 and 20.
Expand edgesuses the color at the edge to expand the texture. Using it may help with hiding seams on the applied texture.
Then we also have two super-experimental functions: Equalize brightness ? which tries to level the brightness of a pixel on different views, and Equalize color ? which levels the colour of pixels. They may help when you have differently lit or coloured parts of the face on different photographs and therefore you get shadow and colour patches on texture. Although sometimes these functions work well, it?s still much better to have an uniformly lit face while shooting if you plan to use the photos for texture grabbing.
Project management, Saving & Exporting
You can easily save the project in the middle of the face-building process, then load it and continue the work from the point where you left it.
We would recommend you keeping the project file in the same folder where you keep the photos used in it, or keep photos in the directory which is placed next to the project file. Just keep in mind that Blender uses relative file paths in projects, so storing files on different hard drives wouldn?t be a future-proof idea.
We don?t include the photographs into a project file, so when you want to transfer the project to another computer (or a person), you?d need to transfer not only the project file, but the photographs as well if you or the person you transfer the project to are going to edit the shape using the photos.
At the same time, the created texture is stored inside the project file, so first you?re transferring it along with the project file and second, it makes your project file quite heavy. If you don?t want or don?t need to transfer the texture, you can delete it on the Texture panel. You can also export it using the Export button on the Texture panel and then delete from the project.
To export the geometry you need to select it in the 3D viewport and then go to the File > Export menu where you can choose the file type and save the model. We recommend using Wavefront (.obj) or Alembic (.abc) formats, because other ones do not work consistently in Blender. But you?re free to try and choose any other format depending on your workflow.
If you?re going to use the head for facial tracking with our FaceTracker, you?d need to keep the topology intact, we rely on vertices order in FaceTracker, so please don?t use any kind of automatic optimisations during exporting. In this case you can use only Wavefront and Alembic formats, because Blender modifies geometry with other formats and there?s no way to prevent it at the moment.
Using Wavefront (.obj) and Collada (.dae) formats you can export the texture along with the model. If you choose the Wavefront format, the texture files (.mtl and .png) will be saved next to the model file, while the Collada file will have everything embedded with the model.
Links
Download FaceBuilder for Blender from our site.Follow us: Facebook, Twitter, Instagram, YouTube

