I?m an Ubuntu fan for many years. I usually update my Ubuntu installation to latest available release in order to use the latest and greatest applications and features that the open source world has to offer. For example, latest Ubuntu 19.04 has GNOME 3.32, Linux Kernel 5.0 and performance improvements!
I also always do a fresh installation of Ubuntu (of course to make sure that the installation is fresh) and I have kept my data in a separate partition to avoid deleting entire disk during installation. I also dual boot Windows 10 (yes, I?m a fan of Windows as well. However, my primary development environment is on Ubuntu). Therefore, I always install Ubuntu to a separate partition and mount my home directory in a different partition.
Encrypting data
Nowadays, privacy and security are utmost important and encrypting your data is crucial for your privacy and security. There are many pros and cons of encrypting your data and that?s a different topic. Most essential point is that your data is safe as long as your encryption key (passphrase) is safe and only you have access to your data.
Encrypting your data is also very important when we consider the EU General Data Protection Regulation (GDPR). Companies encrypt data on computers to reduce the probability of a data breach.
In Ubuntu, there are several ways to encrypt your data.
- Use eCryptfs (The enterprise cryptographic filesystem for Linux) to encrypt your home directory.
- Use fscrypt (a high-level tool for the management of Linux filesystem encryption)
- Use LUKS (The Linux Unified Key Setup) to encrypt your disks
Since Ubuntu 18.04 LTS release, Ubuntu installation no longer offers you to encrypt your home folder using eCryptfs during installation. Instead, it offers to encrypt your entire hard disk. However, this option to encrypt the Ubuntu installation is only enabled if you chose to erase your disk and install Ubuntu.
You can still use eCryptfs by installing the ecryptfs-utils package after Ubuntu installation. However, I didn?t want to use ecryptfs-utils package since it was removed in Ubuntu installation after calling it buggy and under-maintained! You can refer the bug comments for more details, but alternatives suggested were to use full disk encryption using LUKS or fscrypt support in file system (for e.g. ext4) to have per-directory encryption.
Even though I had backups, I didn?t want to erase my Ubuntu partitions to enable disk encryption using LUKS. Therefore, I first tried fscrypt tool.
One of the highlighted features in Linux Kernel 5.0 is the native support for Adiantum filesystem encryption. Since Adiantum was designed and created by Google specifically for low-powered mobile devices running Android Go, I expected there will be not much performance overhead if I use fscrypt with Adiantum.
I managed to get fscrypt working with Adiantum encryption after building fscrypt from source. Adiantum support is not yet available from the fscrypt package in official Ubuntu repositories. Setting up fscrypt was straightforward, but I encountered several issues. Sometimes I couldn?t even read my own files after unlocking. All I got was ?Operation not permitted? when trying to access my files. Since fscrypt was not enough stable for me, I thought of trying full disk encryption using LUKS.
As I mentioned earlier, you can enable full disk encryption using LUKS if you chose to erase disk and install Ubuntu. But it was not an option for me, since I dual boot Windows.
In Ubuntu wiki, there are very detailed instructions to encrypt your full system manually. It?s a comprehensive guide; nonetheless , I did not follow it due to few reasons. One major reason is that in one of the steps, it asks you to download a script from Dropbox and execute. You know that you should never run untrusted scripts from web. Anyhow, I downloaded it and examined how it works. Even-though, I didn?t execute it, it is a well-written script. It turns out the steps to actually encrypt your partitions are very simple.
I also found it easy to understand the steps by following another guide to encrypt partitions on Ubuntu.
Disk encryption using LUKS
In this section, I will explain how I encrypted my partitions using LUKS and how I installed Ubuntu 19.04 on encrypted partitions.
Please note that I already had the GUID Partition Table (GPT), which made things very easy.
What is LUKS?
The Linux Unified Key Setup (LUKS) is the standard for Linux hard disk encryption. LUKS also supports secure management of multiple user passwords.
Preparing partitions
When installing Ubuntu 19.04, I decided to create 3 partitions.
- Boot partition to mount /boot
- Root partition to mount /
- Data partition to mount /home
Earlier, I had /boot and / mounted to a single partition. Using an encrypted /boot directory will make things more complicated and I decided to keep my /boot directory unencrypted.
Note: Before you also think of encrypting your disks, please make sure to backup your data.
Booting Ubuntu 19.04 live image with ?Try Ubuntu” option.
It?s required to encrypt partitions before installing Ubuntu. Therefore I first booted my PC from Ubuntu 19.04 live image and chose ?Try Ubuntu” option.
Note: I used Rufus (on Windows), which is an excellent tool to create bootable USB drives.
Creating partitions
I deleted my existing root and data partitions using GParted application, which is already installed on Ubuntu 19.04 live image.
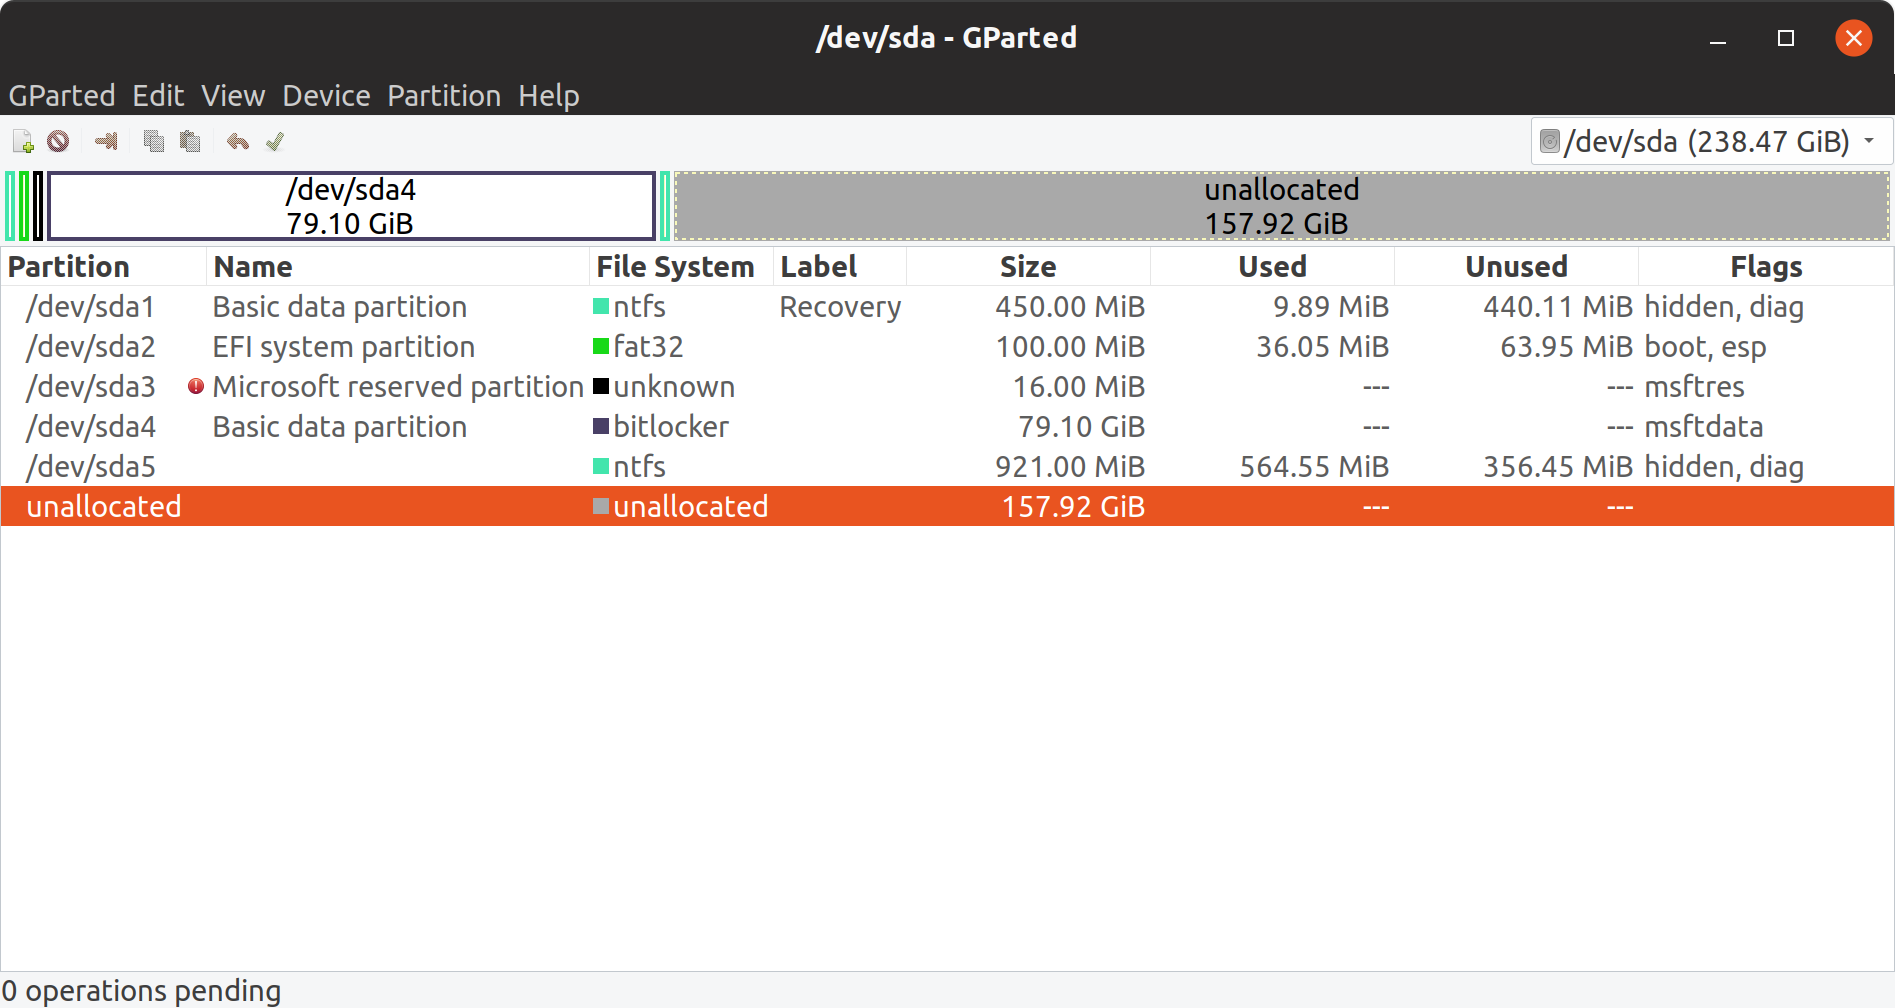 GParted after deleting existing Linux partitions
I created 3 partition as explained earlier.
For Boot partition I gave 500MiB
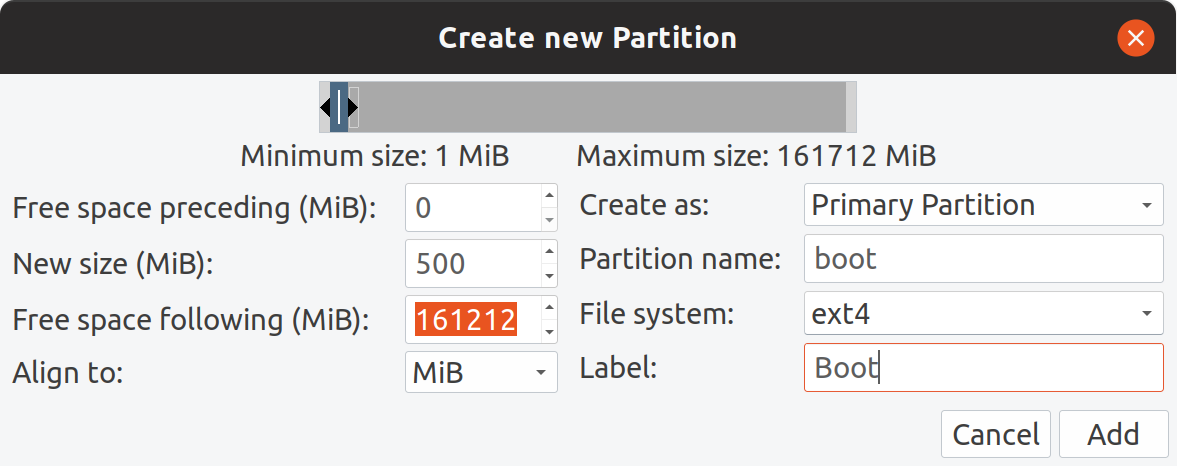 Boot partition
I gave 51200MiB (50GiB) for the root partition, where the OS will be installed. You really don?t need to give lots of space to root partition. In my experience, 50GiB is more than enough, especially when you have swap file in your root partition and install all your software on root partition.
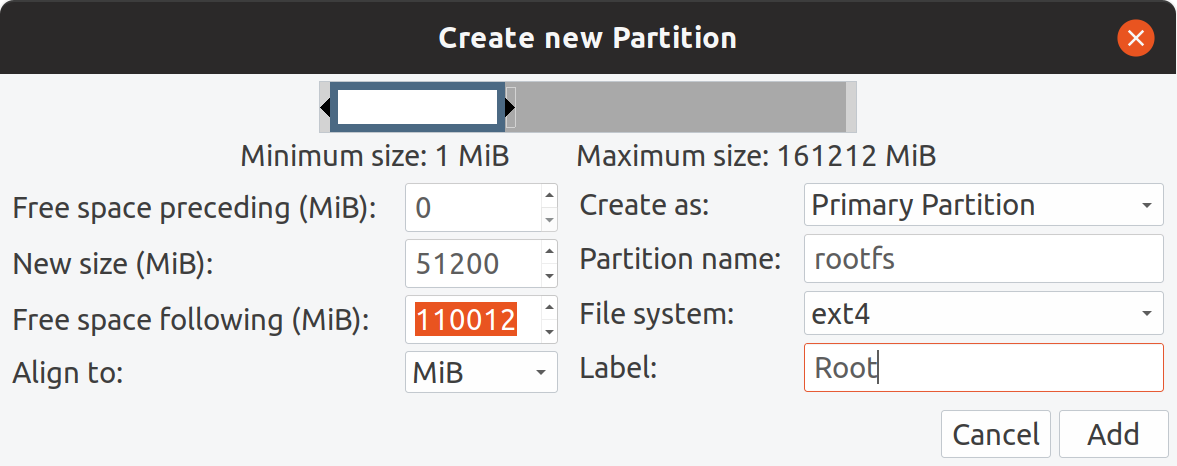 Root partition
I allocated rest of the space to my data partition.
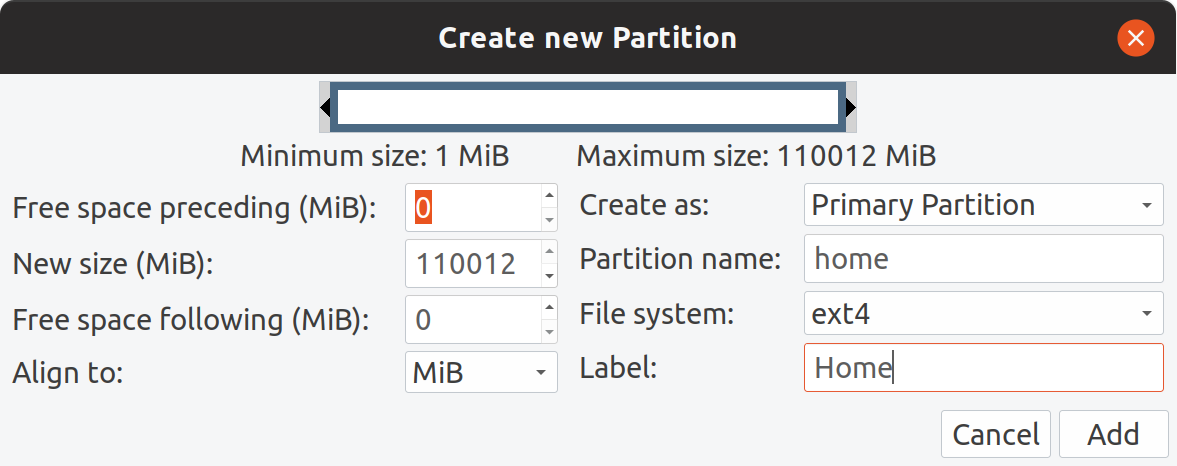 Home partition
After 3 partitions were created, changes were shown as pending operations in GParted.
 Pending operations in GParted
I clicked on checkmark icon on GParted to apply the operations.
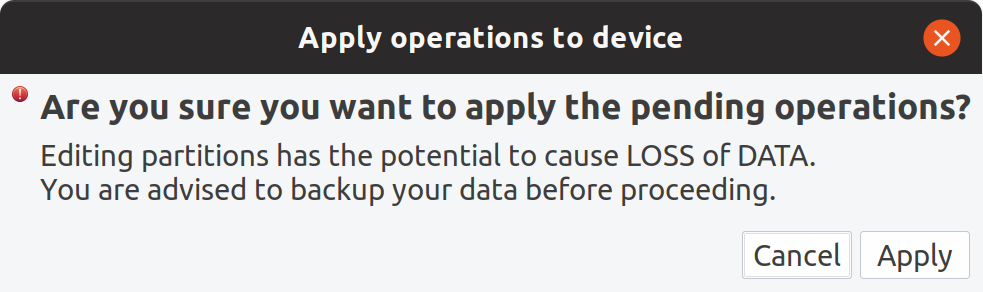 Confirmation to apply pending operations
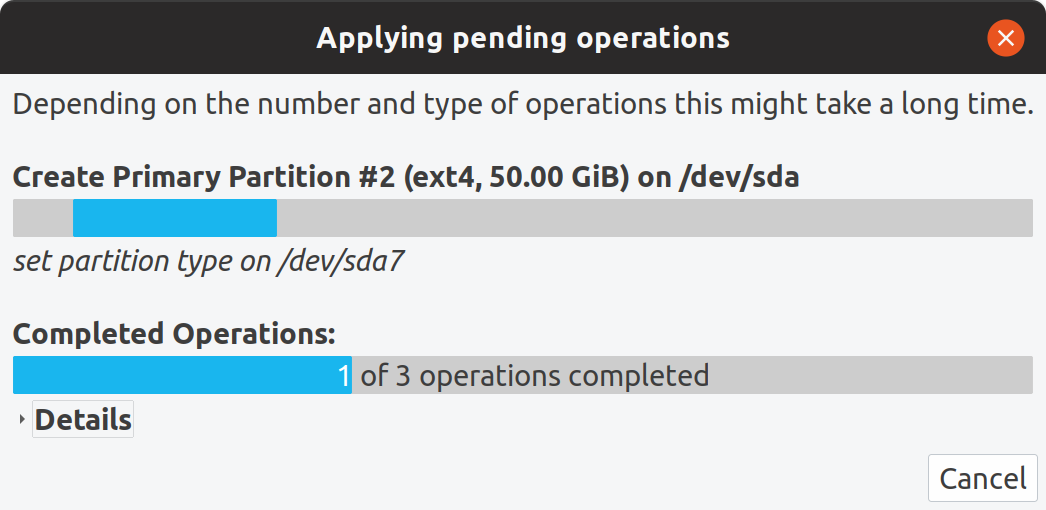
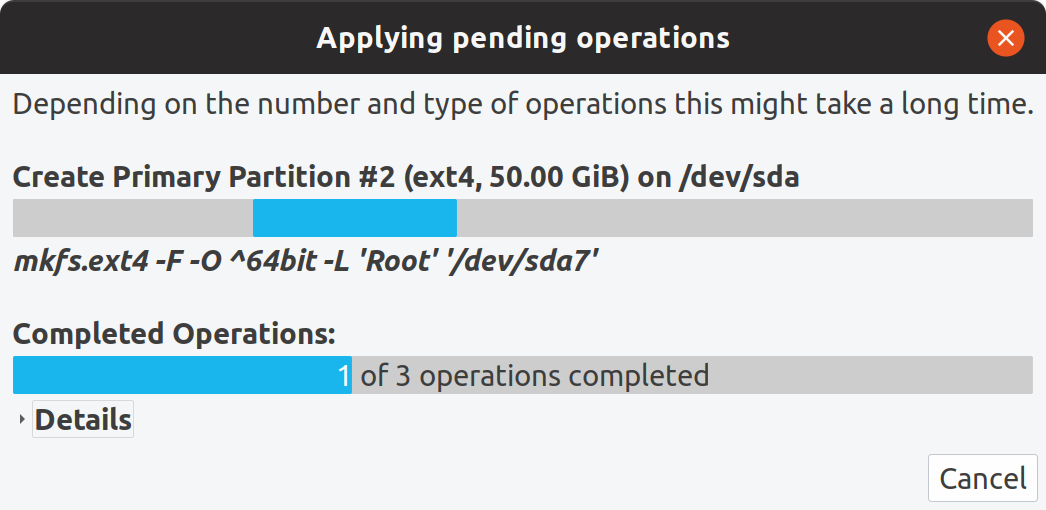
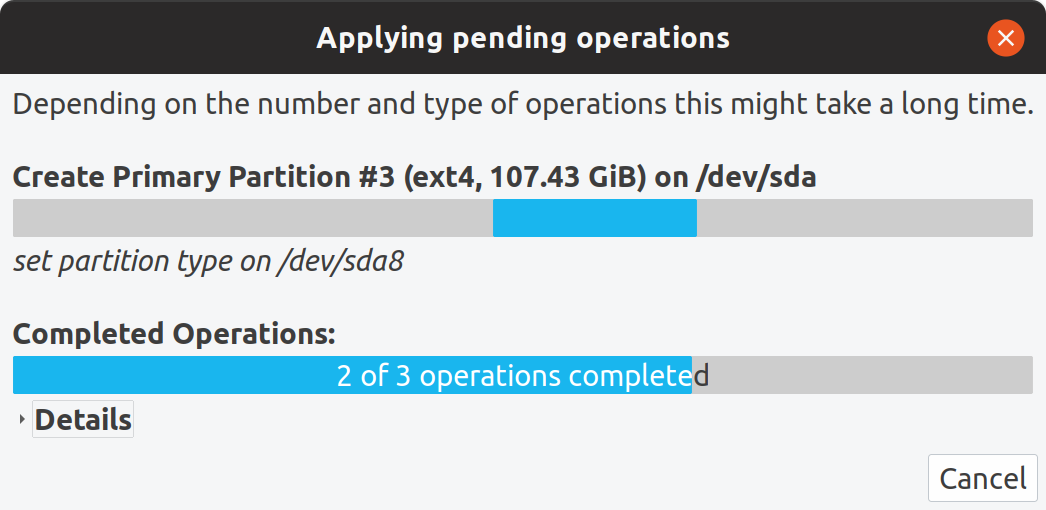
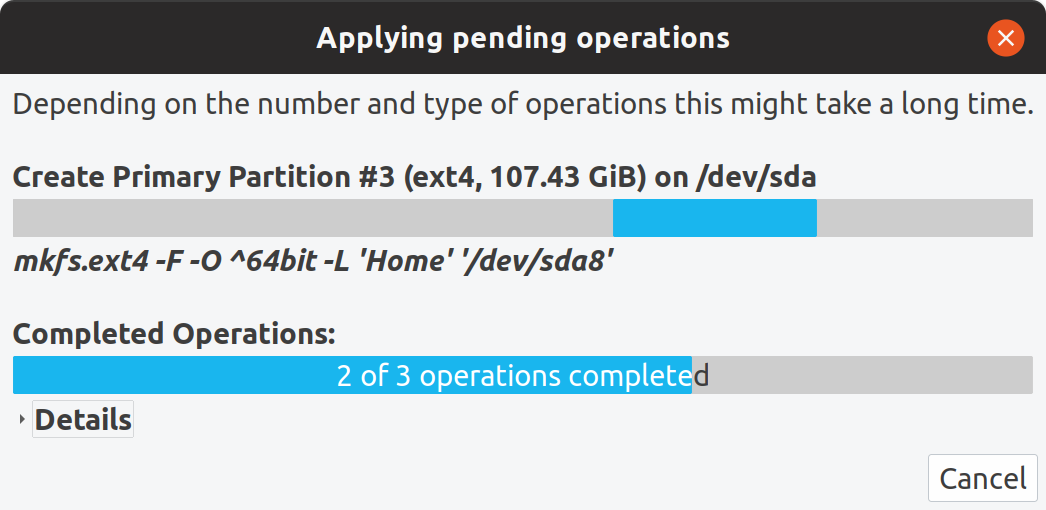
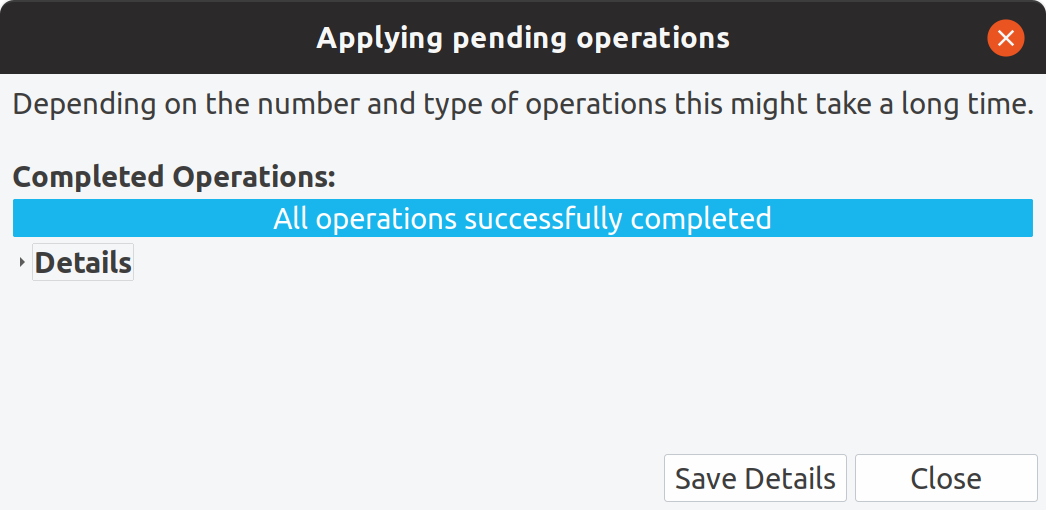 Applying pending operations
Once all operations were successfully completed, I started to encrypt new partitions /dev/sda7 (rootfs) and /dev/sda8 (data) using the terminal.
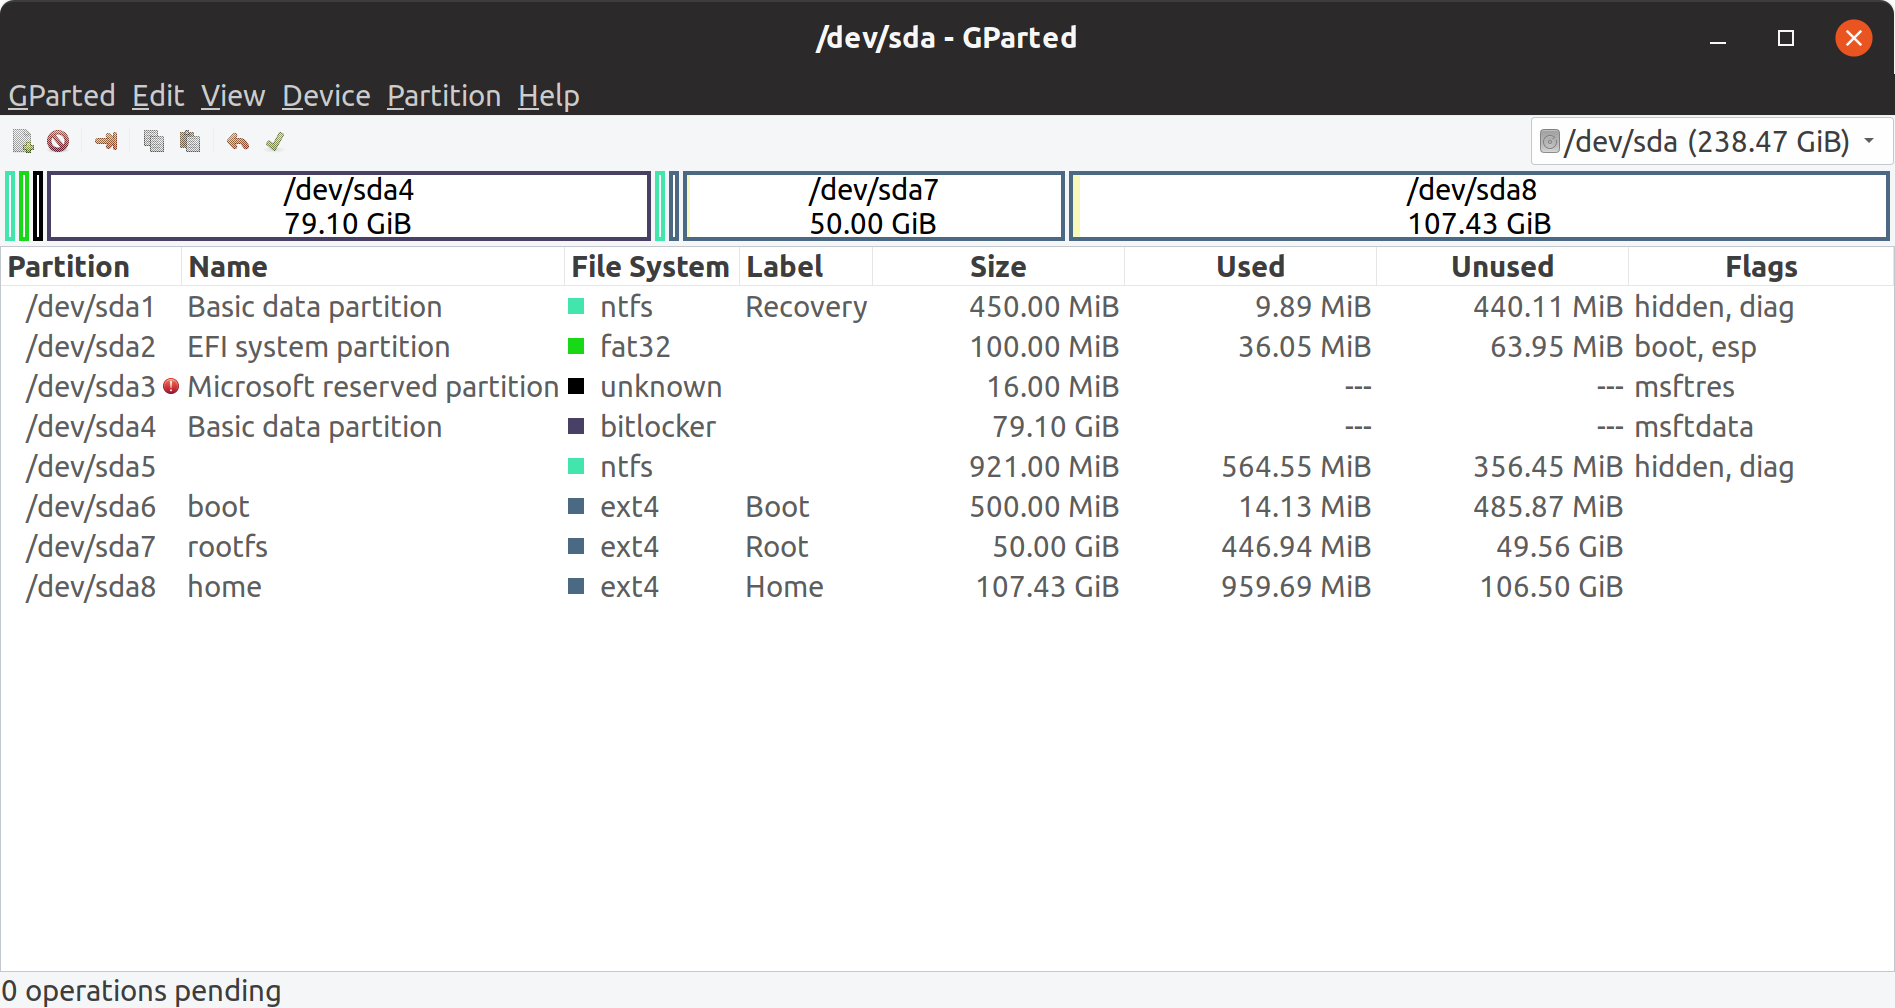 3 new partitions created
Encrypting root and data partitions
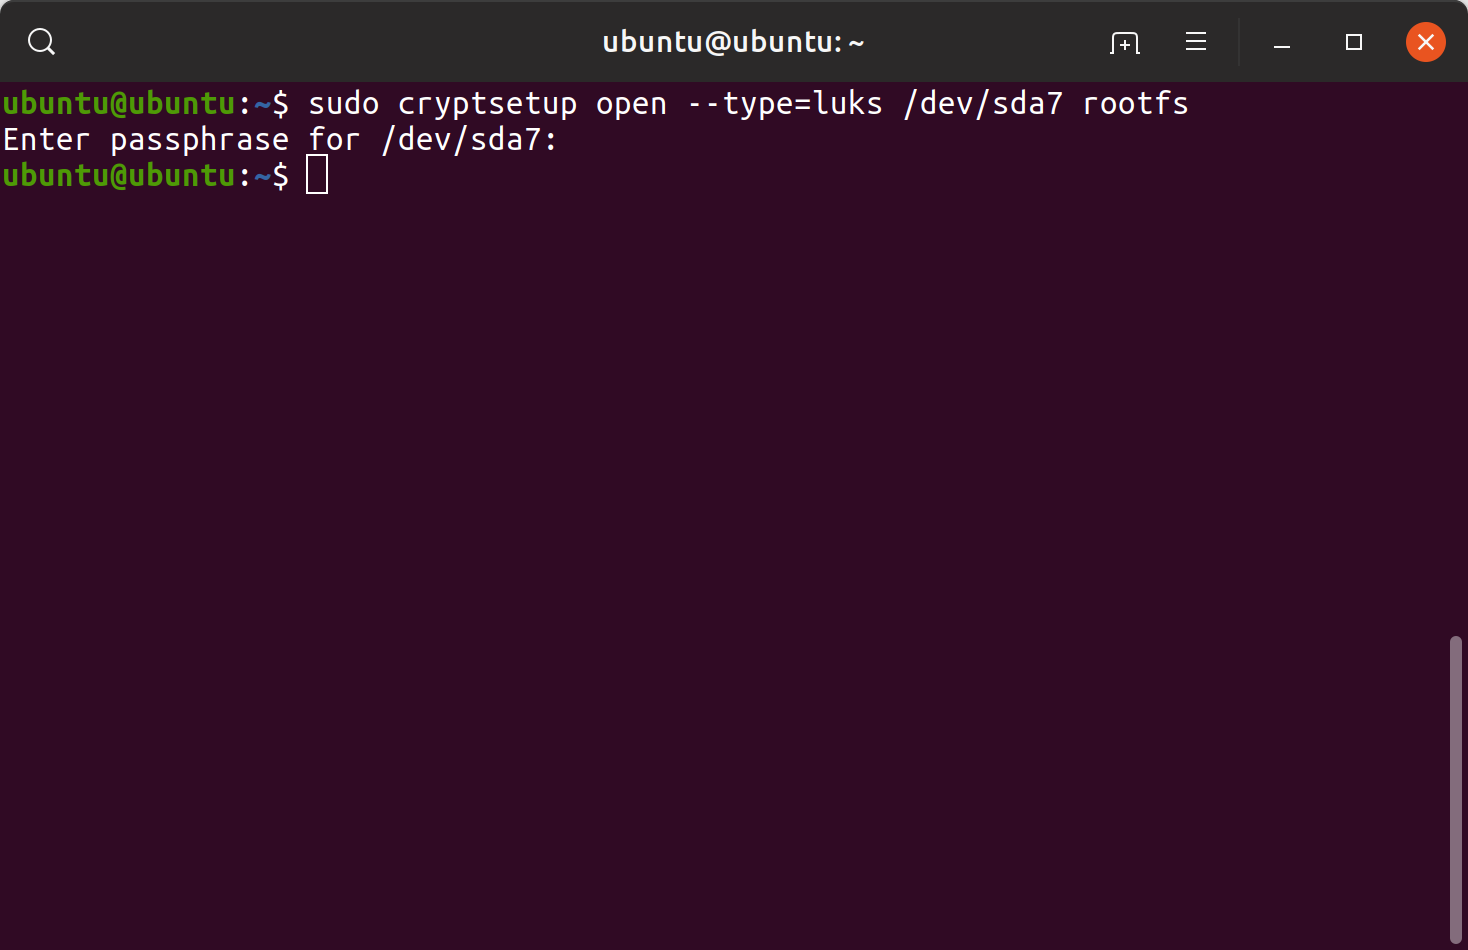
I used the cryptsetup command to encrypt partitions using LUKS.
First, the cryptsetup command was used to initialize LUKS partitions. After initializing a LUKS partition, the partition was opened providing the passphrase.
sudo cryptsetup luksFormat –hash=sha512 –key-size=512 /dev/sda7 sudo cryptsetup open –type=luks /dev/sda7 rootfssudo cryptsetup luksFormat –hash=sha512 –key-size=512 /dev/sda8sudo cryptsetup open –type=luks /dev/sda8 home
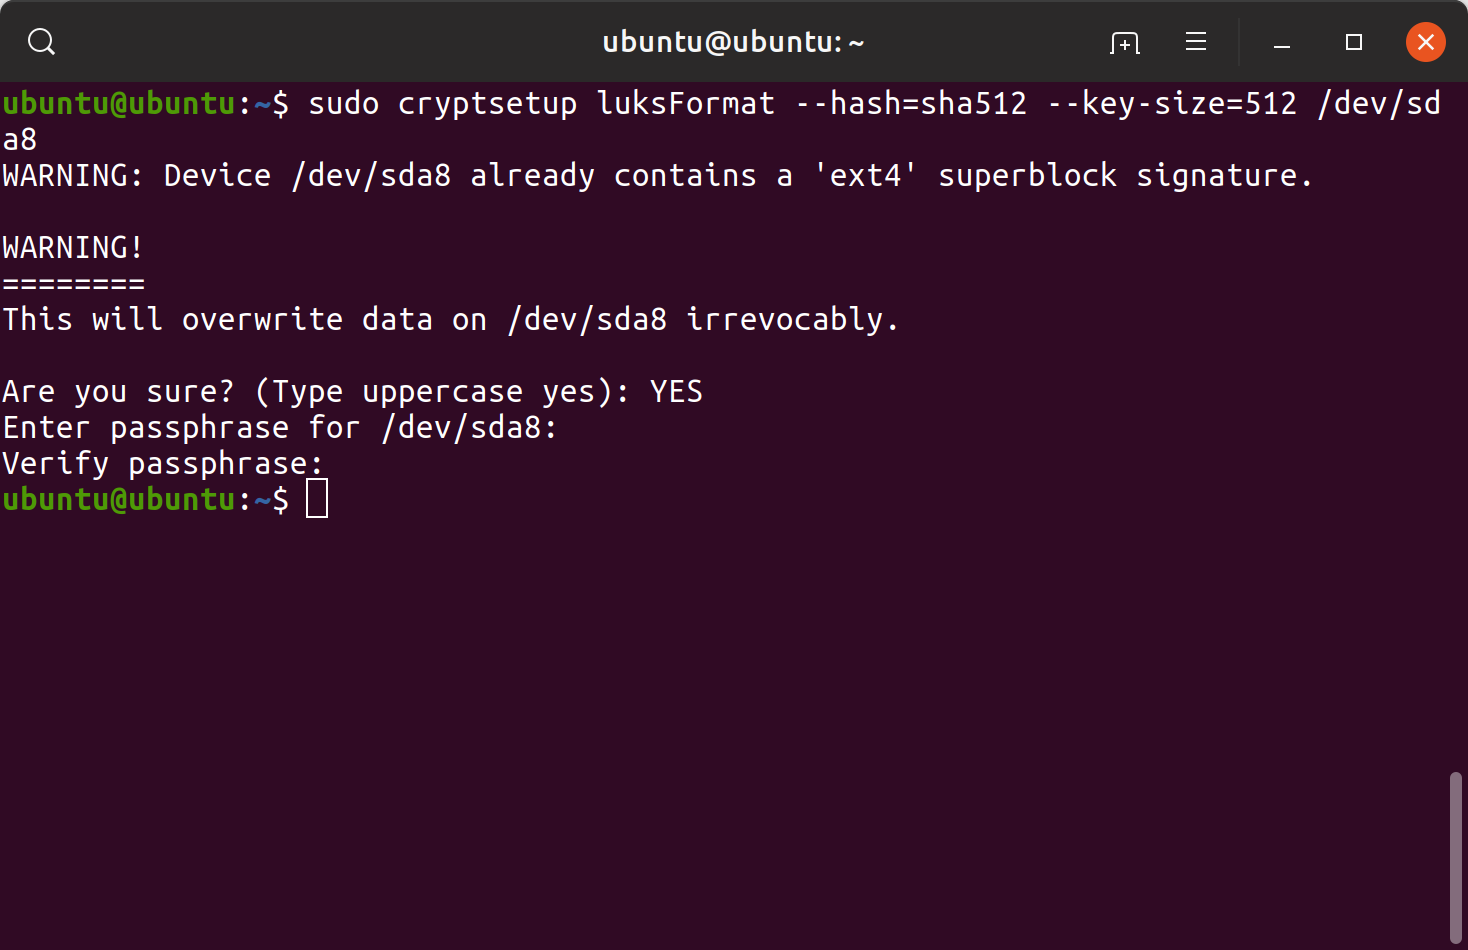
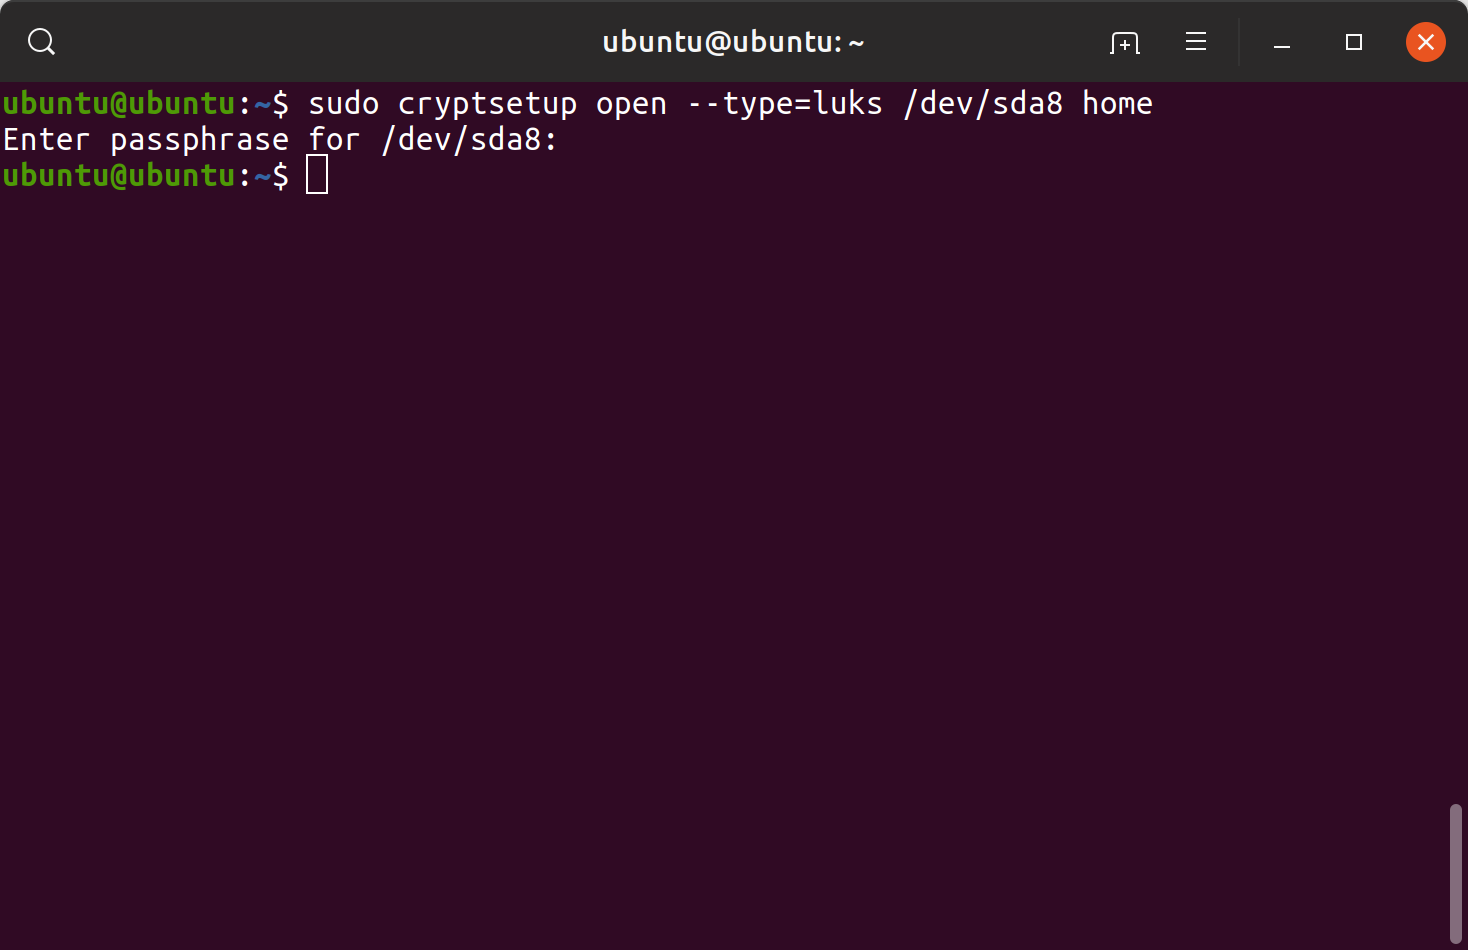 Initializing and opening LUKS partitions
Now LUKS partitions are available under /dev/mapper/as LVM logical volumes
Note: It?s recommended to overwrite the LUKS partition to erase existing content. This step takes a very long time! Be ready for that.
sudo dd if=/dev/zero of=/dev/mapper/rootfs bs=16M status=progresssudo dd if=/dev/zero of=/dev/mapper/home bs=16M status=progress
Creating logical volumes to install Ubuntu and create Home directory
Now we need to create logical volumes on top of LUKS volumes to install Ubuntu on root partition and create home directory in data partition.
I used following commands to create logical volumes.
sudo pvcreate /dev/mapper/rootfssudo vgcreate vgroot /dev/mapper/rootfssudo lvcreate -n lvroot -l 100%FREE vgrootsudo pvcreate /dev/mapper/homesudo vgcreate vghome /dev/mapper/homesudo lvcreate -n lvhome -l 100%FREE vghome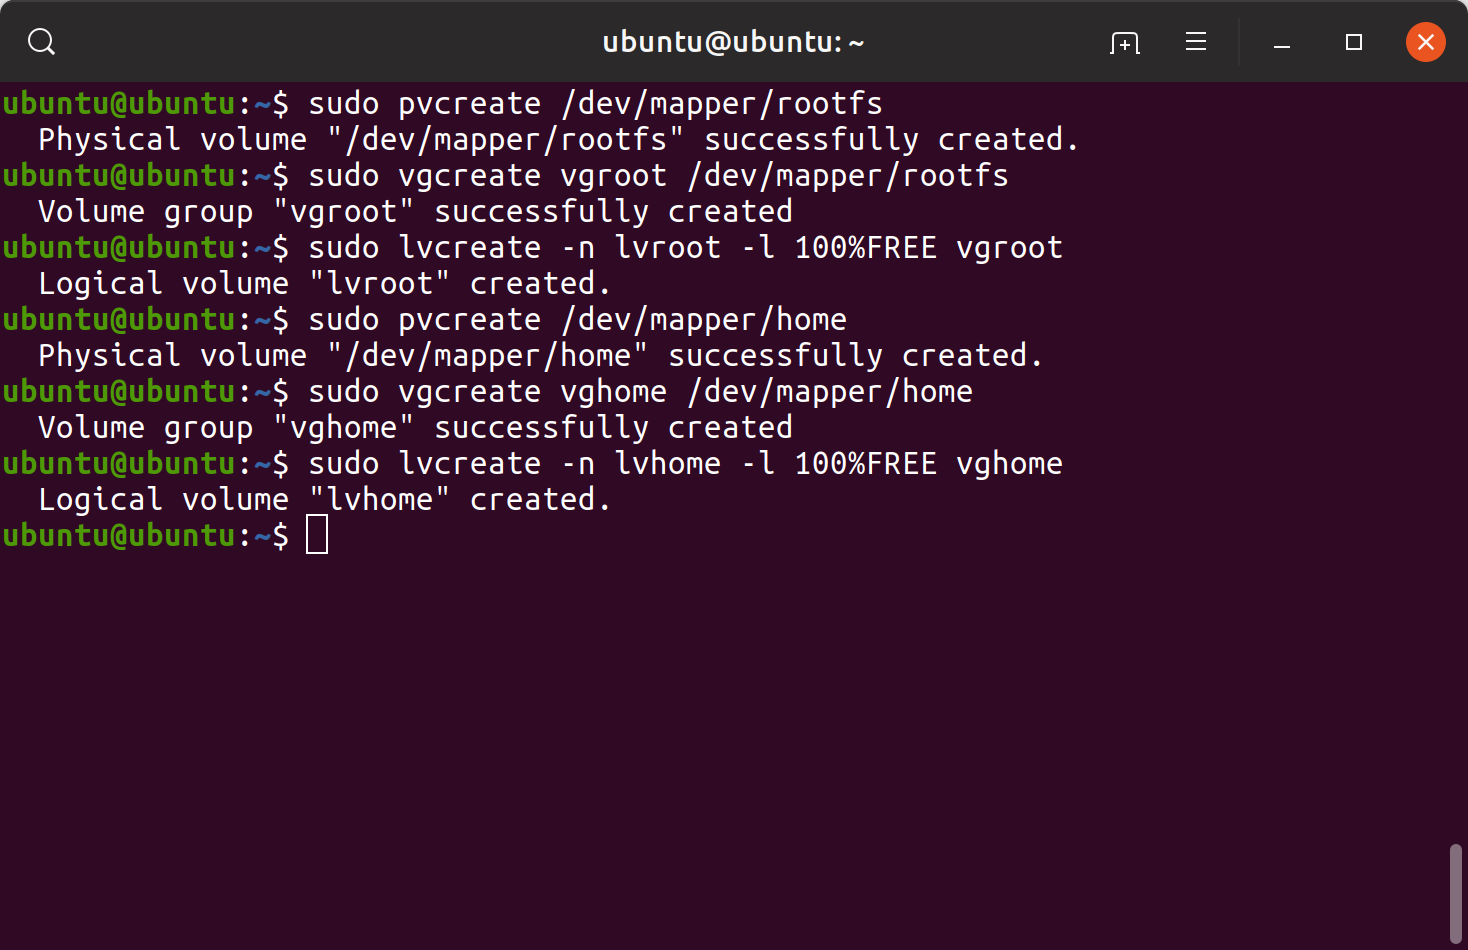 Logical volumes creation
Following screenshot shows how the LUKS partitions are displayed on Disks application.
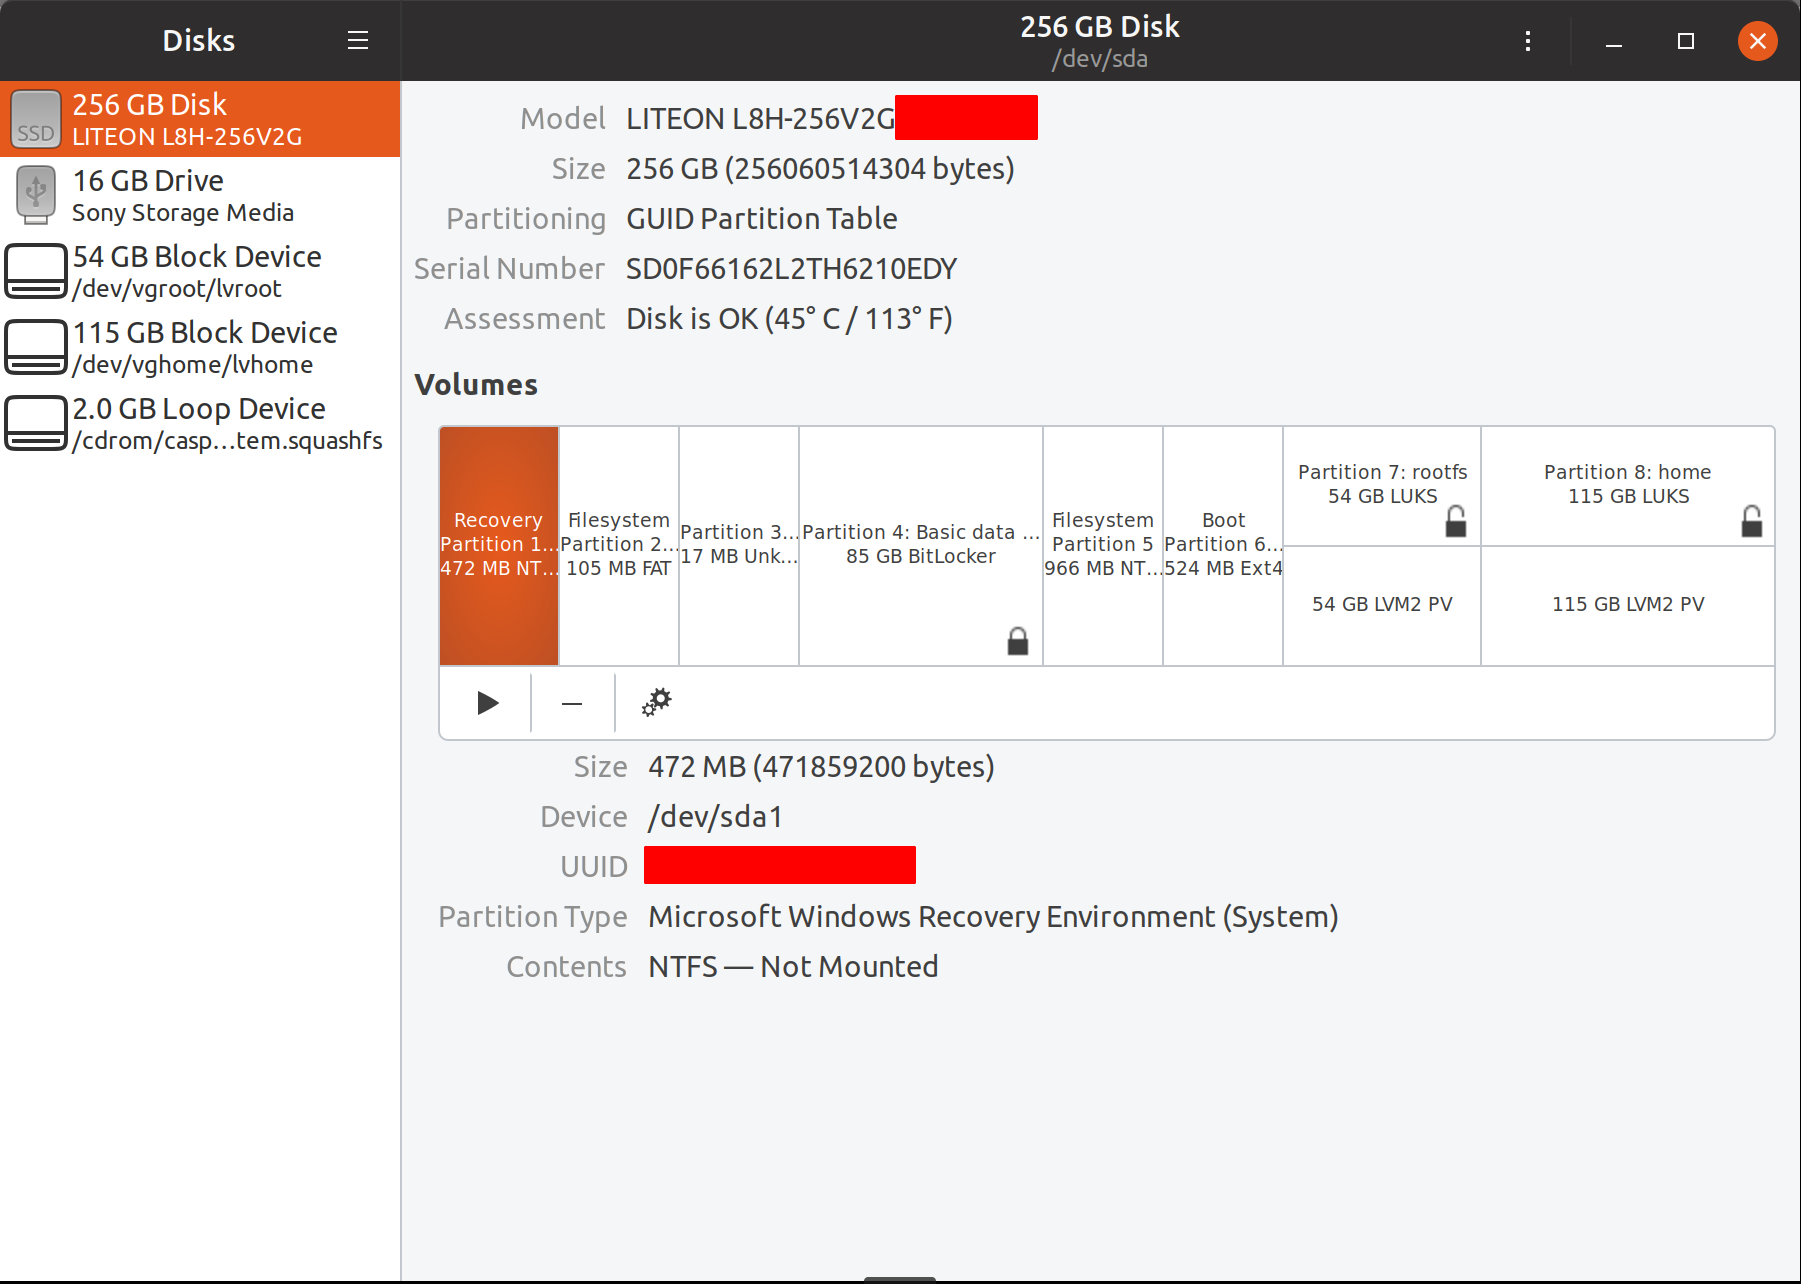 LUKS partitions and logical volumes shown in ?Disks? application
Once logical volumes are created, I started the Ubuntu installation from the shortcut icon on Desktop.
 Ubuntu installation wizard
Following wizard showed that I had Windows Boot Manager.
Here, if you chose to ?Erase disk and install Ubuntu?, you can directly encrypt your Ubuntu installation.
I selected ?Something else? as I already had encrypted my partitions.
 Installation type
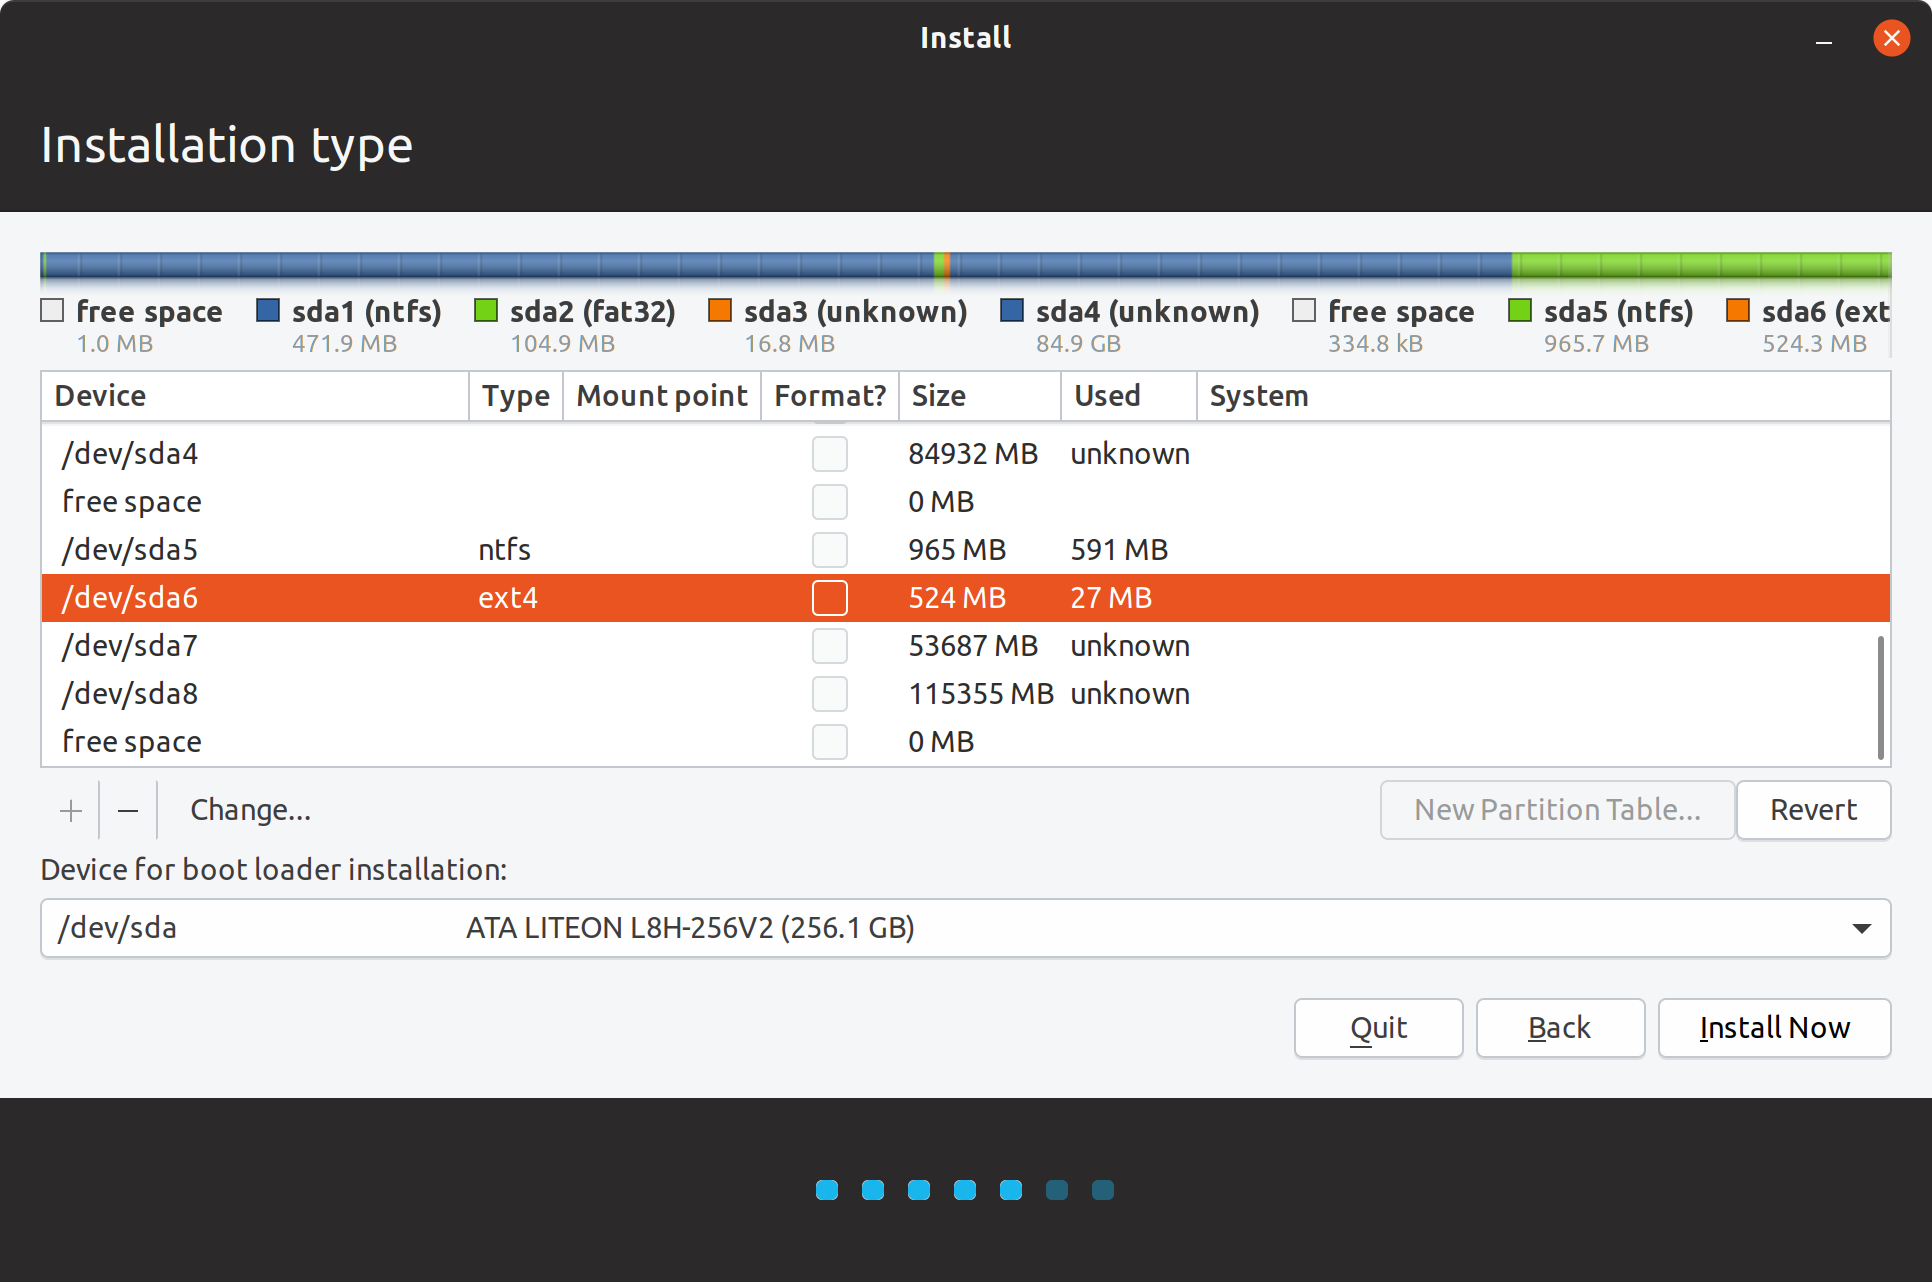
Once I chose to do ?Something else?, I got following screen.
Here, I made sure that my main disk is selected as the ?Device for boot loader installation?
 Mount partitions and install boot loader
I chose /dev/sda6 as my boot partition and selected /boot as the mount point.
 Configuring the boot partition
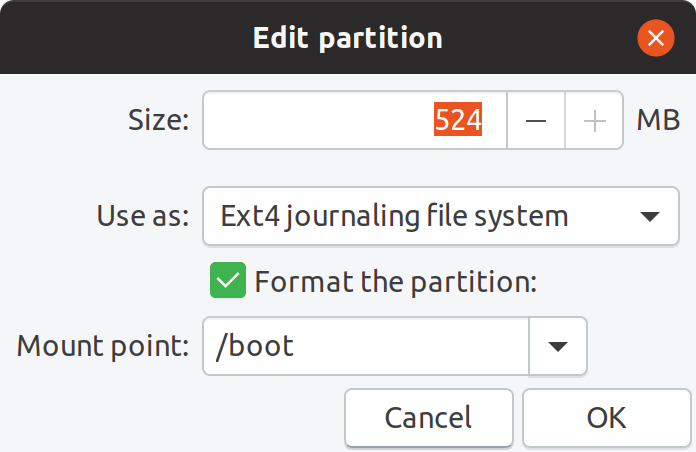 Mounting boot partition to /boot and specifying to format it
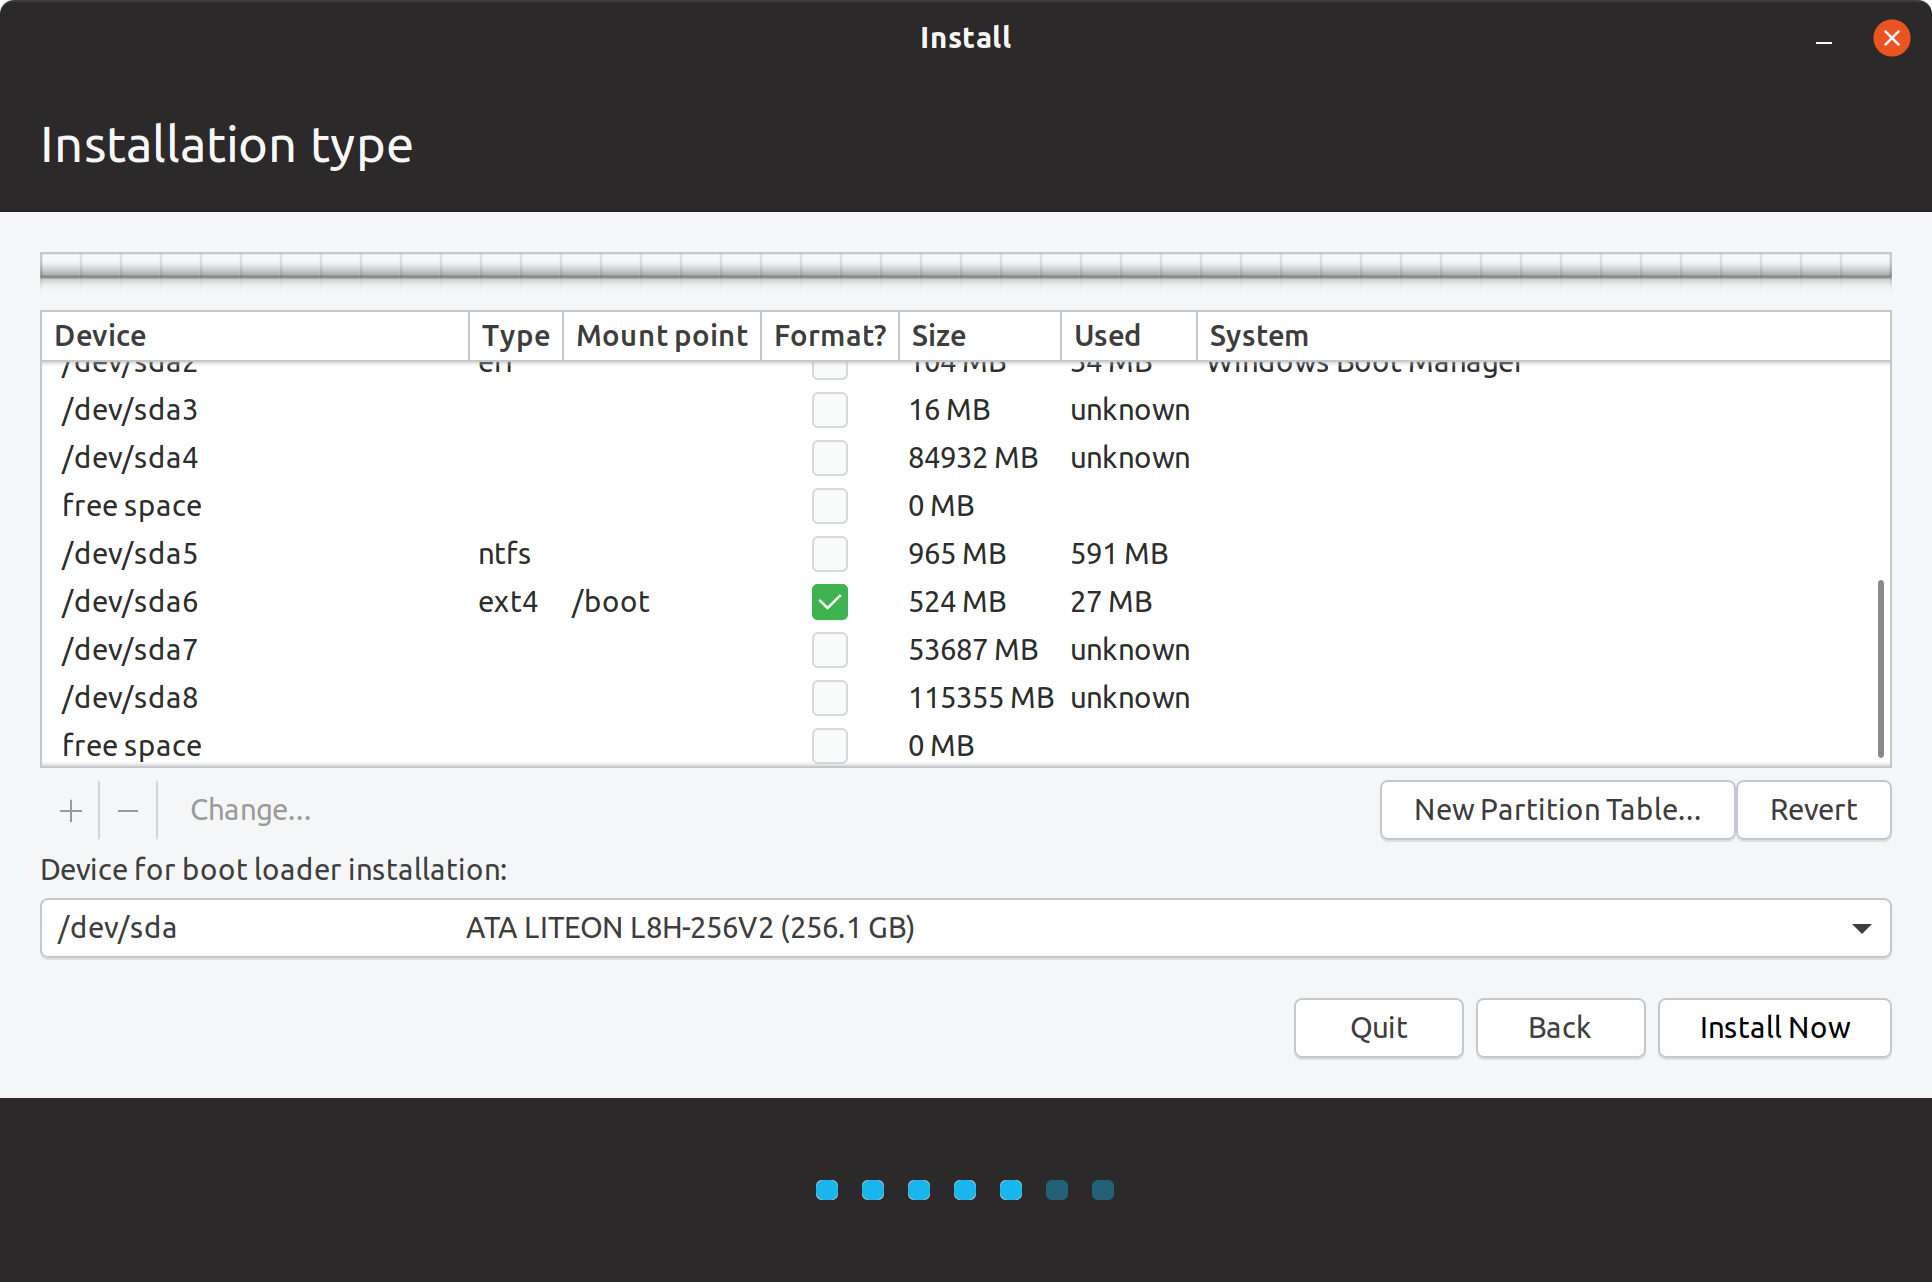 Mounted /dev/sda6 to /boot
Next, I chose the logical volume I created to mount /.
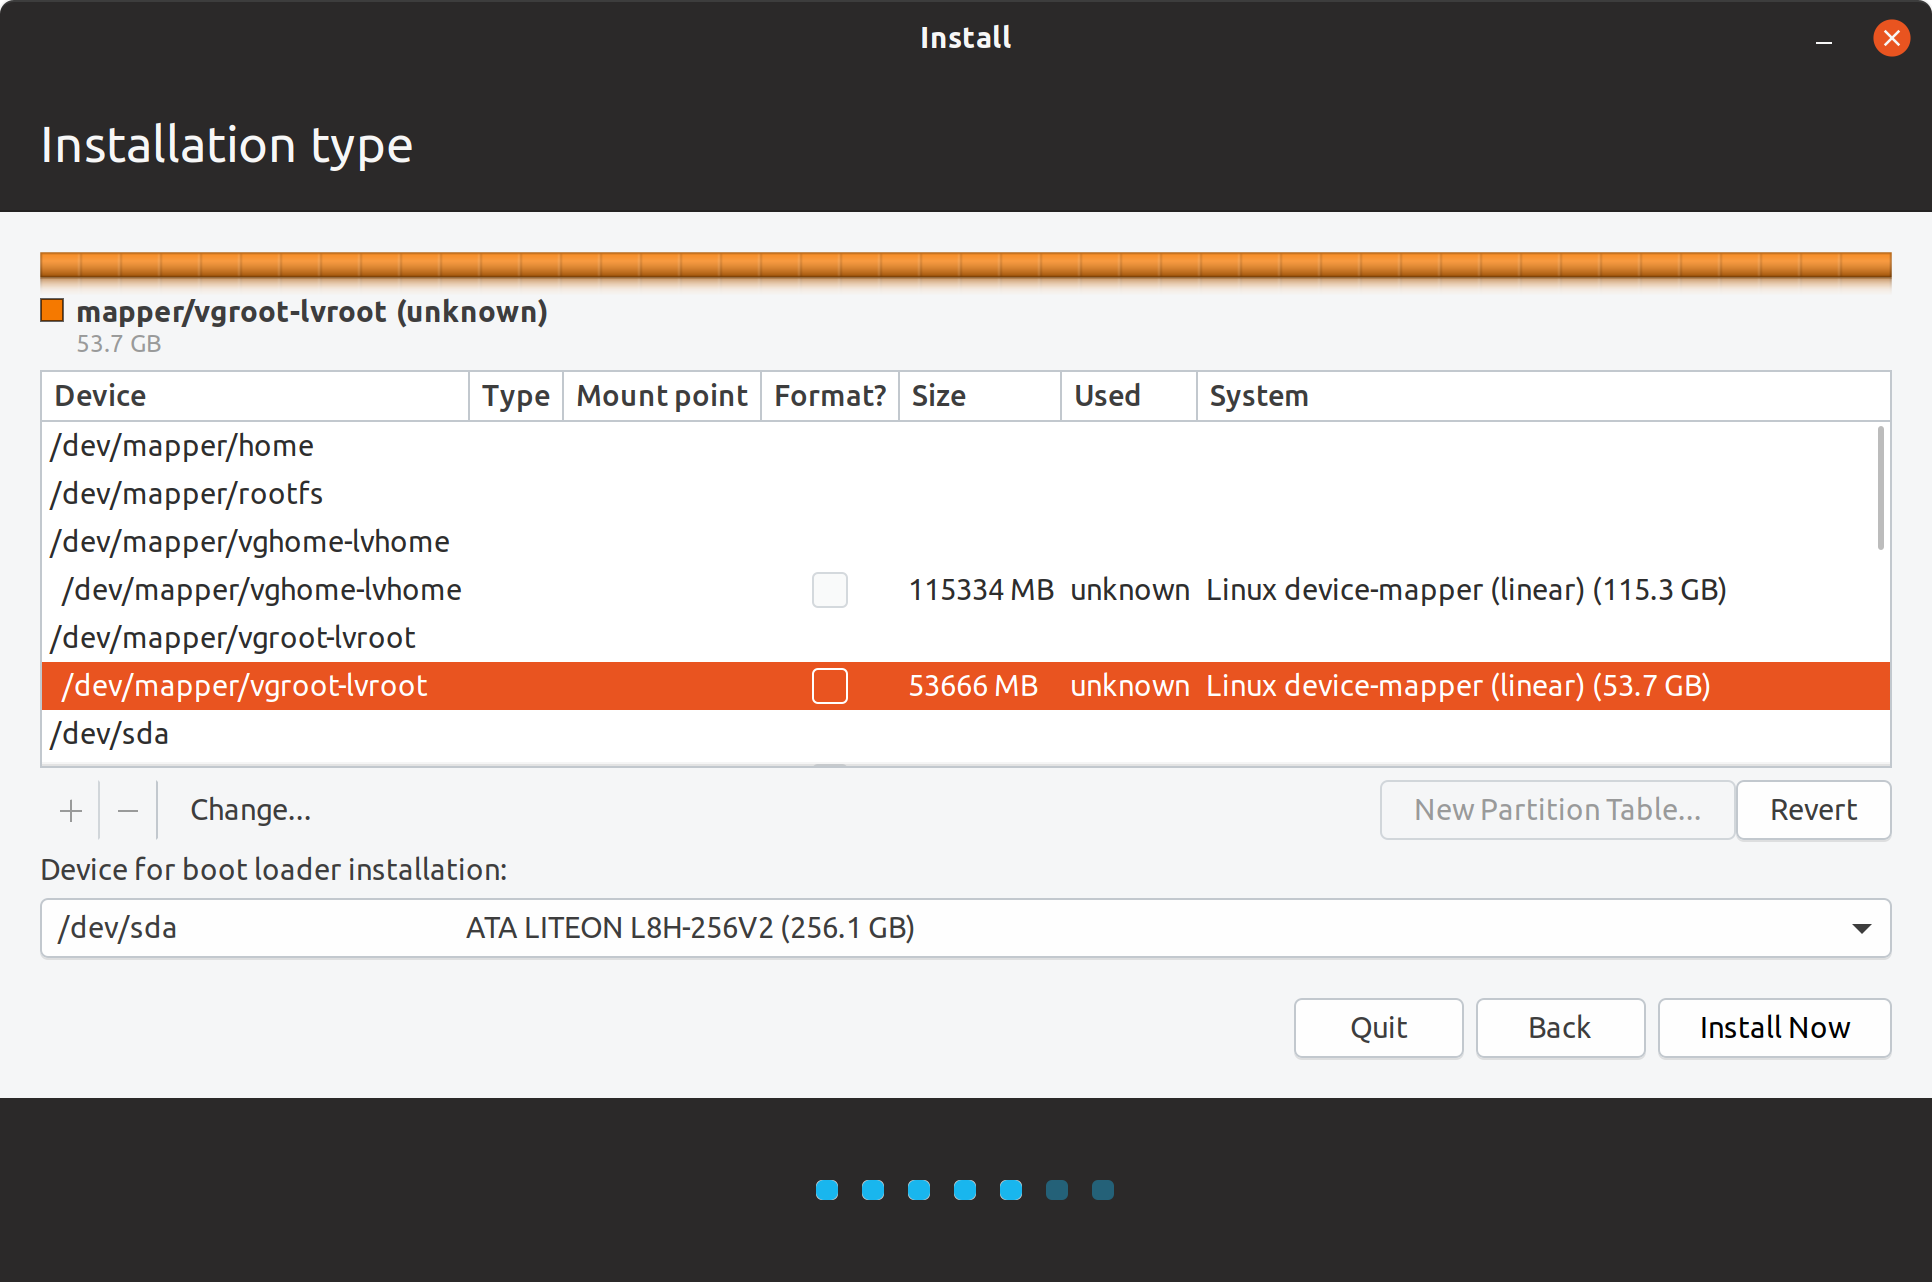 Encrypted logical volumes
I specified to format the root partition with Ext4 journaling file system.
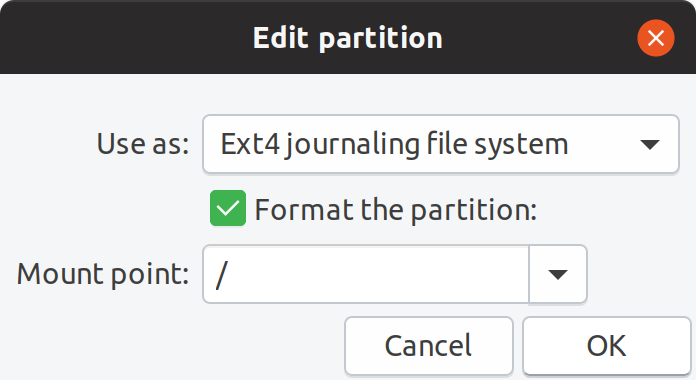 Mounting / to ?/dev/mapper/vgroot-lvroot?
Similarly, I selected the logical volume I created to mount /home and specified to format it with ext4.
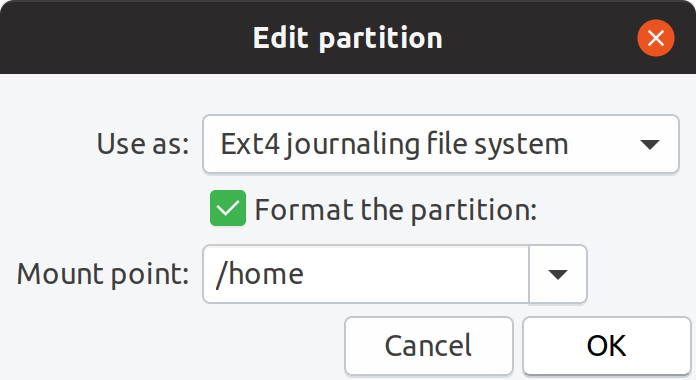 Mounting /home to ?/dev/mapper/vghome-lvhome?
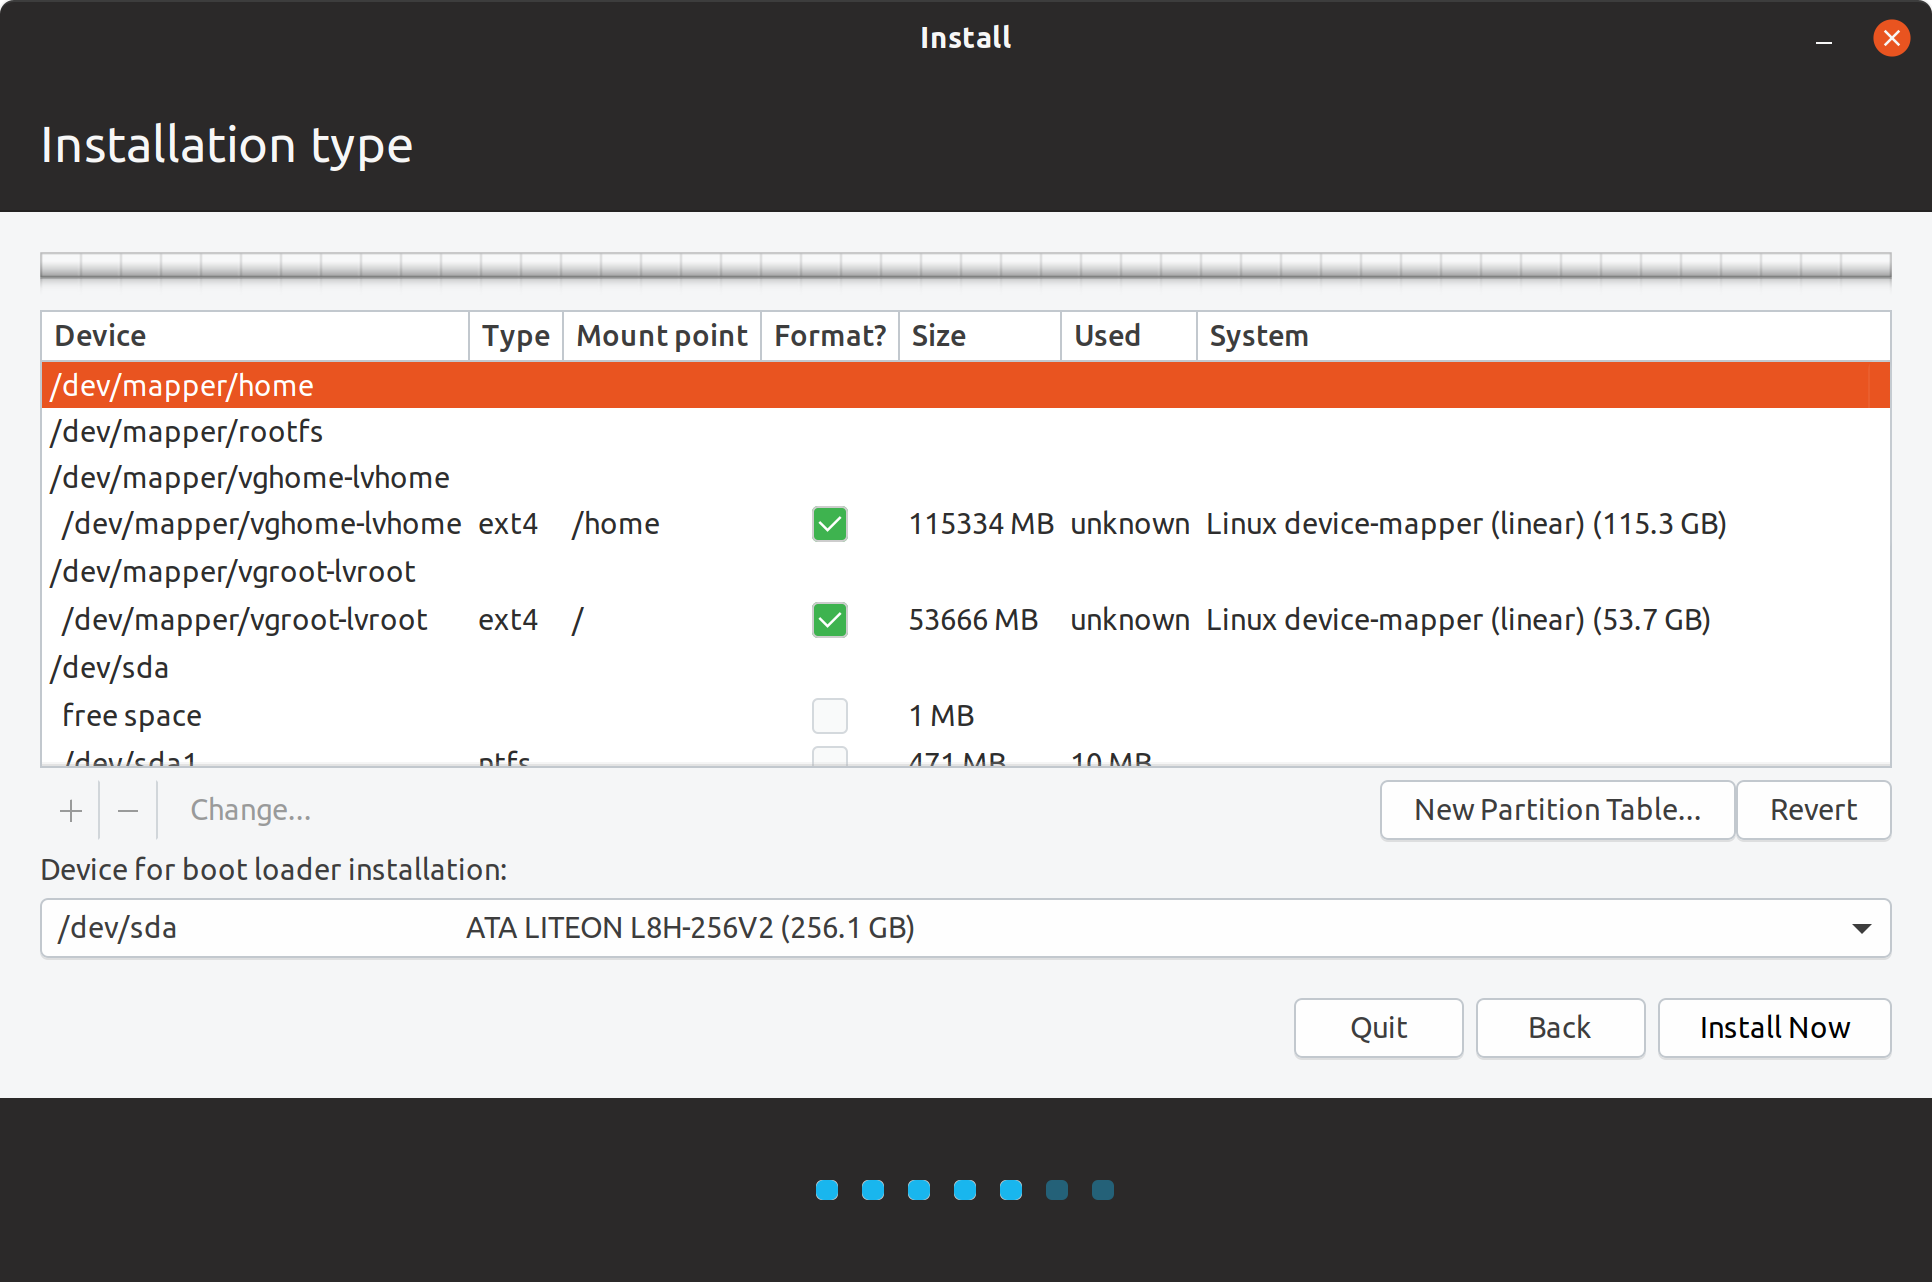 Mounted encrypted logical volumes
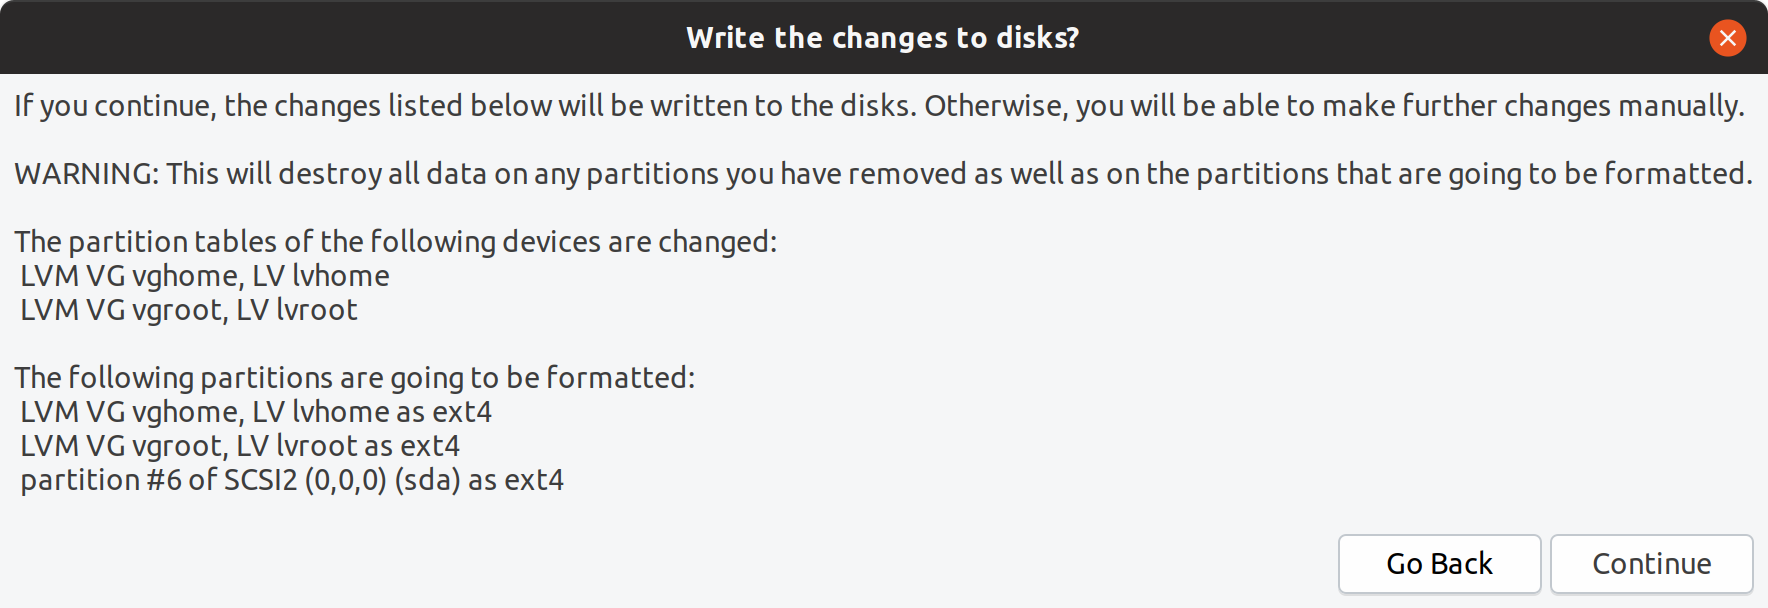 Confirmation to write changes
After confirming to write the changes to the disk, the installation continued.
You can see that the option to encrypt home directory is not available in Ubuntu installation anymore.
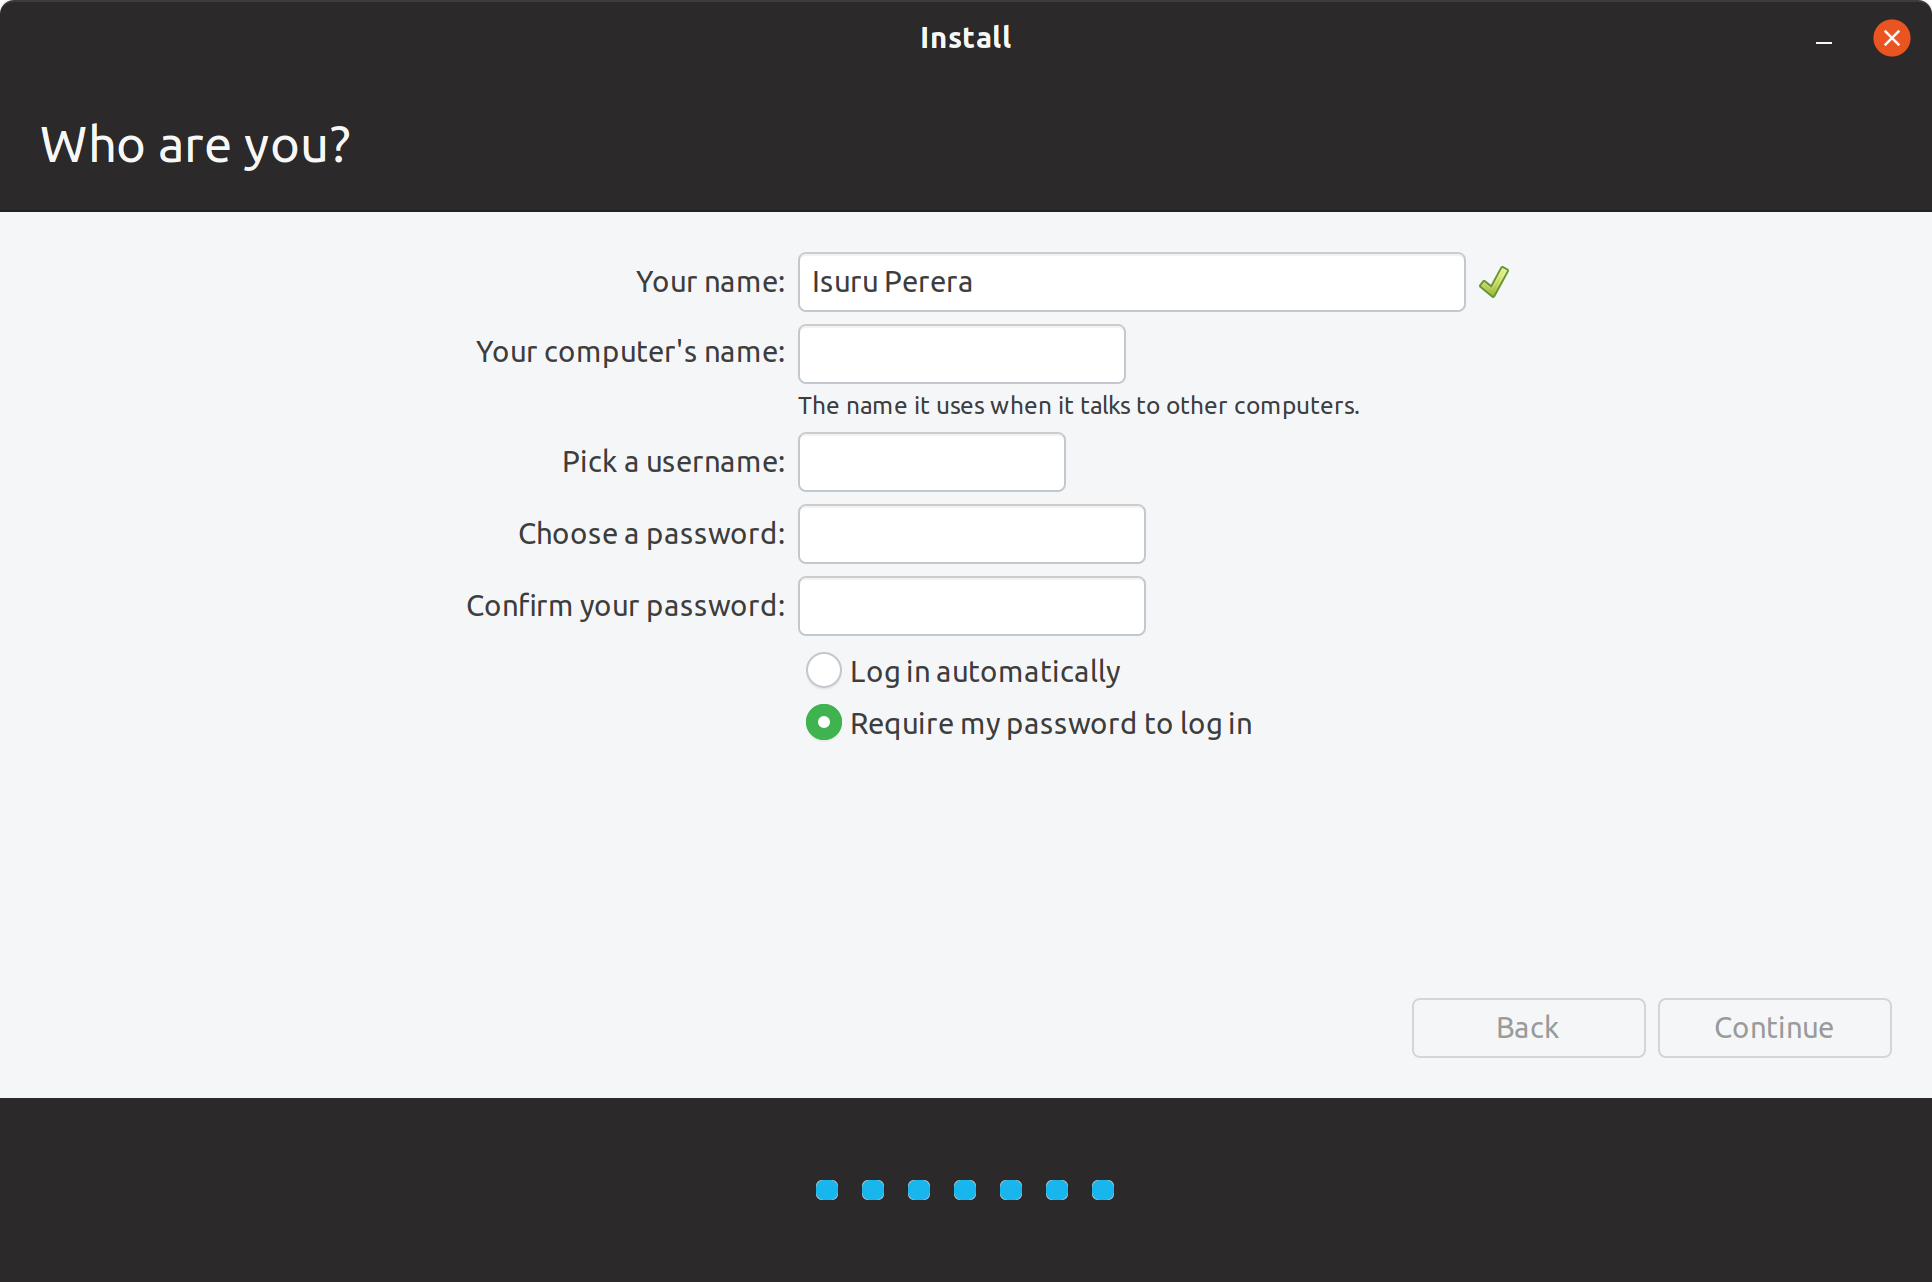 Configuring user account
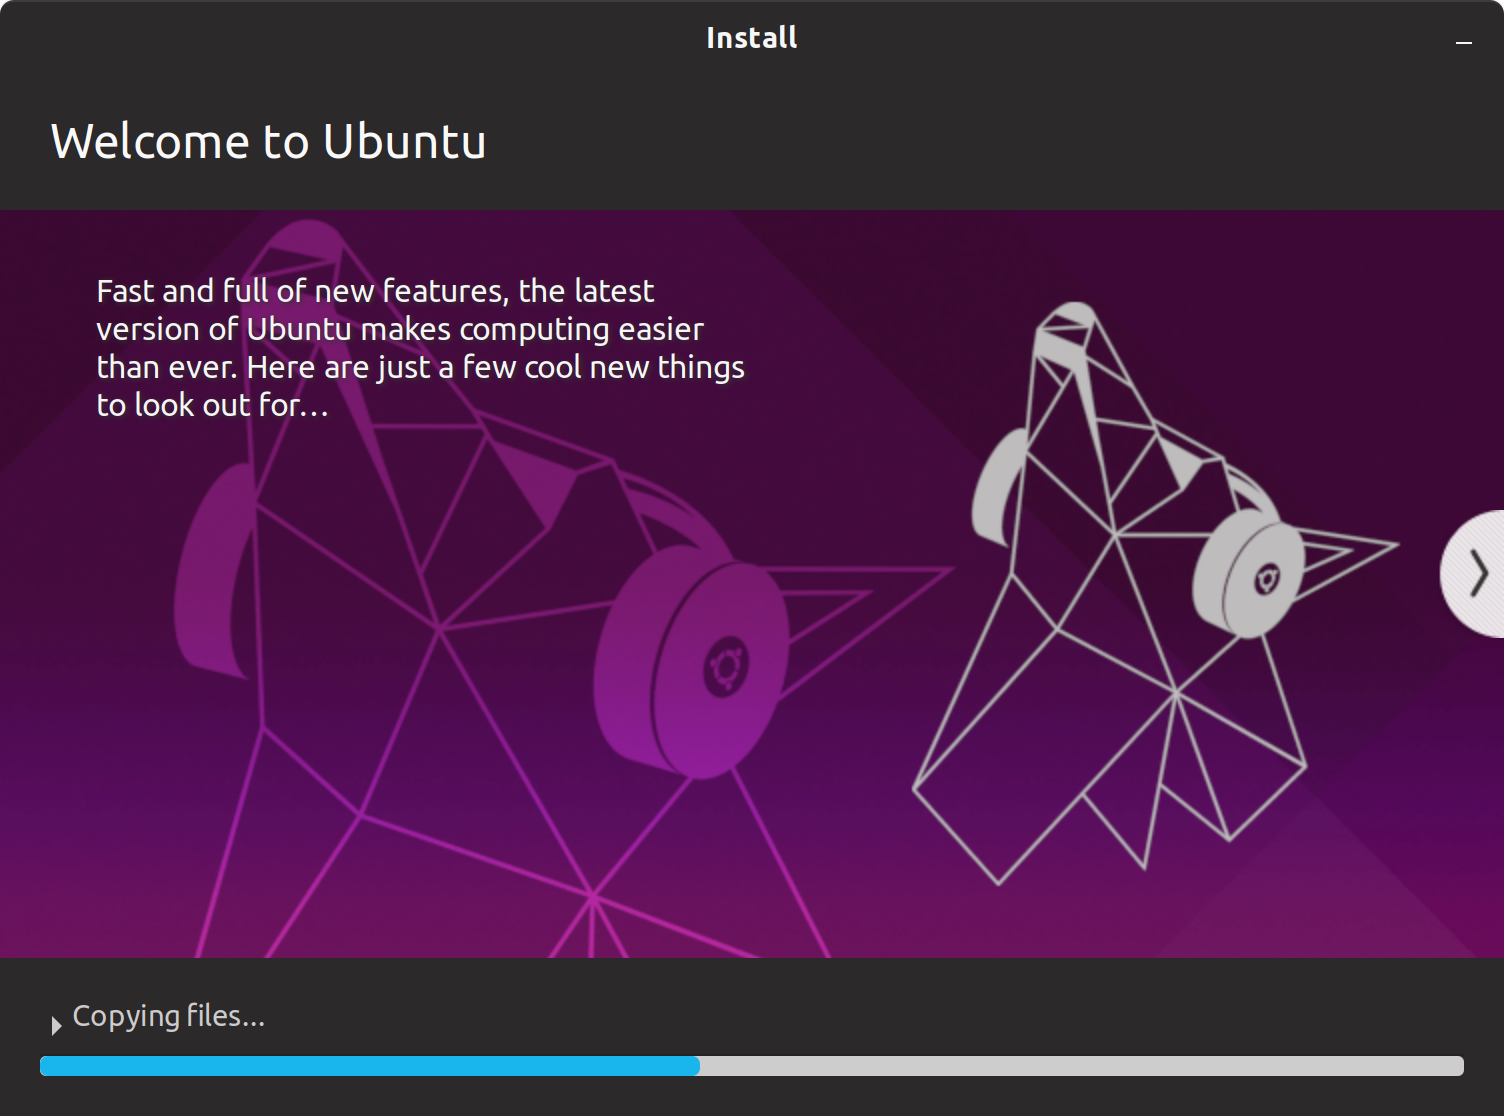 Copying files?
Once the installation is complete, I clicked ?Continue Testing? to make necessary changes to load the encrypted partitions at startup.
 Installation complete message
I used following commands to note down UUIDs of the encrypted partitions.
sudo blkid </dev/DEV_ROOTFS>sudo blkid </dev/DEV_HOME>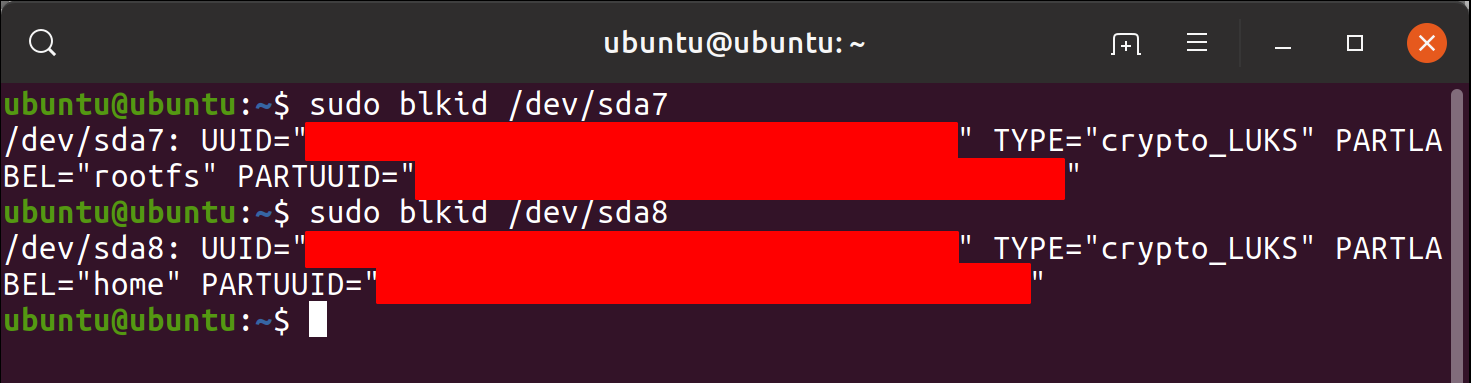
Next, I mounted the installed Ubuntu OS on /mnt and used chroot command to change the root directory to /mnt.
sudo mount /dev/mapper/vgroot-lvroot /mntsudo mount </dev/DEV_BOOT> /mnt/bootsudo mount /dev/mapper/vghome-lvhome /mnt/homesudo mount –bind /dev /mnt/devsudo chroot /mntmount -t proc proc /procmount -t sysfs sys /sysmount -t devpts devpts /dev/pts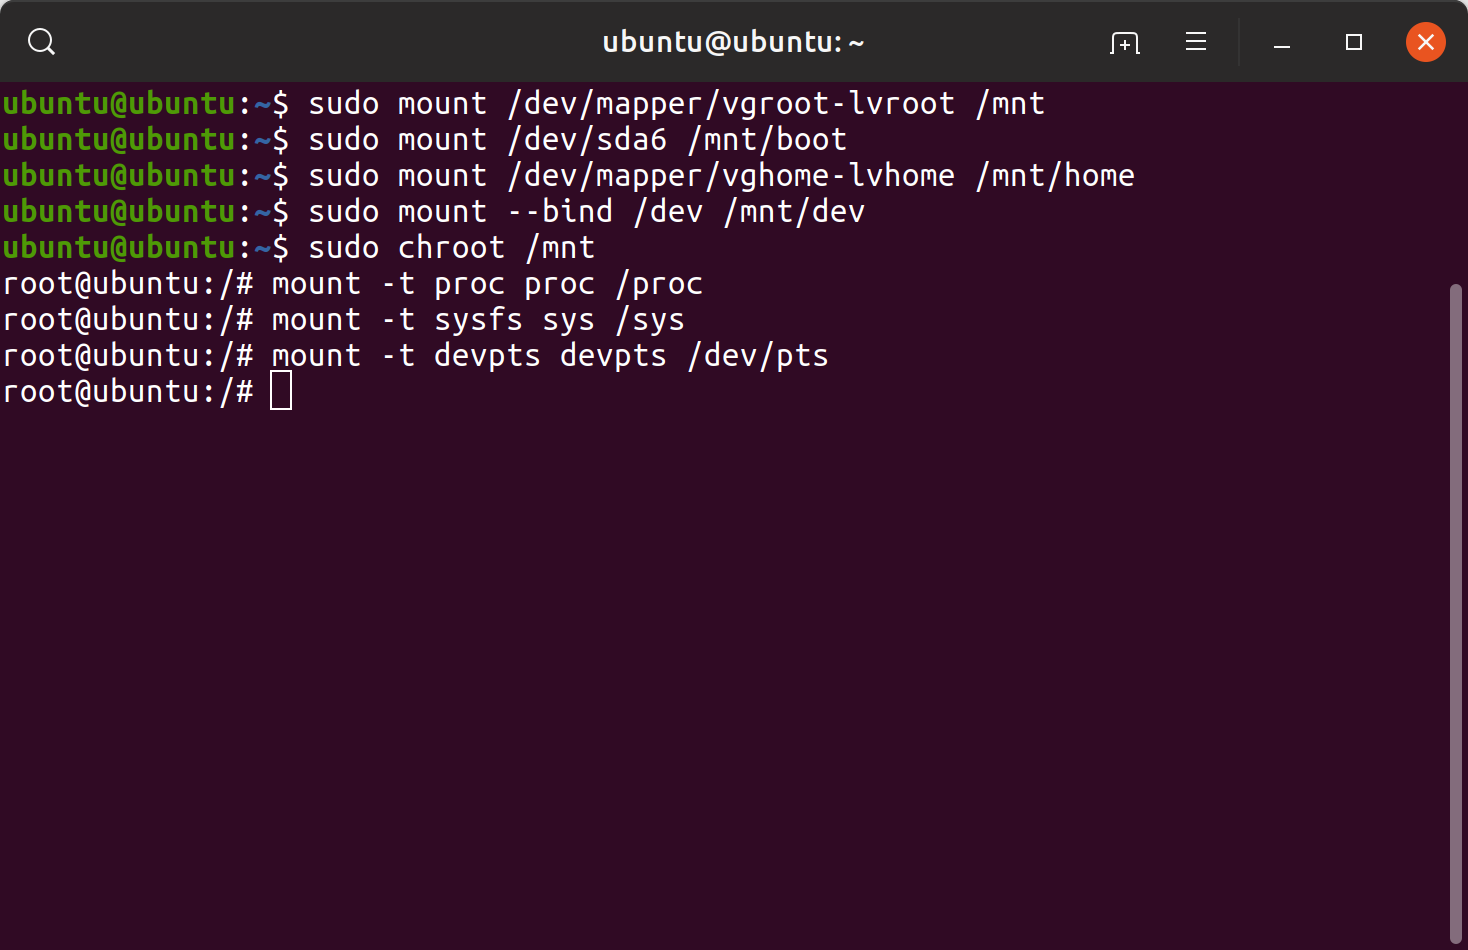 Mounting the installed OS to /mnt
Next, I created a file named /etc/crypttab in the chrooted environment.
sudo nano /etc/crypttab
I added following lines to /etc/crypttab (replacing <UUID_ROOTFS> and <UUID_HOME> from the values obtained from blkid command earlier)
# <target name> <source device> <key file> <options>rootfs UUID=<UUID_ROOTFS> none luks,discardhome UUID=<UUID_HOME> none luks,discard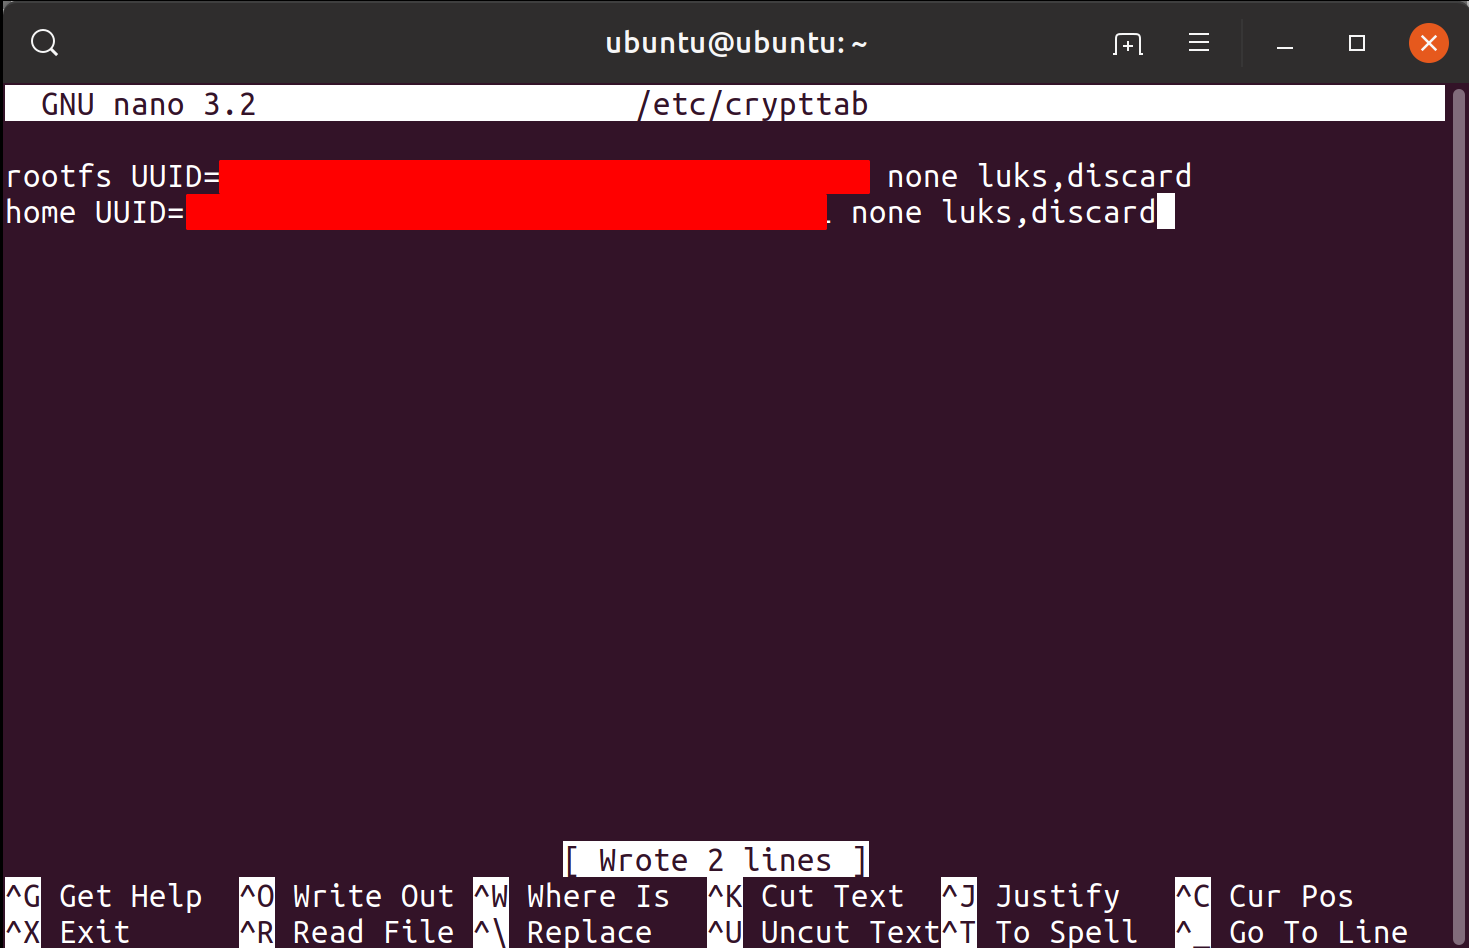
Finally, I used following command to update the Linux kernel to load encrypted partitions at startup.
update-initramfs -k all -c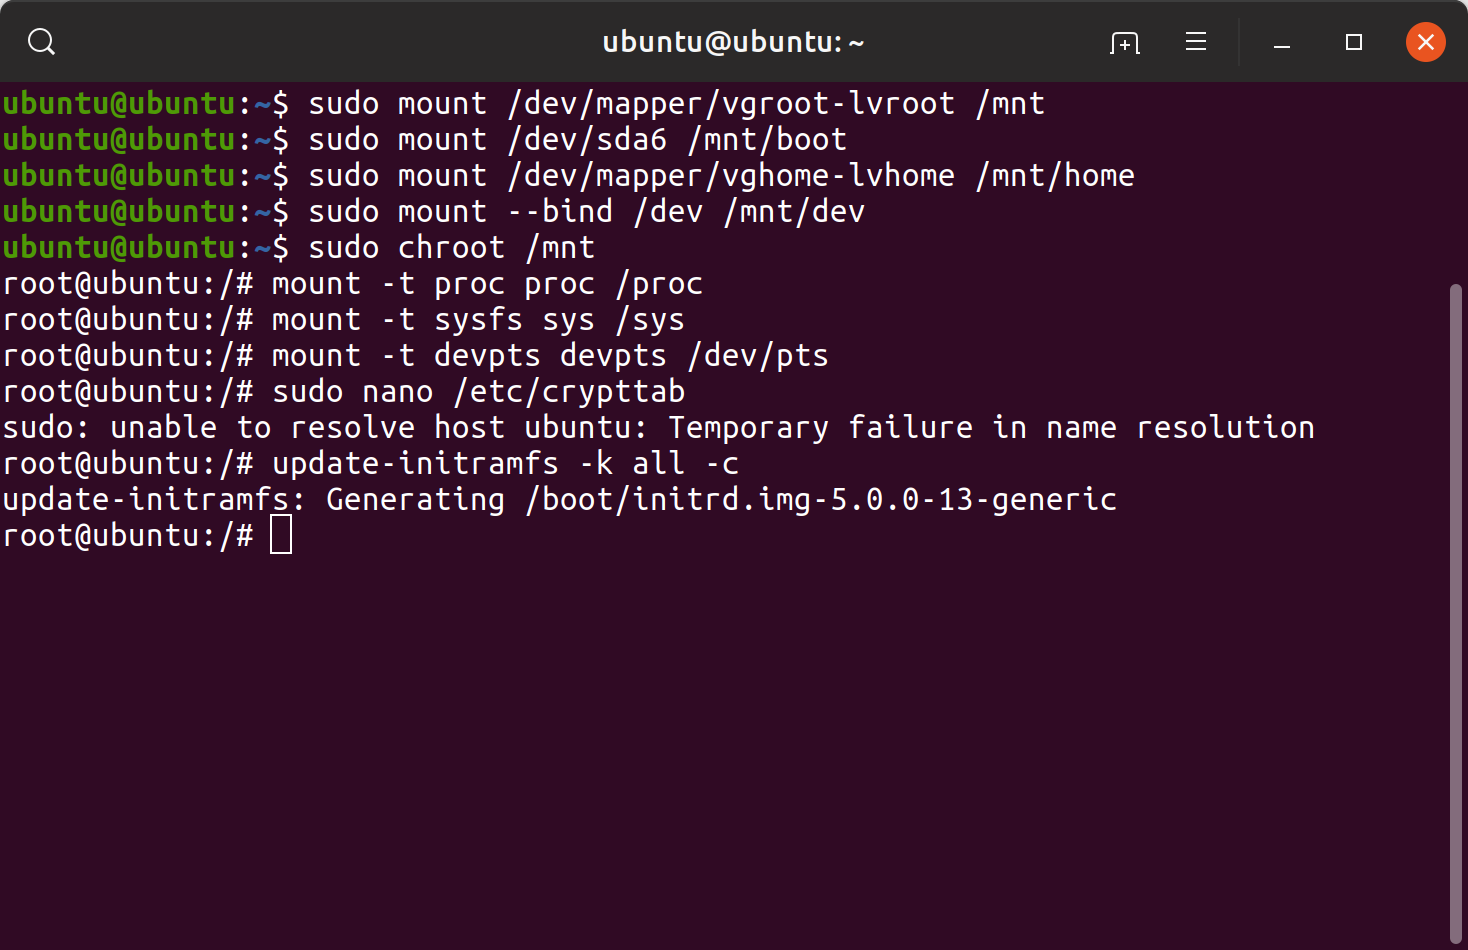
After restarting, Ubuntu prompted to enter the passphrase to unlock the disks at startup.

That?s it! Now I have encrypted root and home partitions!
Conclusion
In this story, I explained the importance of encrypting your data and how to do LUKS full disk encryption on selected partitions by providing step by step instructions (including screenshots).
In my opinion, LUKS is currently the best and stable way to encrypt your data on Ubuntu.