It?s been said that people who own a 3D Printer, must have searched for the solution related to Cura infill patterns in 3D printing (Just Like You are doing right now?).
In fact, the guide on Cura infill patterns is what most people ask about especially the beginners one.
After some research, I found that there are not many articles on the internet that covers the infill pattern in depth.
Not to worry 3d printing owners.
In this blog post, you won?t have any further issue or doubt regarding the infill of a 3d printed model.
So I would recommend you to give your few valuable minutes to read this article because I will go through the basic to advanced level regarding the cura infill doubts.
You might say this article as a mini ?Cura infill mastery course? which will cover almost everything regarding the Cura Infill Patterns?.
Let?s get started with learning.
Read about: Future of 3D Printing
What is Infill in Cura?
Okay, first, forget about Cura for a moment.
What does infill mean in 3d printing?
For example, you are going to print a Cube on your 3D Printer.
Now, here are some questions that exist?
How will the inside portion of the cube?
- Will it be a hollow from inside?
- Will it be solid?
- Or, will it be balanced between complete hollow and completely solid?
Yes, the inside part of your model is known as infill which is mostly invisible from the outer appearance of the 3D printed model.
In other words, infill is that portion of your 3d model which defines the inner structure of the model. As a result, the internal structure of the model or infill of the 3d model is responsible for the strength, shape and weight of the entire model.
Now, you might get an idea about the infill of any 3d printed model. In case you know nothing about why infill is so important in 3D printing, you must read this article.
Since you got the basic knowledge about infill in 3D printing, let?s move forward to the next part of Cura Infill Patterns.
What is Cura and why it is so important for infill design in 3d printing?
When it comes to 3D Printing, slicing software like Cura is the most needed tool for every printing works.
Why?
Because if you know why actually Cura is needed for 3d printing, then you will understand the value of Cura in infill printing.
Let?s learn with an example again???.
Consider you have recently made a 3d model of a flower vase with the help of any 3D modelling software.
Since you have a 3D Printer, you?re most likely to turn your 3d design into a real-life object, a real-life flower vase.
What will you do then?
Just input your 3d model into your 3d printer and you will get your flower vase in your hands
Right?
Completely wrong. That?s not how 3d printing works?.
Wondering why?
Your 3D printer just doesn?t understand the language of a 3d model, just like you don?t get the theory of Blackhole?.
Then how can the 3d printer start printing?
This is why we do need slicing software, Cura.
Cura helps to convert the data of your 3d model and turs it into a language that 3D Printer can understand.
In more technical words, Cura software converts the stl file(a common format of 3d model) into G-Code(A language that 3D Printers are aware of).
Without having slicing software, you won?t be able to make a flower vase with 3d printing.
Okay, till now you have learned what is Cura and why Cura software is a much-needed tool for 3d printing.
Now, here comes the main point.
Why Cura is important for infill design and how it can help to improve your infill pattern as well?
After being familiar with Cura and Infill, it will be easier for you to understand the role of infill.
First, comes the slicing software. As you may know, there are some awesome tools such as Cura, Simplify3D, and more.
Since Cura is available at FREE, it will be easier for you too to start with Cura software.
[Download the latest version of Ultimaker Cura software]
Cura has many functional benefits, because it allows you to customize your 3d model up to a great extent.
Let?s have a quick look at the features of this slicing software that helps to improve the infill quality and save your filament as much as possible.
- You will get too many different infill patterns.
- Great tool for giving desired strength to your 3d model.
- Helps to minimise the weight of the model and as a result, you will end up saving filament.
Congrats, you?re now ready for the next level?.
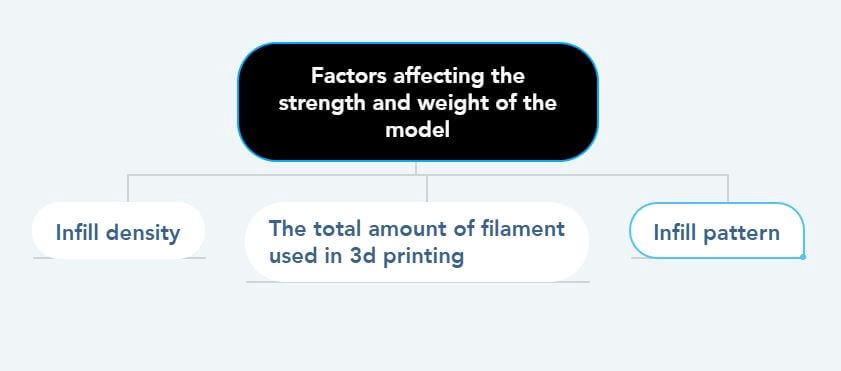
What are the factors that affect the weight and strength of the 3D Printed model?
Well, when it comes to the weight of any 3d printed object, then few things are obvious to discuss.
Here it goes:
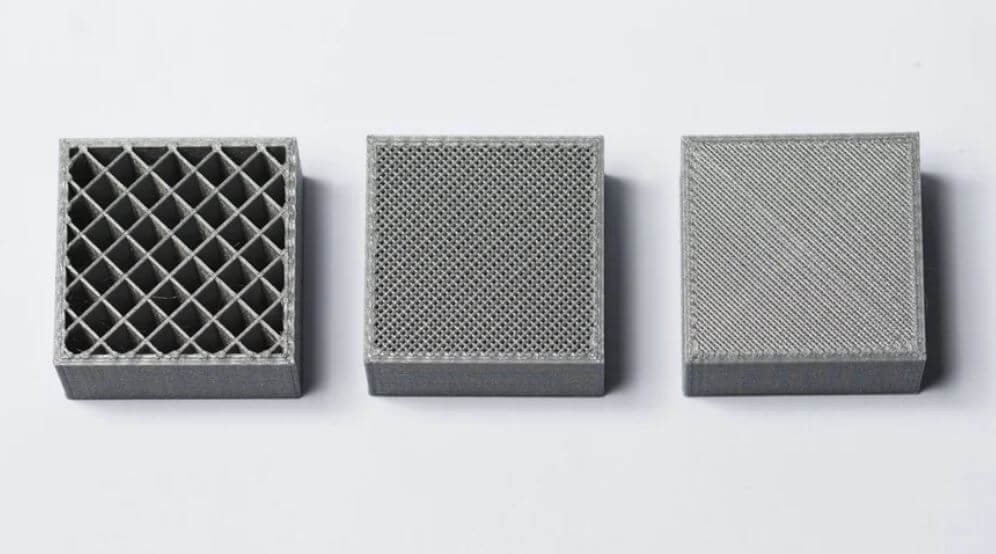
- Infill density
- The total amount of filament used in 3d printing
- Infill pattern
Infill density
After downloading the Cura software, you will get the tab for infill, under which there is a section called infill density.
?The infill density defines the amount of plastic used on the inside of the print. A higher infill density means that there is more plastic on the inside of your print, leading to a stronger object?.
This clearly represents how much plastic(Filaments such as PLA, ABS, and more) your 3d printer is going to use to build the inner structure of the 3D printed model.
Here is an actual definition of infill density in 3d printing from the Ultimaker Cura Officials.
This means the more density you choose, the more solid will be the inner portion of your 3d printed model.
For your information, I must add that Infill density in Cura and any other slicing software is defined as a percentage(%).
For example, you have opened Cura and want to customize the infill setting.
Now, let?s assume two cases.
1st case: You set the infill density at 10%
2nd case: Infill density is taken as 90%.
After the successful print, you will get to see that 3d printed model from case 1 is much lighter as compared to case 2.
Similarly, the 3d model of the 1st case will also have much less strength than the 2nd one.
One thing is clear that infill density directly affects the strength and weight of the structure.
Therefore, it is highly necessary to adjust the infill density perfectly.
One obvious question may arise in your mind that, How do I know which infill density will work for my 3d model?
Well, as I said this is a complete guide of infill setting in cura, I will teach you?ll also learn exactly what to consider before choosing infill value later in this article.
I will also suggest you not to skip any part of this article, as you may have missed any important thing regarding infill setting, pattern or strength?.
Filament weight
Since infill density also represents the infill area to be covered with filament, this setting may waste your filament.
Let me clarify.
The more high value of infill density = More filament is required = More solid will be the inner portion.
Again, how will you understand which value to choose in cura, when you have the option from 0 to 100% infill density.
Here?s the trick.
- First, identify what is the purpose of the model that you are going to 3d print.
- Use our recommendation
- For a more accurate result, test trial and error method.
So, what do I mean by identifying the purpose of the 3D Printing model?
Okay, let?s say you want to print two 3d models today.
One is a beautiful vase which you only want to use as a showpiece and there is another one, a small desk for keeping your books on it.
In both cases, your need from the model is different as the vase is just for showpiece and desk organizer to keep your books in place.
What infill density will you choose for both of the models?
Before you answer this, let me help you a little.
Simple Trick to understand infill density
Just ask a few questions to yourself and you will get enough ideas. Believe me, it?s work.
- Is your 3d model only used for visual appearance?
- Will you use it to hold some weight? ??
Golden Rule: The more strength you need from a model, the more infill density needs to be chosen in Cura.
If you answer these questions, you will be able to understand which 3d model needs more strength and therefore needs more infill density.
Always remember first consider the required or desired strength of the 3d model which you?re going to print.
I have done so many test and 3d prints and I know what needs to be done when it comes to infill density
And here is my recommendation for you regarding the selection of infill density in Cura:
Again, the above recommendation is completely based on my experience in 3D Printing.
And, I am quite sure this will work for you too.
If you are facing any issue, then I would suggest you try different infill density and figure out what works best for you.
The cost factor in infill setting
The simple thing is the less filament you use for your 3d printing, the more you are going to save money.
But saving money is not the only thing that you need to consider.
Because if that is only what needed, then everyone would be 3d printing with as low infill density as possible.
Sometimes it may seem like the part that you are going to print needs to carry a heavyweight just like a 3d printed desk ?.
In this case, your infill density cannot be less than 80% if you really want to make it fully functional.
Therefore apply the saving filament method only where it is applicable.
Don?t just chase to save filament cost every time?.
But In reality, sometimes you may need to spend a little more to make the part fully worthy.
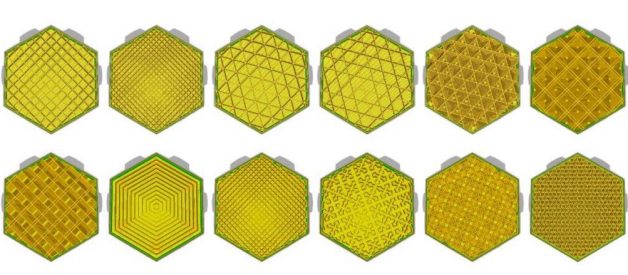
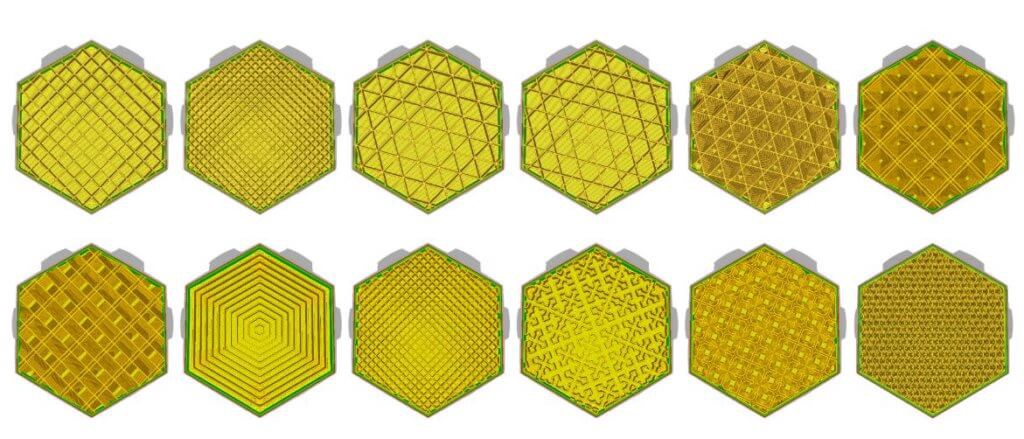
Types of Infill Pattern in Cura
There are many Cura infill patterns to work with.
Let?s start by understanding each of them.
After understanding the infill setting and its related factors, now it will be easier for you to choose the perfect infill pattern in 3D Printing.
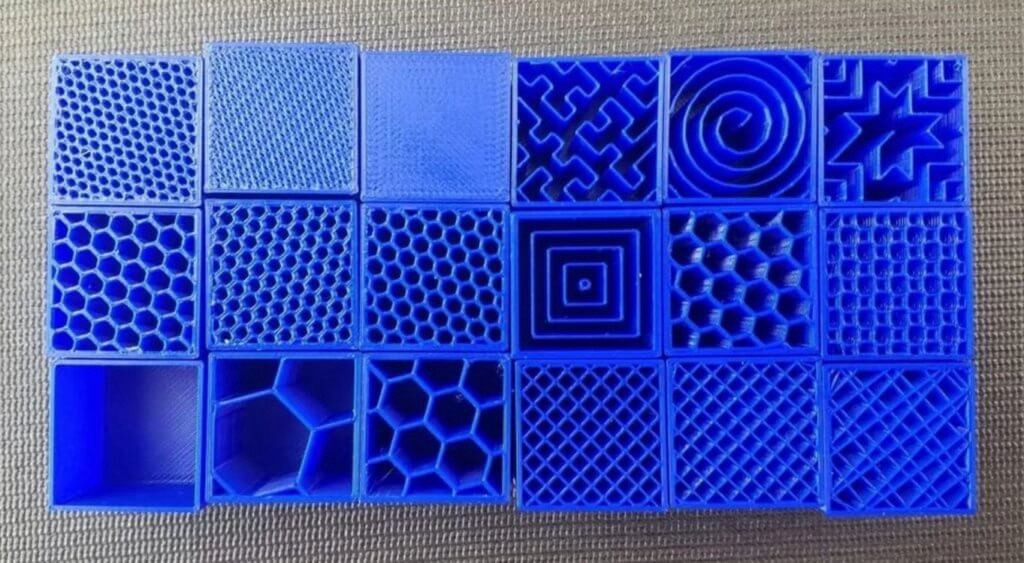
As per the latest version of Cura 4.5, I have listed all the infill patterns available in this slicing software:
Each of these infill patterns has some different individual function. I will try to make things as simple as possible.
1. Grid
This type of infill pattern is mainly made with two perpendicular lines, which together makes a shape of a square.
Due to this infill pattern, there are some pros and cons of this pattern as well.
Advantages:
- In the case of the vertical direction, this infill pattern will give the highest strength.
- This type of pattern will give fair support to the top surface of the model. As a result, the top surface will look smooth.
Disadvantages:
- It does not give enough strength in the horizontal direction.
- Similarly, this infill pattern also does not give strength to the model especially in the diagonal direction.
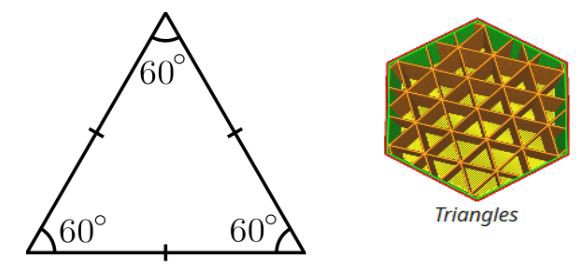
2. Triangles
When three different lines intersect each other to make an equilateral angle(each angle of 60 ), it is known as the triangle infill pattern.
Advantages:
- This gives a uniform strength to every direction.
- It is able to resist force which acts parallel to the surface
Disadvantages:
Advantages:
- It is not suitable when a smooth surface is required. Otherwise, the number of top layer needs to be increased.
- When it comes to high infill rate, this does not perform well in terms of strength.
Disadvantages:
3. Lines
By looking at the below image, you can see the pattern very clearly. In the case of a line pattern, every line is parallel with each other which actually looks similar to the grid pattern.
- Extremely weak in the vertical and horizontal direction as well.
- This is not suitable for a model that requires strength.
4. Tri-Hexagon
Disadvantage:
When you look at the inside of this pattern, you will observe a pattern with a 6-sided polygon. Have a look at the below image which represents the tri-hexagon infill pattern.
Advantages:
- Horizontal direction gives the maximum strength in this infill pattern.
- Every direction gives uniform strength.
- High resistance to shear.
Advantages:
5. Cubic
Cubic is also one of the most common cura infill patterns.
Disadvantages:
When the infill pattern is made with the 3-dimensional cubic pattern. In terms of strength, this pattern is mostly recommended as well.
Give high strength in both horizontal and vertical direction.
Does not allow pillowing(small holes, bumps on the surface) in 3d printing infill.
This is one of the Cura infill patterns that have almost zero cons.
6. Cubic Subdivision
Advantages:
It is a similar pattern as compared to the cubic pattern but comes with different formations.
Disadvantages:
As you can see in the below image that the orientation of cubes in the corner is different as compared to the centre of the model.
Actually a large size cube is centred with 8 small-sized cubes. In other words, a large cube is subdivided into 8 small cubes.
- It uses less filament but also gives a good amount of strength.
- This infill pattern also gives uniformity in all directions in terms of the strength of the model.
- Improves the surface quality of the print.
Advantages:
- This takes a little longer time to slice as compared to other infill patterns
- Due to this pattern formation, It is recommended to use higher infill density as desired
Disadvantages:
7. Octet
Multiple infill lines are being printed to make this type of pattern. It is also considered as a combination of a tetrahedral and a cube shape.
- Since the load on the structure gets distributed in the overall area, it performs well when moderate strength is required.
- This also prevents pillowing.
Advantages:
Disadvantages:
8. Quarter Cubic
By appearance, it may look similar to the cubic pattern, but there are some differences in functionality.
- Just like octet pattern, distribution of load is easy and effective. Hence high strength.
- Suitable for 3D models even when the thickness of the wall is thin.
Advantages:
Disadvantages:
9. Concentric
This type of infill structure can easily be identified by looking at the appearance. Parallel rings are formed parallelly within the structure.
- Whenever you?re going to use 100 % infill, choose concentric infill pattern.
- Due to its structure, the load will be easily distributed over the entire infill area.
- Gives more strength especially in the vertical direction.
- Again, if you?re not going to use 100 % infill density, the concentric pattern must not be used, since it does not give enough strength to the structure.
- Strength in the horizontal direction is less.
Advantages:
10. Zigzag
Disadvantages:
The zigzag pattern is one of the most common Cura infill patterns used by most of the 3D printer?s owners.
This follows the zigzag fashion in the infill pattern. Again, This is quite suitable for the nozzle as it prevents any interruption during each layer.
- Gives more strength especially when high infill density is chosen.
- Gives extremely smooth top surface.
Advantages:
- It does not provide high strength in both vertical and horizontal direction.
- Also, it fails to resist shear.
Disadvantages:
11. Cross
Cross infill pattern almost looks like a puzzle, as it looks like a curve within the structure.
- This gives a soft and flexible body
- Stronger in the vertical direction as compared to the horizontal direction.
Advantages:
- Since no straight line is there within the infill pattern, this makes a weak structure.
- Slicing time is longer than other infill patterns.
- Extremely weak in the horizontal direction.
Disadvantages:
12. Cross 3D
This one is quite similar to the Cross infill pattern. Because of this pattern, the vertical direction becomes very weak.
- Whenever a soft and flexible surface is structure required, you can go for this infill pattern.
- Easy to print as no retraction is required.
Advantages:
- Weak in all direction
- Takes more time to slice
Disadvantage:
13. Gyroid
This is another form of way infill pattern. The functionality of gyroid is also quite different from other ones.
- Due to its structure wavy pattern, it is suitable for a model which requires to pass fluids through the surface. In simple words, it gives permeability(ability to pass fluids through the surface) function to the structure.
- Provides uniform strength
- Good for flexible filament
Okay, till now you get familiar with all of the possible cura infill patterns.
But one question is obvious that is what type of Cura infill pattern should I choose?
In order to learn more about this, please move forward to the next stage.
How to find the Best infill pattern for your 3d printing model?
Well, there are so many infill options and choosing one from these is really a little hard.
Before you expect any particular infill pattern that will work for every situation, then I must clear one thing.
This is a myth.
There is no particular infill pattern that will serve every need of your 3d printed model.
But there is a way to find the most suitable infill pattern for your 3d print.
In this case, you must consider four primary factors while choosing the infill density and Acura infill pattern as well. These are
- Visual appearance
- Strength of the model
- Filament Cost
- Flexibility
After considering these factors please suggest this chart to understand your requirement.
Choose the factor first whichever you need and according to that, you can use the recommended pattern.
I would love to know if you have tried something different and got an amazing result. Please tell us in the comment box below.
How do you change the infill pattern on a cura?
Now, you have downloaded and understood all the fundamental for selecting the best and suitable infill pattern and infill density as well.
Here is a quick look at the interface that guides you to change Cura infill patterns.
1. First, open the Cura software.
2. Now click on the edit box located on the top of the screen.
3. After clicking this button, a new panel will be opened where you need to find the infill tab.
4. Now click on infill pattern and you will find a lot of option regarding infill pattern. Find one as per your need.
Role of Speed in infill strength
Though the role of speed does not affect the infill strength too much, this can somehow reduce the strength up to a little extent as well.
Here is a tip:
Whenever you choose a simple infill pattern such as lines, the grid pattern, you can go for a little extra print speed because the flow of nozzle does not get interrupted during the print of each layer.
Again, any complex infill pattern such as the concentric, cross, it is recommended to reduce the print speed than the average one you use normally.
Plugins to help you in Cura infill pattern
Plugins are a great way to make your task easier. The same thing happens with CURA.
You also have the option to install a plugin from the cura software directly which will guide you through every detail of the software.
Again, this is also a great way of mastering Ultimaker Cura with the help of one plugin.
The plugin is known as settings guide.
Here I have shown you the way to install the plugin from your software.
Since you?re a passioante about 3D Printing, I would suggest you to read relevant artciles that might help you.
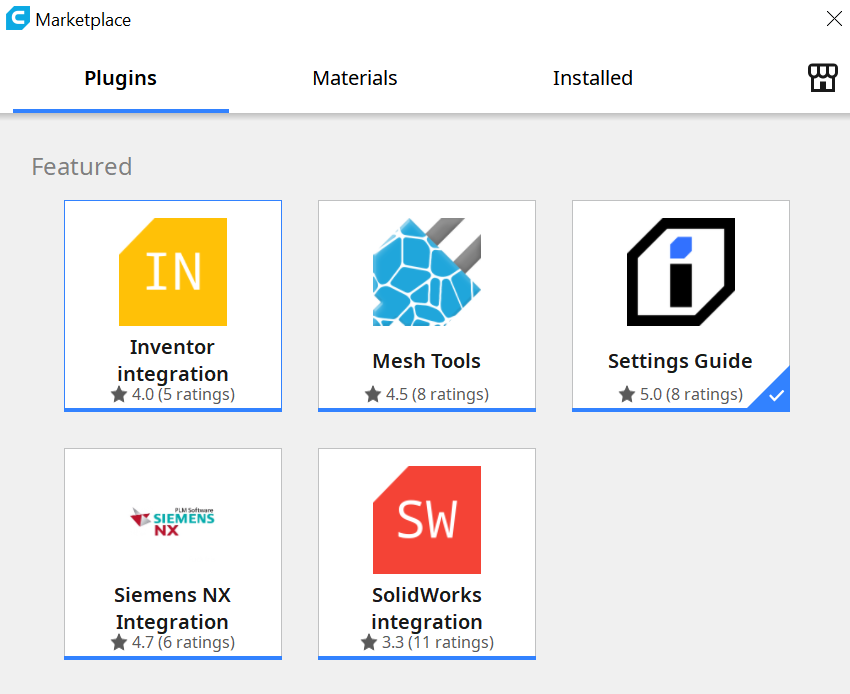
1. After opening the Cura software, Click on the marketplace button located on the top right corner.
2. Then a new tab will be opened as shown in the screenshot below:
3. Now click on the plugin called ? settings guide ?. And Install the plugin.
Conclusion
In conclusion, it is clear that Cura infill patterns must be selected by the following four important factors such as strength, filament cost, the flexibility of the model, smoothness of the surface.
This detailed guide, I have shared every aspect regarding the infill pattern in cura.
Also, if I left any details, please let me know in the comment box. That way will help me improve my work as well ?.
I hope you have liked this complete guide on ?Cura Infill Patterns? and I am expecting you to share this to the people who might get benefit from this article.
Visit the original source to learn more about 3D Printing
Originally published at https://cuberose.in on April 8, 2020.

