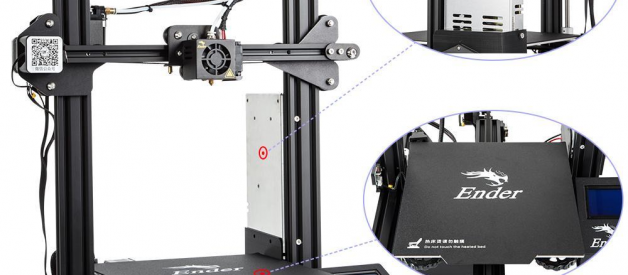
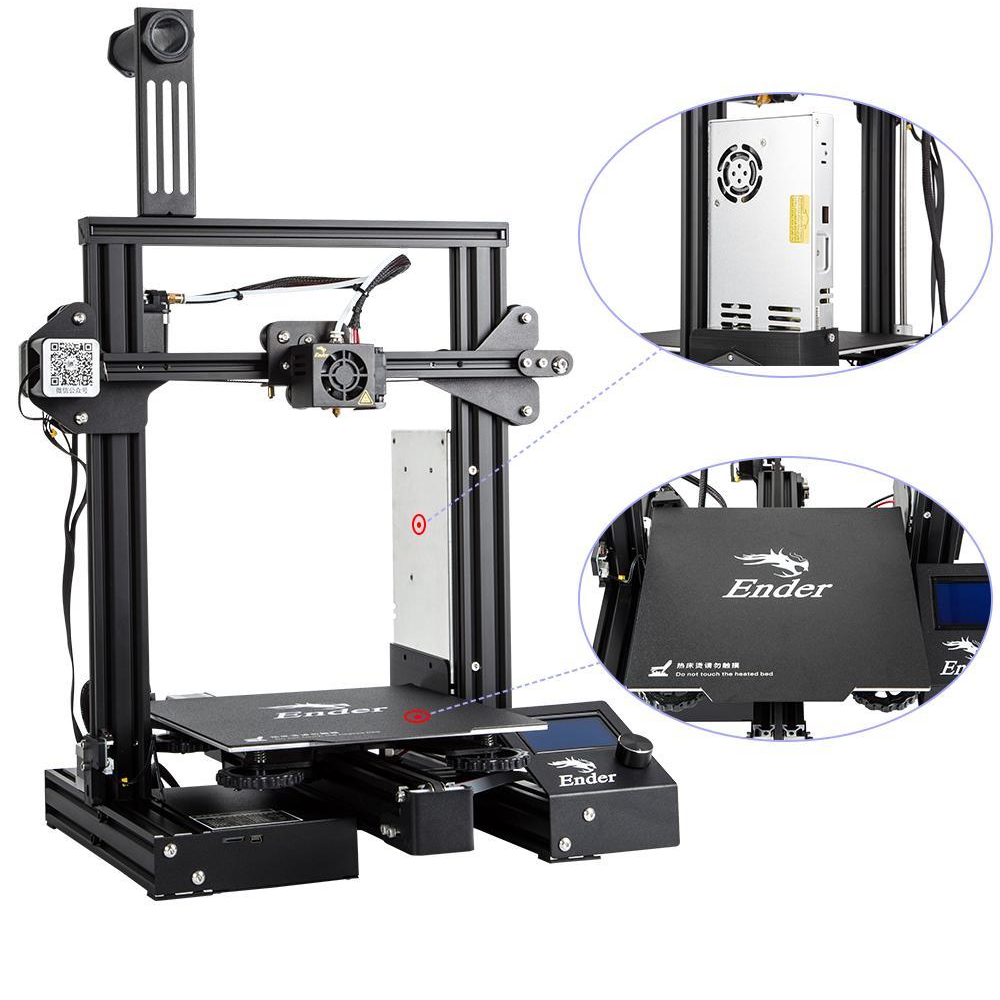
 Ender 3 Pro image from Creality
I previously published a shopper?s guide to some popular 3D printers and wrote about a US$999 3D printer, the Prusa i3. Here is another 3D printer with a 3 in its model number, the Creality Ender 3. Creality?s name is from their motto ?Create Reality, Achieve Dreams?, so it?s pronounced ?cree-ality? not ?see-reality?, though that pronunciation makes sense too. Creality has several families of 3D printers, all based on FDM (filament): the Ender family, Ender 3 and 5), the CR family (CR-10 and CR-20), and on its own the CP-01, a 3-in-1 3D printer, laser engraver and CNC machine (for cutting wood or metal to 3D shapes). Details on the larger and more expensive series machines can be had from their web site.
N.B. If you are completely new to the field of 3D printing, you might wish to start with my introductory page.
The Ender 3 Pro
Much more modestly priced than the Prusa i3, Creality?s Ender 3 doesn?t have all the bells and whistles, but offers a solid experience that makes it a good printer for the beginner getting started in 3D printing. I compared the Prusa to the Tesla, so it makes sense to compare the Ender 3 to a Chevy or other high-volume car: it makes up in affordability what it lacks in elan.
First things first ? there are actually three variants of the Ender 3. The base model at US$219, the 3X at $259, and the Ender 3 Pro (reviewed here), also at US$259. The Pro model features an upgraded, name-brand power supply ? to my mind, well worth the difference in price. I want to sleep at night, not toss and turn wondering if that long-running print is going to set the house on fire. There?s a comparison of the three variants here. At the very low end, there?s an Ender 2 for US$100-150, but it?s a single-arm design. In my limited experience with them, single-arm designs are prone to instability. Creality also offers a 3D scanner for US$999, which I have no opinion on (except it better be damned good at that price). Note that these prices are MSRP. The printers usually go for 20?40% less, even on Creality?s own store, their official Amazon store, and from third-party vendors. Creality?s own store offers free shipping from warehouses in China and several other parts of the world. Accordingly, I bought the Ender 3 Pro ? from their official store ? to be shipped direct from China. They didn?t seem to have a warehouse in Canada, and their US warehouse somehow can?t ship to Canada. I ordered it on September 20th; it actually shipped from Shenzhen via UPS on September 28th. The package visited Narita in Japan, Anchorage AK, Louisville KY, and finally arrived at my little heaven north of Toronto on October 3rd. I might have received it sooner ordering from Amazon but it would have cost a bit more, and I wasn?t in a rush.
One issue to beware of is that Creality apparently doesn?t have any native speakers of English working on their advertising or instructions, so you will have to be a bit flexible in reading their web site and the instruction manuals. Since most readers in the US don?t speak Mandarin, it?s safe to say that their English is better than your Chinese. A minor point, but if something seems unclear, either puzzle it out, or look around online.
Two of my go-to features in a 3D printer ? besides obvious stuff like good stepper motors and a heated printing bed ? are easy manual bed leveling and automatic bed leveling. Ender 3 includes the former, with big knobs at the four corners of the bed. It does not come with automatic bed leveling, though the official store does offer the popular BL Touch Auto Bed Leveling Sensor with connectors for the Ender series printers. The more upscale Ender 5, by contrast, includes the BL Touch pre-installed. I purchased the BL Touch along with the printer, because I?d had only bad experiences with manual bed leveling on my first 3D printer.
Features as ordered
The Ender 3 Pro includes the following features as ordered:- Upgraded Meanwell power supply UL certified- Large 220x220x250mm (8.7 x 8.7 x 9.8″) print area- Uses 1.75mm filament of various types PLA, ABS, PETG, more- Heated print bed, with large leveling knobs- Resume print after power failure- Magnetic ?flex? print bed; glass optional (US$20)- 1-year limited warranty, lifetime technical support
Assembly and First Prints
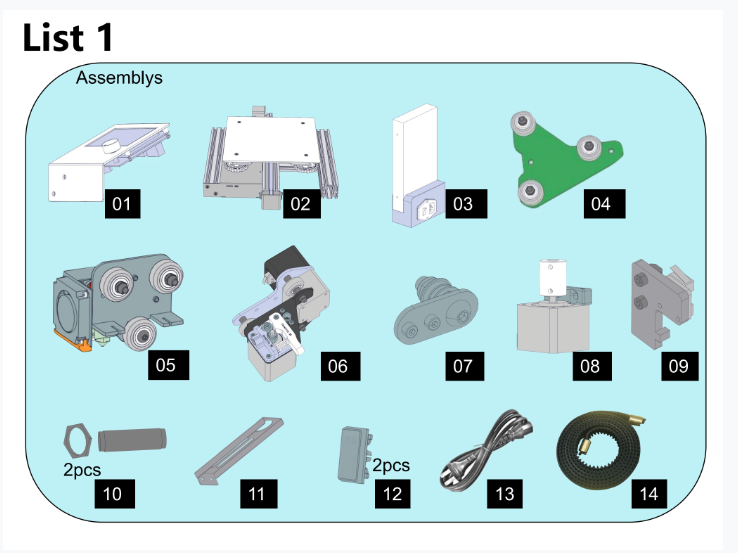 ?List 1, Assemblies? from Ender 3 Pro Assembly Manual
Ender and the makers of my first 3D printer have different ideas about what constitutes a kit. The first time around I got a box of wheels, axles, motors and frame members. The Ender 3 comes with each major sub-assembly put together. See ?List 1? diagram; the one labelled #2 is the whole lower machine assembly. These sub-assemblies with moving parts are allegedly tested, but they?re not put together into a finished printer, to save on shipping costs. As it stands, the 6Kg (13 lb) box measures 53x38x20cm; the finished printer is about 18″ x 18″ x 18″ (not counting another 10″ in height if you use the provided spool holder on top). Since shipping companies charge by a formula called volumetric weight, shipping it assembled would cost a lot for the empty space, and also be more prone to damage in shipping. To put your printer back together takes only 12 ?major steps?; Creality?s ad copy claims ?Only 10 minutes with 20 screws assembly before the first printing?. Really? The instructions, however, are a bit skimpy ? many pictures but few words of explanation ? so don?t be afraid to look for online videos on how to assemble it; just do a web search on ?Creality Ender 3 Assembly?. Here are some vids that I looked at:
- The Official Creality ?assemble? video is here; a minute and a half long video which shows the steps. There are, however, some details that are glossed over 🙂
- A half-hour would be well spent on The Ultimate Creality Ender 3 Quick Start Guide
- Careful Assembly for Great Prints covers some important details that are omitted from most.
- Setting up Your Ender 3 and Ender 3 Unboxing and Assembly
- Luke Hatfield in ?The Edge of Tech? podcast Updated Creality Ender 3 Performance Assembly Build (includes a 121-page(!!) PDF)
- ?Luke?s Lab? (a different Luke) Creality Ender 3 Pro Unboxing and Assembly
- ?Just Vlad? Creality Ender 3 Pro ? 3D printer ? Unbox & Setup
- My time-lapse video build? possibly fun, but not very instructional; also, does not cover initial bed leveling as there are many better videos on that)
In the end, my assembly ? including some things that are not in the manual but worthwhile ? actually took me about an hour and a half from slicing the packing tape to first power up. That?s counting time controlling the video and grabbing a coffee and undoing the one assembly mistake I made (putting the cable on the wrong side of the gantry. Creality, if you?re listening, this needs to be shown on Step 9 of the quick-start sheet). That timing does not include time spent on initial bed leveling. It?s also not counting time reading the manual and looking at videos before I started.
The initial bed leveling was ?interesting? because the plate that holds the bed was not straight (see photo). I had to tighten the front right leveling knob so far that the heat bed hit the central pin designed to stop you from over-tightening. Eventually I moved the Z limit switch up a notch, putting a tiny shim underneath it to give it a stable position.
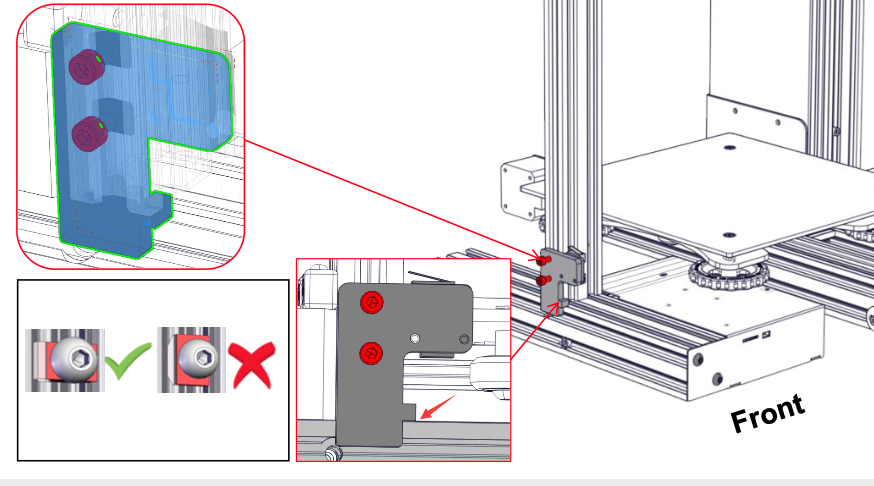 Excerpt from Step 3 of Instructions ? Mounting Z-limit Switch
One issue I ran into is the T nuts which hold several small assemblies onto the aluminum angle bar frame. The T-nuts are too small for the slots, so they spin around while you?re tightening the bolts into them (see excerpt from instructions) This is just peculiar because these nuts do come in a variety of sizes!
The software in the Ender 3 is standard Marlin firmware with its single knob control. My first 3D printer used Marlin, as do most RepRap-based printer designs, so that was familiar. The hot end and the heated bed both came up to temperature and stabilized in minutes.
To be safe, I built and tested it ?as is? before changing anything, or even adding the officially-recommended BL Touch. Once assembly, initial ?smoke test,? and bed leveling were done, I went to print their distributed model of a cartoon cat. This printed fine most of the way, but ultimately resulted in what is commonly called a ?decapicat?. I usually try to start on a new printer with the vendor?s pre-sliced files rather than slicing one of my own, as that eliminates problems caused by different slicing parameters. And I used a brand-new roll of PLA that I didn?t break the seal on until just before printing, to avoid any possible humidity problems. Everyone recommends keeping your PLA in sealed plastic bags or other closed container to avoid humidity problems; that stuff is plant based and it still loves water, which it will happily soak up from the air around it. Damp PLA does not print well.
Well, that didn?t work. Several dead animal (models) later, I found the cause of that problem. The vibrations of the print head moving around were shaking loose the bolts that hold the print bed level, causing it to rise up slightly, and thus causing the nozzle to push on the print, just enough to break it loose from the bed. Locknuts in place, I printed the cartoon dog from Creality?s SD card. Success. I then tried again to print the Good Luck Cat provided on the SD card. Meow!
Upcoming mods: BL Touch, Noise
So the machine?s up and printing. Good. As every good Maker knows, that means it?s time to start modding! There are many upgrades available, including better print heads, better extruders, and so much more. Some you can get from Creality and some from third parties, and some you can print for yourself. You could easily spend your way to double or triple the price of the printer. Then you might well ask ? why are so many of these obvious upgrades not included? The answer is equally obvious ? it?s to keep the initial purchase price down. If you want everything fancy and done, just buy the USD$999 ($750 in kit) Prusa i3. Or the $350 Prusa Mini. If you want a $200-$250 printer, the Ender 3 is your choice, but then you should be prepared to live with some limitations or spend time & money upgrading. It?s that simple. Both companies have good business models that work well for them. Pick one.
At any rate, this is about getting out information on the Ender 3. So I plan to apply several of these mods to my Ender 3, and will report on them in a subsequent article.
Not a Mod
One thing I had trouble with on my first (non-Creality, non-Prusa) printer was stability; it had stability problems due to the base being plastic and the single-arm design. The high-end Prusa i3 printer might be expected to have some vibration problems because the main upright part of its frame is cut from a single sheet of (thick) metal. Because of this, one popular mod for the Prusa i3 is called ?bear frame?; it replaces the heavy sheet metal with angled-aluminum bars. That said, people who have the i3 tend to love it and say that vibration is not a problem. Anyway, you won?t need this mod on the Creality, because the entire frame is made of angle bar metal. That said, there are ?stabilization rods? on the higher models of Creality printers, and you might be able to fit something like this to the Ender 3 if it became a problem.
Getting Away From the Printer
Because the 3D printing area and my office are at opposite ends of the house, I needed remote monitoring, including a webcam to make sure the print job hasn?t gone off the rails (which happens with all 3D printers from time to time at this stage of the technology). The standard tool for remote control and monitoring is a package called Octoprint, which usually runs on a small computer like a Raspberry PI (this configuration is also called OctoPi for short). OctoPrint lets you send files to your printer from a web interface, change parameters, monitor operations, etc. I found an article that covers this installation and even provides a case mod to mount the PI on the Ender 3.
Could Be Better
Nothing is perfect, as they say. While I don?t expect a $999 Prusa i3 for $250, there are some things that could be improved to make this low-end but brand-name 3D printer better. Most of them are the optional mods and upgrades listed above. Another is the documentation.
Summary
Creality?s Ender 3 is among the best of a very crowded field of budget-friendly or entry-level FDM 3D printers. If you?re just getting started or want to try out 3D printing, it?s a good path to take. You?ll want to do some mods on it, but even out of the box it?s a good starting point for the price.
