Here at www.clovis.pro, we changed our prompt to a more functional one for a :
? Better visualisation of git status?? Faster shell autocompletions? Daily coding comfort
Obviously we didn?t want to spend hours with shell configuration and customization like many people do? That?s why we made this article !
Don?t hesitate to add enhancement suggestions, and follow the author on github: @Aarbel ?
The result
?
The process to get it
?
1. Install and configure iTerm2
 $ brew cask install iterm2
If you don?t have installed homebrew (you should? ;)), download and install iTerm2 (it has better color fidelity than the built in Terminal, so your themes will look better).
Choose your Iterm2 color scheme
- you can use Clovis? iTerm2 color scheme file ? (the one in the screenshot)
- or scroll many opensource iTerm2 color schemes here
- ? and download your desired preset?s file here
Apply the color scheme in iTerm2
iTerm ? Preferences ? Profiles ? Colors ? Color presets ? ImportThen again, Color presets ? you-color-scheme-name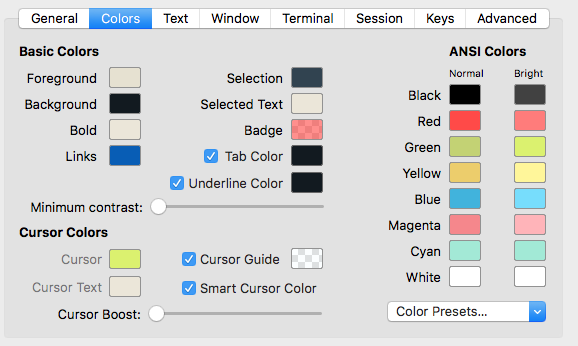
2. Install a patched font
The patched font is the font used by iTerm2 to display characters, and you?ll need a special one for special characters like arrows and git icons.
![]() You?ll get this result at the end, keep calm and follow this doc
You?ll get this result at the end, keep calm and follow this doc
Download and install the font
- Meslo (recommanded, ie the one in the screenshot). Click ?view raw? to download the font.
- Source Code Pro has better alignment for the glyphs @14px.
- Others powerline fonts
Open the downloaded font and press ?Install Font? on your computer.
Add the font in iTerm2
(font size of 12pt is our personal preference)
iTerm2 ? Preferences ? Profiles ? Text ? Change Font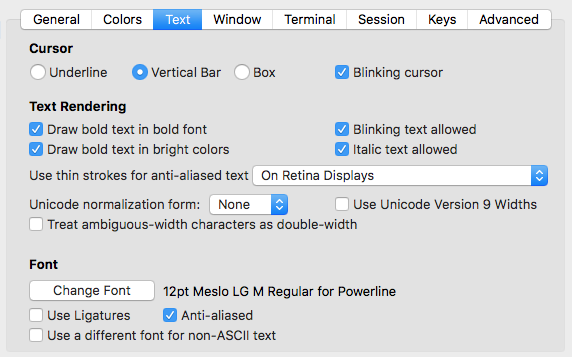
3. Install Zsh and Oh my Zsh
 Don?t mind, you are close !
Zsh is a shell that provides many features, like better files and folders navigation. To install it :
brew install zsh zsh-completions
Oh my Zsh is a Zsh configuration framework, you can read more here: github.com/robbyrussell/oh-my-zsh. To install it :
$ sh -c “$(curl -fsSL https://raw.github.com/robbyrussell/oh-my-zsh/master/tools/install.sh)”
?In the next steps you?ll need to edit the ~/.zshrc configuration file which is run when the terminal starts. At any time you can compare it with Clovis .zshrc configuration file ?
4. Add Powerlevel9k Zsh Theme
![]()
The Powerlevel9k zsh theme adds many other features like a right promp with infos such as exit codes and timestamps. To install it run :
$ git clone https://github.com/bhilburn/powerlevel9k.git ~/.oh-my-zsh/custom/themes/powerlevel9k
Then edit ~/.zshrc configuration file and set
ZSH_THEME=”powerlevel9k/powerlevel9k”
Boom.
Powerlevel9k offers a whole lot more, best is to follow the next steps or check out these user made configs.
5. Final tweaking
- shorter prompt
- enable text editor navigation
- auto suggestions
- syntax highlighting
- new line after each prompt
- change color of warning git status
- change Iterm2 tabs color
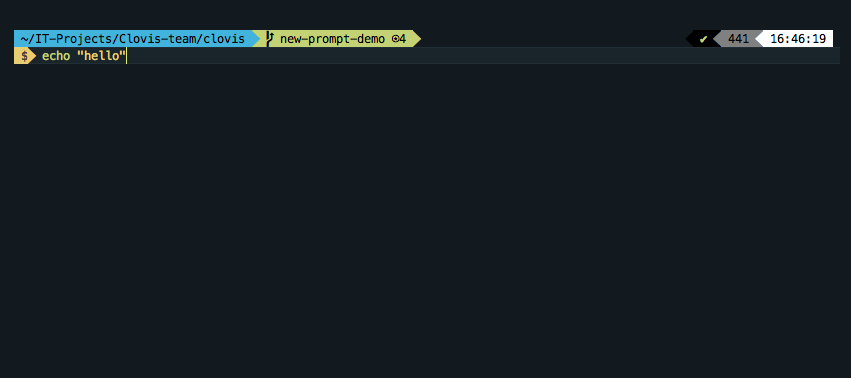
Shorter prompt
Here you can remove the user@hostname and unnecessary informations + put the command line on a second prompt line :
![]() Before?
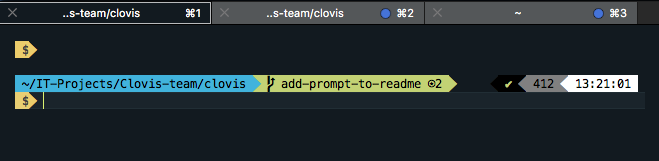
Before?![]() After ?
After ?
You can choose your prompt elements and make them as on the screenshots. Just add these lines to your ~/.zshrcconfiguration file :
POWERLEVEL9K_LEFT_PROMPT_ELEMENTS=(dir rbenv vcs)POWERLEVEL9K_RIGHT_PROMPT_ELEMENTS=(status root_indicator background_jobs history time)
Moreover to make the two lines prompt you have to add this :
POWERLEVEL9K_PROMPT_ON_NEWLINE=true
?? and to make it beautifull with the $ character add these other lines:
# Add a space in the first promptPOWERLEVEL9K_MULTILINE_FIRST_PROMPT_PREFIX=”%f”# Visual customisation of the second prompt linelocal user_symbol=”$”if [[ $(print -P “%#”) =~ “#” ]]; then user_symbol = “#”fiPOWERLEVEL9K_MULTILINE_LAST_PROMPT_PREFIX=”%{%B%F{black}%K{yellow}%} $user_symbol%{%b%f%k%F{yellow}%}? %{%f%}”
You can read more about POWERLEVEL9K prompts options here, and deeper customizations here: code.tutsplus.com/tutorials/how-to-customize-your-command-prompt ? net-24083
Enable text editor navigation
Vertical cursor
![]() iTerm2 ? Preferences ? Profiles ? Text? Cursor : ? Vertical Bar ? Blinking cursor : ? ON
iTerm2 ? Preferences ? Profiles ? Text? Cursor : ? Vertical Bar ? Blinking cursor : ? ON
Text navigation with keyboard
Moreover, by default, word jumps (option + ? or ?) and word deletions (option + backspace) do not work on iTerm2. To enable them, go to :
iTerm ? Preferences ? Profiles ? Keys ? Load Preset? ? Natural Text Editing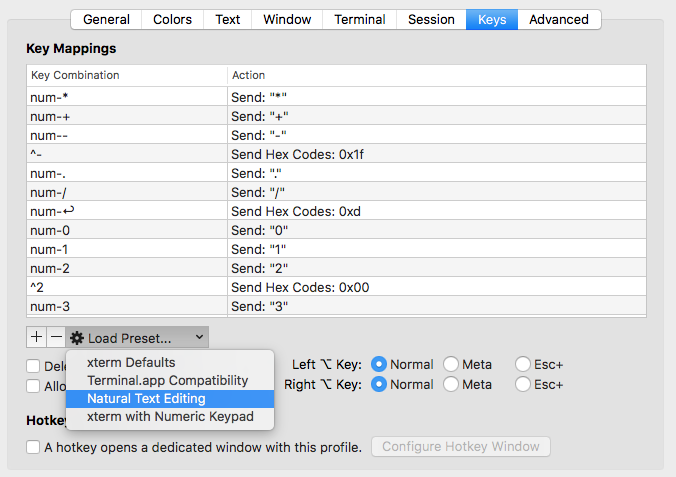
Restart iTerm2 for all changes to take effect.
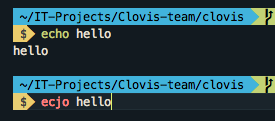
Auto suggestions (for Oh My Zsh)
This plugin suggests the commands you used in your terminal history. You just have to type ? to fill it entirely !
 $ git clone https://github.com/zsh-users/zsh-autosuggestions $ZSH_CUSTOM/plugins/zsh-autosuggestionsNote: $ZSH_CUSTOM/plugins path is by default ~/.oh-my-zsh/custom/plugins
Add the plugin to the list of plugins in ~/.zshrcconfiguration file :
plugins=( ? zsh-autosuggestions)
Start a new terminal session.
More details here : github.com/tarruda/zsh-autosuggestions#oh-my-zsh
Note : if the auto suggestions do not appear to show, it could be a problem with your color scheme. Under ?iTerm ? Preferences ? Colors tab?, check the value of Black Bright, that is the color your auto suggestions will have. It will be displayed on top of the Background color. If there is not enough contrast between the two, you won?t see the suggestions even if they?re actually there..
Syntax highlighting
The highlighting shows if commands are installed and known by the shell, and gives better output colors.
 $ brew install zsh-syntax-highlighting
If you do not have or do not like homebrew, follow the installation instructions instead.
After installation through homebrew, add the next line to the end of your ~/.zshrc file :
source /usr/local/share/zsh-syntax-highlighting/zsh-syntax-highlighting.zsh
After that, it’s best to restart your terminal. Sourcing your ~/.zshrc file withsource ~/.zshrc command does not seem to work well with this plugin.
New line after each prompt
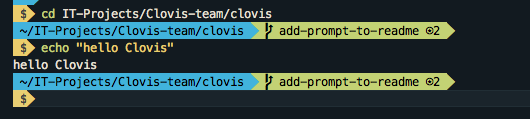 Before
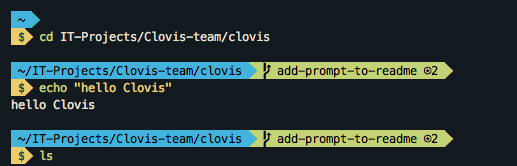 After (better readability)
Again, add this lines to your ~/.zshrcconfiguration file :
POWERLEVEL9K_PROMPT_ADD_NEWLINE=true
Change color of warning git status
 Before
 After
After
You can set it as red for better readability (and not orange). Just add this line:
POWERLEVEL9K_VCS_MODIFIED_BACKGROUND=?red?
Change color of iTerm2 Tabs
 The final UI isn?t perfect, but is better
Same game, just add these lines at the end of ~/.zshrcconfiguration file and restart your term:
# Colorise the top Tabs of Iterm2 with the same color as background# Just change the 18/26/33 wich are the rgb valuesecho -e “33]6;1;bg;red;brightness;18a”echo -e “33]6;1;bg;green;brightness;26a”echo -e “33]6;1;bg;blue;brightness;33a”
6. Visual Studio Code config
Installing a patched font will mess up the integrated terminal in VS Code unless you use the proper settings. You?ll need to go to settings (CMD + ,) and add or edit the following values:
- for Meslo: “terminal.integrated.fontFamily”: “Meslo LG M for Powerline”
- for Source Code Pro: “terminal.integrated.fontFamily”: “Source Code Pro for Powerline”
- for other fonts you?ll need to check the font name in Font Book.
You can also set the font size e.g.: “terminal.integrated.fontSize”: 12
?
Follow the author on github : @Aarbel
Sources : https://github.com/chris-murray/powerlevel9k-customhttps://gist.github.com/kevin-smets/8568070?

 terminal and prompt on OSX in 7minutes)
 terminal and prompt on OSX in 7minutes)