
Using hooks and context with react router
 Photo by Artem Sapegin on Unsplash
I?ve been doing some contract work building app and I have the privilege of a ?greenfield? when starting. I?ve chosen some of the usual suspects, React (with Hooks of course!), Styled-Components, React-Router, etc. But while developing it, I came to a problem set ? one I stumble on every time: creating a basic authentication system.
To be honest, I don?t really have a standard way to do authentication in React applications. Looking back through my previous work, it seems to be a pretty mixed-bag on how I handle tokens, components, and routing for authentication. So, I have picked one of my favorite ways to manage authentication, refined it a bit, and will use this as a basis for a basic authentication system to react, using react-router.
Note: there were a number of pieces missing from this authentication that needed to be added before I used it, check out the closing notes for some ideas. But these are good first steps to get going!
Goals For This Authentication System
- Private and public routes: This application will have basic ?landing? pages, which any user can visit. Along with these, signing up and logging in should be declarative public routes. On the other hand there will be many pages that require authentication to view.
- Redirect to Login: If the user does not have tokens, or the token refresh does not work, the user will automatically be redirected to the Login page if they attempt to see a private route.
- Redirect to referrer: If a user wants to view a specific page, but does not have a valid token, they will be redirected to the login page. We want to make sure that after logging in they?re sent to the page they originally wanted. The default will be the dashboard.
- Authentication Tokens: We?ll use tokens to read and write authentication with. These should be stored in local storage so the user can stay logged in if they leave the site.
- UI is intuitive and straightforward: This really isn?t going to be much of an ?examination? on the UI aspect, but I do think it?s essential for our Login and Sign up page to be simple, and follow the do?s and don?ts outlined by Brad Frost here.
We?ll try to tackle these in order, to make sure we don?t overload the process with too much code. It?s better to refactor the code and understand the full process, rather than code from the start expecting all of these to work. We won?t be using Redux here ? instead will just store the data we need in react context to keep it simple. Under the hood, Redux would do something similar, but the app isn?t of the size that would warrant using Redux at the moment.
Let?s dive in!
Project Initialization
Let?s set up some groundwork with our base project. This will be in your own project, but let?s pretend we?re starting from scratch ? just to make it easier to follow along. See the completed code on github if you want to follow along?we are setting up the base project with Create React App, like so:
I won?t set up any permanent architecture in this project for my files. Everyone has their own style with folder/file architecture, so I?d like to keep this as agnostic as possible for people to follow along with.
Or maybe I?m trying to avoid triggering people that don?t use my architecture!
Our next step will be to install the packages we need. We?re installing React Router and Styled Components and axios.
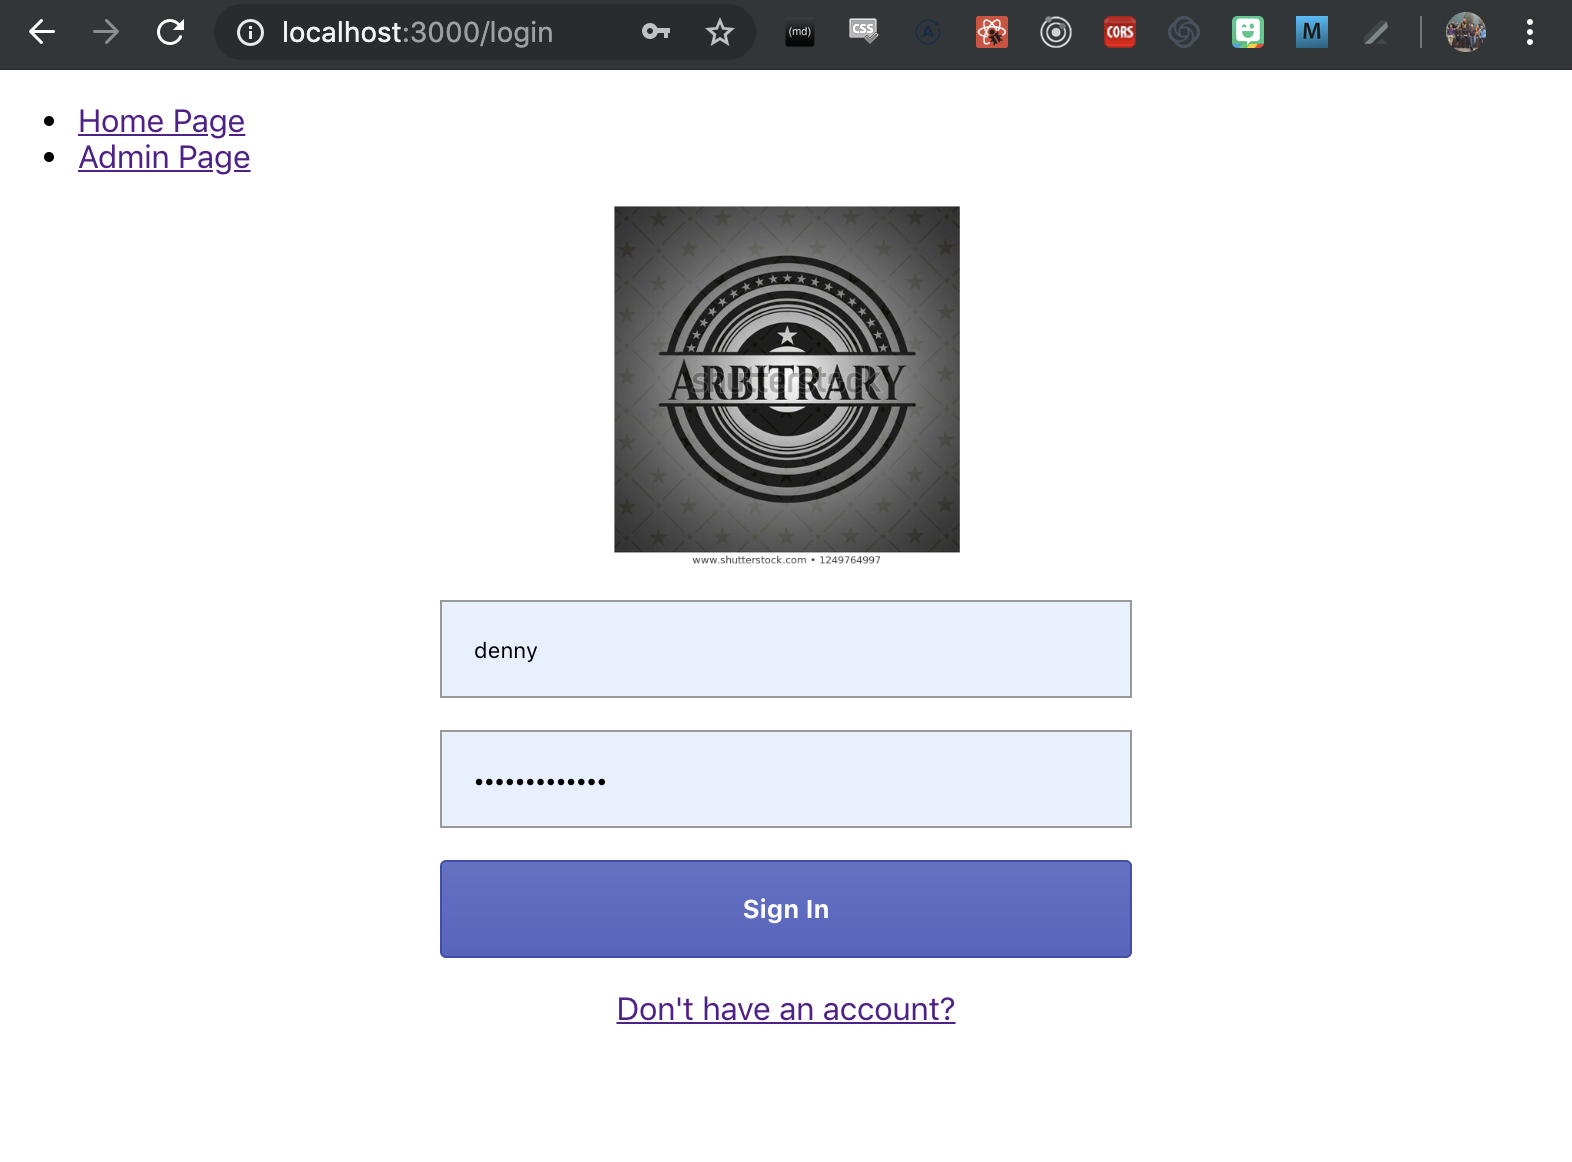
Great, now let?s set up react-router. We?ll be modifying our App.js component, to have some basic routes. For now, let?s add a public Home page and a public Admin page. Don?t worry, we?ll be changing this to private soon.
Note that we?ll be importing two files that aren?t created yet. I just want us to see the router before getting into details on the pages we?re making.
src/App.js
We?ll also create those two components for the home page and the admin page now. Let?s create a new folder in the src directory called pages. We’re going to create two new pages in this directory. They’ll be called unsurprisingly, Home.js and Admin.js. You won’t need to import them though, because we already did it above.
src/pages/Home.js
src/pages/Admin.js
That should do for setting up the initial structure of the project. From here we can start adding the pieces of our authentication system. Be sure to give it a test run with npm start. You should be able to navigate between the pages, and only the Home Page or Admin Page should show.
Wait, What Did We Do So Far?
Before we move on, let?s make sure we have a fundamental understanding of SPAs and react-router. If you?ve worked with routers and SPAs before, you?re welcome to skip over this part!
Create-React-App is a fantastic project that handles a lot of the heavy work for creating a new React application. Behind the scenes, there are a lot of different pieces that need to be put together, particularly with module bundling. That topic is one for a different day, but for our sake, it allows us to just focus on the app itself, without having to worry about configuration.
Now, there are several different ways we can present web pages to users. Traditionally, web pages were served to users from a web server. The user would go to a URL like http://www.dennyssweetwebsite.com/hello the server hosting my web site would get the request, find out the page they were looking for (in this case, hello) and return the user hello.html, which was an HTML file residing on the server.
As the web grew more complex, these calls would resolve to a server application, running on something like PHP which would generate the HTML page for the user and return that data. The critical piece to note here is that the URL specified by the user was directly related to a route on a web server. So, generating and returning that content was an actual address to the web.
On the other hand, Create React App scaffolds a client-side Single Page Application (or SPA). Single Page Applications are web apps that reside entirely on the user?s browser. When a user makes a request for www.dennyssweetwebsite.com they are instead handed my entire application. From there, we don’t actually even need URLs. What the user can view can directly be handled by the state, without ever changing the URL.
The problem is that browsers and users are still highly dependent on the URL. Browsers allow you to move back and forth in history, bookmark specific pages, etc. Users may bookmark particular pages and want to jump directly there. They even may memorize URL?s. Also, in all fairness, URLs are an excellent way to separate our content, especially when it comes to things like route-based lazy loading. For that matter, many Single page applications still use a routing system to split their content. All this does is read the given URL, and instead of passing that change to a server, it will instead display a component for a given URL. Rendering a component based on the route is precisely what we did in App.js above.
OK, the history lesson is over, lets jump into building some private routes.
Private and Public Routes
The first thing we want to set up is a new route component we?ll call PrivateRoute. This decorator will be used by any route that needs to be behind authentication. Simple enough, let?s make a new file in the `src` directory called PrivateRoute.js.
src/PrivateRoute.js
You?ll notice we haven?t added any authentication logic yet. We are merely rendering the route that is passed in, just like a public route. We have changed the API slightly though. We?re using the Render Props style for the route here instead. This will make more sense later when we add logic for authentication ? for now, assume it does the same thing as using the Component props of the public routes.
Now, if you look in that render props, its obvious we should have some authentication inside it. But we don?t have that set up quite yet. We aren?t using Redux, but we may want to have authentication data throughout our app. To avoid prop drilling, we are going to use the Context API. We?ll have another blog entry on the extent of the Context API, but for now let?s assume that data we place into it can be removed anywhere in the react tree. Behind the scenes, this is what Redux uses.
First things first, we are going to create a new context. I?ve created a folder called context in the src directory. Inside that, I’ll create a new file called auth.js.
src/context/auth.js
Here we create our next context, as well as a hook for using this context called useAuth. We’ll come back to this later. As of now, no logic is done ? it will pull whatever data it finds in the AuthContext. To use our new context, we will need to add a provider to react. We’ll add this provider in the App.js file. While we’re doing that, let’s change our Admin route to use the new PrivateRoute component.
src/App.js
Redirect to Home
With our PrivateRoute technically made, the only real way to make it ?work? is to have the user unable to access a page if they are not authenticated. So let?s complete our second goal: to redirect them to the home page if they are not currently authenticated. Later we?ll hook this up to the login page.
Notice that we are passing the value false for the Provider. This means that our useAuth hook will always return false when checking the authentication ? therefore, all private routes are inaccessible. Not ideal, but great for us to test with right now! To get this functionality working, we just need to add the useAuth hook to the PrivateRoute component.
src/PrivateRoute.js
Here, we?re using our hook and pulling whatever value is stored in our AuthContext. Later we?ll be using tokens to update this value. For now, it is set to false. That means isAuthenticated will always be false, so when we hit the logic in our Route render prop, it will redirect us to the home page. Later, this will be to the login page, but for now, if you test this out, you should not be able to reach the admin page ? you?ll be stuck on the home page.
To make sure this is working, trying changing the Provider value to true in App.js. You should now be free to go where ever you like. Let?s change the context value back to false and keep going.
Create Login and Signup Page
Let?s create a login and a signup page. I?ll try and make this as minimalist as possible, while still following some of Brad Frost?s guidelines highlighted above. With that said, we?re going to start off with a few components we?ll be using in our pages. First, we are going to make two new folders in src, components, and img.
Let?s start with an AuthForm component. For the sake of simplicity, it will just have some styled-components, that we will be sharing between Login and Signup.
src/components/AuthForm.js
The components are pretty self-explanatory. Since our focus is primarily on the private routing logic, I?m not going to spend time describing this, but we?ll be able to use these components to build our Login and Signup page.
The only other piece we?ll need to set up beforehand is a logo to use on the Signup and Login forms. I?ve just placed an arbitrary logo in src/img/logo.jpg? you’ll see it used in our pages in a moment.
Now let?s make the Login and Signup pages.
src/pages/Login.js
src/pages/Signup.js
Both of these are similar now but will have more specific logic in the future. We won?t be diving further into signup, but it?s there for you!
Next, we need to add these new routes. Since these users log in or create their account with these, they are public routes.
src/App.js
You should now be able to jump to the login and sign up pages by typing in the URL. We can add buttons later, but you should also be able to navigate back and forth between the two pages by hitting the link below the Sign in/ Sign up button.
One final addition: when the user attempts to go to Private Route, we want to redirect the user back to the login page. This just requires a minor update in the redirect of the PrivateRoute component.
src/PrivateRoute.js
Token Authentication
We?re going to add basic token authentication to our web app. We won?t go deeply into security ? perhaps that can be covered in a different blog entry. For now, we?re going to build a token system that calls a login endpoint with a username and password, and stores those tokens in our state and local storage. When we visit a private route page we will check the state for tokens, if there are none we review the local storage. If neither exists, we direct the user to the login page. You?ll notice a lot of the pieces are already set up for this ? we just need to plug in some logic.
The first step: update our App.js with some new state for our auth provider context. By using state with our context provider, we allow our context data to be dynamic, that is, they don’t need to be set before runtime. They can change depending on the user’s input.
Let’s see that in action.
App.js
Now any component using our AuthContext can get tokens and set the tokens. Let?s plug this logic into our login page. While we?re at it, we?ll add state using the useState hook for our login form and allow the user to click ?Sign In? to trigger the login flow.
Note: I?ve added an Axios call. You can read more about Axios on their github. The URL we pass is obviously not a real URL ? it needs to point to somewhere that distributes a token.
Login.js
I?m not going into the signup flow ? it?s almost identical to the login flow. A couple of differences: the requirement of the password field for a second time, perhaps some other personal info, and using the signup URL instead of login.
Now, since we?ve moved this to a token flow, and changed the objects within our Auth Context on App.js, the isAuthenticated variable in PrivateRoute.js is actually pointing towards an object that looks like this:
Even if no values are assigned, our isAuthenticated is going to be true, as the object always exists. For the sake of keeping this blog entry more straightforward, we’re going to assume having authTokens means you are authenticated. Later, when a call occurs where our auth tokens are indicated to be expired, we’ll clear this token as well as local storage. This will also happen when a user logs out.
Let?s update that now. First, we use the new useAuth hook to get our tokens from context. We’ll check if the authTokens have been set, if they do render the component, if not we redirect them back to the login.
PrivateRoute.js
Logging Out and Expired Tokens
The last piece to our token authentication is handling expired tokens, or removing the tokens in general when the user logs out. The first piece will be the logout flow, as it will be a bit simpler, and give us a strong base to work off of.
When logging out, we can assume that all tokens, both in our state and in our local storage, need to be removed. Let?s make a simple button for that in the admin page. FYI, it?s going to be a massive button on that page.
Admin.js
Redirect To Referer After Login If Available
Let?s think of the approach users take to reach our web app. Up to this point, we can assume a user has entered our home page and then decided ?I?m going to log in,? so they navigate to our login route, sign in, and are taken to the dashboard.
My expected flow would be attempting to view a page that requires an auth token would redirect me to log in. Once I successfully login, I will be redirected back to the page I was initially trying to view. Right now, the user will be redirected to the home page. Let?s add a referer value to the Login state.
Login.js
Now, when the user logs in, they will either be redirected to the referer, or to the home page. Let?s add this new state pass in the redirect of our PrivateRoute.js
PrivateRoute.js
The user should now be redirected back to the page they were initially attempting to view.
Closing Thoughts
That does it for a basic walk through. So we?re ready for prod right? Well I wouldn?t get too comfy ? there?s a lot more work to be done.

Some other things that could be important are:
- a user object that has necessary user data
- checking the token on the initial app mount to determine if it?s expired
- cascading permissions, where a manager ?restriction? means, the manager and anything above (for example, an admin) have permissions to the page.
- better security, error logging, loading, etc
Perhaps that?s a blog for another day. Hopefully, this was helpful for everyone for a basic start. It?s a little different from my usual performance related blogs ? they?re fun to do from time to time.
As I said, this is a basic introduction, but I?ve been finding myself using patterns like this more often. As I get more into blogging, I plan to include more basic guide blogs or component design blogs like this. If you have any suggestions, shoot me a tweet at my link below.
