
Building a REST API in Django is so super easy. In this tutorial, we?ll walk through the steps to get your first API up and running.

(This post is part of a series where I teach how to deploy a React front end on a Django back end. However, nothing in this post is React specific. Whatever your API needs, read on!)
[Just want to see some source code? My pleasure: https://github.com/bennett39/drf_tutorial]
Why REST API?
Before we get to the code, it?s worth considering why you would want to build an API. If someone had explained these basic concepts to me before I started, I would have been so much better off.
A REST API is a standardized way to provide data to other applications. Those applications can then use the data however they want. Sometimes, APIs also offer a way for other applications to make changes to the data.
There are a few key options for a REST API request:
- GET ? The most common option, returns some data from the API based on the endpoint you visit and any parameters you provide
- POST ? Creates a new record that gets appended to the database
- PUT ? Looks for a record at the given URI you provide. If it exists, update the existing record. If not, create a new record
- DELETE ? Deletes the record at the given URI
- PATCH ? Update individual fields of a record
Typically, an API is a window into a database. The API backend handles querying the database and formatting the response. What you receive is a static response, usually in JSON format, of whatever resource you requested.
REST APIs are so commonplace in software development, it?s an essential skill for a developer to know how they work. APIs are how applications communicate with one another or even within themselves.
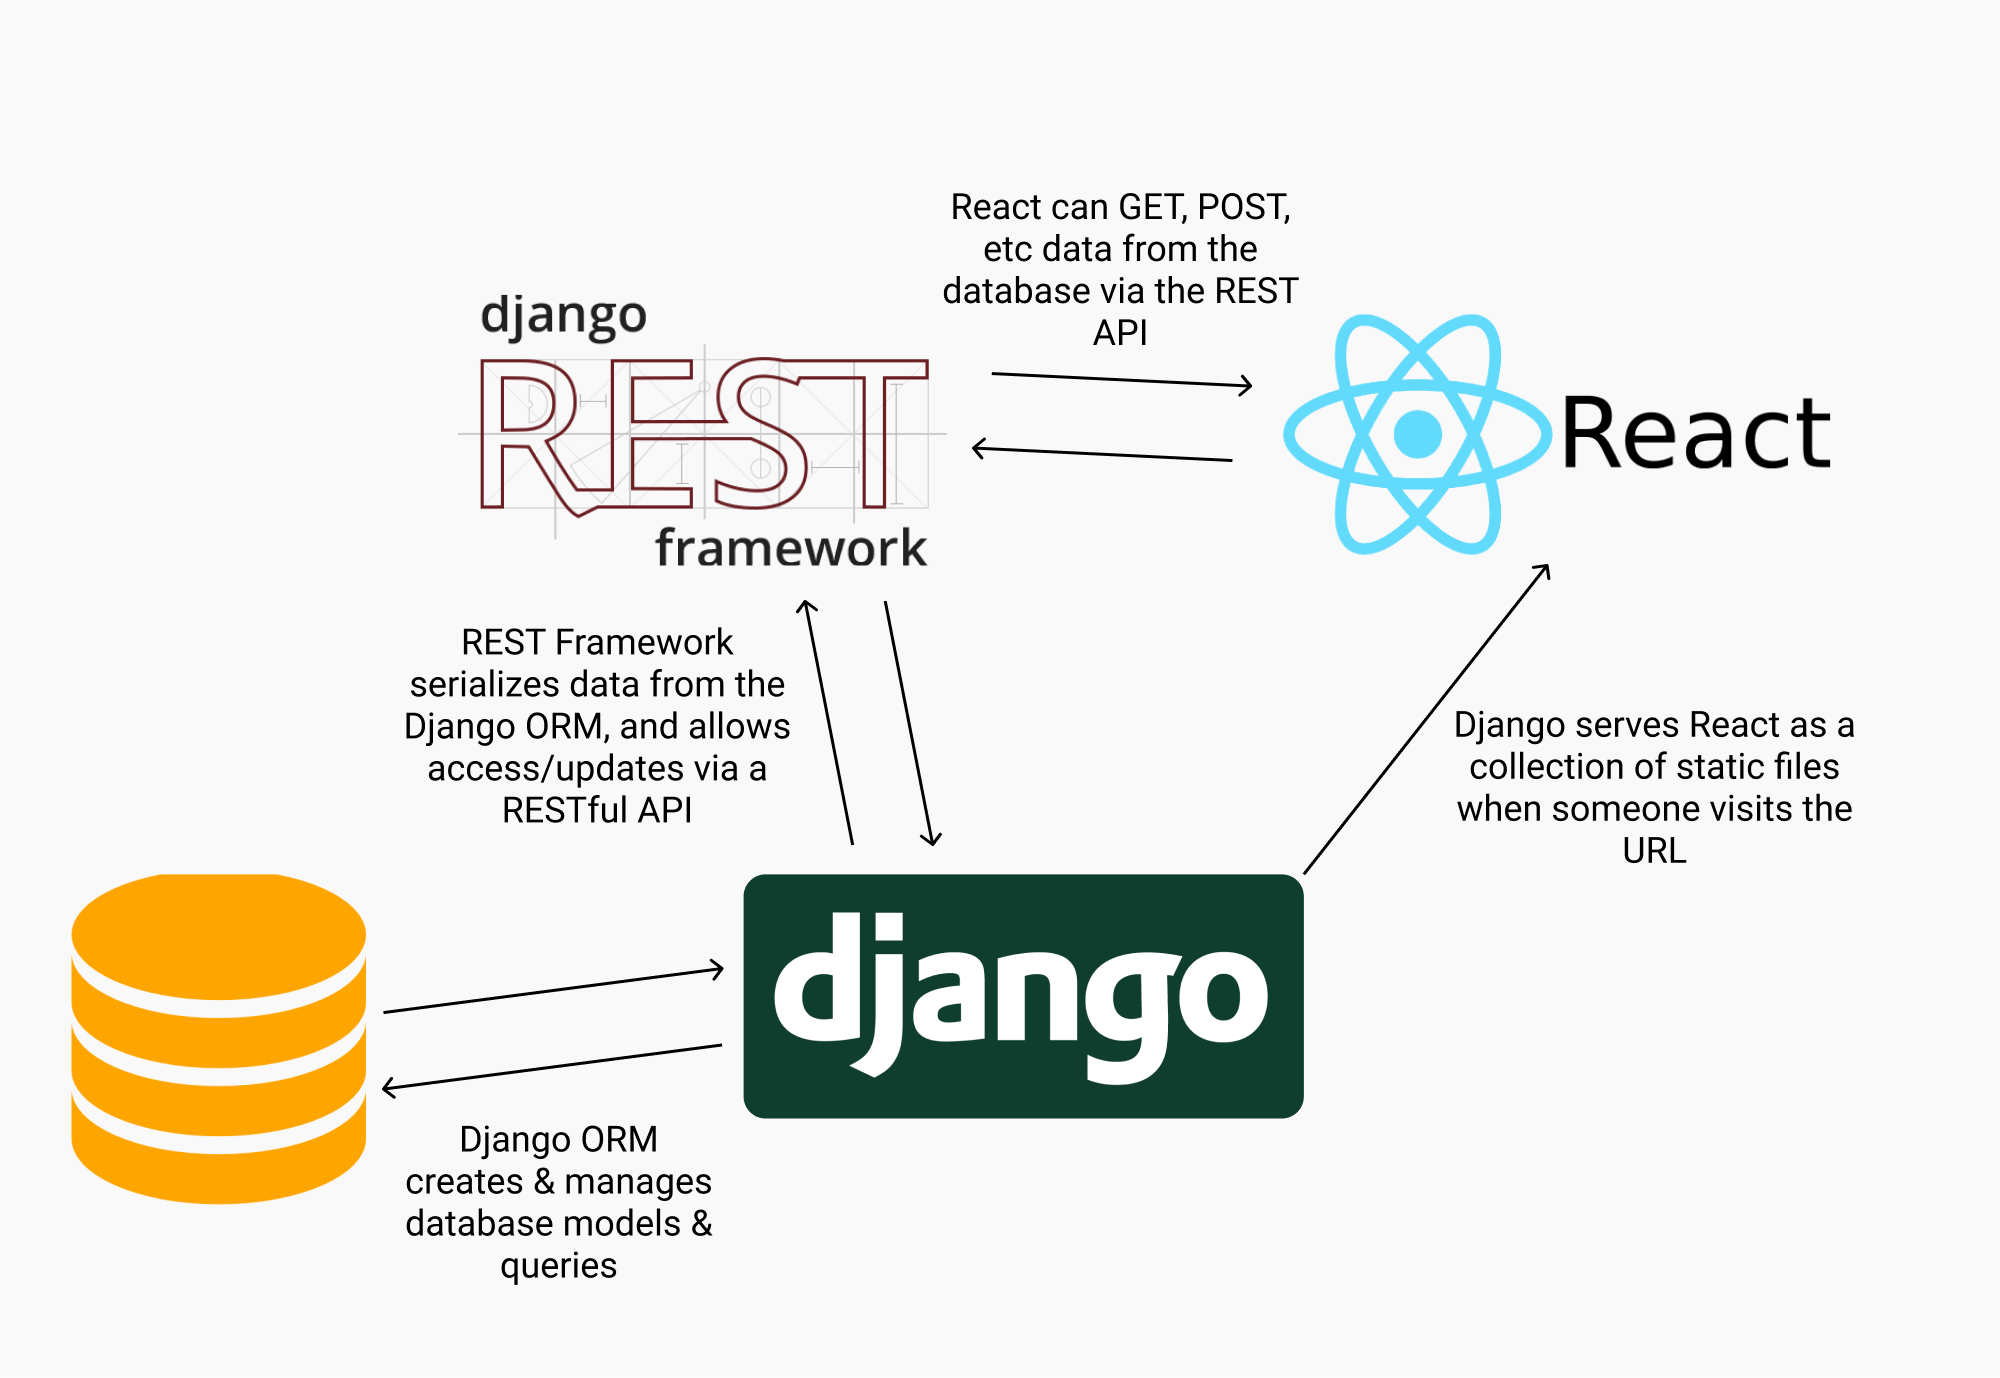 A typical Django application that uses React as a front end. It needs an API to allow React to consume data from the database.
For example, in web development, many applications rely on REST APIs to allow the front end to talk to the back end. If you?re deploying a React application atop Django, for instance, you?ll need an API to allow React to consume information from the database.
The process of querying and converting tabular database values into JSON or another format is called serialization. When you?re creating an API, correct serialization of data is the major challenge.
Why Django REST Framework?
The biggest reason to use Django REST Framework is because it makes serialization so easy!
In Django, you define your models for your database using Python. While you can write raw SQL, for the most part the Django ORM handles all the database migrations and queries.
 A sample Django database model, defined in Python. The Django ORM writes all the SQL needed to create and update this model.
Think of the Django ORM like a librarian, pulling the information you need for you, so you don?t have to go get it yourself.
As a developer, this frees you up to worry about the business logic of your application and forget about the low level implementation details. Django ORM handles all that for you.
The Django REST Framework, then, plays nicely with the Django ORM that?s already doing all the heavy lifting of querying the database. Just a few lines of code using Django REST Framework, and you can serialize your database models to REST-ful formats.
To-do list to create a REST API in Django
Okay, so based on what we know, what are the steps to creating a REST API?
- Set up Django
- Create a model in the database that the Django ORM will manage
- Set up the Django REST Framework
- Serialize the model from step 2
- Create the URI endpoints to view the serialized data
If it seems simple, that?s because it is. Let?s get to it!
1. Set up Django
To create a Django app, we?ll need to install Django. That?s easy enough!
First, though, consider creating a new virtual environment for your project so you can manage your dependencies separately.
1.1 Virtual Environment
I use pyenv and pyenv-virtualenv for my environments:
$ pyenv virtualenv django-restLooking in links: /tmp/tmpjizkdypnRequirement already satisfied: setuptools in /home/bennett/.pyenv/versions/3.6.8/envs/django-rest/lib/python3.6/site-packages (40.6.2)Requirement already satisfied: pip in /home/bennett/.pyenv/versions/3.6.8/envs/django-rest/lib/python3.6/site-packages (18.1)$ pyenv local django-rest
1.2 Install Django
Now, we can install Django:
$ pip install django
Next, let?s start a new Django project:
$ django-admin startproject mysite
If we look at the directory now, we?ll see that Django created a new folder for us:
$ lsmysite/
And if we look inside that folder, there?s everything we need to run a Django site:
$ cd mysite/$ lsmanage.py* mysite/
Let?s make sure it works. Test run the Django server:
$ python manage.py runserverWatching for file changes with StatReloaderPerforming system checks…System check identified no issues (0 silenced).You have 17 unapplied migration(s). Your project may not work properly until you apply the migrations for app(s): admin, auth, contenttypes, sessions.Run ‘python manage.py migrate’ to apply them.May 17, 2019 – 16:09:28Django version 2.2.1, using settings ‘mysite.settings’Starting development server at http://127.0.0.1:8000/Quit the server with CONTROL-C.
Go to localhost:8000 and you should see the Django welcome screen!
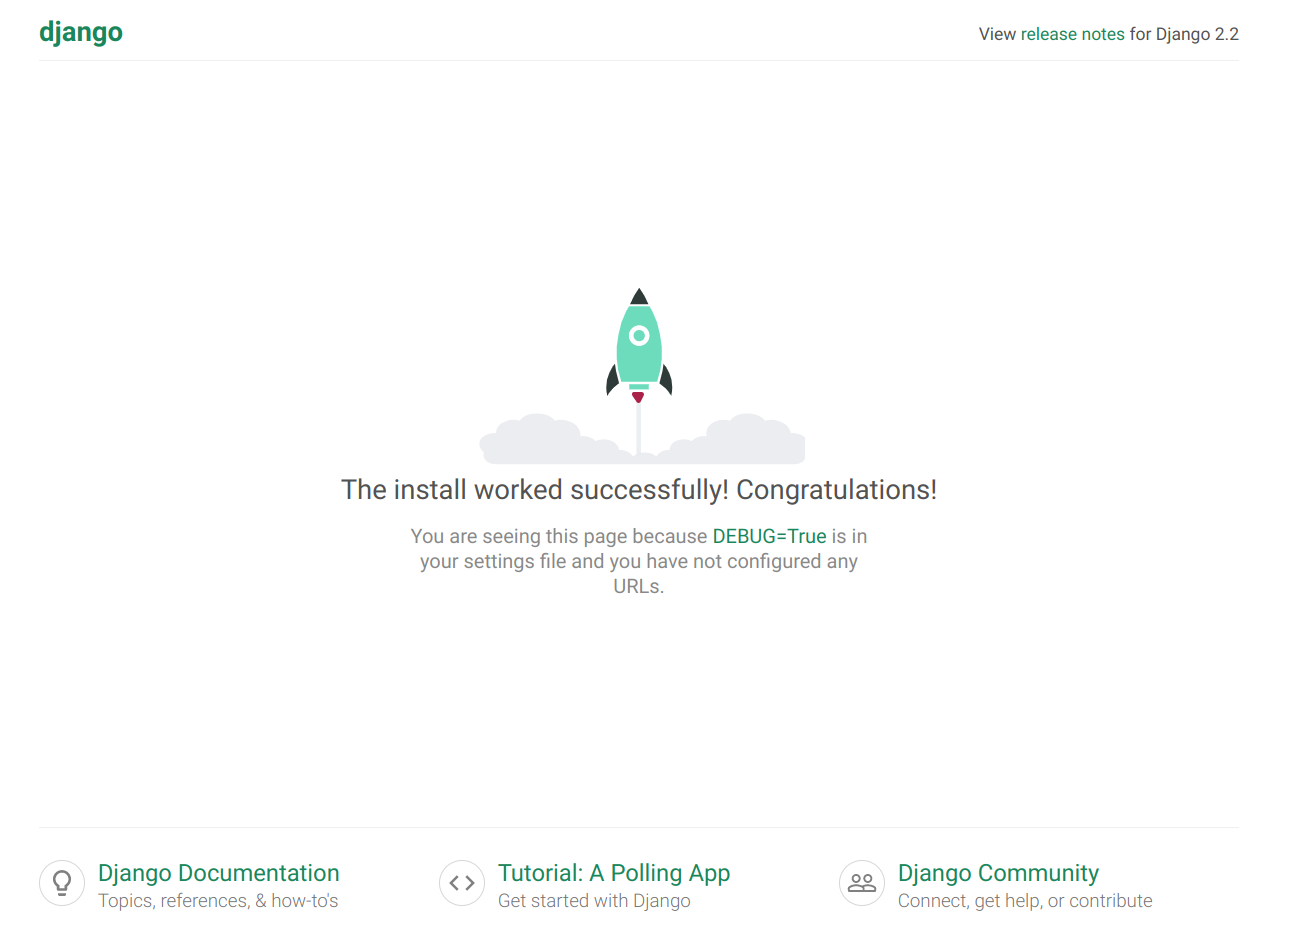 Hey! Django works!
1.3 Create API app
We could build our application with the folder structure the way it is right now. However, best practice is to separate your Django project into separate apps when you build something new.
So, let?s create a new app for our API:
$ python manage.py startapp myapi$ lsdb.sqlite3 manage.py* myapi/ mysite/
1.4 Register the myapi app with the mysite project
We need to tell Django to recognize this new app that we just created. The steps we do later won?t work if Django doesn?t know about myapi.
So, we edit mysite/settings.py :
INSTALLED_APPS = [ ‘myapi.apps.MyapiConfig’, … # Leave all the other INSTALLED_APPS]
1.5 Migrate the database
Remember how I said Django allows you to define database models using Python?
Whenever we create or make changes to a model, we need to tell Django to migrate those changes to the database. The Django ORM then writes all the SQL CREATE TABLE commands for us.
It turns out that Django comes with a few models already built in. We need to migrate those built in models to our database.
(For those of you thinking, ?We didn?t create a database!? You?re right. But Django will create a simple SQLite database for us if we don?t specify differently. And SQLite is awesome!)
So, let?s migrate those initial models:
$ python manage.py migrateOperations to perform: Apply all migrations: admin, auth, contenttypes, sessionsRunning migrations: Applying contenttypes.0001_initial… OK Applying auth.0001_initial… OK Applying admin.0001_initial… OK Applying admin.0002_logentry_remove_auto_add… OK Applying admin.0003_logentry_add_action_flag_choices… OK Applying contenttypes.0002_remove_content_type_name… OK Applying auth.0002_alter_permission_name_max_length… OK Applying auth.0003_alter_user_email_max_length… OK Applying auth.0004_alter_user_username_opts… OK Applying auth.0005_alter_user_last_login_null… OK Applying auth.0006_require_contenttypes_0002… OK Applying auth.0007_alter_validators_add_error_messages… OK Applying auth.0008_alter_user_username_max_length… OK Applying auth.0009_alter_user_last_name_max_length… OK Applying auth.0010_alter_group_name_max_length… OK Applying auth.0011_update_proxy_permissions… OK Applying sessions.0001_initial… OK
1.6 Create Super User
One more thing before we move on.
We?re about to create some models. It would be nice if we had access to Django?s pretty admin interface when we want to review the data in our database.
To do so, we?ll need login credentials. So, let?s make ourselves the owners and administrators of this project. THE ALL-POWERFUL SUPERUSER!!!
$ python manage.py createsuperuserUsername (leave blank to use ‘bennett’): Email address: [email protected]: Password (again): Superuser created successfully.
Let?s verify that it works. Start up the Django server:
$ python manage.py runserver
And then navigate to localhost:8000/admin
 Oooo, Django Admin!!! Pretty.
Log in with your superuser credentials, and you should see the admin dashboard:
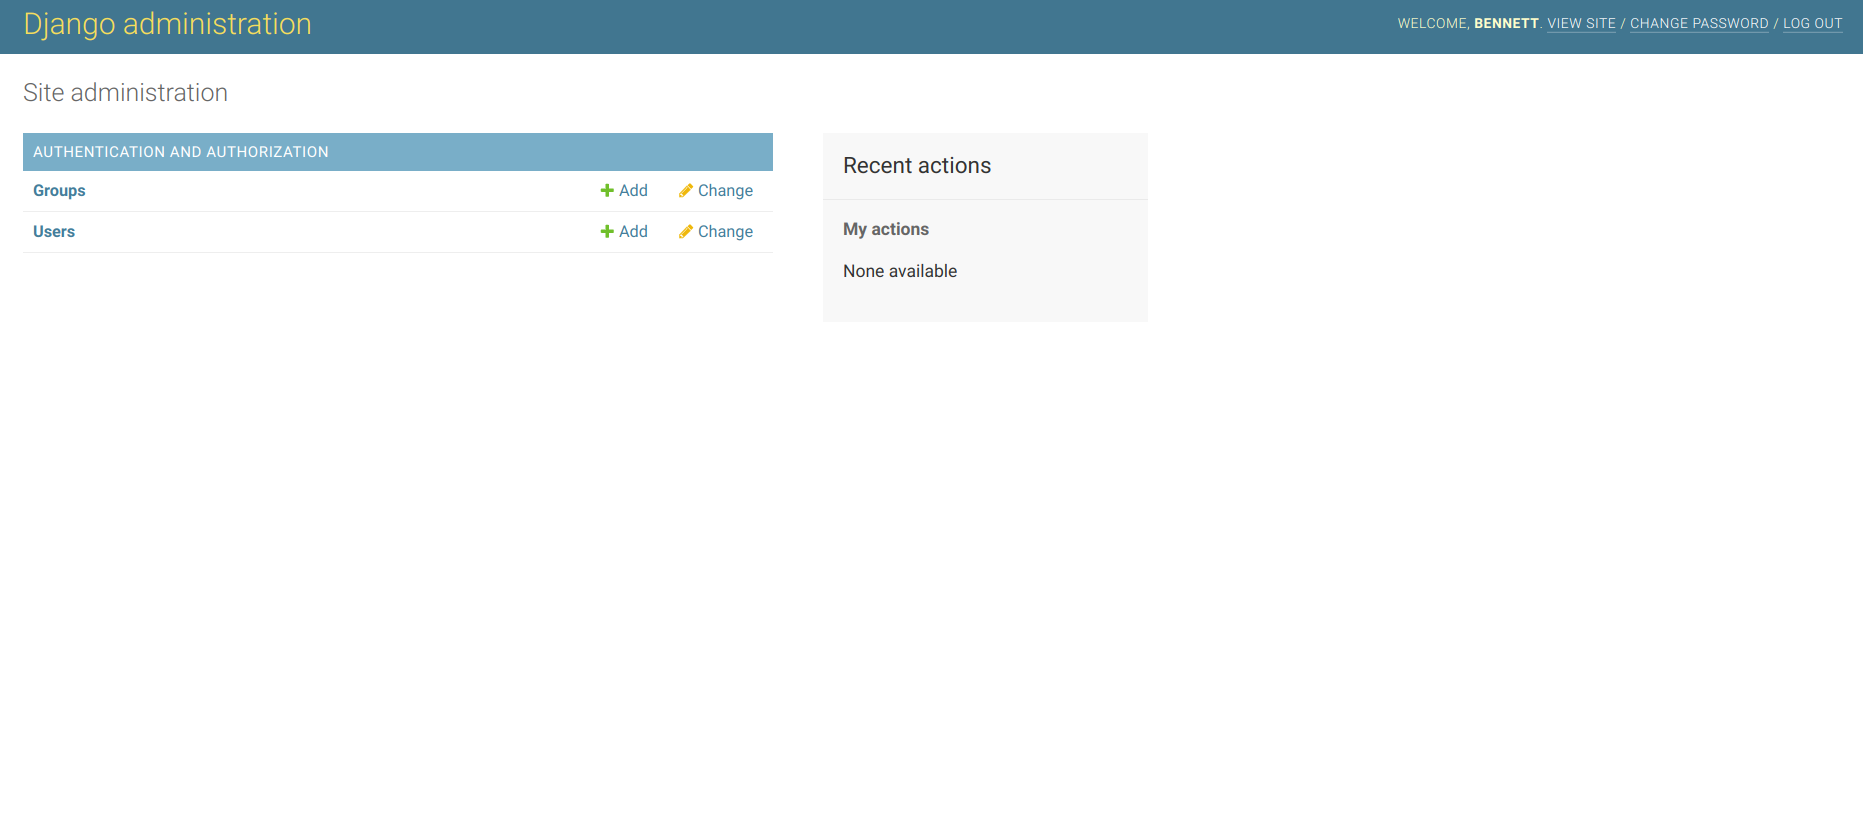 Look at those lovely User and Group models
2. Create a model in the database that Django ORM will manage
Let?s make our first model!
We?ll build it in myapi/models.py , so open up that file.
2.1 myapi/models.py
Let?s make a database of superheroes! Each hero has a name and an alias that they go by in normal life. We?ll start there with our model:
# models.pyfrom django.db import modelsclass Hero(models.Model): name = models.CharField(max_length=60) alias = models.CharField(max_length=60) def __str__(self): return self.name
name and alias are character fields where we can store strings. The __str__ method just tells Django what to print when it needs to print out an instance of the Hero model.
2.2 Make migrations
Remember, whenever we define or change a model, we need to tell Django to migrate those changes.
$ python manage.py makemigrationsMigrations for ‘myapi’: myapi/migrations/0001_initial.py – Create model Hero$ python manage.py migrateOperations to perform: Apply all migrations: admin, auth, contenttypes, myapi, sessionsRunning migrations: Applying myapi.0001_initial… OK
2.3 Register Hero with the admin site
Remember that awesome admin site that comes out of the box with Django?
It doesn?t know the Hero model exists, but with two lines of code, we can tell it about Hero.
Open myapi/admin.py and make it look like this:
from django.contrib import adminfrom .models import Heroadmin.site.register(Hero)
Now run the Django server:
$ python manage.py runserver
And visit localhost:8000/admin
 Heros is there now!
2.4 Create some new heroes
While we?re on the admin site, might as well create a few heroes to play around with in our application.
Click ?Add.? Then, make your heroes!
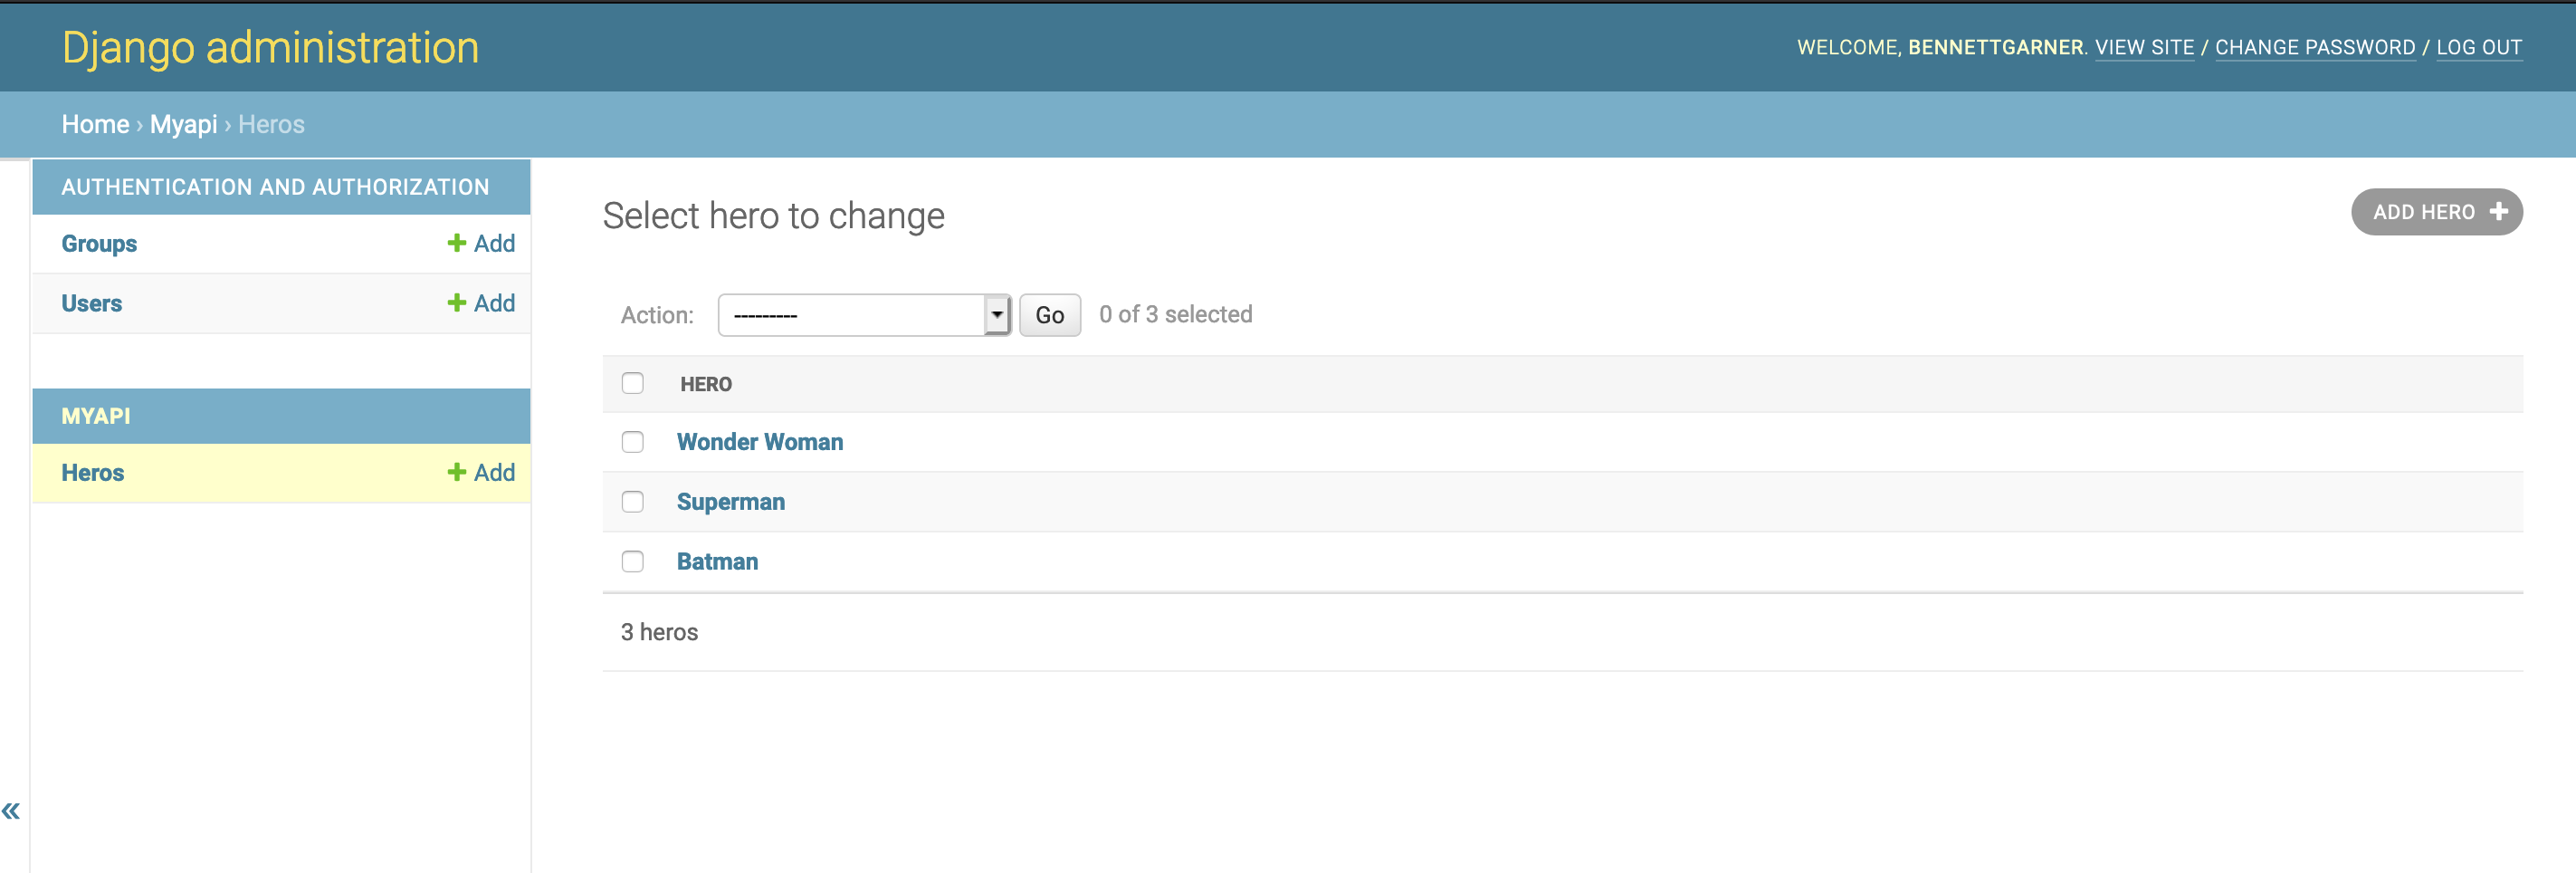 3 Heroes in the database
3. Set up Django REST Framework
Okay, time to start thinking about our heroes API. We need to serialize the data from our database via endpoints.
To do that, we?ll need Django REST Framework, so let?s get that installed.
$ pip install djangorestframework
Now, tell Django that we installed the REST Framework in mysite/settings.py:
INSTALLED_APPS = [ # All your installed apps stay the same … ‘rest_framework’,]
That?s it!
4. Serialize the Hero model
Now we?re starting to get into some new waters. We need to tell REST Framework about our Hero model and how it should serialize the data.
To do so, let?s create a new file ? myapi/serializers.py
In this file, we need to:
- Import the Hero model
- Import the REST Framework serializer
- Create a new class that links the Hero with its serializer
Here?s how:
# serializers.pyfrom rest_framework import serializersfrom .models import Heroclass HeroSerializer(serializers.HyperlinkedModelSerializer): class Meta: model = Hero fields = (‘name’, ‘alias’)
5. Display the data
Now, all that?s left to do is wire up the URLs and views to display the data!
5.1 Views
Let?s start with the view. We need to render the different heroes in JSON format.
To do so, we need to:
- Query the database for all heroes
- Pass that database queryset into the serializer we just created, so that it gets converted into JSON and rendered
In myapi/views.py:
# views.pyfrom rest_framework import viewsetsfrom .serializers import HeroSerializerfrom .models import Heroclass HeroViewSet(viewsets.ModelViewSet): queryset = Hero.objects.all().order_by(‘name’) serializer_class = HeroSerializer
5.2 Site URLs
Okay, awesome. We?re soooooo close. The last step is to point a URL at the viewset we just created.
In Django, URLs get resolved at the project level first. So there?s a file in mysite directory called urls.py.
Head over there. You?ll see the URL for the admin site is already in there. Now, we just need to add a URL for our API. For now, let?s just put our API at the index:
# mysite/urls.pyfrom django.contrib import adminfrom django.urls import path, includeurlpatterns = [ path(‘admin/’, admin.site.urls), path(”, include(‘myapi.urls’)), ]
5.3 API URLs
If you?re paying attention and not just blindly copy-pasting, you?ll notice that we included ‘myapi.urls’ . That?s a path to a file we haven?t edited yet. And that?s where Django is going to look next for instructions on how to route this URL.
So, let?s go there next ? myapi/urls.py:
# myapi/urls.pyfrom django.urls import include, pathfrom rest_framework import routersfrom . import viewsrouter = routers.DefaultRouter()router.register(r’heroes’, views.HeroViewSet)# Wire up our API using automatic URL routing.# Additionally, we include login URLs for the browsable API.urlpatterns = [ path(”, include(router.urls)), path(‘api-auth/’, include(‘rest_framework.urls’, namespace=’rest_framework’))]
The REST Framework router will make sure our requests end up at the right resource dynamically. If we add or delete items from the database, the URLs will update to match. Cool right?
So far, we?ve only added one model/serializer/view group to the router ? heroes. But we can add more in the future repeating the same process above for different models!
Test it out!
Start up the Django server again:
$ python manage.py runserver
Now go to localhost:8000
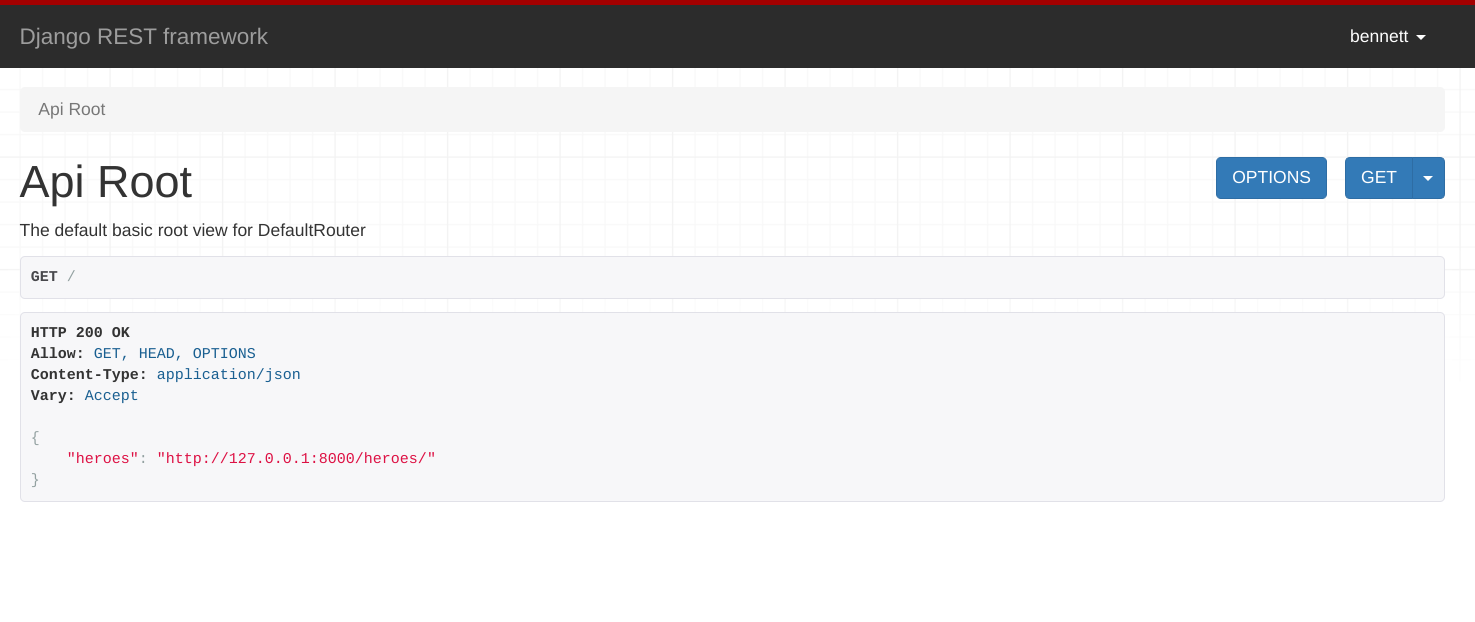 The root of our new API ? Django REST Framework makes it look nice
Visit the endpoint via GET
If we click the link (Hyperlinks are good REST-ful design, btw), we see the heroes API results:
GET an Individual Hero
We can GET a single model instance using its ID.
Django REST Framework viewsets take care of this for us.
If you go to 127.0.0.1:8000/heroes/<id>/ where <id> is the ID of one of your Heroes models, you?ll be able to see just that hero.
For example, http://127.0.0.1:8000/heroes/1/ for me returns:
GET /heroes/1/HTTP 200 OKAllow: GET, PUT, PATCH, DELETE, HEAD, OPTIONSContent-Type: application/jsonVary: Accept{ “name”: “Batman”, “alias”: “Bruce Wayne”}
We can make this a little more user-friendly by adding ID into the heroes/ endpoint response. In myapi/serializers.py, change the fields list to include ?id?:
class HeroSerializer(serializers.HyperlinkedModelSerializer): class Meta: model = Hero fields = (?id?, ?name?, ?alias?)
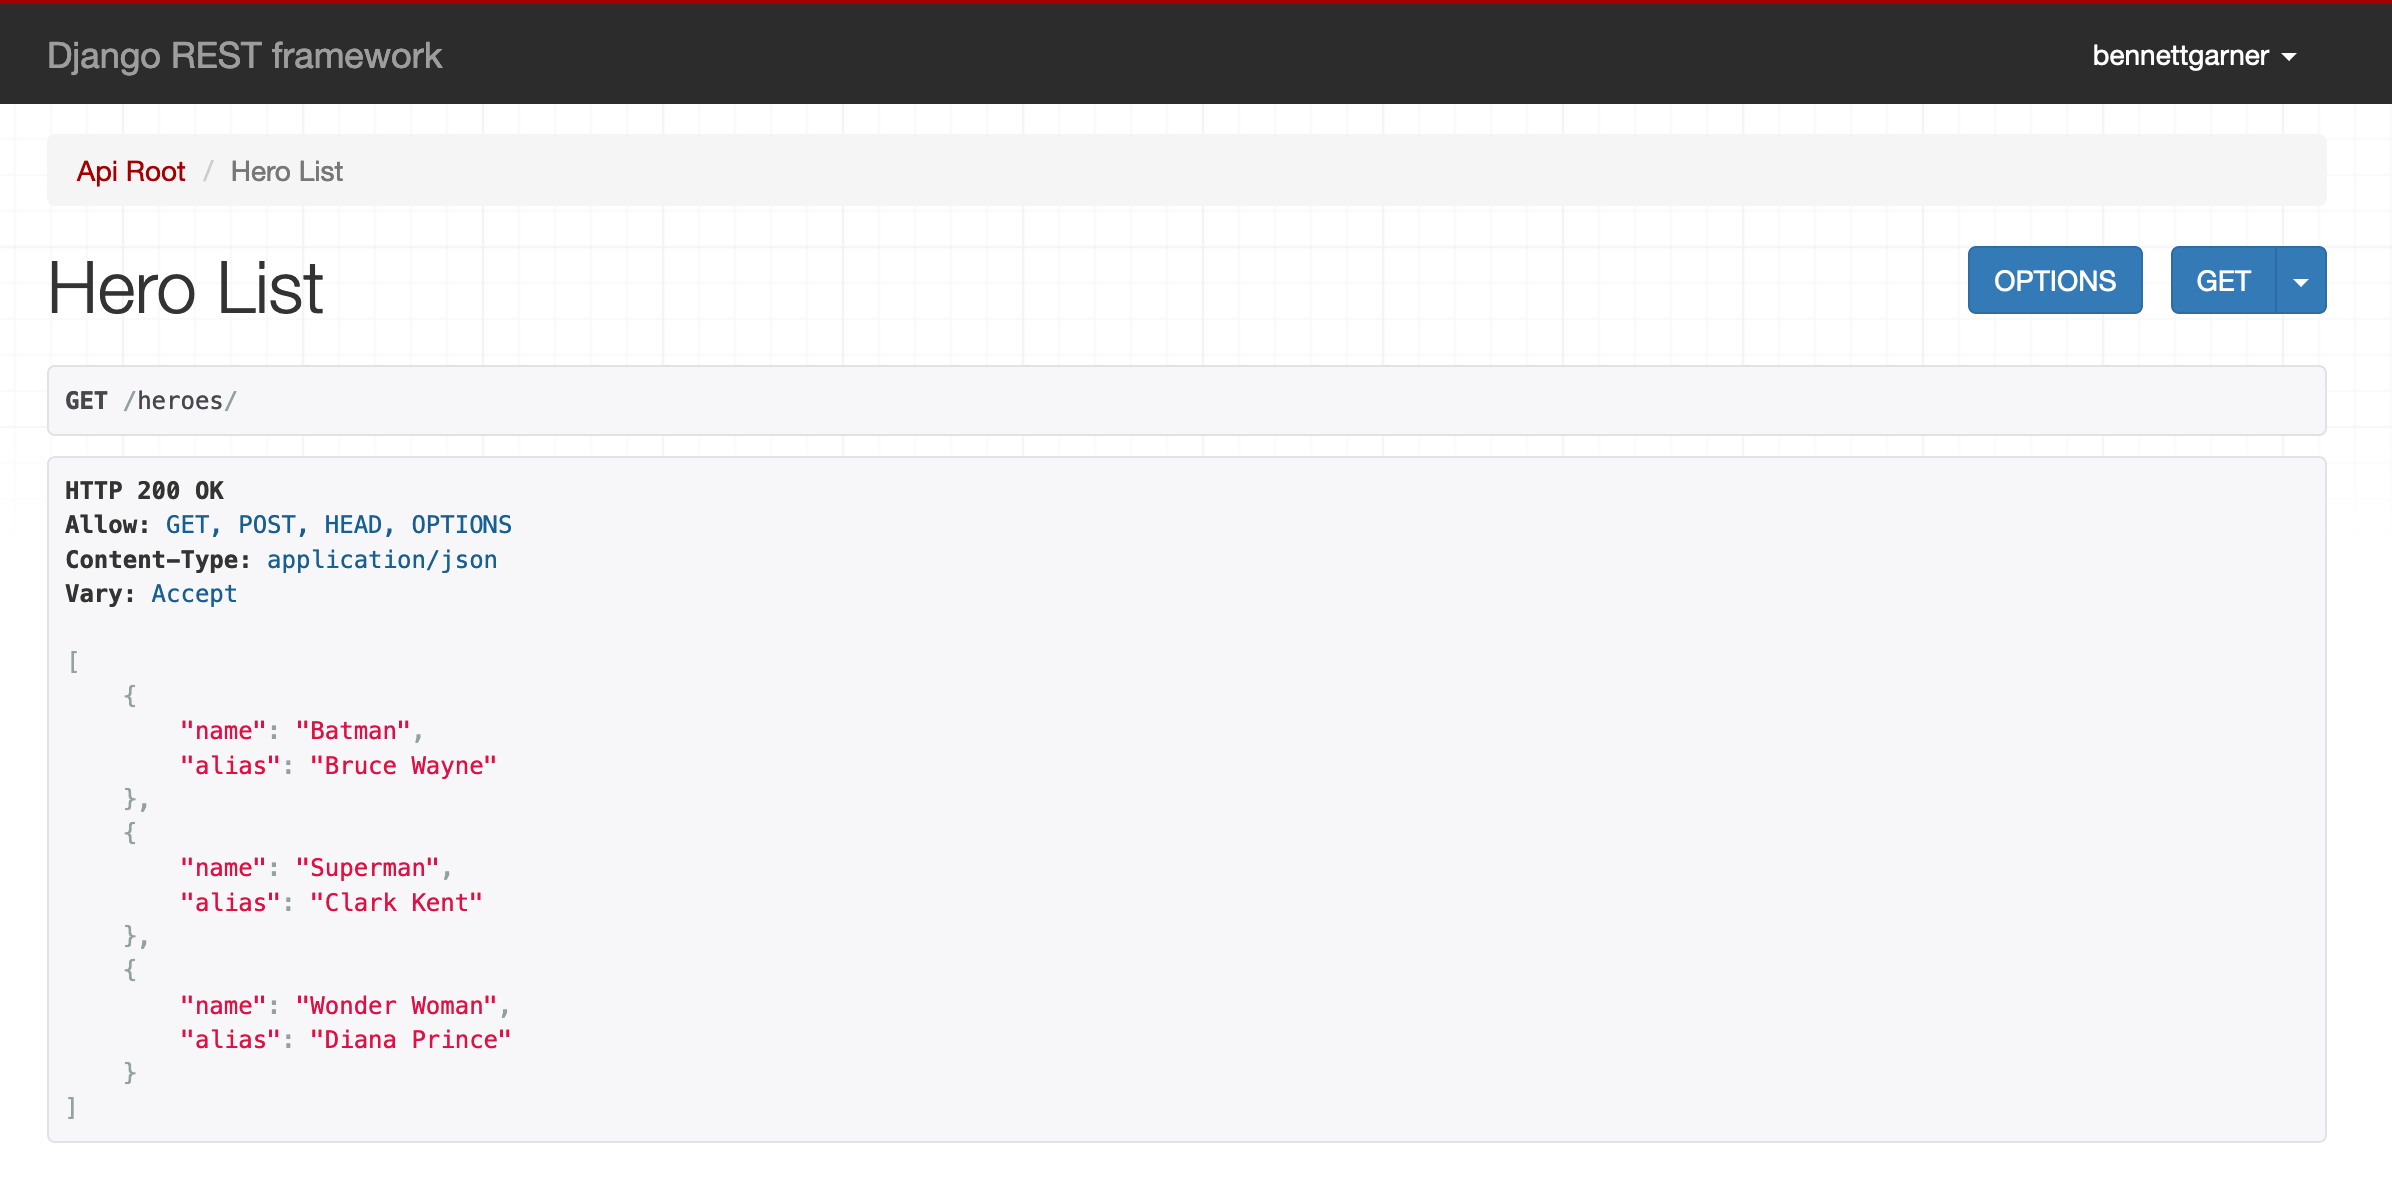
Now the hero list looks like this:
GET /heroes/HTTP 200 OKAllow: GET, POST, HEAD, OPTIONSContent-Type: application/jsonVary: Accept[ { “id”: 1, “name”: “Batman”, “alias”: “Bruce Wayne” }, { “id”: 2, “name”: “Superman”, “alias”: “Clark Kent” }, { “id”: 3, “name”: “Wonder Woman”, “alias”: “Diana Prince” }]
We can use those IDs to look up individual models.
Send a POST request
Our API also handles post requests. We can send JSON to the API and it will create a new record in the database.
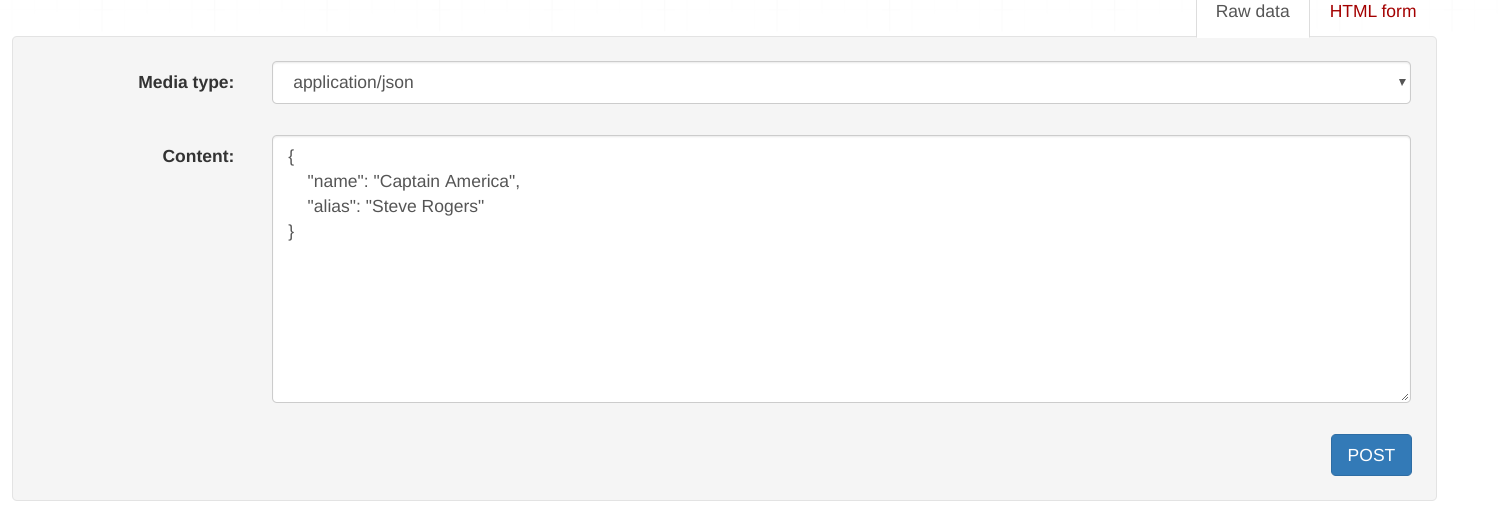 Sending a POST request to our API
Now, our API includes Captain America!
Having Trouble?
Here?s the source code, so you can check your work:
- https://github.com/bennett39/drf_tutorial
Quick REST APIs with Django REST Framework
I hope you enjoyed this quick tutorial. Of course, APIs can get much more complicated with multiple models intersecting and endpoints with more complex queries.
That said, you?re well on your way with this post. REST Framework handles complexity fairly well. If you get stuck, there?s a great community willing to help you find a solution.
Have fun building some new APIs!
About Bennett
I?m a software developer in New York City. I do web stuff in Python and JavaScript.
Like what you?ve read here? I have an email list you can subscribe to. Infrequent emails, only valuable content, no time wasters. I?d love to have you there.
