Before we get into the ?making? side of this guide ? it?s best to first understand what we?re working with. This section of the guide is going to get into the nitty-gritty details of the how the tilesets work in RPGmaker MV.
It might be a bit boring at first, but stay with me! This info really helps when it comes to making your own tilesets for your game.
This guide will be operating under the assumption that you?re already a bit familiar with the engine, so I?ll focus specifically on the art side of it. For more information about how to use RPGmaker MV itself ? check out the ?Help? tab in the engine.
Now, let?s get started!
RPGmaker MV uses a grid system made up of ?tiles? of 48×48 pixels.
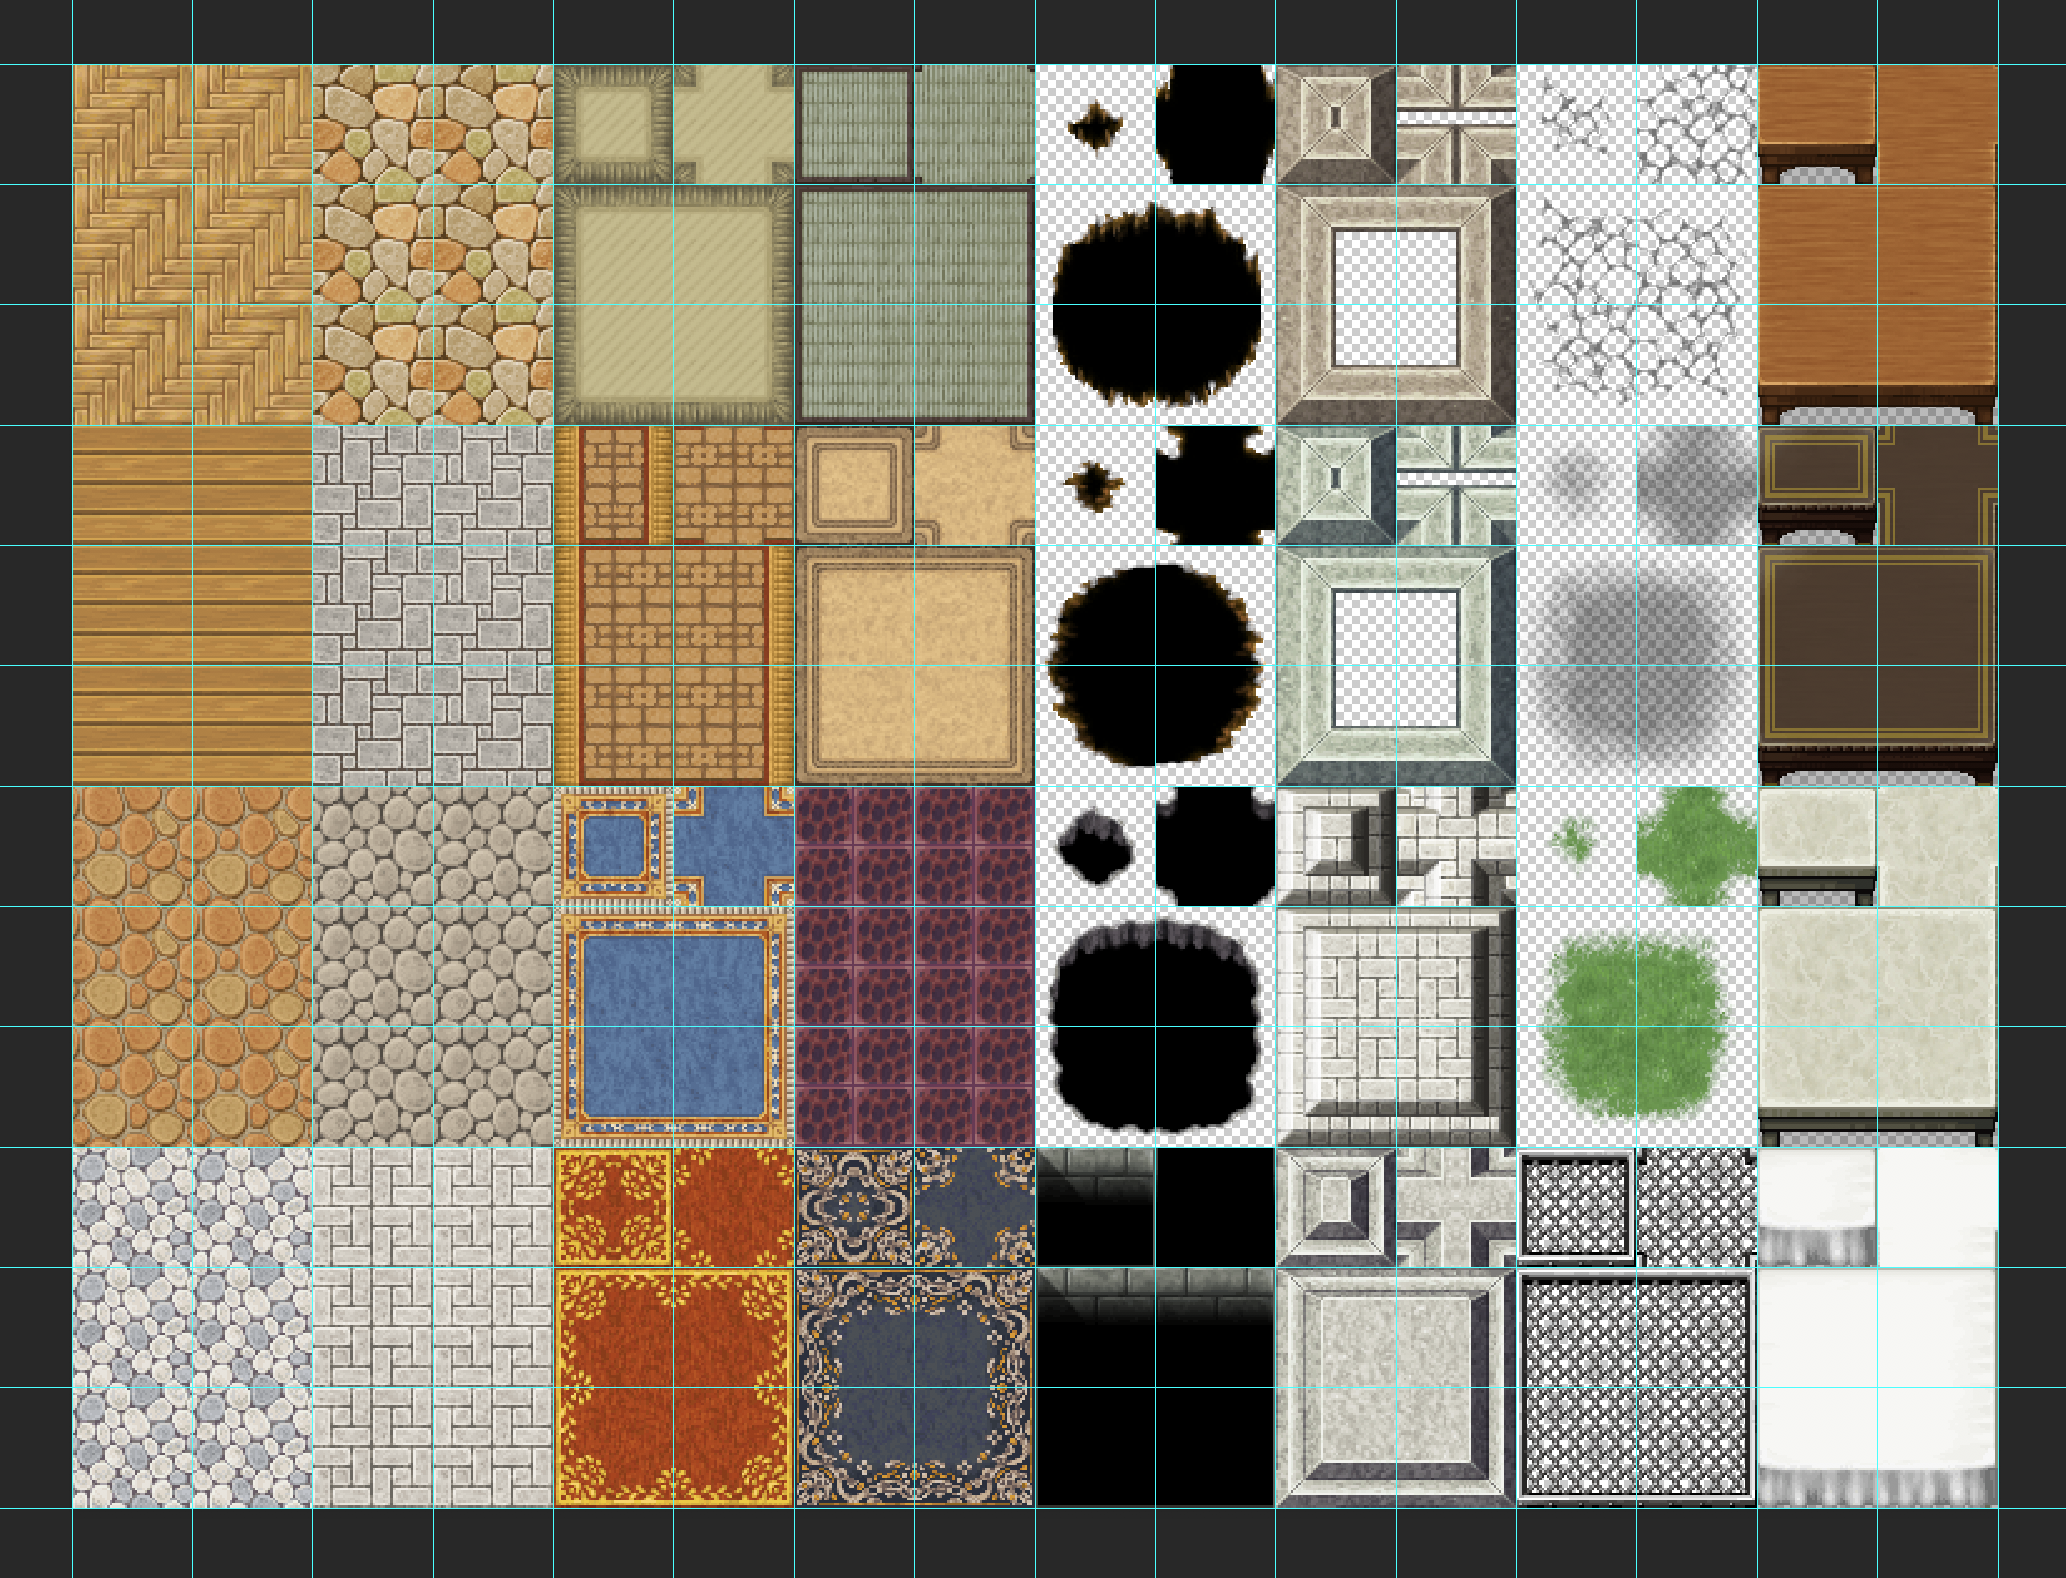
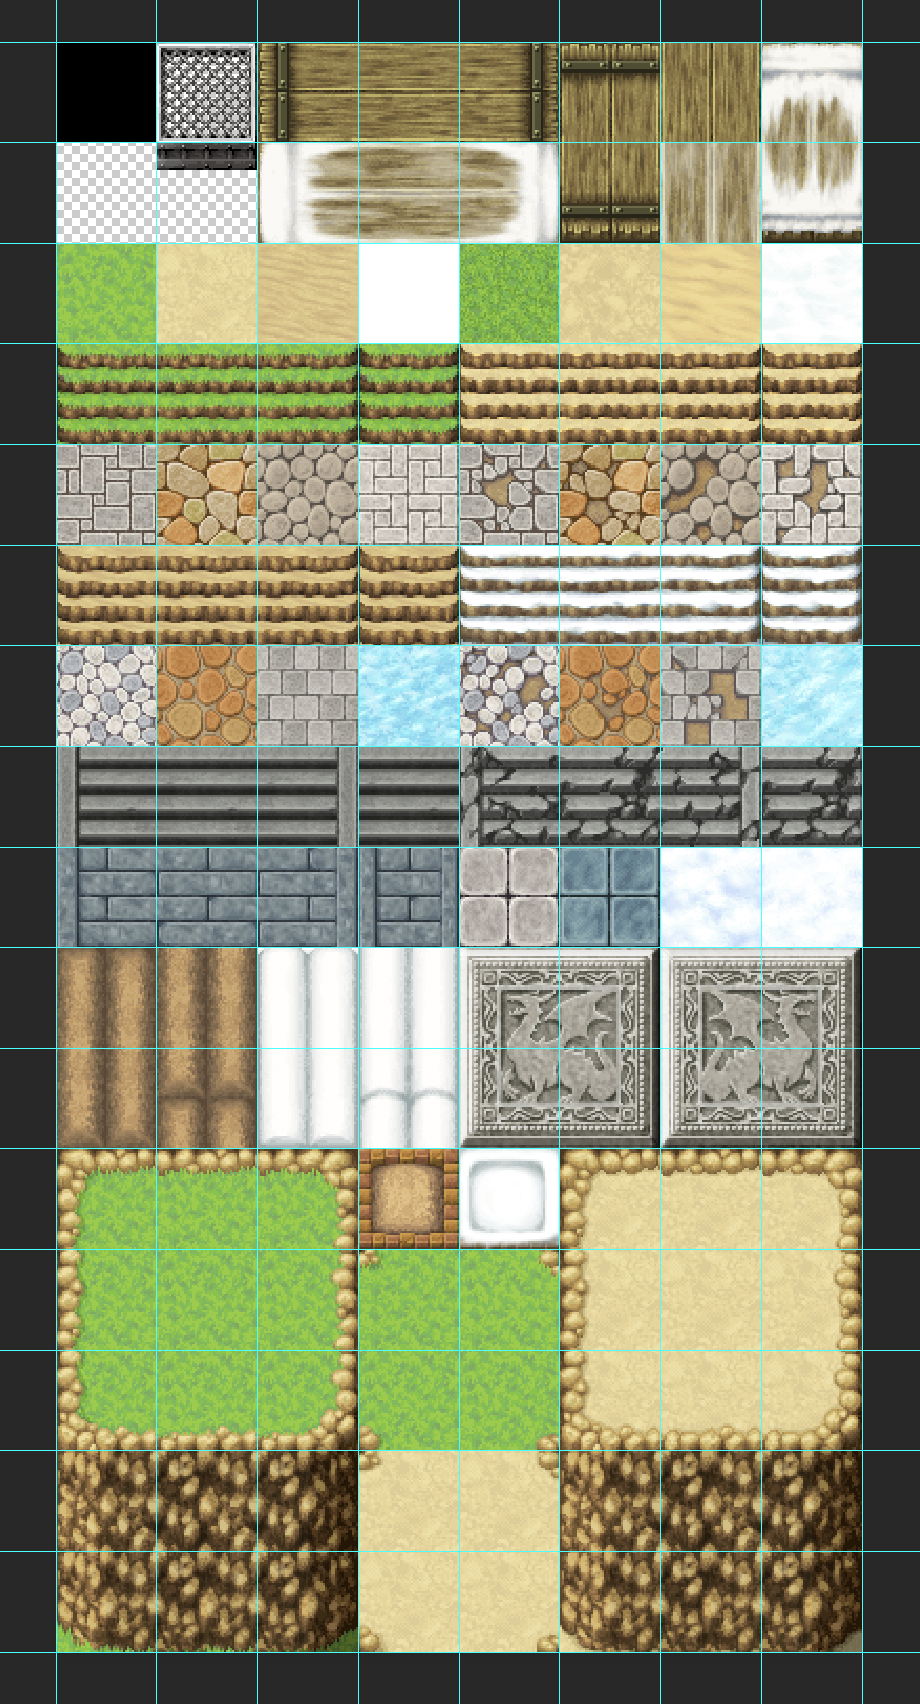
 Ex.1 ? Tileset ?Inside_B.png? ? Comes automatically with the RPGmaker install.
In a visual sense, the grid system is fairly straightforward. Each square can be placed 1:1 in the engine.
Tilesets themselves are made up of a series of .png image files that can be split into a grid of these 48×48 squares.
 Ex.2 ? The RPGmaker user interface shows the grid when in the ?Event? mode.
The reason for the grid is to allow for the simplistic top-down movement in the game. The player can only move up, down, left and right, one tile at a time. Meaning that the game world itself is made up of two things: tiles you can walk on, and tiles you can?t. This is important to remember later when designing tilesets with objects taking up more than one square.
What?s with all the letters?
Tilesets are made up of a series of images, each letter and number corresponds with how the engine will read and use the tilesets in the map creation screen. Let?s go through each of them.
A1 ? Animated Tiles
Tilesets in this section are used for areas like water or lava, these tiles are the bottom most layer and appear beneath all other tiles placed on the map. These tiles are animated environmental tiles used to provide a bit of ambience in the game world, bubbling or flowing in the background as the player runs around exploring. RPGmaker refers to these tiles as ?Auto-tiles? meaning that the engine will interpret and place the animations for these tiles automatically, providing you follow the specifications outlined below.
File Specs: 768 x 576 px ? 16 x 12 Grid ? .png ? 72 ppiWhen creating your own tilesets it?s a good idea to keep to these file specifications to avoid any funky engine issues when loading them in.
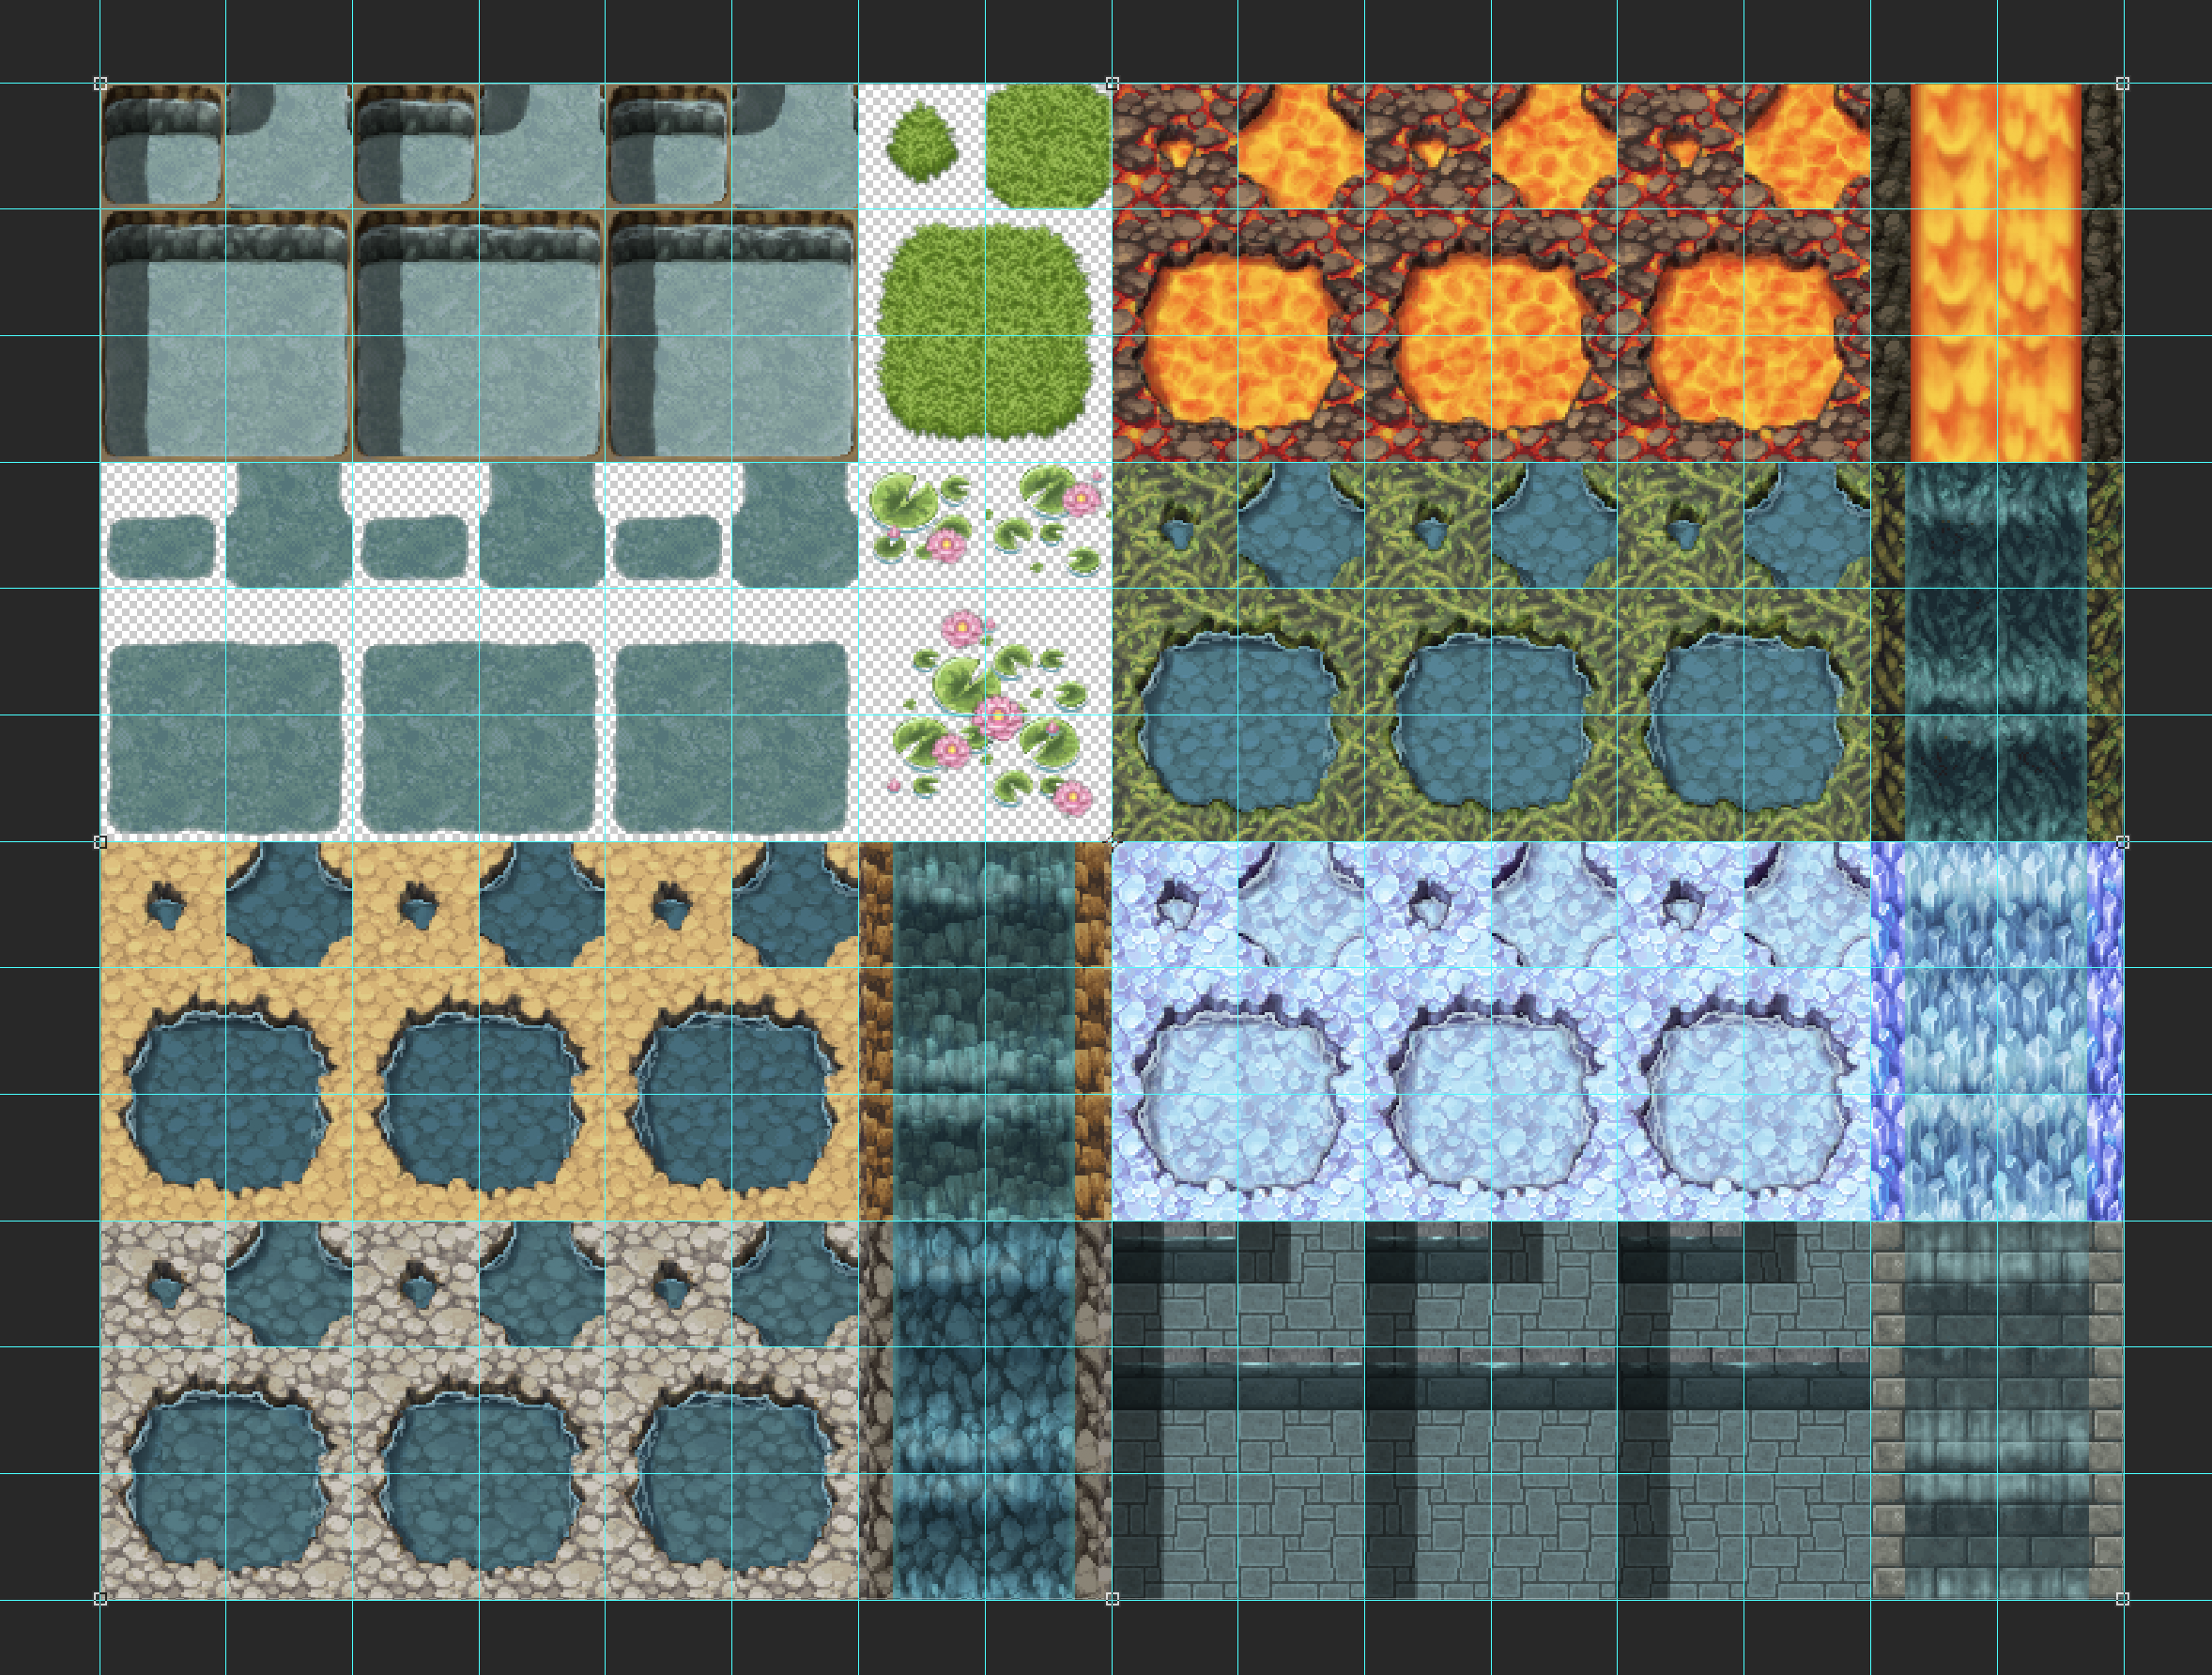 Ex.3 ? ?Dungeon A1? ? Blue grid lines are used to represent the 48×48 grid.
Each individual floor type ? for example the water in the top left of Ex.3, is made up of 6 squares.
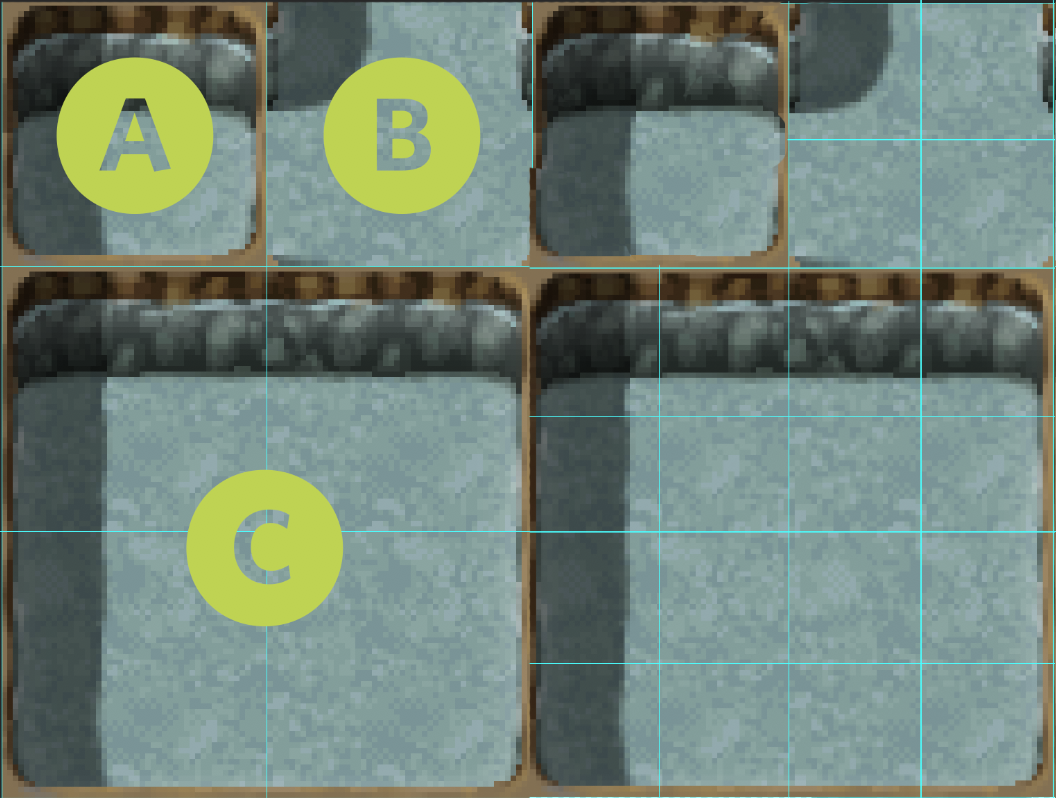 Ex.4 ? A closer look at the 6 square grid. On the right is how the grid is further broken down for tiles labeled B and C.
Tile ?A? is the tile that appears in the panel on the left of the map screen in the engine, or in the instance that only a single tile is placed on the map.
Tile ?B? is split further beyond the 48×48 square, into four 24x24px squares, with each corner making up the outer edges of the tile ? these are what?s used to represent corners of placed tiles that intersect.
Tile ?C? is split similarly, and makes up the edges of the tiles on all four sides. These are referenced depending on how you spread the tiles on the map. The centre of this group of tiles is what?s referenced for the interior of a large group of tiles, allowing for the wide expanse of water or grass.
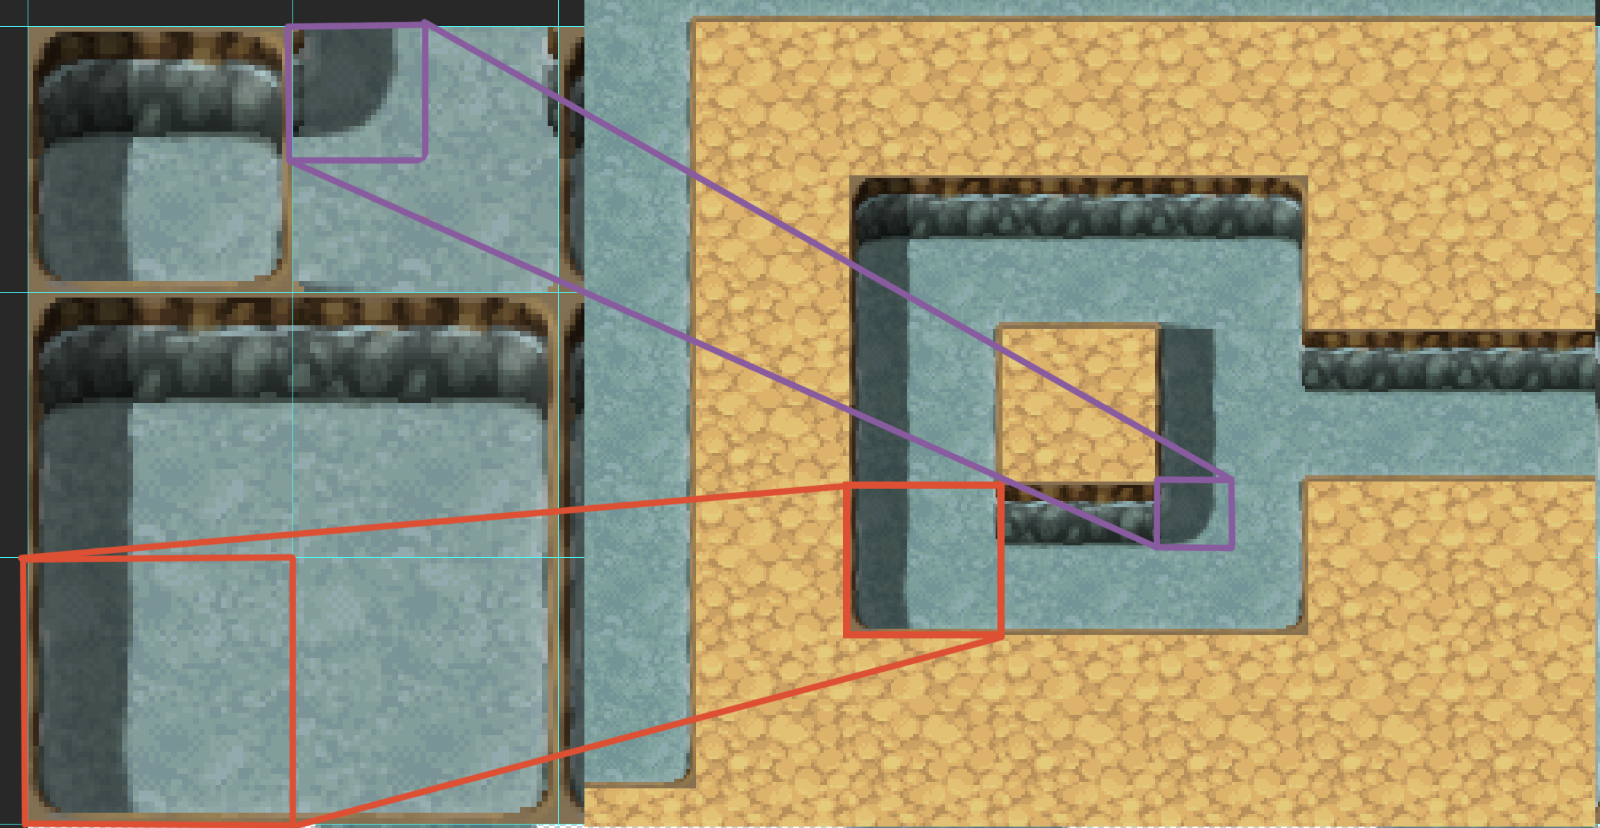 Ex.5 ? How it looks in the engine. The smaller square of 24x24px within ?B? is referenced for the outer edge of the island shape made in the engine. The lower left square of ?C? is referenced for the left and bottom edge of the tile while the top right corner is referenced from the top right internal square of ?B?.
The animation for these tiles works by cycling between the three sets of 6 tiles arranged side by side. Kinda like frames in Flash.
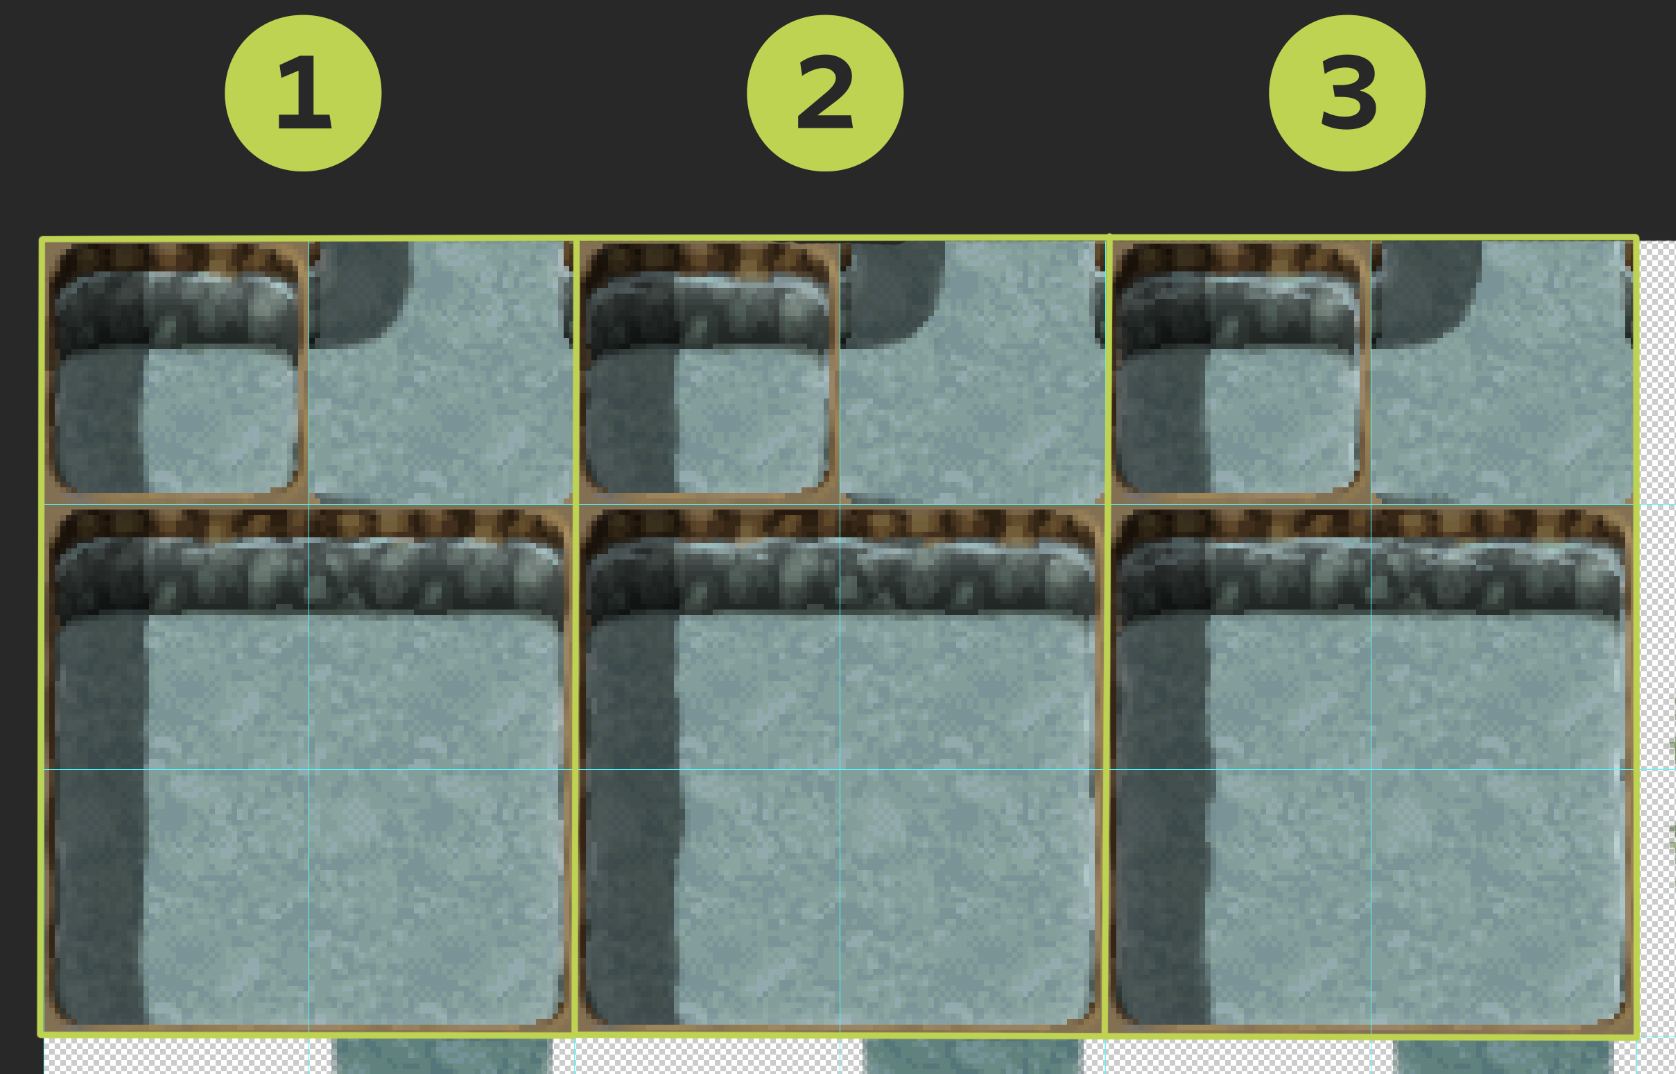 Ex.6 ? The ?frames? for the animation.
The single set of 6 squares found beside the 3 frames (the patches of grass, or the lily pads in Ex.7) works similarly to the previous set of tiles. The top left represents it?s display image (or single tile instance), the right is it?s corners, and the bottom group of four tiles are used as references for it?s edges and centre. The difference for this set is in the transparent background, so that they can be placed over top the auto-tiles to the left. They only have one set of 6 because they are not animated.
The three frames of darker water under the top left set in Ex.7 can also be placed over top of the water set at the top of the image since they also have transparent backgrounds. The layer hierarchy is top down in this image file, so tiles that you wish to be on the bottom layer should be closer to the top of the grid. These tiles are animated- as they have the three sets that make up the frames.
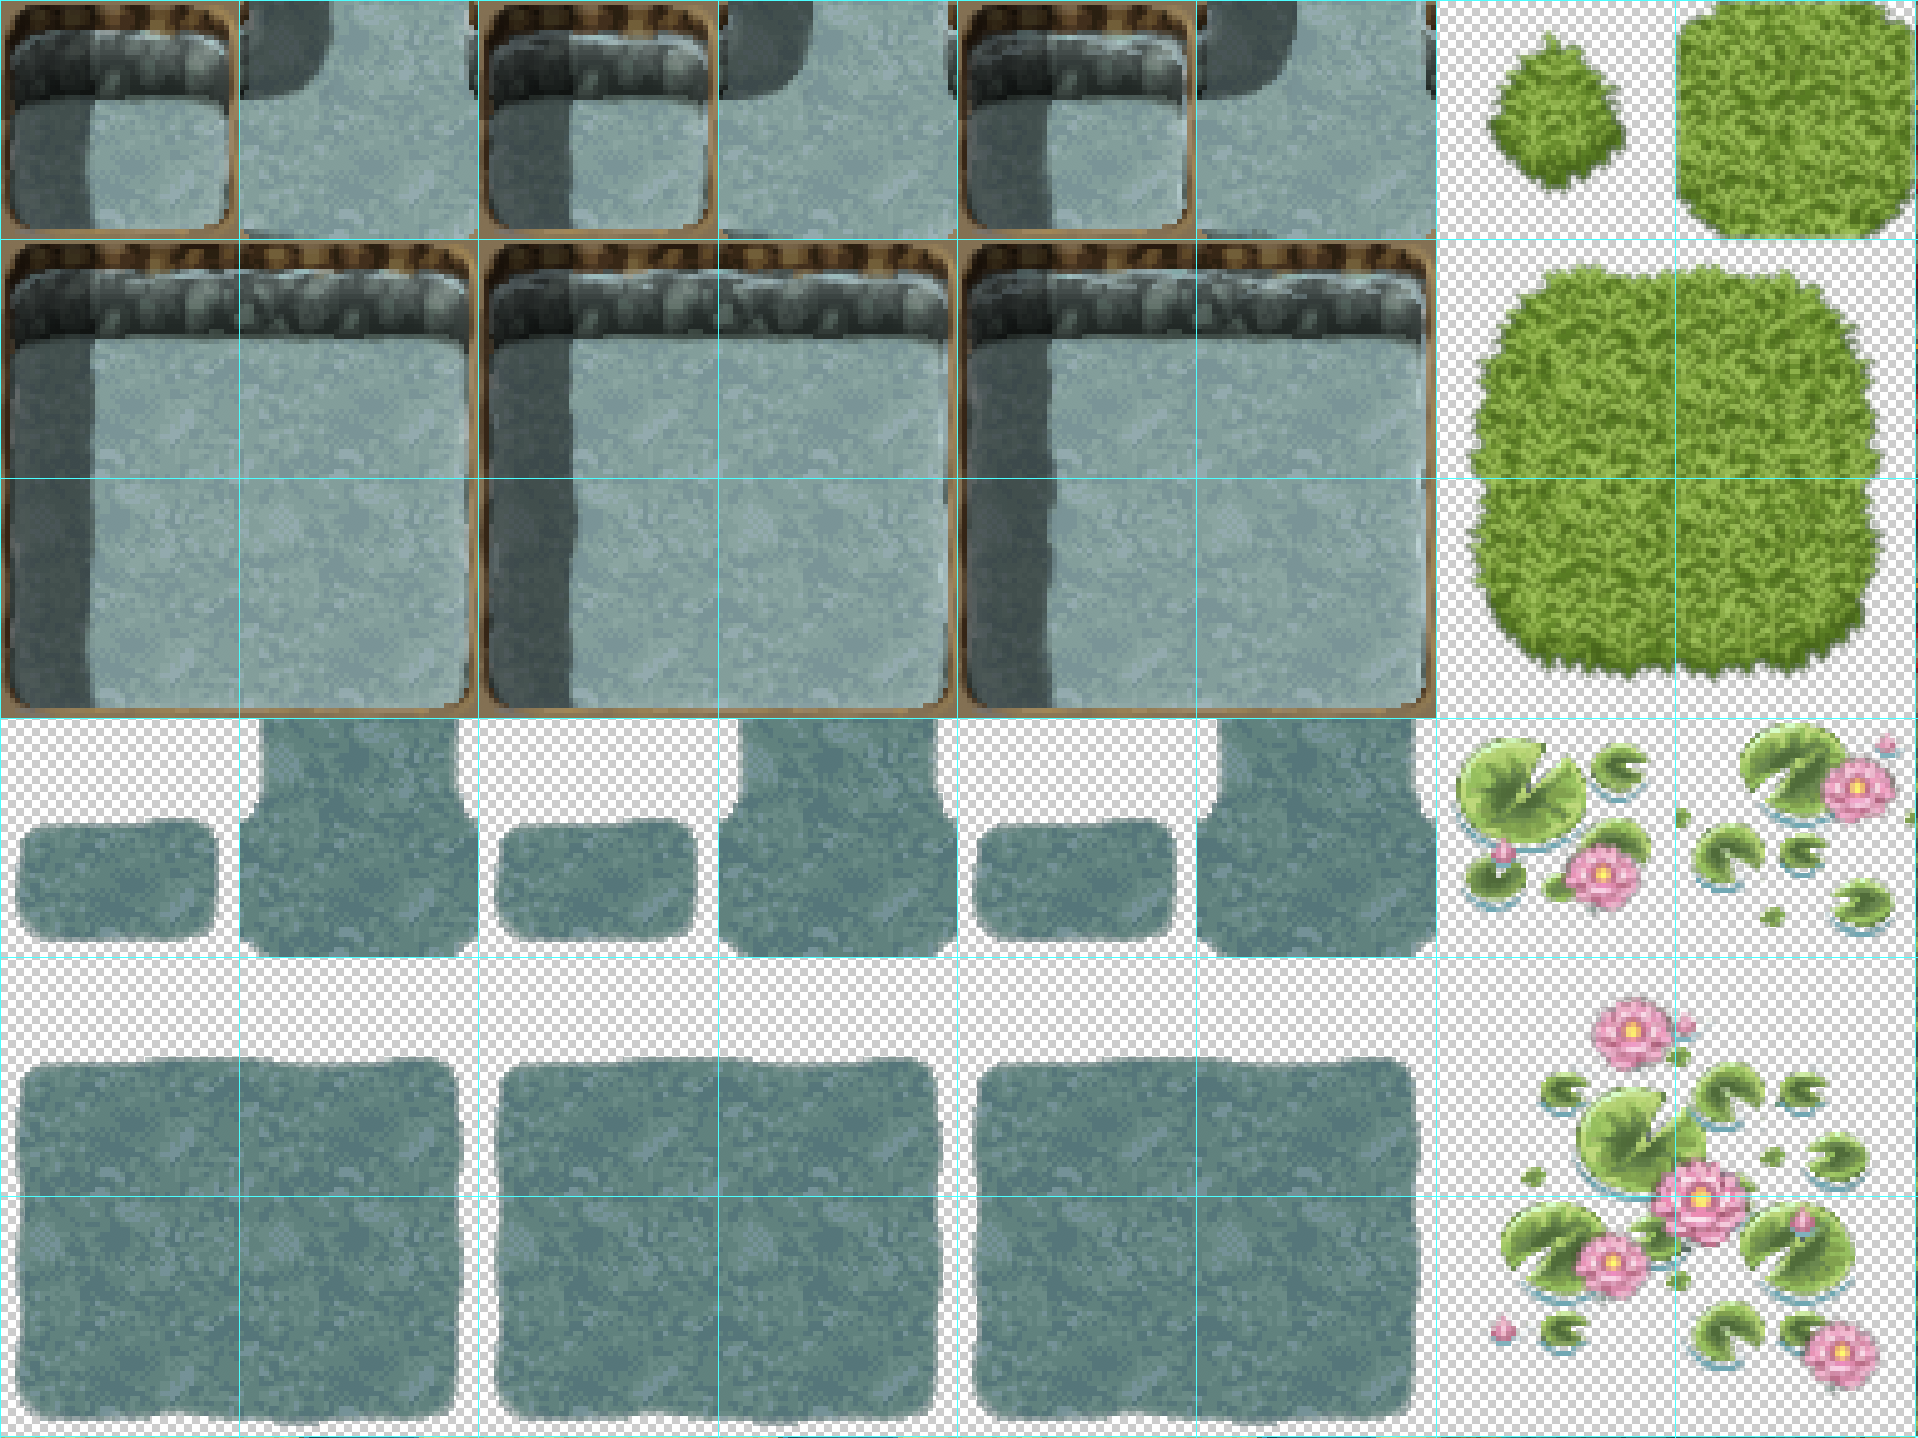 Ex.7 ? A closer look at the full image shown in Ex.3
Note: If you?re finding this confusing, I totally feel you, the best way to understand how this works is through experimentation.
Feel free to dig into the game files that come automatically with RPGmaker (In the place you saved your files ? Games>?Game Title?>img>tilesets), open them up in your image editor of choice and mess around with the tilesets themselves. Sometimes it helps to open up the files and use them as a reference while you are drawing your own tiles ? keeping them as a layer below your own as a marker of where the tiles end and begin.
A2 ? Ground
The A2 files are a bit more straight forward than the animated tiles. They are made up of the same 6 square grid, and work the same way as A1 ? but with a single set of 6 tiles for each since they don?t need to be animated. For a better understanding of how the squares within these sets work, take a look back at the A1 guide.
In Ex.8 below you can find the tiles for floors, holes, tables and ground textures that can be placed over top of A1 tiles.
Tables are included in this set so the auto-tile feature can assist you in making tables of different shapes and sizes to fit your various environments.
File Specs: 768 x 576 px ? 16 x 12 Grid ? .png ? 72 ppi
 Ex. 8 ? ?Inside_A2.png? ? Can also be found in the original files of RPGmaker MV.
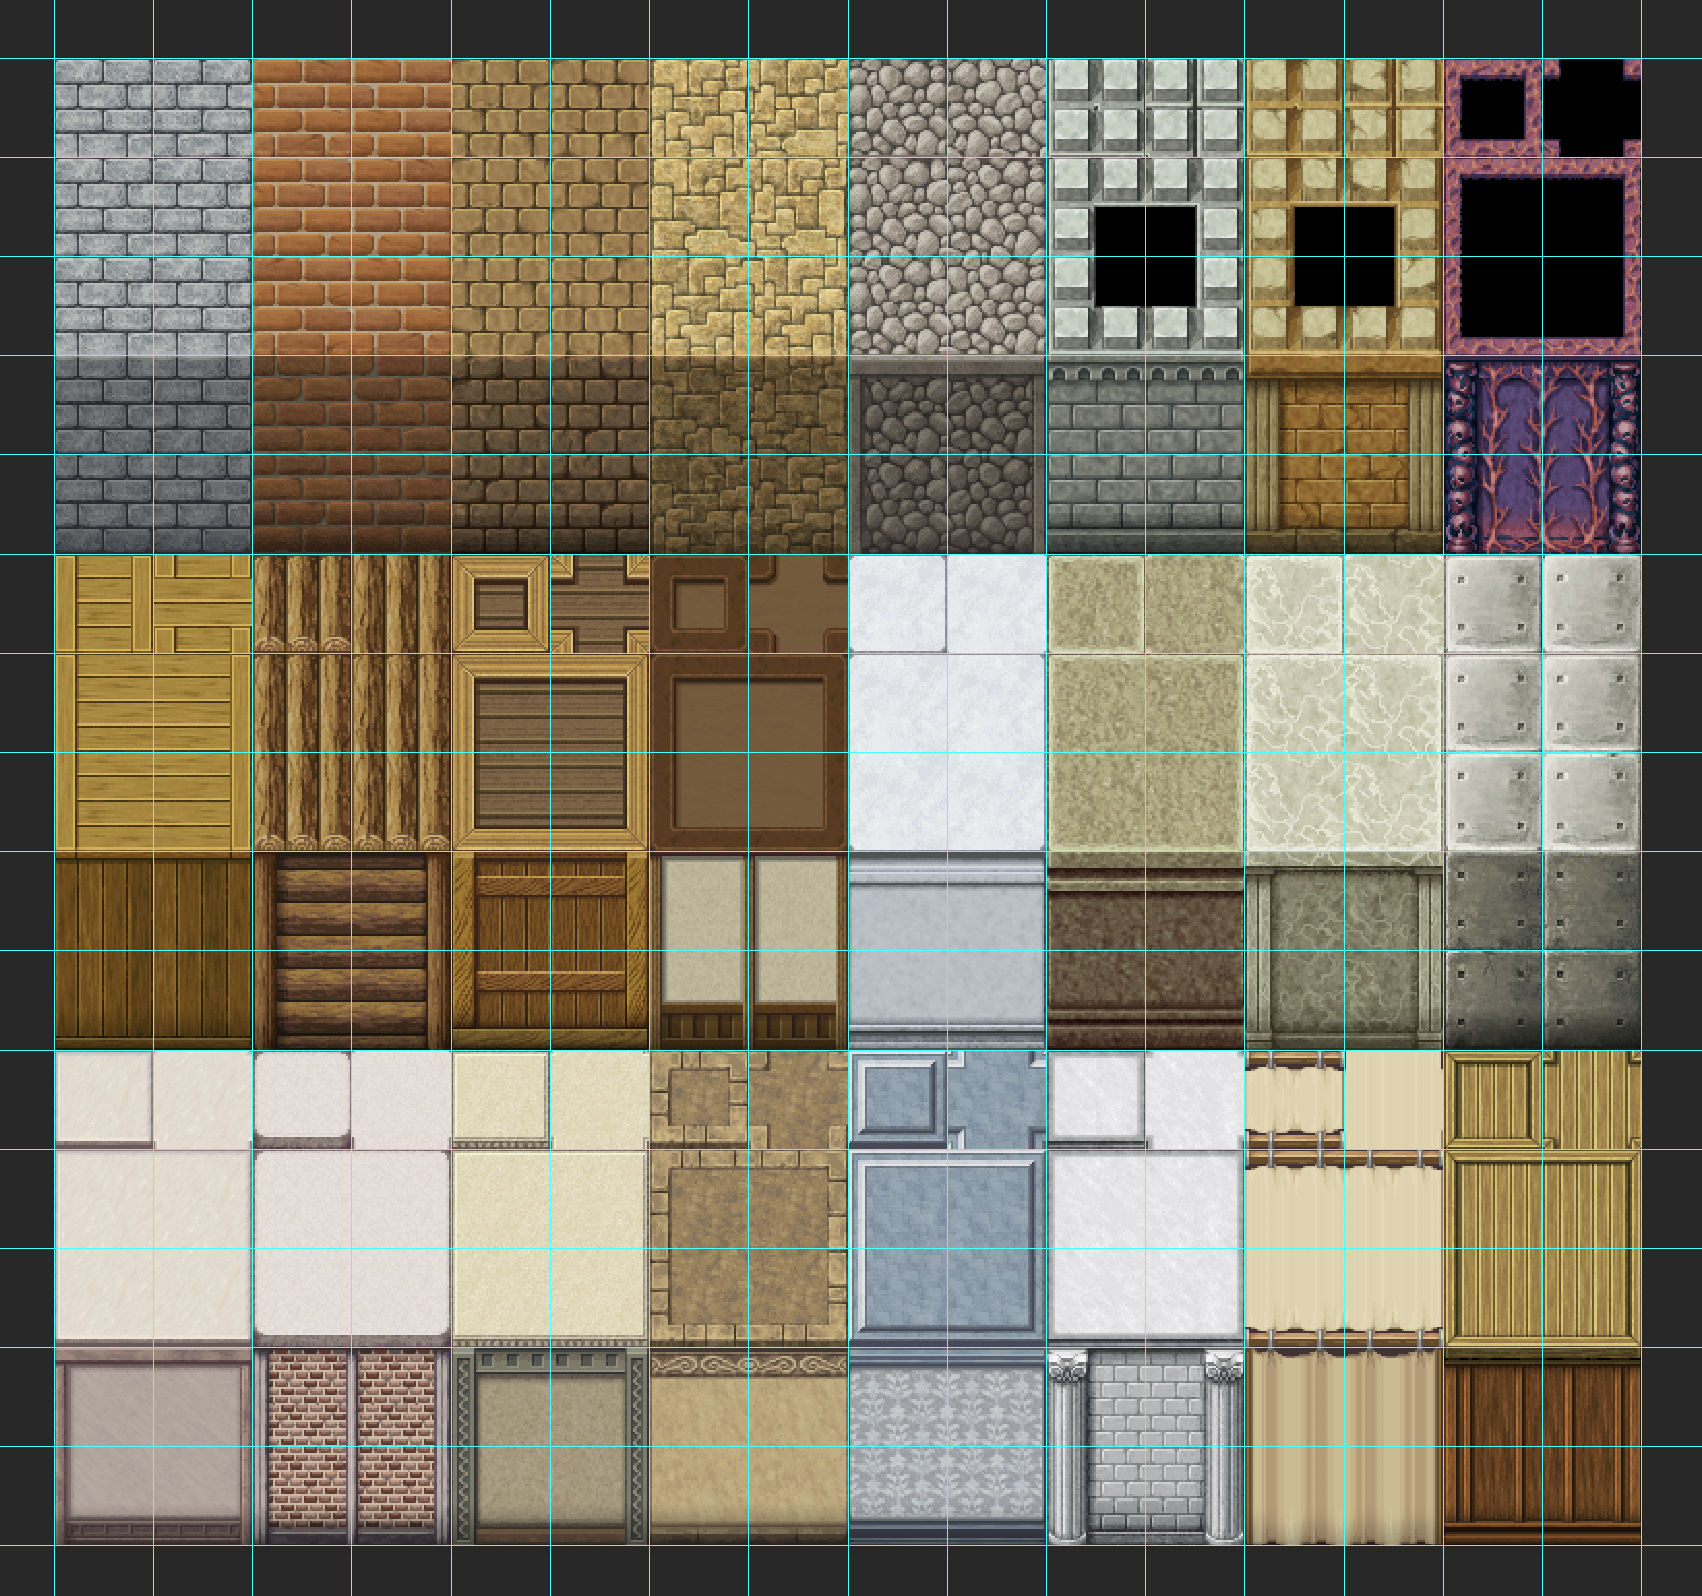
A3 ? Building Tiles
These tiles are a little different, but in terms of complexity ? they are a breath of fresh air. The layout for these tiles is pretty straight forward. They are broken into sets of 4 tiles, but only one of them is shown in the panel at the left of map creation screen in the engine.
Similarly to the set in A1 ? these tiles are broken down further into squares of 24×24 . The inner most sections are used to fill in the centre ? when tiles are spread across a space larger than two tiles in width or height.
The most important note to take away from this is that these tiles need to have a repeating pattern that aligns with itself so when they are used in the engine they look?well? good.
File Specs: 768 x 384 px ? 16 x 8 Grid ? .png ? 72 ppi
 Ex.9 ? ?Outside_A3.png?
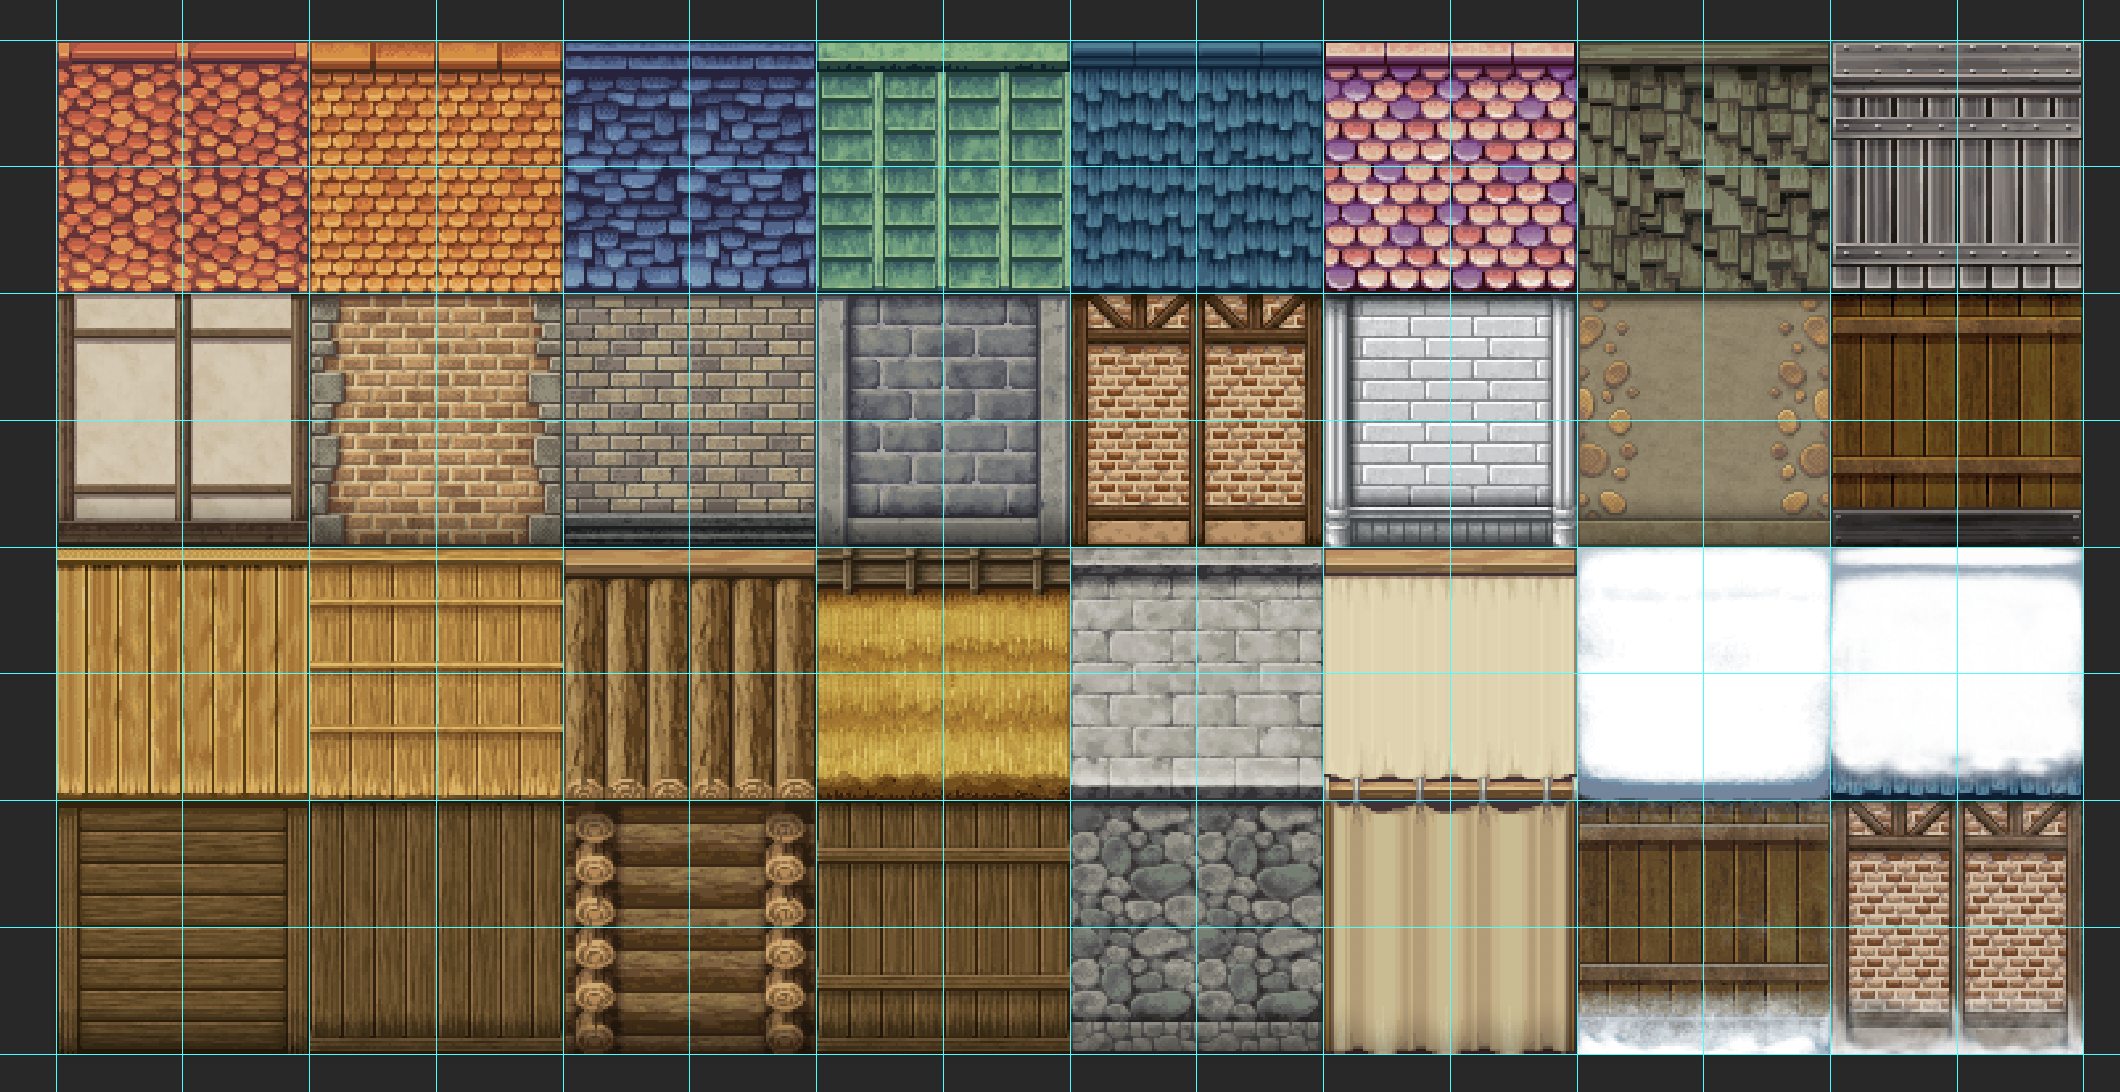
A4 ? Walls
Wall tiles are a bit tricky as well. As you can see from the image Ex.10 ? walls are made up of 10 tiles. Like A1, the top left tile in the set is used for the display in the map creation screen or in the instance were only a single tile is placed. The tile beside it makes up the corners of intersecting wall tiles by splitting into smaller square within the tile. Looking back at Ex.4 and Ex.5 you can see how this works in a similar way to the A1 set.
File Specs: 768 x 720 px ? 16 x 15 Grid ? .png ? 72 ppi
 Ex.10 ? ?Inside_A4.png?
To better understand the wall tiles we can take a look at how they function within the engine:
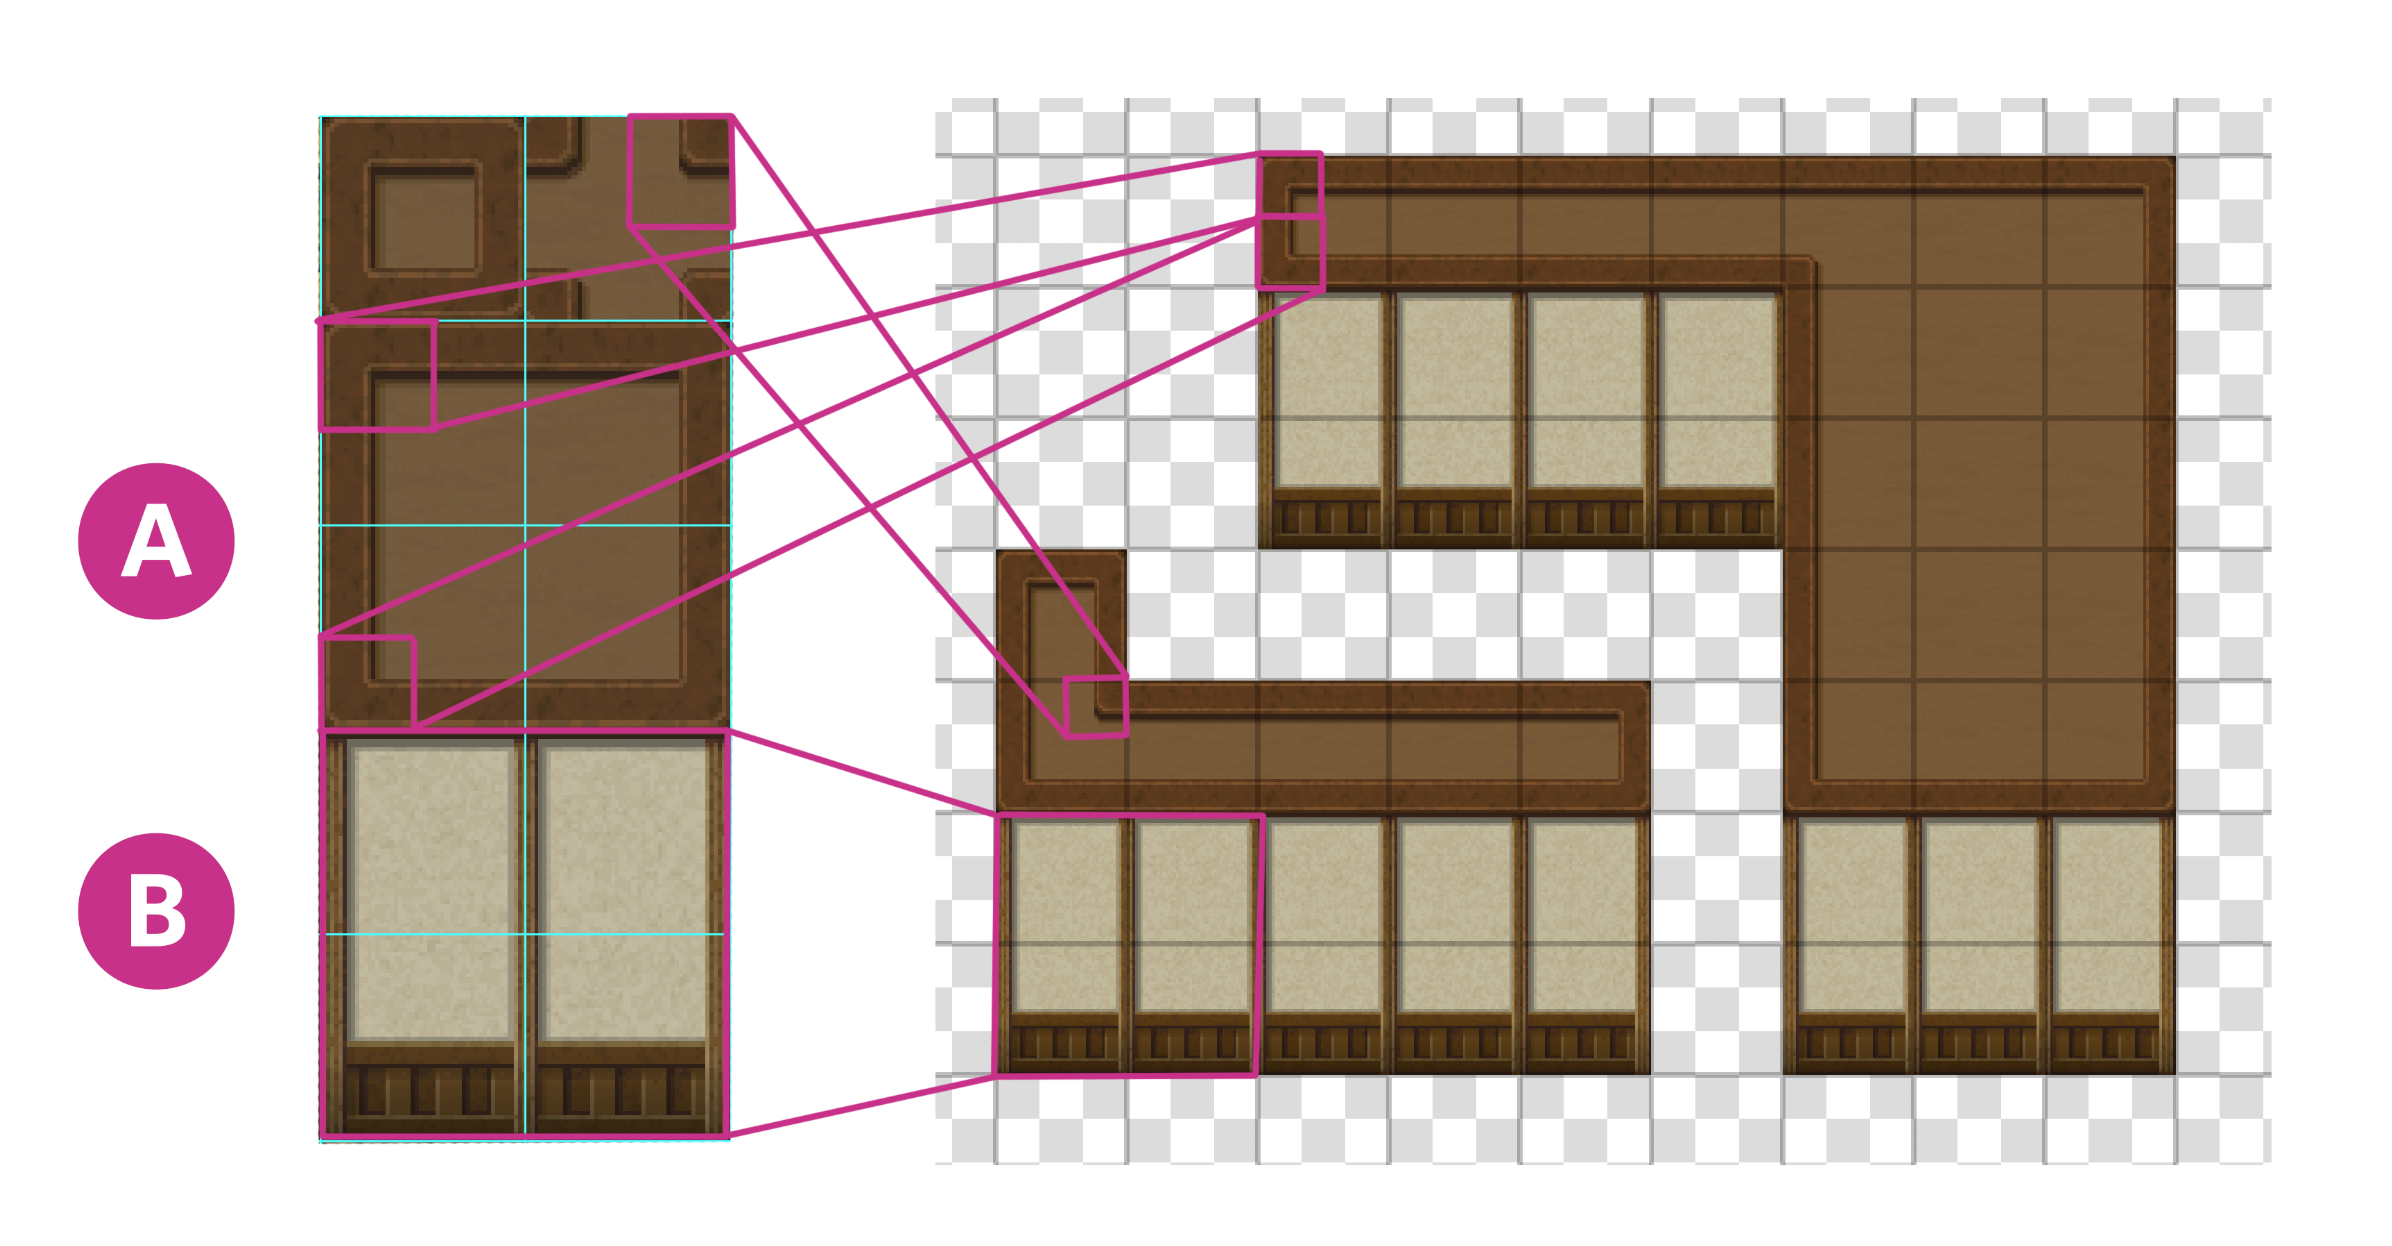 Ex.11 ? A map made with the ?Inside? tileset that comes default in RPGmaker.
The tiles labeled ?A? are what makes up the roof tiles, and the tiles labeled ?B? are the wall tiles. In this example you can also see a more visual representation of how the squares are split further into a set of smaller 24×24 corner tiles, used to represent bends and corners where roof tiles meet.
A5 ? Normal
These tiles are used in outside and dungeon environments ? being a combination of floor, wide set stairs, and ledge shapes that are more common to these types of environments.
File Specs: 384 x 768 px ? 16 x 8 Grid ? .png ? 72 ppi
 Ex.12 ? ?Outside_A5.png?
These tiles follow a specific pattern to be aware of ? the 3rd, 5th and 7th rows are treated as floor tiles and the bottom 5 rows are treated similarly to the A4 wall set with the internal square taking up it?s own space as well as each of the intersecting corners taking their own squares in between the two sets. The other tiles are referenced 1:1 and do not auto-tile.
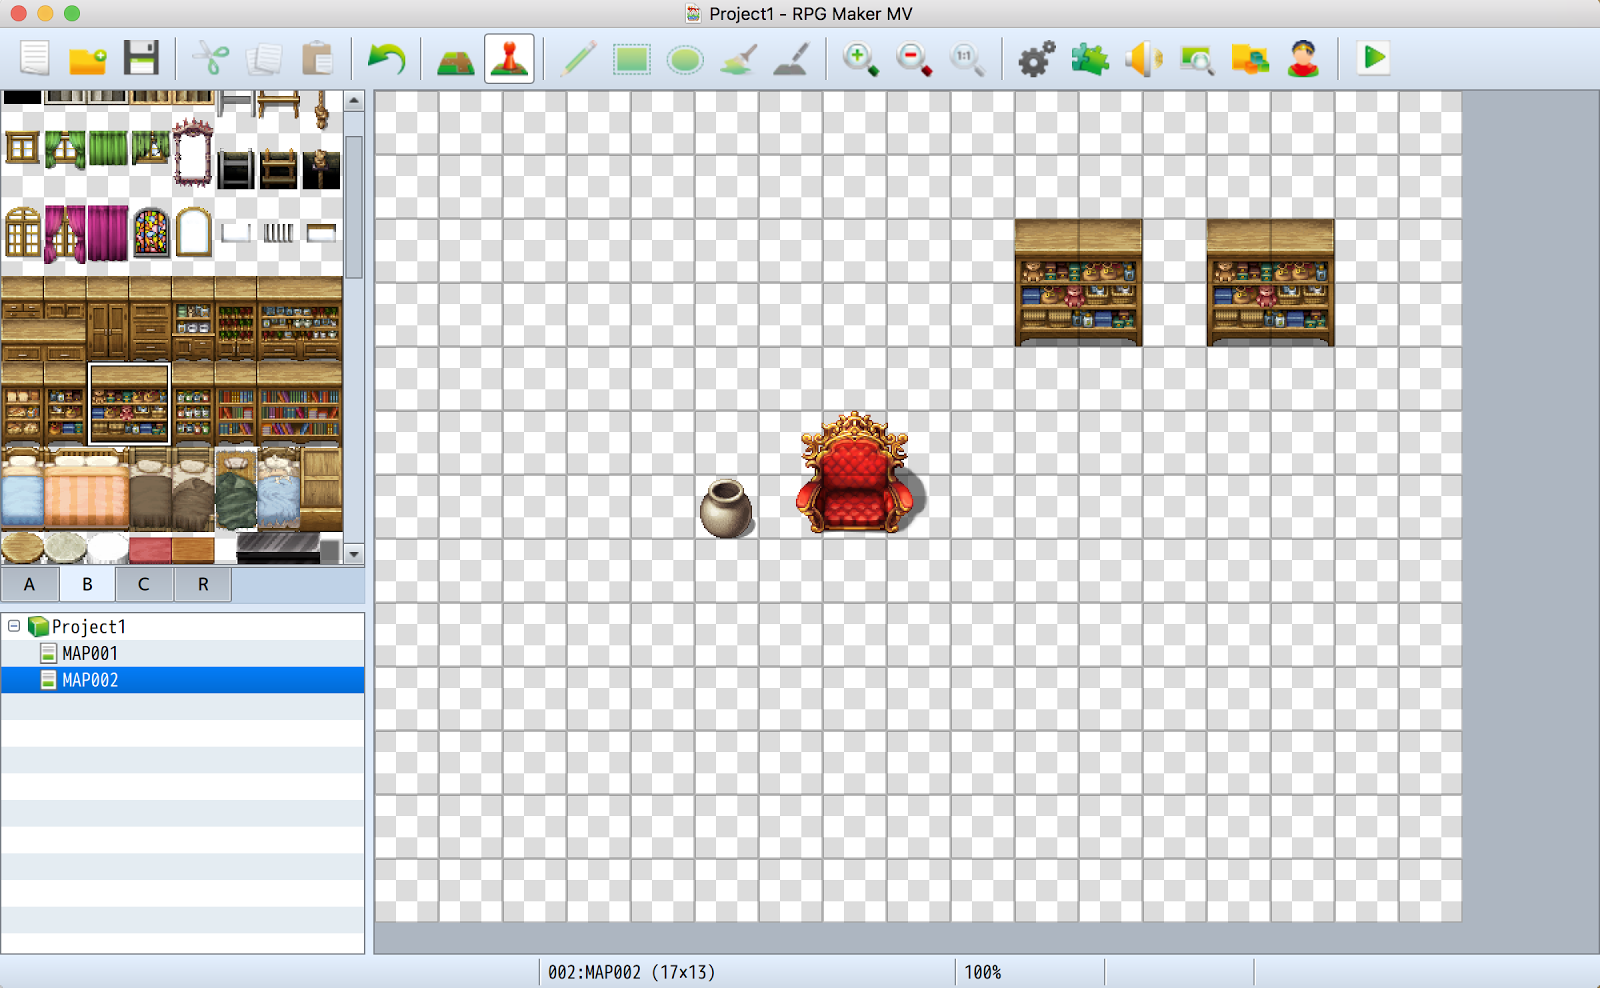
B ? Objects
This set is where the fun happens, these tiles are ?normal type? meaning they are placed 1:1 on the map directly from the image. They are not animated, nor do they auto-tile so you can draw to your heart?s content. One thing to keep in mind with this set ? it?s important to keep the top left tile blank. This tile can be used as an eraser of sorts when using the map creation screen.
File Specs: 768 x 768 px* ? 16 x 16 Grid ? .png ? 72 ppi
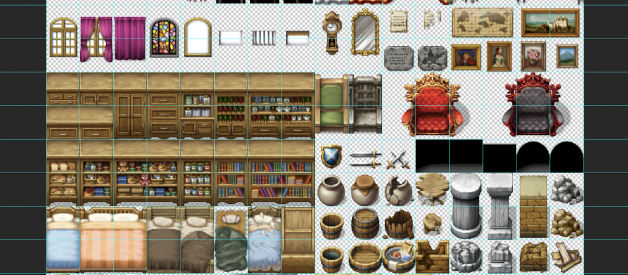
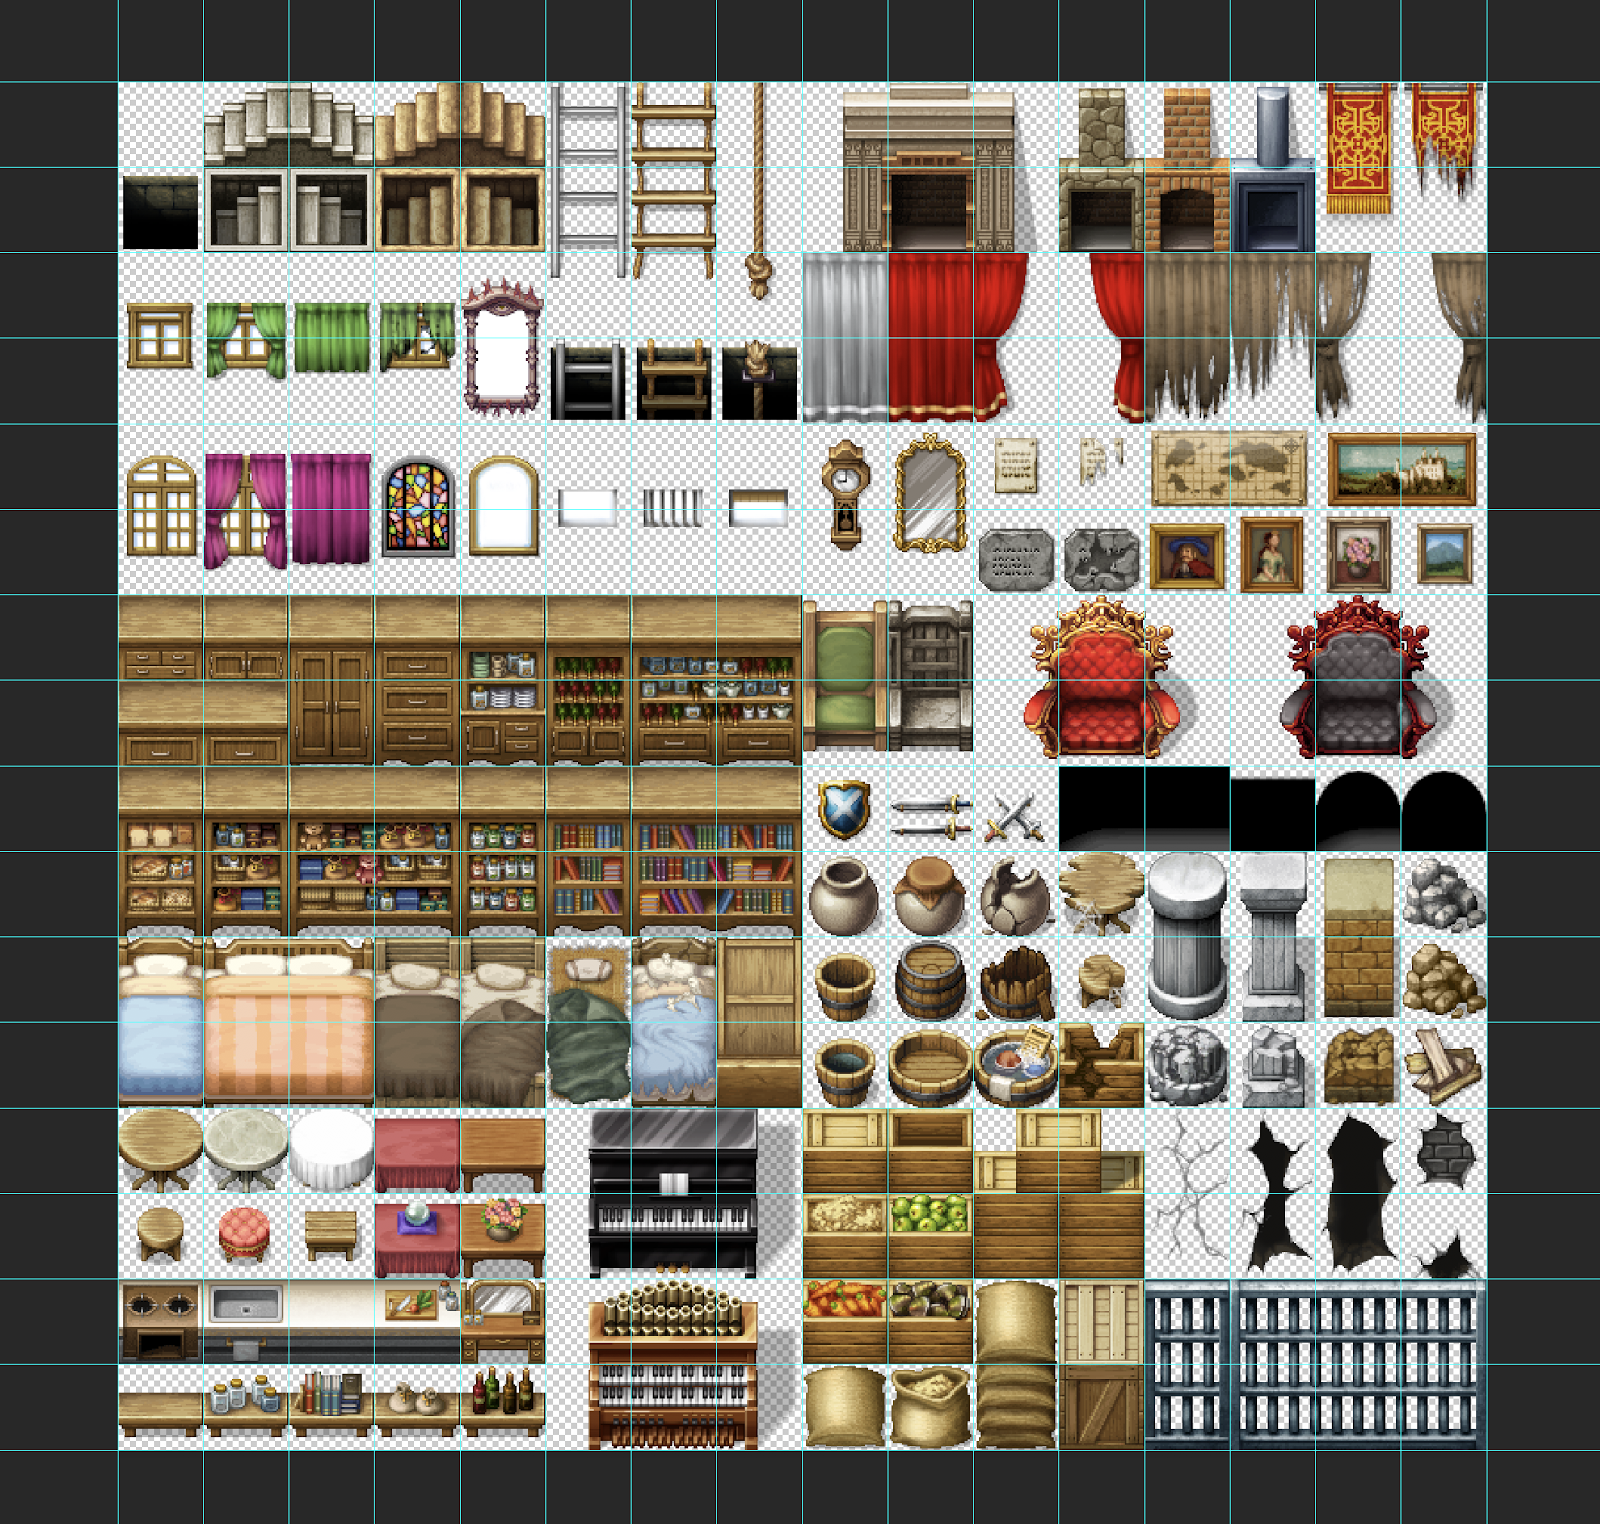
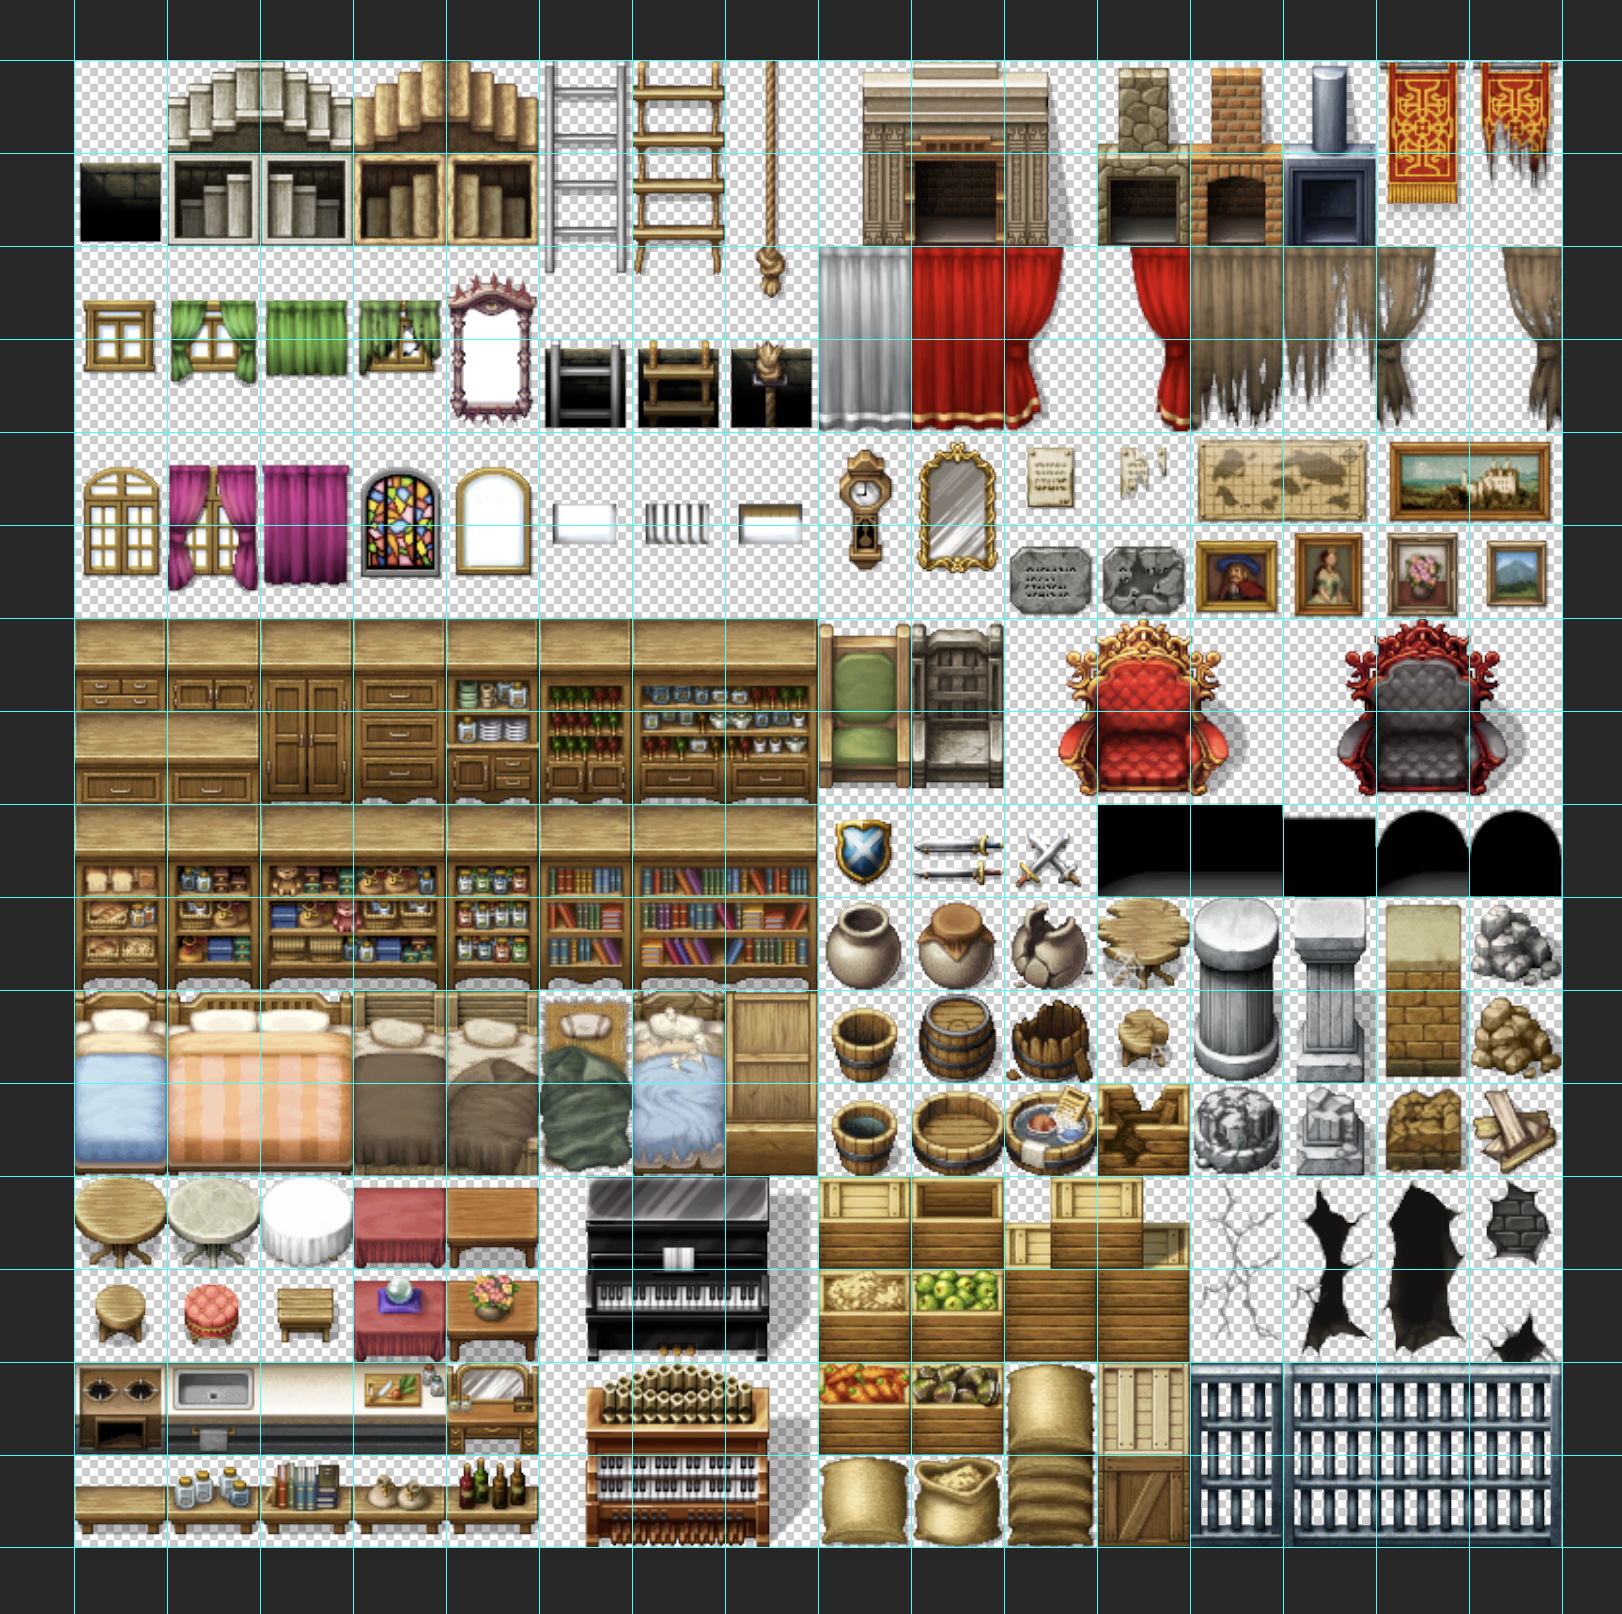 Ex.13 ? ?Inside_B.png?
Don?t worry ? You aren?t restricted to the 48×48 square for the object tiles you make. Sometimes objects or environmental elements drawn in the tilesets are a bit bigger than the 48×48 squares, for example, the red chair in Ex.13 which takes up 6 squares.
Providing all 6 squares line up and fit together to make the image, they can be easily placed into the game.
*The cool thing about this set is, providing the width is always 768px, you can make the height of the image as tall as you want to be able to fit more items.
One important note! Be aware that the engine will split this set down the middle to make it fit the panel in the map maker- this means that any sprites taking up more than one tile should avoid overlapping the centre of the image to allow for easy pasting in the map. It sucks having to scroll back and forth through your tiles to find the other half of a couch.
C ? More Objects
Super simple, these tiles behave the same way as B tiles. The only difference is that they can be placed overtop of B tiles. This means that these tiles are meant for objects and elements that sit on tables, raised platforms or other objects you may have drawn in the B set.
File Specs: 768 x 768 px ? 16 x 16 Grid ? .png ? 72 ppi
That?s it for tilesets!
Now that you?ve got a bit of an understanding of how these tiles work it?ll be a lot easier to get started on making your own. Let?s do it!
If any of this was a bit hard to understand I highly recommend checking out the documentation that comes with RPGmaker MV in the ?help? tab. Or experimenting with the tilesets on your own! The best way to learn is through doing.
Now let?s move onto the making part!
