
Working with unit testing on any project that at least tries to be serious is a must, it doesn?t matter if you choose to use a TDD (test-driven development) approach or not you are going to have a lot of benefits by using it.
In this article first, we are going to shortly mention the benefits of unit testing and then we are going to create a full example of angular unit testing using jasmine and karma explaining each step of the process.
Benefits of Unit Testing
Lets go first through what I think are the main reasons to use unit testing in your solution?
- Improve the design of implementations. Start coding a feature without giving it a lot of thought to the design is a very common mistake among developers. Using unit testing is going to enforce you to think and re-think the design, and if you are using TDD the impact is even bigger.
- Allows refactoring.Since you already have tests that ensure that everything is working as expected, you can easily add changes to that code with the certainty that you are not adding any bugs.
- Add new features without breaking anything.When you are adding a new feature you can run the tests to ensure that you ain?t breaking any other part of the application.
There are many more, but these three are already such a big win on any project that for me are deal sealers. but if you are not convinced yet let?s mention a couple more.
- Tests are good documentation.
- Tests make developers more confident about their work.
You can say that all their benefits come at a great cost: TIME, but this is completely false. All the time that using unit testing may cost you is going to be small compared to the time they are going to save you later when you are introducing new features or making any refactors. The time spent resolving bugs is going to be drastically smaller than if you are not using unit testing.
Let?s have some fun? we are going to create a small but quite complete example of an application using Angular, Jasmine and Karma.
These are some of the things that we are going to talk about:
- Explain a little bit the tools karma and jasmine.
- Explain the karma configuration.
- Explain the test entry file.
- Create a first simple test. Introducing jasmine and angular testing features.
- Test an angular form. Introducing jasmine and angular testing features.
- Test a component with services. Introducing angular testing features.
Create an Angular project with jasmine and karma
As the angular team recommends we are going to use angular-cli to create our app. By doing this the configuration of jasmine and karma comes resolved for us.
Install angular-cli and create a new project:
- npm install -g @angular/cli
- ng new angular-unit-testing
When you create the project all the dependencies get installed among them everything you are going to need to create the tests.
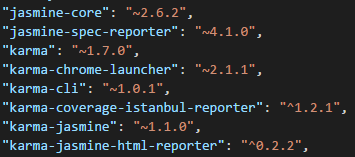
In the image above you can see all the dependencies installed for testing purposes. Let?s go through the more important ones;
- jasmine-core. Jasmine is the framework we are going to use to create our tests. It has a bunch of functionalities to allow us the write different kinds of tests.
- karma. Karma is a task runner for our tests. It uses a configuration file in order to set the startup file, the reporters, the testing framework, the browser among other things.
- The rest of the dependencies are mainly reporters for our tests, tools to use karma and jasmine and browser launchers.
To run the test you only need to run the command ?ng test?. This command is going to execute the tests, open the browser, show a console and a browser report and, not less important, leave the execution of the test in watch mode.
Karma Config
Let?s take a look at the karma configuration file created by angular-cli.
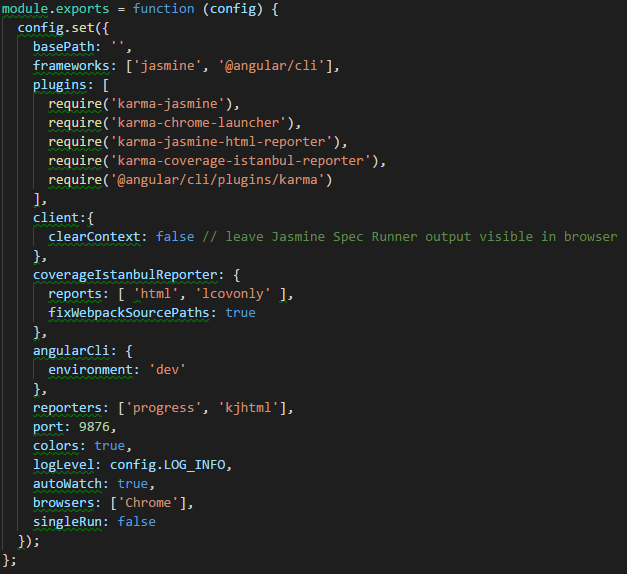
You probably can guess what most of these configuration properties are for, but let?s go through some of them.
- frameworks: this is where jasmine gets set as a testing framework. If you want to use another framework this is the place to do it.
- reporters: this is where you set the reporters. You can change them or add new ones.
- autoWatch: if this is set to true, the tests run in watch mode. If you change any test and save the file the tests are re-build and re-run.
- browsers: this is where you set the browser where the test should run. By default it is chrome but you can install and use other browser launchers.
Test entry file
The angular-cli configuration of karma uses the file ?test.ts? as the entry point of the tests for the application. Let?s take a look to that file;
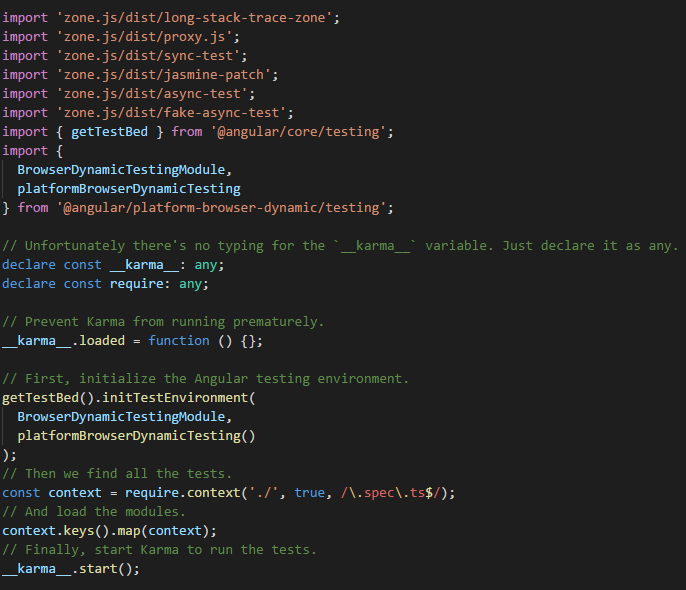
We have a lot of things going on here. You are probably never going to need to change this file but let?s go and discuss some of the things happening;
- An environment to run angular tests is being created using all the imports at the beginning of the file.
- TestBed is a powerful unit testing tool provided by angular, and it is initialized in this file.
- Finally, karma loads all the test files of the application matching their names against a regular expression. All files inside our app folder that has ?spec.ts? on its name are considered a test.
Our First test
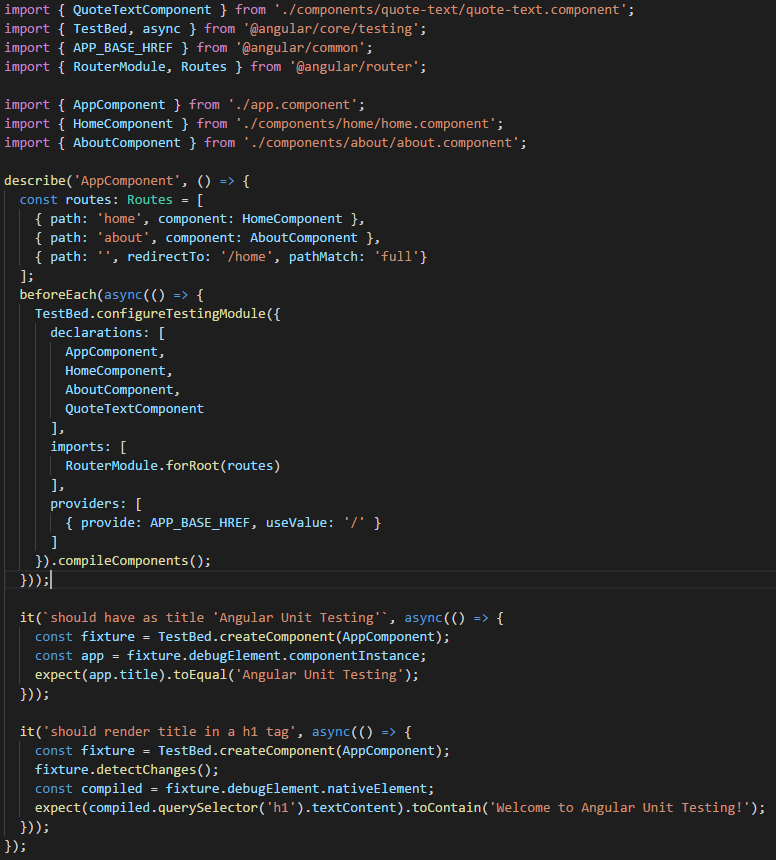
Let?s create our first test. Let?s do it to our app.component.ts. This component only has a property ?text? with the value ?Angular Unit Testing? that is rendered in the HTML inside an ?h2? tag, it also contains the routing root element and some routing links. Let?s create a test file to check that the component actually has that property and that is actually rendered in the HTML.
Let?s go through everything that?s going on here;
- We import all the angular testing tools that we are going to use.
- We import all the dependencies that this component has.
- We use a ?describe? to start our test block with the title matching the tested component name.
- We use an async before each. The purpose of the async is to let all the possible asynchronous code to finish before continuing.
Before running any test in angular you need to configure an angular testbed. This allows you to create an angular environment for the component being tested. Any module, component or service that your tested component needs have to be included in the testbed. Finally, after setting the configuration, you call the compile components function.
For app.component we need to configure a dummy routes module and use a provider to set the base href, without this the test is not going to compile because we are setting the routing module and it needs a base href.
Finally, we have two tests. Let?s go through the first one;
- In the first test, we are checking that the component actually contains the expected text in the ?title? property.
- First, we need to have an instance of the app.component, for that we use the create component function of the angular testbed, as a result, we get a fixture object that is going to allows us to create an instance of that component.
- Now that we have an instance of app.component we can check the value in the text property an make jasmine expect to be equal to the expected value.
The second test does something similar but it checks that the dom renders the ?text? property.
- First, it does the same as the other test, gets the app.component fixture, then it executes the detect changes function, this function applies component changes to the HTML (in this case we apply the interpolation to the DOM of the ?text? component property).
- Then it gets the native element of the compiled HTML (the HTML rendered by the component).
- Finally, we select the ?h2? containing the ?text? value and expect that the selected HTML contains the expected value.
Testing a Form
Let?s see now how to test an angular form. Let?s see first the contact.component HTML;

This is quite straight-forward doesn?t need any explanation. This is just a regular angular form using form controls. The submit button is disabled if the form is not valid.
Let?s see now, the contact.component
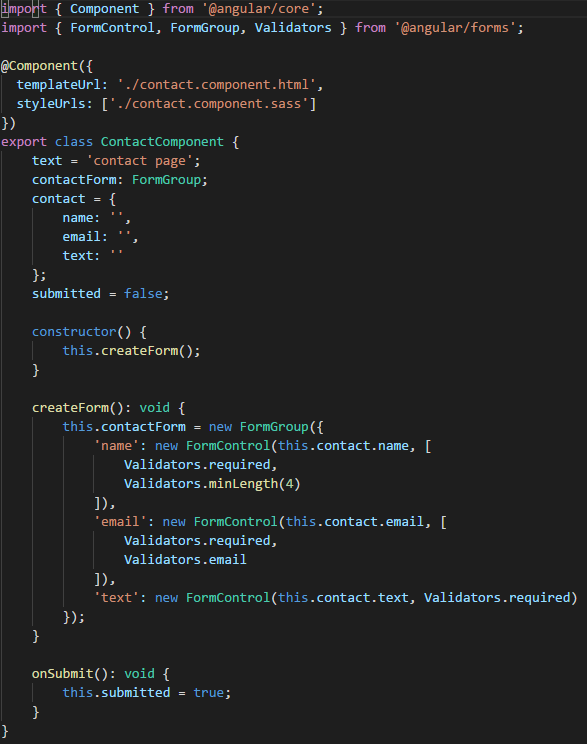
This component is also quite simple to understand. The on submit function just changes the submitted property to true. The contact form has three controls with their validations.
Let?s see now, the tests for this component;
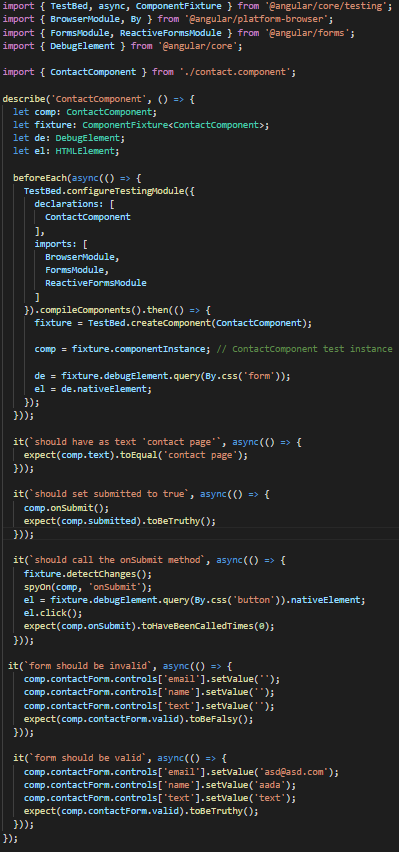
This test has many differences compared to the one we saw before, don?t worry we are going to talk about each of them.
- First, we have the import section, nothing strange here except that we are introducing the ?By? that is going to allow us to select elements from the DOM.
- We declare the tests block with the name of the component to test.
- We are going to use create some test scoped objects that we will use in different tests that are going to be initialized in the ?beforeEach?.
- The first part of the ?beforeEach? is setting all the needed dependencies to start the test module. We have already mentioned the reason for the ?async?.
- In this example, we are using the promise that the ?compileComponents? function returns. When the promise is resolved we are giving a value to each of the variables that we declare at the beginning.
- The first test just expects that the component instance has the expected value of the ?text? property.
- The second test expects the property of the component ?submitted? to be true when the ?onSubmit? function is called.
- The third test applies the component state to the HTML with the function ?detectChanges? of the ?fixture? object then it gets the submit button from the DOM and trigger the click event. Before all of this, we create a jasmine ?spy? on the ?onSubmit? function of the component. Finally, we expect that the spied function is not executed, because the button should be disabled since the form is not valid.
- The fourth test set invalid values to the component form and expect the form valid property to be false.
- Finally, in the fifth test, we set valid values to the form and expect the form valid property to be true.
Let?s see one more thing before wrapping this article up. We are going to see how to deal with services when the component we are testing uses them.
Testing a component with services
When you are going to test a component with services, as we have already seen, you need to add the providers to the testing module created in the ?beforeEach?. The thing is that you probably don?t want to use the actual services but a mocked version instead, so let?s see how to do that?
First, let?s take a look at the implementation of the component;
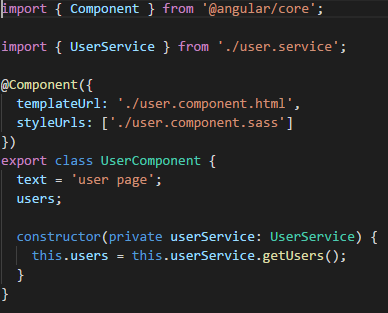
This is a simple component that gets the list of users from a service.
The actual service implementation is not important it could be getting the users from anywhere, but let?s see how we create the tests for the component mocking the service implementation.

This test is similar to the examples we saw before with one main difference, in the provider?s declaration of the test module we are telling the module that when the service ?UserService? is injected it should use the ?UserServiceMock? instead. The ?UserServiceMock? is a dummy service that we created that returns dummy data to run the tests of the component. And that?s all, this is how you should mock your services when testing a component.
Conclusion
We went through a bunch of features and examples to try to explain how to test angular components, as you can see is quite simple and you can perform any different kind of tests.I hope this article helps you understand a little bit better how to use the tools to test angular.
GitHub Link
![LifeAfter MOD APK v1.0.145 [Unlimited Gold, Diamonds Lives & Ammo]](https://911weknow.com/wp-content/themes/mts_myblog/images/nothumb-myblog-related.png)

)
)