In this tutorial you will learn how to create NumberPicker widgets in Android Studio with custom values and how to retrieve NumberPicker values.
What are NumberPickers?
NumberPickers are a widget avalible in Android Studio. They are a set of values selectable by either a horizontal or vertical scrolling wheel.
Creating a NumberPicker
To create a NumberPicker, go to the XML file of your main activity. Switch from the Design tab to the Text tab and type <NumberPicker. As you type this, Android Studio will suggest a NumberPicker. Press tab to create one, then set the width and height to wrap_content.
When you switch back to the Design tab, the NumberPicker should be visible. The NumberPicker in the XML will look different from the NumberPicker in the app. Under ID, name the NumberPicker with the what_where_why naming scheme. In this case it will be numberpicker_main_picker. Don?t forget to constrain your NumberPicker! For this example the picker is centered horizontally and vertically.
In your MainActivity, create a NumberPicker variable and wire it to the NumberPicker you created in your XML.
private NumberPicker picker1;@Overrideprotected void onCreate(Bundle savedInstanceState) { super.onCreate(savedInstanceState); setContentView(R.layout.activity_main); picker1 = findViewById(R.id.numberpicker_main_picker);}
Setting Custom Values
To set custom values on your NumberPicker, first set a minimum and maximum value. In this example we will have 5 values, so we will set the range to:
picker1.setMaxValue(4);picker1.setMinValue(0);
A NumberPicker takes an array of Strings as its values. First create an instance variable of a string array, then initialize the array with your desired values.
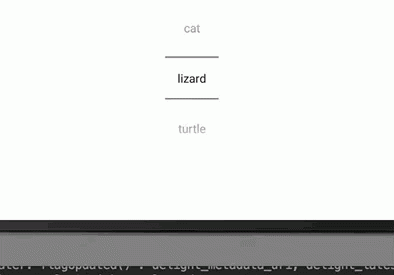
private String pickerVals;…….pickerVals = new String {“dog”, “cat”, “lizard”, “turtle”, “axolotl”};
Next, set the NumberPicker values to these Strings with .setDisplayedValues()
picker1.setDisplayedValues(pickerVals);
When the program is run, it should look like this:
*note: the best way to format this code is to handle it under an initializePicker(); method, then run the method in onCreate. However, for the sake of simplicity in this tutorial, I will not be doing this.*
Retrieving NumberPicker Values
To get the value of your NumberPicker every time it is changed, create an onValueChangeListener in onCreate. In the overriden onValueChange method, create an int variable to store the picker value. Next, make a Log.d to log what the picker value is.
picker1.setOnValueChangedListener(new NumberPicker.OnValueChangeListener() { @Override public void onValueChange(NumberPicker numberPicker, int i, int i1) { int valuePicker1 = picker1.getValue(); Log.d(“picker value”, valuePicker1 + “”); }});
With the code we currently have, the NumberPicker value will be an int. To retrieve the String value of the picker we must access the String array storing our picker values. Rather than just logging the value of picker1, we must log pickerVals[valuePicker1].
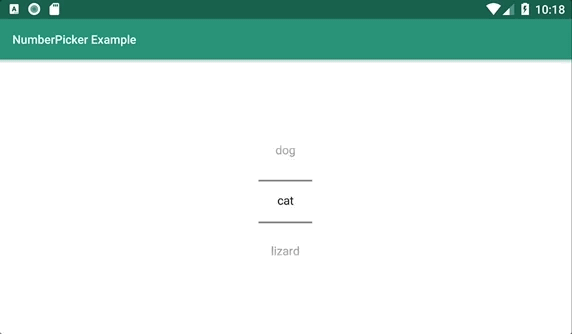
Log.d(“picker value”, pickerVals[valuePicker1]);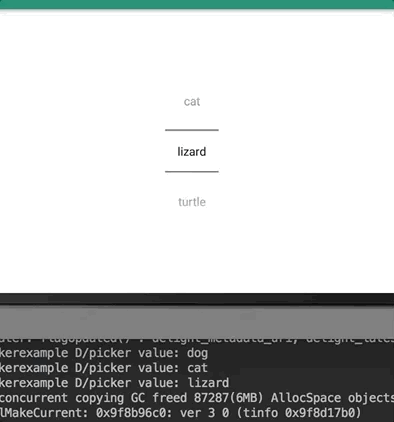 Looking at the log below you can see that the appearing animal names are corresponding to the picker value.
Conclusion
Here is the resulting code of the project:
package com.example.numberpickerexample;import android.support.v7.app.AppCompatActivity;import android.os.Bundle;import android.util.Log;import android.widget.NumberPicker;public class MainActivity extends AppCompatActivity { private NumberPicker picker1; private String pickerVals; @Override protected void onCreate(Bundle savedInstanceState) { super.onCreate(savedInstanceState); setContentView(R.layout.activity_main); picker1 = findViewById(R.id.numberpicker_main_picker); picker1.setMaxValue(4); picker1.setMinValue(0); pickerVals = new String {“dog”, “cat”, “lizard”, “turtle”, “axolotl”}; picker1.setDisplayedValues(pickerVals); picker1.setOnValueChangedListener(new NumberPicker.OnValueChangeListener() { @Override public void onValueChange(NumberPicker numberPicker, int i, int i1) { int valuePicker1 = picker1.getValue(); Log.d(“picker value”, pickerVals[valuePicker1]); } }); }}
And the XML file:
<?xml version=”1.0″ encoding=”utf-8″?><android.support.constraint.ConstraintLayout xmlns:android=”http://schemas.android.com/apk/res/android” xmlns:app=”http://schemas.android.com/apk/res-auto” xmlns:tools=”http://schemas.android.com/tools” android:layout_width=”match_parent” android:layout_height=”match_parent” tools:context=”.MainActivity”> <NumberPicker android:id=”@+id/numberpicker_main_picker” android:layout_width=”wrap_content” android:layout_height=”wrap_content” app:layout_constraintBottom_toBottomOf=”parent” app:layout_constraintEnd_toEndOf=”parent” app:layout_constraintHorizontal_bias=”0.5″ app:layout_constraintStart_toStartOf=”parent” app:layout_constraintTop_toTopOf=”parent”></NumberPicker></android.support.constraint.ConstraintLayout>
Good luck!

