Before we start let?s begin with a couple of definitions to give you an idea of what we will be dealing with if you?re a complete beginner.
What is Handlebars?
Handlebars is one of the most used templating engines for web applications ?competing? with other well-known ones like Mustache js, Pug, EJS and others. It?s especially used on the server side along with the express js framework.
Wait wait wait.. what on earth is a templating engine?
Simply said ?Templating? engine is an engine that can manipulate your HTML code from the server side using the server side code you use. By it?s very authentic built in syntaxes you can loop, change content dynamically, alert messages to user and etc.
Answered THEWOLF to the same question on a thread on stackoverflow.com.
In other words, a templating engine takes a bunch of static HTML files, fills them with the necessary data on the server side then sends them as any ordinary HTML file to the client.
So enough with these confusing terms and?
Let?s Get Our Hands Dirty
Setting Up A Basic Express Server
Let?s start by creating a folder which will contain our app and within it type the following command to create the JSON file containing all the information and dependencies:
npm init
After filling the necessary information, we need to install express of course by typing the express installation command:
npm install express –save
Now we create our main js file which will contain our application?s logic and name it ?index.js? which must include these few lines to get us going:
//Loads the express moduleconst express = require(‘express’);//Creates our express serverconst app = express();const port = 3000;//Serves static files (we need it to import a css file)app.use(express.static(‘public’))//Sets a basic routeapp.get(‘/’, (req, res) => res.send(‘Hello World !’));//Makes the app listen to port 3000app.listen(port, () => console.log(`App listening to port ${port}`));
Let?s test this out by typing the command below on the command prompt:
node index.js
If everything works fine we should be able to see the message ?App listening to port 3000? on the console and if we open this URL ? http://localhost:3000/? in the browser we should be able to see a nice shiny ?Hello World !? on the page.
Finally, let?s create a folder by the name of ?public? in which we create a .css file and let?s call it ?style.css? and we?re good to go.
It?s time for some Handlebars Yay!
First off, we need to install the Handlebars dependency as follows:
npm install express-handlebars –save
Then we need to create a folder containing the files needed for Handlebars to work, let?s call it ?views? in which we create a file called ?main.handlebars? and 2 subfolders with the respective names ?partials? and ?layouts?. Inside the layouts folder create a file and name it ?index.handlebars? and let’s fill it with some HTML code:
<!DOCTYPE html><html lang=”en”> <head> <meta charset=”utf-8″ /> <meta http-equiv=”X-UA-Compatible” content=”IE=edge” /> <title>My Awesome App</title> <meta name=”viewport” content=”width=device-width, initial-scale=1.0, viewport-fit=cover” /> <link rel=”stylesheet” type=”text/css” href=”./style.css” /> </head> <body> {{{body}}} </body></html>
So far our directory should look like this:
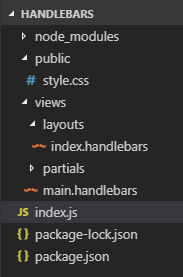 Project?s tree
Now let?s move on to the code editor and type some juicy lines of Javascript:
const express = require(‘express’);const app = express();const port = 3000;//Loads the handlebars moduleconst handlebars = require(‘express-handlebars’);//Sets our app to use the handlebars engineapp.set(‘view engine’, ‘handlebars’);//Sets handlebars configurations (we will go through them later on)app.engine(‘handlebars’, handlebars({layoutsDir: __dirname + ‘/views/layouts’,}));app.use(express.static(‘public’))app.get(‘/’, (req, res) => {//Serves the body of the page aka “main.handlebars” to the container //aka “index.handlebars”res.render(‘main’, {layout : ‘index’});});app.listen(port, () => console.log(`App listening to port ${port}`));
Here?s what?s going on, Handlebars takes a static template file you give it inside the layouts folder (the ?index.handlebars? file), this file contains some kind of a placeholder (the {{{body}}} if you look back at the code) which will be filled with the content of another .handlebars file (?main.handlebars?). As its name suggests the ?main.handlebars? contains the core of the HTML code we want it to be rendered (it?s not necessary that you name it main though).

Since our ?main.handlebars? file is empty if you try to run the app and look at the result nothing will show up since neither our ?main.handlebars? nor ?index.handlebars??s body contain anything, so let?s open the ?main.handlebars? file and fill it with some content:
<h2>Liste of my most loved League champions</h2><ul> <li class=”midlaner”>Leblanc</li> <li class=”midlaner”>Lux</li> <li class=”toplaner”>Teemo</li> <li class=”midlaner”>Kassadin</li> <li class=”toplaner”>Jarvan IV</li></ul>
Let?s add some CSS:
li {font-size: 2rem;width: 300px;margin: 4px;padding: 4px;list-style: none}.midlaner {background-color: #eeeeee}.toplaner {background-color: #ffea00}
By now if you refresh the page, you will see some content (probably not interesting enough to catch your eyes).
Handlebars Configuration
- extname: string
The first thing it came to my mind and I?m pretty sure it was the same for you when you were about to create handlebars file is ?Uhm that?s a heck of a big file extension? and that?s where our first configuration property comes in handy.
Let?s change the code so our file extension will take fewer characters, ?.hbs? for instance looks good to me:
//instead of app.set(‘view engine’, ‘handlebars’); app.set(‘view engine’, ‘hbs’);//instead of app.engine(‘handlebars’, handlebars({app.engine(‘hbs’, handlebars({layoutsDir: __dirname + ‘/views/layouts’,//new configuration parameterextname: ‘hbs’}));
Don?t forget to change the extension of the files we already created (?main.handlebars? to ?main.hbs? and ?index.handlebars? to ?index.hbs?).
- defaultLayout: string
By default, if you don?t tell handlebars which layout file to render, it will throw an error telling you there?s no layout file. Using this property will give you the control to what name of the file it has to look for in case you didn?t explicitly mention it in the render function.
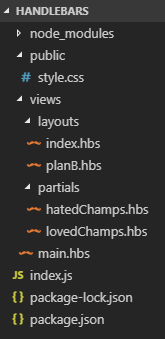
Let?s create a file and name it ?planB.hbs? and let?s fill it with something different:
<!DOCTYPE html><html lang=”en”> <head> <meta charset=”utf-8″ /> <meta http-equiv=”X-UA-Compatible” content=”IE=edge” /> <title>My Awesome App</title> <meta name=”viewport” content=”width=device-width, initial-scale=1.0, viewport-fit=cover” /> <link rel=”stylesheet” type=”text/css” href=”./style.css” /> </head> <body> <h2>This is the plan B page</h2> {{!– We could use the same body as the index.hbs page –}} {{!– using the {{{body}}}, you remember it right ?–}} </body></html>
Let?s add the new property to our ?index.js? file:
app.engine(‘hbs’, handlebars({layoutsDir: __dirname + ‘/views/layouts’,extname: ‘hbs’,//new configuration parameterdefaultLayout: ‘planB’,}));app.get(‘/’, (req, res) => {//instead of res.render(‘main’, {layout: ‘index’});res.render(‘main’);});
I guess you predicted correctly what we will be getting after running the code, didn?t you?
Keep in mind that adding the property with a name of a file let?s say ?file1.hbs? as value will be overwritten if you mention explicitly another file ?file2.hbs? in the render function, in other words, the file mentioned in the render function has the priority to be rendered over the one mentioned in the defaultLayout property.
- partialsDir: string
This property helps to make the project more organized, it takes a string path to a folder as a value, this folder will contain small chunks of code that we can use in the body of our ?main.hbs?, ?index.hbs? or any other partial file (a partial nested inside another one). It?s the same idea of the component-based frameworks such as React.
Let?s create two files in the subfolder named ?partials? that we created earlier and call them ?lovedChamps.hbs? and ?hatedChamps.hbs?.
Cut the code inside the ?main.hbs? file and paste it inside the ?lovedChamps.hbs? and let?s create another list inside the ?hatedChamps.hbs?.
?main.hbs?:
{{> lovedChamps}}{{> hatedChamps}}
As you can see we?re referring to the files containing the code we want to include to our core code by this notation {{> partial_name}}.
?lovedChamps.hbs?:
<h2>Liste of my most loved League champions</h2><ul> <li class=”midlaner”>Leblanc</li> <li class=”midlaner”>Lux</li> <li class=”toplaner”>Teemo</li> <li class=”midlaner”>Kassadin</li> <li class=”toplaner”>Jarvan IV</li></ul>
?hatedChamps.hbs?:
<h2>Liste of my most hated League champions</h2><ul> <li class=”midlaner”>Yasuo</li> <li class=”midlaner”>Zoe</li> <li class=”toplaner”>Mundo</li> <li class=”toplaner”>Darius</li> <li class=”midlaner”>Fizz</li></ul>
?index.js?:
app.engine(‘hbs’, handlebars({layoutsDir: __dirname + ‘/views/layouts’,extname: ‘hbs’,defaultLayout: ‘planB’,//new configuration parameterpartialsDir: __dirname + ‘/views/partials/’}));app.get(‘/’, (req, res) => {//Using the index.hbs file instead of planBres.render(‘main’, {layout: ‘index’});});
Run this and see magic happens.

Dynamic Values & Helpers
- Dynamic Values
Until now we have been working with static files but what if we want to add values dynamically after we get them from a certain logic inside our ?index.js? (e.g. data from a Firebase database). We can do that because it?s one of the main purposes of the templating engine if not the main reason for it to exist.
Let?s say I want to make a request to a certain API to know which pro player has the same champions pool as I do and then I want Handlebars to fill the name in my HTML file automatically without me hard coding it:
?index.js?:
//I would like to use a real api but let’s use this for the sake of //the simplicity of the articlefakeApi = () => ‘Faker’;app.get(‘/’, (req, res) => {res.render(‘main’, {layout: ‘index’, proPlayer: fakeApi()});});
?main.hbs?:
{{> lovedChamps}}{{> hatedChamps}}<h2>Similar pro player : {{proPlayer}}</h2>
Notice that we use this notation {{variable_name}} as a placeholder for the variable that contains the value from the logic inside the Javascript file in the server (?index.js?).
Another thing to mention is that we can pass as many variables as we want to the render function res.render (?main?, {layout: ?index?, key1: val1, key2: val2? keyn: valn});
- Helpers
Helper functions, or ?helpers? are functions that can be registered with Handlebars and can be called within a template. Helpers can be used for transforming output, iterating over data, etc.
Let?s say we requested an API and it responded with a list of champions that we need to try because they have a similar play style as the champions we love. Filling each champion name in a variable and then hard coding them one by one in a list looks like such an exhausting job, imagine a scenario of a real-world app where we have a list of thousands of clients that we need to show to user (the client side).. that would be insane to even think about, but thanks to helpers that wouldn?t take even 2 minutes to get it done and here?s how we do it:
?index.js?:
fakeApi = () => { return [ { name: ‘Katarina’, lane: ‘midlaner’ }, { name: ‘Jayce’, lane: ‘toplaner’ }, { name: ‘Heimerdinger’, lane: ‘toplaner’ }, { name: ‘Zed’, lane: ‘midlaner’ }, { name: ‘Azir’, lane: ‘midlaner’ } ];}app.get(‘/’, (req, res) => {res.render(‘main’, {layout: ‘index’, suggestedChamps: fakeApi(), listExists: true});});
?main.hbs?:
{{> lovedChamps}}{{> hatedChamps}}{{!– depending on the value of the listExists variable –}}{{!– if it?s true then the list will be rendered –}}{{!– if the value is equal to false the list will not be rendered –}}{{#if listExists}} <ul> {{#each suggestedChamps}} <li class={{this.lane}}>{{this.name}}</li> {{/each}} </ul>{{/if}}
Notice that the keyword this here means each one of the array elements.
Also as you can see we used another helper which is the if helper to make a conditional rendering depending on the value of the listExists variable.
Conclusion
I hope you enjoyed going through this basic guide of Handlebars, you can check their official website, their npm page or Github repository for the documentation or more advanced stuff.
You can also find the project files here on my Github repository and this is it, I hope you learned something new from this article and see you in future articles.
The video format of this guide: Get Started With Handlebars.js

