
Introduce webcam-easy npm module
 Image by Tumisu from Pixabay
Recently, computer vision has been a hot topic, which enables applications to deliver new, engaging user experiences. In order to bring computer vision to the browser, one of the key element is being able to access the webcam with JavaScript.
To contribute to the computer vision open source community, I had built a npm module called ?webcam-easy?, which provides an easy to use JavaScript module that can access webcam and take photo.
Below is a demo how I use webcam-easy.js to build a web-app that can turn on webcam and snapshot picture.
 source: bensonruan.com
Try it yourself in the link below :
How to access webcam and take photo with JavaScript
I had built a npm module webcam-easy.js, which provides an easy to use JavaScript module that can access webcam and?
bensonruan.com
How to use webcam-easy.js
webcam-easy.js a JavaScript module I built for accessing webcam stream, it can allows us to capture a picture from the webcam. Below are the major features for webcam-easy.js:
- Streaming webcam on desktop computer or mobile
- Switch back or front cameras on mobile
- Take pictures and be able to download.
You can easily add it as a module to your own application. If you are building an web-app that need to access webcam in the browser, this is for you! I will show you step by step instruction below of how to use this module.
# Step 1: Include webcam-easy.js
First of all, simply include the script webcam-easy.min.js in the <head> section of the html file.
<html> <head> <script type=”text/javascript” src=”https://unpkg.com/webcam-easy/dist/webcam-easy.min.js”></script> </head>
Or you can install it via npm for use in a TypeScript / ES6 project
npm install webcam-easy
JavaScript
import Webcam from ‘webcam-easy’;
# Step 2: Place elements in HTML
The next thing we will need to do is to add the html elements below
- webcam video element
- canvas element for capture picture
- optional audio element for the snap sound
<video id=”webcam” autoplay playsinline width=”640″ height=”480″></video><canvas id=”canvas” class=”d-none”></canvas><audio id=”snapSound” src=”audio/snap.wav” preload = “auto”></audio>
# Step 3: Initialize webcam object
Then, we will initialize the Webcam object, the constructor accepts below parameters
- webcamElement ? the webcam <video> html element
- facingMode ? ?user? or ?element?, default value is ?user?
- canvasElement & snapSoundElement are optional
const webcamElement = document.getElementById(‘webcam’);const canvasElement = document.getElementById(‘canvas’);const snapSoundElement = document.getElementById(‘snapSound’);const webcam = new Webcam(webcamElement, ‘user’, canvasElement, snapSoundElement);
# Step 4: Start Webcam
By calling the webcam.start() function, the browser will ask user permission to access the camera, once it is allowed, it will start streaming the webcam to the video element.
webcam.start() .then(result =>{ console.log(“webcam started”); }) .catch(err => { console.log(err);});
# Step 5: Snapshot
Just call webcam.snap() function to capture snapshot of the webcam. The function returns a data URI containing a representation of the image in the format of PNG. By setting the an html <a> link?s ?href? attribute to the image data return, the user can download and save the snapshot.
let picture = webcam.snap();document.querySelector(‘#download-photo’).href = picture;
# Step 6: Stop webcam
You also want the user to be able to stop their webcam, simply call the webcam.stop() function.
Mobile front & back camera support
webcam-easy.js not only work for desktop webcam, but it also supports mobile front and back camera as well. When you initialize the Webcam object, you can pass the facingMode parameter, while ?user? represent the front camera that facing the user, and ?environment? represent the back camera.
You can also call the webcam.flip() to switch between front and back camera.
$(‘#cameraFlip’).click(function() { webcam.flip(); webcam.start();});
How I implemented webcam-easy.js
Here, I would also like to share some technical details of how I implemented this JavaScript module. I had checkout some other open source webcam JS libraries, and find some works on desktop but not on mobile, some works only on front camera but not on rear camera, some is not mirroring the webcam? Below I am going to show you how I overcame those challenges.
Check browser support
Most of the modern browsers do support webcam access on desktop/laptop, but unfortunately, not including IE.
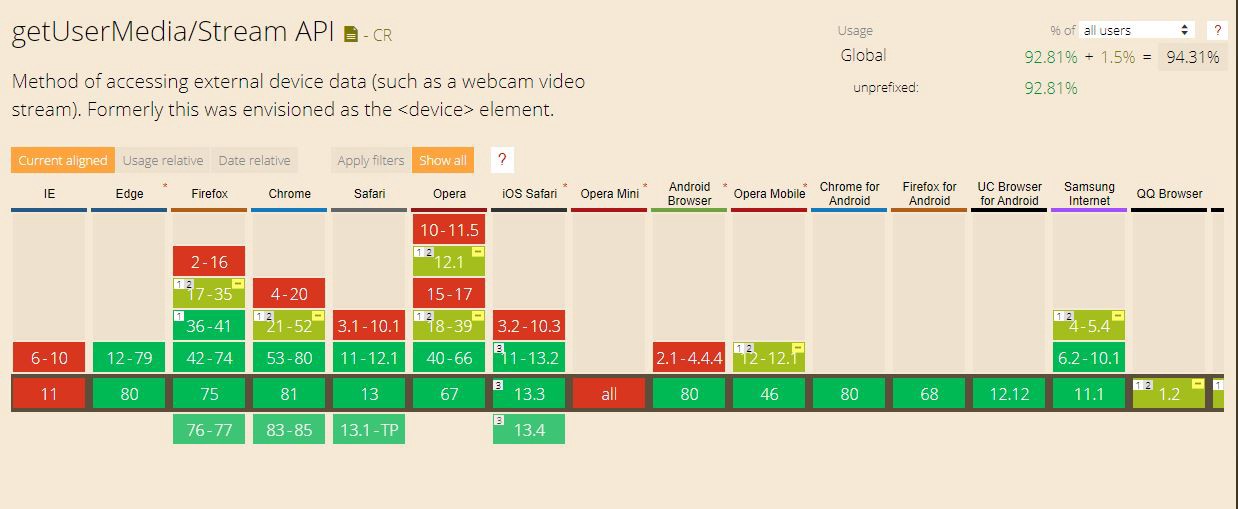 source : https://caniuse.com/#feat=stream
As of Chrome 47, the getUserMedia API cannot be called from insecure origins. It means for security reason, the url required to be in https protocol, http url can not access webcam.
Another important thing to know is on iPhone/iPad, only Safari can access webcam, all other browser apps like Chrome or other social media build in browsers can not access the webcam. On Android phones, webcam works fine in Chrome app.
Get media devices and stream
All the functionalities are exposed by the MediaDevices object, which is returned by navigator.mediaDevices. MediaDevices has two methods, enumerateDevices() and getUserMedia().
enumerateDevices()
Returns a Promise giving access to an array of MediaDeviceInfo objects for available devices. It not only contains video inputs but also audio inputs. The MediaDeviceInfo objects contain some valuable information, below are the properties of the object
- deviceId ? an identifier for the represented device.
- groupId ? a group identifier. Two devices have the same group identifier if they belong to the same physical device ? for example a monitor with both a built-in camera and a microphone.
- kind ? an enumerated value that is either “videoinput”, “audioinput” or “audiooutput”
- label ? a label describing this device (for example ?Front camera?, ?Back camera?).
If you only want to retrieve the video input, filter by the kind property.
navigator.mediaDevices.enumerateDevices() .then(getVideoInputs) .catch(errorCallback);function getVideoInputs(mediaDevices){ mediaDevices.forEach(mediaDevice => { if (mediaDevice.kind === ‘videoinput’) { this._webcamList.push(mediaDevice); } });}
I find out that before the user grant permission to access the webcam, the MediaDeviceInfo objects get return does not expose any information, both the deviceId and label would be empty.
getUserMedia()
Returns a Promise that gives access to a MediaStream. And the user will be prompted to grant access to the webcam. Then you can set the video html element?s srcObject to be the stream, and call play() to start streaming the webcam.
navigator.mediaDevices.getUserMedia(this.getMediaConstraints()) .then(stream => { this._webcamElement.srcObject = stream; this._webcamElement.play(); }) .catch(error => { //… });
And make sure the video html element had include autoplay and playsinline property.
<video id=”webcam” autoplay playsinline></video>
Mirror webcam
As an expected user experience, when you are streaming a user-facing webcam, the image should mirror what?s captured. You can achieve this by applying the transform style.
if(this._facingMode == ‘user’){ this._webcamElement.style.transform = “scale(-1,1)”;} Image by Gerd Altmann from Pixabay
Conclusion
If you are building a computer vision web-app that need to access the webcam, consider using webcam-easy.js JavaScript module, it will save you a lot of time. Then you can do all sort of cool things like real-time face detection, real-time object tracking, motion detection?
Thank you for reading. If you like this article, please share on Facebook or Twitter. Let me know in the comment if you have any questions. Follow me on GitHub and Linkedin.
