Tips to Save You Time and Stay Better Organized in Microsoft Outlook
What?s Outlook
Microsoft Outlook is a personal information manager from Microsoft, accessible as a piece of the Microsoft Office suite. Albeit often used as an email application, it likewise incorporates a calendar, task manager, contact manager, note taking, and journal. It?s been around since MS-DOS and is found in most corporations across the country. The most recent variant of Microsoft?s well-known suite, Office ProPlus, is coming packaged with Outlook 2016.
1. Dictation: Text to Speech
Microsoft has a hidden gem with an add-in called Dictate. Designed by Microsoft?s Garage team, it has one purpose: Highly accurate speech to text.
Pop over to the home page: https://www.microsoft.com/en-us/garage/profiles/dictate/ and download to get started.

2. Remember to Follow Up
?By flagging email messages, you can track responses to messages that you send. You can also make sure that you follow up on messages that you receive. In either case, you can include a reminder alert.? ? Microsoft
As an alternative, you can flag an email you send to someone else with a ?Recipient follow up flag?. When used, the email will be added to the recipient?s task list. I don?t recommend using recipient follow up flags. They?re not common, and come off a bit rude.
Flag an email to remind you to follow up
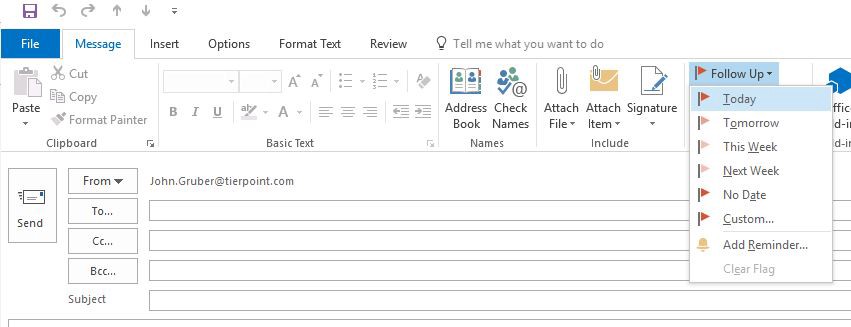
- Before you send an email, find the Follow Up button in the Message Ribbon.
- Select a default flag for follow up or set a custom date/time and reminder.
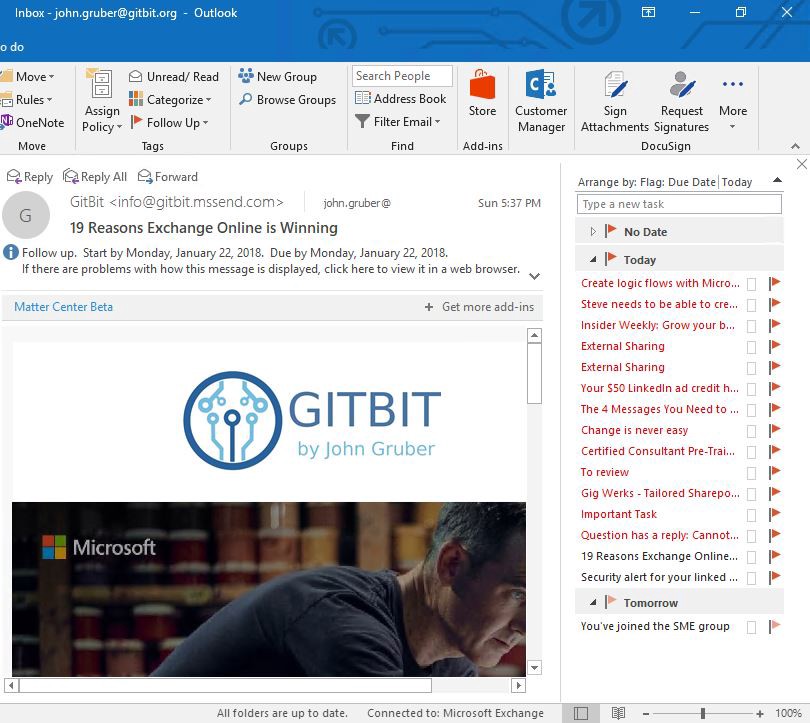
Show Flags and Tasks from Inbox

If you haven?t already, you can enable the To-Do bar to see all of your flags and tasks directly from your inbox.
- From the View ribbon, click To-Do Bar then select Tasks.
3. Create Tasks from Emails for Quick Note Taking
Flagging an item for follow up is great but it doesn?t leave any room for notes or additional information. Instead of flagging an email for follow up, convert an email to a task. Creating a task is an easy way to add notes and additional information to the email and continue to live in Outlook. You can always add a follow-up flag to the task!
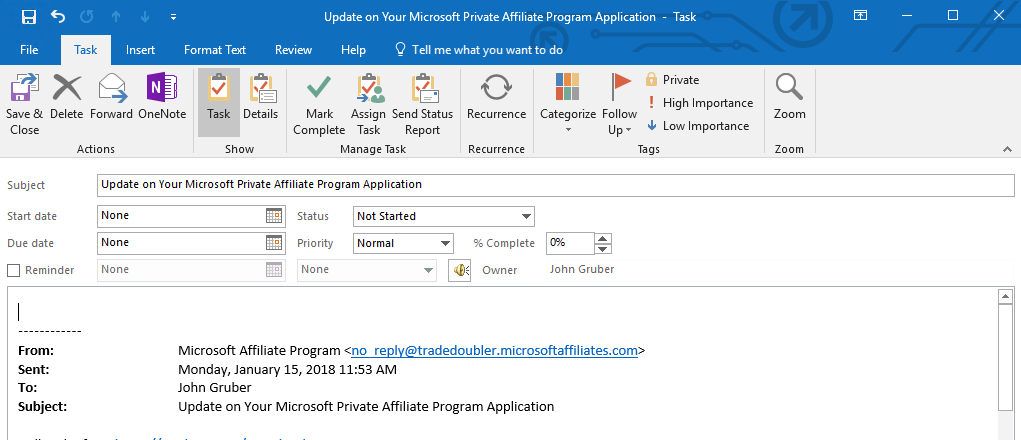
How to Create a Task from an Email
- Drag and drop the email into the task icon. That?s it!
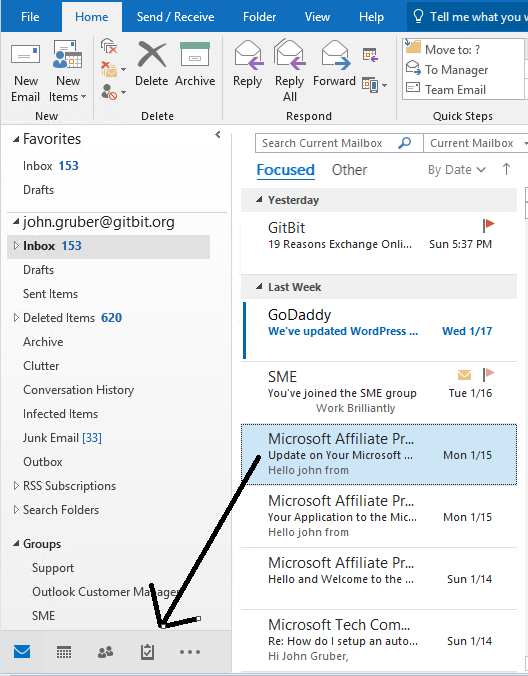
4. Organize multiple Email Chains with OneNote Integration
OneNote is a free-flowing place to organize your information in one easy place. OneNote?s integration into Outlook is awesome. You can take notes on meetings, save emails in OneNote notebooks, and even create flags from OneNote to show up in your Outlook To-Do Bar.
How to Save Emails in OneNote
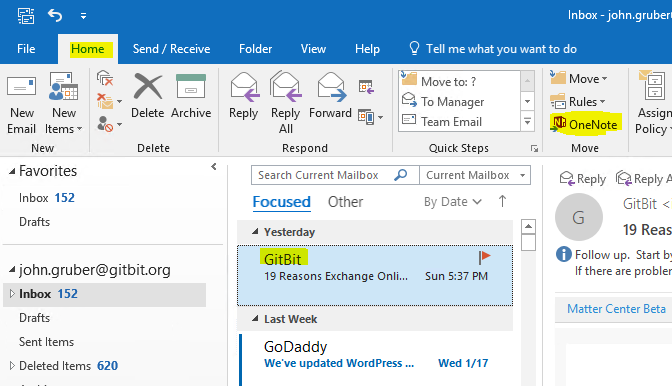
- From your Inbox, highlight the email you want to save.
- Click the OneNote icon in the Home ribbon.
- Select where you want to save the email.
Once the email is saved in OneNote, you can add notes, additional information or make a checklist. Then create a flag from your OneNote Page to wrap it back into Outlook!
How to Create an Outlook Flag from a OneNote Page
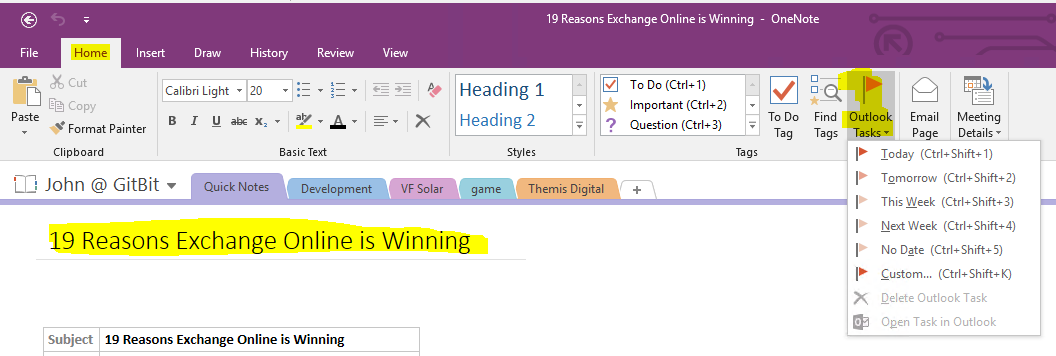
- From your OneNote page, click the title.
- Open the Home ribbon, then click Outlook Tasks.
- Select the flag you want to use and you?re all set!
Pro Tip: You can flag just about anything in OneNote including paragraphs. I tend to lose these flags so I recommend keeping the flag on the title.
5. Webinar / Conferencing Integration
If you?re not already using a web conferencing tool like Teams, Webex, or GoToMeeting, you should start right away. These tools integrate directly into Outlook and offer video and audio conference calls, screen sharing, display presentations, and so much more.
How to create a Teams Meeting
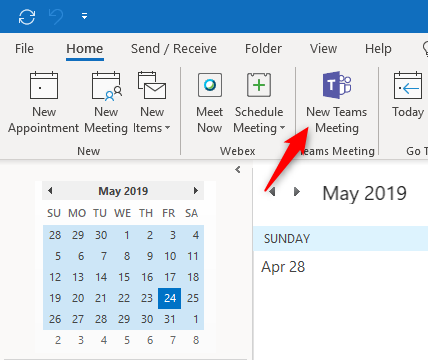
- From your Outlook calendar, click New Teams Meeting located on the Home Ribbon.
How to create a WebEx Meeting
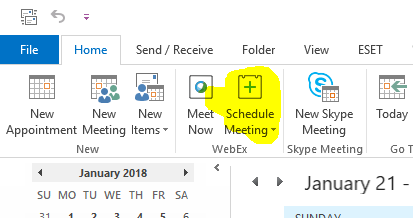
- If your organization has WebEx, download and install the Outlook integration package.
- From your calendar, find the Schedule Meeting button in the Home ribbon
6. Clear the Clutter and Stay Focused
The Clutter feature learns how you prioritize your mail, and then helps you by putting low priority messages in a separate folder (while still giving you a daily summary so you don?t miss anything). When on the go, you can also take advantage of this capability by using the ?Focused Inbox? in the Outlook mobile app (for iOS and Android devices).
You?ll find the clutter folder in your mailbox. You?ll also find the ?Other? tab while looking at your Inbox
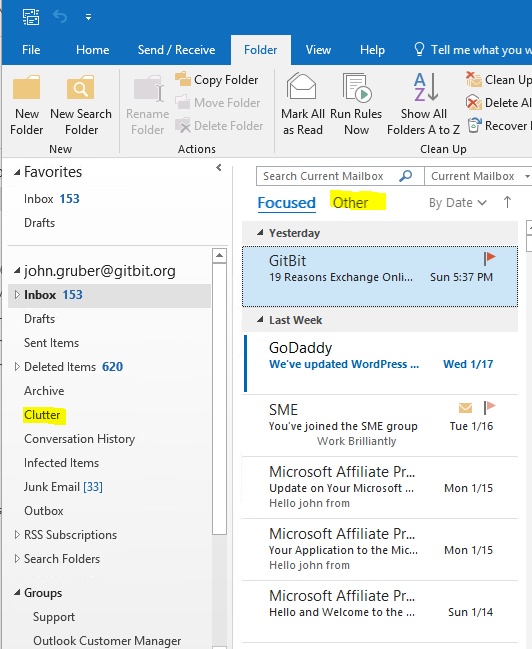
Here?s how it works
- Clutter analyzes your emails, and based on your past behavior, determines the messages that you?re most likely to ignore.
- It then automatically moves those messages to a folder called Clutter so that you can review them later.
Managing the Clutter folder
You can help Clutter learn your preferences faster by manually moving items in or out of the Clutter folder
Move from Inbox to Clutter
Drag and drop emails from your inbox to the clutter folder and Outlook will automatically learn to move those messages to the clutter folder in the future. You can also right-click the item, click Move -> Move to Clutter.
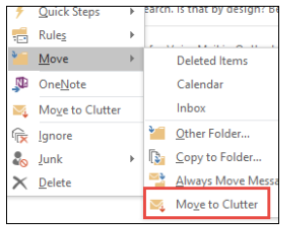
Move from Clutter to Inbox
Something important land in the clutter folder? No problem, follow the ?Move from Inbox to Clutter? steps above and you?re good to go. Outlook will learn where those items belong in the future.
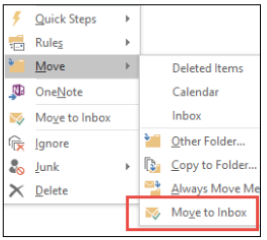
Turning Off/On Clutter Tool
- You can turn Clutter off/on by signing into your Outlook on the web account, navigate to Settings > Options > Mail > Automatic processing > Clutter.
- Focused Inbox can be disabled in the Outlook mobile app for iOS and Android in settings.
7. Automate your Inbox with Mailbox Rules
?A rule is an action that Outlook for Windows runs automatically on incoming or outgoing messages. You choose what triggers the rule as well as the actions the rule takes. For example, you can create a rule to move all messages from your manager to a folder or to delete all messages with ?Buy now!? in the subject.
By using rules, you can reduce manual and repetitive actions needed to manage your email messages. When you turn on rules, they run continuously and automatically.
Rules generally fall into one of two categories ? organization or notification. You can use the Rules Wizard to help you design rules to manage your messages.
The Rules Wizard includes templates for the most frequently used rules.
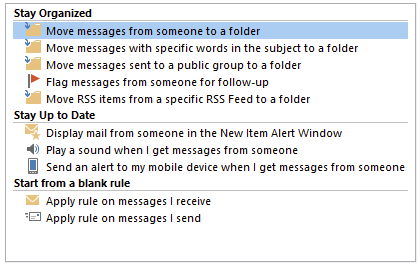
How to Create a Rule

- Choose Rules > Manage Rules & Alerts from the ribbon or choose the File tab and then choose Manage Rules & Alerts.
- In the Rules and Alerts dialog box, on the E-mail Rules tab, choose New Rule.
- In the Rules Wizard, under Step 1: Select a template, pick one of the default templates under Stay Organized, Stay Up to Date, or, Start from a blank rule.
8. Shortcuts
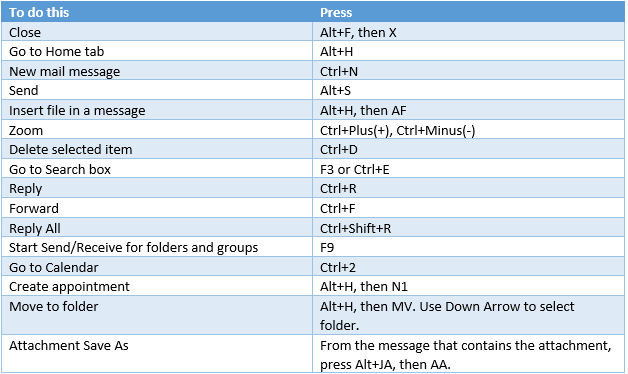
Outlook has shortcut keys galore! For a full list check out Microsoft?s support page.
Frequently Used Shortcuts
Quickly Move Between Views
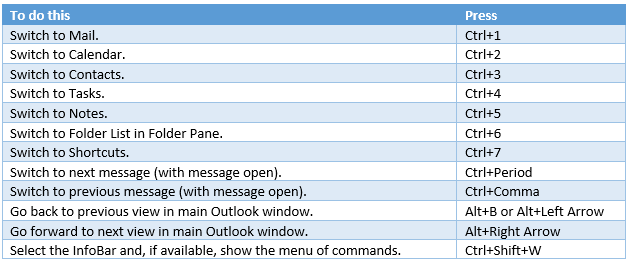
9. Email Templates
Use email templates to send messages that include information that infrequently changes from message to message. Compose and save a message as a template, and then reuse it when you want it. New information can be added before the template is sent as an email message.
How to Create an Email Template
- Create a new email and fill in the subject and body to prepare the template.
- In the message window, click the File button in the top left corner.
- Click Save As.
- In the Save As dialog box, in the Save as type list, click Outlook Template.
- In the File name box, type a name for your template, and then click Save.
10. Store Commonly Used Words
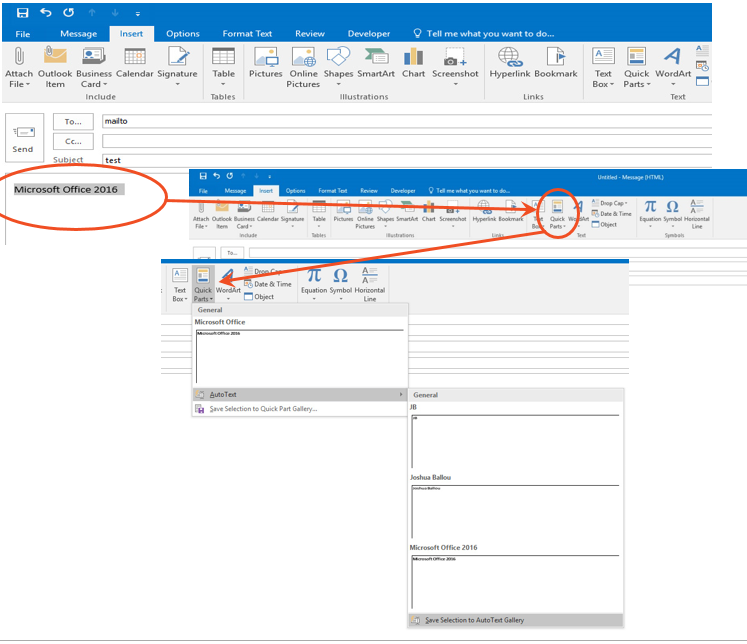
AutoText is reusable content that you can store and access again and again. You can save AutoText to the AutoText gallery by selecting the text you want to reuse, click AutoText, and then click Save Selection to AutoText Gallery. By filling in the new building block information you store the content you save to use again and again.
How to Save & Use content from AutoText
- Select the content in your email message that you want to store as reusable.
- On the Insert ribbon in the Text group, click Quick Parts, and then click AutoText to access the AutoText gallery.
- You can then save your desired text to the gallery by clicking AutoText, and then click Save Selection to AutoText Gallery.
- By filling in the new building block information, the content is stored to use again and again.
11. Keep Project Members Informed with Contact Groups
One of the first things I do when I start a new project is to create a contact group in Outlook. Every time I send an email regarding the project I include the group and everyone is informed. As people are no longer part of the project I remove them from the group. It?s that simple.
How to Create a Contact Group
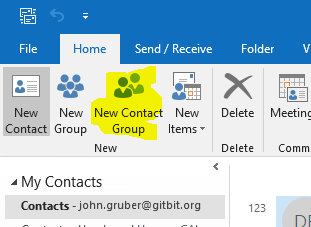
- Go to your Outlook Contacts.
- In the Home ribbon, click New Contact Group.
- Name the group.
- Use the Add Members button to add members to the group.
- When finished, click Save & Close.
12. Smart Lookup
Fact-check or explore terms in your emails with Smart Lookup. Simply highlight terms in your document and use this feature to bring in search results from the web right into your reading or authoring environment.
The Insights pane offers more than just definitions. When you select a word or phrase, right-click it, and choose Smart Lookup, the insights pane will open with definitions, Wiki articles, and top related searches from the web. You can also get to Smart Lookup any time by going to Review > Smart Lookup and entering a query there.
Note: If you are on a touch device, double-tap the word to select it and then tap Smart Lookup.
13. Tame your inbox with Clean-up
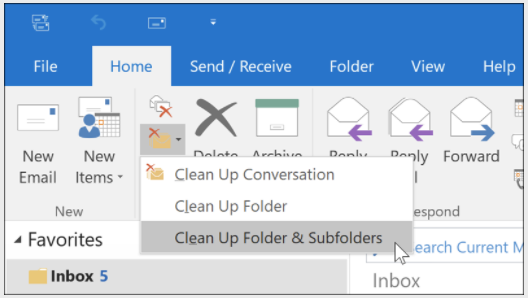
Overwhelmed trying to achieve Inbox Zero? Folder Clean-up can help.
From your Inbox (or any other email folder), select Home > Clean Up. You can Clean Up Conversation, Clean Up Folder, or Clean Up Folder & Sub-folders. Outlook will automatically move redundant, read messages to the Deleted Items folder. Folder clean-up will never remove unread messages.

