
Step-by-step guide to creating Twitch commands
 Photo by Caspar Camille Rubin on Unsplash
You?re probably here because you want to make a Twitch command. A cool little feature that spices up your video chat or, in my case, that of someone else.
For the people that stumbled across this thinking: ?Wait, what? Twitch commands?? ? A Twitch command is a trigger set up in the viewer chat that, when invoked, usually returns an automated message.
It?s meant mostly to summon more interest for the stream and to engage viewers more.
If you?re part of the former group and have been looking online for an easy guide to create such a command, I was you not so long ago.
Backstory time!
In a matter of a couple of months, I had made friends with a very cool streamer on Twitch: theSlychemist.
After seeing the time and effort this guy was putting into his work and the overall kind demeanor, I decided to make it a personal goal to help him grow his channel.
Being a .NET developer by trade, I offered my services and he asked me whether I?d be able to create a command for him. I figured it couldn?t be that hard, just a bit of Googling and Python programming, no biggie. So, I said: ?Sure!?
I hope you read that with a Morgan Freeman voice-over in your head.
I was half right (or half wrong?), because there is some documentation available, but not enough to get you to hit the ground running.
Fear not! This post is my attempt at helping you do just that, so you won?t have to experience what I went through in getting my very first Twitch command up and running.
The post might seem big but about half of it is optional bonus material, placed in Appendix A and B.
Necessities
To be able to follow along, there are a few things you?ll need:
- A Twitch account ? For testing your commands before release. You probably already have one, why else would you be here?
- Streamlabs Chatbot ? This will process and run your commands, and provide logging for debugging, which you will most definitely need. Log in with your Twitch account for both the Bot and the Streamer.
- An IDE that can compile Python. I use Jetbrains PyCharm Community Edition, because it?s both free and very good. It has IntelliSense built-in, it knows the PEP 8 styling rules which helps keep your code clean, and you can easily test your methods if you need to. Feel free to use the code editor of your choice, as long as it can compile Python. That will save you quite a few silly bugs compared to coding in Notepad.
- Python 2.7.13. Yes, Python is on 3.7.4 at the time of writing, but Streamlabs Chatbot works with a compiler that works with 2.7.13. Don?t shoot the messenger. After this, open up Streamlabs Chatbot and head to the Scripts section. Click the settings icon in the upper right and add the path to the Python27Lib folder (not Libs). If you let Python install itself with default settings, it should be in C:Python27Lib:
 You can ignore the API Key field for this exercise.
- At least some basic programming skills are assumed throughout this post. This is a post on creating Twitch commands, so I won?t be diving into variables and method/function calls and how they work. You should be comfortable with those terms before continuing.
What Are We Building?
So yeah, obviously we?re going to write some code, but what are we actually building?
As this is intended as a foundation for setting up and releasing a command, we?ll keep it simple. Let?s make a command that, when invoked by a viewer, returns a message stating the odds that this person is actually from outer space.
Convoluted example, but don?t worry, it?s nowhere near as difficult as it sounds.
Basic Setup
All Streamlabs Chatbot (SC) commands have some basics you need to have implemented correctly for it to even appear as a runnable script in their UI, let alone run it.
These are:
File naming
For the Python script to be picked up as a script for SC, the format should be command_StreamlabsSystem.py.
So, let?s start by creating a mulder directory and within that directory, create mulder_StreamlabsSystem.py.
![]() Mulder seems like an appropriate name for this command.
Mulder seems like an appropriate name for this command.
You?re free to choose where to create this directory, as long as it?s named the same as the command.
Pro tip: If you create it in the internal SC scripts directory on your machine, it will save a lot of work importing and updating when we hit the test/release step.
On Windows, you?ll find it at:
C:UsersUSERNAMEAppDataRoamingStreamlabsStreamlabs ChatbotServicesScripts.
Basic structure
SC won?t show your script in the scripts section unless it contains at least the following:
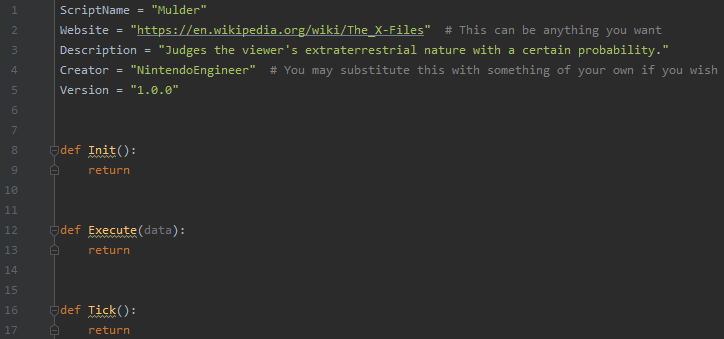
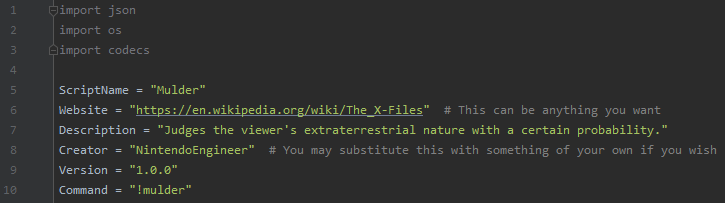
- Script information ? this is a set of global variables SC uses to populate some of the fields in the Scripts section. Let?s add these to our empty script:
 You don?t have to include the comments (gray sections).
- Script initializer ? the Init() method is run by SC every time the script is (re)loaded in the Scripts section. Add the following under the Script Information (add a new line first for cleanliness):
![]() Your IDE might complain about the uppercase ?I?, but SC wants it this way.
Your IDE might complain about the uppercase ?I?, but SC wants it this way.
- Script execution: the Execute(data) method is run by SC every time any command is typed into the Twitch video chat. We?ll address how to filter only the mulder command in a bit. The data parameter is passed by SC automatically and contains information about the sender and the message. Let?s add this to our script:
![]() Yeah, yeah, capital ?E?, we know.
Yeah, yeah, capital ?E?, we know.
- Script iteration logic: the Tick() method is run every time the script progresses, so every tick, as the name suggests. This is logic that runs even when there is no incoming data or anything in the chat. It just runs continuously. Let?s add it to our script:
![]() We won?t use this in our example, but it can be useful when creating more advanced commands.
We won?t use this in our example, but it can be useful when creating more advanced commands.
Right! Now we have what we need so SC will at least acknowledge our hard work. Your file should look like this now:
 Based on PEP 8, PyCharm suggests two new lines between methods, so I just follow suit.
If your file doesn?t look like this, make sure to make the necessary adjustments.
Loading the script
If you took advantage of the pro tip earlier on, this is going to be a piece of cake. Simply open SC, go to the Scripts section and it should already be there:
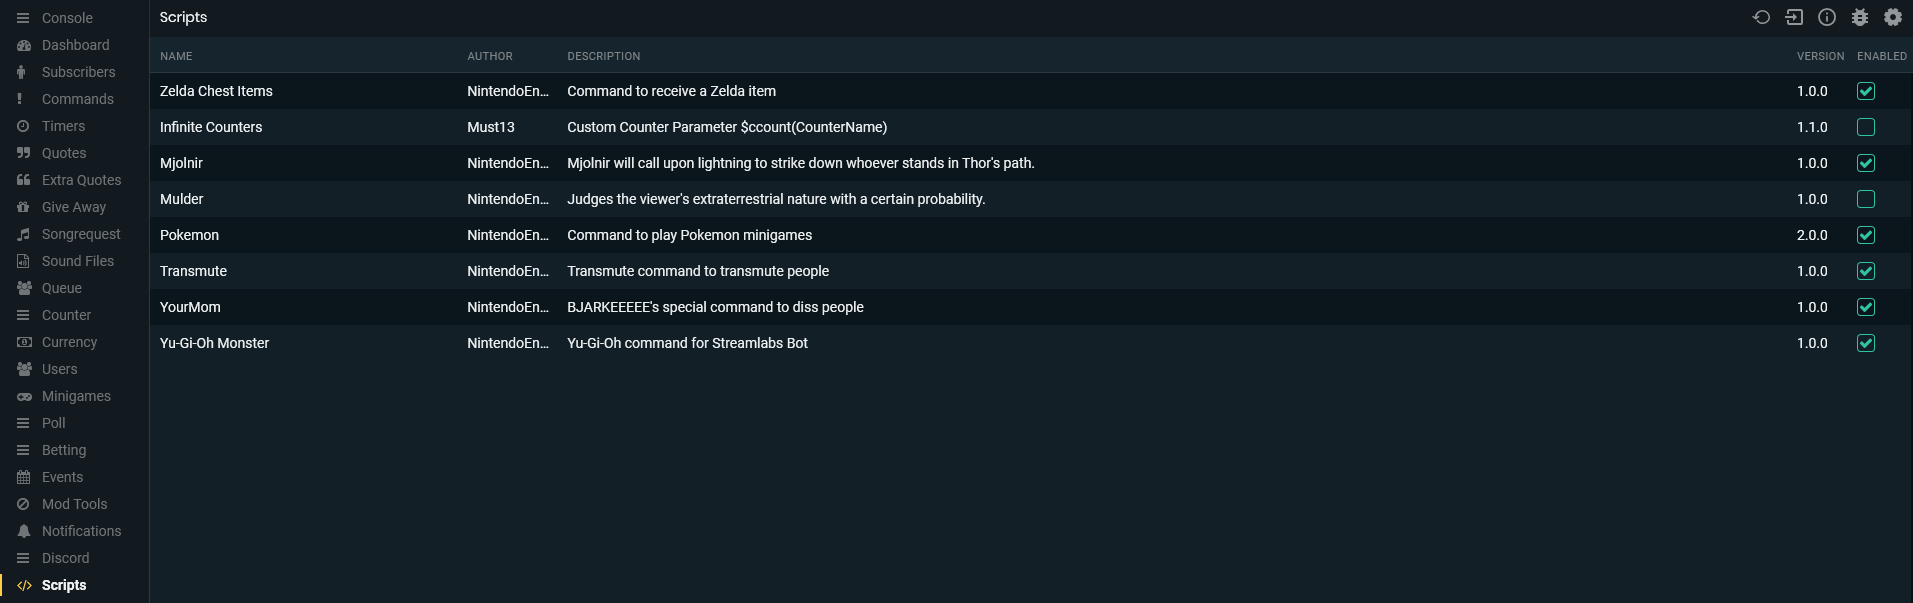 Look at Mulder shining there!
You can see the Mulder command and some of my other commands (to see them live, check in to a stream of theSlychemist).
All of them are in the same SC Scripts folder, so they appeared automatically when I created them.
If it didn?t appear, try hitting that reload button in the upper right corner. If it still doesn?t appear, check all the previous steps or try the option below.
If you didn?t follow the pro tip, you?re going to have to take the long way around:
- Use your preferred tool to zip the mulder directory.
- Go to the Scripts section in SC and hit the import button in the upper right corner (second button from the left).
- Go to where the .zip file has been stored and select it for import.
- It should now appear in the list.
Fair warning: If you?re loading the command like this, it will become very tedious very fast when you have to debug code. You?ll be changing code, zipping the file, importing it, and then you can test it.
If the fix didn?t work, you can do the whole thing all over again. You can avoid this by following the advice given in the Basic Setup section. Then, it becomes as simple as hitting the reload button.
Implementing the Logic
Now that we have the foundation out of the way, it?s time to add some functionality, or logic, to our script.
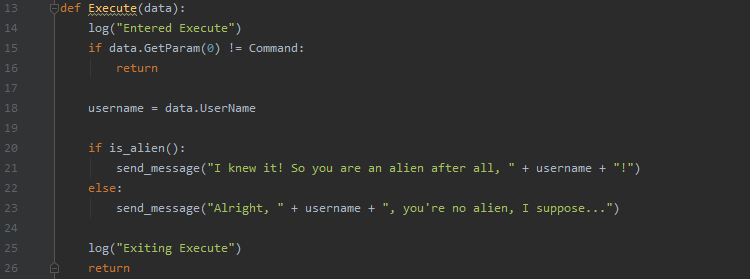
Our command logic goes in the Execute(data) method, which gets called by SC when a message is posted in the chat.
There are some gotcha?s to consider but I?ll guide you through it, so let?s get to it!
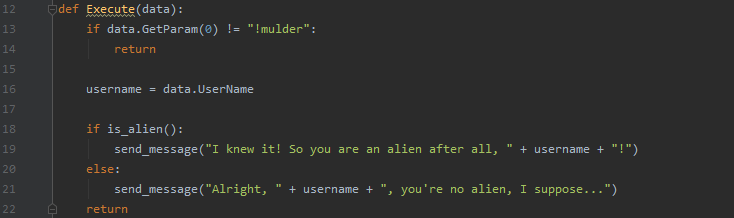
Remember how I said that any command (or message, for that matter) in the chat will trigger our Execute(data) method?
As we only want to respond to the command ?!mulder?, we should verify that the first thing in the message actually says that. We use the data parameter that is passed for this, as it contains some properties and methods we can leverage.
One such method is the data.GetParam(int id). We?ll use it to get the first thing in the message and verify if it equals ?!mulder?. If it doesn?t, we don?t do anything. But enough talk, let?s implement it:
 Python works with zero-based index, so the first thing in the message is at index 0.
Our command should state whether someone is extraterrestrial or not, based on probability.
Let?s introduce that probability and give it a value of about 10%, so every one out of ten people is actually an alien. Well, damn.
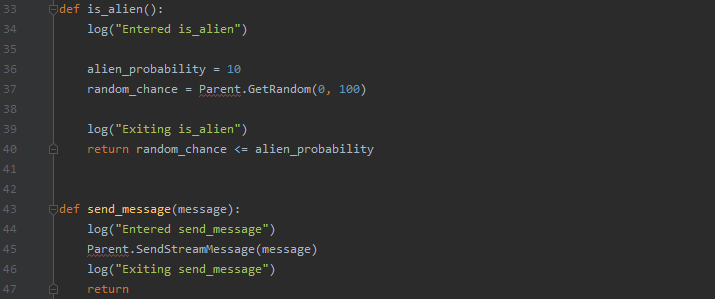
Also, deciding whether someone is an alien is a separate micro-responsibility that we can delegate to a utility method, is_alien().
Let?s add that method under the Tick() method and add the probability to it:
 Looking good so far!
Now, we need to beef that up and have it return True if someone is an alien and False if not.
Python has native random methods but they don?t seem to play well with SC. We?re going to use the random functionality that SC provides, namely Parent.GetRandom(int min, int max) to return a value between 0 and 100.
If we get a value lower or equal to our probability, we return True, otherwise, we return False (you can ignore the Parent error):
 random_chance ? alien_probability already equals True or False, so we use that as return value.
Based on the outcome, we will send back one of two messages to the chat.
To make things more legible, let?s introduce another utility method that will handle sending messages for us: send_message(message). You can add the following under the is_alien() method:
 Doesn?t look like much, but it will keep our code more legible in the long run. Can you imagine red squiggly lines everywhere?
We?re going to use the username of the viewer who triggered the command in both possible messages.
As we have to get that from the data parameter and we don?t want to violate the DRY principle (Don?t Repeat Yourself), let?s introduce a variable to hold that username for us:
 We?ll reference the username variable instead of getting it from data every time.
Now, we need to send the messages based on the is_alien() response. Adding that logic completes our command logic:
 Look at you go! You?re a pro-Twitch-command creator.
Trying It Out
First off, go to the Scripts section of SC, reload the scripts as before, and make sure you enable the Mulder command by checking the box on the right.
It should look like this when you?re done:
![]() Good stuff!
Good stuff!
Now, head over to the Console section of SC (upper left), type !mulder in the chat and hit enter.
Magic ensues! Mulder is judging your very nature. It took a few tries but he finally managed to figure out I?m not from this planet:
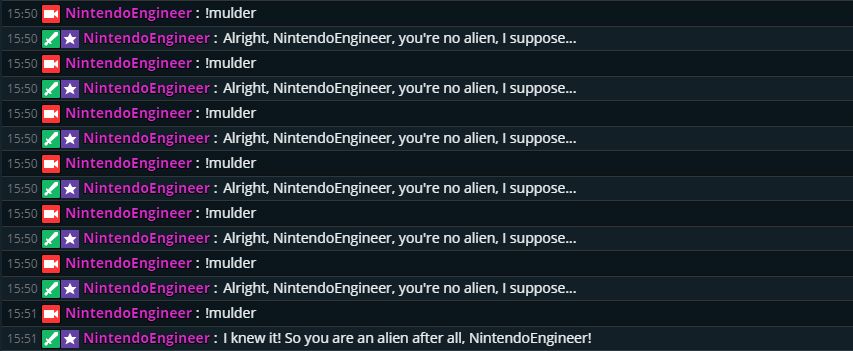 Just because I don?t need oxygen to survive? Mulder likes to overreact.
May I congratulate you on writing your first Twitch command script? This is my basic flow when creating commands for theSlychemist. You could stop here, run off, and create an array of commands and you?re free to do so.
However, if you want to take a bit more advice from a random dude on the internet ? read the next few sections as well, at least the part about debugging your code. It?s going to prove to be a life-saver.
Appendix A: Debugging
I know, I know, not the sexiest subject to be talking about.
Scripts should just work as you imagined when you coded it and that should be the end of it. I have this thought pretty often when coding and that?s because almost nothing ever works in one go.
Even the example project above needed a few tweaks for me to get it right, because silly mistakes happen (don?t worry, the script works as shown, I just had to fix mine first). So, let?s dive into debugging with SC.
Logging
This is basically all I need to show you. Logging what your script is doing and when it?s doing it is the fastest way to find out where a bug could be hiding (ready those flyswatters).
Luckily, SC has a log method of its own: Parent.Log(string command, string message) and we are going to use that.
Let?s get to it.
First off, that log method looks kind of bulky and, as we?re going to use it more than once, let?s create a utility method to wrap it in.
The added benefit is that we don?t need to specify the command every time we want to log something. It stays the same anyway and doing it this way keeps us DRY:
 You can place it all the way at the bottom, underneath the send_message method.
I noticed that we?re using the literal command name in two different places and this violates the DRY principle, so let?s fix that.
Add a global variable to the ones we already have and replace all instances of ?!mulder? with that variable:

![]()

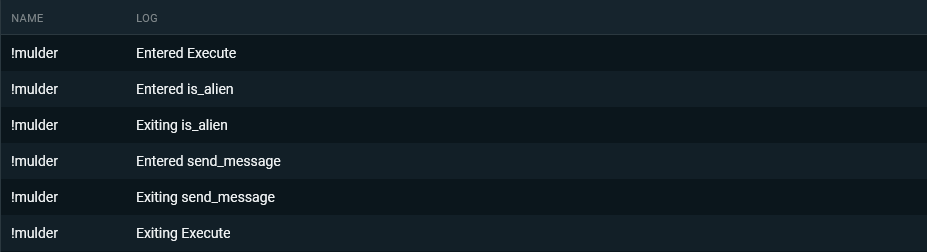
Now, let?s add some log statements to the methods we?re using:
Good things are happening here. Reload the script in SC and then move to the log window by clicking the middle icon in the upper right:
![]() The circular ?info? button.
The circular ?info? button.
Clear the window with the reload symbol in the upper right and move to the Console section of SC. Enter !mulder again and move back to the log window.
It should show you the logs as it flows through the different methods:
 Looks good to me!
There are quite a few things that could go wrong in a program and having logs to pinpoint the location will save a lot of time when debugging these problems.
As you continue to create more advanced commands, you?ll recognize where and how to place logs to verify correct values are being passed around or to check if the method you need is actually being called.
You can do a lot with logs.
Appendix B: Nice to Have
Here is some neat stuff you could add to your command to make it just a little bit cooler, but they?re by no means necessary to create your commands.
Adding a cooldown period
You might not want your commands to be available to everyone all the time, even though they?re awesome. You could have a busy chat or someone could be a troll and spam the command all the time.
That?s where cooldowns come in. SC has a few handles to add and check for cooldowns on a user or a command. I?m going to show the user-specific cooldown here.
It involves two small additions:
Add the user cooldown at the end of the Execute(data) method, using data.User to get the user ID of the viewer and specify 30 seconds as the cooldown time:
 That should put a dent in the number of triggers.
Now, at the beginning of the Execute(data) method, in the command check, include an extra check for the user cooldown.
If a user calls this command again while still on cooldown, we don?t want to execute our logic. Adding that bit of logic:
![]() Now the trolls have been thwarted!
Now the trolls have been thwarted!
Checking whether I can trigger the command shortly after each other yields a promising result. The command does not execute, because I triggered it in the last 30 seconds:
 I guess he must be speechless after his faulty conclusion last time.
Now you know how to add a user cooldown.
Adding a cooldown for the command itself has a similar flow, simply exchange the user cooldown methods with the command cooldown methods.
Adding UI
You may or may not have seen an interface in SC for some commands where the controller can change values used in the script. It looks something like this:

The huge added benefit is that things like cooldown time and other values can be changed from outside of the script, without having to touch the script at all.
This saves quite a bit of work and makes the script easier to handle for people who aren?t used to scripting.
I want this for our script, so let?s dive into it:
First off, let?s create the UI_Config.json file in the same folder as our Python file. Get the naming right, create it and open it in your IDE:
 It?s kinda empty in here?
SC has the format and options of the file documented on their GitHub Wiki page. First, we have to choose the name and type of file our values will be dumped in to use in our script.
Add the following to the file:
 Mind the brackets and the quotes.
We need two values for our script: the probability in percentages and the cooldown in seconds. Both are numbers, so we?ll need a numberbox for both.
Let?s add those and fill in the fields:
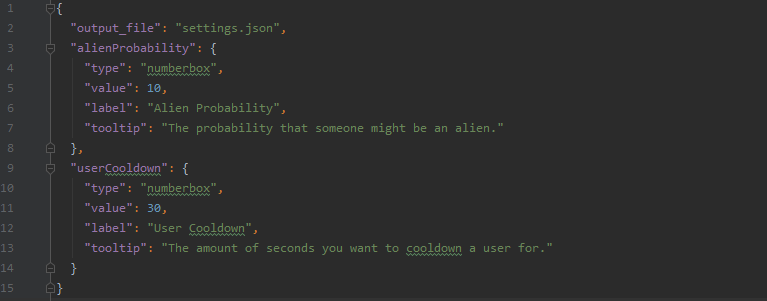 value: the initial value, label: what appears above the box, tooltip: when you hover over it with your mouse.
Save the file, go back to the Scripts section in SC and reload the scripts.
When you now click on the Mulder command, it shows our fresh new UI:
 What?s this!? Your Mulder is evolving!
We?re not there yet, friend. Remember the output file we defined? Hit Save Settings in the UI and head back to your IDE.
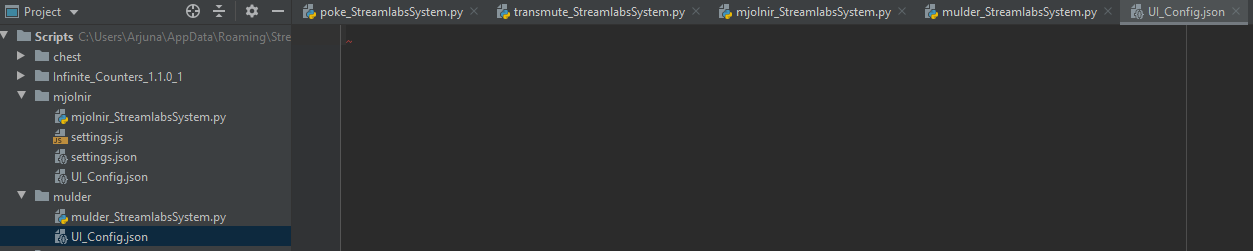
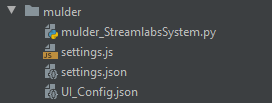
You should see two new files created:
 So far, so good.
We?re interested in the settings.json file, which is the file we defined. If you open it up, you?ll see our defined values and their data:
 This is automatically generated by SC. Nice, huh?
We now want to use these dynamically updated values instead of the hardcoded ones in our file. To this end, we?ll need to import some libraries to help with reading out this settings file.
Add the following above the global script information variables:
 We?ll get to using these next.
Before we load the file, we need to have something to store these variables in. Let?s create a global settings object to that end:
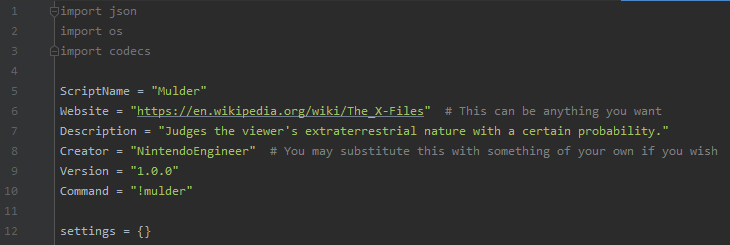 Empty at first, we?ll load the values next.
We only want to read these values in once, when the script is (re)loaded. There is no need to read those every time the script executes.
Which method runs only once per (re)load? You remembered! It?s the Init() method. Let?s start adding logic to it step-by-step.
First, we need to let Python know we are going to change our global settings object:
 Now Python knows that we mean our global settings object when we use it in the method.
We?re going to need to access the settings.json file.
As it?s in the same place as the current script we?re in, we can ask Python to get the path to the directory we?re in right now for later use:
 Just a little longer, you can do it!
Alright then! Now, let?s get to the juicy bit: reading the file and storing the contents in our settings object.
We?re going to construct the full path to the file with the working directory we defined before and join that with the actual filename. Make sure the filename is exactly the same as the filename defined in UI_Config.json:
 We have loaded the settings!
Great! Now that we have loaded the settings, we can use that object to access the values defined in the UI.
Let?s replace the hardcoded values with the dynamic reference to their counterpart (Make sure the spelling matches the spelling in the UI_Config.json file):


Test time! Head towards SC, go to the Scripts section and reload the scripts.
Calling the command in the console yields the result we had before, but now we can dynamically change our values from outside of our script:
 Same, but not the same?
Bonus point: We can catch a possible error when trying to read our settings file. In our current scenario, a read error would result in the script breaking, but if we catch and handle this error, we?re able to build a fallback.
This is the cleaner way to handle this. The following code catches any error, or exception in Python lingo, logs the error for research, and provides fallback values so the script can continue while you calmly investigate what?s happening:
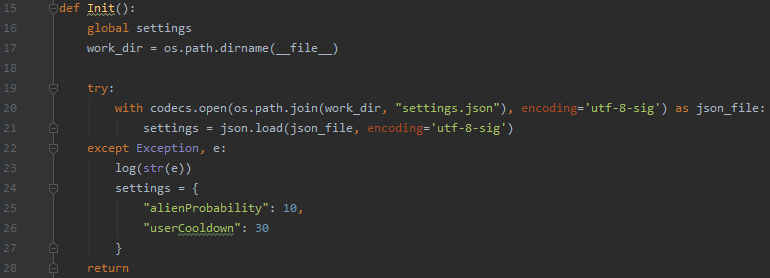 Make sure the spelling is correct!
And that?s how you incorporate UI!
The End
I want to say that?s all there is to it and that?d be true, but I understand that all these steps can seem quite daunting for a newcomer. However, don?t worry about it. After creating a few commands, this will become second nature to you, guaranteed.
This was the ?basic? step-by-step to create a Twitch command script.
Is that all there is to it? Yes and no. Yes, this is how you set up a command script and, no, there is so much more you can do within Python.
The options are near-endless. For a collection of different basic, semi-advanced, and extremely advanced commands, take a look at a stream of theSlychemist. Most of my commands are visible there.
Depending on how well this post does and if there?s interest for a post on more advanced techniques, I?ll create a few more posts showing how to play music, timeout viewers, and even use global state to ?remember? viewers and their previous actions.
Thank you for reading and remember: The truth is out there?
